Chapter 5
Enhancing Your Blog with Themes, Widgets, and Upgrades
In This Chapter
![]() Giving your blog a new look
Giving your blog a new look
![]() Enhancing your theme with features
Enhancing your theme with features
![]() Adding widgets to your sidebar
Adding widgets to your sidebar
![]() Upgrading your free WordPress.com blog
Upgrading your free WordPress.com blog
![]() Giving your domain a name
Giving your domain a name
You don’t want your blog to look identical to everyone else’s, do you? Although WordPress.com doesn’t give you the vast array of design options that you’d have by hosting your own blog, you do have some flexibility.
The great thing about the WordPress hosted service is how easily you can change your theme to one of the alternative designs available. What’s not so hot is that you can’t create your own custom theme. As I note later in this chapter, you can pay a fee to customize the CSS of the template you choose to use, but you need to be familiar with CSS to use this upgrade — and again, you’re limited to customizing only the templates that WordPress provides.
Most of the themes available on WordPress.com are free; however, a handful of Premium themes cost anywhere from $18 to $75 and have extended features that make them different from the free themes.
In this chapter, you discover the WordPress.com themes that let you choose a design and format for your blog. You have some fabulous themes to choose from, all created by WordPress users. At this writing, 315 themes are available. You also explore the fun of using sidebar widgets to rearrange how you show off your blogroll, category and monthly archive lists, and page lists.
This chapter also discusses enhancing your blog with custom CSS (Cascading Style Sheets), choosing a domain name, and increasing the amount of hard drive space on your WordPress.com account through its upgrade feature (for a fee).
Changing Your Blog’s Look
It’s time to choose a theme for your WordPress.com blog. In this case, the word theme is synonymous with the words design and template. All three words describe the very same things: the visual layout and appearance of your blog.
Follow these steps to find your theme:
- On the Dashboard, click the Themes link on the Appearance menu.
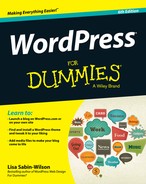
A page full of themes appears along with a thumbnail image of each theme so you get a basic idea of what it looks like. Figure 5-1 shows the Browse Themes area of this page.
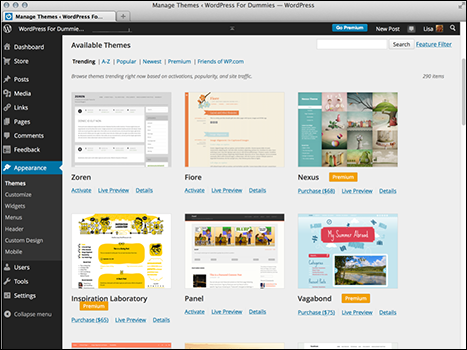
Figure 5-1: Choose a look for your blog.
- Scroll through the themes and when you find one you like, hover your mouse pointer over the thumbnail image associated with it or click the Activate and Preview links for more options (on Premium themes, the buttons are Purchase and Preview).
What happens next is pretty nifty! A new page pops up showing you a preview of what your own blog would look like with that particular theme and any options you set. You can also just click the Activate link to use the theme immediately with its default options, or click the Details link to see more information about the theme.
 You can page through the list of available themes by using the handy menu links under Themes at the top of the page. You can browse by the following: Trending, Popular, Newest, and Premium on the left side, and All, Free, and Premium on the right side. You can also search for themes by typing a keyword in the search box at the top of the Themes page.
 - Click the Activate link in the lower right corner of the theme you’re previewing to activate the theme on your own blog, or click the Cancel link in the top-left corner if you decide that you’d rather not use that theme.
No, really — it’s just that easy. If you get tired of your theme, go to the Themes link and click a different theme name, and you’re done.
 In the introduction to this chapter, I tell you about the Premium themes at WordPress.com. Some of the themes you find on the Themes page on your Dashboard may be marked Premium, and WordPress.com requires payment from you before you can use them.
Enhancing Your Theme with Features
Several different features and tools are available within your WordPress.com account that enable you to individualize your site with the look and features that you need. Among your choices are everything from menus to fonts and backgrounds to social media features and tools to enhance the look and functionality of your WordPress.com blog.
Adding navigation menus
WordPress helps you easily add navigation menus to your theme with a feature called Menus. This feature enables you to build your own custom menu of links by adding links to any pages, posts, categories, or custom links you’d like. Click the Menus link under the Appearance menu to load the Edit Menus page shown in Figure 5-2.
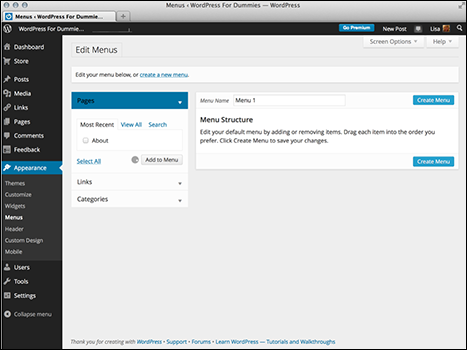
Figure 5-2: Add navigation menus with the Edit Menus page on the WordPress.com Dashboard.
On the Edit Menus page, you can build your custom menu by adding links from Posts, Pages, Categories, or Custom links on the left side of the Edit Menus page to the menu interface on the right side of the page. Follow these steps to make it happen:
- Click the Menus link in the Appearance menu on your Dashboard.
The Edit Menus page opens on your WordPress Dashboard.
- Type a name in the Menu Name box and click the Create Menu button.
The Edit Menus page is reloaded with a message that tells you your new menu has been created.
- Assign the new menu to the Theme Locations area.
Most themes have a defined location for the main navigation menu for your site. Click the Manage Locations tab at the top of the Edit Menus page (this tab only appears after you have created at least one menu). For your primary navigation menu, click the drop-down list in the Theme Locations section and choose the menu you just created to assign it as the menu location used in your theme for your site; then click the Save Changes button.
- Add links to your newly created menu.
You can add links to the new menu you just created in three ways (the items in this list are shown in Figure 5-2):
- Links: In the URL field, type the URL of the website that you want to add (for example, http://www.google.com). Then type the name of the link that you want displayed in your menu in the Label field (for this URL, type Google). Then click the Add to Menu button.
- Pages: Click the View All link to display a list of all the published page(s) on your site. Select the check box next to the page names you would like to add to your menu. Then click the Add to Menu button.
- Categories: Click the View All link to display a list of all the categories you created on your site. Select the check box next to the category names you would like to add to the menu. Then click the Add to Menu button.
- Review your menu choices on the right side of the page.
When you add new menu items, the column on the right side of the Edit Menus page populates with your menu choices (see Figure 5-2).
- Edit your menu choices, if needed.
Click the down arrow to the right of the menu link name to edit the information of each individual link in your new menu.
- Save your menu before leaving the Edit Menus page.
Click the Save Menu button under Menu Settings on the top-right or bottom-right side. A message confirming the save appears.
Changing the background color and image
Many themes in the WordPress.com theme library support the Background feature, which allows you to use the handy Background tool to change the background color and/or image that displays on your website. Visit the Background Image page on your Dashboard by clicking the Background link under the Appearance menu and then follow these steps to make changes to the background color and/or image for your site:
- Click the Background link under the Appearance menu.
The Background Image page loads on the Dashboard.
- To change the background color, type the hexadecimal color code in the Background Color text box.
If you don’t know what hex code you want to use, click the Select a Color link, and click a color within the provided color selector shown in Figure 5-3.
A hexadecimal (or hex) code represents a certain color. Hex codes always start with a hash symbol (#) and have six letters and/or numbers to represent a particular color; for example,#d5d6d7. - To use an image file for the background, upload an image from your computer.
Click the Browse button under the Choose an Image from Your Computer text, and select a file from your computer. Then click the Upload button.
- Change the display options for your new background image.
- Position: Select Left, Center, or Right to set the screen position of the background image on your website.
- Repeat: Select No Repeat, Tile, Tile Horizontally, or Tile Vertically in the drop-down menu to set the image repeat behavior of the background image on your website.
- Attachment: Select Scroll to set the background image to scroll down the page, or select Fixed to set the background image in a static position (so it doesn’t scroll down the page).
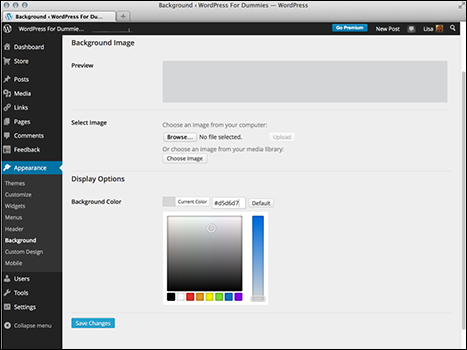
Figure 5-3: The color selector on the Background Image page is helpful if you don’t know a color’s hex code.
- Save your changes.
Click the Save Changes button before navigating away from the Background Image page. Otherwise, your new settings aren’t saved.
Creating a mobile-friendly display
The mobile web is all the rage today: Visitors to your site use every type of device from desktop computers to laptops, tablets, and mobile phones. WordPress.com gives you a nifty interface to create a mobile-friendly theme for your blog, which helps create a beautiful application-like experience for anyone browsing your website on any mobile device (such as a smartphone or tablet).
Follow these steps to enable and configure the mobile feature on your WordPress.com blog:
- Click the Mobile link under the Appearance menu.
The Mobile Options page displays in your browser window, as shown in Figure 5-4.
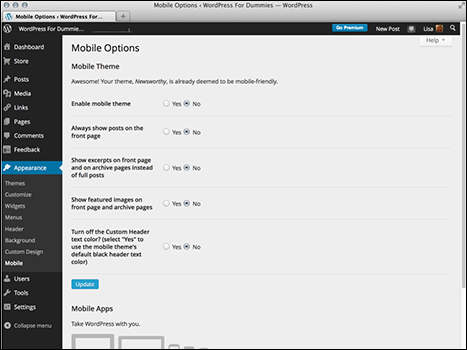
Figure 5-4: Make your site mobile-friendly with the Mobile Options page on your WordPress.com Dashboard.
- If it’s not already selected, select Yes for the Enable Mobile Theme option.
This feature is not enabled by default. You can enable it at any time by selecting the Yes radio button.
- Select the Always Show Posts on the Front Page option.
Select Yes to display your posts on the front page of the mobile theme. Select No if you don’t want to display posts on the front page.
- Select the Show Excerpts on Front Page and on Archive Pages Instead of Full Posts option.
Select Yes to display only a short excerpt of each post on the front page and archive pages, requiring the reader to click the Read More link, or post title, to read the full post. The advantage to this is a faster page load — if the device is only loading short excerpts, the page load will be faster on a mobile device.
- Select the Show Featured Images on Front Page and Archive Pages option.
Select Yes or No. Again, choosing to display images can slow down the page load of the site on a mobile device.
- Select the Turn Off the Custom Header Text Color? option.
Select Yes to use the mobile theme’s default black header text color, or leave it as No to use the text color you’ve chosen in the theme customization options (if any).
- Click the Update button to save your changes.
The Mobile Options page reloads with a message that tells you that your settings have been saved.
With the mobile feature enabled and your configurations saved, readers of your blog who use mobile devices can now have an enjoyable experience browsing your site.
Changing the header image
Several themes in the WordPress.com library support the Custom Header feature, which allows you to change the image displayed in the header (or top) of your site through the use of a friendly interface on your WordPress Dashboard. Click the Header link under the Appearance menu to load the Custom Header page, where you can upload your own header image and/or change the header text color.
To use existing header images, follow these steps:
- Click the Header link in the Appearance menu on your Dashboard.
The Custom Header page appears.
- Click the Browse button under the Upload New Header Image title. Select the image from your computer; then click Open.
WordPress automatically resizes your header image to predefined dimensions set by the theme you are currently using. For best results, start with an image that meets those dimensions, at a minimum.
- Click Upload.
Your image uploads to your web server. The Crop Header Image page appears, where you can crop the image and adjust which portion of the header image you would like displayed (see Figure 5-5).
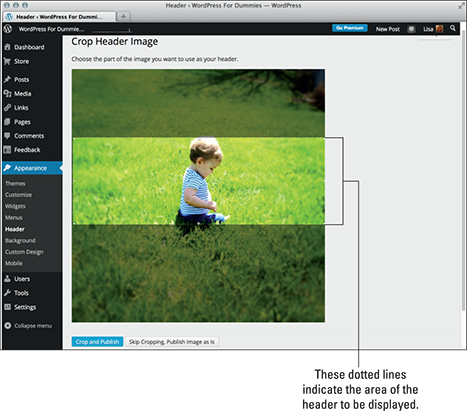
Figure 5-5: Adjust how much of the header you would like to display.
- Click the Crop and Publish button.
The Custom Header page appears, and your new header image is now displayed.
- View your website.
Your new header image is now displayed at the top of your website.
In themes that don’t have the custom header image feature, you can easily define a background image for the header image using CSS (see Chapter 13).
Using the Custom Design upgrade
WordPress.com themes give users another option for customizing the design of their theme: the Custom Design upgrade. Click the Custom Design link in the Appearance menu and you see that, for $30/year, you have access to other customization tools such as the following:
- Fonts: Personalize the display of fonts on your site with Typekit (https://typekit.com), which is an external service that allows you to use real fonts of your choice for display on your WordPress.com site. Typekit gives you hundreds of fonts to choose from in its font library, but you need to sign up for a Typekit account to use its fonts on your WordPress.com site.
- Colors: Change the colors of your theme instantly using WordPress color palettes.
- CSS: Gain full control over the CSS (Cascading Style Sheet) for your theme with this option (Chapter 13 has additional information on CSS).
Widget Wonder: Adding Handy Tools to Your Sidebar
WordPress widgets are very helpful tools built in to the WordPress.com application. They allow you to easily arrange the display of content in your blog sidebar, such as your blogroll(s), recent posts, and monthly and category archive lists. With widgets, you can arrange and display the content in the sidebar of your blog without having to know a single bit of PHP or HTML.
Selecting and activating widgets
Click the Widgets link on the Appearance menu on the Dashboard. The Widgets page displays the available widgets, as shown in Figure 5-6. This feature is a big draw because it lets you control what features you use and where you place them — all without having to know a lick of code.
On the left side of the Widgets page, in the Available Widgets box, is a listing of all widgets available for your WordPress blog. On the right side of the Widgets page are separate boxes for widgets that are available for the display of different widgets on your blog. These widget boxes are defined by the theme you’ve chosen to use on your site. Some themes have only one widget box available; other themes have several.
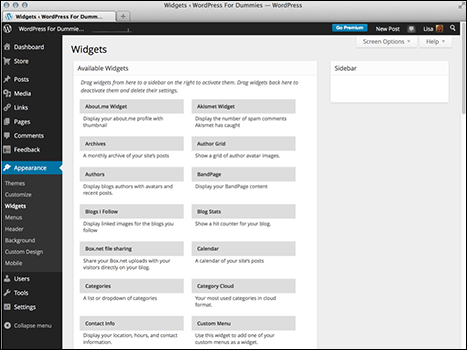
Figure 5-6: Choose from the available widgets on the WordPress.com Widgets page.
To add a new widget to your sidebar, follow these steps:
- Choose the widget you want to use.
The widgets are listed in the Available Widgets section, and you may have to scroll to see them all. For the purpose of these steps, choose the Recent Posts widget.
- Click the widget name.
Drag and drop the widget into your desired Widget Area on the right side of the page. After you release your mouse button and drop the widget in the Widget Area, your site updates automatically. In other words, the contents of the widget (in this case, a listing of recent posts on your blog) now appear on your site.
- Click the arrow to the right of the widget title.
Click the arrow on the Recent Posts widget to expand the widget and view the widget options. Each widget has different options that you can configure. The Recent Posts widget, for example, lets you configure the title and the number of posts to display in the Recent Posts listing on your site. See Figure 5-7.

Figure 5-7: Configuring widget options.
- Select your options and click the Save button.
The options you’ve set are now saved. Click the Close link to collapse the widget options.
- Arrange your widgets in the order you want them to appear on your site by clicking a widget and dragging it above or below another widget.
Repeat this step until your widgets are arranged the way you want them.
To remove a widget from your sidebar, click the arrow to the right of the widget title to open the options menu. Then click the Delete link. WordPress removes the widget from the Widget Area on the right side of this page and places it back in the Available Widgets list.
After you select and configure all your widgets, visit the front page of your website and you see that your blog’s sidebar matches the content (and order of the content) that you’ve arranged in the sidebar on the Widgets page. How cool is that? You can go back to the Widgets page and rearrange the items, as well as add and remove items, to your heart’s content.
You may not wish to display the Recent Posts widget on every page of your website on WordPress.com. If you would only like to display it on category pages of your site, click the Visibility button at the bottom of the Recent Posts widget shown in Figure 5-7 and select Show Only if on Category Pages. This is a nifty way of creating unique views for different sections of your site.
Using the Text widget
The Text widget in WordPress.com is a little different from the rest of the widgets on the Widgets page. Add the Text widget just as you would any other, using the steps in the preceding section. After you have it settled in the sidebar, click the arrow to the right of the widget title. A text box drops down to let you type text or HTML code to insert a hyperlink or include an image file. See Figure 5-8.
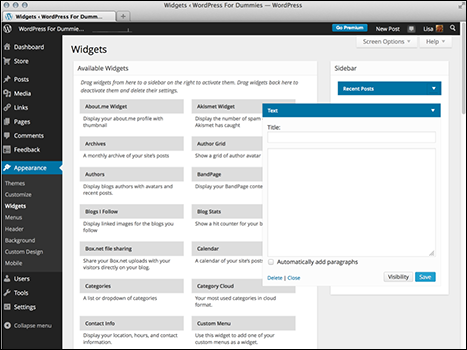
Figure 5-8: Type text or HTML code into the Text widget text box.
 WordPress.com users can’t, by default, monetize their blogs within their network. This means that you can’t run any type of advertisement services such as Google AdSense, Yahoo!, or text ad links. I mention this here because many users think they can use the Text widget to include the ad code (JavaScript, PHP, or others) that advertisement services provide them to display ads on their site. WordPress doesn’t allow it; therefore programming code such as JavaScript and PHP doesn’t work in the WordPress.com Text widget. WordPress.com allows some light advertising in only very special circumstances, and it has a program called WordAds that users can opt into — but currently it’s open to sites that have moderate to high traffic and appropriate content on their site. You can read more about WordPress.com’s advertising policy at http://en.support.wordpress.com/advertising.
You have no real options to configure for the Text widget, but you can use the simple text box for several things. Here are a couple of examples of what you can use a Text widget for:
- Type a short paragraph of text, such as a bio.
- Insert the HTML code to display an image in your sidebar. (See Chapter 13 for information on basic HTML codes you can use.)
The Text widget accepts basic HTML that you can use to do things like insert an image, a hyperlink, or a list of items. You may need to brush up on some HTML markup to make that happen, but the next section gives you some basic methods to get you started.
Inserting images
You may want to insert an image in your Text widget. The HTML markup to insert an image looks like this:
<img src="/path/to/image-file.jpg" alt="Image File Name" />
I break down this code for you in easy snippets to help you understand what’s at work here:
<img src=: This is the HTML markup that tells the browser that the website is looking for an image file."/path/to/image-file.jpg": This is the actual directory path where the web browser can find the physical image file. For example, if you upload an image to your web server in the/wp-content/uploadsdirectory, the physical path for that image file would be/wp-content/uploads/image-file.jpg. The easiest way to include an image is to use the media uploader to upload your image, then copy the file URL and paste it as the path in this HTML markup code.alt="Image File Name": The alt tag is part of the HTML markup and provides a description for the image that search engines pick up and recognize as keywords. The alt tag description also displays as text on browsers that can’t, for some reason, load the image file, also in screen readers. For example, if the server load time is slow, the text description loads first to at least provide visitors with a description of what the image is./>: This HTML markup tag closes the initial<img src=tag, telling the web browser when the call to the image file is complete.
Inserting hyperlinks
At times, you may want to insert a link (commonly referred to as a hyperlink) within the Text widget. A hyperlink is a line of text that’s anchored to a web address (URL) so that when visitors on your website click the text, it takes them to another website, or page, in their browser window. The HTML markup to insert a hyperlink looks like this:
<a href="http://wiley.com">Wiley Publishing</a>
To break down that markup, here’s a simple explanation:
<a href=: This is the HTML markup that tells the browser that the text within this tag should be hyperlinked to the web address provided in the next bullet point."http://wiley.com": This is the URL that you want the text to be anchored to. The URL needs to be surrounded by quotes, which defines it as the intended anchor, or address.">: This markup closes the previously opened<a href=HTML tag.Wiley Publishing: In this example, this is the text that is linked, or anchored, by the URL. This clickable text displays on your website.</a>: This HTML markup tag tells the web browser that the hyperlink is closed. Anything that exists between<a href="..">and</a>is hyperlinked, or clickable, through to the intended anchor, or web address.
Commonly, designers use URLs to link words to other websites or pages. However, you can also provide hyperlinks to files like PDF (Adobe Acrobat), DOC (Microsoft Word), or any other file type.
Inserting lists
You may need to provide a clean-looking format for lists of information that you publish on your website. With HTML markup, you can easily provide lists that are formatted depending on your needs.
Ordered lists are numbered sequentially, such as a step list of things to do, like this:
- Write my book chapters.
- Submit my book chapters to my publisher.
- Panic a little when the book is released to the public.
- Breathe a sigh of relief when public reviews are overwhelmingly positive!
Ordered lists are easy to do in a program like Microsoft Word, or even in the WordPress post editor, because you can use the What You See Is What You Get (WYSIWYG) editor to format the list for you. However, if you want to code an ordered list using HTML in a Text widget, it’s a little different. My preceding step-list sample looks like this when using HTML markup:
<ol>
<li>Write my book chapters.</li>
<li>Submit my book chapters to my publisher.</li>
<li>Panic a little when the book is released to the public.</li>
<li>Breathe a sigh of relief when public reviews are overwhelmingly positive!
</li>
</ol>
The beginning <ol> tells a web browser to display this list as an ordered list, meaning that it’s ordered with numbers starting with the number 1. The entire list ends with the </ol> HTML tag, which tells the web browser that the ordered list is now complete.
Between the <ol> and </ol> are list items designated as such by the HTML markup <li>. Each list item starts with <li> and ends with </li>, which tells the web browser to display the line of text as one list item.
If you fail to close any open HTML markup tags — for example, if you start an ordered list with <ol> but fail to include the closing </ol> at the end — it messes up the display on your website. The web browser considers anything beneath the initial <ol> to be part of the ordered list until it recognizes the closing tag </ol>.
Unordered lists are very similar to ordered lists, except instead of using numbers, they use bullet points to display the list, like this:
- Write my book chapters.
- Submit my book chapters to my publisher.
- Panic a little when the book is released to the public.
- Breathe a sigh of relief when public reviews are overwhelmingly positive!
The HTML markup for an unordered list is just like the unordered list, except instead of using the <ol> tag, use the <ul> tag (ul stands for unordered list):
<ul>
<li>Write my book chapters.</li>
<li>Submit my book chapters to my publisher.</li>
<li>Panic a little when the book is released to the public.</li>
<li>Breathe a sigh of relief when public reviews are overwhelmingly positive!
</li>
</ul>
Both ordered and unordered lists use the list item tags <li> and </li>. The only difference between the two lists is in the first opening and last closing tags. Ordered lists use <ol> and </ol>, whereas unordered lists use <ul> and </ul>.
Using the RSS widget
The RSS widget lets you display content from another blog in your sidebar. If I wanted to display a list of recent posts from another blog that I have somewhere else, for example, I would use the RSS widget to accomplish this task. Follow these steps to add the RSS widget to your blog:
- Add the RSS widget to your selected Widget Area on the Widgets page.
Follow the steps in the “Selecting and activating widgets” section, earlier in this chapter, to add the widget.
- Click the drop-down arrow to the right of the RSS widget’s name.
A box drops down, displaying the different options you can configure for the RSS widget.
- In the Enter the RSS Feed URL Here text box, type the RSS URL of the blog you want to add.
You can usually find the RSS Feed URL of a blog listed in the sidebar.
- Type the title of the RSS widget.
This title is what appears in your blog above the links from this blog. If I wanted to add the RSS feed from my personal blog, for example, I would type Lisa Sabin-Wilson’s blog.
- Select the number of items to display.
The drop-down menu here gives you a choice of 1–20. Choose the number of items from the RSS feed that you would like to display on your site.
- (Optional) Select the Display the Item Content check box.
Selecting this check box tells WordPress that you also want to display the content of the feed (usually, the content of the blog post from the feed URL). If you want to display only the title, leave the check box unselected.
- (Optional) Select the Display Item Author, If Available check box.
Select this option if you want to display the author’s name along with the item’s title.
- (Optional) Select the Display Item Date check box.
Select this option if you want to display the date the item was published, along with the item title.
- Click the Save Changes button.
WordPress saves all the options you just set and reloads the Widgets page with your RSS widget intact.
Figure 5-9 shows my WordPress.com blog displaying the content from my personal blog in the footer of my site. I used the RSS widget to make this happen!
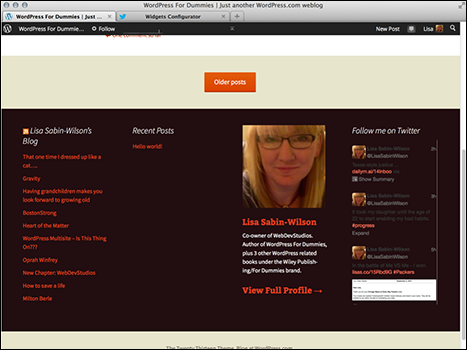
Figure 5-9: Content from another blog shown in my sidebar via the RSS widget.
Upgrading Your WordPress Account (for a Fee)
Although WordPress.com is a free service, it offers enhancements for a fee. WordPress.com calls these items upgrades, and you can purchase the upgrades from within your WordPress.com Dashboard. Click the Store link on the Dashboard navigation menu to display the Store page shown in Figure 5-10.
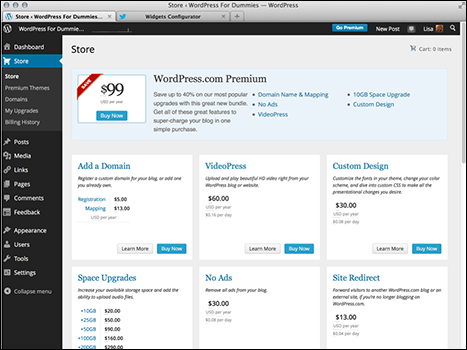
Figure 5-10: Visit the WordPress.com Store page for upgrades.
Following is a list of the current upgrades you can purchase to enhance your WordPress.com account with the prices reflecting the annual cost:
- Add a Domain: This upgrade allows you to add your own domain name to your WordPress.com account; see the next section, “Naming Your Domain.” This service costs $5 for the domain registration and $13 for the domain mapping.
- VideoPress: This upgrade allows you to upload, store, and share your videos from your WordPress.com account. This service covers the storage space that your video files take up on the WordPress.com servers. It costs $60/year.
- Custom Design: This upgrade lets you customize the Cascading Style Sheets (CSS) and use Custom Fonts for the theme you’re currently using in the WordPress.com system. Recommended for users who understand the use of CSS, this upgrade costs $30/year.
- Space Upgrades: With the free WordPress.com blog, you have 3GB of hard drive space for use in your upload directory. The various space upgrades add more, letting you upload more files (images, videos, audio files, and so on). As of this writing, you can add
- 10GB for $20/year
- 25GB for $50/year
- 50GB for $90/year
- 100GB for $160/year
- 200GB for $290/year
- No Ads: For $30/year, you can ensure that your WordPress.com blog is ad-free. Occasionally, WordPress.com does serve ads on your blog pages to try to defray the costs of running a popular service. If you’d rather not have those ads appearing on your blog, pay for the No Ads upgrade and you’ll be ad-free!
- Site Redirect: You can pay WordPress.com to add a forwarder on your WordPress.com blog address if you change blog addresses or domain name. The forwarder automatically forwards your visitor’s browser to your new domain name, or blog address, seamlessly. The cost is $13/year.
- Premium Themes: You can get many of the themes available on WordPress.com for free — but if you purchase the Premium theme upgrade for a one-time fee of $20, you get access to the premium theme of your choice to use on your blog forever. You can also purchase access to Unlimited Premium themes for $120/year.
- WordPress.com Business: This hosting upgrade for $299/year is considered by WordPress.com to be its Pro-level service. It offers access to any of the themes (including premium) at no additional cost, and allows you to upload all the video and audio files you want with unlimited storage. It also offers access to premium support through live chat channels with WordPress.com specialists during regular business hours (M-F, 9-5pm EST).
- WordPress.com Enterprise: Upgrade to this package for $500/month and have access to a website with custom branding, reliable hosting, bulletproof security, and more than 100 plugins available for your use (plugins that are unavailable for free or Business users of the WordPress.com service).
- Guided Transfer: Sometimes WordPress.com users transfer their site to their own hosting account using the (self-hosted) WordPress.org software, which provides them with a great deal more control and flexibility. If transferring your WordPress.com account is something you’d rather not do yourself, you can hire WordPress.com to do it for you for a one-time fee of $129.
Naming Your Domain
The URL for your WordPress.com blog is http://blogaddress.wordpress.com, with blogaddress being the blog address you chose for your WordPress.com blog. My blog address is lsrn94; therefore, my WordPress.com domain is http://lsrn94.wordpress.com.
WordPress.com lets you use your own domain name for your WordPress.com blog. Using the Domains feature in WordPress.com is not free, however. At this writing, this feature costs $5 for the domain registration and $13 for the domain mapping.
When you have your domain registered, go to your WordPress.com Dashboard, click the Domains link in the Store menu to display the Domains page, and type your domain name in the Add a Domain text box shown in Figure 5-11. Then follow the prompts to fully set up your domain name.
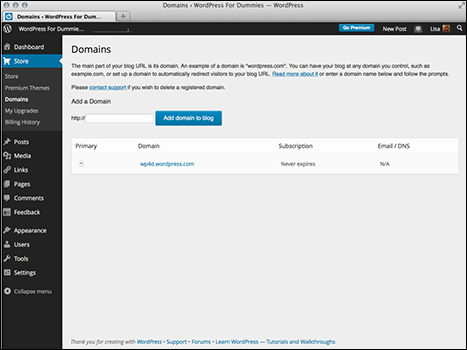
Figure 5-11: Use your own domain in WordPress.com by upgrading on the Domains page.
When you configure your domain name correctly, your domain name points to your WordPress.com blog.