Chapter 8. Development
Developing change management applications is in many aspects different from a regular software project, mainly because of the special development environment provided by IBM Rational ClearQuest and by IBM Rational Team Concert.
In this chapter we shall explain the special development considerations for preparing the development process and discuss techniques that can help large organizations overcome the limitations in ClearQuest.
We start by demonstrating how to implement the design patterns explained in Chapter 2, “Disciplines: Requirements, Analysis & Design,” using ClearQuest and Rational Team Concert (RTC). We continue with reusable assets: schemas, packages, and code. In section 8.2, “Parallel Development,” we explain methods that allow a team to work in parallel and accelerate the ClearQuest application delivery. In section 8.3, “Comparing and Merging Schema Versions,” we explain development techniques using the new Eclipse Designer; we focus on comparing versions and merging, features that are not available in ClearQuest Windows Designer. Section 8.4, “Storing Hooks Externally,” deals with techniques to improve maintainability by storing hooks outside the schema. The following sections are more relevant for large organizations; we provide a procedure for releasing a new version to production. We briefly discuss some of the additional considerations for customers who have ClearQuest MultiSite when developing their ClearQuest applications. In section 8.7, “ClearQuest Script Debugging,” we discuss unit testing and debugging techniques. Section 8.8, “Other Development Considerations,” is a collection of various subjects that ClearQuest administrators struggle with. Among others we discuss listing techniques, good administration practice, utilities assisting in maintenance, and more. In section 8.9, “Web Considerations,” we discuss the needs of applications that will be used with Web browsers. The last section includes some tips regarding expected future changes.
8.1. ClearQuest Schema Development
After your organization has defined the requirements and you have made the ClearQuest application design, it is time to start developing the application. Where should you start? ClearQuest provides some schemas; should you start with one of those, or should you start with a blank schema? Most of the built-in schemas are related to integrations with other Rational products: AnalystStudio with RequisitePro, TestStudio with TestManager, UCM with ClearCase, and Enterprise with all of the above. The DefectTracking schema is often used as a starting point for software defect tracking.
Another option is to look for a good schema at developerworks.com or in one of the forums. We definitely suggest looking at some schemas that may be candidates to be your starting baseline. You can also take elements from other schemas that work for you and add them to your base schema. In the next paragraphs we shall discuss some development considerations.
8.1.1. Common Schema (ALM)
A common schema is an idea raised by ClearQuest community members who asked themselves the same the questions we have just raised: how to start developing a schema. The idea is to gather requirements and best practices that will cover the needs of many organizations. The 80-20 rule is very relevant here—a common or base schema that will cover 80 percent of the requirements of the organization with minimal development effort to get started. The other 20 percent will be developed to cover the specific and unique requirements of each organization, and they can be developed over time. This idea led Rational to develop the Application Lifecycle Management (ALM) schema that is now provided with ClearQuest. This is a good starting point for many organizations.
Organizations coming from the same domain such as finance or electronics could probably use a common schema that will cover many of their basic needs.
8.1.2. Implementing Patterns
In section 2.3, “Design Patterns,” in Chapter 2, “Disciplines: Requirements, Analysis & Design,” we discussed design patterns. In this chapter we shall provide some examples of implementations of those patterns (also called idioms). You can use patterns that meet the requirements of the system you develop. We provide some of the implementations in Perl and others in BASIC, but each one can be implemented in both languages.
8.1.2.1. Closing Pattern
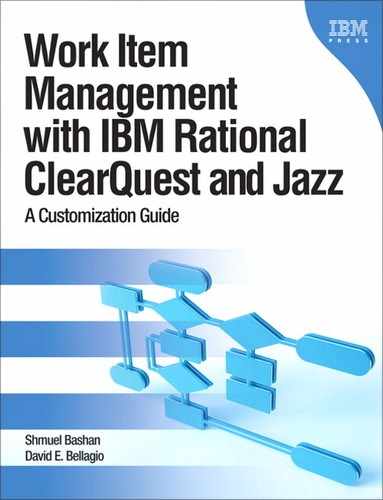
The purpose of the Closing pattern is to capture the closing type and the closing reason. (See section 2.3.1, “Closing Pattern,” in Chapter 2, “Disciplines: Requirements, Analysis & Design,” for the definition.) The pattern is implemented by adding two or more fields to each state-based record type.
Table 8.1. Suggested Fields to Implement the Closing Pattern
The CloseType choice list values can be divided into two types:
• Type one: The action was done to close the work item; values would be Fixed, Fixed Indirectly, Coding, Configuration, and so on.
• Type two: No work was done on the product; values would be Not a Defect, Work as Designed, Can’t Replicate, and so on.
The Perl script in Listing 8.1 is an example of implementing the Closing pattern in the ClearQuest action Reject initialization hook. Notice that values are autoset for the fields CloseDate and CloseType and that the requiredness of the field CloseReason is set to Mandatory. We could, of course, set the requiredness of the field CloseReason in the behaviors table.
Listing 8.1. Implementing the Closing Pattern
sub Bug_Initialization {
my($actionname, $actiontype) = @_;
# $actionname as string scalar
# $actiontype as long scalar
# action is Reject
# record type name is Bug
# Start User Code
# Do any setup for the action here.
# purpose: Set close type and date, and require close reason
my $date = GetCurrentDate() . " " . GetCurrentTime();
$entity->SetFieldValue("CloseDate", $date);
$entity->SetFieldValue("CloseType", "Rejected");
$entity->SetFieldRequirednessForCurrentAction("CloseReason",
$CQPerlExt::CQ_MANDATORY);
# End User Code
}
A similar hook should be used for all actions that lead to an end state, for example, Close and Reject. It is also possible to set the fields’ CloseReason and CloseType behavior values to Mandatory in the Closed state column in the behaviors table.
Implementing the Closing Pattern in Jazz
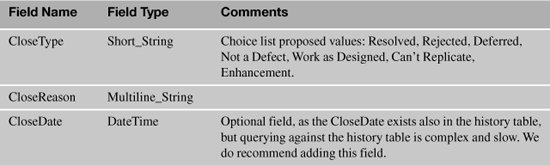
To implement this pattern in Rational Team Concert you have to set the preconditions of the relevant properties (fields) for the closing states. This is done in several steps; in the initial steps you define the operational behaviors and in the following steps you define the preconditions.
1. In Rational Team Concert open the project and select the Process Configuration tab.
2. Under Configuration expand Team Configuration and select Operation Behavior.
3. In Operation Behavior expand Work Items and mark the role for the Save Work Item (server). In Figure 8.1 you can see that the role Everyone (default) was selected, but you can select other roles depending on your process.
Figure 8.1. Implementing the Closing pattern with RTC: setting the operation behavior
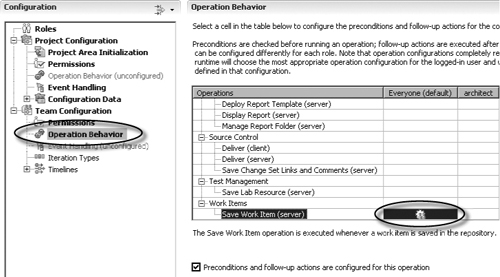
4. Check the box “Preconditions and follow-up actions are configured for this operation.”
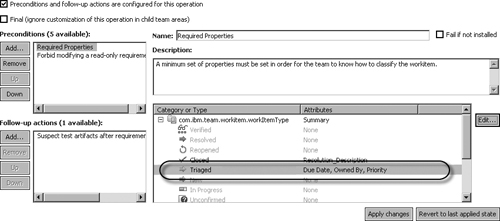
5. Under Preconditions select the Required Properties precondition (see Figure 8.2). If it is not in the list click Add... and select it.
6. Under Category or Type select the work item type that is relevant to this pattern. You can repeat this operation for more than one work item type. In Figure 8.2 you can see that com.ibm.team.workitem.workItemType is the one we expanded.
7. Mark the Closed state and click on the Edit... button to select the attribute. The attribute is actually the required property. In Figure 8.2 you can see that the property Resolution_Description was selected. Resolution_Description is a custom attribute that we have created for this pattern.
Figure 8.2. Implementing the Closing pattern with RTC: setting preconditions
When the user selects the Close action, the Resolution_Description property will be marked as required (red star); the user will not be able to save the work item without filling in the Resolution_Description property.
8.1.2.2. Triage Pattern
The purpose of the Triage pattern is to assign a work item to the right solution provider and to set the priority of the work. Implementing the Triage pattern involves setting the Owner (or equivalent) field to Mandatory prior to changing the state to Opened (or equivalent). In ClearQuest implementing the Triage pattern involves setting the fields Owner and Priority to Mandatory for state Opened and all states that follow this state in the workflow.
Figure 8.3 displays the ClearQuest behaviors table of the Defect record type. The triage action is Assign which will transition the record to the Assigned state. Note that both Owner and Priority are set to Mandatory for the states Assigned, Opened, Resolved, and Closed.
Figure 8.3. Implementing the Triage pattern

It is possible to perform automatic assignment in several situations. In section 5.7.2, “Hook to Automatically Set Responsible Based on Role of Type Single,” in Chapter 5, “Roles,” we discussed this subject in detail.
Implementing the Triage Pattern in Jazz
The Triage pattern is implemented in Rational Team Concert in a similar way to the Closing pattern described in section 8.1.2.1, “Closing Pattern.” You have to set the operational behavior. In this idiom you select the Triaged state, click Edit..., and select the properties Owned By and Priority. In Figure 8.4 on the next page you can see that the property Due Date was selected in addition to Owned By and Priority that we have defined in the pattern. That is absolutely fine as many rules can be applied as well as variants of the pattern.
8.1.2.3. Parent Control Pattern
The purpose of the Parent Control pattern is to ensure that all children of a record are in the same state before the parent state is changed. (See section 2.3.3, “Parent Control Pattern,” in Chapter 2, “Disciplines: Requirements, Analysis & Design,” for the definition.)
The code in Listing 8.2 demonstrates how to implement the Parent Control pattern. In the parent record add a validation hook that calls the ChildrenStatus() subroutine; the code for ChildrenStatus is provided in Listing 8.3.
This validation hook should be added to any action you want to check, such as Resolve or Close. Listing 8.2 is a defect validation hook for the action Resolve.
Figure 8.4. Implementing the Triage pattern in RTC
Listing 8.2. Implementing the Parent Control Pattern
sub Defect_Validation {
my($actionname, $actiontype) = @_;
my $result;
# $actionname as string scalar
# $actiontype as long scalar
# $result as string scalar
# action is Resolve
# record type name is Defect
# Start User Code
# Purpose: Enforce the Parent-Control Pattern
my $id = $entity->GetDisplayName();
my $children = ChildrenStatus ($id, "Resolved");
$session->OutputDebugString("Children status: $children
");
if ( $children == 2) {
$result = "To Resolve this record all children must be
in status Resolved.";
}
# End User Code
return $result;
}
The global subroutine ChildrenStatus() checks the states of all child records and denies the action if at least one of the children has not reached the relevant state. This pattern can be applied to the Closed state or the Resolved state or any other state where child status affects the parent status. This implementation assumes that parent and children are of same type, but it can be easily converted to a more general solution.
Listing 8.3. Checking the Status of Child Records
sub ChildrenStatus {
my ($parentid, $closed_state) = @_;
# Purpose: return the status of children records
# Input: parentid
# closed_state- The name of the state to verify
#
# Output: return value: 0 = no children,
# 1 = all children closed
# 2 = at least one opened child
my $session = $entity->GetSession();
my $entitytype = $entity->GetEntityDefName();
my $parentObj = $session->GetEntity($entitytype, $parentid);
my $children = $parentObj->GetFieldValue("Children")->GetValueAsList();
my ($total_children, $total_closed_children) = (0, 0);
my $result = 0;
foreach my $childid (@$children) {
my $childObj = $session->GetEntity($entitytype, $childid);
my $childrentate = $childObj->LookupStateName();
$total_children++;
if ($childrentate eq $closed_state) {
$total_closed_children++;
}
}
if ($total_children) {
if ($total_closed_children == $total_children) {
$result = 1;
} else {
$result = 2;
}
} else {
$result = 0;
}
return $result;
}
We pass the parent record ID to get the parent entity, although this is not necessary when the hook is running from a parent action. This is done so that we can use the same hook in other situations, such as to check the status of other records. This makes the subroutine more general and easier to reuse in other parent/child control situations.
8.1.2.4. Child Control Pattern
The purpose of the Child Control pattern is to ensure that the parent changes its state when all its children have reached the same state. In this pattern the child autosets the state of the parent. (See section 2.3.4, “Child Control Pattern,” in Chapter 2, “Disciplines: Requirements, Analysis & Design,” for the design pattern definition.)
The code in Listing 8.4 is an example of an implementation of the Child Control pattern. In the child record add a commit hook with the BASIC code in this listing.
Listing 8.4. Implementing the Child Control Pattern
Sub Defect_Commit(actionname, actiontype)
' actionname As String
' actiontype As Long
' action is Resolve
' record type name is Defect
' Start User Code
' Purpose: Move the parent record to state Resolved if all siblings
' are resolved.
' Method: Get the parent record (we assume there is only one parent)
' Get all children of the parent and check their states.
' If all children are resolved edit the parent record with
' action Resolve to change its state.
Dim ParentObj
Dim sessionObj
Dim defectChildEntityObj
set = GetSession
ThisID = GetDisplayName
ActionJustPerformed = GetActionName
StateStatus = ""
SameState = 0
parent_id = GetFieldValue("Parent").GetValue()
if parent_id <> "" then
set ParentObj = sessionobj.GetEntity("defect", parent_id)
ChildRefList = ParentObj.GetFieldValue("Children").GetValue
ChildArray = split (ChildRefList, vbLf)
For Each ChildID In ChildArray
set defectChildEntityObj = sessionobj.GetEntity("defect", ChildID)
CurrentState = defectChildEntityObj.GetFieldValue("State").GetValue
if StateStatus = "" then
StateStatus = CurrentState
SameState = 1
elseif StateStatus = CurrentState then
SameState = 1
else
SameState = 0
end if
Next
if SameState = 1 then
' Change the parent state
sessionobj.EditEntity ParentObj, ActionJustPerformed
status = ParentObj.Validate
if (status <> "") then
end if
ParentObj.Commit
end if
end if
' End User Code
End Sub
This will do the job, but if you want to apply the same pattern not only to the Resolved state but also to the Closed state, you will have to copy the same hook to the Close action commit hook. This is not very efficient from a maintenance point of view. We therefore suggest creating a global hook and calling it from the required actions, as demonstrated in the Parent Control pattern in Listing 8.3.
In the current version of Jazz (2.0) the Child Control pattern and the Parent Control pattern cannot be implemented.
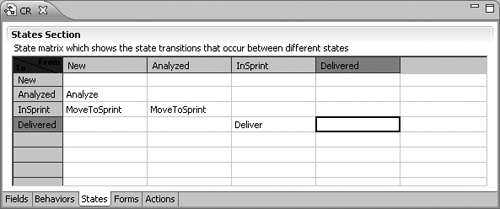
8.1.2.5. Dead End Pattern
The purpose of the Dead End pattern is to ensure that a record cannot be reopened after closure. (See section 2.3.5, “Dead End Pattern,” in Chapter 2, “Disciplines: Requirements, Analysis & Design,” for the definition.) The Dead End pattern is implemented by ensuring that no action of type Change_State can be executed when the record is in Closed state. It can easily be checked in the ClearQuest states table, as demonstrated in Figure 8.5. The state Delivered (the Closed state) column has no actions; therefore the schema conforms to the Dead End pattern.
Figure 8.5. Implementing the Dead End design pattern: preventing a change state
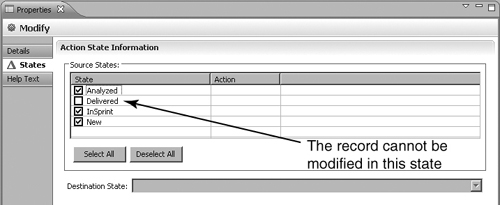
A firmer policy of this pattern is to not allow any modifications to the record once it is in the Closed state. This is achieved by clearing the Closed states from any action of type Modify. In Figure 8.6 you can see that the Modify action is not allowed when the record is in state Delivered, which is the Closed state.
Figure 8.6. Implementing the Dead End design pattern: prevent field changes
Implementing the Dead End Pattern in Jazz
Implementing the Dead End pattern in Rational Team Concert work items is very similar to the procedure we have described for ClearQuest.
1. In Rational Team Concert open the project and select the Process Configuration tab.
2. Under Configuration expand Configuration Data and expand Work Items (advanced).
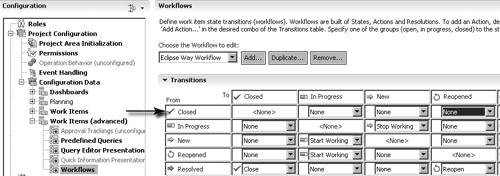
3. Click on Workflow to open it, and choose the workflow from the choice list.
4. In the Transition table, examine the row of the Closed state (the From row). Make sure all selections in this row are None.
Figure 8.7 demonstrates how the Eclipse Way workflow was altered to include the Dead End pattern by selecting None in the transition to the Reopened state.
Figure 8.7. Implementing the Dead End pattern in RTC
8.1.2.6. Data Hierarchy Pattern
The purpose of the Data Hierarchy pattern is to allow a hierarchical relation between data records. This allows you to organize product component relations and to generate bills of materials (BOMs) for the system to be tracked. Using the pattern will prevent user errors when selecting components and their versions and when selecting related elements such as modules of products or functions of modules.
To implement the pattern use a field of type Reference_List to point to a lower level in the hierarchy. See Figure 8.9 for an example of a hierarchy of records and the code in Listing 8.6 as an implementation of the Data Hierarchy pattern.
The pattern is applicable to any ClearQuest stateless record type.
The pattern is not applicable to Jazz work items, as the stateless record type is not supported.
8.1.2.7. Superuser Modification Pattern
The purpose of the Superuser Modification pattern is to allow the superuser to modify a record in all states even when the process rules do not allow it. See section 2.3.7, “Superuser Modification Pattern,” in Chapter 2, “Disciplines: Requirements, Analysis & Design,” for more information.
The pattern is implemented by adding an action of type Modify to each stateful record type. To this action we add two hooks: an Access_Control hook to verify that the user has superuser permission, and an initialization hook to set the requiredness of all the fields to Optional. This allows the superuser to modify fields that are read-only for other users. Note that the action is stored in the history table, and if the Audit Trail package is applied, the fields that the superuser changed will be registered in the log.
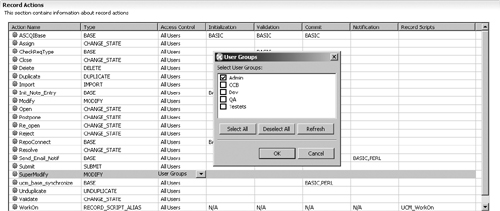
In Figure 8.8 you can see an action called SuperModify of type Modify and the Access_ Control hook that is set to the group Admin.
Figure 8.8. Implementing the Superuser Modification design pattern
The Perl code in Listing 8.5 is an example of the initialization hook for the action Super-Modify. Note that in this script all fields are set to Optional; if this is not desirable you can revert some of the fields to ReadOnly or Mandatory by using the session method
SetFieldRequirednessForCurrentAction()
Listing 8.5. Implementing the Superuser Modification Pattern
sub Defect_Initialization {
my($actionname, $actiontype) = @_;
# $actionname as string scalar
# $actiontype as long scalar
# action is SuperModify
# record type name is Defect
# Start User Code
my $sessionobj = $entity->GetSession();
my $fieldnamelist = $entity->GetFieldNames();
foreach my $fieldname (@$fieldnamelist) {
$entity->SetFieldRequirednessForCurrentAction($fieldname,
$CQPerlExt::CQ_OPTIONAL);
}
# End User Code
}
8.1.3. Employing Reusable Assets
Reusable assets are any part of the schema that can be saved or exported and later can be used, by you and by others, in another schema or another record type. Hook code is the obvious example, as many times we need to perform the same functionality or use the same pattern again. Many elements of the ClearQuest schema can be reused: record types, action hooks, field hooks, global hooks, and forms. In order to be effectively reused, the asset should be well documented, published, and accessible.
8.1.3.1. Writing Reusable Code
You spend a lot of time on writing code, testing, and debugging, so this is the most rewarding area in which to invest in creating reusable assets. The following are just few common examples:
• Convert user LoginName to User_FullName
• Many variants of choice list population
• Automatic assignment
• Auto-change state
• Many variants of cloning a record
• Time calculation and formatting
The developerWorks site contains a list of hooks and code examples organized by category. It is important that you be familiar with that site:
ClearQuest Users, “IBM Rational ClearQuest Hooks Index,” IBM developerWorks, www.ibm.com/developerworks/rational/library/4236.html (accessed February 24, 2011).
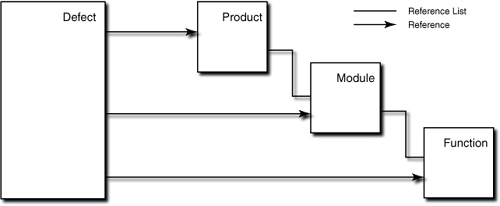
The following is an example of how to write a hook in such a way that it will be easy to reuse, but first some explanation. The schema was designed to track defects in a computer-aided design/computer-aided manufacturing (CAD/CAM) system. The CAD system has several products; in each product there are modules, and in each module there are functions. Product is a stateless record type and has a Reference_List field to Module, which is also a stateless record type. Module has a Reference_List field to Function, which is also a stateless record type. In the Defect record type there are three fields of type Reference that point to the stateless record types just mentioned (Product, Module, and Function). These three fields need to be dynamically populated as they depend on each other. When the user selects a product, the choice list of modules needs to be populated, and when Module is selected, the choice list of functions needs to be populated.
Figure 8.9 demonstrates the described ClearQuest record types and the way they reference each other.
Figure 8.9. Record types and referencing relations
The choice list hooks for the dependent fields are very similar to each other, so it is easier to write a subroutine that will be called from all fields. The calling function syntax is
ChoiceList(RefField, RefedRecord, FilterField,
RefFieldInRefedRecord);
The choice list hook of the field Module is
@choices = ChoiceList ("Product", "Product", "name", "Modules");
The choice list hook of the field Function is
@choices = ChoiceList ("Module", "Module", "name", "Functions");
The code for the global subroutine is provided in Listing 8.6.
Listing 8.6. Reusing the ChoiceList Library Subroutine
sub ChoiceList {
# Purpose: build the choice-list of a dependent list
# Input:
# dep_field – Parent field of type reference that the list
# is dependent on (e.g. "Product")
# dep_rectype – The parent referenced record type (e.g. "Product")
# that contains the reference field to the list
# filter - field for the compare equal query filter (e.g "name")
# list_field - The field in the parent record type that references
# the list we want to build (e.g., "Modules")
# Output:
# Returns @list - the dependent choice list
# Written By: Etan Shomrai
my ($dep_field, $dep_rectype, $filter, $list_field) = @_;
my $session = $entity->GetSession();
my @list ;
my @dep_field_val = ($entity->GetFieldValue($dep_field)->GetValue());
my $queryDefObj = $session->BuildQuery($dep_rectype);
my $filterOp = $queryDefObj->BuildFilterOperator(
$CQPerlExt::CQ_BOOL_OP_AND);
$filterOp->BuildFilter($filter, $CQPerlExt::CQ_COMP_OP_EQ,
@dep_field_val);
$queryDefObj->BuildField ($list_field) ;
my $resultSetObj = $session->BuildResultSet( $queryDefObj );
$resultSetObj->Execute();
while ($resultSetObj->MoveNext() == $CQPerlExt::CQ_SUCCESS) {
push ( @list, $resultSetObj->GetColumnValue (1) );
}
return @list;
}
The ChoiceList subroutine may look complex because we need to pass four parameters, but consider the advantages of being able to use it for any dependent field and in any record type. If you have several state-based record types, each one having some fields that reference dependent stateless record types, your schema may have quite a lot of hooks that are very similar and that you need to maintain.
A similar code example is given in section 8.8.7.4, “Creating a Tree-like List.”
8.1.3.2. Exporting and Importing Schema Portions
ClearQuest allows you to export part of the schema using the command
cqload exportintegration ... begin_rev end_rev ...
So if you have developed a special feature or a new record type, you can export it to a file and import it later to another schema. In this way you have a development artifact in one schema that can be reused in another schema. When maintaining this schema element, you should consider the fact that it is reused in another schema.
The full syntax of the export command is
cqload exportintegration
[-dbset dbset_name]
clearquest_login
clearquest_password
schema_name
begin_rev
end_rev
record_type_to_rename
schema_pathname
The exportintegration command has an optional parameter record_type_to_rename that allows you to rename a record type while importing. If you do not plan to rename the record type, provide an empty string: "".
The import command is similar:
cqload importintegration ... to-schema ...
The full syntax is
cqload importintegration
[-dbset dbset_name]
clearquest_login
clearquest_password
schema_name
new_record_type_name
integration_name
integration_version
schema_pathname
form_name
Some of the parameters are optional; if you are not using an optional parameter, enter an empty string: "".
• record_type_to_rename allows you to rename a record type that you are importing.
• integration name and integration version are used for documentation purposes; you can use any string values for integration name such as “Role record” or “New role record type” and any string to indicate integration version such as 2 or 2.0 to indicate that you are importing version 2 of the Role record. We strongly suggest using these optional parameters.
• form name is used to identify the entity form on which new tabs will be included; if not relevant use "".
In section 8.2, “Parallel Development,” you can see more examples of importintegration and exportintegration.
8.1.4. Using ClearQuest Packages
ClearQuest packages are reusable solutions to application problems. We can divide the packages into three types:
• Integration packages: packages that are related to integration between ClearQuest and other products such as RequisitePro, ClearCase, Microsoft Project, and others.
• Functionality packages: packages that provide functionality to change management problems such as requiring an electronic signature, tracking customer details, storing users’ notes and discussions, storing resolution types, and others. Most of these packages are actually realizations of design patterns that we discussed in section 2.3, “Design Patterns,” in Chapter 2, “Disciplines: Requirements, Analysis & Design.”
• Schema packages: packages that provide an out-of-the-box schema solution. Currently the two packages that construct a full solution are ClearQuestALM and DefectTracking.
The significant advantage of using packages is that the effort is minimal. Rational has developed them and is maintaining them. However, there are some disadvantages that you should be aware of:
• After a package is installed, you cannot remove it from the schema.
• Some element (fields, actions, hooks) of the packages may be read-only and you cannot modify them directly. If the provided functionality does not entirely meet your needs, you should consider the value versus the limitations. (See section 8.1.4.1, “Enabling a Package for Editing,” for an explanation of how to enable a read-only package for editing.)
• If you modify a package, your changes maybe overwritten when a newer version of the package is installed.
You should consider these disadvantages before installing a package. If you need to integrate ClearQuest with another product, we suggest that you use the package that performs integration, and we suggest using it as is. For functionality packages you are free to decide; for example, creating the Attachment package or the Notes package is very simple. If you intend to change it, maybe you are better off creating this functionality in the schema rather than installing the package.
For a full list of available packages see the ClearQuest Designer help under Developing > Developing schemas with the Rational ClearQuest Designer > Schemas and packages.
8.1.4.1. Enabling a Package for Editing
As we explained in the previous section, some of the packaged created elements are read-only. For example, the Resolution package changes all the hooks of the Resolve action to read-only. This is a severe limitation that in many cases is unacceptable. There is a solution that must be used with caution. The following command line enables a record type for editing so that you can make changes:
packageutil enablepackageediting -dbset dbset_name
cqadmin_login cqadmin_password -enable cquser_login
After this command is executed, the user cquser_login is granted the ability to edit package-owned components in the schema. This user can now make the changes in the schema. Extra care should be taken to prevent conflicts with the package components. When the work is done, the ClearQuest administrator should deny the ability to edit by using the command
packageutil enablepackageediting -dbset dbset_name
cqadmin_login cqadmin_password -disable cquser_login
8.1.4.2. Creating Your Package
It is possible to create a new package using the packageutil utility. However, Rational does not recommend and does not support the creation of packages by customers.
Partners that want to create integration packages or packages as part of their solution can contact Rational to get the required documentation.
8.1.5. Understanding Session Variables
Session variables are variables that are persistent for the entire session. For example, if one hook sets a session variable, it can be read from other hooks as long as the users have not terminated the session by logging out.
Session variables have no naming convention, but we suggest using the underscore character as the first letter of a session variable, for example, _ParentID, _AllowedUsers.
Session variables are not set and read as regular variables; you should use special methods to do that. The following are examples in Perl, to set the session variable in one hook:
# Perl example- Set session variable
my $RecId = $entity->GetDisplayName();
$session->SetNameValue("_ParentID", $ RecId);
You read the session variable in another hook:
# Perl example- Get session variable
my $ParentId = $session->GetNameValue(" _ParentID");
The following are examples in BASIC. Note that the method names for setting the session variables and getting the values are not the same in Perl and BASIC.
' Basic example - Set session variable
RecId = GetFieldValue("id").GetValue
curSession.NameValue "_ParentID", RecId
In the next example we first check if the session variable contains values before getting it:
' Basic example - Get session variable
If curSession.HasValue ("_ParentID") Then
ParentId = curSession.NameValue(" _ParentID")
' Get the parent entity and copy fields
' . . .
End if
You can use session variables to do the following:
• Cache data to speed up user operations, for example, a long users list in a choice list.
• Store values from one record to be read by another record, for example, in cloning operations.
• Verify session type.
ClearQuest autostores the session type in a global variable; for example, if the variable _CQ_WEB_SESSION has value, the current session is a Web one. As using MsgBox() is not allowed in Web sessions (the message will pop up in the Web server and not in the client desktop), you can avoid this call in Web sessions.
For additional information see ClearQuest Help > Reference > API Reference > Working with sessions > Using Session variables.
8.2. Parallel Development
ClearQuest designers maintain the versions of their work in the schema. When the schema is checked out by one user, it cannot be edited by others but can be opened for view only. Only after you have checked in the schema version you have worked on will another user be able to check it out for editing. This limits significantly the development speed and the ability to provide the organization with solutions in an agile manner.
ClearQuest Eclipse Designer version 7.1 introduced new features that help the members of the development team to work in parallel, and we shall discuss them in section 8.3, “Comparing and Merging Schema Versions.”
In the following paragraphs we shall explain some of the methods that allow a team to work in parallel and accelerate the ClearQuest application delivery. The methods for users still using versions below 7.1 are different; we shall discuss both methods.
8.2.1. Coding Hooks
Whether your schema scripting language is Perl or BASIC, most of the work of developing the schema is spent on coding. So the obvious place to look for parallel development is hooks coding.
The simplest method is to write the code externally with one of the many editors that fits Perl or BASIC and when you think it is ready, send it to the ClearQuest designer to copy to the main schema and test it. Another way is to have the second schema developer work on a different repository, develop the hooks within ClearQuest Designer, do minimal local tests, and send the code to the ClearQuest designer to copy to the main schema and test it.
This is basic; it takes some of the load from the main designer, but the problem is that the secondary hooks developer cannot test the code in a real environment and so cannot provide reliable hooks. It is recommended that the secondary developer have the same schema version as the main developer to make the tests resemble reality as much as possible. The final tests and debugging are left to the main developer.
If you are using ClearQuest Eclipse Designer version 7.1, the two schemas can be compared and merged. See section 8.3, “Comparing and Merging Schema Versions,” for a detailed description of how this is done.
8.2.2. Record Types
Another way to split the work is to componentize the schema. Select a component that is independent of the others, so that two (or more) developers can work on their own component independently. If designed carefully, a record type can be independent and thus allow two (or more) developers to work in parallel, each one on a different record type. But they still cannot work on the same schema because it can be checked out by one user only.
If the record type is referenced, then creating the referencing fields will be left for the merging phase. Another option is to create a stub record type that will later be replaced with the one the secondary developer is working on.
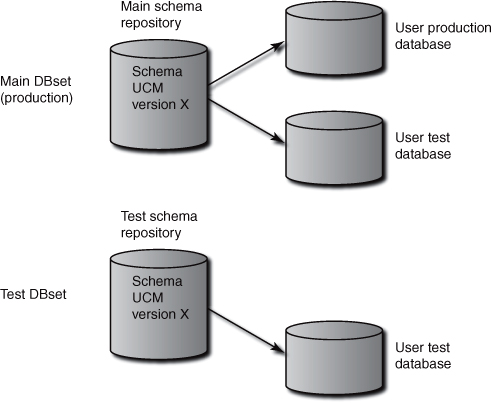
The following describes the method step by step. For simplicity we describe it with two users, DevA and DevB, though the method can be used with more developers. First let’s describe the environment: DevA is working on the schema called UCM that is connected to the production database and to a test database (Main DBset in Figure 8.10). DevB is working on a test environment, having another schema repository and a test database (Test DBset in Figure 8.10).
Figure 8.10. Two-developers configuration
To create a common baseline the schema version X is exported from the main DBset using the command
cqload exportschema -dbset Main DevA_name DevA_pw UCM
c:UCM_X.txt
The file c:UCM_X.txt is copied to the test environment or to a shared directory and imported into the test repository using the command
Cqload importrtschema -dbset Test DevB_name DevB_pw c:UCM_X.txt
Now two developers have the same version of the schema and can start working in parallel. A caution: Coordination and planning are required because ClearQuest does not support real merge. If the developers work on the same objects, conflicts may arise. We recommend that each one work on a different record type; this ensures no conflicts. Also, global hooks should be considered as a single object, and only one developer should work on the global hooks.
After DevB has finished his or her work, tested it against the test database, and checked in the schema to create a new version X+1, the changes from DevB should be merged to DevA’s schema. This is performed by exporting only changes from version X to version X+1. DevB will use the following command:
cqload exportintegration -dbset Test DevB_name DevB_pw UCM X X+1
rectype_to_rename c:UCM_X+1.txt
Needless to say, versions X and X+1 will be replaced with the correct schema version. Also the cqload exportintegration command allows you to export more than one version, but it is rarely required.
DevA has finished his or her work, tested it against the test database, and checked in the schema to create a new version X+1. Now DevA needs to import the changes from DevB. First the export file is copied to DevA’s environment, and the following command is performed:
cqload importintegration -dbset Main DevB_name DevB_pw UCM
rectype_to_rename integ_name integ_version c:UCM_X+1.txt
Now a new schema version is created, X+2, that includes the work of the two developers. Some notes on the importintegration command: The integ_name integ_version parameters are for documentation purposes and help track the merges. rectype_to_rename is used if you want change the name of the imported record type, but this is rarely used; in our case both developers coordinated their work. There are additional parameters for import forms, which we shall discuss in the next section.
With ClearQuest Eclipse Designer the record type from the secondary schemas can be merged into the main schema. See section 8.3, “Comparing and Merging Schema Versions,” for a detailed description of how this is done.
A more prudent approach is that both developers work in isolated test environments and merge their work into a different test environment. After the changes are verified and validated in the test environment, they will be exported and merged into the production environment. The disadvantage is the additional effort required to manage the environment and the promotion from one environment to another.
8.2.3. Designing Forms and Tabs
The user interface should be designed and created by professionals; programming skills are not required. The best case is that a professional with the required skills will design the forms and tabs and select the required controls. Such a person can do this using ClearQuest Designer working on another schema, so the main schema developer can continue the work in parallel. When the GUI designers finish their work, the forms can be copied to the main schema. This is done in the following way:
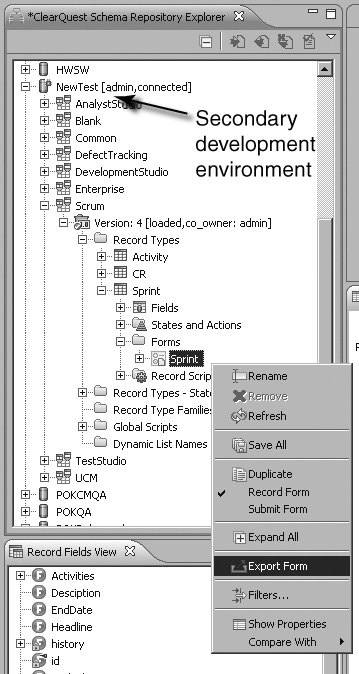
1. From the Schema Repository Explorer of the GUI designer schema (secondary development environment), expand the schema tree.
2. Select the form you want to export, right-click, and select Export Form from the dialog that appears. This dialog is shown in Figure 8.11.
Figure 8.11. Export a form using ClearQuest Eclipse Designer
3. Enter the file name for the exported file (for example, SprintRecord.form).
4. From the Schema Repository Explorer of the main designer schema (primary development environment), expand the schema tree.
5. Select the Forms folder, right-click, and select Import Form from the dialog.
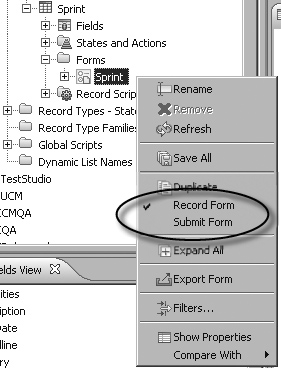
6. Pick the exported file and click the Save button.
7. Expand the form folder, select the newly imported form, and make it active by right-clicking and marking it as Record Form or Submit Form. This is shown in Figure 8.12.
The user interfaces were graphically designed in another schema and imported to the main schema; by doing this we have achieved parallel development of another element of the schema.
To copy forms it is also possible to use the utilities
cqload exportintegration . . .
cqload importintegration . . .
Figure 8.12. Setting the type of the imported form to Record Form using ClearQuest Eclipse Designer
See the following article:
Glockner, Christian, “Collaborative Schema Design with IBM Rational ClearQuest,” IBM developerWorks, www.ibm.com/developerworks/rational/library/10/collaborative-schemadesignwithibmrationalclearquest/index.html, 2010 (accessed February 24, 2011).
8.3. Comparing and Merging Schema Versions
The ClearQuest schema is versioned sequentially, in a linear manner and not in a tree manner. The schema designer can open any old version for viewing, but until version 7.1 there was no mechanism to indicate what changes were introduced from one version to another. ClearQuest designers can enter a description of their changes every time they check in a schema, and they should, but this is optional and does not ensure the correctness and completeness of the information.
ClearQuest Eclipse Designer version 7.1 introduces some new and very important features that help administrators better manage their schemas. Some of the features are
• A generic History view that displays the history of all schema revisions
• The ability to make a structural comparison of schema versions
• The ability to merge changes from one schema version to another
To open the schema History view, select the schema, right-click, and select Show > History.
The version comparison is a significant step forward, and it is especially important in large organizations where more than one person is working on the schema. You can select and compare two versions of the same schema from the History view. More important is the ability to select two versions of two different schemas from the Schema Repository Explorer. This is done in the following way: Hold the CTRL key and select the two versions, right-click, and select Compare With > Each Other.
Figure 8.13 shows a History view of a schema.
Figure 8.13. Schema Revision History view: compare schema revisions

The technique for parallel development as explained in section 8.2, “Parallel Development,” is becoming much simpler. Consider again the two developers we described in that section and the environment shown in Figure 8.10; instead of exporting and importing, the main designer will compare the changes made in the secondary schema and can easily import the required changes to the main schema. The process is as follows:
1. Expand the two repositories in the Schema Repository Explorer.
2. Check out the main schema.
3. Press CTRL and select the checked-out schema version and the secondary schema version.
4. Right-click and select Compare With > Each Other.
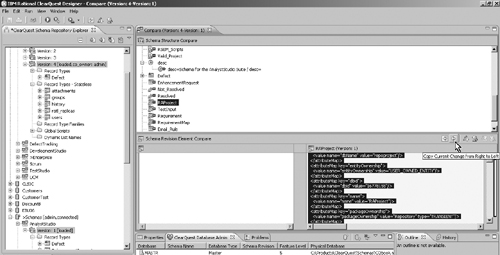
The Schema Compare window opens; it has three sections (views). The upper section is the Schema Structure Compare with all the schema elements that are different. The lower two sections display the elements of each schema. Special icons for Added, Removed, and Conflict indicate the type of change for each element in the structure. Figure 8.14 demonstrates the Compare window of the two schema versions.
Figure 8.14. Comparing two schemas and Copy record type
5. Focus on the element that needs to be imported by double-clicking on it.
The content is displayed in XML format in the lower section. Figure 8.14 shows the content of the selected record (RAProject) in the right lower window.
6. Click on the button Copy Current Change From Right to Left (or Left to Right depending who is copying from whom).
This button is located on the toolbar that is below the Schema Structure Compare section. Note that the schema elements are copied to the left section, but not yet to the main schema. Other buttons in the toolbar allow you to copy all non-conflicting changes and to navigate between changes.
7. Save the schema to actually copy the elements to the main schema.
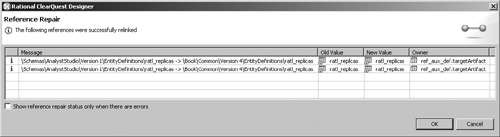
If the imported record types have reference fields, ClearQuest will fix references and show you the fixes.
Figure 8.15 shows the Reference Repair window, ready for the user confirmation to perform the repair. To better understand reference repair, let’s look at an example. The reference to the “ratl_replicas” record type needs to be fixed because the “dbid” field values in the two schemas are not the same. ClearQuest will report an error if there is a reference to an object that does not exist in the new schema, so you should pay extra attention to elements that are referenced. For example, if you copy the EnhancementRe-quest record type, the RAProject record type should also be copied (or installed via a package) as it is being referenced.
8. Continue and copy other elements to the main schema.
Before the next element can be compared, you will be asked to save the changes. Only after saving will you be able to see the changes in the Schema Explorer.
9. Perform tests against the test database, and verify that changes introduced actually work as expected.
10. Check in the new schema version.
The differences between the two schemas are displayed in the Schema Structure Compare window as seen in Figure 8.14. Elements can be highlighted, and their XML content is presented in the lower right window; the displayed elements can be copied to the other schema.
When fields with references are copied to another schema, the references are not valid (as the record “dbid” is different) and therefore need to be repaired. Figure 8.15 shows the identification of the required repairs.
Figure 8.15. Reference Repair message after record merge
8.4. Storing Hooks Externally
The limited ability to develop in parallel and the need to check in and upgrade the production database, even for a small change, has led some organizations to develop smart techniques to store elements of the schema externally, so that changes will be possible without checking out the schema. One of the techniques is to store the code externally, that is, not in the hook itself. The hook will extract the external code, parse, validate, and execute it. The Perl hook skeleton to execute an action hook may look like this:
my $ActionName = $entity->GetActionName();
my $HookType = "Commit";
my $hookcode = FindCode( $ActionName, $HookType);
eval $hookcode;
This technique will work in Perl only because the BASIC language does not have an eval() equivalent. The FindCode function will extract the code for the relevant hook and the Perl eval() command will execute it. So how can we store the code externally? One way may be in a shared file repository (and possibly under version control, with ClearCase, for example), but this might be problematic in distributed environments and for ClearQuest Web users. Another way is to store the code in the ClearQuest user database, for example, in a multiline string of a stateless record type. Even with this solution we can propose several techniques:
• A record for each hook; for example, the Submit action initialization hook can be stored in one record, and the Submit action commit hook stored in another. This method is probably easier to implement because a single query can extract the required code. Also, it minimizes the chance that two schema developers will need to access and change the same hook.
• One record with all hooks stored in XML format for easy parsing.
• A combination of one record for each hook type; for example, all the action initialization hooks in one record, all action commit hooks in another; field value change hooks in one record and field choice list hooks in another, and so forth. Extracting and parsing are easier.
This method requires a special test environment. We explained in section 7.5.3, “Creating a Test Environment,” of Chapter 7, “Disciplines, Part 2,” how to create a test environment. When you change a hook and save it in the defined external location, it takes effect immediately. Therefore, you need to develop and/or modify the script and save it in an isolated test environment so that you can test without affecting the production environment. In most organizations where this solution is relevant, or that use an isolated development environment or an isolated test environment, this solution may be suitable.
The technique of storing the code externally out of the ClearQuest schema was presented at the IBM Rational Software Development Conference 2006, session CCM32.
8.5. Releasing a Version to Production
The release process includes several stages. The first stage is in the development environment. Similar to the unit testing that developers perform prior to publishing their work, the ClearQuest developer performs testing and debugging on the test database. This test database does not have to be of the same type as the production database, but it has to be one that the ClearQuest designer can create and delete without the DBA’s assistance.
The next step is promoting the changes to the test environment. This environment is similar or identical to the production environment. System tests should also be performed here by the stakeholders who approve the changes. The last step is the promotion to the production environment. We provide the suggested steps for the promotion that includes schema, data, and queries and reports.
8.5.1. Developer Testing
The schema developer should configure the test environment. From ClearQuest Designer select File > Test Configuration. In the wizard select the New Configuration icon (or right-click on ClearQuest and select New) and type the test configuration name. The configuration wizard has two pages. Figure 8.16 shows page one, where you define the test database or create a new one by pressing the Create a Database button.
The second page is for the definition of the client type to be executed. Click the Client Setup tab and define each of the clients you need to test. Click on the Client Type radio button and verify that the definition is correct, and modify it as required. As previously mentioned, you should test each environment that the users are using.
Figure 8.17 shows the Client Setup page, with the Web client definition.
To run the test, mark the test database and click the Run button. For subsequent test execution click on the menu button Rerun Test Work.
Figure 8.16. Setting the test database configuration
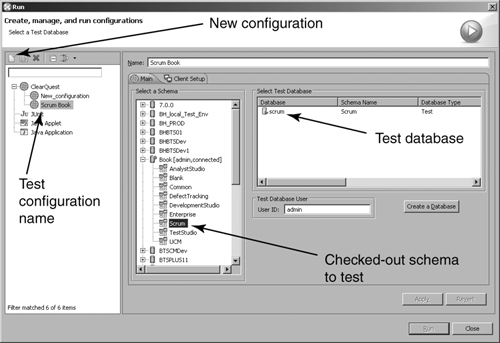
Figure 8.17. Setting the test client type
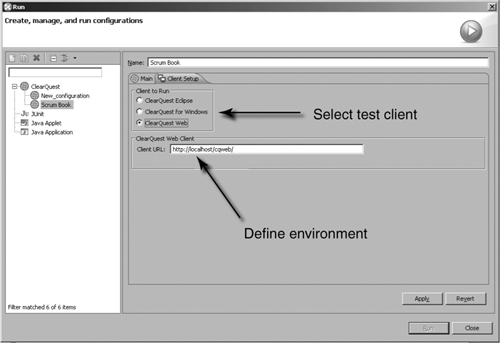
When you run Test Work, ClearQuest Designer performs schema validation, and if validation is successful, the test database is upgraded to the last revision. When you set up the client to ClearQuest Web, the database is not upgraded. So to test the Web client, first test your changes with the Windows or Eclipse client and then with the Web client.
8.5.2. System Testing
If there are several developers, each one performs similar tests on his or her environment until they all integrate their changes in one of the ways we explained in section 8.2, “Parallel Development.” When all changes are merged into the main schema, we can start more general tests, similar to system integration tests. These tests will probably be performed on a test database that is similar to the production database. Intensive tests should be carried out; sometimes performance tests are required, especially if you expect an increase in the number of users, or if the schema changes include time-consuming hooks. In large deployments performance tests should be considered in each major release.
If the stakeholders were not involved in the development process, user acceptance tests should probably be carried out.
8.5.3. Promotion to Production
We assumed that all the tests were performed in a test repository, so we should promote the release from the test environment to the production environment. First, get approval for the promotion. Second, export all the changes, including
• A new schema version
• Possibly new queries, charts, and reports that were built
• Data for dynamic lists
• Data import for new stateless record types
The process includes, but is not limited to, the following activities:
1. Prepare a checklist of all the activities that you should perform, similar to this list but including the detailed commands.
2. Export the schema version using the command cqload exportintegration.
3. Export dynamic lists with the command importutil exportlist.
4. Export new queries: from the ClearQuest client workspace select a query, Right-click, and select “export query.”
5. We assume that the data for stateless record types was already imported to the test database from files, so we do not need the export again, but if this is not the case use the Eclipse client Export Tool to export the data.
Now that we have all the data exported, we can copy all the files to the shared directory, if they are not already exported to one.
To import the data to the production environment perform the following activities:
1. Get approval for the upgrade, including approval for downtime.
2. Import the schema version using the command cqload importintegration (or with Eclipse Designer compare and merge).
3. Inform all the users of the upgrade time, requesting that they log out. Send the message one day before the upgrade, and a reminder a few minutes before the upgrade. It is best to perform the upgrade at times when the minimum number of users is active.
4. Check in the schema and upgrade the production database.
5. Import dynamic lists with the command importutil importlist.
6. Import queries to the ClearQuest client workspace: right-click on the folder and select “import query.”
7. Import data records to the stateless record types using the Eclipse client Import Tool.
8. Perform a sanity check to be sure nothing is missing. Perform regression tests.
9. Inform the users when the process is complete.
8.6. Globally Distributed Development (GDD) Considerations and ClearQuest MultiSite (CQMS)
Customers using ClearQuest MultiSite (CQMS) need to take into consideration the following subjects related to the development process:
• The schema upgrade process
• Mastership changes
• Testing mastership issues
8.6.1. Upgrading the Schema
The ClearQuest MultiSite automatic synchronization process does not deal with upgrading the user database. Therefore, the schema administrator must set up a manual procedure for checking in the new schema version, transporting the changes to the other sites, upgrading other sites’ databases, and turning on automatic synchronization.
This procedure is described in ClearQuest Help > Administering > Administering Rational ClearQuest MultiSite > Database replicas administration > Upgrading a schema version.
8.6.2. Addressing Mastership Changes
In a multisite environment the ClearQuest record can have mastership in different sites along the record workflow. This is common when testing is performed in one site and development in another site. When assigning a new owner from another site, mastership will change. There are cases when a user in a site that currently does not have mastership needs to modify the record.
This problem can be solved in a few ways:
• Develop a command-line utility that connects to the remote site and updates the master-ship. Users will have to wait for the next synchronization to be able to make the change.
• Send an e-mail to the E-mail Reader in the remote site to change the mastership. This solution is slow and less reliable because of technology.
• A user that is defined in both sites can log in with the Web client to the other site and change the mastership or even make the required modifications. This solution does not require any changes or development.
Note that to change the mastership via the GUI, the ClearQuest designer should include the field “ratl_mastership” in the form.
See also ClearQuest Help > Administering > Administering Rational ClearQuest MultiSite > Mastership management > Transferring mastership of a record, as well as the following:
Staff, IBM Rational, “ClearQuest MultiSite Project Management and Integration Hooks,” IBM developerWorks, www.ibm.com/developerworks/rational/library/4518.html#firstmajorhead, 2003 (accessed February 24, 2011).
8.6.3. Testing the Mastership
After you have developed the required schema changes, you should test your work. In a multisite environment the record mastership is usually changed from site to site, so testing is more complex than usual. We assume that you have set up an isolated test environment that includes repositories that are similar to the production environment.
The first step would be to upgrade all clans as discussed in section 8.6.1, “Upgrading the Schema.”
The second step is to run tests in your master site. That is no different from any test case execution. When you change state and change the owner of a record, this record mastership may move to another site.
The third step is to continue the test in the new master site. Make sure that the synchronization occurred and start ClearQuest at the remote site. You can do this by Remote Desktop Connection or by using the ClearQuest Web client of the new master site.
Do not change mastership to your site just for the sake of easy testing from one site. This is not reliable enough testing for a multisite environment.
8.7. ClearQuest Script Debugging
The ClearQuest Designer IDE does not include debug options either in the Windows version or in the Eclipse version, so how can we debug our ClearQuest schema?
• You can instrument the code to output messages with variables values.
• You can use the ClearQuest diagnostics to trace the program.
To output variable values from a VB script use the MsgBox() calls or equivalent. MsgBox() interrupts the execution and requires the developer to manually hit a button in the message to continue the execution.
The other method to output the values of variables is to use the session method OutputDebugString(). The output is viewed with another utility such as DBWin32.exe, which we shall discuss in section 8.7.2, “Employing the OutputDebugString() Method.”
You can also trace various types of messages with IBM Rational ClearQuest Diagnostic Output.
8.7.1. Employing the MsgBox() Function
The MsgBox() function will pop up a message window with the string that you pass as parameter. You can include additional parameters to set the button style and the titles, but for debug purpose a single string parameter is enough.
For example, we want to debug a hook that builds the record URL so that we can include it in the e-mail notifications. To verify that the script is building the URL string correctly, we can use the MsgBox function.
This function can be used as is in a BASIC script; the next line of code demonstrates how to display the value of the field RecordURL. The output is similar to the output in Figure 8.18.
MsgBox "RecordURL:" & GetFieldStringValue("RecordURL")
In Perl scripts the usage is a bit different; we have to use the Win32 library. The following Perl code is equivalent to the BASIC code:
use Win32;
my $url = $entity->GetFieldStringValue("RecordURL");
my $msg = "RecordURL: ";
Win32::MsgBox($msg . $url);
This function call creates the message shown in Figure 8.18.
Figure 8.18. Message box from Perl hook

A few notes about the usage of MsgBox(). This call is not practical for debugging Web client behavior as the message pops up on the Web server machine. You must remember to remove the MsgBox after you have finished debugging. After removing the call, you must test your application again. We have witnessed cases where programs behave differently with and without the MsgBox call, especially in choice list loops. So our suggestion is not to use MsgBox() for debugging. However, the fact that the program stops while the message window is on can be an advantage for debugging,
In organizations that do not use the Web client, the MsgBox() function can be used to interact with users.
8.7.2. Employing the OutputDebugString() Method
The OutputDebugString() is a session method that outputs a string to the debugger. You construct a string and pass it as parameter to the method. It is very similar to what we have shown with the MsgBox() function.
It is important to include a new line at the end of your string; otherwise all messages will appear on one line.
The following is an example of VB code that outputs a field value to the debugger:
url = GetFieldStringValue("RecordURL")
msg = "Defect_Validation >>>> RecordURL: "
session.OutputDebugString msg & url & vbcrlf
Here is the same example in Perl:
my $url = $entity->GetFieldStringValue("RecordURL");
my $msg = "Defect_Validation >>>> RecordURL: ";
$session->OutputDebugString($msg . $url . "
");
We suggest constructing the message in a way that will be clear not only to you but also to others. For example, we can include in the message the hook name and field name that we preset in the message. Also include some special characters to easily differentiate your messages and system messages.
Let’s look at an example. You are required to include in the e-mail notification the URL of the work item. You write a global script to construct the URL. An example of such a script is shown in Listing 8.7.
Listing 8.7. Using OutputDebugString in a Script
sub getEntityURL()
{
# Purpose: Construct the entity URL
# Input :
# Output : return entityURL
# Web server name is stored in dynamic list
# Format : http://{webserver}/cqweb/restapi/
# {db-set}/{userdb}/RECORD/{id}
# &format=HTML&recordType={rectype}&noframes=true
$session = $entity->GetSession();
my $list_values = $session->GetListMembers("WebServer");
my $servername = $$list_values[0];
$session->OutputDebugString("getEntityURL>> >>server= $servername
.
");
my $S_URL = 'http://' . $servername . '/cqweb/restapi';
my ($dbDesc, $dbSet, $dbName, $entID);
$dbDesc = $session->GetSessionDatabase;
$dbSet = $dbDesc->GetDatabaseSetName;
$dbName = $dbDesc->GetDatabaseName;
$entID = $entity->GetDisplayName;
# Get the current entity name
my $entitydefobj = $session->GetEntityDef($entity->GetEntityDefName());
my $objectname = $entitydefobj->GetName();
$session->OutputDebugString("getEntityURL>> >>URL=$S_URL .
");
my $retval = "$S_URL/$dbSet/$dbName/RECORD/" .
"$entID?format=HTML&recordType=$objectname&noframes=true"
return ($retval);
}
While this script is not very complex, the URL format must be accurate and debugging can be very helpful in finding small errors. The following examples are related to this record URL.
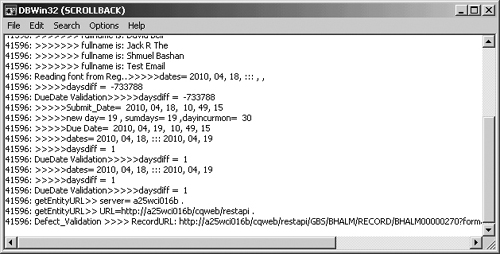
The screen shot in Figure 8.19 shows the DBWin32 window. Note that the last line is an output from the Defect validation hook. The two lines preceding the last one are output from the global script getEntityURL() that we have provided before. Note the special comment that we have used to make it clear from which script the message is sent.
Another advantage of the OutputDebugString() is that you can leave it in the hooks, with no serious performance impact on the application.
Figure 8.19. DBWin32 debug window
In the DBWin32 top menu select Edit > Clear Buffer to clear the window of previous and unnecessary messages.
8.7.3. Debugging with Tracing Information
IBM Rational ClearQuest provides a wealth of tracing information that helps in debugging the application. You can control the debug level and the output.
Controlling the trace diagnostic is done by a set of Windows registry key values. The key is
[HKEY_CURRENT_USERSoftwareRational SoftwareClearQuestDiagnostic]
The important value names are
• Trace: a list of what information to collect
• Report: what additional information to include in the output, such as times, sequence numbers, and so forth
• Output: where to send the data, for example, a file path or debugger
IBM Rational ClearQuest tools read these keys only when they are started. So if you change a key value, restart your ClearQuest application.
There are almost 60 different kinds of traces that you can choose depending on the application area you need to trace. The most common are the following:
• HOOKS: annotates the output with which hook is firing
• THROW: reports exceptions thrown by the ClearQuest core
• API: includes all ClearQuest API calls in the trace, showing their parameters and return values
This is probably the most used diagnostic key. You can set a higher trace level by specifying the level number, such as API = 2.
• SQL: shows all calls made to the database
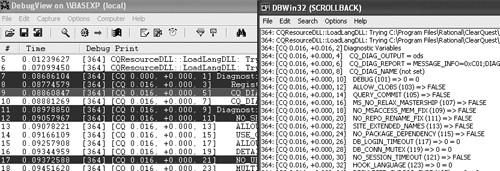
To collect the trace output you have to specify the data in the registry value Output. If you set the value to ODS (OutputDebugString), it can be collected with a suitable monitor utility such as one of the following:
• DBWin32: provided with IBM Rational ClearQuest. The file is located in <InstallDir> Common.
• DebugView: a more capable free utility that can be downloaded from www.sysinternals.com/utilities/debugview.mspx. Output can be filtered and highlighted, and it is timestamped.
• A file name: the path to a file to collect the trace in, for example, "Output"="C:\temp debug\cqtrace.log".
Figure 8.20 is provided as a visual comparison of DebugView and DBWin32.
Figure 8.20. DebugView versus DBWin32
Courtesy Alan Murphy
Here is an example of the registry file that you can import with the registry editor (regedit.exe):
Windows Registry Editor Version 5.00
[HKEY_USERS.DEFAULTSoftwareRational SoftwareClearQuest
Diagnostic]
"Trace"="API;CHARTS;CODEPAGE;DB_CONNECT;DBDESC;EDIT;EMAIL;HOOKS;
LICENSE;MAINS;METADATA_INIT;ODS;PACKAGES;PERL;RESULTSET;SESSION;
SYSTEM_UPGRADE;THREAD;THROW;TIMER;USER_ADMIN;VBASIC;"
"Behavior"=""
"Report"="MESSAGE_INFO=0X1309"
"Output"="ODS"
Debug flags can be set on either platform via environment variables.
On UNIX, debug flags are set with calls like the following:
setenv CQ_DIAG_TRACE Throw;Db_Connect=2;SQL=2;API
setenv CQ_DIAG_REPORT MESSAGE_INFO=0x70B
setenv CQ_DIAG_OUTPUT trace.log
On Windows, debug flags are set with calls like the following:
set CQ_DIAG_TRACE=Throw;Db_Connect=2;SQL=2;API
set CQ_DIAG_REPORT=MESSAGE_INFO=0x70B
set CQ_DIAG_OUTPUT=c: race.log
If your scripting language is VBScript, you can use the Microsoft Script Debugger or the debugger from Visual Studio, Visual InterDev components, which will allow more advanced debugging. You will be able to set breakpoints, to stop and proceed with a single step, and even to set variables values.
To use the Microsoft Script Debugger do the following:
1. Download the Script Debugger engine from Microsoft, “Script Debugger for Windows NT 4.0 and Later,” Microsoft Download Center, www.microsoft.com/downloads/en/details.aspx?FamilyID=2f465be0-94fd-4569-b3c4-dffdf19ccd99&displaylang=en, 2005 (accessed February 24, 2011).
2. Install it.
3. Enable the Debugger.
First enable it in Internet Explorer: Tools > Internet Options > Advanced.
Ensure that the Disable Script debugging options are unchecked.
Enable just-in-time debugging.
4. Run Regedit.exe and edit this key:
HKEY_CURRENT_USERSoftwareMicrosoftWindows ScriptSettings.
Set JITDebug = 1.
8.8. Other Development Considerations
Other development issues to consider are listed below in no specific order. Some may be of high importance to some customers; others may be of minor importance but can make a difference in some situations.
8.8.1. Choosing a Scripting Language
As you know, the current options for scripting are Perl and BASIC. If your organization has both Windows and UNIX operating systems as practitioners’ desktops, there is no option—you must select Perl as your scripting language because BASIC is not supported on Linux and UNIX. Each language provides some advantages and we cannot recommend one over the other. Some examples:
• ActiveX controls are supported only in BASIC.
• The ability to execute hooks stored externally is supported only with Perl.
• BASIC provides more advanced debugging utilities.
8.8.2. When Is a Stateless Record Type Required?
Stateless record types are good as data containers; they are meant to collect data that is logically related in a physical element. When is it recommended to create a stateless record type? If you have more than one field that is related to the same logical unit. An example is Project; if you need only the project name, use a field in the work item. If you need in addition the project manager name, the project description, and the project status (Active, Planned, Obsolete), then a stateless record type for Project is a good choice.
Read more on stateless record types in section 4.3, “Stateless Objects,” in Chapter 4, “The Data.”
8.8.3. Dealing with Records That Have More Than One Field as Unique Key
Unique keys allow you to select one or more fields that define the database primary key. For state-based record types the primary key is the record ID, which is unique and automatically created by the system. For stateless record types the default unique key is the field DBID, but you can change it to a more meaningful and useful field. For example, the unique key for the record type Project would be the Project Name field. A more complex example is a record type like Component. It is possible that two projects will have two different components with the same name. (For example, the component Infrastructure in the project Portal is not the same component as Infrastructure in the project SAP.) In this case we shall have to select a second field as unique key, and because the component is unique in a project, it is correct to select the Component Name as the first unique key and the Project field as the second unique key.
In some cases we even have to select three fields to define the uniqueness of the record. See Figure 4.15 in Chapter 4, “The Data,” for an example of how to define three fields as a combined unique key for the record type Roles.
See section 4.4.4, “More on ClearQuest Unique Key,” in Chapter 4, “The Data,” for detailed information and code examples of how to construct the key, get the entity, and retrieve data from stateless records.
8.8.4. Organizing Global Scripts
The best way to organize global hooks is by subject. For each subject create a global script. In each script you can add several subroutines and functions. In this way the list of global scripts will not be very long, and it will be easier to manage and easier to find hooks during development. Do not move or change scripts that are created by packages.
Figure 8.21 is an example of a global scripts folder in the Schema Repository Explorer.
Figure 8.21. ClearQuest global scripts
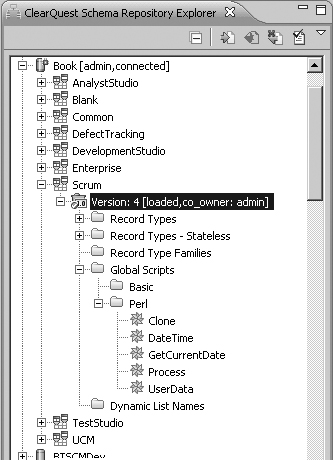
In this example the script UserData contains a few subroutines to deal with user data, such as convertLoginToFull(), getUserGroups(), and similar.
8.8.5. Devising a Naming Convention
When developing the schema, you have to decide on the names of fields, actions and states, subroutines, function names, and variable names.
Decide on the naming convention to use prior to developing the schema. Publish this naming convention to all people involved in the schema development, so they will use the same naming convention. This will prevent errors, increase readability of the code, and increase productivity.
The following is not necessarily the best or our recommendation for naming conventions but is more of an example:
• Fields: The field name should start with a capital character. If the field contains more than one word, each word should start with a capital letter. Examples: Owner, DefectType.
• Actions: The same as for fields, but use active verbs. Examples: Submit, Assign.
• States: The same as for fields, but use passive verbs. Examples: Submitted, Assigned.
• Functions and subroutines: Method names should be verbs, in mixed case with the first letter lowercase and the first letter of each internal word capitalized (Java style). Examples: getParentObject, constructUniqueKey.
• Variables in hooks: There are several types of variables that can be used in hooks:
– Regular variables: The first letter should be capitalized. Examples: ParentID, Role.
– Session variables: These should start with an underscore. Examples: _ParentID, _TargetState.
– Object variables: The first letter should be a lowercase o and the first letter of each internal word should be capitalized. Examples: oSession, oEntity.
8.8.5.1. Reserved Names
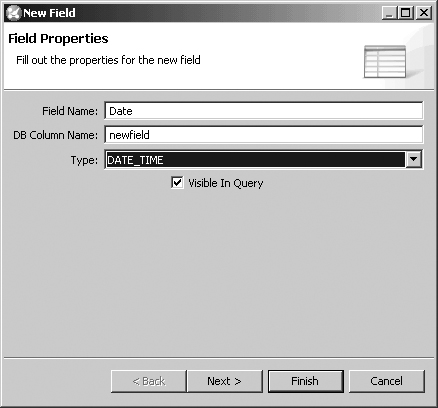
Object names cannot be the same as any reserved keywords for the database. ClearQuest interfaces will change the database column name if it is identical to a reserved word. In Figure 8.22 you can see that the field name is Date but the DB Column Name is “newfield.” Although this is not an error, we do not recommend using reserved words.
Figure 8.22. ClearQuest reserved names used in a field name
See also ClearQuest Help > Developing > Rational ClearQuest schemas > Naming restrictions.
8.8.6. Storing the old_id Field for Future Import
When you import records to ClearQuest, it is wise (even necessary) to store the old ID for reference. Old_id is very useful for validating migrations and for users moving from a legacy system into ClearQuest. If you need to import updates to existing records, you will need a field that contains a unique identifier for each record. For state-based records it is the field ID. But the Clear-Quest Import Tool cannot use it and requires another field. Figure 8.23 shows this in the Import Tool settings wizard.
Figure 8.23. ClearQuest Field Name for importing updates
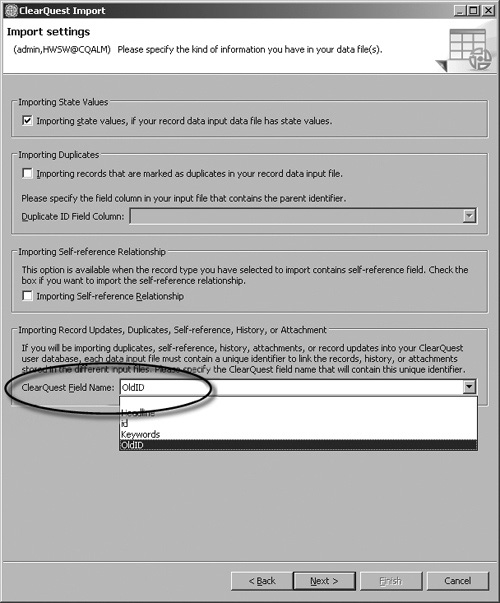
Now you can see that the old_id field pays off. We strongly recommend including this field in any state-based record type. In the Submit action validation hook, insert the record ID to the field old_id using this single line:
$entity->SetFieldValue ( "old_id" , $entity->GetDisplayName );
Do not include this hook in the old_id field Default_Value hook or in the Submit initialization hook. Users can use the utilities Save as Default and Load Default, and this runs after the field default_value and action initialization hooks and will override the value set by the hook.
8.8.7. Dealing with Long Selection Lists
In many situations the user has to select an item from a very long list. This list can be a user name from all the organization’s users, or a part number from a list of thousands of parts. The user’s selection operation tends to be slow and annoying. To improve the operation and the user experience you can do one of the following:
• Cache the list to speed up the operation.
• Break the list into several lists.
• Create a tree-like list.
In the following sections we discuss these options.
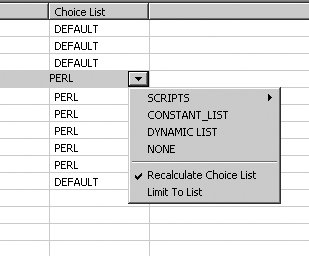
8.8.7.1. Recalculating and Invalidating the Choice List
When the list of one field (for example, Module) depends on the value selected in another field (for example, Product), the list must be refreshed as it is not valid at all times. One easy and somewhat inefficient method of ensuring that the choice list of a field is always valid is to select the Recalculate Choice List property for the field.
By selecting the choice list properties, you can mark the Recalculate Choice List as shown in Figure 8.24.
Figure 8.24. Recalculate Choice List property
Instead, you can write a field Value_Changed hook in one field that invalidates the choice list of another field.
In section 12.2, “User-Defined Fields in ClearQuest,” in Chapter 12, “Sample Applications and Solutions,” we give an example of user-defined fields that are dependent on the project; in this example we used the Recalculate Choice List. In Listing 8.8 we shall use the same example but with the call to InvalidateFieldChoiceList(). This hook shows how to write a Value_Changed hook in the field Project to invalidate the choice list of the dependent fields (UserFieldValue_1 and UserFieldValue_2).
Listing 8.8. Invalidate Dependent Fields
Sub project_ValueChanged(fieldname)
' fieldname As String
' record type name is Defect
' field name is Project
' Start User Code
REM Porpose: Populate the project fields names
REM Clear & Invalidate the dependent fields choices
proj = GetFieldValue(fieldname).GetValue()
If proj <> "Null" Then
name1 = GetFieldValue("Project.FieldName_1").GetValue()
name2 = GetFieldValue("Project.FieldName_2").GetValue()
SetFieldValue "UserFieldName_1", name1
SetFieldValue "UserFieldName_2", name2
End If
SetFieldValue "UserFieldValue_1", ""
SetFieldValue "UserFieldValue_2", ""
InvalidateFieldChoiceList "UserFieldValue_1"
InvalidateFieldChoiceList "UserFieldValue_2"
' End User Code
End Sub
The code in Listing 8.9 is an example of the choice list of the field UserFieldValue_2. (In section 12.2, “User-Defined Fields in ClearQuest,” in Chapter 12, “Sample Applications and Solutions,” you will understand why we gave the field such a name.) We first check the validation status and if valid, we populate the choice list.
Listing 8.9. Checking Field Validation Status
Sub userfieldvalue_2_ChoiceList(fieldname, choices)
' fieldname As String
' choices As Object
' record type name is Defect
' field name is UserFieldValue_2
' Start User Code
Dim oProj
set oProj = GetFieldValue("project")
' Check the field status
If oProj.GetValidationStatus() = AD_KNOWN_VALID AND _
oProj.GetValue() <> "" then
call Populate_list("Project.Field2_list" , choices)
End If
' End User Code
End Sub
We do not recommend using the previous procedure for each and every dependent field choice list. The Recalculate Choice List property is very easy to use and does not complicate the coding. However, if you encounter some performance issues during testing, and you find the root cause to be too many choice lists recalculations, then it is definitely the recommended solution.
8.8.7.2. Caching the List
Long lists that are used often in a session are good candidates for caching; for example, the list of all subscribed users may be used in various fields such as AssignTo, RequestInfoFrom, Subscribers, and so on. To cache lists we use session variables as they are active for an entire session. The code in Listing 8.10 is an example that shows how to populate a list (myList) from a cache (the variable is _SubscribedUsers).
Listing 8.10. Caching Long Lists
oSession = GetSession()
If oSession.HasValue ("_SubscribedUsers") Then
REM – cache exists: populate choice list
myUsers = oSession.NameValue ("_SubscribedUsers")
For Each User in myUsers
myList.AddItem User
Next
Else
REM – cache does NOT exist: call creation subroutine
CreateSubscribedUsers ()
End If
Additional information and examples of how to create and use the session variables are provided in section 8.1.5, “Understanding Session Variables.”
8.8.7.3. Creating Several Lists
In some cases a long list can be broken down into several lists. For example, a field that contains the defect cause or reason could be a very long list. A user having to select from a long list may spend quite some time selecting the right value. Instead you can break this list into several lists by defect category, so the user will first select the category and then the cause. Although two operations are required, the total amount of time is shorter and the user experience is better. If the first field is required only to ease the selection of the second field, consider autoclearing it after the second field is saved and unchecking the Visible in Query property.
The code example in Listing 8.6 is also an example of list modules broken down by products. The implementation in ClearQuest is usually by stateless record types linked with a field of type Reference_List.
8.8.7.4. Creating a Tree-like List
Arranging and displaying the data in a tree-like manner can ease the user selection work, as navigation from an upper level to lower ones is made easy. Unfortunately, ClearQuest does not have such graphic control in the GUI palette. But with some programming we can imitate the tree structure with regular list controls such as drop-down combo boxes. An important limitation of this implementation is that the maximum number of levels in the tree must be defined in Clear-Quest Designer.
Let’s consider an example. To record a defect in an SAP implementation, the component_ ID should be selected. The number of components is greater than 13,000, but luckily SAP components are arranged in a tree manner, so we can provide a practical solution.
Our proposed solution is to create a stateless record type having the following fields:
• ComponentID (short string)
• ComponentDescription (short string)
• ComponentLevel (integer)
In the work item record (defect or other type) add a field for each level in the tree. The user will select the first level, and the selection will populate the values for next level. The user experience is similar to tree navigation. In Figure 8.25 you can see an example of six fields supporting a six-level data tree.
Figure 8.25. Six-level data hierarchy
As the algorithm for building the choice list for each level (except first level) is the same, it is preferable to put the code in a global hook and call it from the choice list hook. The code in Listing 8.11 is an example of the global hook.
Listing 8.11. Multilevel Choice Lists
sub Comp_ChoiceList {
my($fieldname) = @_;
my @choices;
# Purpose: build the choicelist for a tree like data structure
# Input: $fieldname as string scalar
# Output: @choices as string array
# By: SB 25.08.09
# Comments: field name is Comp_level+numlevel
# (ex:Comp_level1,Comp_level2 ...Comp_level9)
# This subroutine deals with levels 2 to 9
# chop last digit from fieldname to get the current level
my $fieldstr = substr( $fieldname, 0 , -1);
my $numlevel = int (chop($fieldname));
my $session = $entity->GetSession();
my $resultvalue, $fld, $val ;
# Get the upper level ID to use in the query filter
my $uplevelname = $ fieldstr . sprintf("%01d", $numlevel-1);
my $uplevel = $entity->GetFieldValue($uplevelname)->GetValue();
($fld, $val) = split ': ' , $uplevel ;
# Build the query:
# select ComponentID, Description
# from SAP_Component_ID
# where Comp_Level=$numlevel AND ComponentID like 'UplevelID'
my $queryDefObj = $session->BuildQuery("SAP_Component_ID");
my @curid = ( $fld . "-%");
my $filterOp = $queryDefObj->BuildFilterOperator(
$CQPerlExt::CQ_BOOL_OP_AND);
my @mytemp = (sprintf("%01d", $numlevel));
$filterOp->BuildFilter("Comp_Level",
$CQPerlExt::CQ_COMP_OP_EQ, @mytemp );
$filterOp->BuildFilter("ComponentID",
$CQPerlExt::CQ_COMP_OP_LIKE, @curid );
$queryDefObj->BuildField("ComponentID");
$queryDefObj->BuildField("Description");
my $resultSetObj = $session->BuildResultSet($queryDefObj);
$resultSetObj->Execute();
while ($resultSetObj->MoveNext() == $CQPerlExt::CQ_SUCCESS) {
$resultvalue = $resultSetObj->GetColumnValue(1) . ": " .
$resultSetObj->GetColumnValue(2);
push(@choices, $resultvalue );
}
return @choices;
}
The code in Listing 8.12 is the calling subroutine from the field comp_level2 choice list hook. Note that the number that was chopped represents the level in the tree; also note that you can pass the field name as is and do the chopping in the global hook. Take this as an exercise. The calling hooks from other levels are the same.
Listing 8.12. Build a Choice List in Each Level
sub comp_level2_ChoiceList {
my($fieldname) = @_;
my @choices;
# $fieldname as string scalar
# @choices as string array
# record type name is RQMDefect
# field name is Comp_level2
@choices = Comp_ChoiceList($fieldname);
return @choices;
}
8.8.8. Updating a Dynamic List
Dynamic lists are lists that are linked to a field’s choice list and can be updated outside the schema. If a field’s choice list requires a periodic update, it is a good idea to hook it to a dynamic list so that you will not have to change the schema (as with a static choice list). Dynamic lists can be updated manually from the ClearQuest native client, by using a utility to import data to the list, or by using the API. We shall discuss each of the three update methods.
8.8.8.1. ClearQuest Client
This operation can be performed from the Windows client or the Eclipse client; each is accessed in a different way:
• Windows: Click Edit > Named Lists and select the list to edit.
• Eclipse: Click Tools >Administration > Edit Named Lists and select the list to edit.
To edit dynamic lists you need Dynamic List Administrator or Superuser privileges.
8.8.8.2. Import Utility
The command-line utility importutil allows importing lists to dynamic lists. The command syntax is
importutil importlist [ -dbset name ] login password
dbname listname "import_file_name"
The import file format is a list of members, with each member in a separate line.
8.8.8.3. Using the API
The ClearQuest API allows you to read dynamic lists and add members to the list. Listing 8.13 is an example that demonstrates how to make use of the API. If you look at the DefectTracking schema, there are two fields, Keywords and Symptoms, that are of type Multiline and connected to choice list control. This allows the user to select more than one element (multi-selection). The user can also type a value in addition to selecting a value. An organization may want to check whether the user entered a value that is not in the original list, and if so, add that value to the dynamic list. The ValueChanged hook in Listing 8.13 does exactly this operation.
Listing 8.13. Updating a List Dynamically
Sub keywords_ValueChanged(fieldname)
' fieldname As String
' record type name is Defect
' field name is Keywords
' Start User Code
Dim session
Dim Keyvals ' current values in the field
Dim Listmembers ' current list in the dynamic choice-list
set session = GetSession()
'Notice: Both the field and the dynamic list are called "keywords"
Listmembers = Session.GetListMembers("keywords")
av = GetFieldValue("keywords").GetValueAsList
if not IsEmpty(av) then
Keyvals = Split(Cstr(av(0)),vbLF)
end if
For Each keyfield in Keyvals
isnew = 1 ' Assume it is new
For Each keymember in Listmembers
if (keyfield = keymember ) then
isnew = 0 ' It is NOT new
exit for
end if
Next
if ( isnew = 1 ) then
' Add item to the dynamic list
Session.AddListMember "Keywords", keyfield
end if
Next
' End User Code
End Sub
Note the BASIC session method that adds the member to the list:
sessionAddListMemberlistName, listMember
8.8.9. Using Hard-Coded Data
Using hard-coded data in hooks may lead to situations where you will have to change the schema to modify the data. The code in Listing 8.14 is an example of data hard-coded in the choice list hook; the list is dependent on the target state, which is hard-coded, and the choice lists for the field Resolution are also hard-coded.
Listing 8.14. Hard-Coded Values in Hooks
sub resolution_ChoiceList {
my($fieldname) = @_;
my @choices;
# record type name is Defect
# field name is Resolution
my $state = $entity->GetFieldValue("State")->GetValue();
push(@choices, "");
if ($state eq "Rejected") {
push(@choices, "Cannot replicate error", "New Requirements",
"Works as defined", "Canceled", "Test Error",
"Out of Scope", "Deferred");
}
elsif ($state eq "Fixed"){
push(@choices, "Data", "Requirements", "Code", "Configuration",
"Build", "Documentation", "Environment", "Security",
"Globalization");
}
return @choices;
}
In this case we can consider the choice list very much as a constant list. So if the list is unlikely to change, it is reasonable to include it in a hook. But if you anticipate that values will be added to the list, you should consider other techniques to store the data. ClearQuest offers you dynamic lists and stateless records for dynamic data.
The simplest way to use a dynamic list is to add it to the choice list in the schema and later add the values using the client. A more advanced way is to read data from the list from a hook using the method GetListMembers().
The code in Listing 8.15 is an example that enhances the ALM schema. We want to automatically assign the next role, and we need to select the primary user from multiple available roles. In the dynamic list we store the application name and the application abbreviation which is part of the role name. This allows us to identify the next role and automate the process.
Listing 8.15. Auto-Assign Next Role
sub GetNextRole()
{
my( $almtype, $role ) = @_;
# Purpose: Build the the ALMRoleTypeLabel from the activity type and
# the current role. The application and the abbreviation are
# stored in a dynamic list
# for example> WebSphere Business Modeler::WBM
# Input : $almtype- Activity type == application name
# $role - Abbreviated role text (ex. Build Deploy Lead == BDL)
# Output: $almrole - ex. BDL-WBM
my $list_values = $session->GetListMembers("ApplicationTypes");
# Verify if the almtype exist in the dynamic list
foreach $Keyval (@$list_values) {
my ($type, $abbrev)= split '::', $Keyval;
if ($almtype eq $type) {
$AppAbbrev = $abbrev;
last;
}
}
# Build the ALMrole name.
my $almrole = $role . "-" . $AppAbbrev ;
return $almrole;
}
Our suggestion is to store data outside the schema, even if it requires some more coding effort. Your investment will be rewarded by lower maintenance and fewer schema changes.
8.9. Web Considerations
If your users will be using the ClearQuest Web client, you should be aware of some differences in its dynamic behavior. Record scripts attached to buttons will not work if not enabled for the Web. Dependent choice lists that need to be recalculated when another field value is changed must specify for Web execution which is the dependent field.
8.9.1. Enable Button Hooks
If a pushbutton control has pre-action or post-action hooks, they must be set to “Enabled for web.” This is defined in the button Properties window, under the Button Hooks tab. See Figure 8.26 for an example of hooks PreClone and PostClone that are enabled for the Web.
Other button types that have hooks associated with them must also be checked to be “Enabled for web” in the same way.
Figure 8.26. Enabling pushbuttons for the Web
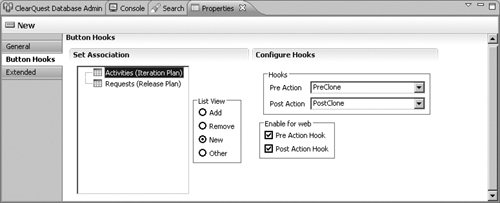
8.9.2. Field Dependency
If a field has a choice list hook and the result of this hook is dependent on the value of another field, then the choice list needs to be recalculated each time the dependent field value is changed. To update the choice list associated with the dependent field, click Recalculate Choice List on the choice list of the field. The contents of the list are recalculated before the list is displayed. But this is not enough for Web clients.
To make a form with dependent fields available in Rational ClearQuest Web:
1. When adding the field to the form, use one of the following form controls for the parent field and its dependent fields: drop-down list box, combo box, drop-down combo box.
2. Open the Properties window of the parent field control (right-click the control field and click Properties). In the property sheet for the control, use the Web Dependent Fields tab to specify the fields that depend on the respective field value.
3. On the Web Dependent Fields tab, select the appropriate child fields from the Available list and click the arrow to add them to the Selected list. Only the parent field of the dependency must be Web-enabled.
Figure 8.27 shows the Properties window of the field Type; the field Owner was selected as dependent. This ensures that when the value in the field Type is changed, the choice list of the field Owner will be recalculated.
Figure 8.27. Setting Web dependency
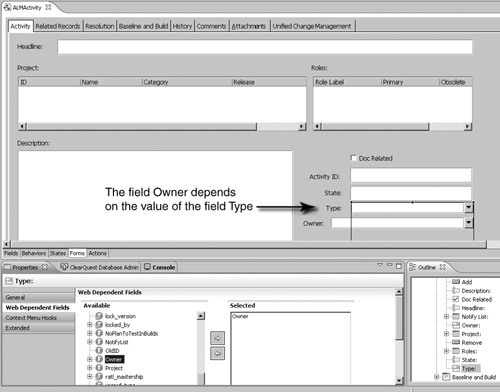
8.9.3. Other Limitations
Another limitation of the Web client is that context menu hooks are not supported on any form control. Also, as previously discussed, message boxes (launched with MsgBox) will not be displayed on the Web client. They will be opened on the Web server. Many open messages may lead to crashing of the Web server.
For more information on the dynamic behavior of ClearQuest Web, see ClearQuest Help > Developing > Developing schemas with the ClearQuest designer > Customizing the ClearQuest Web.
Also see
IBM Rational, “Writing ClearQuest Hooks to Run in ClearQuest Web 7.0.x,” IBM Tech-note, www-01.ibm.com/support/docview.wss?uid=swg21238816, 2008 (accessed February 24, 2011).
8.10. Preparing for the Future
In many cases you get list of requirements and you develop the features based on the priorities of the requirements. When you develop one feature, bear in mind what will be required in the future. You can save yourself a lot of schema development time by considering future development. Here is an example:
You need to develop a new record type, and you have all the detailed definitions for it. You can start working according to the definitions. But if you know that in a future release your organization plans to adopt UCM and integrate to ClearCase, you may prepare your record type for that. The UCM package imposes some constraints, such as having a short field called Headline and a reference field to Users called Owner. If these fields are already in the schema, it saves you the need to create new fields in the future, as well as the significant effort of copying data from the old fields to the new ones. To continue with the same example, the UCM enforces some rules on the state machine; it is therefore best to be ready with a state machine that would be easily enabled for the UCM package.
You should also consider maintenance issues. For example, even if the use case does not require a Modify action in all states, it is advisable to add a Modify action, with Access_Control to the administrator only, to deal with maintenance issues in the future. We also suggest adding a special action that will allow the administrator to modify even fields that are in read-only mode. To do this you can implement the Superuser Modification pattern as described in section 8.1.2.7, “Superuser Modification Pattern.”
Another maintenance suggestion is to create a stateless record type that will store systemwide or project-specific information. This project information will be used by the hooks you develop. Some examples for such data are maximum single attachment size, total attachment size, special notification lists, and physical name of Web server.
8.11. Resources
8.11.1. ClearQuest
King, Amber, “Extending IBM Rational ClearQuest: Dynamic Hook Code and Configurable Field Behavior,” presentation CRMA41 delivered at the Rational Software Developer Conference, Orlando, FL, June 10-14, 2007.
Murphy, Alan, “Superscripts—Advanced IBM Rational ClearQuest Scripting Techniques,” presentation CRMA34 delivered at the Rational Software Developer Conference, Orlando, FL, June 1-5, 2008.
8.11.2. Jazz
Patterson, Scott, “Introduction to Jazz Foundation Application SDK,” https://jazz.net/wiki/bin/view/Main/AppSdkIntroduction, December 1, 2010 (accessed February 22, 2011).
The Jazz Foundation Application provides a set of libraries, samples, tools, and documentation. This reference outlines the current capabilities of the Jazz Foundation Application SDK.
Lemieux, Jean-Michel, “Integrating and Extending Rational Team Concert (the SDK),” https://jazz.net/wiki/bin/view/Main/RtcSdk20, November 19, 2010 (accessed February 22, 2011).
Welcome to the development resources for integrating and extending Team Concert. This information is intended to provide a reference to developers building integrations with Team Concert that require code or scripts to be written.
Streule, Patrick, “Resource Oriented Work Item API 2.0,” https://jazz.net/wiki/bin/view/Main/ ResourceOrientedWorkItemAPIv2, April 13, 2010 (accessed February 22, 2011).
In a nutshell, the API described here allows you to get, create, modify, and query work items and other resources using standard HTTP methods.
Lemieux, Jean-Michel, “Extending Rational Team Concert 2.0,” presentation SDP023 delivered at the Rational Software Developer Conference, Orlando, FL, May 31-June 4, 2009, https://jazz.net/wiki/pub/Main/RtcSdk20/RSDC2009-extendingrtc.ppt (accessed February 22, 2011).
“Extending Team Concert,” http://jazz.net/forums/rss.php?f=2 (accessed February 22, 2011).
8.12. Summary
In this chapter we covered advanced considerations related to the development of ClearQuest and Jazz-based applications. The chapter started with ClearQuest schema development, selecting the base schema to start, and using packages and design patterns. We provided examples of implementing several design patterns in ClearQuest and Jazz. We described how to create and reuse assets of various types such as code, forms, record types, and schema portions.
We continued with a discussion of subjects that are appealing to many large organizations, such as parallel development, storing hook code externally to improve maintainability, and creating and using the test environment to improve system quality.
We briefly discussed some development considerations for customers using ClearQuest MutiSite, such as mastership and testing.
The chapter ended with many development topics, among them creating a tree-like hierarchy, dealing with long lists, updating dynamic lists, and many more. We discussed the general development issues of naming convention, script organization, hard-coding data in hooks, and various development considerations for Web clients.