Chapter 4. The Data
The data accumulated in the work item serves several purposes:
• Information for analysis
Enables an understanding of the reason for and cause of the issue, the requirements for the change, the cost and resources needed, the possible risks, and the release in which the issue will be resolved.
• Information for the solution provider
Enables an understanding of the issue location and the required changes to provide the solution, be it a defect, enhancement, or feature.
• Information for managers
Enables tracking of changes and monitoring the status of issues, for example, meeting target dates, what and who is causing a delay, how to improve the process; data for statistical study regarding solution performance such as time spent at each state (also known as aging analysis), estimated times versus actual times; quality metrics such as defects per component, phase caused versus phase detected; and other information. Read more on metrics in Chapter 9, “Metrics and Governance.”
• Historical information for testers and developers
Enables detection of repeating defects and learning the root cause and best solution or best method to test. Historical data is also used as proof in audits.
To meet these objectives we need the following information:
• Issue description
This is a very detailed description of the issue or the request. In the case of a defect the description should also include steps to reproduce it.
This is information that enables you to identify the element that needs to be changed. For a software defect, the location would be the product (name and version) and the module (name and version). The product tree varies from company to company, but the information that enables you to locate the item/component to be changed must be supplied or detected.
• Environment
In many cases the system configuration is important for reproducing the defect or may even influence the results. The information required for the environment varies depending on the system architecture. Examples are database vendor and version, operating system on client and server, client type, and service packs. There could be many variants to environment data.
• Internal impact
Does the issue affect other components? Is the change required in other releases? A common example is a defect that was found in a recent release but exists in older releases and needs to be fixed. We may need to develop new test cases or modify existing test cases.
• External impacts
External impacts are mainly customers that are affected by the change. We may need to create a patch and distribute it to affected customers; work-arounds should be investigated and if found viable should be communicated to customers. It is important to consider the cost of making the change versus the impact of not making it. Integrations with other systems should also be considered as external impacts.
• Corrective actions
Who will perform the change (team, engineer, etc.)? What is the change to be performed? In many cases the actual change differs from the required change, because constraints can reduce or extend the focus of the change. An explanation and justification for performing the change (why) and a description of the actual change that was performed should be included.
• Times
Included here are the amount of effort such as estimated effort and actual effort to perform the change, and estimated effort and actual effort to test the change. Also various timestamps are captured, such as due dates and actual dates for decision, resolution, and closure.
• Tests
How will the test (an existing test case or a new one to be developed) be performed—with manual testing or automatic scripts? Who will perform the test (team, tester)? If internal impacts and other modules are affected, full regression testing may be required. A description of the test procedure or a link to the test case and the expected test results or a link to the test log results should be included. Important information is the required configuration of the test environment. This can be a link to the test management system that has all this information.
• History
A list of all actions and changes in the work item, including username and date of action, should be included.
• Additional data
It is important to include data that is required in a specific environment, such as an audit trail when regulatory compliance is needed, or hardware or firmware specifications in embedded systems.
• Quality assurance
Organizations that adopt processes like CMMI (Capability Maturity Model Integration) would require additional data for improvement of process and quality. Examples are phase caused, phase detected, repeating defects, estimated effort, actual effort, and where first found.
4.1. Work Item Content
Let’s examine in detail each of the previously mentioned information domains. ClearQuest and Jazz work items store data in fields, so we shall describe what fields are required to meet the information objectives.
4.1.1. Work Item Description
Work item description data consists of fields that contain the description of the change request or issue in different levels of detail. Usually the work item includes a short description used in queries and summary reports and a detailed description used by practitioners.
4.1.1.1. Headline
Headline is a one-line text field that should be carefully considered. It is sometimes called Title or Subject, but the name is not important; the content is. Users of the system should understand by reading this single line what the essence of the required change is. If the change is a defect, the line should describe the problem and possibly the domain or location. It is recommended that the organization define written procedures for the structure of the headline.
Examples of good headlines are
Module administrating does not print list of users.
SQL injection is allowed via search field.
These types of structures enable every reader to focus on the essence of the problem. The organization should not allow “freedom of speech” in this field. Some companies even define a list of known problems for the user to select from. While this may sound excessive, it definitely makes the headline clear.
When working with UCM, there must be a field called Headline with a length of 125 characters.
4.1.1.2. Description
Description is a free-text multiline field where the submitter of the work item describes in detail the required change. Depending on the type of the work item, the field can contain the description of the task. In the case of a defect the submitter should include the steps to reproduce the problem (see also section 4.1.1.3, “Steps to Reproduce”). It is advisable to copy system messages or other output to this field that will help to clarify the problem. If there is a lot of information, it is best to store system messages and logs as attachments and include a note in the description regarding the additional information in the Attachments tab.
For example, in Figure 4.1 the check box indicates that an attachment exists in the Attachments tab. The check box is filled automatically by the Value_Changed hook of the Attachment field. This check box allows the user to see at a glance if there is an attachment without the need to navigate to that tab. Similarly, you can add a check box for other data such as Log_Note or other fields in other tabs. This is somewhat similar to the Jazz Quick Information view but less detailed.
Figure 4.1. Description field with adjacent attachment check box; the checkmark indicates that an attachment exists.

A Perl script to mark the Has_Attachment check box if an attachment has been added is included in section 4.6.1, “HasAttachment.”
4.1.1.3. Steps to Reproduce
The Steps to Reproduce field is related mainly to defects (but may also be relevant to some enhancement requests) and includes a detailed description of step-by-step actions that lead to the reproduction of the problem. In some companies, if the defect was detected during system tests, it is enough to specify the test procedure or the automatic test program, because the test procedure specifies the steps to reproduce the defect. Developers spend a lot of time trying to reproduce issues during the debug and resolution process, so we want to emphasize that a link to the test case or configured test case in the test management system is important information for understanding and reproducing the issue.
We do not exclude the option of capturing a sequence of snapshots or even video of the steps causing the issue and attaching the file to the defect. The trade-off between disk space and clarity should be considered.
4.1.1.4. Test Case
The Test Case field contains the name or the reference to the test case in the test management system. When using ClearQuest-TestManager integration, that information is inserted automatically by Rational TestManager; that is, if a defect is reported during the execution of a test case, the test case name (or reference) data is included in the defect form. That information is used in two ways: to verify coverage, and to obtain traceability to use cases or requirements for QA metrics. It is very important to trace defects to requirements. Chapter 9, “Metrics and Governance,” goes into more detail on metrics.
This information will ease the work of the testers when validating the fix; they will know immediately which test case they should use to verify whether the problem was correctly fixed.
See also section 4.1.8, “Tests.”
The Jazz environment is similar. If a tester working with Rational Quality Manager identified a defect during test case execution and reported it, the test case name will be automatically included in the Summary field and in the Description field of the defect work item. Also in the Links tab, under the Links section, a link is created to the test case. A tester can hit the link and the test case artifact will open in Rational Quality Manager. An example of such a defect is shown in Figure 4.2.
Figure 4.2. Jazz defect with a link to the test case

Table 4.1 provides a list of suggested fields and their types for the work item description. Some of the fields are included in ClearQuest built-in schemas and in the Jazz process templates.
Table 4.1. Suggested Fields for Description Data

4.1.2. Location
Location information describes the physical artifact involved in the change. This is usually a set of fields that include information regarding the component/module where the change is required. A full hierarchy of the element should be defined (product tree). In many software cases we see the following data to define the location: Product Name > Product Version > Module Name > Module Version. In most cases there is a dependency between the elements, so building the system in a dependent manner is recommended so that the user will not be able to select a wrong element. For example, if the product name is selected, then the versions of only that product will appear in the product version list. After the user has selected the product version, only the modules that are part of that product version will appear in the list of modules, and so forth for the whole product tree. In section 4.4, “Object Relations,” we further discuss this matter and provide examples.
In complex products it is likely that more information will be required to identify the location. For products that include both hardware and software, we shall have to designate fields for elements and versions of both disciplines.
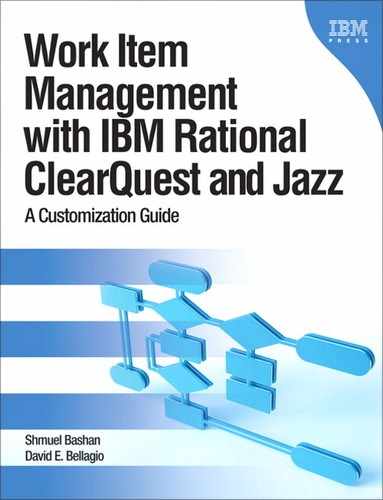
Figure 4.3 shows the ALMCategory record for hardware and software practice. Here a record type was allocated for item identification. Note that the category type is Hardware, the name of the category is TapeDrive, and there are two subcategories for hardware and for software.
Figure 4.3. ALMCategory record in hardware and software disciplines
It is important that this data be easy to maintain, ideally by the project team. Commonly the structure changes and items are added. This information is owned by the project teams, and they should be able to update it easily.
4.1.3. Environment
This field (or set of fields) specifies the environment configuration of the system where the defect was detected. For other types of change the environment is less likely to be interesting. Required information for configuration varies tremendously from one system to another and generally includes information such as
• Operating system (OS)
• OS version
• Service pack (SP) (if relevant in both client and server)
• Other software products (such as database, networking, and licensing)
• Software libraries
In some systems the hardware configuration should also be specified.
In Command and Control Systems, specifying the exact system configuration may be critical to identifying the problem, reproducing it, and fixing it. It is also recommended that the information not be stored in a free-text field but as a set of fields with closed value lists; this allows precise definition and enables easier search. In many cases the development team cannot reproduce a problem that was discovered by the testing team; the problem or defect did not disappear and certainly was not resolved as some optimistic developers tend to assume. The reason for the inability to reproduce, in most cases, is differences in the system configuration between the development environment and the test environment.
As mentioned previously, if there is a dependency between elements, building the system in a dependent manner is recommended so that the user will not be able to select a wrong value; for example, after the OS field is selected, only SPs related to that OS should appear in the list.
As we explained in section 4.1.2, it is important that this data be easy to maintain, ideally by the project team. Commonly the structure changes and items are added. This information is owned by the project teams and they should be able to update it easily.
4.1.4. Internal Impacts
When analyzing the change, we should examine whether it affects other related components, or whether the changes are required only in the current release or in previous releases as well.
4.1.4.1. Impact on Components
During the analysis of the change we must check the impact of the change on other software components; in some cases a change may require fixes in more than one component. In these cases we must consider the complexity and the risk of affecting the related components. A special field of type Reference_List is required to store the list of the related (affected) component.
If there are affected components, the testing team must analyze the influence of the change on existing test cases and test procedures, that is, what tests to run to ensure that the issue was fixed and that errors will be detected, if they still exist, during regression tests.
4.1.4.2. Impact on Releases
In addition, we must examine previous releases and find in what releases the change is required. For example, a defect was detected in release 7.5; we now need to examine whether the defect was generated in release 7.5 or was generated in an earlier release and just detected in this release. So if we find that the defect also exists in releases 7.4 and 7.3, the organization has to decide whether to fix only the next release (i.e., 7.6), or to fix all previous releases having that defect. If only the new release is fixed, some administrative action has to be taken, such as including a note in the release notes document, or even reporting to customers and suggesting upgrading to the new release.
If the defect was not detected in internal tests (reported by customers), the test plan has to be modified so that the defect will be detected in the future during formal tests.
4.1.5. External Impacts
Making a change to an application can also impact actors, documentation, training, and other applications.
4.1.5.1. Users
All of the users of the system may be affected by the change: customers, internal users, partners, and others. The following questions should be considered:
• Do we need to create a patch and distribute it to affected customers?
• Are there viable work-arounds?
• What is the cost of making the change versus the impact of not making it?
• Do we need to modify the training materials and train the users?
So we must include fields to track that information, such as
• Affected_Customers (list of customers)
• Customer_Severity
• Customer_Priority
• Estimated_Cost
This customer data must be populated from the system containing the master customer data. Usually corporations have this data somewhere else, so ClearQuest must be populated periodically to keep in sync.
Not making the change can have negative commercial impact, such as a bad reputation, customer complaints, and unsatisfied users, which can cause a decline in future sales.
In section 6.2.2.3, “Creating Integration with Perl and BASIC API,” in Chapter 6, “Integrations,” we provide a Perl script to update Devices information from an ERP (enterprise resource planning) system. A similar method can be used to update customer data from a CRM (customer relationship management) system.
4.1.5.2. Applications
In some cases external impact is related to external applications that are integrated into the system under test. In such cases we should include the application names or their interfaces to the system.
4.1.5.3. Documentation
A change may affect relevant documentation, especially if the change is an enhancement or a new feature. This may require changes or additions to the user manual or other technical documentation. Software artifacts have documents related to them, and we may want to include fields that define whether a documentation change is required, which documents need to be changed, and what sections should be changed.
We believe that if this is the case, a new work item(s) should be opened (as a referenced child) to manage the process of these additional changes. Because documentation change is handled by the Technical Writer role, it is even more important to create a new work item for this additional change.
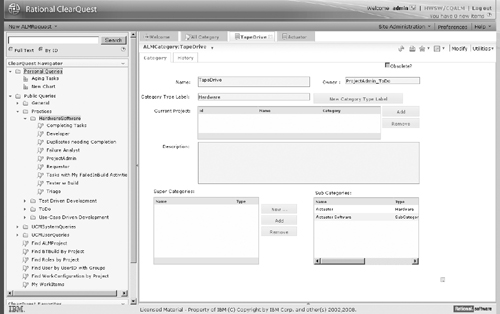
The ClearQuest ALM schema auto-creates child tasks and activities to deal with these different types of activities, providing an advantage that allows defining such a process without modifying the schema. Figure 4.4 shows an ALMTask with three child activities of types Dev, Test, and Doc Assess.
Figure 4.4. ALMActivity of type Doc Assess as child of ALMTask of type Defect
In many cases an application change requires an update in the release notes, which are considered as documentation. Work items often include a special field with notes to be included in the release notes.
4.1.5.4. Training
The considerations for training materials changes are similar to those for documentation, as described in the preceding section. Changes of type New Feature will most likely require additions or modifications to the training materials.
4.1.6. Corrective Actions
When the SCCB decides to approve a change, it has to make some more decisions: who the solution provider is, exactly what they will change, when they will provide it, and what the priority is.
4.1.6.1. Assign the Solution Provider
The first stage is to assign the work item to the solution provider (also known as the assignee or owner). In many cases the work item is assigned to the group leader of the relevant component (this is auto-assigned in the ClearQuest ALM schema based on the ALMRole > Primary setting), and the group leader assigns the work item to the developer to develop the change.
We have seen cases where a work item is assigned to a group, for example, the group developing the component. We believe that this is a mistake and that only one person should be assigned to a work item at a given time. We hear claims like “We do not know now who will do it, but it is certainly someone from the GUI group.” Several assignees mean that nobody is responsible! The answer to this claim is “Let the group leader be the owner of the work item until he or she decides who will actually be the owner.” Another advantage of setting a single owner is the ability to create process automation by auto-assigning a work item by roles.
See section 5.3.2, “Implementing Roles Implicitly,” in Chapter 5, “Roles,” for a more detailed description, and section 5.7.2, “Hook to Automatically Set Responsible Based on Role of Type Single,” in the same chapter for a code example.
When working with ClearCase/UCM there must be a field called Owner; this field contains the user login of the solution provider. (This is created with the ClearQuest package Unified Change Management.)
In section 5.2.1, “Basic Definitions,” in Chapter 5, “Roles,” we discuss the differences between the responsible role and the solution provider role. In some situations having just a single field for the owner does not provide the required governance level.
4.1.6.2. Prioritize
Users usually have more than one task to do at a time. Therefore, when we assign a task to a user, we must set the priority (a field) and possibly set another field with the target date, or target release (which implicitly sets the target date).
4.1.6.3. Document the Solution
The solution provider should carefully document the changes performed. At a minimum the type of change (a field with a choice list such as code, configuration, data, documentation, etc.) should be defined, but it is advisable that the organization have more detailed information on the substance of the change and versions of files that were changed (this information is created automatically when working with a version control system integration such as ClearCase or Rational Team Concert). Also, when relevant, recommendations for testing, documentation that needs to be changed, or the documentation that was changed should be provided.
When working with UCM, the ClearCase Stream, View, and Change-Set (the versions of the changed files) are automatically filled in special fields provided by the integration package.
Table 4.2 provides a list of suggested fields and their types for the work item corrective actions. Some of the fields are included in ClearQuest built-in schemas and in the Jazz process templates.
Table 4.2. Suggested Fields for Corrective Actions Data

4.1.7. Times
Each action timestamp is automatically stored in the database history table. In many cases this is not enough and we shall propose additional fields to improve system quality, ease of use, and the ability to easily create queries and charts.
4.1.7.1. Termination Dates
By termination we mean setting additional fields to store the expected and the actual termination dates of some important actions, for example, the SCCB decision date, the solution provider termination date, the release date, and the closing date. Each organization will set additional (or other) terms according to its needs.
ClearQuest, Rational Team Concert, and Rational Quality Manager enable the organization to set controls on the defined times; here are some examples:
• A query to display all changes for which the target date is almost due
• Sending an e-mail to a manager with details of each change for which the target date has passed
• Generating a periodic lag report
It is possible and recommended that several methods be combined, according to the type of the term. E-mail is recommended if the work item has related items and a delay will affect or cause a delay in the related item too. E-mail is also recommended for high-priority work items. Refer to this article for more information:
Staff, IBM Rational, “External VB Application to Do ‘Something’ with Records Not Touched in 14 Days,” IBM developerWorks, www.ibm.com/developerworks/rational/library/3895.html, 2004 (accessed February 23, 2011).
4.1.7.2. Amount of Effort
The amount of effort performed by practitioners is important information. It is stored in a field of type Integer and can have values measured in hours or days. This is not the duration or the elapsed time, which is the calendar time between two actions, but the actual work time. The duration can be calculated from the history table.
We usually store the amount of effort in two types of work tasks:
• Resolution: The time that the solution provider actually worked on resolving the change or the issue
• Testing: The time that testers worked on testing the solution; for new features the time may include the time to develop a new test case or modify an existing one
Another possible effort time we may want to capture is the analysis time.
Other actions in the process of change are less time-consuming (although they may take much calendar time) and therefore are not very interesting to capture.
This information allows us to calculate the cost of the change and enables us to estimate more accurately similar changes in the future. Moreover, we can evaluate the actual amount of effort versus the estimated amount of effort and improve either the estimation during the analysis phase or the actual development in the solution phase.
Table 4.3 provides a list of suggested fields and their types for the work item times. Some of the fields are included in ClearQuest built-in schemas and in the Jazz process templates.
Table 4.3. Suggested Fields for Times

A few words about field types and time units. As previously mentioned, for ClearQuest you can use either DateTime or Integer, but you still have to decide what the measurement unit will be. In most cases hours is appropriate for work item amount of effort. Days might work, but then the minimum unit of work is one day, because ClearQuest does not support the floating-point field type.
If decimals are required to define the time units, review this article from the IBM developerWorks library:
Muse, William, “Getting around a Decimal,” IBM developerWorks, www.ibm.com/developerworks/rational/library/4498.html, 2003 (accessed February 24, 2011).
In a Jazz work item the user can specify the unit of work, for example, 2 w (for two weeks), 3 d, 20 h, 30 m. The user can also combine units, for example, 2 d 4 h, as seen in Figure 4.5.
Figure 4.5. Jazz work item times: estimated and actual effort, and due date. Note the units of time in Jazz.
![]()
See Chapter 12, “Sample Applications and Solutions,” for an example of an SLA solution that makes extensive use of terms data.
4.1.8. Tests
After the new release is built, a tester should verify whether all required changes were resolved and the quality of each change:
• If the change is a defect that was detected in system tests, it is probable that a test case exists and just has to be executed.
• If the change is a new feature, you will probably need to develop a new test case(s).
• If the change is an enhancement request, you will probably need to modify an existing test case and possibly develop a new one.
The tester should provide the following information:
• The identification of the product tested, that is, build number or product version and other information about it
• Environment configuration of the system under test
• The test case name
• The test script name and type of test script (automatic, manual, etc.)
• Test results (pass, fail, inconclusive, etc.); if the result is not “pass,” additional information is required: failure description and tester opinion, screen shots, system outputs, and other references and supporting evidence of the failure
• Results log (log file name or reference to database log)
Many of these fields are already included in the schema for ClearQuest Test Manager and Rational Quality Manager. In Figure 4.2 you can see that in the Rational Quality Manager defect there are links to the test case and the test log. The links are created automatically when the defect is reported from Rational Quality Manager during test execution.
Another field that is useful in improving the quality of the solution and the change process is the FailCount. In many cases a defect claimed to be fixed fails again and again during tests. High fail count indicates an unhealthy situation that should be mitigated. The reasons can vary from unclear requirements to poor quality of coding.
Table 4.4 provides a list of suggested fields and their types for the work item test data. Some of the fields are included in ClearQuest built-in schemas and in the Jazz process templates.
Table 4.4. Suggested Fields for Test Data

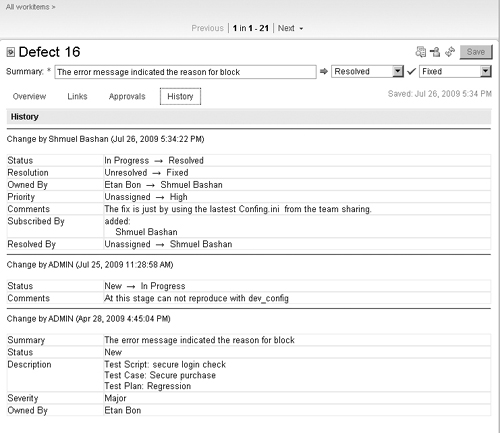
4.1.9. History
We need to save the history of a work item mainly for the following reasons:
• Tracking information for audits; finding out who has performed an action, when the action was performed, and what has been changed
• Generating quality metrics
• Statistical information
ClearQuest aging charts and trend charts are generated from the history table.
For organizations that must comply with regulations, history is not only important, it is a necessity because they must provide proof that actions were performed according to regulations, and in case of exceptions, they must identify the cause and take action to prevent irregularity in the future. ClearQuest automatically stores the following information for each action:
• Time_stamp
• User_Name: login name of the user who performed the action
• Action_Name
• Old_State: the state of the record before the action
• New_State: the state of the record after the action; it may be the same as Old_State if the action was of type Modify
There are additional fields that are not presented to the user when building a query; some of them are
• Entity_Name: the name of the entity that the history record is related to, such as Defect, Project, etc.
• Entity_DBID: the database ID of the record on which the user performed the action
The History stateless record type is read-only and cannot be customized via ClearQuest Designer. Neither the user nor the administrator can change the history data (or the metadata).
You can get history data by querying the history records; you can also get data using ClearQuest API. See the article “Getting the Last Line in the History Tab” for an API BASIC hook example at www.ibm.com/developerworks/rational/library/4319.html.
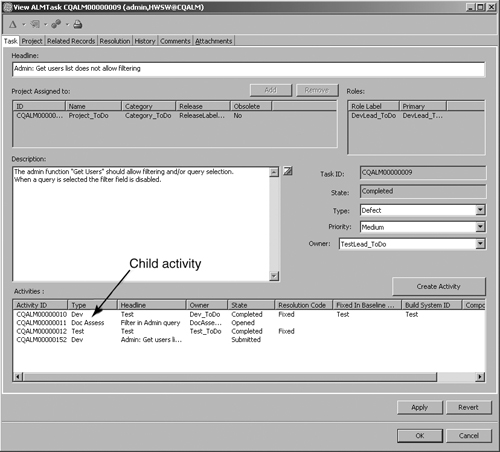
Figure 4.6 shows the History tab of a defect record in the ClearQuest Eclipse client.
Figure 4.6. The ClearQuest History tab
In some cases more detailed history information is required by the organization; for example, what was the value of some fields before and after a change, or who is the user who changed the priority and what was the previous value?
In some medical and financial systems every field change must be tracked for audit reasons. ClearQuest provides a package called Audit Trail that allows you to keep the timestamp, the user login, the action performed, and a list of fields with previous value and current value. The Audit Trail package can be customized; for example, you may want to display changes in some fields but not all of them, as your organization sees fit.
Figure 4.7 shows the Audit Trail tab of a defect record in the ClearQuest Eclipse client.
Figure 4.7. The ClearQuest Audit Trail tab

The Jazz work item automatically stores a full audit trail. Users can see in the History tab who performed an action, at what time, and what data was added or changed.
Figure 4.8 shows the History tab of a defect record in the Jazz work item. Notice how easy it is to detect when a user made a change and the exact change of each field.
Figure 4.8. The Jazz work item History tab
4.1.10. Additional Data
In this category we include information that is required to manage the work item or to support information in other categories.
4.1.10.1. Requestor Information
Although the submitter login and the submit timestamp are stored in the history record, it is common to include these two fields in the change record: Submit_Date (of type DateTime) and Submitter (of type Reference).
Some organizations allow customers to submit changes to the ClearQuest database. Usually each customer gets a ClearQuest login, but several persons in the customer organization may use the same login. You should be able to identify when the requestor is a customer and require him or her to fill in a few more fields to identify the reporting person. There is a package called Customer that adds those fields. We suggest including a hook to change the requiredness of those fields if the requestor is a customer.
Figure 4.9 shows the Customer tab in the EnhancementRequest record.
Figure 4.9. The ClearQuest Customer tab

4.1.10.2. Ownership
As previously explained, the user login name is stored in a field called Owner. In many cases the login name is just a code or initials, which makes it hard for the assigner to identify the person. In these cases it is recommended that the user’s full name be used. But we also need the field Owner (of type Reference) because it is mandatory for UCM and important in other cases, for example, to easily get the owner e-mail in a hook, to make the login name selectable in a query filter, to pop up the linked record form to see the user details. A simple solution is to have two fields: Owner_Fullname (of type Short String) and Owner (of type Reference). A Choice_List hook attached to Owner_Fullname will display of course the User.Full_Name values, and a Value_Change hook will insert the correct value in the Owner field.
In section 4.6.3, “Convert Full_Name to Login_Name,” see hooks in Perl and VBA for how to convert Full_Name to Login_Name.
Another example is “User Fullname Drop-down List,” which explains how to keep the Login_ID in a field while allowing the user to select a human-readable name; the article can be found at www.ibm.com/developerworks/rational/library/4369.html.
In Chapter 5, “Roles,” there is an additional discussion of ownership. We propose using two fields: Responsible and Owner. Having two fields helps differentiate the current owner and the solution provider.
4.1.10.3. Attachments
Attachments are files that contain information that cannot be displayed in a regular field, for example, images, colored or formatted text, or very large files that require a special viewer. Screen shots, system logs, and files created by the application are good candidates to be stored as attachments. Attachments may be huge, so it is recommended that large text files be compressed; images should be stored in compressed formats like .jpg or .gif rather than .BMP.
Many large attachments can rapidly increase the database size and cause degradation in performance. You can add a hook to limit the size of the attachment. The hook checks the size of the file, and if it exceeds a given size, the Commit action will fail with the appropriate error message. See the article “Restricting Attachment Size” with a VBA code example at www.ibm.com/developerworks/rational/library/3883.html.
A Perl example is provided in section 4.6.2, “Limit Attachment Size (Perl).”
Some companies limit not only the single attachment size but also the total size of all attachments per work item. For example, a single attachment size limit can be 3MB and the total size limit of attachments per record can be 5MB.
To use attachments in ClearQuest you can install the Attachment package to your schema, or do it manually in the following way. In ClearQuest Designer define a new field of type Attachment_List and add the field to a Form tab; there is a special control for attachments.
Each field of type Attachment_List may contain several attachment files. You may create several fields to store files for various purposes, for example, Test attachments, Development attachments, Customer attachments, or Internal attachments. Notice that the user can include a comment on each attachment he or she adds. We believe that it is better to include comments that explain the type and reason for the attachment because the file name may not be descriptive enough, for example, “Testing screen dump with the error message” or “Installation instructions.”
Figure 4.10 shows the Attachments tab of a defect record in ClearQuest Web client.
Figure 4.10. The ClearQuest Attachments tab

In the ClearQuest Windows client the attachment list can be displayed in several ways. The comment (or the file description) is shown only in the Details mode, similarly to the way it is displayed in the Web client in Figure 4.10. To change the view mode, right-click on the attachment area (field control) and select View > Details, as shown in Figure 4.11.
Figure 4.11. Attachments field: setting the View format to Details in CQ Windows client

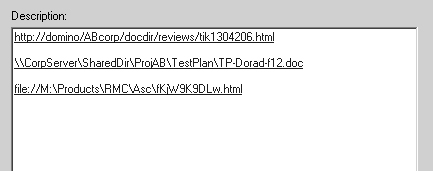
Another way to deal with attachments is by creating a link to the attachment file. The file is not stored in the ClearQuest database but in the file system. To create a link to a file the user just writes in any multiline field a line in URL or UNC format, for example:
\server_nameshared_directorydirectory_nameFile_Name
H:DevDataBashanideasdialogue_control.doc
Figure 4.12 displays some links in the Description field.
Figure 4.12. Links to external files
There is an important difference between the two methods.
• In the first method (database attachments) the files are stored in the database and users can access them only via ClearQuest. Also, it is not possible to change the original attachment file, so the data is trustable as evidence.
• In the second method (external attachments) the files are stored in the file system and can be changed without leaving any information about the change in ClearQuest, but there are some advantages such as the ability to version the file, the ability to access the file without the need to enter ClearQuest, and the fact that there are no limits on the size.
Attachments 2.0 is a new ClearQuest package that upgrades the Attachments 1.0 package to provide external storage of CQ attachments in off-site locations such as FTP servers.
Attachments 2.0 uses the existing Attachments 1.0 Add button as usual when the CQ record is being edited and changed, temporarily displays the new attachment(s) in the usual Attachments 1.0 window, then, when the record is saved, moves it to the external storage site. The attachment is removed from the CQ display and a URL link to the attachment’s location is stored in a field in the CQ Attachments tab.
Another useful use of attachments is the ability to take a screen shot and insert it right in the work item as an attachment. This is especially important for testers who want to include the screen showing an error, both for clarity and in case the defect is not reproduced in the development environment. A user can capture a screen or a window, save it to a file, and then add the file as an attachment to ClearQuest or to the Jazz work item.
But there is an easier way, when using an Eclipse client either for Rational Team Concert or Rational Quality Manager:
1. To take a screen capture and attach it, click Add Screenshot.
Figure 4.13 shows the Attachments section in the Rational Team Concert Eclipse client. Note the Add file... button and the Add Screenshot... button.
Figure 4.13. Jazz work item attachment; note the Add Screenshot... button

2. Click the Add Screenshot... button; the screen shot tool will pop up.
3. Position the frame on the area that you want to capture. Use the arrows on the sides of the frame to expand or reduce its size to fit the area.
4. Click the camera icon. You can use the pen, oval, and rectangle icons to highlight specific areas of the screen capture.
5. Specify the graphics format in which to save the image.
6. Under Attach to: click Work Item <ID>. This is used to enter the screen shot file as an attachment to the current work item that you edit, or to another work item.
7. In Figure 4.14 you can see that the current work item is 13. Click it to add the .PNG attachment to this work item.
Figure 4.14. Jazz work item Add Screenshot... tool

Screen shot attachments in the RTC Web client are available only in RTC version 3.0.
When using a ClearQuest Windows client, a ClearQuest hook allows you to add the clipboard content—for example, an application window or an error message window—as a .jpg image to the Attachments section of a defect.
For the hook code and instructions see the article “Save Clipboard Content as .jpg Image Attachment” at www.ibm.com/developerworks/rational/library/3927.html.
This solution makes use of the ActiveX control and will not work on the ClearQuest Web client.
4.1.11. Quality Assurance
Organizations that adopt processes like CMMI would require additional data for improvement of process and quality. For example, capturing “phase caused” and “phase detected” can indicate how well the organization is doing in testing in all phases. If most defects are detected in the same phase, the organization’s testing is good.
Another example is capturing “estimated effort” and “actual effort,” which can allow us to improve during the analysis phase (wrong estimation) or indicate flaws in the change process (excessive fix effort).
Repeating defects are defects that were discovered in previous versions, were fixed, and appear in newer versions. These can be measured by counting the number of times the same work item returns to the testing state.
Capturing “where first found” is useful for validating testing and finding areas where improvement may be needed. It is important because it indicates problems found internally even if customers found them eventually.
4.2. State-Based Objects
State-based objects are in most cases the work items that contain the data discussed in this chapter. We do not recommend using stateful record types as data containers; for that purpose use stateless record types, described in section 4.3, “Stateless Objects.” There are situations where a data container seems to have a status, like open/close, active/obsolete, etc. Consider the workflow rules to decide whether the object is a data container or a work item with real workflow. If it is a data container, use a stateless record type, and add a field with a check box or radio button on the form to set the status of the record.
An example of a state-based object used as a data container is in the ClearQuest ALM schema; the ALMProject record type is a state-based record.
Stateless objects are powerful for presenting data and creating hierarchy relations, bills of materials, and more. These types of objects do not exist in Jazz. We can create Jazz work items as replacements for stateless objects (similar to the ALMProject previously mentioned). In the current Jazz version they do not have the same power as in ClearQuest because the referencing mechanism is not the same, but they can be advantageous over using fields with no container.
4.3. Stateless Objects
Stateless objects are meant to collect data that is logically related in a physical element. The object is defined in ClearQuest as a stateless record type.
What advantage do we gain by collecting the information in these objects?
• The data model becomes simpler.
• We can improve the users’ experience by lowering the number of fields that they have to fill in.
• We can reduce errors by automating operations that are related to the same object.
• We can improve the user experience and reduce errors by generating choice lists with correct items only.
• We can improve response time and flexibility because the responsibility for generating the stateless records can be assigned to a member or members of the group dealing with the object, as opposed to being the ClearQuest administrator’s responsibility. For example, instead of having the project manager request that the ClearQuest admin open a new project record, the project manager can generate the new project record and later modify it as necessary without the mediation of the ClearQuest admin.
• A project object may contain the following fields: Name, Leader, Manager, QA_Manager, Team_Members, Current_Release, and Components.
• A component object may contain the following fields: Name, Leader, Team_Members, In_Project, and Modules.
• A module object may contain the following fields: Name, Leader, Team_Members, and In_Component.
• A customer object may contain the following fields: Name, Location, Contacts, Products_Used, and Licenses.
It is recommended that the same field names be used in all objects; for example, instead of Project_Name use Name, instead of Project_Members use Team_Members. Doing so will make the scripts you are coding simpler, more readable, and reusable.
For example, it is easier to code one hook GetMembers() that will operate on all objects having the field Members. See section 8.1.3, “Employing Reusable Assets,” in Chapter 8, “Development,” for more information and code examples.
ClearQuest stateless record types contain the following elements:
• Fields of various types
Some of the fields are auto-defined and are read-only (Version, Record_Type, etc.). You can define more fields of any predefined type as required.
• Actions of any type except Change_State
The actions Submit and Import are created automatically.
• Field behaviors
Field behaviors define a field’s requiredness (Mandatory, Optional, and Read-Only).
• Unique key
The unique key allows you to select one or more fields that define the database primary key. For state-based record types the primary key is the record ID, which is unique and automatically created; here you will have to define it. Extra care should be taken, and a lot of thinking is required when selecting the unique key or keys. Using the previous examples, for the Project record type it is quite clear that the Name field is a good choice for the unique key. Now what about the Component record type? Is it possible that we shall have in two projects a different component with the same name? In many cases the answer is yes; that means that selecting just the field Name as the unique key of a component is not enough. In this case we shall have to select a second field as a unique key, and because the component is unique in a project it is correct to select the In_Project field as the second unique key.
In some cases it is necessary to select three fields to define the uniqueness of a record. Figure 4.15 shows how to define three fields as a combined unique key for the record type Roles.
Figure 4.15. Unique key constructed of three fields

Note that ClearQuest always creates a field called DBID for every newly created record; this field is unique and may be used as the unique key, although we do not recommend it because this field has no meaning. See section 4.4.4, “More on ClearQuest Unique Key,” for additional information on referencing record types with multiple unique keys and for an explanation of how to replace a field in a unique key.
• Form
A form displays the fields and interacts with the user.
4.4. Object Relations
A very important feature of a change management system is the ability to create relationships between objects. In ClearQuest you can create relationships between record types, and in Jazz you can link artifacts such as work items and service providers. In section 4.4.5, “Jazz Links,” we discuss the Jazz links.
In ClearQuest there are two types of relationships:
• Single or Reference
• Multiple or Reference_List
4.4.1. ClearQuest Single Relationship
In this relationship, one record is referenced from another record. The relationship is realized by a field of type Reference. Note that the reference points to the unique key of the referenced object. Some examples of such a relationship are the field Owner, which is a reference to the Users record type, and the field Project, which is a reference to the Project record type. As you can see, any object can be referenced: state-based, stateless, built-in, or user-defined.
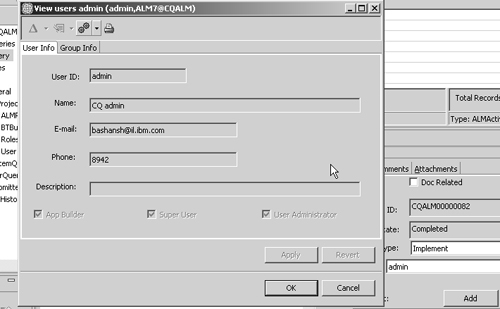
The control used for this field is usually a drop-down combo or list box. A nice feature is that users can right-click on the field and select View Details; Figure 4.16 shows how this is done with the field Owner.
Figure 4.16. View the details of the referenced record

This will pop up the referenced object form—in this example the Users record whose unique key (field Login_Name) is “admin”—so the user can see the values of all the fields of this specific record and even perform actions.
Figure 4.17 shows the Users record that was popped up after the selection. Note that this operation is not available in the ClearQuest Web client.
Figure 4.17. Referenced record details in pop-up window
4.4.2. ClearQuest Multiple Relationship
In this relationship, several records are referenced from one record. The relationship is realized by a field of type Reference_List. A reference list can point to any record type, either of the same type (defect to defect) or a different type (feature to activity), from state-based to stateless and vice versa. Some examples of such relationships in the Defect record type are the field Related_Defects, which lists references to the Defect record type, and the field Activities, which lists references to the Activity record type.
There is a special graphic control for a field of type Reference_List. This control has a kind of table format, and it allows the designer to select the fields (columns) to be displayed to the user. See Figure 4.22 and the explanation in section 4.4.3, “Back Reference,” for how to set the columns.
In Figure 4.18, a state-based record type called Task is referencing a stateless record type called Config_Item whose fields—Name, Platform, Promotion_ID, DB2_info, CI_Action, and CC_Component—are displayed in the control.
Figure 4.18. Reference list graphic control example

The control also includes three buttons, Add, Remove, and New, which are related to the same field.
• Add
Add enables the user to include existing records as referenced records (children). To add objects, a wizard allows the user to run a query, and the user can select from the result set one or more records to be included in the list of referenced objects.
• Remove
Remove allows the user to select an object from the list and remove it from the list, thus disconnecting the referencing. Note that Remove does not delete the object.
Pressing New opens the Submit form, allowing the user to fill out the form. When the user presses OK, the record is committed to the database and is referenced from the parent record.
Each button has pre-action and post-action hooks that enable the designer to perform advanced features, such as cloning a child from a parent or copying some fields from the base record to the referenced one. Another powerful usage of these hooks is to set global variables (in the pre-action hook) and clear them in the post-action hook. The global variables are used to pass information between the parent and the “future” child, that is, before the child record is committed to the database and the reference link between the parent and the child records is established.
Figure 4.19 shows how to define the PreAction Hook of the Add button of the Parent/Child control.
Figure 4.19. Button properties and action hooks

The List View and the button controls should have the same Associated Component. This assures that pre-/post-action hooks are related to the correct list. If there are multiple parent/child controls on a single form, and in the case that you have added buttons, extra care should be taken in relating the buttons to the correct component.
In ClearQuest Eclipse Designer the association selection is done by field label and not by arbitrary name such as List1, List2, and so on.
4.4.3. Back Reference
The Back Reference field creates a link from the referenced record back to the parent record. This field is a read-only field (which means that hooks cannot be added to that field). The Back Reference field is always of type Reference_List, whether the pointing field is of type Reference or Reference_List.
Also for this field there is a special child-parent control called List View, which is similar to the parent-child control but does not have the buttons Add, Remove, and New. It means that the user cannot link a parent to a child, but only a child to a parent. Usually there is no need to link a parent from the child, but in the rare cases where this feature is required, we hereby provide an advanced scripting solution. See the script and explanation in section 4.6.4, “Create Parent from Child.”
This field is not created as a usual field with Add Field. When you create the Reference or Reference_List field, type the name of the Back Reference field in the dialog.
For example, we can see in Figure 4.20 the Properties window of the field Tasks of the ALMRequest record type. This field references the record type ALMTask. When you type the name of the Back Reference field Request, a read-only field of type Reference_List will be created in the ALMTask record type. Its name will be Request and it will point to the ALMRequest record type.
Figure 4.20. Reference List field with Back Reference and field properties window in ClearQuest Eclipse Designer

There are two special controls for multiple relations: the Parent/Child control for the Reference_List field and the List View for the Back_Reference_List field. In Figure 4.21 you can see the two controls. Note that usually the Parent/Child control has three buttons (New, Add, and Remove). The schema designer can remove a button or add a button. For example, if we want to create relationships only from existing records, we can remove the button New. This is demonstrated at the top of Figure 4.21 for the field Request. In other cases the schema designer can add a fourth button; for example, we may want to have two types of New buttons, one to submit a blank child record and the second to submit a clone child record that inherits some of the parent fields. There are many cloning techniques; we explain one technique in section 4.6.4, “Create Parent from Child,” and you can read about others in IBM developerWorks.
Figure 4.21. Reference and Back Reference List graphic controls

Figure 4.21 shows a form with three field controls. The two Parent/Child controls have buttons associated with them. The association is set in the Properties view: right-click on the button and select > Show Properties View. Click on the Button Hooks tab. This tab is shown at the bottom of Figure 4.21; note that the button type is set to New and it is associated with the field control labeled Related Tasks. Also note the hooks that are associated with the button; this is explained in section 4.6.4, “Create Parent from Child,” and a hook example is provided in Listing 4.5.
Note that the columns in each control are not the same. The designer can customize the control by selecting which columns will be displayed, what the title is (by default the title is equal to the field name), and what the initial column width is. Figure 4.22 shows the same ClearQuest Designer forms. To set the columns, select the field and select the Columns tab. Click the New button and select the field from the Selected Source Field list. Arrange the fields with the up/down buttons. In the Selected Column’s Attributes section you can change the label and set the initial width. This is very important, as it will help the user to see important information without changing the width. Also note that the column label for the field was changed to Task ID; in many cases accurate labeling can prevent confusion.
Figure 4.22. Setting the columns of the List View graphic control

When the user adds a record to the list, the column values in this field are automatically filled. The user can right-click on a record in the list and select Open Record; the referenced record form will open and the user will be able to perform any allowed action.
Back Reference is powerful in two aspects:
• It allows the user to see the relationship from both directions, and not only see the relationship but also access the related record. When a line (a record) in the Reference or Back Reference control is double-clicked, the parent record pops up, allowing you to view all the details in the tabs and even perform an action.
• It is easier to query the records when you have the Back Reference field, especially if the records are of different types. As you know, the query wizard requests a record type before building the filter and the display, so when you have a Back Reference field you can select either the parent type or the child type, whichever is more convenient and appropriate.
But back referencing also has a performance drawback. When displayed, each record retrieves from the database all the data of the records referenced (not just the fields displayed in the control). So it is recommended that reference lists be used with some caution and that the trade-offs be considered.
Another important issue is the direction of the reference. Let us take an example of a product that contains several components. Also, let’s assume that we need only a Reference_List connection without a Back Reference List connection. We should now ask ourselves, Do we create the Reference_List field in the Product record type or in the Component record type? To answer this question we suggest you examine the user scenario. How will the users work? Will they create a component and immediately relate it to the product that contains it, or will they create a component and in a later stage edit a product and associate all the components to that product? Another use case to consider is Open New Product: if the reference list field is in the Product record type, it will be easy to associate all the components with that record. If the Reference List field is in the Component record type, it will be harder to associate all the components with that record. This is opposed to the other scenario: run a query to identify all components, mark them all in the result set view, perform the Modify operation, and select the new product. (In the Web client it is slightly different; mark the records in the result set view, right-click, and select Multi-Record Update > Modify.)
In most cases each product will contain several components, and each component may be associated with several products, so to realize this model we also need a Back Reference field. But once again we have to ask ourselves in what direction to set referencing, that is, in which record type to create the Reference_List field. The considerations are very similar to the use cases we have previously described.
Another issue to consider when selecting the direction is who is doing the reference operation, the administrator or the user? The administrator is usually doing a bulk operation; thus up-down reference is suggested. A user is usually doing a single operation, so bottom-up reference is suggested.
Think how the users will work and what will make their work easier and faster. Usability is a more important factor than the amount of scripting or maintenance.
4.4.4. More on ClearQuest Unique Key
The usage of reference fields that point to the unique key(s) of another stateless record type can be complex in some situations. How is the key displayed when multiple fields are defined as a unique key? How can we retrieve information from the database in such cases? What is the procedure to replace a key when the schema changes?
In the following sections we shall answer these questions.
4.4.4.1. Referencing
We explained before that a field of type Reference points to the unique key of the referenced object. If the field Owner is a reference to the Users record, the value of the field login_name (which is the unique key of the Users record type) will be displayed in the field Owner. See the Owner field in Figure 4.1 for an example.
If the referenced object has more than one key, all the keys will be displayed in that field. In the following example, the Product record type has two fields as a unique key: Name and InProject; see the special icon for the unique key field of the ClearQuest Eclipse Designer in Figure 4.23. The Defect record type has a field of type Reference that points to the Product record type. The form control for this field is a drop-down list box. When the user selects this control, he or she will see double values in the list: Project Name Product Name.
Figure 4.23. Referencing a record with two unique keys

Sometimes this feature is good, but at other times you want the user to first select the project and then select the product. To do this you must replace the field of type Reference with two fields of type Short_String. You also have to write a choice list hook for each field to display the correct values.
Your choice list hook should implement the following query:
"select productname from Products where InProject = "myProject"
The choice list hooks are simple and largely discussed in IBM DeveloperWorks ClearQuest Hook Index as a field dependency. Several examples of such choice list hooks are provided in the following link: www.ibm.com/developerworks/rational/library/4517.html.
4.4.4.2. Access Records
To access a record that has multiple fields in a unique key from a hook, we have to construct the unique key. A common method to get record data is by calling the session method
GetEntity(entity def_name, display_name)
If we use the same example, the entity def_name is Product and the display_name is a string that is constructed from the values of the two fields of the unique key with a space between them. In a hook, constructing the display_name is done like this:
In BASIC:
GetFieldStringValue("ProjectName") & " " & _
GetFieldStringValue("ProductName")
In Perl:
$entity->GetFieldStringValue("ProjectName") . " " .
$entity->EntityGetFieldStringValue("ProductName");
4.4.4.3. Replacing a Unique Key
We have witnessed some cases where the schema data model was changed and consequently one of the fields creating the unique key had to be replaced. This is a multistep operation and requires caution. Fortunately, ClearQuest protects you from making errors that cannot be recovered. Do the following:
1. Create a new field.
2. Add the field to the record form and check in the schema. (ClearQuest does not allow you to add a field and make it unique in the same operation.)
3. Upgrade all databases.
4. Check out the schema, open the Unique Key dialog, and add the new field by marking the check box. Now you have three fields as a unique key!
5. Check in and upgrade the databases.
6. Run a query to display all records with all the fields that construct the new unique key.
7. Carefully verify if there are records that will not be unique by replacing the unique keys, manually modifying them as required. If there are many records, a manual operation may take a long time, and you should consider creating an external script to add data.
8. Check out the schema, open the Unique Key dialog, and remove the unnecessary field by clearing the check box.
9. Test, check in, and upgrade the production database.
As you can see, the procedure to replace a unique key is quite complex; it requires changes in the schema and in the users database. We suggest that you carefully examine the requirements before defining the unique keys.
4.4.5. Jazz Links
Jazz links represent relationships between the project area and service providers such as project areas on other servers or even links to a ClearQuest service provider. Link types reflect the nature of the service that a provider makes available to the project. Establishing links for the project area enables linking between artifacts in this project area and artifacts made accessible by the service provider.
In a work item you can create links of the following types to other work items or artifacts like the SubVersion or Rational Team Concert artifacts:
• Blocks
• Children
• Depends On
• Duplicate Of
• Duplicated By
• Parent
• Related
• Related Artifact
• SVN Revisions
Figure 4.24 demonstrates how to link child work item(s) to a defect work item. In the same way you can link other work items with the available linking types.
Figure 4.24. Link types in a Jazz work item

4.5. Data Representation
Data representation is the way the data stored in the database is presented to the user, and how the user can interact with it. In the following sections we shall discuss some design considerations to improve the user experience and ease of use, and describe how to represent the data in ClearQuest forms and in Jazz work items.
4.5.1. ClearQuest Data Representation
The data is presented to the ClearQuest user in forms. There are only two types of forms: the Submit form (used during the action of type Submit) and a Record form used in all other action types. Each form includes tabs. In each tab you put graphic controls that are associated with data fields. The ClearQuest control palette includes various controls. Each field type has a default control, but you can override it when necessary.
In ClearQuest Designer the fields are dragged and dropped from the Record Field View to the tab, positioned, resized, and aligned to other fields. Alternatively, select a control from the palette, position it on the tab, and set the field source in the Field Properties view.
A lot of attention is required when designing the forms. Users do not like to navigate back and forth, wasting time to enter data or read information.
An important design factor is the physical size of the form. Constantly scrolling up and down or right and left does not improve the user experience. To decide what the physical size of the form should be, investigate the users’ screen resolution and design the forms to fit that resolution. Usually it would be 1024 × 768, but it may be higher.
Another important factor is the client type. The Windows and Eclipse clients look almost identical to the ClearQuest Designer forms, but the Web client is slightly different, so check that you get what you want in all client types and in various resolutions. The ratio between the length and width of the form should be about 4:3; this ratio is optimal to view all the elements of ClearQuest (workspace, result set, record form) without the need to scroll a lot. The ALM schema forms were designed to fit a screen resolution of 1280 × 1024.
The tab organization is also very important. Try to position all the fields that a specific role needs during an action in a single tab. It is not an easy task and it is not always achievable. It may require some time to put the same field on two tabs; that is OK because it serves a good purpose—user efficiency and satisfaction. The order of the fields in a tab is also very important; try to organize the fields in a logical manner. If a user has to select the product name and then the product version, put the version field below or to the right of the name field (assuming the form language direction is left to right).
Fields that are related to one another can be grouped in a box. Position the fields on the form, in the order explained above, and if possible set their size to be equal, align them to the top and then to the left (or to the right, but be consistent). Now select the group box object from the control palette and surround the fields with the box. The last thing is to enter the label of the group box in the group box property sheet. When using the CQ Eclipse Designer, position the group control first and then position the fields on the group control.
The screen shot in Figure 4.25 shows how three fields and a button of the Project record type of the ALM schema were grouped together.
Figure 4.25. Grouping fields to improve presentation

For power users who use the tab key for navigation instead of the mouse, ClearQuest allows setting the tab order. In the ClearQuest Designer (Windows version) top menu select Form Layout > Set Tab Order and click the fields in the order you find correct. The fields are numbered so you can see and verify the order. When using the CQ Eclipse Designer the tab order is defined in the Field Properties view, Extended tab.
To learn more about creating forms and form controls see ClearQuest help > Developing > Developing schemas with the ClearQuest Designer > Working with Forms.
4.5.2. Jazz Work Items Data Representation
With Rational Team Concert the terms are a bit different. The form is called presentation and only one presentation can be linked to a work item type. You can define new tabs and define sections within each tab. This is a very easy way to physically arrange fields with logical similarity. User-defined fields (called custom attributes in Jazz) will default to a tab called Custom. This can be overriden so you can put your custom fields on any tab. Although the tab organization is somewhat limited, it has some advantages such as ease of use and nifty visualization.
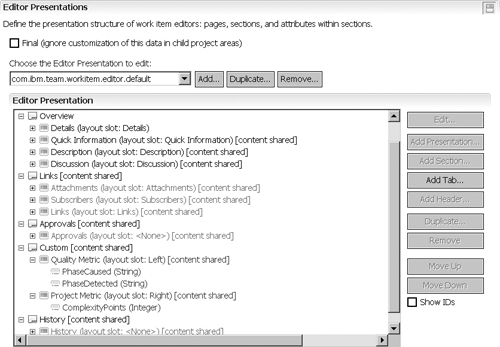
Figure 4.26 shows the Jazz editor presentations. Note the hierarchy of the presentations:
• Tabs: These are Overview, Links, Approvals, Custom, History.
• Sections: Some tabs have a single section (History and Approval); others have two, three, or four sections. In the Custom tab there are two sections: Quality Metric and Project Metric.
• Presentations (field controls to present attributes): In the Quality Metric section, there are two presentations: PhaseCaused and PhaseDetected.
The designer uses the button on the right side to add a new tab, section, and presentation. The presentation can be moved up and down with the relevant buttons.
Figure 4.26. Rational Team Concert Editor presentation
The user sees the sections and attributes presentations on the Custom tab as shown in Figure 4.27.
Figure 4.27. Rational Team Concert: client view of custom attributes

In Jazz the editor presentation is not part of the work item type (as in ClearQuest). You have to bind the editor presentation ID to the work item type in the Editor Presentation Binding window. One editor presentation ID can be bound to several work items. Jazz provides some built-in editors that you can use, duplicate, and further customize.
To learn more about creating presentations in Jazz work items, see Rational Team Concert Documentation > Managing change and releases > Tracking work items > Customizing work items > Customizing the work item editor.
Rational Team Concert version 3.0 supports customization from the Web client as well. The customization method is identical to that for the Eclipse client. The Web editor presentation even has some WYSIWYG capabilities.
4.6. ClearQuest Scripts
This section provides some examples of scripts that are related to data and data presentation. We have included references in each section to the relevant script section. The scripts described are the following:
• A script that limits attachment size and indicates on the main tab that attachments exist.
• A script to ease the selection of owner by selecting full name instead of login name and populating the login after the user’s selection.
• A script that demonstrates how a click on a button creates a cloned record. The script is special because a cloned record is not of the same type as the base record. Also, the script creates a parent record from the child, a feature that is required in several cases.
4.6.1. HasAttachment
Listing 4.1 is an example of how to set the HasAttachment check box on the main tab, so that the user does not have to navigate to the Attachments tab to see if there are attachments. The ValueChanged hook of the Attachments field calls the hasAttachment global subroutine. The example is related to section 4.1.1.2, “Description.”
Listing 4.1. HasAttachment Hook in Perl
sub attachments_ValueChanged {
my($fieldname) = @_;
# $fieldname as string scalar
# record type name is Issue
# field name is Attachments
# Start User Code
my $ExistAttach = hasAttachments();
$entity->SetFieldValue("HasAttachments", $ExistAttach);
# End User Code
}
sub hasAttachments {
# Purpose: Check if the record has attachments
# Input : None, checks $entity
# Output : 0= no attachment, 1= at least one attachment
my $attachmentfieldslist = $entity->GetAttachmentFields();
for (my $index = 0; $index < $attachmentfieldslist->Count();
$index++)
{
my $attachmentfield = $attachmentfieldslist->Item($index);
my $attachments = $attachmentfield->GetAttachments();
return 1 if ($attachments->Count());
}
return 0;
}
4.6.2. Limit Attachment Size (Perl)
The script in Listing 4.2 verifies the total number of all attachments and checks whether they exceed a value that is hard-coded in the hook. A better solution is to store this value externally. One location can be a stateless record with a “limitattachmentssize” field (a stateless record to store various maintenance fields). A second solution is to use a dynamic list with a single value.
Listing 4.2. Limit Attachment Size Hook in Perl
sub Limit_Attachment {
# Purpose: Sum the size of all attachments and return error if it
# exceeds a defined value (1024).
# Input : None, checks $entity
# Output : empty string if OK
# The total size if exceeds
$limitattachmentssize = 1024;
my $attachfields = $entity->GetAttachmentFields();
my $attachfieldscount = $attachfields->Count();
$result = "";
my $totalattachmentssize = 0;
for (my $attachfieldindex = 0; $attachfieldindex < $attachfieldscount;
$attachfieldindex++)
{
my $attachfieldlist = $attachfields->Item($attachfieldindex);
my $attachments = $attachfieldlist->GetAttachments();
my $numattachments = $attachments->Count();
for (my $attachindex = 0 ; $attachindex < $numattachments ;
$attachindex++)
{
my $attachmententity = $attachments->Item($attachindex);
my $attachmentfilename = $attachmententity->GetFileName();
my $attachmentfilesize = $attachmententity->GetFileSize();
if ($attachmentfilesize == 0)
{
my ($diskfiledev, $diskfileino, $diskfilemode,
$diskfilenlink, $diskfileuid, $diskfilegid, $diskfilerdev,
$diskfilesize, $diskfileatime, $diskfilemtime, $diskfilectime,
$diskfileblksize, $diskfileblocks)= stat $attachmentfilename;
$attachmentfilesize = $diskfilesize;
}
$totalattachmentssize = $totalattachmentssize + $attachmentfilesize;
}
}
if ($totalattachmentssize > $limitattachmentssize) {
$result = "Total attachments size ($totalattachmentssize)" .
" exceeds the $limitattachmentssize byte limit";
}
return $result;
}
4.6.3. Convert Full_Name to Login_Name
This section provides hook examples of how to get the user login name from a given full name. It is related to section 4.1.10.2, “Ownership.” The hook is provided in Perl in Listing 4.3 and in BASIC in Listing 4.4.
Listing 4.3. Getting Login from Name—Hook in Perl
sub GetLoginfromFullName {
my( $value ) = @_;
my $result = "" ;
# Purpose: Get a string of user full name and return the login name
# Input : $value as string
my $session = $entity->GetSession();
my @myname = ( $value );
my $queryDefObj = $session->BuildQuery("users");
$queryDefObj->BuildField("login_name");
my $filterOp = $queryDefObj->BuildFilterOperator($CQPerlExt::CQ_BOOL_OP_AND);
$filterOp->BuildFilter("fullname", $CQPerlExt::CQ_COMP_OP_EQ, @myname);
my $resultSetObj = $session->BuildResultSet($queryDefObj);
$resultSetObj->Execute();
if ( $resultSetObj->MoveNext() == $CQPerlExt::CQ_SUCCESS) {
$result = $resultSetObj->GetColumnValue(1);
}
return $result
}
Listing 4.4. Getting Login from Name—Hook in BASIC
Function GetLoginfromFullName (sName)
REM Purpose: Get a string of user full name and return the login name
REM Input : sName as string
Set oSession = GetSession()
Set oQuery = oSession.BuildQuery("users")
oQuery.BuildField("login_name")
Set oFilter = oQuery.BuildFilterOperator(AD_BOOL_OP_AND)
oFilter.BuildFilter "fullname", AD_COMP_OP_EQ, sName
Set oResultSet = oSession.BuildResultSet(oQuery)
oResultSet.Execute
If oResultSet.MoveNext = AD_SUCCESS Then
GetLoginfromFullName = oResultSet.GetColumnValue(1)
End If
End Function
4.6.4. Create Parent from Child
In this example we demonstrate how to create a parent record from a child record. Not only is the link created but also some fields are copied. To generate the parent the user clicks on a button CloneParentCR, and the record script attached to the button creates the record.
In Figure 4.28 you can see the ClearQuest Designer view. Note that the button is of type Other.
Figure 4.28. Creating a parent record from a child

The code in Listing 4.5 is the record script CloneParentCR. The code creates a new record CR, copies some fields from the Feature record, and creates the link by adding the CR ID to the Feature Reference_List field.
sub feature_CloneParentCR {
my($result);
my($param) = @_;
# record type name is Feature
# Start User Code
# Purpose: To clone a "Feature" record type to "CR" record type
# and connect them as child(Feature)<--parent(CR)
# Author: Shmuel B
# Consideration: As mandatory fields altered, possible changes
# to the script may be needed
#
my $session = $entity->GetSession();
my $ircr = $session->BuildEntity("CR"); # create the CR
my $id = $entity->GetDisplayName();
my $value;
# pairs of : GetFieldValue from Feature
# SetFieldValue to CR
$value = $entity->GetFieldValue("Product")->GetValue();
$ircr->SetFieldValue("Product", $value);
$value = $entity->GetFieldValue("Module")->GetValue();
$ircr->SetFieldValue("Module", $value);
$value = $entity->GetFieldValue("Function")->GetValue();
$ircr->SetFieldValue("Function", $value);
$value = $entity->GetFieldValue("Priority")->GetValue();
$ircr->SetFieldValue("Priority", $value);
$value = $entity->GetFieldValue("Description")->GetValue();
$ircr->SetFieldValue("Description", $value);
$value = $entity->GetFieldValue("Initiator")->GetValue();
$ircr->SetFieldValue("Initiator", $value);
$value = $entity->GetFieldValue("Assign_To")->GetValue();
$ircr->SetFieldValue("AssignTo", $value);
$value = $entity->GetFieldValue("Risk")->GetValue();
$ircr->SetFieldValue("Risk", $value);
$value = $entity->GetFieldValue("Customer")->GetValue();
$ircr->SetFieldValue("CustomerAppeal", $value);
$value = $entity->GetFieldValue("Notes_Log")->GetValue();
$ircr->SetFieldValue("Notes_Log", $value);
$value = $entity->GetFieldValue("Option")->GetValue();
$ircr->SetFieldValue("Option", $value);
$value = $entity->GetFieldValue("Dev_NC")->GetValue();
$ircr->SetFieldValue("DevNC_T", $value);
$value = $entity->GetFieldValue("Dev_Infra")->GetValue();
$ircr->SetFieldValue("DevInfra_T", $value);
$value = $entity->GetFieldValue("Dev_Total")->GetValue();
$ircr->SetFieldValue("DevTotal_T", $value);
$value = $entity->GetFieldValue("CQA")->GetValue();
$ircr->SetFieldValue("CQA_T", $value);
$value = $entity->GetFieldValue("Feature_Type")->GetValue();
$ircr->SetFieldValue("ReqType", $value);
# Create the Parent-child link
$ircr->AddFieldValue("Features", $id);
# Set CR Mandatory fields NOT copied above
$ircr->SetFieldValue("ReqClass", "CR");
$result = $ircr->Validate();
if (!$result) {
my $ircrid = $ircr->GetDisplayName();
# Mark the Parent (CR) id in the child (feature)
$entity->SetFieldValue("ParentCR", $ircrid);
$ircr->Commit();
} else {
$ircr->Revert();
}
# End User Code
return $result;
}
Cloning Records of the Same Type
When cloning records of the same type, you can use the entity method GetFieldNames() and loop on all fields because fields in both records are identical. In the case described in Listing 4.5, the records are of different types and many of the field names are not the same, so we have to copy field by field.
4.7. Summary
In this chapter we discussed the data in the work item, the purposes the data serves, and the various roles that use the data. We classified the data as to description, location, environment, internal and external impacts, corrective actions, terms, testing, history, and quality. For each class we included a table with suggested fields.
In the second section of the chapter we explained objects and their relationships along with some common usage and implementation samples. We explained the importance of data representation to the user experience. We described how to use ClearQuest Designer to create the forms and how to use the Rational Team Concert editor presentation to customize the user interface.
In the last section we provided script examples for some common data implementations that were discussed in this chapter.