There’s more to writing than writing, especially when it’s part of design. It’s easier to get the writing done when you thoughtfully and intentionally prepare to do the writing. Smart writers do prep work on every assignment. You can be smart, too!
Whether you’ve got just a few strings to write for a new screen in your app, or a whole site full of marketing content, you’ll want to do each of the following in order to fully prepare to get the writing done:
- articulate the assignment
- collect inputs
- generate ideas
- create structure
- make space to write
You might be feeling an instinct to rush past this phase, especially if you need those words, like, yesterday. But the more time you’re able to spend here, the faster and more successful the remaining phases of your writing workflow will be. As Abraham Lincoln once said to Albert Einstein at Mark Twain’s birthday party: If you’ve only got six hours to chop down a cherry tree, spend five hours sharpening your samurai sword. (I think that’s the quote, anyway.)
Articulate the Assignment
How are you supposed to get the writing done if you don’t know what needs doing? What kinds of words? Where? For what purpose? What will it mean to be done with the writing? And what’s your role in all this, anyway?
To answer these questions, you need to articulate your writing assignment. A design could require one big writing assignment, or lots of little ones. (Or lots of big ones. Or a mix!) The assignment is a flexible unit that says, “Here are the boundaries of the writing work I am responsible for.”
Design writing assignments vary, of course, but tend to share some common characteristics:
- Deadline: When does the writing assignment—independent of the rest of the design project—need to be completed? This deadline could be something you work into the overall project plan, along with a schedule for check-ins and reviews.
- Roles: Your whole team needs a shared understanding of what it means to be the writer. What resources are available to writers? What expectations apply to writers? Are you responsible for getting a draft together for someone else to refine, or do you need to fully own the text? Take nothing for granted, especially the first time.
- Context: Where will the writing go? Who will be reading it? What are the circumstances of their reading it? You may feel like you know all of this from the design work already, but often a particular bit of writing (like an error message or confirmation dialog) will be specific to a subset of users or situations.
- Requirements/Constraints: What specific requirements and constraints apply to this writing? Are there character limits? Things that have to be mentioned for legal or practical reasons? Controlled vocabularies for interface elements?
- Scope: Scope is the checklist of all the “stuff” you have to actually write. Scope could be as simple as a description of the page and an outline of points you need to make, or it could be a complex inventory of messages required by an interactive experience.
Taken together, your deadline, role, context, requirements, and scope will give you a complete idea of what you need to do to be done. That’s your assignment.
Err on the side of capturing this information publicly, even if it seems like no one else cares, just to cover your butt. The header area of a task or ticket in your project management system is a great option, or even just an email to your team: “Hey friends, here’s what I understand about the writing needs on this project. Let me know if I’ve missed anything…”
This is a good gut-check moment. Does the assignment seem right? Good? Doable? In articulating your assignment, you might have already learned that what seemed like one assignment could be better managed as several. Or that the scope is just too darn big given the deadlines you need to hit. Do what you can to work out these kinks before you start writing to save time for everyone (but mostly you).
Collect Inputs
Writing in design can feel more like assembling a puzzle than writing a novel—and someone’s ripped open twenty puzzles at once and dumped all the pieces together. Worry about sorting and choosing the right pieces later. First, just make sure you have all of the pieces. You want to collect inputs.
If the people asking you to do the writing are not writers, they may not have any idea what would be useful to you. And you might not know what’s useful until you see it. Ask stakeholders for all of the material they have relating to the project, even if they’re not sure it’s relevant.
At my company, we call this the “document dump.” And sometimes it’s a real dump, all right. But every junk yard has its treasures. Some good stuff to ask for:
- notes from meetings, interviews, and workshops
- project briefs and scope of work documents
- design comps, wireframes, and task flows
- marketing collateral
- user personas and research findings
If you know early on that you’re going to be the writer on a project, take a fresh look at the calendar for any meetings or research sessions that might be valuable to sit in on. Many teams don’t think to invite writers to these things. Being there in person (and doing your own interviews, if you have time) allows you to record what people actually say and how they say it—there’s often a lot of flavor in how people speak that doesn’t make it into a project manager’s notes, but can be very valuable when it comes to doing the writing.
As you collect all of these things, be sure to keep your receipts. Track your inputs and where they came from. For a huge project with lots of inputs, you could go full spreadsheet, but descriptive file names and a few notes scribbled here and there might be enough. Later on in the project, you’ll be grateful to have a paper trail, so to speak, as reviewers and stakeholders start asking questions and trying to poke holes in your writing. (It’s okay—that’s their job!)
Tracking inputs is especially important if you’re able to reuse text that’s already been through things like legal and compliance reviews. Two of the questions you’ll hear most often about writing are: “Who else has looked at this?” and “Where did this [copy/phrase/slogan/benefit/feature/wording] come from?”
Generate Ideas
Now we’re closing in on where most people start their writing work—coming up with ideas. It’s important to separate the action of generating ideas from doing the writing: first think, then write.
When you’re generating ideas, anything is possible. The words are made up and the rules don’t matter! This open mindset is necessary for creativity to flourish, as you’ve probably found in your design work. Treating the words in your design like annoying tasks that are in your way is not a mindset that lends itself to thoughtful, useful, and/or creative writing.
There are lots of ways to generate ideas for design writing. Some are going to work very well for your assignment, and some might not fit at all. I’m going to cover a few methods that work well in many situations.
Mindmapping
Most writing tools don’t make thinking easy. When writers start generating ideas inside a blank document in Microsoft Word, or a blank body field in their CMS, they’re literally doing their thinking inside of a box.
Mindmapping breaks you out of that box. A mindmap is a visual outline that offers a flexible, nonlinear way of brainstorming and organizing your thoughts. You may have found yourself intuitively creating a mindmap when standing in front of a whiteboard or while scratching out ideas on a napkin.
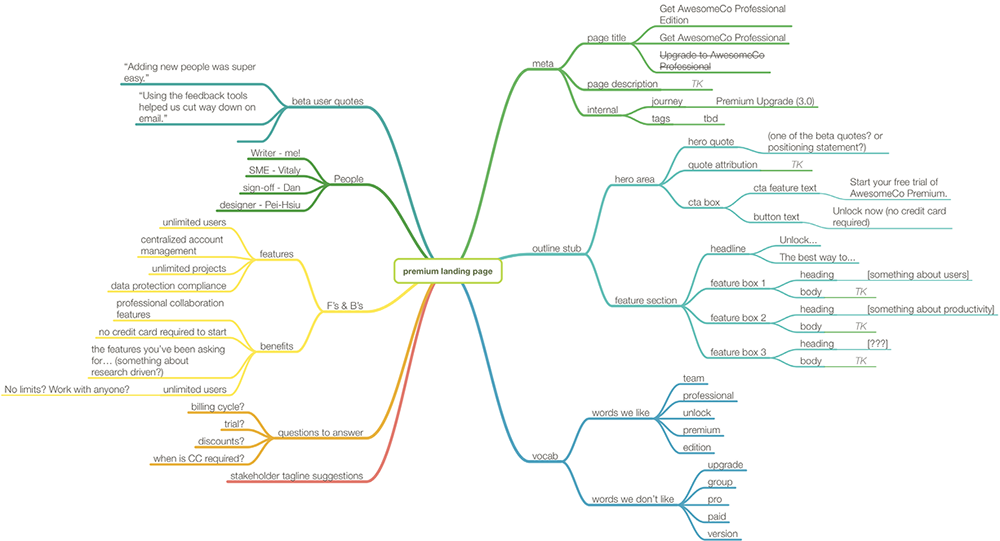
For marketing and product content, mindmaps are great for transitioning from a big mess of ideas into a linear outline. You can start mashing together snippets of writing, recycled text, quotes, and any other random notion you have into one single canvas and begin sorting them into sections that make sense (Fig 1.1). For interface content, mindmaps can be a great way to collect and sort ideas for labels and feature names (Fig 1.2). In either case, having a bunch of options collected in one place ensures you’ll never experience blank-page paralysis when it’s time to do the writing.
Mindmapping makes it easy to start thinking and planning with words in small ways, without committing to writing everything at once, like that big, empty New Document window wants you to do.

Freewriting
Like mindmapping, freewriting is a technique you’ve probably informally used before. Freewriting is stringing words together for a set amount of time. It’s especially effective for longform product and marketing copy.
If you want to try freewriting, here are a few things to consider:
- Use a timer, not a clock. If you’re watching the clock, you’re multitasking. The whole point of this is to not multitask—just write.
- Go for quantity, not quality. Try to write as many gosh-dang-doodily words as you can. Typitty type type type, my friend. Remember, this is still just an input—not a first draft.
- Fight the urge to switch to planning/designing/outlining. Write down whatever comes into your head, e.g., “Another reason this product is great is that—you know what, I need to pick up milk from the store—is that it does XYZ faster than the competition.” You can pull out the relevant bits to your outline later.
Here’s an example of my freewriting for a to-do list application’s marketing page:
we want you to subscribe to our to-do list software. we want your money please subscribe. go for the premium plan because it’s the best value, especially if you sign up for a year. there’s also a free forever plan for one device. it’s very good software and it gets updated all the time, unlike the other guys who seem to only do a big update every six months. It syncs faster and more reliably than any other app (is that true?). encryption is coming soon and will be added for free when it releases. What are the benefits though how are we different, it’s different because you can sync through whatever service you want, it allows you to customize how tags and categories work or not use them at all (it’s to-dos done your way? tagline?)
Obviously—hopefully!—this is not website-ready marketing copy. Even if you cleaned up the sentences, it’s still a big blob of text. That’s okay—you’re just generating ideas. This is a lump of wet clay, and you haven’t yet decided if you’re going to throw it into one big, beautiful vase or a set of ten tiny teacups.
You can even modify this technique for interface and conversational content with a few simple prefixes:
A: What do you want to do today?
B: ummm i want to buy pants I guess.
A: pants are a thing that we sell. see where it says PANTS up there?
B: Pants, got it. Wow that’s a big list.
A: Yes. we sell many kinds of pants. Do you want men’s or women’s pants? Or maybe a certain color?
B: Black pants.
A: Here are all of our black pants.
B: Wow that is a lot of pants. Just show me women’s pants.
A: Just women’s pants, got it.
And so on. There are other techniques that will create similar inputs—having users talk aloud during user research sessions, for instance, or pair writing with a partner. Riffing like this can give you a lot to work with when it comes time to distill it down into tidy text for your interface.
Brainstorming
Let’s be real: a brainstorming meeting is a meeting where everyone is responsible for generating ideas, which also means that no one is responsible for generating ideas—so avoid them if you can.
If there’s too much organizational inertia working against you, and you find yourself stuck holding a “Let’s brainstorm the writing!” meeting, these tips will make it less painful and more productive:
- Make idea generation the sole agenda item. Packing brainstorming into an existing agenda is asking for trouble. It takes a certain amount of time and energy to get into an open frame of mind—anything other than idea generation will pull you closed, hampering both the quantity and quality of your ideation session.
- Avoid decisions of all kinds. Decision-making is a form of convergent thinking. It’s an act of limiting, reducing, filtering, choosing—editing. Making decisions, even small ones, brings the scent of criticism and closed-mindedness into the room that can spoil an otherwise productive brainstorming session.
- Encourage note-taking. If quantity is the goal—and it should be—forcing people to wait for a turn to speak, or to wait for the facilitator to write it on the whiteboard, is an agonizingly slow way to go about things. If you’re concerned about people keeping ideas to themselves, try handing out sticky notes or index cards for notes to be periodically collected and added to a shared display.
Create Structure
To get the writing done, you’ll need a clear structure to support your writing work. You’ll want to turn your assignment into a to-do list of sorts that helps you see what kind of writing-writing work actually needs to happen.
There are three documentation structures that can guide your next phase: outlines, templates, and inventories.
Outlines
Outlines are great for longform writing like product overviews, knowledge base articles, in-product documentation, and so on. Outlines give an…uh…well, an outline of what you need to communicate and the rough order in which you need to communicate it.
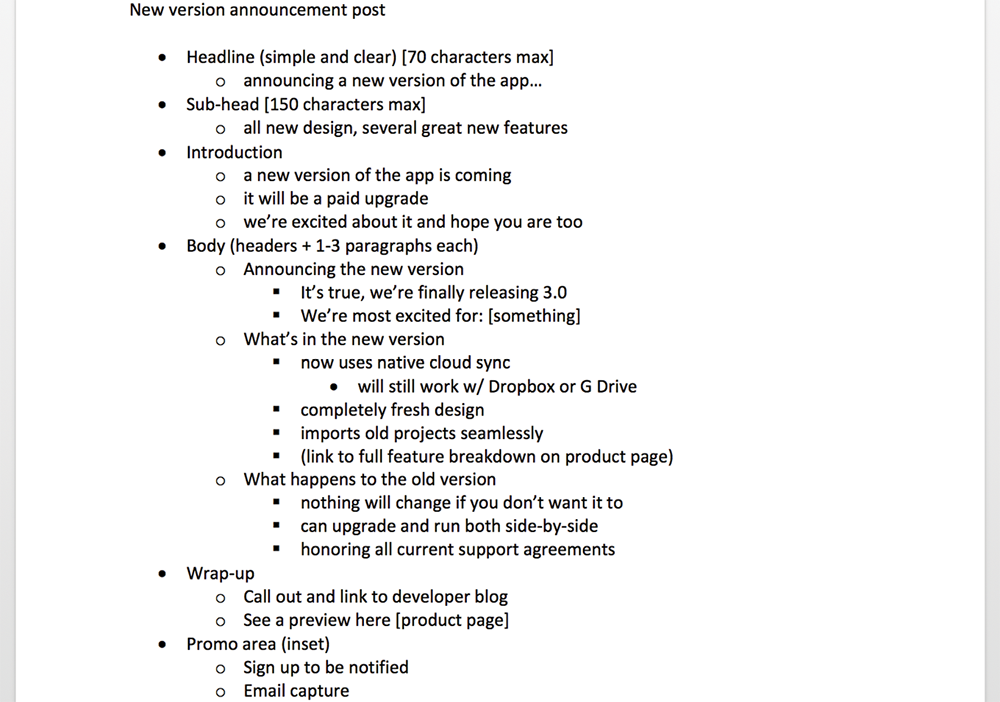
Creating an outline may give you flashbacks to school research papers, but they are very useful in the world of design writing. Outlines are hierarchical: main point, sub-point, sub-sub-point (Fig 1.3). In that way, the outline not only informs your writing, but also the design—the big idea becomes your H1, the next level your H2. Blocks of similar ideas at the same level might work well as bullet points or a chart.
List out the main beats, the big ideas, of what you want to say. Then, as you’re able, add detail under those big ideas. Answer questions like: Who cares? So what? Why does this matter? Don’t worry about how the words sound—the text of the outline is for you, not your readers.
After you’ve gotten your rough outline together, look for opportunities to group and collapse related ideas. Where are you repeating yourself? Where might you need to add a larger point to tie a few of the smaller ones together? Give a thought to the order of things, too. What information will be most useful to have toward the top of the copy? What can wait until the end?
Clear thinking is powerful. With a strong outline, some of your writing will seem to write itself!
Templates
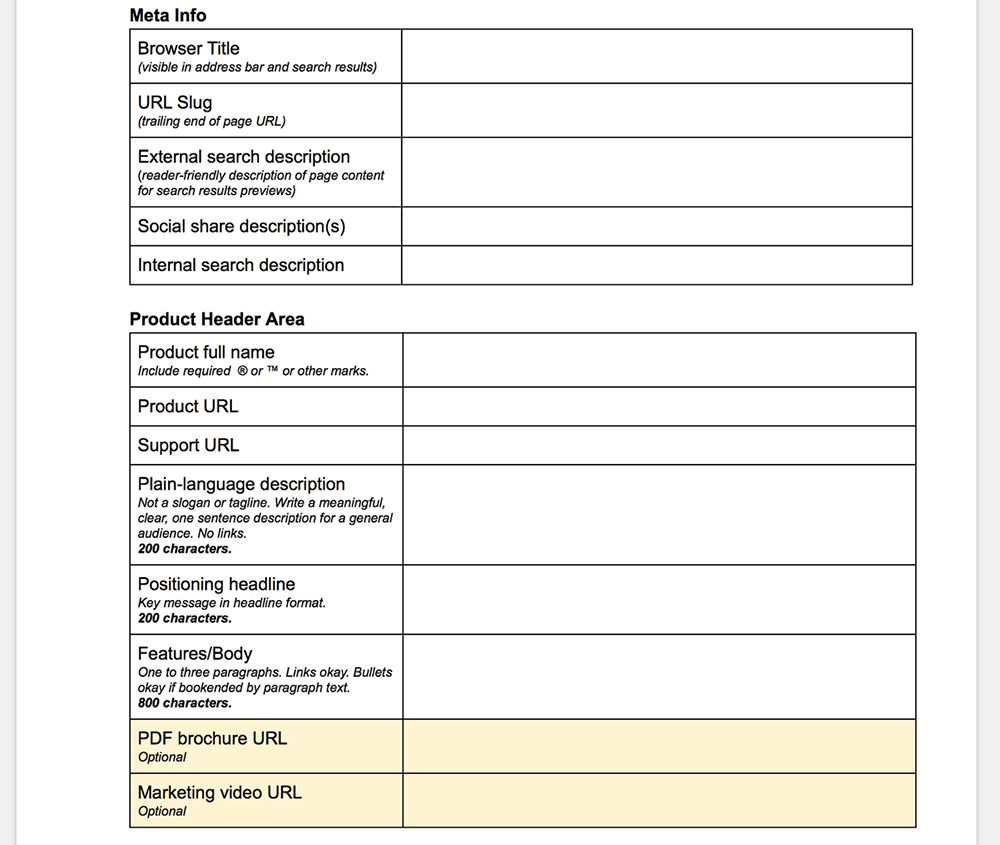
Templates are any tool that says “Structure your writing in this particular way.” Content strategists have all kinds of names for the templates they make: page tables, page description diagrams, content templates, and more. Templates are sometimes built into content management systems or headless content systems like Gather Content.
Templates can generally be understood as a two-column table (Fig 1.4). The left column defines what needs to be written (including constraints like word or character limits), and the right column provides space to write the thing. You can turn any design that needs words into a template by simply listing the various design elements down the left column.
As the name implies, templates are a great choice when you have to make the same sort of thing more than once.
Inventories
Inventories work well when you have lots of little bits of texts, as with interface copy. Inventories are made in spreadsheets, where it’s easy to keep track of all those little bits and their associated data.
You can start by sequentially numbering text elements in a wireframe—this creates a quick inventory that connects what’s been designed and what’s being written (Fig 1.5).
The resulting identification system makes it easier to manage your work and collaborate on it with others. Having all of your strings ID’d makes them “talkable”—the difference between:

“Do you have the approved copy for G 7.1?”
and:
“Do you have the approved copy for the text that goes under the button on the fifth screen of the third section of the app? No, not that button, the other button. Right. Wait, that doesn’t fit, what version are you looking at?”
Make Space to Write
We’re almost to the writing part of writing! To create your draft copy, you’ll need three things: a place to put the words, a place to put yourself, and some time to do the writing.
Prepare your digital space
Thanks to our friends Copy and Paste, you can usually do your writing in one environment and move it to another without too much fuss. You don’t have to do all of your writing in Microsoft Word or the CMS just because that’s where it needs to end up.
You want a writing environment that thinks about writing the way that you do. It should make it easy for you to write quickly. It should make it easy for you to collaborate with others and complete editing and review steps in your workflow. And it should be appropriate to the type of content you’re working on—a word processor focused on desktop publishing might well be overkill for writing out a few strings for your interface.
Web-based writing environments can be fantastic, and offer advantages when it comes to version control and collaboration. Be cautious about doing your work in a web browser, however. There are many points of potential failure: web browser crashes, service outages, accidental refreshes—you get the idea. (I don’t think I’ll ever break the habit of mashing ⌘S after finishing a paragraph.)
Consider a workflow where the bulk of your composing—those big sprints of “doing the writing”—happens in a stable local application on your computer. You can then copy your work into whatever web-based tool you need to use for editing. We’ll talk about this more with version management in Chapter 3.
Your design environment might work well as a writing environment. If you go that route, create a duplicate version of your project before you start, so you’ve got the freedom to be a bit messy. Once you’ve got some final, authoritative text, you can drop it back into the master file in place of those squiggly lines.
Prepare your physical space
I once worked in a small, open-plan office at a startup company. Our designer, Amanda, took to wearing her “design hoodie” on days when she had to get a lot of work done. When the hood was up, we weren’t allowed to bother her for any reason. No “quick questions.” No “Have you seen that video where…” Hood up = DESIGN TIME, no interruptions.
Whether it’s a hoodie or an office with a door or a coffee shop where no one knows you, it helps to do the writing in a space where you won’t be interrupted. Developers and designers know that there are some kinds of work that require you to build a bit of intellectual momentum, and that being interrupted, even briefly, can kill that momentum. Writing is that kind of work, too.
This is challenging in some office cultures. Strive for it anyway. Try talking to your supervisor or project managers about ways to carve out the time and space you need to write. If writing is an infrequent responsibility and you have a lot of demands on your time, you may end up needing to shift your schedule a bit. Try writing early in the morning or late in the day when other folks are less likely to use your ears as an inbox.
Oh, and in case it needs saying: when it’s time to write, turn off notifications on as many things as you can get away with. If closing your email client or shutting off your phone gives you anxiety, try a timer—the world’s not going to end if you’re offline for fifteen minutes. And if it does, look on the bright side: no more deadlines!
Clear (some of) your calendar
“Hey Siri, add appointment to write all the things from 1 p.m. to 3 p.m. tomorrow.”
Blocking off time on your calendar to write—and protecting that time against meetings and interruptions—is a good start, and more than many writers are able to pull off. So do it if you can.
But be honest with yourself about that time. Two hours on the calendar rarely equals two nonstop hours of writing. (If you figure out how to do that, please tell me.)
Timeboxing can help you make the most of your writing time. Make a quick list of what you want to work on in a given period, and apportion each item some of that time. You could do this per screen or page (e.g., landing page, thirty minutes), by content type (e.g., confirmation buttons, twenty minutes), by user journey (e.g., password reset flow, thirty minutes), or whatever else makes sense for your brain and your assignment.
First Draft Inbound
Preparation isn’t the part of writing that people tend to think of as writing, but it’s no less important. Having a clear assignment, lots of inputs and ideas to work with, and a sense of how the rest of your work is going to go sets you up for a more efficient process and successful writing outcomes.
For the marketing copy on a new, large website, you might spend weeks in the Prepare phase. For the interface language on a single app screen, twenty or thirty minutes of preparation might be enough. A little planning up front goes a long way.
Take a breather if you need to, and get ready for the phase with all of the typing and crying: Compose.