
Chapter 13. Remote Access
Network Transparency
The manpage for X calls it a portable, network-transparent window system. The phrase network-transparent refers to the location-independence of the clients and server—the client may be on the same machine as the server or on machines spread all over the planet, as long as he has a network connection to the server.
In this chapter, we’ll examine how to use remote clients and entire sessions, and the security and performance implications involved in remote access.
Remote access always involves two or more hosts, and when discussing this topic, it can be easy to confuse which machine is which. Throughout this chapter, I’ve adopted the convention of calling the computer on which the X server is running blue, and the computer on which the remote client is running red. The machine name is embedded into the shell prompt in the examples: blue$ is the shell prompt for the X server machine, and red$ is the shell prompt for the client machine.
Tip
As virtualization and partitioning technologies such as Xen, Solaris compartments, and VMware grow into widespread use, X’s network transparency gains new value. The ability to display windows from different machine partitions side-by-side on one display provides an important productivity boost for system administrators.
Displaying on a Remote Server
Causing an X client to display on a remote server is fairly straightforward: simply use the displayspec (Sections 1.12 and 7.1) to point to the desired server when starting the client.
Let’s assume that the X display number on blue is :0 and the client you want to run on red is xclock.
For ease of experimentation, turn off access controls on blue—of course, don’t do this on a production machine without understanding the consequences:
	blue$ xhost +
	access control disabled, clients can connect from any host
Now the client can simply be started on red, using the displayspec blue:0:
red$ xclock -display blue:0The xclock window will appear on blue’s display.
Tip
For this to work, you may need to check your firewall settings, both on your router/switch and on the host running the X server. On a Linux system, iptables-L will show you the current firewall rules; you can configure the settings with your distribution’s tools (such as lokkit or Yast) or use the iptables command.
Telling a client to display across the network in this way does not address any of the three remote access challenges (Section 13.7): no attempt is made to reduce network bandwidth or latency requirements, no authentication is performed, and the data can be readily intercepted on the network.
Warning
SUSE uses KDM as the default display manager and has configured it so that the local X servers accept connections only through Unix domain sockets and not through TCP/IP. This prevents the use of remote clients. To enable remote connections, remove the -nolisten tcp options from /opt/kde3/share/config/kdm and restart KDM.
Enabling Remote Sessions
Display managers—such as XDM, GDM, and KDM—manage local X displays, but are also capable of managing remote displays through a protocol called X Display Manager Control Protocol (XDMCP).
XDMCP enables a user to remotely log in to a server using a graphical authentication dialog. After the user has logged in, a normal session is started (including the window manager, desktop environment, and so forth), as though the user was using a local X server.
XDMCP uses both TCP and UDP on port 177. It is disabled by default in most distributions and must be enabled before remote session can be used; the procedure to enable it varies according to the display manager in use.
XDM
XDMCP is enabled or disabled by an entry in the xdm-config file (typically located at /etc/X11/xdm/xdm-config). The entry of interest is DisplayManager.requestPort, usually configured like this:
DisplayManager.requestPort: 0To enable XDMCP, change the port number to 177:
DisplayManager.requestPort: 177You should also check your Xaccess file (usually /etc/X11/xdm/xaccess) to ensure that it has two lines like this:
	*
	* CHOOSER BROADCAST
The first line enables any X server to connect directly to this XDMCP server (Section 13.4), and the second line enables indirect queries (Section 13.6).
Finish by restarting XDM.
KDM
KDM uses the kdmrc file (usually /etc/X11/xdm/kdmrc or /opt/kde3/share/config/kdm/kdmrc) to control remote sessions. In this file, there is an [XDMCP] section, which typically looks like this:
	[Xdmcp]
	Enable=false
To enable XDMCP, simply change the value to true:
	[Xdmcp]
	Enable=true
The Xaccess file must be set up in the same way as for XDM.
Finally, restart KDM.
GDM
GDM’s support for remote sessions is controlled by an entry in the [xdmcp] section of the local GDM configuration file (/etc/gdm/gdm-custom.conf or /etc/X11/gdm/ custom.conf):
[xdmcp] Enable=falseHonorIndirect=false
To enable XDMCP, change the Enable line to true; it’s also recommended that you enable HonorIndirect so that you can use indirect queries (Section 13.6):
[xdmcp] Enable=trueHonorIndirect=true
Then restart GDM.
Accessing a Remote Session on a Specific Host
To access a remote session, command-line options are passed to the X server, which cause it to contact a remote system using XDMCP. The remote system, in turn, will draw an authentication screen using the standard X protocol.
To access a remote session on red using an X server on blue, start the X server with the option -query red:
blue$ X :8 -query redThe X server will attempt to contact the XDMCP server on red, and if successful, a session login prompt will appear on the display. This is called a direct query because a specific XDMCP server is contacted directly.
The advantage of directly querying a host in this way is that less network traffic is generated than when using the broadcast (Section 13.5) or indirect (Section 13.6) mechanisms.
Accessing a Remote Session on Any Available Host
Querying a specific host for a remote session works fine as long as you know the name of the host and that host is up—but if you’re a guest on a network, or you want to connect to any of several hosts that provide similar services, you’ll want to use a broadcast query.
This is even simpler to do than direct queries; just use the -broadcast option on the X server command line:
blue$ X :8 -broadcastThe X server will perform a XDMCP broadcast using UDP and present a session authentication prompt from the first server that responds.
This approach is particularly useful for load balancing. You can set up a bank of servers with identical services and files (typically sharing the home directories using NFS) and configure all of your users to connect using XDMCP broadcasts. Available servers only will respond; any server that is down or heavily loaded will not respond to broadcast requests.
The downside to this approach is that every X server will broadcast an XDMCP query, and every XDMCP server will respond. If you have 1,000 X servers and 50 XDMCP servers and the desktops are all turned on between 8:55 and 9:05 in the morning, there will be 1,000 broadcast queries and up to 50,000 replies in a 10-minute period. That would not be overwhelming to most networks but it is a significant amount of traffic.
Accessing a Remote Session from a List of Available Sessions
There is a compromise approach between direct XDMCP queries (Section 13.4) and XDMCP broadcasts (Section 13.5): a single host is designated as the host that decides which X server should connect to which XDMCP server. By default, that one system will broadcast a query to the network and present a graphical chooser to the user. When the user selects one of the available hosts, the X server and XDMCP server directly communicate, and the user is presented with an authentication dialog.
This technique is called an indirect query and is invoked with the -indirect host option on the X server command line. If the indirect host is red, you can send it an indirect query like this:
blue$X :8-indirectred
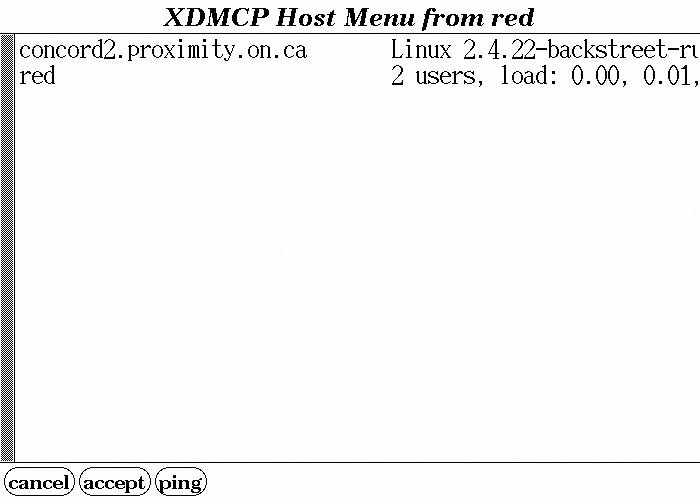
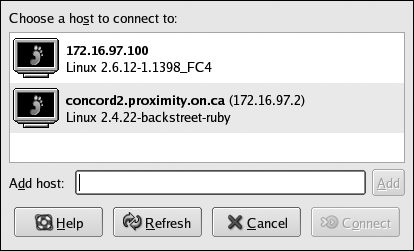
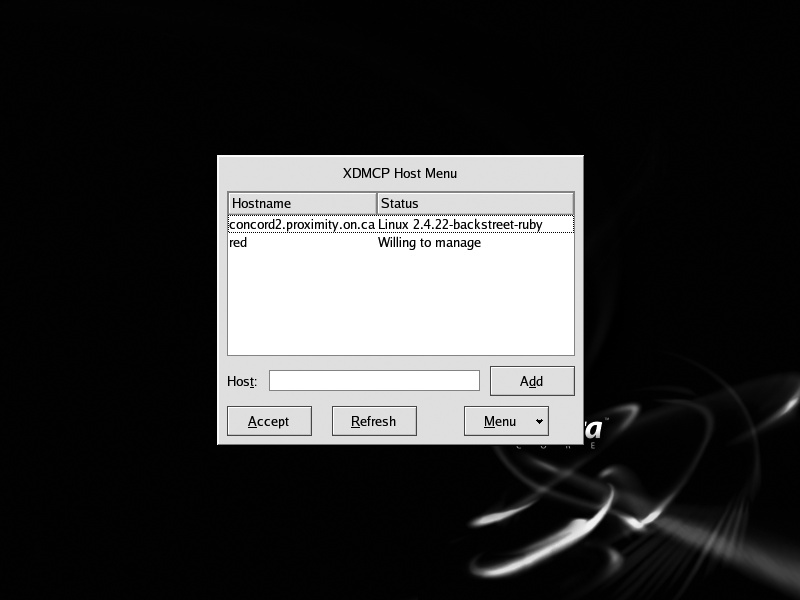
The appearance of the chooser display—the menu from which the user selects a host—varies according to the display manager in use on the indirect host. Figures 13-1 through 13-3 show the appearance of the standard choosers from XDM, GDM, and KDM hosted on a Fedora system.
Notice that in each case, the user is able to select a host by clicking on it. The hostname and status message come from each XDMCP host and may be customized; the host picture, if any, comes from the indirect host.
When the user selects a host, the indirect host instructs the X server to connect to that host, which it does directly. From that point on, the indirect host is not involved in any communication between the X server and the XDMCP host. However, if the XDMCP host’s authentication dialog includes a Disconnect option, that option will cause the connection to the indirect host to be re-activated, and the host menu to once again be displayed.
Although the default configuration for all common display managers is to discover the list of hosts for the chooser list by broadcast, it is also possible to configure the chooser to present a list of selected hosts only. Those hosts will still be queried to ensure that they are accepting XDMCP connections, and only hosts that are available are shown in the chooser’s list.
It is also possible to replace the chooser with a program or script that selects the target host using any criteria you care to code. For example, you could select the host on a round-robin basis, according to the time of day (East coast server early in the day, West coast server late in the day), or according to the user’s IP address.
Using an indirect XDMCP query has several advantages over direct queries (Section 13.4) and broadcasts (Section 13.5): the user can select the host they wish to use, and the hosts can be discovered by broadcast without each X server system generating broadcast traffic. However, there is a single point of failure. iI the indirect host is down, the indirect query will fail. If a large number of X servers rely on a single indirect host, it may be wise to configure multiple machines to serve in that role with a failover system such as Heartbeat (http://www.linux-ha.org/).
The Three Challenges of Remote Access
Three are three challenges that any X remote access solution must address; one affects performance, and the remaining two affect security:
- Network bandwidth and latency
Bandwidth refers to the overall network data-delivery rate; latency refers to the round-trip delay. X requires moderate network bandwidth and low latency to deliver an effective user interface.
- Access control
Since unauthorized clients can access the screen (in the same way that xwd [Section 6.11] does), it’s possible for a malicious client to snoop around your display and collect personal information, such as your bank account number and balance if displayed in a browser window. Therefore, it’s important to ensure that only authorized clients can connect and perform certain operations.
- Privacy
Even if data can’t be snooped on-screen, raw X protocol traffic can be captured on the network and analyzed to re-create the screen image (and user actions). Some form of encryption must be employed to circumvent this danger.
Many different programs, protocols, and techniques have been developed to address these issues, with varying degrees of success. In the remainder of this chapter, we’ll examine a number of remote display techniques in the light of these three challenges.
Host-Based Access Control
You can allow or disallow client connections based on the IP address of the client’s host. The xhost program manages host-based access control.
Running xhost by itself displays the current status:
	blue$ xhost
	access control enabled, only authorized clients can connect
The output indicates that host-based control is active, but since no hosts are listed, no hosts are authorized to connect.
You can grant access to a host by IP address or by name (which must resolve to an IP address), using the + symbol:
blue$xhost +red being added to access control list blue$redxhost +172.16.97.251 being added to access control list172.16.97.251
The output of xhost (by itself) will now reflect the added hosts:
	blue$ xhost
	access control enabled, only authorized clients can connect
	INET:172.16.97.251
	INET:red
You can remove hosts with the -symbol:
blue$xhost -blue$172.16.97.251xhostaccess control enabled, only authorized clients can connect INET:red
To disable access control altogether and permit any client to connect to the X server, use + by itself as an option:
	blue$ xhost +
	access control disabled, clients can connect from any host
Obviously, this is quite dangerous! But, Imust admit, it’s convenient when you’re experimenting on a private, secure network. To re-enable access control, use a dash by itself as the option:
	blue$ xhost -
	access control enabled, only authorized clients can connect
It’s possible to invoke the X server with access control entirely disabled—as though xhost+ had been executed—using the -ac option:
blue$ X -acHost-based access control does not address network bandwidth and latency issues nor does it address privacy. It also suffers from two significant drawbacks:
It grants access permission to all users of a particular host.
It’s relatively easy to spoof IP addresses.
These two faults led to the development of magic cookies (Section 13.9).
xauth and Magic Cookies
X provides a simple shared-secret access control protocol known as MIT-MAGIC-COOKIE-1.
Magic cookies or tokens are simply secret numbers. If a client attempting to connect to an X server knows the correct magic cookie value, it is permitted to connect; if it doesn’t have the right number, the connection is denied.
Magic cookies are stored in the file ~/.Xauthority and are cross-referenced to particular displays. This file is stored in a binary format and cannot be usefully viewed as text.
When a local client is executed, it takes the target displayspec, cross-references that against the ~/.Xauthority file to get the appropriate magic cookie, and then presents that magic cookie to the server. If the permission mode on the ~/.Xauthority file allows reading only by the owner, then other users on the local machine will not be able to read the token value and connect to the X server.
The xauth command is used to manipulate the ~/.Xauthority file; it can operate interactively, accepting commands one-at-a-time from a user, or commands can be given as arguments. The examples in this article all use arguments.
To see the current magic cookies and the display associated with each token, use the xauth list command:
	blue$ xauth list
	blue/unix:0 MIT-MAGIC-COOKIE-1 63fa4c416da8b8c5b4d3ae32b3206486
	blue:0 MIT-MAGIC-COOKIE-1 63fa4c416da8b8c5b4d3ae32b3206486
	green:3 MIT-MAGIC-COOKIE-1 35abebfef1c159b75783a4f33e2610fd
	orange:1 MIT-MAGIC-COOKIE-1 b6577a2f2b7af4d82a1321779468cd0f
In this case, there are two entries for the local machine blue: the first one is for Unix domain socket connections, and the second is for TCP/IP connections. The token value is identical (63fa4c416da8b8c5b4d3ae32b3206486 in each case). The syntax for the Unix domain socket in the xauth output (blue/unix:0 in this example) is slightly different from a normal displayspec (which would be :0). The last two entries in the output above are for displays on other hosts.
You may see some entries that use the XDM-AUTHORIZATION-1 protocol; this is a variation on the magic cookie scheme that doesn’t pass the token across the network in plaintext, and it is used by display managers.
You can view the magic cookie for one display by specifying a displayspec:
	blue$ xauth list :0
	blue/unix:0 MIT-MAGIC-COOKIE-1 63fa4c416da8b8c5b4d3ae32b3206486
If a client on red is going to connect to display :0 on blue, the magic cookie for that display needs to be placed into the ~/.Xauthority file on red. Sharing the home directories via NFS will take care of this automatically; otherwise, this can be done with xauth’s add command, which accepts a displayspec, protocol, and token value as arguments:
red$xauth addred$blue:0MIT-MAGIC-COOKIE-163fa4c416da8b8c5b4d3ae32b3206486xauth listblue:0 MIT-MAGIC-COOKIE-1 63fa4c416da8b8c5b4d3ae32b3206486blue:0
It’s a pain typing in MIT-MAGIC-COOKIE-1 all the time, so xauth permits you to substitute the period character (.); therefore, the preceding add command could be rewritten as:
red$ xauth add blue:0 . 63fa4c416da8b8c5b4d3ae32b3206486You can also use xauth to create an extract file, which can be sent to another machine and merged into the ~/.Xauth file there:
blue$ xauthextract...transferextractfile blue:0extractfilefrom the hostbluetoredusing the file tranfer mechanism of your choice... red$xauth mergeextractfile
Tip
Obviously, transporting cookies between hosts is a big nuisance. Don’t despair; the process can be automated using SSH (Section 13.12).
Once the magic cookie has been copied to the remote machine (red), clients started there will be able to successfully connect to the X server regardless of the currenthost-based authentication settings (Section 13.8).
To remove a magic cookie from a ~/.Xauthority file, use the remove command:
red$ xauth remove blue:0Initial cookies are generated by the display manager or by the program starting the X server (such as startx). If you wish to start an X server in your own script and use magic cookies for access control, use the mcookie command to make a cookie and then use xauth to store it in ~/.Xauthority before starting the X server. Here is an example:
	#!/bin/bash
	# Start an X server with a magic cookie

	export DISPLAY=:8                   # Choose a display number
	xauth add $DISPLAY . $(mcookie)     # Create cookie, save in ~/.Xauthority
	X -terminate $DISPLAY &         # Start the X server
	SERVERPID=$!                        # Remember the server process ID

	# Run any clients here...
	mwm &
	kcalc &
	soffice &

	wait $SERVERPID                     # Wait for server to finish
	xauth remove $DISPLAY               # Remove the cookie from the file
If your system doesn’t have mcookie, you can make a random cookie from a hash of random data—just change the first xauth line to read:
	xauth add $DISPLAY . $(dd if=/dev/random bs=10k count=1 2>/dev/null|
	    md5sum|cut -c1-32)
Magic cookies are read by the X server from ~/.Xauthority only when the server starts up. Clients are subject to access control only when they first connect to the server; once connected, they can remain connected for any length of time without further access control checks.
Magic cookies do not address network bandwidth and latency issues, and they are a weak solution to the access control problem. The most significant issue with using magic cookies for access control is that they are passed across the network in plain text, and if the network traffic is intercepted, the magic cookie will be compromised. It can also be compromised if ~/.Xauthority can be read by an attacker.
The X Security Extension
Both host-based and magic cookie access control grant X server access on an all or nothing basis. A finer level of control is obviously desirable in some situations.
The X Security Extension (SECURITY) was introduced in 1996 but is only entering widespread use now, a decade later. It permits clients to be divided into two categories: trusted and untrusted . Trusted clients are permitted to use the entire X protocol; untrusted applications are limited in what they do—for example, they are prohibited from accessing window images of trusted clients, so xwd (Section 6.11) cannot usefully be used as an untrusted client.
Although having only two categories of applications doesn’t provide much granularity of control, it strikes a pragmatic balance between functionality and complexity. The simplicity of this approach helps ensure that it is actually used, and used correctly.
SECURITY enables the X server itself to generate magic cookies, and those magic cookies can be associated with attributes. The two commonly used attributes are:
(There is also a group attribute, but this is intended to be used with the Application Group extension, which is defunct.)
Any client that is trusted can ask the X server to create a new cookie. To create a new cookie from the command line, use the xauth command generate, which accepts a displayspec and a protocol as arguments. Optionally, you can include the keywords trusted or untrusted and the keyword timeout followed by a value in seconds. Here are some examples that generate tokens for display :2 on blue:
$xauth generate# Untrusted, 60 second timeout.blue:2.$xauth generate# Trusted, 5 minute timeoutblue:2. trusted timeout300$xauth generate# Untrusted, no timeoutblue:2. timeout0
The simplest way to use SECURITY is to leave the original, trusted magic cookie in place for local connections, and to generate a nonexpiring, untrusted key for remote TCP/IP connections. Running this command on the local display will set up the token for remote clients:
$xauth generate "$(hostname -f):$DISPLAY" . untrusted timeout 0Xauth will place the new magic cookie into the ~/.Xauthority file, leaving the local token unchanged.
One problem with the generate command is that it replaces any existing token (for the given display) with the newly generated value; therefore, the xauth list command will show only the most recently generated token for each displayspec.
To get around this problem, you can use the -f option to xauth, which enables you to specify an alternate authority file. To generate two untrusted keys and place them in separate files, you could use:
$xauth -f~/.Xauthority1generate blue:2 . untrusted$xauth -f~/.Xauthority2generate blue:2 . untrusted
You can then query a specific authority file to get the token:
$ xauth -f ~/.Xauthority1 list blue:2These tokens can be transferred to different remote machines as needed.
Effective use of the X Security extension mildly improves the basic cookie scheme to improve privacy, but the gains are minimal.
Low-Bandwidth X (LBX)
X provides a mechanism that is supposed to reduce bandwidth and latency requirements for X applications and that is called LBX—but it doesn’t make any appreciable difference for most applications. Nonetheless, it’s interesting to know how it works and why it’s fallen into disuse.
LBX was part of the illfated Broadway remote-access initiative, and it consists of two parts:
- LBXproxy
A proxy server that runs on the client host. X clients connect to LBXproxy instead of the X server; LBXproxy then communicates with the server, using compression and caching in an attempt to reduce traffic.
- The LBX Extension
If data is being compressed on one end of the connection, it must be decompressed at the other end. The LBX extension to the X server provides the other end of the link.
Before attempting to use LBX, confirm that your server supports it. You can grep the output of xdpyinfo (Section 6.2):
blue$ xdpyinfo|grep LBXAssuming the LBX extension is present—it is on most servers, though it may be dropped from the standard X distribution soon—you can set up the lbxproxy . This example sets up the proxy to receive X client connections directed to local display :5, and to forward the connections to the X server blue:2:
red$ lbxproxy -display blue:2 :5Once lbxproxy is running, you should direct clients on the remote machine to connect to the lbxproxy instead of the X server. Setting the DISPLAY variable is the most convenient way to do this:
red$ export DISPLAY=:5If you’re using cookies, you’ll notice that clients won’t be able to connect to lbxproxy, even if they can successfully connect to the X server:
	red$ xclock
	Xlib: connection to ":5.0" refused by server
	Xlib: No protocol specified

	Error: Can't open display: :5
This happens because the magic cookie is cross-referenced against the server display-spec in ~/.Xauthority instead of against the client displayspec. To correct the problem, make a copy of the server’s magic cookie (associated with blue:2 in this example) and cross-referenced it to lbxproxy’s display number (:5). The following command will automate the process:
red$ xauth add :5 . $(xauth list blue:2|sed "s/.*-1//")Why doesn’t lbxproxy make much difference? Its compression algorithm is weak, and the volume of cacheable data is insufficient to matter much.
There are some alternative packages available that work in a similar manner but offer somewhat better compression; the Differential X Protocol Compressor (dxpc ) is one, but it must be executed on both the server host and client host.
However, in many cases, good general compression on the network link appears to be as effective as a proxy compression tool.
X Tunneling with SSH
Secure Shell ( SSH) provides a simple and effective way to run X clients on a remote machine, addressing all three challenges of remote access. This is by far the preferred approach to running remote X clients.
At its most basic level, SSH provides remote shell access, acting like a secure version of telnet. But SSH also provides tunneling capability, which creates a listening port on one end of the connection and forwards any TCP/IP connections through the encrypted channel to a designated port on the remote host (or any system directly reachable from the remote host). Going one step further, SSH provides an enhanced version of the tunneling facility specifically for X traffic.
To connect to a remote host using SSH, simply specify a username (chris in this example) and host (red) in this format:
blue$ ssh chris@redYou may be prompted for your password on the remote host; you will then receive a shell prompt on that system.
X tunneling (called X11forwarding in the SSH documentation) may be enabled or disabled by default, depending on the system configuration; to force it on, use the -X (uppercase) option:
blue$ ssh -X chris@redYou can use the -x (lowercase) option to force X11 forwarding off:
blue$ ssh -x chris@red When an X11 forwarding connection is established, SSH generates a new magic cookie using the SECURITY extension (Sections 13.10 and 13.15), caches that on the originating machine, sets up the tunnel to the remote system, places a dummy magic cookie value in the remote ~/.Xauthority file, and sets the DISPLAY variable to point to the remote end of the tunnel. It then monitors traffic coming through the tunnel and changes any occurrence of the dummy cookie to the actual cookie.
This ensures that:
The cookie value is never passed unencrypted over the network.
If the remote ~/.Xauthority file is compromised, the cookie will not work for other connection paths to the server.
All of the X traffic going through the tunnel is encrypted so it is protected against snooping.
Therefore, once you have connected to a remote system using SSH with X11 forwarding turned on, you can start X clients.
It’s also possible to specify the name of the client directly on the SSH command line. For example, to run kcalc on blue:
blue$ ssh -X chris@red kcalcIn this case, no interactive remote shell will be started.
As they would say on late-night infomercials: “But wait—there’s more!” SSH also has a compression feature, which is enabled with the -C option:
blue$ ssh -X -C chris@red kcalcAlthough this is a simple data-stream compression (like gzip), it provides at least as much benefit as LBX (Section 13.11) in most use cases.
Using Public Keys with SSH
SSH provides a simple way of starting a remote X client with a single command (Section 13.12). It’s often convenient to place an SSH command in a .desktop file so that a menu option or icon will invoke a remote client automatically.
The user would probably not be aware that the application was running remotely— except that she will be prompted for a password each time she clicks on the icon.
It’s possible to configure SSH to use public key cryptography for authentication instead of passwords. This eliminates the password prompt altogether and makes remote client execution beautifully seamless.
Tip
Public key cryptography and the intricacies of SSH are fascinating subjects, and I cannot do them justice in a few short articles. For detailed information on SSH, consult SSH, The Secure Shell: The Definitive Guide by Daniel J. Barrett et al. (O’Reilly).
There are several versions of SSH in use, but the most widely used is the open source OpenSSH package. It is included with BSD systems (where it originated) as well as most Linux distributions and some commercial Unix systems.
To set up public key authentication using OpenSSH (once again, I’m using blue to mean the host on which the X server is running, and red to mean the host on which the X client will be run):
On blue, create a public key, pressing ENTER to accept the default values for the various prompts:
blue$
ssh-keygen -t rsaGenerating public/private rsa key pair. Enter file in which to save the key (/home/chris/.ssh/id_rsa):ENTEREnter passphrase (empty for no passphrase):ENTEREnter same passphrase again:ENTERYour identification has been saved in /home/chris/.ssh/id_rsa. Your public key has been saved in /home/chris/.ssh/id_rsa.pub. The key fingerprint is:aa:bb:cc:dd:ee:ff:aa:bb:cc:dd:ee:ff:aa:bb:cc:ddchris@blueAppend the contents of the file ~/.ssh/id_rsa.pub on blue to ~/.ssh/authorized_ keys on red:
blue$
ssh chris@red "cat >>~/.ssh/authorized_keys" <~/.ssh/id_rsa.pubchris@red's password:Ensure that ~/.ssh/authorized_keys on red has 0600 permission:
	blue$ ssh chris@red chmod 0600 ~/.ssh/authorized_keys
	chris@red's password:
Confirm that you can log in to the remote system without a password using SSH:
blue$
sshred$red
You can use the same public key with as many systems as you want; simply repeat step 2 for each additional system.
Using Passphrase Protection of SSH Keys
Using SSH without public key authentication results in a password request for each new SSH connection, but using SSH with public key authentication is only as secure as the ~/.ssh/id_rsa file. If that file is compromised—by a trojan program, account compromise, or even a stolen copy of a system backup—the accounts on other hosts will also be compromised. The challenge is balancing convenience against vulnerability.
SSH provides a solution to this problem too (of course!). Your private key file can be protected by a passphrase, and the ssh-agent program can be set up to request the passphrase only once per session, regardless of how many SSH connections are later established. If the private key file is stolen, it will be useless without the passphrase.
To set up a passphrase on your private key when using OpenSSH, execute ssh-keygen with the -p option. I used TOPsecret
blue$ssh-keygen -pEnter file in which the key is (/home/chris/.ssh/id_rsa):ENTERKey has comment '/home/chris/.ssh/id_rsa' Enter new passphrase (empty for no passphrase):Enter same passphrase again:TOPsecretYour identification has been saved with the new passphrase.TOPsecret
If you make only this change, then you will be prompted for your passphrase every time you use ssh to connect to red:
blue$sshEnter passphrase for key '/home/chris/.ssh/id_rsa':redred$TOPsecret
To set things up so that you are only prompted for the passphrase once per session, execute ssh-agent and ssh-add during session startup. There are many different places you can place these two commands—startx, xinitrc, ~/.kde/env/ssh.sh, and others—but the easiest place to put them is probably at the end of your shell startup script (~/.bash_profile for bash users, ~/.profile for sh, ksh, ash, and zsh users, or ~/ .login for csh users).
The two lines to add are:
	eval $(ssh-agent)
	ssh-add
(Users with a genuine old-school Bourne shell—both of you!—should substitute 'ssh-agent' for $(ssh-agent).)
Or, for CSH users:
	eval 'ssh-agent -c'
	ssh-add
These two lines will be executed when you log in using character mode or start a session using a display manager. Ssh-agent will be started in daemon mode, and will then pass environment variables back to your login shell to tell later SSH clients how to connect to it; ssh-add then instructs ssh-agent to load your private keys, at which point you will be prompted for any necessary passphrases. The password prompt will appear as text or in a dialog box as appropriate.
OpenSSH and the SECURITY Extension
Recent versions of OpenSSH support the SECURITY Extension and can generate untrusted magic cookies on-the-fly. The -X option has been changed to use untrusted cookies by default.
To use OpenSSH with trusted cookies, use the -Y option:
blue$ ssh -Y chris@red xwd -root >demo.xwd