
Chapter 15. Building a Kiosk
What Is a Kiosk, and Why Do I Want One?
A kiosk is a publicly accessible computer display dedicated to a specific task or group of tasks. Here are some examples:
An electronic catalog station in a library
An automated teller machine
A ticket-vending machine
A video wall
A browsing and word-processing system in an Internet café
Many of these applications—including the library card catalog and ticket-vending machine—are most easily developed and deployed using a restricted, browser-based interface.
Kiosks differ from normal user-interface configurations in the way that they are managed. Many kiosks do not offer normal windows, and instead run a single application that takes up the entire display; others offer a limited selection of applications in a normal window environment. The user-interface hardware may also be more limited than in a desktop configuration—for example, there may be no keyboard—and it may be more rugged: a trackball or touchscreen to control the pointer instead of a mouse.
In all cases, a kiosk configuration will strictly limit what the user can do and be robust enough that it will handle most error situations without intervention. This chapter covers configuring a kiosk using standard applications and tools.
Selecting Kiosk Hardware
If your kiosk will be used only by selected, trusted users (e.g., staff) or in a light-duty environment (Internet café), you may be able to get by with regular PC hardware.
For any other purpose, you will probably want to invest in specialized hardware. Kiosk hardware is usually similar to desktop hardware but is typically more rugged and is often mounted in a custom-built case. Obviously, the wide range of kiosk applications means that there is also a wide range of possible kiosk hardware configurations: what is suitable for a vending machine is not suitable for an Internet café.
Monitor
Although LCDs have long life, low-power consumption, and a flat surface, they usually have a soft plastic surface that is not sufficiently durable for public operation. Therefore, many kiosks use an LCD display covered by a glass, acrylic, or polycarbonate sheet, or a traditional CRT display. Since most kiosks are used from a standing position, the display may be farther from the user than a normal desktop display. Because some users may have visual impairment, it is best to use a large, bright, highcontrast display. The monitor should be positioned to accommodate users of many different heights, including people in wheelchairs.
For some applications such as public information displays or video walls, you may want to consider using a rear-projection screen and one or more LCD or DLP video projectors.
Pointer
Mice are inappropriate for most kiosks, because the cord and position sensor are susceptible to damage. When the kiosk application requires pointer positioning (not always the case), a touchscreen, touchpad, or trackball are usually used.
Keyboard
Some kiosk applications require a full keyboard. Keyboards are susceptible to dirt, abraded labels, and liquids; to deal with this, some kiosk builders use cheap keyboards that can be replaced inexpensively, while others choose rugged keyboards that resist liquids and can be easily cleaned. The keyboard can be mounted behind a metal or acrylic panel cut to shape.
If your application does not require a full keyboard, you may be able to use a USB numeric keypad instead; these are commonly marketed for use with laptops.
There are a number of companies that make custom keycaps for use with keyboards or keypads; you can order standard sets of specialized symbols, blank keycaps (for unused keys on the keyboard), or custom legends. Another possibility is mounting heavy-duty pushbuttons adjacent to the screen and wiring those pushbuttons in parallel with the keys on a keypad or keyboard; the application can then present soft keys—on-screen options that can be selected by pressing one of the adjacent buttons.
For applications that require only limited keyboard input, consider using a touchscreen and presenting the keyboard on-screen when necessary.
System Unit, Power Supply, and Ventilation
Most kiosks have an inner and outer case; the outer case is visible to the user and takes the form of a vending machine, podium, recessed wall unit, or whatever is suited to the application. The inner case is usually a standard or rackmount PC chassis. Because kiosks may run without inspection for weeks or months at a time, it is wise to select a basic but rugged chassis with a good power supply and extra fans for the system unit. Easily washed air filters which are oversized (in case they become partially clogged) will help prolong the life of the unit, and airflow through the outer case or cabinet of the kiosk should also be carefully planned. Ventilation louvers should be positioned to allow good airflow while eliminating the possibility of liquids or foreign objects reaching internal components (an internal baffle can prove helpful). A good UPS with temperature monitoring is highly recommended. Depending on the application, the external power supply cable, network cable, and (if necessary) alarm cables may need to be armored.
Configure X for a Kiosk
Configuring X for a kiosk involves removing features to limit what the user can do. The three main configuration entries for this can be placed in the ServerFlags section:
	Section "ServerFlags"
	    Option    "DontZoom"
	    Option    "DontZap"
	    Option    "DontVTSwitch"
	EndSection
This prevents the user from changing the display resolution, terminating the X server, or switching virtual terminals.
During the development and testing of the kiosk, you may want to store the kiosk X configuration in a separate file (such as /etc/X11/xorg.kiosk.conf) so that the default X server retains its original configuration. To start X with the kiosk configuration, supply the -config argument on the command line:
blue$ X -config /etc/X11/xorg.kiosk.confControlling the Keyboard
Many programs have special functions that can be invoked using function keys, Alt-or Ctrl-key combinations, or Alt-Ctrl-Shift-modified mouse clicks. To prevent the users from accessing these functions, you can modify the keyboard map using the X Keyboard Extension or the xmodmap command. In most cases, the xmodmap command provides the simplest solution.
Here is an xmodmap file that will disable the Ctrl, Alt, and CapsLock keys as well as function keys F1–F12:
	! clear unneeded modifier keys
	clear CTRL
	clear mod1
	clear mod2
	clear mod3
	clear mod4
	clear mod5
	clear lock

	! clear the function keys (F1-F12)
	keysym 0xffbe =
	keysym 0xffbf =
	keysym 0xffc0 =
	keysym 0xffc1 =
	keysym 0xffc2 =
	keysym 0xffc3 =
	keysym 0xffc4 =
	keysym 0xffc5 =
	keysym 0xffc6 =
	keysym 0xffc7 =
	keysym 0xffc8 =
	keysym 0xffc9 =
To use this file, pass the filename (/usr/local/kiosk/xmodmap.txt in this case) to xmodmap as an argument:
$ xmodmap /usr/local/kiosk/xmodmap.txtTo disable other keys, discover the keycode by running the xev utility, then add additional lines to clear out the key symbols (also called keysyms) associated with that keycode. For example, to disable the A key, run xev and press the A key. xev will output a message like this on stdout:
KeyPress event, serial 29, synthetic NO, window 0x3a00001, root 0x119, subw 0x0, time 342476839, (176,174), root:(1062,320),state 0x10, keycode 38 (keysym 0x61, a), same_screen YES,XLookupString gives 1 bytes: (61) "a" XmbLookupString gives 1 bytes: (61) "a" XFilterEvent returns: False KeyRelease event, serial 29, synthetic NO, window 0x3a00001, root 0x119, subw 0x0, time 342476939, (176,174), root:(1062,320),state 0x10, keycode 38 (keysym 0x61, a), same_screen YES,XLookupString gives 1 bytes: (61) "a"
From this output you can see that the keysym for A is 0x0061; append a line to the xmodmap file disabling that key:
keysym 0x0061 =
Controlling the Mouse
The middle and left mouse buttons can be used to access special features of some programs. For example, if you highlight a URI in Firefox and press the middle mouse button on a nonlink portion of a web page, the browser will load the page at that URI. Likewise, the right mouse button provides a pop-up menu of features that you may not want your users to access, such as saving onto the local filesystem.
You can configure which physical mouse buttons generate which button event using xmodmap. Normally, button 1 generates a button 1 event, button 2 generates a button 2 event, and so forth.
To change the mouse button mapping, first find out how many mouse buttons are configured by your X server:
$ xmodmap -pp
	There are 5 pointer buttons defined.


	Physical       Button
	 Button         Code
	    1             1
	    2             2
	    3             3
	    4             4
	    5             5
In normal operation, buttons 1–3 correspond to the left, middle, and right mouse buttons; button 4 and 5 are scrollwheel up and down; and buttons 6 and 7 are scroll-wheel left and right (for mice that have two scrollwheels, a tiltable scrollwheel, or buttons on the side of the mouse and typically used for browser history navigation).
You can use the xmodmap pointer command to specify the button event code for each physical button:
$ xmodmap -e "pointer = 1 10 11 4 5"You must specify a code for each button defined on the mouse (five for this mouse).
In this example, button 1 (left button) and buttons 4 and 5 (scrollwheel up and down) retain their original meaning, but button 2 will generate a button 10 event, and button 3 will generate a button 11 event, both of which are ignored by most applications. This effectively disables buttons 2 and 3.
If you are using xmodmap to change the keyboard, you can append the pointer line to the end of the xmodmap input file:
pointer = 1 10 11 4 5Some applications may not use the pointer mapping set by xmodmap and may continue to recognize all of the mouse buttons. In that case, you can disable all but the first mouse button by using the Buttons option in the mouse’s InputDevice section of the X server configuration file:
	Section "InputDevice"
	        Identifier  "Mouse0"
	        Driver      "mouse"
	        Option      "Buttons" "1"
	        Option      "Protocol" "IMPS/
	        Option      "Device" "/dev/input/
	EndSection
Starting a Single Fullscreen Application
For a kiosk that runs only one application, it makes sense to omit the window manager and just start that one application in fullscreen mode.
For many applications, this can be done with a command-line geometry specification; on a 1024 x 768 screen, this opens a full-screen xclock:
$ xclock -geometry 1024x768+0+0It is common to use a web browser as a kiosk application. Unfortunately, most of the current generation of web browsers ignores command-line geometry specifications, and, although they have a fullscreen mode, this mode is not accessible from the command line. In that case, it may be necessary to use a browser extension or chrome file; alternately, you can use JavaScript to invoke a full-screen browser window, using a file such as this:
	<?xml version='1.0' encoding='UTF-8'?>
	<!DOCTYPE html PUBLIC
	        '-//W3C//DTD XHTML 1.0 Transitional//EN'
	        'http://www.w3.org/TR/xhtml1/DTD/xhtml1-transitional.dtd'>

	<html xmlns='http://www.w3.org/1999/xhtml' xml:lang='en'>
	  <head>
	        <title>Kiosk Startup</title>
	  </head>
	  <body>
	    <script language="JavaScript">
	        window.open('http://yellow/','master','width=1024,height=768,menubar=no')
	    </script>
	  </body>
</html>Insert the desired URI, width, and height into the window.open line, save the file locally (e.g., at /usr/local/kiosk/index.html) and then invoke the browser with the script:
$ firefox file:/usr/local/kiosk/index.htmlThis will start a second window on top of the first, with a 1024 x 768 geometry and no menu bar. Since no window manager is running, the user cannot close, minimize, or move the top window to return to the first window. To disable the status bar, navigation bar, and other user interface features on a browser such as Mozilla or Fire-fox, start the browser normally and deselect those features using the View menu, then exit the browser. The browser configuration files will automatically be updated with your preferences.
Network Status Monitoring
Impaired or broken kiosk operation can be very frustrating to users, so automatic monitoring (and notification) of network status may help prevent users from taking out their frustration on your hardware.
If you’re using a browser as your kiosk application, you can use a command such as wget to periodically poll the server and determine whether it is available. For example, if the main index page for the kiosk is http://yellow, you could check whether the remote server is prepared to serve that page with this command:
blue$ wget http://yellow/ --spider -t 1The exit status will be 0 if the page is available, or 1 if it is not. The --spider argument instructs wget to check the page availability (using the HTTP HEAD command) rather than retrieve the page (using HTTP GET), therefore reducing the amount of data transferred over the network.
If you’re using another network-based service, you can use any other appropriate tool (such as ping for general server connectivity, showmount -e for NFS servers, or a netcat or a Perl script for a custom service) to test whether the service the kiosk needs is available.
Using the wget command, we can create a script that will place a message on the kiosk display when the remote server becomes unavailable and removes it when the remote server comes back online:
#!/bin/bash # # monitor.sh :: monitor server availability, warn user if service unavailable # # === Configuration variables # Seconds between service availability tests SECONDS=15 # Command to test the server availability CHECK="wget http://yellow/ --spider -t 1"# URIs for warning message (should be file://...) and kiosk's homepage WARN="file:/usr/local/kiosk/outage_warning.html"HOMEPAGE="http://yellow/"# === End of configuration variables STATE="UP" while sleep $SECONDS do $CHECK RESULT=$? case "$STATE" in "UP") if [ "$RESULT" -ne "0" ] then firefox -remote "openurl($WARN)" STATE="DOWN" fi ;; "DOWN") if [ "$RESULT" -eq 0 ] then firefox -remote "openurl($HOMEPAGE)" STATE="UP" fi ;; esac done
This script uses the Firefox -remote argument to instruct a running instance of Firefox to load a local error message page ($WARN) or the kiosk’s home page on the remote server ($HOMEPAGE) when connectivity to the remote server is lost or restored.
If you’re setting up a kiosk that uses an application other than a browser, substitute another command to check that the remote server is accessible and replace the browser messages with a graphic image that will fill the screen when the server is down:
#!/bin/bash # # monitor.sh :: monitor server availability, warn user if service unavailable # # === Configuration variables # Seconds between service availability tests SECONDS=15 # Command to test the server availability CHECK="ping yellow"# File containing a full-screen warning image WARN="file:/usr/local/kiosk/outage_warning.tiff"# === End of configuration variables STATE="UP" while sleep $SECONDS do $CHECK RESULT=$? case "$STATE" in "UP") if [ "$RESULT" -ne "0" ] then xloadimage -fullscreen $WARN STATE="DOWN" fi ;; "DOWN") if [ "$RESULT" -eq 0 ] then killall xloadimage # Add any application-reset commands here STATE="UP" fi ;; esac done
Tip
If xloadimage is not included with your distribution/system, you can obtain it from ftp://ftp.x.org/R5contrib/ or use a similar application such as ImageMagick’s display. Note that both xloadimage and display can be exited by pressing Q, so they may not be appropriate for desktops that are equipped with a full keyboard (but will work fine on kiosks that have only a keypad, soft keys, or a pointer device).
Using xscreensaver to Reset a Kiosk
It’s often desirable to reset a kiosk after a period of inactivity. For example, if a kiosk is presenting a library catalog, it should return to the library home page after a few minutes of idle time.
Although there are many ways to detect kiosk inactivity, xscreensaver (Section 6.13) already contains the required logic and can be easily put to use.
xscreensaver uses various graphics hacks to present screensaver effects—whether bouncing cows, fractals, or floating text. You can add, as an additional hack, a script that simply resets your kiosk application and deactivates the screensaver, or you can create a script that resets your application and then executes an existing graphics hack.
To simply reset your application and the disable the screensaver, create a script like this:
	#!/bin/bash
	#
	# kiosk-reset :: xscreensaver 'hack' to reset the kiosk

	# Reset the kiosk application (Firefox browser in this case)
	firefox -remote 'openURL(http://yellow)' &

	# Deactivate the screensaver to return to normal display mode
/usr/bin/xscreensaver-command -deactivateName this script kiosk-reset, add execute permission, and save it in /usr/libexec/ xscreensaver (or whatever location is used by your version of xscreensaver).
Next, add a line configuring this hack into /usr/share/X11/app-defaults/XScreenSaver, in the *programs section:
	*programs:
	  "Kiosk reset" /usr/libexec/xscreensaver/kiosk-reset

	  "Qix (solid)" /usr/libexec/xscreensaver/qix -root -solid -segments 100
If you have an existing ~/.xscreensaver file, delete it so that the changes to /usr/share/ X11/app-defaults/XScreenSaver are detected.
Use the xscreensaver-demo application to configure xscreensaver, specifying the length of idle time before the screensaver should kick in and denoting Kiosk reset as the one and only screensaver to be used.
The script above will reset the Firefox browser to the specified page, and then resume normal operation; however, the screen will go black briefly when xscreensaver kicks in.
Instead of this unpolished blanking effect, it may be better to run one of the existing hacks to present a message to users while the kiosk is idle; for example, the GLslideshow hack can very attractively zoom around and cross-fade between product images, or fontglide can present advertising messages or announcements in an attention-getting manner.
To invoke another hack from your script, you need to find the command line for that hack; this can most easily be done by copying (or modifying) the command line for the hack from /usr/share/X11/app-defaults/XScreenSaver, or configuring the hack using the Settings feature in /usr/share/X11/app-defaults/XScreenSaver and then using the Advanced tab to view the command line.
Replace the xscreensaver-command line in the earlier kiosk-reset script with the command line for your selected hack:
#!/bin/bash # # kiosk-reset :: xscreensaver 'hack' to reset the kiosk # Reset the kiosk application (Firefox browser in this case) firefox -remote 'openURL(http://yellow/)' & # Execute an existing xscreensaver hack exec/usr/libexec/xscreensaver/phosphor -program'echo -e "fX Power Toolsby Chris Tyler O'Reilly Media, 2007 Everything you ever wanted to know about X - and then some -Slashdot Anonymous Coward Touch the mouse to begin..."'-root
Refining the Kiosk Appearance
The default X cursor (which is a thick X, visible whenever an application has not taken overridden the default cursor shape) and the root window appearance (either solid black or a stippled grayscale pattern) are ugly. You can control both using the xsetroot command:
blue$ xsetroot -cursor_name left_ptr -solid steelblueleft_ptr is the name of the standard, northwest-pointing arrow cursor; to see other possible cursor names, read /usr/include/X11/cursorfont.h. To see the cursor shapes, use the X font display program, and match up the character numbers (seen at the top of the window when you click on a shape) with the numbers in /usr/include/X11/ cursorfont.h:
$ xfd -fn cursorThe -solid argument takes a color name (Section 3.13) or a color code (hex digits in the form #rrbbgg) as its argument.
Putting It All Together: Scripting a Kiosk
The core of most kiosk systems is a script (or group of scripts) that start the X server, kiosk applications, and any related services, and then monitor the kiosk application, restarting the X sever or applications when necessary.
Here is an example of a basic kiosk script, combining the ideas from the other articles in this chapter:
#!/bin/bash # # kiosk.sh :: start a web browser in Kiosk mode # # --- Configuration variables export DISPLAY=":1" BROWSER="/usr/bin/mozilla"STARTPAGE="file:/usr/local/kiosk/index.html"HOMEPAGE="http://yellow/"WARN=file:"/usr/local/kiosk/outage_warning.html"XSERVER="/usr/bin/X"XMODMAP="/usr/bin/xmodmap /usr/local/kiosk/xmodmap.txt"SCREENSAVER="/usr/bin/xscreensaver -nosplash"SCREENSETUP="xsetroot -cursor_name left_ptr -solid blue"SECONDS="15"CHECK="wget $HOMEPAGE --spider -t 1"# --- End of configuration variables while true do # Step 1: Start the X server, allowing local connections only $XSERVER $DISPLAY -nolisten tcp -ac -terminate & XPID=$! # Step 2: Start the screensaver $SCREENSAVER & # Step 3: Adjust the keymapping, pointer configuration, mouse shape, # and root window color $XMODMAP $SCREENSETUP # Step 4: Start the browser $BROWSER $STARTPAGE & BROWSERPID=$! # Step 5: Start the network monitoring code ( sleep 10 # Give the browser a chance to start STATE="UP" while sleep $SECONDS do $CHECK RESULT=$? case "$STATE" in "UP") if [ "$RESULT" -ne "0" ] then firefox -remote "openurl($WARN)" STATE="DOWN" fi ;; "DOWN") if [ "$RESULT" -eq 0 ] then firefox -remote "openurl($HOMEPAGE)" STATE="UP" fi ;; esac done )& # Step 6: Wait until the application dies wait $BROWSERPID # Step 7: Kill everything and start over killall -KILL $BROWSERPID $XPID done
The core of the script is a loop, which will restart the kiosk if it stops. The X server is started without access controls, but only local connections are accepted; in most cases, that should be sufficient to prevent external clients from connecting.
After the X server is started, the screensaver is started. This is done first to ensure that the X server always has a connected client, so that it does not reset prematurely—or terminate in this case, due to the -terminate option on the X command line. This enables the script to run xmodmap without the server resetting and clearing out the xmodmap settings as soon as it’s done. The script then runs the browser program—which could just as easily be any other full-screen program of your choosing—and then the network monitoring code in the background.
Finally, the script monitors the application (Firefox) to see if it terminates—which shouldn’t happen, but many programs have slow memory leaks or other problems that may cause them to fail after extended periods of use. An X server failure should automatically cause the application to terminate. Nonetheless, the script watches for this condition, and rather than leave anything to chance, it kills off all of the child processes and restarts all of them.
Note that display :1 is used here; this facilitates testing of the kiosk script while display :0 is active on the system.
Booting a Kiosk
Most kiosk systems boot directly into the configured kiosk application. This can easily be configured and tested on a system that supports runlevels.
Traditionally, runlevel 4 is unused, so it is a perfect candidate for a kiosk mode. It’s easiest to start off by copying the scripts for a working runlevel. On a Fedora system, you could copy the runlevel 5 configuration with this command:
blue$ cp -l /etc/rc.d/rc5.d /etc/rc.d/rc4.dOther systems may use other directories; for example, Debian/Ubuntu uses /etc/rc4.d and /etc/rc5.d.
Next, disable all unnecessary services (this will depend on the kiosk application). For example, to delete the bluetooth services:
blue# chkconfig bluetooth offWarning
It is a good idea to leave ssh enabled, so that you can log in to the kiosk remotely for diagnostic and maintenance work.
You can also use your system-or distribution-specific configuration tools, but they will have the same effect: deleting symlinks from the directory for runlevel 4.
You will then need to modify /etc/inittab to disable character-mode logins in runlevel 4. Here are the affected lines:
	# Run gettys in standard runlevels
	1:2345:respawn:/sbin/mingetty tty1
	2:2345:respawn:/sbin/mingetty tty2
	3:2345:respawn:/sbin/mingetty tty3
	4:2345:respawn:/sbin/mingetty tty4
	5:2345:respawn:/sbin/mingetty tty5
	6:2345:respawn:/sbin/mingetty tty6
In each line, the character 4 in the second field must be removed:
	# Run gettys in standard runlevels
	1:235:respawn:/sbin/mingetty tty1
	2:235:respawn:/sbin/mingetty tty2
	3:235:respawn:/sbin/mingetty tty3
	4:235:respawn:/sbin/mingetty tty4
	5:235:respawn:/sbin/mingetty tty5
	6:235:respawn:/sbin/mingetty tty6
Finally, append a line to this file to configure init to start the kiosk script (and respawn it if it dies) only in runlevel 4:
ks:4:respawn:/usr/local/kiosk/kiosk.shWhenever you change /etc/inittab, you must inform init of the change:
# init qYou can then test the kiosk mode by switching into from your current runlevel:
# init 4Once you are confident that the kiosk is properly configured, you can change the default system boot runlevel by changing the initdefault line in /etc/inittab. To temporarily boot into runlevel 3 or 5 for maintenance, append the desired runlevel to the boot parameters (Section 2.5).
Creating a Video Wall
Video walls—huge grids of monitor or projection screens set up to show large images—are always impressive. Xinerama can be used to create displays that span as many screens as you have video cards, but typical PC motherboard design limits you to six or seven video cards. For larger displays, DMX provides a way of merging displays from multiple hosts into one giant display.
DMX stands for Distributed Multihead X. The DMX server, Xdmx, is an X server that uses other X servers as screens. This permits you to combine almost any number of monitors into one giant display.
To use Xdmx in its most basic form, start it with two or more -display arguments, a display number for the Xdmx server itself and any other standard X server options:
blue$ Xdmx -display blue:0 -display red:0 -ac +xinerama :35In this example, the Xdmx server is display :35, and it uses blue:0 (left) and red:0 (right) as screens in a Xinerama configuration with no access control. If blue:0 and red:0 are both 800 x 600 in size, then the Xdmx server will have a display resolution of 1600 x 600 pixels.
In order to configure the spatial relationship of the constituent displays/screens, Xdmx provides a configuration file option. A simple config file looks like this:
	virtual testconfig 1600x600 {
	    display blue:0 800x600 @0x0;
	    display red:0 800x600 @800x0;
	}
The file consists of one or more configurations, each of which consists of the key-word virtual, a name assigned to this configuration, and a list of displays enclosed in braces. Each display entry starts with the keyword display followed by the displayspec (Section 1.12), display geometry, and the position of that display within the Xdmx display space. Semicolons separate the display entries. This example is the same as the Xdmx command shown earlier, and it configures two 800 x 600 displays into one 1600 x 600 display.
The configuration file is used with the -configfile option to Xdmx:
blue$ Xdmx -configfile dmxconfigfile -ac +xinerama :35If the config file includes multiple configurations, select one with the -config option:
blue$ Xdmx -configfile dmxconfigfile -config testconfig -ac +xinerama:35If you’re going to configure multiple screens on each host, I recommend that the screens be configured using Xinerama at the host level, so that Xdmx has only one entry for each display. For example, to build a 16-monitor grid where four 800 x 600 monitors are controlled by each of four hosts (host0 through host3), the four monitors on each host should be configured using Xinerama (Section 4.2) to present a single 3200 x 600 display (one row of the grid). The Xdmx configuration would then look like this:
virtual grid 3200x2400 {
display host0:0 3200x600 @0x0;
display host1:0 3200x600 @0x600;
display host2:0 3200x600 @0x1200;
display host3:0 3200x600 @0x1800;
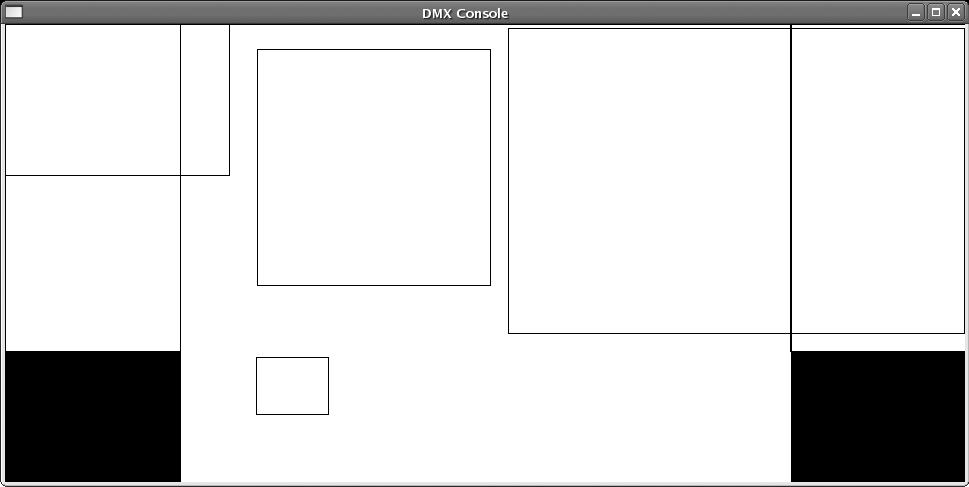
}Xdmx will take its input from the first display specified, unless the -input option is used. The argument to -input can be any of the backend (hardware) displays in the configuration, or it can be a separate X server, in which case a DMX Console is drawn that shows outlines of the various backend displays and an outline of each window. Figure 15-1 shows a DMX Console window; note that there are inaccessible areas in this Xinerama configuration.
There are several things to keep in mind when configuring DMX:
Performance will be degraded by the simple fact that multiple X servers will be processing the command and reply streams and the amount of network traffic that will be generated.
Xvideo and XVideo-MotionCompensation extensions will not be available through DMX. Video and animation will have to be drawn using traditional X operations or through the RENDER extension. If you’re using mplayer, this can be configured using the
-vo x11option.GLX is available through DMX if all of the backend displays support it.
DRI will not be available.
Tip
There is a graphical configuration tool that is shipped with Xdmx named xdmxconfig, but the configuration files generated by that program may need editing before they are used. Specifically, some versions will insert slash characters which the Xdmx server will parse incorrectly. Deleting the slashes will clear up the problem.