
Appendix A: Setting Up Android SDK and ADB Tools
In this appendix:
• Installing the Java Development Kit
• Installing the Android SDK
• Installing the platform tools
• Setting up environment variables for Windows computers
This appendix helps you to set up the Android developer tools you use to root and hack your phone.
Installing the Java Development Kit
The first step to getting access to the Android developer tools is to download the Java Development Kit (JDK). Although you do not use the tools provided by the JDK, it must be installed for you to be able to install the Android SDK.
1. Navigate your browser to www.oracle.com/technetwork/java/javase/downloads/ (see Figure A-1). Any current version will work with Android SDK.

Figure A-1: Downloading the JDK
2. Click the Java Platform (JDK) button.
3. Click to accept the licensing agreements and then select the correct installer for your computer. Most Windows users will click on Windows x86. If you have 64-bit Windows, click the x64 link.
4. Download the installer to a location you can easily find on your computer.
5. Run the installer executable.
6. Click through the JDK installation wizard accepting all the defaults.
Installing the Android SDK
Now you can download and run the installer for the Android SDK.
1. Navigate your browser to http://developer.android.com/sdk/.
2. Download the appropriate package for your operating system (Windows users should download the installer executable).
3. Run the downloaded package.
4. Click through the installer.
Take special note of where the Android SDK is installed. You can change the path but it is better to accept the default path. For 64-bit systems, the default path should be something like C:Program Files(x86)androidandroid-sdk-windows. For 32-bit systems, the only difference will be the absence of “(x86)” from the path.
When the wizard completes, it will have a check mark to start the SDK manager. You use the SDK manager to download the required platform tools (i.e. ADB and others). You can also launch the SDK manager from the operating system, as shown in Figure A-2.
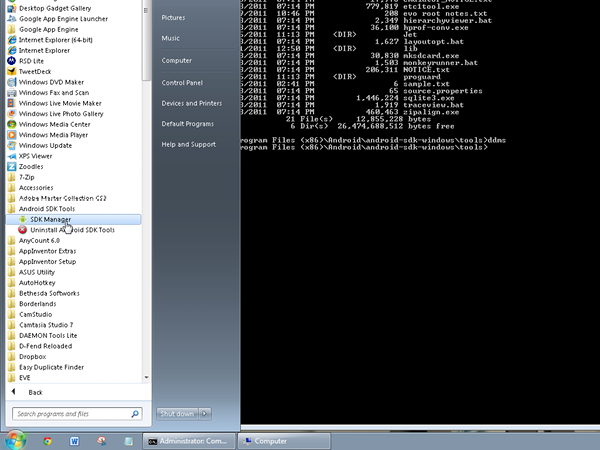
Figure A-2: Starting the SDK manager manually in Windows
Installing the Platform Tools
When the SDK Manager starts, it finds out from Google what packages are available for download and then presents you with an interface to select the packages you wish to install.
1. Click on the Android Platform Tools entry in the left-most column.
2. Click the Accept radio button below the description in the right-most column.
3. Accept the Google USB Driver Package by clicking the OK button.
4. Optionally, reject the other packages. This saves some download time.
5. Click the Install button at the bottom of the SDK Manager.
The selected SDK packages will download and install. When the download and installation process is complete, you can close the archive downloader and the SDK Manager.
At this point, the SDK platform tools (such as ADB, DDMS and others) should be installed on your computer. To verify this, follow these steps:
1. Open a command prompt window. (On Windows, press the Windows key+R. A run box will pop up. Type cmd and press Enter.)
2. In the command prompt window, you should see a path such as C:Users<username> followed by a flashing cursor. The cursor indicates where your typed text will show up. The path is the folder context in which you are issuing commands. In other words, every command typed at this prompt will attempt to run and affect the folder at C:Users<username>.
3. Click in the command prompt window, type cd , and press Enter.
The DOS command cd stands for “change directory”. The backslash is shorthand for “the root of this disk”. So the command cd means “change the folder to the root (or highest level) in this disk.” You can access any location from any folder using the target folder’s full path. It is important to learn these concepts because they are shared with the Android operating system command prompt. You will use these commands frequently.
4. Type cd “Program Files(x86)Androidandroid-sdk-windows” and press Enter.
This is the path you noted when the SDK Manager was installing the SDK. Make sure you include the quotation marks. Whenever there is a space in your command, you need to enclose it in quotation marks. If you are using a 32-bit operating system, you will not have the (x86) part of the path.
5. Now that you are in the context of the android-sdk-windows folder, you can test to see if the files and folders for the developer tools are functioning. Type dir and press Enter. The listing of folders and files should include a folder called platform-tools. This is the folder in which the ADB.exe command lives.
The dir command gives a listing of the files and folders in the current folder context in the Windows command window. At the Android command line (and in Linux), you use the ls command.
6. Type cd platform-tools and press Enter to change your context to the platform-tools folder.
7. Type adb and press Enter. You should see the ADB command help screen scroll past (see Figure A-3).
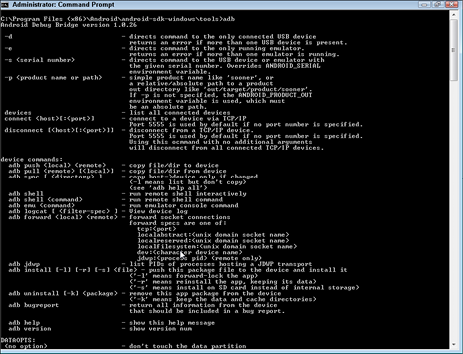
Figure A-3: The ADB help screen, which appears when you run ADB with no switches or parameters
Setting Up Windows Environment Variables
Now that you know that ADB is installed, you need to place a PATH entry in your system variables. This will enable you to use the ADB command regardless of the current folder context of your command prompt. For example, you want to be able to run the following command from the folder to which you have downloaded a custom TCP/IP module for your Android device:
adb push tcpip.ko systemetc
If you do not do this, you will always need to be in the c:Program Files (x86)Androidandroid-sdk-windowsplatform-tools folder to run ADB.
To make the ADB command universally accessible (in Windows Vista and Windows 7), follow these steps:
1. Click the Windows Start button.
2. Right-click Computer and select Properties.
3. Click Advanced System Settings in the left column to open the System Properties dialog box.
4. Click the Environment Variables button.
5. In the System Variables box, scroll down until you see an entry labeled PATH.
6. Double-click the PATH entry to open the Edit variable window.
7. Click in the Variable Value field and place your cursor at the very end of the string of text.
8. Type a semi-colon (;).
9. Type in the full path to your ADB command folder: C:Program Files (x86)Androidandroid-sdk-windowsplatform-tools.
10. Click on OK to close each of the open dialog boxes and close the System Properties box.
You should now be able to access ADB from a command line prompt, no matter which folder context your command line is in. This can be very useful if you are in the process of transferring exploit files from the folder into which you downloaded or extracted them.