
Chapter 10. Advanced Topics: Transforming XML with XSL
Topics in this section deal with transforming XML during import and export using the eXtensible Stylesheet Language Transforms (XSLT). Anyone can write XSLT with a text editor. Refer to Appendix A for some useful books to learn more about XSLT.
XSLT for Wrangling XML versus XML Scripting for Automating XML Publishing
Here’s what I think are the key differentiators for which process to use and why: if you need to change the XML structure itself as it is being imported or exported into InDesign, use XSL transforms. I provide some examples later in this book. InDesign has its limitations in transforming XML on import and export; the trick is to know when to “speak InDesign” and how.
Note
Although I provide working examples that you can copy, I do not detail every step that I take in writing the XSLT.
If you need to use InDesign to handle tasks that are inherent to InDesign itself, such as Map Tags to Styles, you could use the XML scripting capabilities. Figure 10-1 lists some of the available scripts.
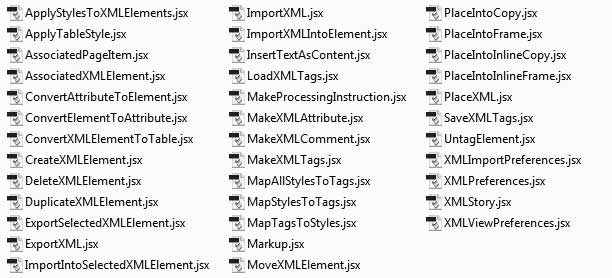
If you want to try more advanced automation, there are scripts for what Adobe terms “rules-based XML publishing” (Figure 10-2).

The rules are intended for the high-end publishing workflows used by magazine, catalog, and newspaper publishers. They are not shipped with the regular distribution of scripts in the InDesign Scripts folder. You may have to contact someone via the forums to get these scripts now.
It’s beyond the scope of a small book such as this to explore scripting and XML rules. Take a look at books such as Grant Gamble’s InDesign CS5 Automation Using XML & JavaScript or Shirley W. Hopkins’s AppleScripting Adobe InDesign CS5 and CS5.5 (both published through Createspace, 2011).
Now, on to what you might want to do with XML in InDesign using XSLT.
XSL: Extracting Elements from a Source XML File for a New Use
Sometimes, you know that there is content inside the main XML document that you would like to use for another purpose. The most common alternative purpose is something like making a list of figures or a table of contents from captions and titles in the XML file. But you can be more creative. Perhaps you need to find all of the keywords that were tagged in an XML file and extract them to build the foundations for a glossary XML file. Here is some XML content with keywords:
    <Story name="Residency Requirements">
        <SectionHead>Residency Requirements</SectionHead>
        <para>New York State law requires that all students  file proof of
               residence each academic year. For New York State residents,
               the proper form should be submitted upon registration.
               Until you comply with this requirement, you will be billed the
               <keyword>non-resident tuition rate</keyword> (twice the resident
               rate).
         </para>
        <topic title="Residents of Monroe County">
            <SubHeads>Residents of Monroe County</SubHeads>
            <para>If you have been a permanent legal resident of New York State
                  for the past year, and a resident of Monroe County for the
                  last six months,complete a Residency Certificate
                  <keyword>Affidavit</keyword>, sign it, and submit it
                  with your registration.
         </para>
        </topic> ...
    </Story>
An XSL transform can be pretty simple:
<xsl:stylesheet version="1.0" xmlns:xsl="http://www.w3.org/1999/XSL/Transform">
    <xsl:output method="xml" version="1.0" encoding="UTF-8" indent="no"/>
    <xsl:template match="/">
        <!-- make a new root element for the glossary XML -->
        <xsl:element name="glossary">
            <xsl:for-each select="//keyword">
                <!-- make an element for the term -->
                <xsl:element name="term">Term: <xsl:value-of select="."/>
                </xsl:element>
                <!-- make an element for the definition -->
                <xsl:element name="definition">Definition: </xsl:element>
            </xsl:for-each>
        </xsl:element>
    </xsl:template>
</xsl:stylesheet>
The results will be very useful: a new glossary XML file, with keywords as terms, and a blank definition element following each term, ready for an author to work on. Because the keywords were in the source XML and they are all now terms in the output XML, the transform makes it easy to correlate the glossary to the document that contains the keywords by filling in the definition:
<?xml version="1.0" encoding="UTF-8"?>
<glossary>
    <term>Term: non-resident tuition rate</term>
    <definition>Definition: </definition>
    <term>Term: Affidavit</term>
    <definition>Definition: </definition>
</glossary>
This type of XSL seems to work well on an existing InDesign file tagged with keywords. Upon export, if the XSL is used, the resulting file will just be the glossary XML, which you can put in a document of its own or into sidebars in a separate text flow in the same document as the original XML.
Alternatively, you could export the entire document XML and then apply the transform to the exported XML (using an XSLT processor such as Oxygen or XMLSpy) to get your starting glossary XML file.
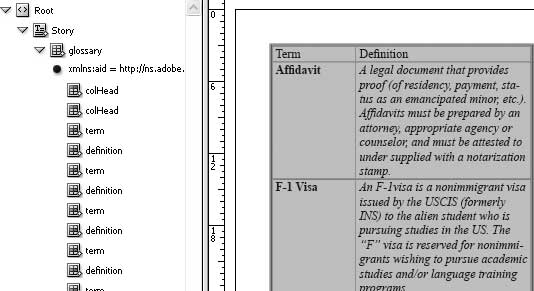
XSL: Getting the Elements to Sort Themselves
One of the common things that people who work with XML do is to sort XML content based on values of attributes on XML elements, or according to the text contained in the elements. Sorting is useful for tables of data, but sometimes it is used for blocks of content like glossaries or directory listings. For example, with this XML:
<?xml version="1.0" encoding="UTF-8"?>
<glossary>
<term>Affidavit</term>
<definition>A legal document that provides proof (of residency, payment,
status as an emancipated minor, etc.). Affidavits must be prepared by an
attorney, appropriate agency or counselor, and must be attested to under
supplied with a notarization stamp.</definition>
<term>F-1 Visa</term>
<definition>An F-1visa is a nonimmigrant visa issued by the USCIS (formerly
INS) to the alien student who is pursuing studies in the US. The "F" visa
is reserved for nonimmigrants wishing to pursue academic studies and/or
language training programs.</definition>
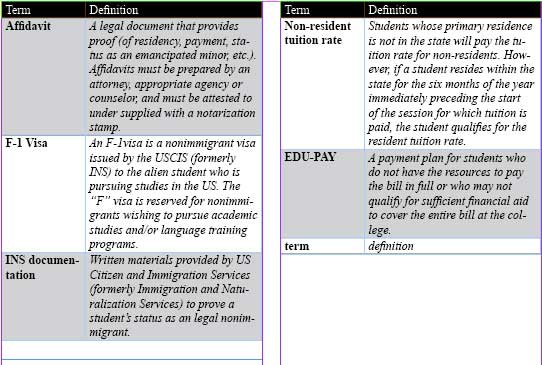
<term>INS documentation</term>
<definition>Written materials provided by US Citizen and Immigration
Services (formerly Immigration and Naturalization Services) to prove a
student's status as an legal nonimmigrant.</definition>
<term>Non-resident tuition rate</term>
<definition>Students whose primary residence is not in the state will pay
the tuition rate for non-residents. However, if a student resides within
the state for the six months of the year immediately preceding the start
of the session for which tuition is paid, the student qualifies for the
resident tuition rate.</definition>
<term>EDU-PAY</term>
<definition>A payment plan for students who do not have the resources to
pay the bill in full or who may not qualify for sufficient financial aid
to cover the entire bill at the college.</definition>
</glossary>you can use this XSL to write a top-level <glossary> element containing terms and
definitions sorted in ascending alphabetical order:
<?xml version="1.0" encoding="UTF-8"?>
<xsl:stylesheet version="1.0" xmlns:xsl="http://www.w3.org/1999/XSL/Transform">
    <xsl:output method="xml" version="1.0" encoding="UTF-8"/>
    <xsl:template match="/">
        <xsl:element name="glossary">
            <xsl:for-each select="glossary/term">
              <xsl:sort order="ascending"/>
              <xsl:copy-of select="."/>
            <xsl:copy-of select="following-sibling::definition[1]"/>
            </xsl:for-each>
        </xsl:element>
    </xsl:template>
</xsl:stylesheet>
This is the resulting XML; the definition for EDU-PAY is now near the top of the list of terms instead of at the end.
<glossary>
    <term>Affidavit</term>
    <definition>A legal document that provides proof (of residency, payment,
    status as an emancipated minor, etc.). Affidavits must be prepared by an
    attorney, appropriate agency or counselor, and must be attested to under
    supplied with a notarization stamp.</definition>
    <term>EDU-PAY</term>
    <definition>A payment plan for students who do not have the resources to
    pay the bill in full or who may not qualify for sufficient financial aid
    to cover the entire bill at the college.</definition>
    <term>F-1 Visa</term>
    <definition>An F-1visa is a nonimmigrant visa issued by the USCIS (formerly
    INS) to the alien student who is pursuing studies in the US. The "F" visa
    is reserved for nonimmigrants wishing to pursue academic studies and/or
    language training programs.</definition>
    <term>INS documentation</term>
    <definition>Written materials provided by US Citizen and Immigration
    Services (formerly Immigration and Naturalization Services) to prove a
    student's status as an legal nonimmigrant.</definition>
    <term>Non-resident tuition rate</term>
    <definition>Students whose primary residence is not in the state will pay
    the tuition rate for non-residents. However, if a student resides within
    the state for the six months of the year immediately preceding the start
    of the session for which tuition is paid, the student qualifies for the
    resident tuition rate.</definition>
</glossary>
You can apply sorts that create descending order by using xsl:sort order="descending" on the elements you
are looping over with the <xsl:for-each>. For more about loops and
sorts, see http://www.w3schools.com/xsl/el_sort.asp.
To sort before importing XML into InDesign, apply the sorting transform, and then import the resulting XML output.
Note
For large documents, sorting when importing the XML (applying the XSL transform within the XML Import Options dialog) may make InDesign crash. Generally, best practice is to do sorting as a preprocessing step before importing XML.
XSL: Getting Rid of Elements You Don’t Want
Excluding some of the elements can be accomplished with placeholders and the XML import option “Only import text elements that match existing structure” (see Understanding InDesign’s XML Import Options), but you might want to remove entire sets of elements, or only selected ones, on your way in or out of InDesign.
For example, let’s suppose that you have product catalog XML that
contains <price> elements that
have both <unit> and <bulk> elements.[5] You produce two catalogs: one for wholesalers and one for
consumers. You might use the same XML file for each catalog but suppress
whichever price that doesn’t apply in each catalog version.
Your XSL transform would look for the type of price you want in the catalog and copy only those products for import. This is the tiny example XML file, in which one element has a bulk price:
<?xml version="1.0" encoding="UTF-8"?>
<!-- <?xml-stylesheet type="text/xsl" href="bulkPrice.xsl"?> -->
<products>
    <product type="petToy">
        <name>Chewy Toy</name>
        <catno>D123</catno>
        <price currency="USD">
            <bulk qty="100">.39</bulk>
            <unit qty="1">.99</unit>
        </price>
        <unit pack="recyled" measure="imperial">4 oz.</unit>
        <description>Delicious enviro-friendly dog treat made with processed pig
         parts, shaped like a miniature pig.</description>
    </product>
    <product type="petToy">
        <name>Squeaky Toy</name>
        <catno>D456</catno>
        <price currency="USD">
            <unit qty="1">1.49</unit>
        </price>
        <unit pack="recyled" measure="imperial">5.1 oz.</unit>
        <description>Exciting enviro-friendly dog toy made with recycled,
         nontoxic, heavy-duty plastics. Squeak is air-produced, no hard parts
         inside. Safe for all mature dogs over 10 lbs. Not recommended for
         puppies and smaller dogs.</description>
    </product>
</products>
And here is a small XSL file that looks for a bulk price and copies
only <product> elements that have
one:
<?xml version="1.0" encoding="UTF-8"?>
<xsl:stylesheet version="1.0" xmlns:xsl="http://www.w3.org/1999/XSL/Transform">
    <xsl:output method="xml" version="1.0" standalone="yes"/>
    <xsl:template match="/">
        <xsl:apply-templates select="products"/>
    </xsl:template>
    <xsl:template match="products">
        <xsl:copy-of select="product[price/bulk !='']"/>
    </xsl:template>
</xsl:stylesheet>
The previous example XSL produces this XML output:
<?xml version="1.0" encoding="UTF-16" standalone="yes"?>
<product type="petToy">
    <name>Chewy Toy</name>
    <catno>D123</catno>
    <price currency="USD">
        <bulk qty="100">.39</bulk>
        <unit qty="1">.99</unit>
    </price>
    <unit pack="recyled" measure="imperial">4 oz.</unit>
    <description>Delicious enviro-friendly dog treat made with processed pig
    parts, shaped like a miniature pig.</description>
</product>
In the previous example, the Squeaky Toy item was excluded because it doesn’t have a bulk price. When the XML is imported into the wholesale catalog with the XSLT applied during import, the catalog content will be pertinent to the wholesale audience.
Alternately, you could process the original XML with XSL as a separate step before importing the XML into InDesign.
Creating Wrappers for Repeating Chunks
Sometimes you need to make a wrapper around part of the incoming XML to use the functions of InDesign placeholders or tables. With XSL, you can add an element to the original XML structure. Suppose you have a set of fairly complex elements that belong together, but they are just strung along one after another. In InDesign, you want to put each set into its own separate text flow. Here’s an example of how you could make this happen with our previous glossary XML example:
<xsl:stylesheet version="1.0" xmlns:xsl="http://www.w3.org/1999/XSL/Transform">
    <xsl:output method="xml" version="1.0" encoding="UTF-8" indent="no"/>
    <xsl:template match="/">
        <xsl:element name="glossary">
            <xsl:for-each select="glossary/term">
                <!-- start the wrapper element inside the for-each loop so it
                   will make a wrapper for each term and definition pair -->
                <xsl:element name="glossTerm">
                    <xsl:copy-of select="."/>
                    <xsl:copy-of select="following-sibling::definition[1]"/>
                </xsl:element>
                <!-- end the wrapper element-->
            </xsl:for-each>
        </xsl:element>
    </xsl:template>
</xsl:stylesheet>
The resulting XML has a wrapper around each term and definition pair:
<?xml version="1.0" encoding="UTF-16"?>
<glossary>
    <glossTerm>
        <term>Affidavit</term>
        <definition>A legal document that provides proof (of residency, payment,
        status as an emancipated minor, etc.). Affidavits must be prepared by
        an attorney, appropriate agency or counselor, and must be attested to
        under supplied with a notarization stamp.</definition>
    </glossTerm>
    <glossTerm>
        <term>F-1 Visa</term>
        <definition>An F-1visa is a nonimmigrant visa issued by the USCIS
         (formerly INS) to the alien student who is pursuing studies in the US.
         The "F" visa is reserved for nonimmigrants wishing to pursue academic
         studies and/or language training programs.</definition>
    </glossTerm>
    <glossTerm>
        <term>INS documentation</term>
        <definition>Written materials provided by US Citizen and Immigration
         Services (formerly Immigration and Naturalization Services) to prove a
         student's status as an legal nonimmigrant.</definition>
    </glossTerm>
    <glossTerm>
        <term>Non-resident tuition rate</term>
        <definition>Students whose primary residence is not in the state will
         pay the tuition rate for non-residents. However, if a student resides
         within the state for the six months of the year immediately preceding
         the start of the session for which tuition is paid, the student
         qualifies for the resident tuition rate.</definition>
    </glossTerm>
    <glossTerm>
        <term>EDU-PAY</term>
        <definition>A payment plan for students who do not have the
         resources to pay the bill in full or who may not qualify for sufficient
         financial aid to cover the entire bill at the college.</definition>
    </glossTerm>
</glossary>
If you have a text frame for each glossTerm, you can drag each of the terms into
its text frame. Or you can create a glossary as a text flow tagged as
<glossary> that you set up
previously for repeating block placeholder elements structured like this:
an element called <glossTerm>,
containing the <term> element,
followed by a manual line break, then a tab and a <definition> element, followed by a
paragraph break. See Figure 10-3.
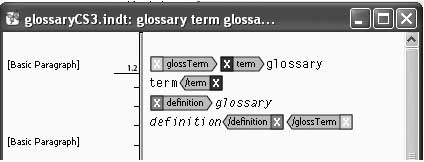
The <term> and <definition> elements are mapped to
character styles to make them bold and italic, respectively. The <glossTerm> element is mapped to a Basic
Paragraph style.
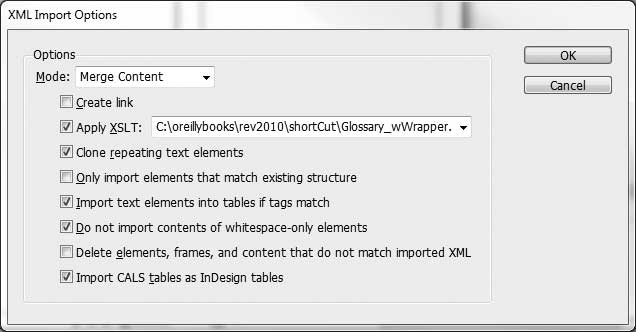
The XML Import Options dialog should look like Figure 10-4, pointing to the XSLT. The results will look like Figure 10-5 in InDesign.

By extrapolation, any time you need to make a repeating block, the same XSLT technique can be used to develop richer XML with the required wrapper elements.
Making a Table from Element Structures
Let’s use the same kind of concept to make an InDesign table from
our incoming XML. In this example, suppose that we do not want to have
<Table> and <Cell> elements in our source XML because
it violates our DTD. We can add the table markup solely within InDesign
and keep our XML source pure. We will use XSLT upon import into
InDesign.
We’ll go back to the InDesign placeholder concept first and make a
table that looks like what we want to generate (this is always the best
practice if you need to make tables from XML in InDesign). Our simple
table looks like Figure 10-6: the table is tagged
as <glossary> and consists of a
header row containing two cells tagged as <colHead> elements and another row
containing one cell tagged as <term> and one tagged as <definition>.
Note
InDesign doesn’t use “rows” in its internal table model. So the
table setup does not need anything tagged as <glossTerm> (which would map to a table
row logically) as a container for the term and definition pair.
Now we can use this XSLT upon import by selecting it in the Import XML dialog using the Apply XSLT option:
<?xml version="1.0" encoding="UTF-8"?>
<xsl:stylesheet version="1.0" xmlns:xsl="http://www.w3.org/1999/XSL/Transform">
<xsl:template match="/">
<xsl:element name="glossary">
<xsl:for-each select="glossary/term">
<!-- start the wrapper element inside the for-each loop so it
will make a wrapper for each term and definition pair -->
<xsl:element name="glossTerm">
<xsl:copy-of select="."/>
<xsl:copy-of select="following-sibling::definition[1]"/>
</xsl:element>
<!-- end the wrapper element-->
</xsl:for-each>
</xsl:element>
</xsl:template>
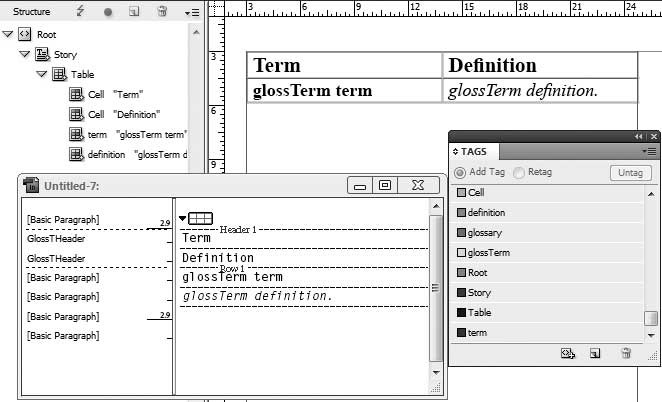
</xsl:stylesheet>By applying the XSLT on the glossary XML, we get the table shown in Figure 10-7 in InDesign.
If you set up the table with heading rows, they will repeat when the table flows from one text frame to another. If you use the alternate row coloring, you can achieve a look like Figure 10-8.
See the InDesign Help section on tables for more information on creating the look you want in your table layout.
Note
If you want to use tables to make run-in heads (similar to how many people do it in Microsoft Word), turn off the rules and shading in the table styles in InDesign. To make true run-in heads in InDesign, follow the directions in the InDesign Help for nested styles.
Upcasting Versus Downcasting
In XSLT, changing simple XML or HTML to a more complex XML form is upcasting and changing XML to a simpler DTD is downcasting.
It may be that you need to convert HTML content into some form of XML. The simplest way to do this is to save your HTML as XHTML, a form of HTML that conforms to XML rules. Once it has been cleaned up as XHTML, you need to change the file extension to .xml before you import it into InDesign.
Note
You can use an open source utility application called HTML Tidy to make valid XHTML from your web page content. It is also bundled with Adobe Dreamweaver and some other applications that you may be using. Check for the ability to save web content as XHTML or HTML 4.0, also know as “strict” HTML.
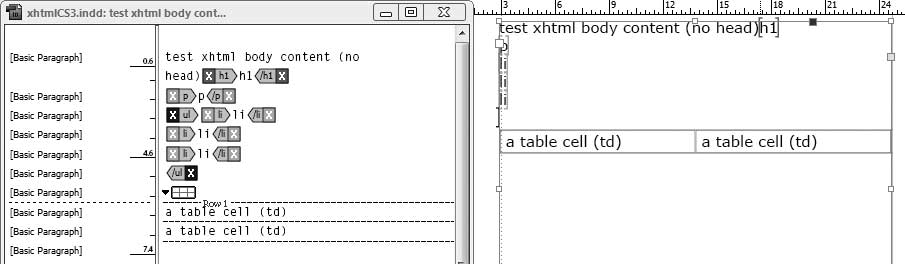
It is possible to import the XHTML file without any transformation,
but we want to modify the incoming XML somewhat to make it more compatible
with our InDesign layout. We will model the XHTML elements that correspond
to the InDesign tagging concepts. We don’t necessarily need the <head> element, because it is used only
for the HTML title bar and metadata, not for anything that we will print.
So we can make a structure like Figure 10-9 in InDesign.
Remember that you can use XSLT to change the order of elements (such as sorting alphabetically), but this step is best done as a preprocessing step before importing XML, rather than using the Apply XSLT option.
Note
To make the import process format imported XML text automatically, create paragraph styles that match the names of the XHTML elements (h1, p, li, etc.) and use Map Tags to Styles with the Map By Name box checked to apply the paragraph styles to the placeholder elements before you import the XML.
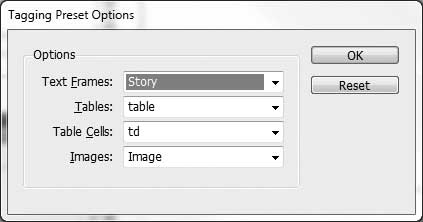
To make the XHTML <table>
element, which is always a lowercase word, match to InDesign’s internal
tag <Table>), which is always
uppercase, we will use the Tagging Presets dialog on the Tags panel (see
Figure 10-10). We also want
the <td> element to map to the
InDesign <Cell>.
In my tests, I used a simple XHTML file that looked like this:
<?xml version="1.0" encoding="UTF-8"?>
<!-- <?xml-stylesheet type="text/xsl" href="xmlizeXHTML.xslt"?> -->
<html>
    <head>
        <title>XHTML example</title>
    </head>
    <body>
        <h1>An example of XHTML</h1>
        <p>Some general rules for XHTML are</p>
        <ul>
            <li>Every start tag must have a matching end tag</li>
            <li>All tag pairs must end without crossing over other end tags
                  (to create properly nested structures)</li>            <li>Tag names cannot start with a number, and they cannot include
                  any spaces, or "illegal" characters, such as  ? and /, which
                  can be confused with parts of the markup and processing
                  instructions.</li>
        </ul>
        <table border="1">
            <tbody>
                <tr><th>a table header (th)</th></tr>
                <tr><td>a table cell (td)</td></tr>
            </tbody>
        </table>
    </body>
</html>
The XSLT that we will use to simplify the XHTML looks like this (although this example is not developed to handle all possible XHTML elements):
<?xml version="1.0" encoding="UTF-8"?>
<xsl:stylesheet version="1.0" xmlns:xsl="http://www.w3.org/1999/XSL/Transform">
    <xsl:output method="xml" version="1.0" encoding="UTF-8" indent="yes"/>
    <xsl:template match="/">
        <xsl:apply-templates select="html/body"></xsl:apply-templates>
    </xsl:template>
    <xsl:template match="html/body">
    <xsl:element name="body"><xsl:apply-templates/></xsl:element>
    </xsl:template>
    <!-- copy some elements directly -->
    <xsl:template match="h1|h2|h3|h4|h5|h6|p|ul|ol"><xsl:copy-of select="."/>
    </xsl:template>
    <!-- simplify the table structure to what InDesign uses,
       no tbody or tr elements needed -->
    <xsl:template match="table">
        <xsl:element name="Table"><xsl:apply-templates/></xsl:element>
    </xsl:template>
    <xsl:template match="tbody"><xsl:apply-templates select="tr"/>
    </xsl:template>
    <xsl:template match="tr"><xsl:apply-templates select="th|td"/>
    </xsl:template>
    <xsl:template match="th"><xsl:element name="Cell"><xsl:apply-templates/>
    </xsl:element>
    </xsl:template>
    <xsl:template match="td"><xsl:copy-of select="."/></xsl:template>
    <xsl:template match="img">
        <xsl:element name="Image"><xsl:attribute name="href">
         <xsl:value-of select="@href"/></xsl:attribute></xsl:element>
    </xsl:template>
    <!-- exclude the head tag content -->
    <xsl:template match="html/head"/>
</xsl:stylesheet>
We can import the XML and apply the XSLT to it as it comes in. Doing
so will strip off the unnecessary <head> element and simplify the <table> by removing the <tbody> and <tr> tags. Select the <body> placeholder element in the
structure view and use File→Import XML,
then select the XHTML file that you saved with a .xml extension.
Note
The import operation sometimes crashed when I selected an <html> element in the placeholder as the
element to import into. Importing worked when I selected the <body> tag as the location to import the
XML, possibly because we are creating an XML file that uses the <body> element as its root. At any rate,
be forewarned that importing and applying XSLT can be fraught with
peril—save a copy of the file with placeholders or make it an InDesign
template before you start applying XSLT while importing XML.
The settings for the XML Import Options dialog will be: Apply XSLT, “Clone repeating text elements” (for the ul/li structure), “Only import elements that match existing structure” (it is important to check this), and “Do not import contents of whitespace-only elements”; see Figure 10-11.

The results, after some tinkering with the Paragraph styles, are shown in Figure 10-12.

Upcasting from HTML to XML for InDesign Import
You can extend this concept to all the tags in the official XHTML DTD, if you wish. Generally, you would want to use XSLT for the following tasks:
To remove unnecessary structure that InDesign doesn’t use (such as the
<head>,<tbody>, and<tr>elements)To wrap elements that you want to have treated as repeating blocks (such as
<ul>or<ol>elements that contain<li>elements)To change names of elements to match InDesign’s built-in names (such as Table and Cell)
Downcasting to HTML
In some cases (although who would ever want to do this?), you might want to save some XML in InDesign as web page content that matches a particular CSS. You can do this by saving the content with an XSLT written to downcast the XML structure to standard HTML tags. (See also the section Exporting XHTML When XML is in Your InDesign File.) Let’s try the XSLT export to HTML with the course descriptions that we have worked with earlier.
First, we must decide what the output for the HTML will be. We’ll assume that we have a CSS already set up for displaying the course descriptions online. To make it simple to understand, the CSS classes have names that correlate to the XML elements.
Note
I recommend that you always use class names that will help you
remember the XML element origin of the HTML output. If you solely use
the <h1>, <h2>, and <p> tags, you will later be unable to
differentiate the HTML produced from <CourseDescriptions> from any other HTML
except by reading the text for meaning. These types of semantic class
names also may have benefit to help search engines as HTML
“microformats” become more widely used.
We are going to create a new XHTML output from the course content
using a series of steps. We can use the same tags that we created for the
XHTML example for this example. We already have a simple tagged file with
<h1>, <p>, <ul>, <li>, <p>, and <code> elements in a <body> element, which we can export to get
an idea of the result file that we want. Select the XML in the Structure
pane, then right-click to get the Structure menu and select Export XML. In
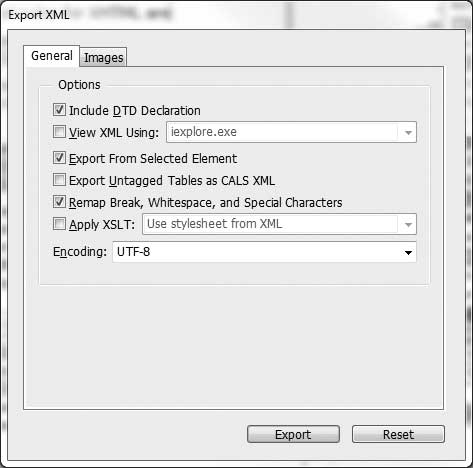
the export dialog, use the settings in Figure 10-13.
Note
The box for “Remap Break, Whitespace, and Special Characters” must be checked to clean up typographic characters that will not display in a browser properly (line returns, pretty quotes, em dashes, ampersands, etc.).
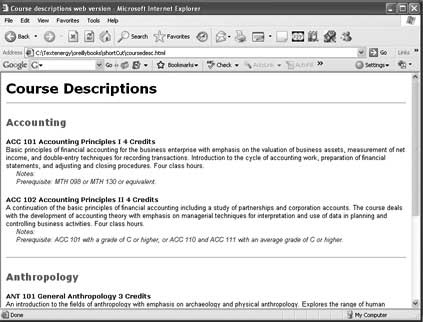
After you export, change the file extension of the exported file
from .xml to .html and see how
it looks in your browser; see Figure 10-14. (For our example,
which did not have a <head>
element, you must edit the output file if you want to make it conform to
the HTML strict DTD. See http://www.w3schools.com/ for good tutorials
on XHTML.)

Compare the course content to the HTML tags to see how you might
want to tag the final output. For example, you might want to output the
element <CourseDescriptions_Major> as an <h1 class="major">, and the <CourseDescription_Name> as an <h2 class="coursename">, the <CourseDescription_Text> as <p class="coursedescription">, and the
prerequisite <CourseDescription_Note> as <p class="coursenote">. The semantically
meaningful CSS class names will help make apparent the subject of the
content and its origin.
This is the sample XML:
<CourseDescriptions>
<CourseDescription_Major>Accounting</CourseDescription_Major>
<CourseDescription>
<CourseDescription_Name>ACC 101	Accounting Principles I	4 Credits
</CourseDescription_Name>
<CourseDescription_Text>Basic principles of financial accounting for
the business enterprise with emphasis on the valuation of business
assets, measurement of net income, and double-entry techniques for
recording transactions. Introduction to the cycle of accounting
work, preparation of financial statements, and adjusting and closing
procedures. Four class hours.</CourseDescription_Text>
<CourseDescription_Footnote type="prereq">
Prerequisite: MTH 098 or MTH 130 or equivalent.
</CourseDescription_Footnote>
</CourseDescription>
...
<CourseDescription_Major>Art</CourseDescription_Major>
<CourseDescription>
<CourseDescription_Name>ART 101 Art Essentials 3 Credits
</CourseDescription_Name>
<CourseDescription_Text>This course is designed to improve the student's
visual perception and expand critical awareness through a variety of
hands-on studio projects. The student will become familiar with the
methods, materials, media, vocabulary, and techniques of making art.
This course is suggested for students who are interested in
developing their creative skills but are not art majors.
Two class hours, two studio hours. (SUNY-A)
</CourseDescription_Text>
</CourseDescription>
</CourseDescriptions>The XSL transform could accomplish these XML to HTML changes:
generate a valid <html> with
<head>, <title> <link> (for the CSS file)
and <body>, and then make the
individual heading levels with the CSS classes and even some IDs. Example 10-1 is a simple XSLT example without
any loops.
<?xml version="1.0" encoding="UTF-8"?>
<xsl:stylesheet version="1.0" xmlns:xsl="http://www.w3.org/1999/XSL/Transform">
    <xsl:output method="html" encoding="utf-8"/>
    <xsl:template match="/">
        <html>
            <head>
                <title>Course descriptions web version</title>
                <link rel="stylesheet" href="courses.css"    type="text/css"></link>
            </head>
            <body>
                <xsl:apply-templates/>
            </body>
        </html>
    </xsl:template>
    <xsl:template match="CourseDescriptions">
        <h1>Course Descriptions</h1>
        <xsl:apply-templates/>
    </xsl:template>
    <xsl:template match="CourseDescription">
        <div>
            <xsl:attribute name="id">
              <xsl:value-of select="substring(CourseDescription_Name,1,7)"/>
              <xsl:apply-templates/></xsl:attribute>
            <xsl:apply-templates/>
        </div>
    </xsl:template>
    <xsl:template match="CourseDescription_Major">
        <hr/>
        <div class="major">
            <xsl:attribute name="id"><xsl:value-of select="."/></xsl:attribute>
            <h2 class="major">
                <xsl:value-of select="."/>
            </h2>
        </div>
    </xsl:template>
    <xsl:template match="CourseDescription_Name">
        <h3 class="coursename">
            <xsl:value-of select="."/>
        </h3>
    </xsl:template>
    <xsl:template match="CourseDescription_Text">
        <p class="coursedescription">
            <xsl:value-of select="."/>
        </p>
    </xsl:template>
    <xsl:template match="CourseDescription_Footnote">
        <p class="coursenote">
            <xsl:text>Notes: </xsl:text><br/>
            <xsl:value-of select="."/>
        </p>
    </xsl:template>
</xsl:stylesheet>
The CSS has only a few classes in it:
body
{background-color: #ffffff;}
h1, h2, h3 {font-family: Verdana, Arial, sans-serif;;margin-bottom:6px}
.major {color:green; font-size: 19px;margin-bottom:0px}
.coursename {color:navy; font-size: 13px;margin-bottom:0px}
p {font-family: Arial, Verdana, sans-serif; font-style:normal; font-size: 13px}
.coursedescription {font-style:normal;color:#000000;margin:0px 0px 0px 0px}
.coursenote {font-style:italic;color:#333333;margin: 0px 10px 20px 20px}
The HTML output looks like Figure 10-15 (viewed in the browser to see the CSS applied).
Notice that the course numbers have been used to generate unique IDs
for the <div>s containing course
descriptions:
<html>
<head>
<META http-equiv="Content-Type" content="text/html; charset=utf-8" />
<title>Course descriptions web version</title>
<link rel="stylesheet" href="courses.css" type="text/css" />
</head>
<body>
<h1>Course Descriptions</h1>
<hr>
<div class="major" id="Accounting">
<h2 class="major">Accounting</h2>
</div>
<div
      id="ACC 101">
<h3 class="coursename">ACC 101	Accounting Principles I	4 Credits</h3>
<p class="coursedescription">Basic principles of financial accounting for
the business enterprise with emphasis on the valuation of business
assets, measurement of net income, and double-entry techniques for
recording transactions. Introduction to the cycle of accounting work,
preparation of financial statements, and adjusting and closing
procedures. Four class hours.</p>
<p class="coursenote">Notes: <br>Prerequisite: MTH 098 or MTH 130
or equivalent.</p>
</div>
...more
<hr>
<div class="major" id="Art">
<h2 class="major">Art</h2>
</div>
<div id="ART 101">
<h3 class="coursename">ART 101 Art Essentials 3 Credits</h3>
<p class="coursedescription">This course is designed to improve the
student's visual perception and expand critical awareness through a
variety of hands-on studio projects. The student will become familiar
with the methods, materials, media, vocabulary, and techniques of making
art. This course is suggested for students who are interested in
developing their creative skills but are not art majors. Two class
hours, two studio hours. (SUNY-A)</p>
</div>
</body>
</html>Note
To get HTML, I used the XSLT on export, but it took a few trials to get it to work. It generated some error messages that require some fairly deep understanding of XSLT to fix. It sometimes crashed if I tried to do anything too fancy with sorting or rearranging the XML. And, I could only name the exported file with the .xml file extension.
However, Adobe has included some nice features in the XHTML export. Check the online documentation, including videos, that Adobe provides about XHTML export from InDesign. One of the options is to add empty CSS classes to content as you export it. Then, you can add the kind of semantic names that I am suggesting if it is worthwhile to help you remember the source of the content. Or you can use a CSS that you already have for your website and forget the semantics. So if XSLT is too daunting, why bother? Just create XHTML directly. Thanks, Adobe. (I think. You won’t get to do all the cool things that XSLT can offer, but that may be overkill for a lot of folks. Just because I love XML and XSLT doesn’t mean that everyone else has to suffer for it.)
Generate a Link with XSLT (Not Automated)
Have you noticed that I haven’t mentioned anything about links in my
discussion of generating XHTML with XSLT? Adobe has enabled an
auto-generation of hyperlinks in InDesign (if you use the Cross Media
Export→Export to XHTML, I believe the
<a> tag will be created from a
hyperlink you have created with a URL). But, if you are writing your own
XSLT, there is no built-in method to get the <a> tag in the Export XML output. The most
straightforward way to handle it is to create a standard web <a> tag in your content, give it an
href attribute, and export it.
If your current InDesign XML tag set doesn’t include the <a> tag, you can add it to the list of
tags. In the Tags window, select New tag, then overtype the highlighted
tag name in the window with “a”. Switch to the Text Selection tool, select
the text you want to use for your link, and tag it by clicking the new
<a> tag name in the Tags
list.
You must add the required href
attribute to the <a>-tagged text.
With the tagged text selected in the Structure pane, click the round black
button in the top of the Structure window. When the Add Attribute window
opens, type “href ” (without quotes) in the name text box and the
destination URL in the value text box.
To get this element in your export when you are using Apply XSLT,
include a small template that copies the <a> tag, including its attribute:
<xsl:template match="a"><xsl:copy-of select="."/></xsl:template>
With XSLT, you can also rewrite an existing element such as <link> to an <a> element with an empty @href attribute. Then you can edit the @href in an HTML editor to insert the correct
link path and file name. More advanced XSLT can use automation to pass in
a relative path to a known website location and prepend it into the
@href value. For example, you can have
a parameter in your XSLT, $mysite,
defined as http://www.mysite.com/, then insert that
as the starting part of every @href.
Then all you would have to do is add the correct filename for the
.html page or other resources that your @href points to.
Adding Useful Attributes to XML
Attributes are little descriptive bits of information used by programs and people to find and manipulate items in XML files. You can add attributes to indicate:
The status of development (draft, revision, final, approved)
The audience or type of user who would want a piece of content (novice, expert, user, service operator, etc.)
The currency of monetary values
Whatever will help you work with your XML content
Generally, it is easier to add attributes with XSLT than within InDesign if you want to use them all over your XML, but Adobe gives you a tool to add an attribute manually, so we’ll start with that.
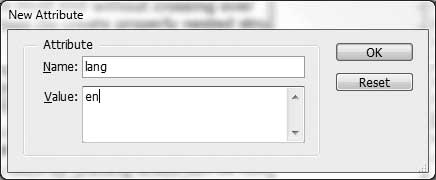
Select an XML element in the Structure pane, then click the big black dot in the top icon bar of the Structure pane (or right-click and select New Attribute from the Structure menu). In the New Attribute dialog, enter the name of the attribute and the value (Figure 10-16).
Note
Adobe should have included the ability to add standard attributes
for lang, whitespace handling, and
other attributes that people who work with XML commonly use. Because
these are not available with any kind of menu or picker in InDesign, you
have to add them manually or with XSLT.
A General Formula for Adding Attributes
Here is a general formula for XSL templates to add an attribute to your XML:
<xsl:attribute name="attname">attvalue</xsl:attribute>
where attname is the name of
the attribute and attvalue is the
value you want to assign to that attribute. In my course descriptions
XSL example, I used a generated value in several places. This template
takes a part of the text string (characters 1–7) that is contained in a
<CourseDescription_Name> and
uses that as the value of the id
attribute that is being added to a div, such as <div
id="ACC 101">; see Example 10-2.
<xsl:template match="CourseDescription">
        <div>
            <xsl:attribute name="id"><xsl:value-of select="substring(
                CourseDescription_Name,1,7)"/><xsl:apply-templates/>
            </xsl:attribute>
            <xsl:apply-templates/>
        </div>
</xsl:template>
Note
The substring operation seemed prone to crashes when I used it with Apply XSLT when importing XML. It might be better to apply the XSLT to the XML as a preprocessing step when you want to do string operations with your transforms.
Generating an id Attribute for a div
In the next template, the value of the <CourseDescription_Major> element is
being used to generate the div’s
id value, such as <div id="Accounting">. The dot in the
xls:value-of select="." will be
replaced with the word Accounting (the dot notation means “self,” or the
current element’s content). See Figure 10-17.

Use of the lang Attribute for Translations
For the sake of multilingual content, you might want to add an
attribute of lang to the root element
of your XML file. The general syntax for the attribute is <elementname lang="en"> (or lang="es" for Spanish, lang="de" for German, lang="it" for Italian, etc.). It can be
important to know whether the content is American English or British
English (for instance, to know what the measurement units should be), so
the approved country codes can be appended to the lang code, as en-us or en-gb.
If you are writing content that mixes in some words, phrases, or
quotations in other languages, you might think about marking these up as
inline elements (keyword, glossterm, or some other element), and using a
lang attribute to indicate that the
content is in a different language. For example, Latin names in
scientific or medical texts, Spanish song titles in a music catalog, or
French words in a cookbook could all be treated in this manner.
Tip
If an entire block element like a <p>, <div>, or <table> should be marked as a
different language, put the lang
attribute on the element rather than adding an inline element with a
lang attribute.
Conversely, if there is text that you do not want to have
translated, such as company names, slogans, trade, and brand names, you
could use lang="en" and add another
attribute such as translate="no" on
the same word or phrase, such as <keyword
lang="en" translate="no>Textenergy
LLC</keyword>.
Note
If you think ahead about attribute issues at the time you create your XML, you can save a lot of money on translation costs.
Creating an Image href Attribute
If you want to import graphics, the XML element that will contain
your image needs an attribute named href and the path and filename of the graphics
file.
The XSL transform is pretty simple—the name of your element
(<Image>, <myBanner>, <logo>, or whatever)—you add code in the
template for that element to append the href attribute to the element:
<xsl:attribute name="href">file://path/filename.ext</xsl:attribute>
Here, href is the
required name of the attribute, and you replace
file://path/filename.ext with the
path (which can be many folders long) and the filename of your graphics
file. You can even leave the basic XSL template with this boilerplate
file://path/filename.ext in it; it
will create a valid placeholder for the image and then you can fill in
the correct path and filename later if you don’t know it at the time you
create the XML for import. (This is often the case when someone says
that you will have artwork for certain places in your document but
hasn’t provided the actual images yet. Once you know which image goes
where, and what the path and filename is, adding images into your XML is
a simple as writing the correct href
value.)
Paths to images
If the folder where your images are located is known, you can write the path as part of the XSLT template. Just replace the path boilerplate with the real path, so it reads as:
<xsl:attribute name="href">file:///C:/test/images/filename.ext</xsl:attribute>
or whatever drive and folders you need to point to. Just realize
that you are hardcoding it in, so if you move the graphics to a
different location, the links will break, and the image won’t show up
in the InDesign layout. Use three slashes for absolute filepaths
(file:///C:/).
If you plan to export your InDesign file later, use the image files’ relative path, such as:
<xsl:attribute name="href">file://images/filename.ext</xsl:attribute>.
(In this example, the images folder is below your InDesign
document folder, but it should be whatever your actual relative path
is to replace //images.)
A Word about Using Find/Change for XML Markup in InDesign
You can use Edit→Find/Change as a means of locating specific types of styling in your document that you would like to mark up as XML elements. The process is described in the Adobe InDesign Technical Reference documentation, available on the Adobe website. The Find/Change dialog has an expression language that lets you write a pattern to search for and a pattern to replace the found text. Using the Find/Change dialog, you can select an XML element to apply from the Tags list (the tags must already be available in your InDesign document, either from using Load Tags or Load DTD).
This method can be very helpful for applying or fixing up XML
markup, such as when you decide to change the name of an XML element after
it has been applied. A common example is to search for a bold override or
a character style that applies bold to the underlying text and tag it as
the element <b>. (I would not recommend using
Find/Change if you are working with a linked XML file
that you have imported into InDesign.)
Note
Always save a copy of your InDesign file before using Find/Change to alter or add XML markup.
There is no mechanism for adding an attribute to an element using Find/Change, and you can’t search for specific XML tags and change their names with the Find/Change dialog.
[5] I’m momentarily tired of course catalog XML. Periodically, I have some fun imagining weird products like environmentally friendly pet toys. It’s late. Forgive me.