Chapter 3. Location Steps and Paths
In Chapter 2, I covered the kinds of content XPath is capable of locating: essentially, any content at all in an XML document. Now it’s time to take a look at how exactly you locate it — a look, in short, at XPath syntax.
XPath Expressions
As earlier chapters (notably Chapter 1) have explained, knowing XML’s own syntax does not prepare you for knowing XPath syntax. Unlike the languages that make use of XPath, XPath itself is not an XML vocabulary. A given “XPath” doesn’t contain all the characteristic left and right angle brackets, ampersands, and other hallmarks of XML syntax dear (or not) to your heart from your other XML work.
Instead, units of XPath meaning, called expressions, are typically used in attribute values. Thus you’ll be creating and using XML code that uses these expressions in ways such as:
<xsl:value-of select="expression"/>and:
<a xlink:href="xpointer(expression)">Table of Contents</a>Sometimes, when you see the term XPath expression, what’s being referred to is simply a speck of meaning — a subatomic particle, as it were, that has a sort of abstract academic interest but little practical value by itself. This sort of expression is a string or numeric value. For instance, both of the following are valid XPath expressions in this limited sense:
"I should have been a pair of ragged claws"
119.725
In the real world of XPath, though, such literal expressions are pretty pointless. If you locate the literal string “I should have been a pair of ragged claws,” you simply locate that string — outside the context of an XML document or, for that matter, devoid of any context at all. XPath expressions are meant primarily to locate content in context. The most familiar real-world analogy for the syntax to accomplish this is a computer’s filesystem or a web server’s directory structure.
Warning
Although I probably sounded scornful just now of literal-valued XPath expressions, don’t write them off. The ability to “find” a literal value (instead of a chunk of content in the source document) is actually quite useful. You’ll see many examples later in this chapter, particularly in the section on the predicate portion of an XPath expression. There, you’ll learn how to locate a particular node (represented by a location path) when its value equals, say, some particular literal value. There’s no way to represent the righthand side of this equation other than with a literal XPath expression. The point is merely that locating the literal value itself is absurd.
The Filesystem Analogy
In Chapter 2, Figure 2-1 depicted the structure of a well-formed XML document. Although I didn’t make the comparison explicit, you may have observed that Figure 2-1 could also represent a directory tree: there’s a root directory, beneath which you find one or more subdirectories, and so on. Within any directory along the way you might find one or more files.
The analogy between locating files and other resources on the one hand and XML-based content in a document on the other is not just abstract but explicit, codified in the syntax. An expression such as the following might be a perfectly legitimate XPath expression as well as a path to one or more files in a computer filesystem:
/root/dir1/dir1_1/file
If you’re dealing with a computer operating system or a web URI, this entire syntactic construct is called (among other things) a directory path; in XPath, it’s known as a location path.
Points of Similarity, Points of Difference
Before getting into the nuances of location paths in their own right, I want to make plain some of the ways in which they are both similar to and different from directory paths. First, the similarities:
Most obviously, the syntax is very similar. Each incremental move through the tree of directories or nodes is separated from others by a slash,
/.The most common way to move through the directory or node tree is down: start at the root, select one of its children, then one of that child’s children, and so on, until finding the resource at the very end of the path.
Both a directory path and a location path can begin with a slash, in which case they’re referred to as absolute paths. They can also dive right in with the name of some subordinate resource, with no leading slash, and in this case, they’re called relative paths. What they’re relative to is “wherever you are” in the filesystem or document in question.
A syntactically correct path is no guarantee that you’ll find anything there. When navigating — or attempting to navigate — a directory path to a resource that doesn’t exist, you get a “File does not exist” error message from the operating system, or an HTTP 404 message from the web server; an XPath expression that “locates” a nonexistent resource fails less egregiously, but fails nonetheless: it returns an empty node-set.
And now the chief differences, neither of them obvious from the simple example already presented:
Within a filesystem, you can easily “move up” or “move down” the directory tree to related resources (directories or files) in the same branch of the directory tree. “Moving sideways” isn’t so easily accomplished, though, especially if you need to “move sideways” to different branches of the tree and/or to other resources whose names share nothing in common. XPath, as you will see, is amazingly flexible in terms of its knowledge of a document’s tree of nodes and the multiple relationships a given node has with others.
While you can use wildcard characters such as
*and?to locate files that share some common naming characteristics, you cannot locate files that share the same type if their names share nothing in common. For instance, it’s become common to name text files with a filename extension of .txt. Using this ad-hoc and totally unofficial “standard,” however, both fails to locate text files with some other extension and possibly locates some non-text files as well. That is, the name is no absolute guarantee of the type. XPath, in contrast, can easily locate types of content in a given document, as well as content with specific names.
Location Paths
“Understanding” a location path and how to code it requires no great intellectual leap. If you know how to walk a filesystem directory tree, separating each level in the navigation from the others with slashes, you already grasp the rudiments of location paths. Still, you need to keep a few points in mind.
The Importance of Context
Chapter 2 discussed context, particularly the notion that each node in a given node-set shares with all the others a context size, and has its own context position within that size — the “Node X of Y” notion.
More subtly, using a multilevel location path imposes a successively finer sieve of context on each level in the path. Consider:
/customers/customer/invoice/item/quantity
As you move to the right in this location path, you’re not only “walking down” into the document’s nether regions, you’re also almost certainly excluding from consideration various portions of the document not of interest at the moment. That is, each level in the location path implicitly changes the context node in terms of which levels to the right will be evaluated. Figure 3-1 illustrates this process.
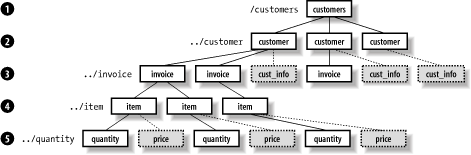
The full location path can be decomposed into five location
steps, each separated from the others by slashes; each
step narrows the view already established by those that preceded it.
Step 1 limits the selection to the root customers
element, and step 2, to the customer elements that
are children of that root element.
So far, there’s been no filtering at all occurring;
every element down to this level in this sample document is still
visible. In step 3, though, something interesting happens: the
location path selects the invoice children of each
customer element. The first and second
customer elements have two and one such children,
respectively; the third customer element has no
invoice children, and as a result this
customer effectively drops out of consideration as
a match for further location steps. For purposes of content retrieved
by this location path, in other words, customer #3
might as well not exist at all.
The filtering continues in steps 4 and 5. For some
reason — perhaps data entry in this document is not
complete — the invoice child of
customer #2 has no item
children and thus disappears from view in step 4. In the fifth and
final step, the location path says that ultimately, only the
quantity children of each item
element are of interest, eliminating the price
children and selecting, in the end, only those
quantity elements descended from
(“belonging to”) the first
customer.
What does this have to do with context? The point is that each succeeding location step does not stand in isolation: the full location path doesn’t select all customer elements, all invoice elements, and so on. In fact, it selects only those nodes (elements, in this case) at the very end of the location path, and of those, only the nodes that have met all preceding conditions in the path.
Absolute Versus Relative Location Paths
As I’ve already mentioned, location paths — just like directory paths — can be either absolute or relative. An absolute location path begins with a slash, which effectively denotes the root node of the document. If the path starts with no leading slash, it’s a relative path.
Practically speaking, when you’re using XPath in an XPointer context, you’ll always use an absolute path except when locating content within the same document containing the XPointer.
In an XSLT stylesheet, the
situation’s a
little more complicated. A typical stylesheet consists of numerous
so-called template rules (one xsl:template element
apiece), each of which matches (via a location path) some portion(s)
of the source document.[1] Within the template rule may be any number of XPath-based
references to other portion(s) of the document, and these latter
references are most commonly relative location paths — that is,
relative to the context established by the containing template rule.
For instance, a template rule might look something like this:
<xsl:template match="/books">
   <xsl:for-each select="book/title">
      <xsl:value-of select="."/>
   </xsl:for-each>
</xsl:template>
The location path bound to the template rule’s
match attribute is absolute, matching the root
books element. Within the template rule, however,
the location path bound to the xsl:for-each
element’s select attribute is
relative — as is the one bound to the
xsl:value-of element’s
select attribute. The former
select attribute locates each
title element of each given
book child of books. The latter
simply re-selects (for a different purpose) the node already
established by the containing xsl:for-each. (By
the way, note in this example the period, also called the
“full stop,” which may be familiar
to you from its occasional use in directory paths.)
Note
In XSLT, template rules may invoke other template rules, using the
xsl:apply-templates element. The
select attribute of this element directs the XSLT
processor to next process any template rule that matches the
indicated relative location path. Thus, the example template rule I
just provided could also be coded in the form of two separate
template rules, like this:
<xsl:template match="/books">
   <xsl:apply-templates select="book/title">
</xsl:template>
<xsl:template match="book/title">
   <xsl:value-of select="."/>
</xsl:template>
The practical effect of a stylesheet structured in this way is that
only one template rule’s match pattern may be an
absolute location path; all others will “trickle
down” to successively lower-level template rules,
chained together by linking the select attributes
of xsl:apply-templates elements to the
corresponding template rules (even when the latter’s
match attributes specify absolute rather than
relative paths).
Compound Location Paths
It’s frequently desirable to select not just the
nodes found by way of a single location
path, but all the nodes found by way of two or more paths. This is
accomplished using the union operator, a
“pipe” or vertical-bar character,
(|), to delimit the constituent paths. (Whitespace
on either side of the pipe is not significant.)
Referring back to the sample document depicted in Figure 3-1, you could select all the
invoice elements and all the
cust_info elements with a single compound location
path:
/customers/customer/invoice | /customers/customer/cust_info
Tip
Here, the selected nodes just happen to be elements at the same level of the node tree. As you will soon see, however, there’s no particular requirement that this be the case; you can just as easily select a node-set consisting of elements at different levels of the hierarchy and/or nodes of any types at all, elements or otherwise.
Location Steps
Location paths are interesting on a grand, macroscopic level. But (at least to my way of thinking) they’re essentially unsophisticated, blunt instruments for extracting content from an XML document. All the real action in XPath is found between the slashes in a full location path — in the location steps.
The location steps you’ve seen so far in this chapter have been extremely simple. They’ve walked you down into the given XML source document by way of the tree of element nodes, and element nodes only, and only those element nodes with specific names. Easy enough to understand, perhaps (not to deny the value of understandability!), and also arguably the most common sort of location step, but not particularly eye opening. In fact, these elementary location steps have simply taken advantage of various default values and shortcuts for parts of the full location step syntax: the axis, the node test, and the predicate. This syntax is:
axis::nodetest[predicate]Tip
As you will see later in this chapter, it’s possible for a location step to include multiple predicates — one after the other or even nested.
Of the three components that a location step may contain, only the
node test is required. If you omit the axis, you also omit the double
colon (::) that delimits it from the node test. If you omit the
predicate, you also omit the square brackets ([
and ]) that enclose it.
Before getting into the details of these three pieces of a location step, let’s take a look at their general purposes.
The Big Picture
A common misconception about microscopes, magnifying glasses, telescopes, and binoculars is that they enlarge the image presented to our eyes from some object or other in the real world. Actually, they narrow the field of vision (assuming you’re looking into them the right way); the image presented to our eyes always stays the same size. Armed with this information, take a look at Figure 3-2.
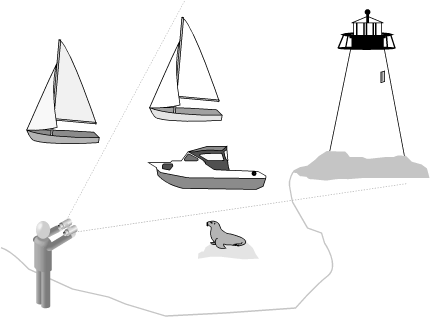
Here, you’re standing on the rock at the end of a jetty projecting out into a bay, binoculars held to your eyes. Everything outside the field of vision doesn’t “exist” for you as long as you’re looking through the lenses: the boats on the water behind you and to either side, the colony of seals on the rocks. You have, in effect, no peripheral vision.
But these are special binoculars. Not only can you use the typical thumbwheel to bring perceived objects into and out of focus, or perhaps to zoom in (that is, narrow the field even further) or out. You can also click a button or push a slider along their top edge, which lets you see (in the chosen direction) only boats, or everything but boats, or boats and buoys only, or just those objects whose names begin with the letter “b.” (The lighthouse is within the field of vision, for example, but it doesn’t fit any of those types of “target.”) And you can do even finer tuning: light up just those boats that have sails, or black sails only, or those flying pirate flags, or only flying pirate flags with no cannons visible.
There’s your XPath location step: the axis selects the direction you’re looking; the node test selects particular generic kinds of objects to see; and the predicate highlights only those objects of the right generic kinds that have other specific characteristics.
Let’s start by examining the one required portion of a location step: the node test.
The Node Test
The node test singles out in a document the sort of nodes in which you’re interested. You have two approaches here: identify the names you’re interested in or identify the types. Table 3-1 summarizes the available options.
|
To select... |
Use... |
|
elements with a particular name |
the element name in which you’re interested (e.g.,
|
|
elements with any name |
an asterisk ( |
|
text nodes |
The |
|
comment nodes |
The |
|
processing instructions with a particular target |
The |
|
processing instructions regardless of the target |
The |
|
all nodes, regardless of their type or name |
The |
Neither attributes nor namespace nodes can be located using the node
test alone. You must use an axis in a location step to locate these
two node types. See the information about the
attribute:: and namespace::
axes later in this chapter for more information.
One other point: Note that the text( ),
comment( ), processing-instruction(
), and node( ) node
tests — technically called node type
tests — are not functions, and all require the use of
parentheses even though the parentheses are
empty. This distinguishes these node tests from those simply seeking
elements whose names just happen to be, for
example, comment and text.
The Axis
Having determined that you want a location step (via the node test) to “see” only nodes of a certain kind, you can specify the direction — the line of sight, if you will — in which you want to see them. (The direction is always relative to the context node at the point of the location step.) This is accomplished using an axis.
The XPath spec defines 13 different axes, many of which are modeled on a “family” view of the source document’s nodes. That is, in a genealogical family tree, each person represents a node; each node (except the one at the very top) has a parent and ancestors, many have children and other descendants, siblings, and so on. So it is in an XML source document, which — thanks to the rules of well-formedness — always contains at least two strictly structured nodes (the root node and the root element).
Let’s take a look at a summary of the 13 axes first, presented as Table 3-2. (I use the word “visible” in this table advisedly. I mean, of course, whether nodes of a given type are visible to an XPath-aware processor — not whether they’re visible to a human reader of the document. By the latter standard, whitespace-only text nodes might be considered “invisible,” even though they’re just as substantial to a processor as any other nodes in the tree.)
In this table, note that each axis is designated as a forward or reverse axis. These terms refer to the direction, relative to the context node, in which nodes are visible — in document order or reverse document order, respectively.
Now let’s look at some nuances of using axes in your own XPath location steps.
Defaults and shortcuts
First, there’s a default axis,
child::. Therefore, the following
two location steps are functionally
identical:
child::circle
circle
Both locate all circle elements that are children
of the context node.
Steps that access
the
parent node via the parent:: axis in XPath, as in
common filesystem directory path syntaxes, can be abbreviated using a
double period. These two location steps are thus equivalent:
parent::node(  )
..
Similarly, the self:: axis can
be abbreviated with a single period. (As
with the parent:: axis, this is technically an
abbreviation for the axis in combination with the node(
) node test.)
When using the parent:: and
self:: axes, you almost never have to specify the
name of the node in question; no node in an XML document ever has
more than one parent or “self,” and
the name of that parent/self node is thus almost always immaterial.
The exception is when a given element type may appear at any of
several levels of a document conforming to a given vocabulary, and
you want to select only those with a particular parent element type.
Note that the self:: axis is useful for testing
the name of the context node in the predicate portion of a location
step. (Predicates are covered in the next section of this chapter.)
The name( ) XPath function, covered in Chapter 4, can also be used for this purpose. However,
the self:: axis is “namespace
aware” and works specifically with the namespace
prefix supplied as the tested value; the name( )
function permits the processor to substitute any prefix it wants, as
long as the namespace URI is correctly mapped. Consider these two
examples:
self::someprefix:somename
name(  )="someprefix:somename"
The first example is true only if the context node’s name is “somename” and its namespace prefix is “someprefix”; the second is true if the context node’s name is “somename” and its namespace prefix, whatever it is, maps to the same namespace URI as does “someprefix.”
When seeking content along the attribute:: axis,
you can replace that axis with a simple at sign
(@). Both of the following location steps locate
the copyright attribute of the context node:
attribute::copyright
@copyright
Finally, while not strictly a shortcut for an axis, the location step
(plus separators) /descendant-or-self::node( )/
can be abbreviated with a simple double slash, //.
Here’s a sample document, a peek into a particularly
unruly kitchen pantry (entirely fictional, of course):
<pantry>
   <shelf>
      <supplies>
         <paper_goods>
            <paper_good>paper towels</paper_good>
            <paper_good>paper plates</paper_good>
         </paper_goods>
      </supplies>
      <snack_foods>
         <snack_food>popcorn</snack_food>
         <snack_food>chips</snack_food>
      </snack_foods>
   </shelf>
   <shelf>
      <supplies>
         <paper_goods>
            <paper_good>napkins</paper_good>
         </paper_goods>
      </supplies>
      <snack_foods>
         <snack_food>dried tofu</snack_food>
      </snack_foods>
   </shelf>
</pantry>
To locate all snack_food elements descended from
this document’s root pantry
element, no matter where they are in its tree of descendants, either
of the following will suffice:
/pantry/descendant-or-self::node(  )/snack_food
/pantry//snack_food
If locating all nodes of a particular name or type, the double slash can begin the location path alone — there is no need to precede them with yet another slash representing the root node. For instance, to locate all elements in a document, use:
//*
and not:
///*
The double-slash shortcut is so useful that you will probably find
yourself using it as a shortcut for the descendant::node(
) location step as well — failing to recognize a
potential pitfall in doing so: the double slash is
not associated with just the
descendant::node(
)
location step, but with the
descendant
-or-self::node(
) location step. In many cases, the results of using either
are identical. For instance:
/pantry//snack_food
works because selecting “all descendants of the
pantry element, as well as the
pantry element itself, as long as the given node
is a snack_food element”
obviously eliminates the pantry element itself,
leaving only the snack_food descendants.
But if you use the wildcard asterisk or the node(
) node test together with the double slash, you may get a
surprise. The following two location paths each select the
pantry element in addition to all the desired
descendants:
/pantry//*
/pantry//node(  )
Restrictions by context node type
The last column in Table 3-2 shows which node types are visible, looking from the context node along the indicated axis. However, it’s also important to note that the axes available at a given moment vary depending on the type of the context node. An XPath processor will not reject outright invalid axis/context node type combinations; it will simply return an empty node-set for that location step. Table 3-3 summarizes these restrictions.
Tip
A curious side effect of the information in Table 3-2 and Table 3-3, taken
together, is that although attribute and namespace nodes
“belong to” their declaring
elements — in the sense that such an element acts as an
attribute/namespace node’s parent and is therefore
visible along the parent:: axis — the reverse
is not true: you can’t see attribute or namespace
nodes along an element’s child::
axis.
Axes and efficiency
Something to remember when selecting axes to navigate around your XML documents is while the end result achieved by using one axis may be identical to that achieved by using another, one means to the end may be significantly more efficient than another. The following XML document illustrates this:
<dictionary>
   <letter>
      <forms>
         <form type="upper">A</form>
         <form type="lower">a</form>
      </forms>
      <word>
         <spelling>aardvark</spelling>
         <part_of_speech>noun</part_of_speech>
         <definition>a nocturnal mammal of southern Africa with a tubular
         snout and a long tongue</definition>
      </word>
   </letter>
</dictionary>
Both of the following location paths locate the
definition element:
//definition
/dictionary/letter/word/definition
The second, however, is a much more direct route to the desired
result. It leads the processor down the tree with no side trips,
right to the definition element. The first, in
contrast, takes a leisurely stroll through all descendants of the
root node, picking up each one in turn and mulling it over
(“Hmm, is this descendant a
dictionary element . . . ?”)
before proceeding further through the tree. This includes irrelevant
detours into the forms branch of the tree and to
the spelling and part_of_speech
siblings of the dictionary node.
Of course, for this extremely simple example document, the difference in processing time is negligible. Turn this document into an entire dictionary, though, and the difference is considerable. (Of course, explicitly coding the full path to a desired descendant can be more tedious — especially for large, deep node trees. It’s hard to argue with performance results, though.)
The Predicate
Those of you who may have suffered under the yoke of English grammar lessons may be familiar with the term “predicate” as it’s commonly used there: the predicate of the sentence is the verb — the word or phrase that drives the sentence’s action. So it is with the optional predicate portion of a location step, which drives the filtering performed by the rest of the step to its finest level of granularity.
A more useful way to understand the term as it’s used in XPath, though, is to think of its form in such constructions as “Whether Result X will be true is predicated upon the truth of Condition Y.” That’s because a location step’s predicate sets forth a Boolean test: if the Boolean test returns true (for a given node selected by the preceding portion of the step), then this node will be selected for inclusion in the resulting node-set. In all other cases, the node is disregarded.
As with Boolean tests in other languages, XPath’s predicates are usually coded (within the enclosing square brackets) as Boolean statements of the general form:
value1operator value2
where:
value1andvalue2are XPath expressions.The whitespace to either side of
operatoris not significant — there can be whitespace there for legibility, or not; andoperatoris one of the Boolean operators listed in Table 3-4.
Tip
If (as is likely) you’re using XPath expressions
within XML documents (as opposed to scripting languages), you must
escape any operators that might cause your documents to fail
well-formedness constraints. For instance, the
< character will need to be escaped as
<, and the > may need
to be escaped using >. (When used in an
attribute value, the greater-than operator (>)
never needs to be escaped.)
As I mentioned, the two values being compared by the operator can be either location paths in their own right or literal values. Importantly, any relative location paths appearing in the predicate are considered relative to the context node established by the portions of the location step that precede the predicate, not relative to the context node in effect for the location step as a whole. Consider the following simple XML document:
<person name="John">
   <child name="John"/>
   <child name="Connie"/>
   <child name="Cindy"/>
   <child name="Mike"/>
</person>
Given this document, consider this location path, paying special attention to the predicate:
/person/child[@name='John']The context node for the final location step as a whole is the
person element. The predicate does
not look at the name
attribute of the person element, however, but
rather at the name attribute of each
child element. Thus, this predicate results in the
selection of only the first child element.
Note that the Boolean condition established by the predicate is an
"any node
that...” rather than an
"all nodes
that...” condition. For instance, given the above
document, the following location path selects the root
person element as long as any
of its child children has the indicated
name attribute value; the selection
doesn’t require that all its
child children meet the test.
/person[child/@name='Cindy']
There’s no restriction on the number of location steps that might employ predicates, although the simple examples above show predicates only on the last step. In navigating around an XHTML document with XPath, you might use a location path such as this:
/html/body/p[@align="center"]/img[@border > 0]
This selects each img element with a
border attribute greater than 0, as long as the
img element’s parent is a
center-aligned p element that is a child of the
body element (which in turn is a child of the
html element).
Nesting predicates
You may not use or encounter this too much in your own XPath location steps, but it’s entirely legal for an expression being tested by the predicate to include a predicate of its own. (After all, the expressions on either side of the operator, being expressions, can be and often are location steps in their own right.) Thus, you might see something like this:
//roofing_material[descendant::type[preceding-sibling::manufacturer='Smith']]This selects all roofing_material elements that
have a type descendant for which, in turn, there
exists a manufacturer on the
preceding-sibling:: axis whose name is
“Smith.”
Compound predicates
You can test for multiple conditions
in
a single predicate by delimiting the multiple conditions with logical
and/or operators. For instance:
camera[brand/@name = 'Minolta' and brand/@list < 300]selects a camera child of the context node only if:
The
cameraelement has abrandchild with anameattribute whose value isMinolta.The
cameraelement has abrandchild, which also has alistattribute whose value is less than 300.
As in other computer languages, using multiple ands
and ors can become quickly indecipherable to the
human eye and mind, so XPath allows you to group conditions together,
using parentheses to eliminate ambiguity. You can nest these grouped
conditions to any arbitrary depth.
Note
Note, in the various example predicates here (and anywhere else in
the book), the escaping of markup-significant characters (such as
< for the <
character). The escaping is required not by
XPath itself, but by the constraints imposed on XML documents by the
XML spec itself; such documents — for example, XSLT
stylesheets — are common (perhaps the most common) venues to find
XPath expressions. (That’s why I’m
escaping them.) But when using XPath outside of an XML or other
markup context, there’s no particular need to escape
the special characters. For example, in a non-markup application, the
preceding location step could be coded:
camera[brand/@name = 'Minolta' and brand/@list < 300]Consider this document:
<weather>
   <day date="2001-12-12">
      <readings>
         <reading time="0600">
            <temp>23</temp>
            <wind_spd>5</wind_spd>
            <wind_dir>ESE</wind_dir>
         </reading>
         <reading time="1200">
            <temp>30</temp>
            <wind_spd>2</wind_spd>
            <wind_dir>SE</wind_dir>
         </reading>
         <reading time="1800">
            <temp>34</temp>
            <wind_spd>10</wind_spd>
            <wind_dir>S</wind_dir>
         </reading>
         <reading time="2400">
            <temp>29</temp>
            <wind_spd>15</wind_spd>
            <wind_dir>S</wind_dir>
         </reading>
      </readings>
   </day>
   ...etc....
</weather>
As a hypothetical case, you might be interested only in those readings meeting the following conditions:
The time at which the reading was taken was either noon or 6 p.m.
The wind speed was less than 15 knots, as long as the wind direction was from the south.
The temperature was less than 25 degrees.
As a location path, these conditions could be expressed as follows:
//reading[(@time="1200"or@time="1800")or(wind_spd < 15andwind_dir="S")or(temp < 25)]
If the connecting operators were all either and or
or, you wouldn’t need to use any
grouping at all. The presence of that lone and,
though, changes the situation considerably: omit the parentheses, or
group (say) the test for wind_dir with the one for
temp, and you’ve suddenly got a
subtly (or radically) different test, returning a subtly (or
radically) different node-set.
Operator precedence in XPath, in
order
of ascending importance, is as follows:
or, and, =,
!=, <=,
<, >=, and
>, so in:
a = borc = dandx = y
the and test takes precedence over the
or, being evaluated as though they were coded:
x = yand(a = borc = d)
When parentheses are used for grouping, conditions are evaluated at their innermost levels first, “boiling up” the respective true or false values to a common level where they can then be compared using operator precedence and left-to-right rules.
Predicates with a single value and no operator
Often, you don’t need to
determine that a node along
some axis has some particular value. You need merely to
check for the
existence of such a node. The way to use an
XPath predicate for this purpose is to take advantage of a special
form of the predicate, which simply uses a location path with no
operator or
value2 within the square brackets.
You could select only book elements that contain
at least one table, for example:
//book[descendant::table]This works because XPath treats an empty node-set as a Boolean false and a non-empty node-set as a Boolean true.
Note that this does not disregard a book element
that contains an empty table element; it tests for
the presence of any
table
element, empty or otherwise. If you want to be sure
you’re selecting only those book
elements with non-empty table descendants, you use
an explicit test in the predicate:
//book[descendant::table!=""]
An earlier note back discussed the general silliness of selecting a
node with a particular name on the parent:: axis,
because that axis will always locate at most a single node
(irrespective of its name). (The root node has no parent, but all
other nodes in a document have exactly one parent.) In some XML
vocabularies, though, a particular element type may be allowed as a
child of different element types. A classic case
is the XHTML div element, which can appear as a
container almost anywhere within the body of an XHTML document. Thus,
you can productively use the parent:: axis in a
case like this, within a single-valued predicate, to isolate (say)
only those div elements that are children of a
p element:
//div[parent::p]
On the other hand, there are often a number of other approaches to the same problem, including the (to my mind) much simpler and easier to digest:
//p/div
The point here is not to argue the merits of one approach or another in general; it’s simply to remind you that as a rule, XPath offers multiple routes to the same solution. If you find yourself trapped by a particular technique that “solves” one problem but creates another, don’t forget to investigate an alternative before consigning XPath to the (ever more crowded) dustbin of technologies long on the theoretical dimension but short on the practical.
Special case: numeric-valued predicates
A very important second exception to the general form of the predicate is when the predicate’s value is (or evaluates to) a number. This form is used to select a node that has a particular context position within the node-set selected by the preceding portion of the location step.
Look back at the weather-readings example. If you wanted to select
the third reading child of all elements in the
document, regardless of its contents, you could do so using:
//reading[3]This numeric form of the predicate is actually an abbreviated form of
the usual
value1-operator-value2
general syntax. The full form uses the XPath position(
) function (covered in Chapter 4) in the
following fashion:
//reading[position( ) = 3]
Note that to test a node’s position and some other condition in a compound predicate, you may not use the short, numeric form of the position test. Thus, the following:
//reading[3 or temp < 25]is not correct, and must be coded as:
//reading[position( ) = 3 or temp < 25]“Stacked” predicates
The XPath spec doesn’t use this term, but I think the word “stacked” pretty well describes what’s going on. (“Chained” might work equally well. But in a chain, the order of the particular objects usually doesn’t make much difference; switch a couple of links and it’s still functionally the same chain. In a stack, the sequence can make all the difference in the world.) A location step can have multiple predicates, one following the other, in this fashion:
axis::nodetest[predicate1]...[predicateN]
where the ellipsis (...) and
[predicateN] indicate that you can have as many
predicates as you need.
In many cases, this works exactly as though you’d
put the stacked predicates together in a single predicate and
connected them with and operators. For instance,
the following two location steps are functionally identical:
day[@date > "2001-12-01"][reading]
day[@date > "2001-12-01" and reading]
Both select a day element only if it has a
date attribute whose value is greater than
2001-12-01
and if it has at
least one reading child.
But the operation of these stacked predicates is slightly different
from the merely anded-together alternative. In
effect, each succeeding stacked predicate is evaluated in terms of
the narrowed context provided by the preceding one(s),
not just in terms of the general context in
which a single (perhaps compound) predicate is evaluated. This is
especially noticeable when one of the predicates on the stack is
numeric, testing for a node’s position.
Consider a document that represents tosses of a coin:
<tosses>
   <toss result="heads"/>
   <toss result="heads"/>
   <toss result="tails"/>
   <toss result="heads"/>
   ...etc....
</tosses>
Now carefully consider the following two location paths into this document, each using a stacked predicate:
(//toss)[@result="heads"][3]
(//toss)[3][@result="heads"]
See the difference? The first path locates (a) all
toss elements whose result
attribute equals “heads,” and then
(b) the third one of those toss elements.
Therefore, in the above document, it selects the fourth
toss element in the document.
The second path, though, starts out by selecting the third
toss element; the stacked predicate applies a
further screen, selecting the third toss element
only if its result attribute has a value of
heads. Because the third toss
element’s result attribute is
tails, therefore, this location path returns an
empty node-set.
Also note in these two examples the use of parentheses to isolate a portion of a location path from a predicate. This enables the XPath to apply the predicate(s) to the parenthetical portion as a whole, rather than just to the last location step in the path.
Compound Location Paths Revisited
Early in this chapter, I mentioned
that
you could join together multiple location paths into a single one,
using the “pipe” character,
|. In that section, you saw this example:
/customers/customer/invoice | /customers/customer/cust_info
For any given location path, you could say that any given location
step shifts the context in which succeeding
location steps are evaluated. Thus, for the first location path in
this compound location path, the context is narrowed first to the
root customers element (thereby excluding from
consideration any content in the document that precedes or follows
the root element), then to customer children of
the root element, and finally to invoice children
of those customer children.
What, you might reasonably wonder, happens to the context in succeeding location paths of a compound location path? Every constituent location path is considered independently — just as if it were the only location path. Obviously, if the location path is absolute (as in the example from early in the chapter just repeated here), its context node is immaterial. If the location path is relative, it is evaluated relative to whatever the context node is at that point, disregarding any shifts in context effected by preceding portions of the compound location path. Consider this example:
invoice | cust_info
The first location path selects all invoice
children of the context node for the compound location path as a
whole. Likewise, the second selects all cust_info
children of the context node for the compound location path as a
whole — not all cust_info
children of the invoice elements selected by the
first location path. The results of the two selections are simply
unioned together into a single node-set.
Along these lines, also note that each constituent location path may employ “stacked” predicates (as discussed earlier in the chapter), compound predicates, or any other location path variations. Predicates used in location path A have no effect on those in location path B and vice versa.
[1] Actually, to say the template
rule “matches content via a location
path” isn’t quite accurate. The
value of an xsl:template
element’s match attribute is not,
strictly speaking, a location path, but rather something called a
“location path pattern” or
“match pattern” — whose syntax
is dictated not by XPath, but by the XSLT spec.
There’s also a practical difference, in that a match
pattern doesn’t really select something in the
source document; it simply (as the term indicates)
matches that something, for purposes of
specifying how the template will behave when a match is found.