
Chapter 7
Managing Your Payables
IN THIS CHAPTER
![]() Finding your way around the Purchases dashboard
Finding your way around the Purchases dashboard
![]() Creating, approving and cancelling bills
Creating, approving and cancelling bills
![]() Recording and scheduling payments
Recording and scheduling payments
![]() Getting a handle on more advanced payment options
Getting a handle on more advanced payment options
![]() Processing expense claims and using the advanced Xero Expenses feature
Processing expense claims and using the advanced Xero Expenses feature
I work with a client who leads an active and generous life. While she often posts funny photos of herself on Facebook, showing her enjoying her next crazy adventure, she has always worked hard — really hard! She sent her kids to private school, owned a lovely house and led an enviable life — and then, in a matter of a few months, lost everything. What happened? It sounds very simple, but she lost track of the bills. She overlooked paying suppliers, and soon unpaid suppliers stopped providing stock — and she was no longer able to run her business.
Inspirationally, the story has a great ending. She refocused her energies on understanding her numbers, took over the bookkeeping, and embraced her business reports. Over time, she repaid her debts — all of them — and slowly rebuilt her business. She’s now re-engaged a bookkeeper; however, at any point in time, she prides herself on knowing exactly how much money she owes her suppliers.
Xero can help you avoid the same pitfalls. In this chapter, I provide everything you need to understand your own debts, starting with working your way through Xero’s Purchases dashboard. I provide tips on utilising purchase orders, keeping track of bills and paying them in a timely manner, and finish off with advice on entering your expense claims into Xero.
Navigating the Purchases Dashboard
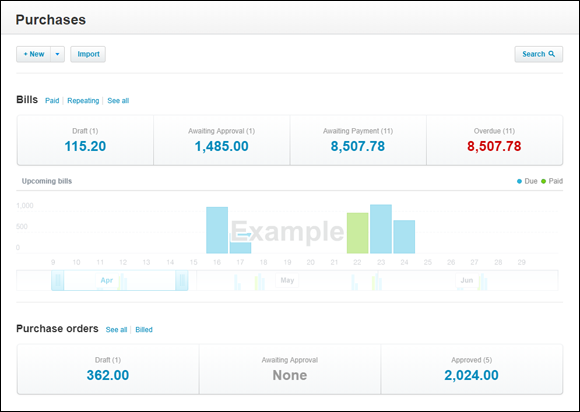
If all your bills are processed through the Purchases area (see the nearby sidebar ‘Understanding your records’ for more on this), the first thing you need to know to manage your payables is: What do I owe? Xero gathers all that information on the Purchases dashboard, which you can access from the home dashboard by clicking Business → Purchases Overview. (Figure 7-1 shows the Purchases dashboard, highlighting the features that are available if you process all bills through the purchases area.)
Source: Xero 2019
FIGURE 7-1: The Purchases dashboard.
If you process all bills through Xero’s purchases area, the Purchases dashboard is split into three blocks: Buttons, menu bar and a bar chart.
The first block of the Purchases dashboard contains three buttons: New, Import and Search. The New button allows you to click through to create a New Bill, Repeating Bill, Credit Note and Purchase Order. The Import button begins the import process (covered in Chapter 3).
Clicking on the Search button opens the search pane. Here you can enter an amount, reference, contact name and/or dates criteria to search for bills or purchase orders.
The second block of the Purchases dashboard contains seven tabs: Paid, Repeating, See All, Draft, Awaiting Approval, Awaiting Payment, and Overdue. Here’s how you can explore this area:
- View all paid bill information by drilling down through the Paid tab. Paid bills can also be printed from this area.
- Sort columns by clicking on the column headers.
- Select bills by checking a single or multiple boxes to the left of the bills.
- View the bill detail by clicking on the relevant bill row. Click on the document symbol to see details of any files attached to the bill transaction. (Click on the teeny-tiny Purchases link in the top left corner to access a different view of the Purchases dashboard.)
- View all repeating bill information by drilling down through the Repeating tab. Repeating bills can be edited or deleted from this area. The area provides an overview of the details of repeating templates.
- View all summarised bill information by drilling down through the See All tab.
- View a summary of draft bills by drilling down through the Draft tab. Draft bills have been saved, but no journals have been created against them. Draft bills can be submitted for approval, approved, deleted and printed from this area.
- View a summary of bills awaiting approval for payment by drilling down through the Awaiting Approval tab. Bills awaiting approval can be approved, deleted and printed from this area.
- View a summary of bills awaiting payment by drilling down through the Awaiting Payment tab. Bills awaiting payment can be printed, paid in a batch or scheduled for payment from this area.
Click on Business → Purchases Overview to return to the high-level view of the Purchases dashboard. The third block of the Purchases dashboard contains a bar chart displaying Upcoming Bills, representing the current net monthly outstanding bills determined by the due date. In other words, it highlights outstanding creditors. Paid bills are indicated by green bars, with cyan indicating unpaid bills. Underneath the chart is a stretch bar.
Here are some ways you can explore the bar chart and stretch bar of the Purchases dashboard:
- Hover over the block to view a summary of the outstanding bills.
- Grab the stretch bar and pull it to view an extended period.
- Click each of the bars of the bar chart to drill down to bill detail.
Managing Your Supplier Bills
The mining boom brought many interesting businesses to Brisbane, Australia (where my business is based). One such business, and a client of mine, is an export business that helps other businesses source large pieces of mining equipment. Everyone in the office speaks French, they make the strongest coffee imaginable, and they tell me where to find authentic French food in Brisbane. (You may be surprised to find out that Brisbane has a thriving French community!) For this business’s owner, monitoring current and future purchases is a critical part of running his business. It helps him forecast cash flow expenditure and claim back consumer tax in a timely manner.
 A respectful relationship with suppliers, which includes paying them according to their payment terms, is critical for business success. Tracking purchases via Xero’s Purchases dashboard helps you know what you owe and when it’s due, and can help you maintain and nurture these relationships.
The life cycle of a bill in Xero can include being created as a draft, being submitted for approval, awaiting approval, being approved, awaiting payment and, finally, applying payment. Xero also allows you to skip these steps and jump straight to the approval stage (or your bill starts off as a purchase order and, once approved, it can be copied into a bill). The following sections cover each of the basic stages. I also cover how to generate a purchase order, which you can use to detail agreed spends for products or services.
Creating a new bill
When you receive an invoice for payment, you need to ‘create’ that invoice as a bill in Xero. Follow these steps to create a new bill within Xero:
-
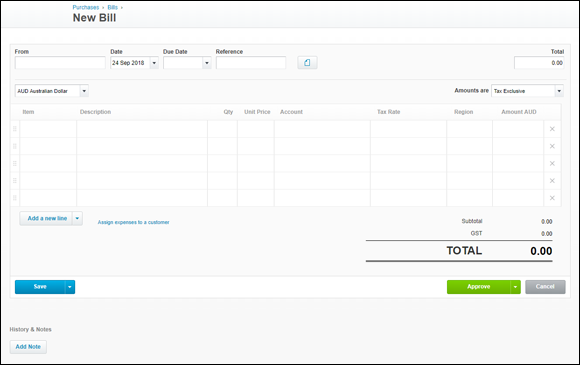
Go to the Purchases dashboard by clicking Business → Purchases Overview and select + New.
The New Bill window appears (see Figure 7-2).
-
Enter the contact name in the From field.
If the supplier is already in your Xero file, start typing the contact name and Xero autosuggests contact names and their associated primary contact person’s first name, last name and email address. Select the relevant contact, or type in the name of a new contact. (Refer to Chapter 5 for guidance on adding Contact details.)
If an existing unbilled purchase order has been assigned to the supplier, a notification appears above the bill, and you can save time by bringing the purchase order details into a bill. If there’s a single unbilled purchase order, click the blue Copy Line Items hyperlink, and at the Copy Purchase Order to Bill window, check the box Mark as Billed and click the green OK button. If there are multiple unbilled purchase orders, select View as a List and a new tab on your browser opens at the Purchase Orders dashboard, where you can select the purchase order you may want to convert to a bill. Discard the original bill you were working with. See the section ‘Generating a purchase order’, later in this chapter.
-
Enter the Date in the date calendar box.
Today’s date automatically appears; you should override this with the actual bill date, if it’s different.
- Enter the bill Due Date.
-
Enter the optional bill Reference field.
Purchase bills are not automatically numbered. You can use the text field for a mnemonic reference, or to repeat the supplier bill number or the name of the contact who issued the bill.
-
Attach the bill to the transaction via the document symbol.
If you received a hardcopy version of the bill, you need to scan the bill to then attach it as a separate file. If you received the bill via email — perhaps as an attached PDF — you can simply forward the email to your unique bills email address, and it will automatically attach to a draft bill. Your unique Xero bills email address is found on the top right corner of the Purchases dashboard. This creates a Draft bill, so at Step 1 you would open the draft bill rather than create a new bill. The copy of the bill is stored in a retrievable format.
 Many countries allow records to be stored in digital format, and the practice is environmentally friendly too! Just check with your country’s tax regulations to make sure maintaining digital records is acceptable.
Select the bill currency from the drop-down Currency field options.
-
Enter the total bill amount in the Total field.
If left blank, the Total field autofills the first time the bill is saved. If you subsequently update the transaction, you need to manually change the Total field.
-
Select the consumer tax status of the bill from the drop-down Amounts Are field options.
The three options are Tax Exclusive, Tax Inclusive and No Tax (refer to Chapter 6 for an explanation of these options).
-
Enter or select the inventory item from the optional Item field.
To add text from the supplier’s last recorded bill in Xero, click the hyperlink Add Last Item under the Contact field. You can edit them when the lines appear on the bill. A message appears momentarily at the top of the screen with the option to undo this action — but you have to be quick to click on it!
The other fields populate with the item details. See Chapter 13 for guidance on setting up inventory items.
-
Enter a comprehensive narrative in the mandatory Description field.
Include as much information as possible, such as dates, contacts, work completed and/or items supplied. Keeping serial numbers and warranty information here is also useful for future reference. Because this field is mandatory, if you’ve nothing to say just add a full stop.
-
Fill in the Qty and Unit Price fields.
Note: If you enter an amount in the quantity field, you must also fill out the Unit Price field.
 If the sale is for a fixed-price product or a service, enter the quantity as 1, and the full price in the unit price column.
 -
Enter the account name or number and select the desired account from the suggested drop-down list for the Account field.
Note: If you enter an amount in the quantity and unit price fields, you must also fill out the Account field. If you don’t enter anything in any of these three accounts, you can still save and approve the bill with them empty.
After a bill has been issued and money paid against it, the From, Due Date, Reference, Branding Theme, Description, Account and Tracking fields are the only fields that you can still edit from within the bill.
- Select the desired rate from the mandatory Tax Rate field.
-
Select from options in the drop-down menus in the available Tracking fields (if available).
Tracking is optional, and you won’t see the field if the feature is not set up. See Chapter 12 for guidance on setting up Tracking fields. The amount field can’t be edited. The subtotal, consumer tax and total automatically calculate. Populate the remaining rows with purchase information as needed. Note: In Figure 7-2 the Tracking field is called ‘Region’. Your Tracking field could be labelled something different.
-
Click the Add a New Line button (as required).
This allows you to add additional lines to the body of the bill. Once you’ve included multiple lines, they can be reordered by selecting, dragging and dropping as desired.
-
To on-charge the bill, click the Assign Expenses to a Customer link.
The Assign a Customer to Any Billable Expense window opens. You see three columns: Description, Amount (tax excl) and Customer. For each line of the bill, you have three options: Leave blank, select a customer, or select Decide Customer Later. If the latter is chosen, you will need to revisit and edit the Billable Expense to select a customer here. To confirm your selection, click the blue OK button. You can also come back and edit your customer selection, or add a customer later. If you’ve added multiple rows of expenses, each row can individually be assigned to different customers.
The billable expense details appear on the bill.
When a sale is raised to a customer tagged with the billable expense, the link Billable Expenses Can Be Added appears. Click the option you require to assign the expense lines.
-
Save the bill.
Xero gives you a number of options:
- If you want to just save the bill, click the blue Save button. (This will save the bill as draft by default.)
- To save the bill as a draft, click the drop-down arrow beside the blue Save button, and select Save as Draft. (The bill is now listed under the Draft tab.)
- To save the bill and continue editing, click the drop-down arrow beside the blue Save button, and select Save (Continue Editing).
- To save the bill and submit for approval, click the drop-down arrow beside the blue Save button, and select Save & Submit for Approval. (The bill is now listed under the Awaiting Approval tab.)
- To save the bill and then create a new bill, click the drop-down arrow beside the blue Save button, and select Save & Add Another.
Source: Xero 2019
FIGURE 7-2: The New Bill window.
A single PDF of a supplier bill can be emailed, via a unique email address located at the top of the Bills dashboard, directly into Xero, and Xero then creates a draft bill, with the supporting PDF attached. This is useful for staff whose User profile limits them to the Purchases area; they can jump in and process bills, without accessing File storage.
Approving and cancelling bills
A lawyer I know spent a few weeks in bed recovering from a severe bout of pneumonia. As he lay there, with nothing to do but think, he mulled over his business performance. He wondered why the cash situation was so tight when he had been so busy. When he returned to work, he took a careful look at the books. The amiable bookkeeper, who regularly baked scrummy cakes for the office, had been siphoning off a considerable sum of money from the business. Combining a gambling habit with forged cheques and erasable ink sooner or later ends up with a visit to jail.
Any bank accounts through which cash leaves the business should be appropriately approved. In a micro or small business, approval of all payments may be the responsibility of the owner. In a larger business, different approval levels may be in place — for example:
- A junior manager is responsible for approving payments up to $1,000.
- A senior manager is responsible for approving payments up to $5,000.
The active word in the preceding examples is responsible. Approving payments should be treated with the utmost of importance and undertaken in a considered manner. Anything less may have a detrimental effect on cash flow. Within Xero, users who can approve a bill are those within the following user levels:
- Adviser
- Standard
- Invoice Only with the Option to Approve & Pay, or Purchases Only
Approving
When approving a bill, you have a number of options:
- Simply approve the bill by clicking the green Approve button.
- To approve the bill and then create a new bill, click the drop-down arrow beside the green Approve button and select Approve & Add Another.
- To approve the Draft or Awaiting Approval bill and view the next bill — if another one is awaiting — (Draft or Awaiting Approval respectively), click the drop-down arrow beside the green Approve button and select Approve & View Next.
Once a bill is approved it is filed in the Awaiting Payment area.
Cancelling, deleting or voiding
Here’s how to cancel, delete or void a bill, dependent on the status of the bill:
- If you want to cancel the bill during the original creation stage, click the grey Cancel button.
- To delete a Draft or Awaiting Approval bill, from the home dashboard click Accounts → Purchases and then drill down on either the Draft or Awaiting Approval option, check the box beside the relevant bill and select the Delete button. At the Confirm window, click the green OK button, and the status of the bill reverts to Deleted.
- To void a bill Awaiting Payment or Paid, first any payment made against the bill needs to be removed (see ‘Removing allocated payments’, later in this chapter). The status of both types of bills now reverts to Awaiting Payment, with no assigned payment allocation. Click on the bill detail, select the Bill Options button, and from the drop-down menu select Void. At the Confirm window, select the green OK button and the status of the bill reverts to Voided.
The details of a cancelled bill disappear entirely, while the erased details of deleted and voided bills can be found by searching under the grouping labelled All, clicking the Search button and checking the Include Deleted & Voided tick box.
 If you click the Cancel button on a bill, no confirmation window appears, so you don’t have a chance to back out. The bill is gone forever.
Generating a purchase order
While living in Cheltenham, I worked for an organisation that closely monitored promotional spends against budget. This process involved raising a detailed internal purchase order. The purchase order needed to be authorised by appropriate personnel, and my role involved checking the proposed account allocations.
A purchase order is a document detailing agreed spends for products or services. Internally, it monitors and controls spending; externally, it provides suppliers with authorisation to deliver their good and services.
The Purchase Orders dashboard is found below the Bills dashboard on the Purchases dashboard (found in Business → Purchase Orders). It’s quite sparse until you’ve created some purchase orders, but this section covers what it can include once it’s populated.
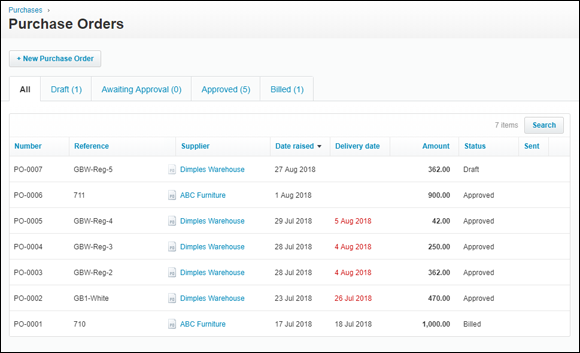
The high-level Purchase Orders dashboard is split into two blocks: Buttons and a menu bar. Click the blue See All hyperlink to see a detailed Purchase Orders dashboard. At the top is a button for creating new purchase orders and across the top are five tabs: All, Draft, Awaiting Approval, Approved and Billed (see Figure 7-3).
Source: Xero 2019
FIGURE 7-3: The Purchase Orders dashboard.
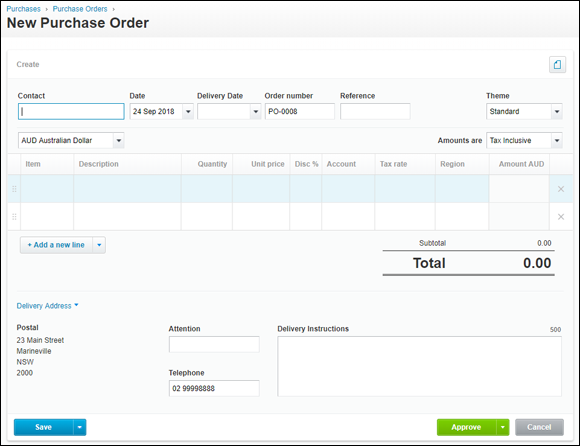
Clicking the + New Purchase Order button brings up the New Purchase Order form (see Figure 7-4). The steps for creating a new purchase order mirror the steps for creating a new bill — refer to the section ‘Creating a new bill’, earlier in this chapter. However, you need to be aware of the following three different options:
- Delivery Date: This field offers a pop-up calendar, and above it are four blocks: Today, + 7 days, + 14 days and + 30 days. Click on + 30 days and the field populates with a delivery date 30 days after the purchase order date.
- Order Number: This autogenerates from the default invoice settings. Refer to Chapter 6 for more insight into this.
- Theme: Check if your existing themes are appropriate. If they’re not, you may need to create a dedicated purchase order template. Further information about themes and templates can be found in Chapter 6.
Source: Xero 2019
FIGURE 7-4: The New Purchase Order form.
The block at the base of the purchase order includes fields for the Delivery Address, general contact details and Delivery Instructions.
The Delivery Address and Attention fields populate from the Organisation Settings existing information. To change the Delivery Address, click on the drop-down options and select from None, + Add New Address, + Add One-off Address, + Search from Contacts, Postal and Physical.
The Delivery Instructions field is a 500-character text field where you can include specific instructions for the delivery company — so, for example, you can let the delivery person know to bring your goods to the red door at the back of the building while navigating the guard dogs!
Like a bill, a purchase order can be saved or approved.
Although a little less exciting than cicadas emerging from underground after 17 years, understanding the life cycle of the purchase order is worthwhile. If you opted to save the purchase order as Draft, under the Draft tab, you have the option to Submit for Approval, Approve, Print, Send or Delete it.
At any stage in the purchase order’s life cycle, you can click on the Purchase Order, click the Options button, select Copy To … and copy the contents to a draft Bill, Purchase Order or Sales Invoice.
Once a purchase order is Awaiting Approval, under the Awaiting Approval tab you have the option to Approve, Print, Send or Delete it (refer to Figure 7-3).
Under the Approved tab, you have the Billed, Print, Send or Copy To options. The Billed option marks the purchase order as billed, but does not create a bill from this. Once a purchase order has been marked as billed, under the Billed tab, you have the option to Print, Send or Copy the order.
Making Payments
You can use Xero several ways to record payments: Recording individual payments, preparing batch payments or linking payments against bills directly from within your Bank Reconciliation dashboard. The following sections take you through the first two options (turn to Chapter 8 for more on bank reconciliations).
Recording an individual payment
To record a full or partial payment against a bill, follow these steps:
-
Go to the Purchases dashboard and click Business → Purchases Overview.
Bills need to be approved for payment before payment can be applied against them.
-
Select the bill to pay by drilling down through the Awaiting Payment tabs and click through to the detail of the bill.
The bottom of the bill features the Make a Payment block (see Figure 7-5).
- Fill out the Amount Paid field.
- Fill out the Date Paid calendar field.
-
Select the general ledger account the payment is to be made from using the drop-down list in the Paid From field.
Payment may be made from your bank, credit card or PayPal account, or any account set up to enable payments from this account (such as an intercompany loan account). Refer to Chapter 2 for guidance on customising general ledger accounts.
-
Enter a useful reference in the optional Reference field.
This reference won’t be picked up in search results, but it can be seen on some reports. -
Check the box beside the Pay by Check (US) (or Cheque, in Canada) field (if required).
Only United States and Canadian users have this feature (see the sidebar ‘Payments made by check’ for more). -
Click the green Add Payment button.
At the top of the screen, a green tick appears, along with confirmation details of the payment and a blue View Bill — Send Remittance Advice link. See the section ‘Sending remittance advice’, later in this chapter, for guidance on how to do this.
If the Pay by Check field was selected, the Pay by Check window opens.
The information on the check autofills, and the Check # and Pay To fields can be overridden. For traceability, adding further information to the optional Memo field is good practice.
- Click the blue Edit link to add or edit the recipient’s address details.
-
Click the drop-down arrow at the Check Style field to select a check template style (if required).
See the section ‘Stylising your check’, later in this chapter, for information on different check styles.
-
Select your print and/or save options.
You have three options: Save & Print PDF, Save, and Cancel. To print a check, click Save & Print PDF and, at the Print Check window, click Print Now.
The PDF of the check downloads to your computer’s download file. To finalise payment, email or mail it to the client.

Source: Xero 2019
FIGURE 7-5: The Make a Payment block.
Recording batch payments
Recording batch payments may not be as enticing as a batch of warm and gooey chocolate-chip cookies, but using this feature within Xero can really reduce processing time.
Before processing batch payments, you need to have set up your bank accounts in Xero — refer to Chapter 2 for more on this. When preparing to make a payment, check that enough money is available in your business accounts. Check your bank account directly — the business account balances on the Xero dashboard may not include recent transactions.
Creating a new batch payment
To record batch payments, follow these steps:
- Check single or multiple bills to be paid in the Awaiting Payment area of the Purchases dashboard.
-
Click the Batch Payment or Make Payment button (for US and Canadian users).
The Confirm window opens.
For US and Canadian users, the Make Payment window opens with three options: Pay By Check, Batch Payment and Pay with Bill.com (US only). -
Click the green OK or Batch Payment button (for US and Canadian users).
The New Batch Payment window opens (see Figure 7-6).
- Enter the date payment will be made in the mandatory Payment Date calendar.
- Select the account that payments will be made from in the mandatory Bank Account field at the top of the window.
-
Enter supplier bank account details in the Bank Account column.
Once a bank account has been allocated to a supplier payment, this account will save and be available the next time you make a batch payment. If you intend to use this process to transfer payments electronically, you must complete this field — see the next section.
-
Enter a payment or supplier reference in the optional Details fields.
Details added to the optional Details fields will appear on your bank statement.
-
If required, override the amount to be paid in the Payment column.
The amount outstanding for the bill autofills in the payment field; however, if you’re simply making a part-payment or deposit, override the amount.
-
Click the green Make Payments button.
The batch payment is created.
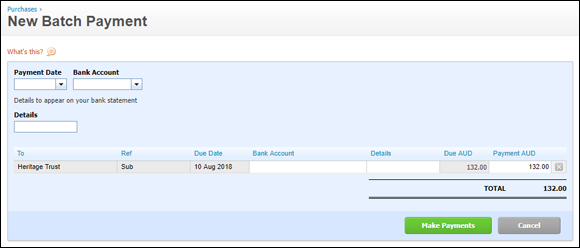
Source: Xero 2019
FIGURE 7-6: The New Batch Payment window.
Exporting a batch file to your bank
If you’ve never created a bank file, take a few moments to get your head around the process; it may save you a huge amount of time! A bank file is a file that can be uploaded to your internet banking. Payments are processed in Xero, and details of those payments (including full bank account details) are exported via a bank file. You then import the bank file into your online banking. But don’t worry — importing the file does not result in payments going out from your account like automatic balls from a baseball-pitching machine. Once the bank file is imported, you can see full details of pending payments and authorise them accordingly.
Note: Prior to being able to upload files to your bank, you need to contact your bank and let staff know you want to upload electronic bank files. Staff can then enable this feature. Depending on the bank, staff may need to provide you with a security code device and a direct entry user ID, and let you know if you need to include a self-balancing transaction.
After a payment is processed within Xero (refer to preceding sections), follow these steps to export a bank file:
-
Click Export Batch File from the batch payment window.
The bank file is downloaded to your computer.
Note: For this to work, business bank details and supplier bank details need to be entered into Xero.
-
Manually upload the file to your online internet banking.
Some financial institutions require you to use a banking security token at this stage. It generates a unique security code every few seconds. You need this code when you log in, along with your username and password.
- Authorise the payments from within your internet banking.
After processing the bank file, you don’t need to store it, just delete it.
If you didn’t create a bank file immediately after the batch payment was processed, you can return later to the payment. Locate it under the relevant bank account’s Account Transactions tab and click on the relevant payment (the Description is Payment: Multiple Items). At the top, you can access the Export Batch File button, and work through the preceding steps.
Removing allocated payments
You may find you’ve assigned a payment to a bill and then need to remove it, because you need to change the details of the bill or the payment was allocated incorrectly. To ‘unallocate’ a payment, follow these steps:
- Go to the Purchases dashboard, click on Business → Purchases Overview, click the Search button on the right side, and use the criteria options that have appeared to search for the bill.
- Locate the bill and drill down to see the bill detail.
-
Click on the relevant Less Payment hyperlink and the corresponding currency amount at the bottom of the column headed Amount.
The Payment transaction appears. If multiple payments have been assigned, multiple lines of payment will appear, and each one needs to be individually removed.
-
On the Payment transaction, click on the Options button, and select Remove & Redo from the drop-down menu.
The payment is removed from the bill. If additional payments need to be removed, click your web browser’s back arrow twice and then refresh the screen to see the current transaction details. Repeat Steps 3 and 4 to remove additional payments.
Mastering Other Payment Considerations
As well as the basic functions of entering and approving bills, and making payments, with Xero you can also master some more advanced options, such as working with repeating bills, scheduling payment and sending remittance advices. The following sections cover these aspects and more.
Printing bills
You’re unlikely to need to print the bill created in Xero on a regular basis, but if you ever need to, follow these steps to print your record of the supplier bills:
-
Go to the Purchases dashboard, drill down on the Awaiting Payment tab to find the relevant bill, and check the box to the left of the document(s).
A single bill or multiple bills can be selected and processed at the same time.
-
Click the blue Print button.
The Confirm window opens.
-
Click the green OK button.
The Print Bills window opens.
-
Click the green Print Now button.
You see a status window telling you that Xero is creating a PDF.
- Print the PDF by clicking the Print icon in the upper left corner.
Working with Repeating Bills
Unfortunately, many business bills arrive on an all-too-regular basis, but utilising Xero’s Repeating Bills function, which automatically generates new supplier bills based on a saved template, makes this a little less burdensome.
Once you’ve defined a Repeating Bill template, an automatic bill is created and saved as a draft or approved (as per the requirements you’ve defined within the template). Templates can be edited if terms change. All this results in you being able to use your valuable time to earn money rather than prepare bills!
To create a Repeating Bill, follow these steps:
-
Go to the Purchases dashboard, click on the drop-down menu beside the + New button, and select the Repeating Bill option.
The New Repeating Bill window opens (see Figure 7-7).
-
Fill out the Repeat this Transaction Every field.
You have a number of options here. For example, if you want the bill to repeat every month, enter 1 in the numeral field and select Month(s) from the drop-down menu.
- Select the original Bill Date by clicking in the calendar field.
-
Define the repeating Bill Due date.
Again, you have a number of options here. For example, if you want the bill to be due on the 7th of the following month, enter 7 in the Due field and select Of the Following Month from the drop-down menu.
- Fill out the optional End Date calendar field (if end date is known).
-
Click the file symbol and attach files relevant to the recurring transactions.
If the recurring transaction was for car lease payments, for example, you could attach the original supporting lease document here, and it would be associated with every transaction — without using up any extra storage space.
-
Select the Save as Draft or Approve option.
Selecting this option tells Xero whether you’d like the bill saved as a draft or approved when it generates, based on the dates you have entered.
Where the bill is the same every repeat instance, you would choose the option to approve. Where the bill might vary in value every instance — for example, a phone bill — you would choose to save it as a draft.
-
Fill out the remainder of the body of the bill by following the steps outlined in the section ‘Creating a new bill’, earlier in this chapter.
Use the reference field to give the bill an identifying name.
-
Save the template by clicking the green Save button.
The template is filed under the Repeating tab. When the bill is created, it indicates that it has been generated from a repeating transaction.
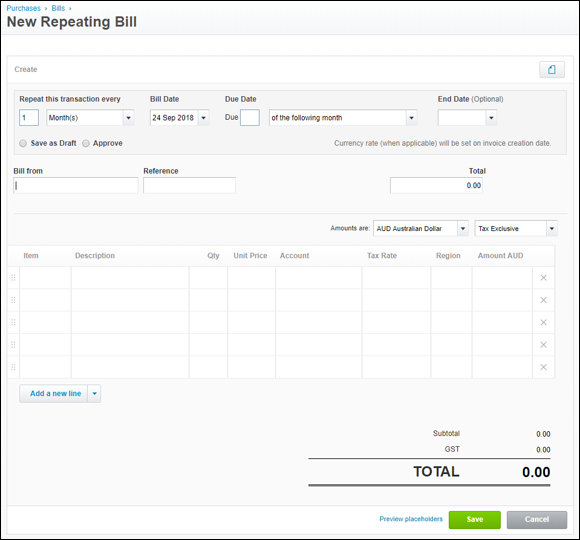
Source: Xero 2019
FIGURE 7-7: The New Repeating Bill window.
Scheduling payments
A business I worked for in London struggled to pay its bills. Suppliers sat in the reception area throughout the working day, desperate to collect what was owed to them. The situation was very depressing. As money was made available, it was released and applied to outstanding bills. The members of the Accounts Payable department had to pay close attention to who was to be paid. Suppliers with goods and services that were needed to keep the business operating were prioritised. Future payments were grouped together in bundles of £10,000 lots, so the business could easily identify and pay critical payments quickly. Batching future payments enabled the business to protect its cash flow during difficult times.
While this wasn’t a happy scenario for the suppliers, the payment system kept the business afloat and people employed.
Xero’s Schedule Payments feature enables you to develop a program of planned payments, helping you manage your cash flow. You’re able to see the total payments due on a particular day, and you can click on the date to see a list of scheduled payments planned for that day. Follow these steps to schedule future payments:
- Check single or multiple bills to be paid in the Awaiting Payment area of the Purchases dashboard.
-
Click the Schedule Payment button and select the intended date in the calendar box.
The Planned Date column fills out with the selected data. Hovering beside the planned date reveals a blue plus and minus option and a red cross. Clicking the blue plus and minus options increases or decreases the date by one day. The date can be overridden by clicking it and selecting another date from the calendar box or erased by clicking the red cross.
Once you’ve entered future payments, a Schedule of Planned Payments block appears on the Purchases dashboard, with the payments grouped by payment dates. Each block clearly details the date and the total group payment. Click on the block to drill down to see the batch payments for that date.
Stylising your check
I was once told if you stamped the correct details on a cow, you could use the mammal in place of a typical paper-based check. Far easier to customise checks in Xero, and send them as payment!
Note: Only US and Canadian users can access the Checks dashboard in Xero and customise a check.
To customise a check, follow these steps:
-
Go to Organisation menu → Settings → General Settings → Check Styles (under Features).
The Check Styles dashboard appears.
If you have an older version of Xero, you may have old-style checks set up. You can no longer create new old-style checks in Xero. While your existing old-style checks can be edited, new-style checks are easier to stylise and use, and upgrading is effortless. So I recommend ditching the old and embracing the new. On the top right corner of the old-style checks block, simply click the button labelled Upgrade to New Check Style to upgrade. -
Click New Style on the top of the Check Styles dashboard.
The New Check Style editing window opens (see Figure 7-8). The Check design is in the top half of the window, and the Voucher design is underneath it.
The check doubles as a remittance advice, because it has room at the top for the check details and at the bottom is a voucher, with the reason for the payment. The recipient can give the check to the bank and retain the voucher for record-keeping purposes. -
In the Style name field, enter Company Check.
See if the address details are correct and leave all the other information as is.
To ensure characters align with the pre-printed check stock, select the relevant Paper type, Paper layout, Font, Font size and move information fields to the appropriate areas. -
Scroll down the screen to review the set-up for Vouchers.
Uncheck any information fields not required.
- Click the Save button.
-
Upload a logo to the stylised check by clicking the Options button and selecting Upload Logo.
Note: The additional options that appear here are Edit, Copy, Upload/Change/Remove, Preview, and Delete.
-
Click Browse, select the logo, click Open and click the blue Upload button.
Magnetic Ink Character Recognition (MICR) encoding is supported, so you can print the routing number and account number on blank check stock and save money by not purchasing check stock for every account — though the ink is expensive!
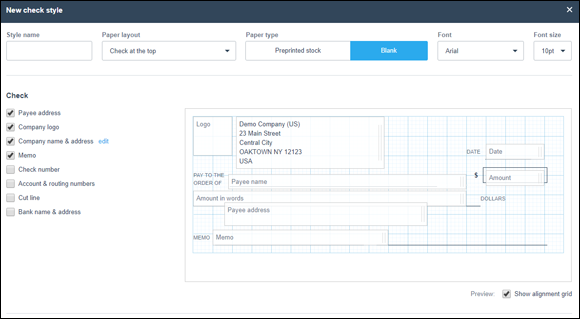
Source: Xero 2019
FIGURE 7-8: The New Check Style window.
Sending remittance advice
A remittance advice notice lets your suppliers know that you’ve processed a payment against their bills, so they stop chasing you for payment! The notice details the supplier bills that payments have been applied against and can assist suppliers during their reconciliation process.
Send a remittance advice immediately after payment has been made by following these steps:
-
Click the Send Remittance Advice link or the Send Remittance button.
The Send Remittance Advice link appears at the top of the screen after making an individual payment and the Send Remittance button appears after making a batch payment.
Clicking the link or the button opens the Send Remittance Advice window.
If you need to resend a remittance advice, or didn’t send it directly after payment was made, access the Purchases dashboard and search for the relevant paid bill. Drill down to the detail, and click the blue Payment link on the bottom right (just above the Amount Due field). The Transaction: Payment window opens. At this stage you also have the option to View Remittance PDF, but it’s preferable to email it. Click Options → Send Remittance to access the Send Remittance Advice window. (This option isn’t available for US users.) -
Fill out the Email Address field.
If the Contact already has an email address listed, it appears here. If an email address is entered as part of the remittance advice process, it is added to the contact’s details.
-
Select a remittance advice branded theme from the drop-down options for Use Branding Theme.
Refer to Chapter 6 for guidance on setting up branded themes.
-
Select an email template from the drop-down options for Email Template.
Refer to Chapter 6 for guidance on setting up email templates.
- Edit the email Subject field and Message body as necessary.
-
Check the Send Me a Copy box.
This allows you to maintain a digital copy of correspondence.
Remittance advices are useful for reconciling purposes but, once I have receipted and reconciled payment, I shred any printed versions. I hate unnecessary paper!
Managing credit notes
If a change to a supplier bill occurs, you may request the supplier issues a credit note. The credit note can offset outstanding bills, or accompany a refund. (If you have accounting knowledge, then, yes, technically this is known as a debit note — don’t get confused by Xero’s terminology!)
To process a credit note, follow these steps:
- Go to the Purchases dashboard, click the drop-down arrow beside the + New button and click the Credit Note button.
-
Complete the details on the Credit Note screen.
Include a reference to what bill it is applied against, and enter positive values!
-
Save or approve the Credit Note.
Follow the same steps as with saving and approving bills (refer to the section ‘Approving and cancelling bills’ earlier in this chapter, for more details).
If no outstanding supplier bill exists, the Approved Credit Note simply saves, and is listed on the Awaiting Payment grouping on the dashboard. If, at a future date, a bill is approved against the supplier, an Allocate Outstanding Credit? window opens, where you can select Allocate (or Skip if you don’t want to allocate now). Select Allocate and a window very similar to Figure 7-9 opens.
If, however, an outstanding supplier bill does exist, the Allocate Balance on Credit Note window automatically appears.
-
If the credit note should be applied to this bill, allocate the amount accordingly.
In the example shown in Figure 7-9, the value of the credit note can be split across individual bills or treated as a cash refund. Once you enter the full credit amount against a bill, the Remaining Credit balance becomes zero.
Where a new bill was raised against an existing credit note, you only have the option to allocate the credit note amount to the recently raised bill.
-
Click the green Allocate Credit button.
The amount is applied to the Bill. Note: The amount allocated cannot be greater than the invoice.
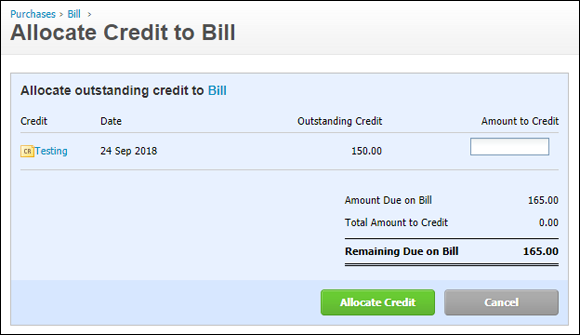
Source: Xero 2019
FIGURE 7-9: The Allocate Credit to Bill window.
Entering Expense Claims
In an ideal world, you’re able to enter all business transactions through your business accounts and avoid cash transactions altogether; however, this rarely ends up being the case. Say, for example, an employee of your business fills the business car up with $50 worth of petrol and then pays for it personally — so spends personal money on behalf of the business. The employee charging the purchase to a company credit card, so it then goes through the normal payment process, is preferable, but in real life that may not be feasible. Instead, the employee needs to claim the money back from the business and the payment needs to be processed as an ad hoc expense claim.
Processing expenses though Xero means your employees are responsible for entering their own expenses and are no longer bound to one petty cash tin (perhaps kept at head office or locked away somewhere else). And accounts staff are freed of the time-consuming task of processing an old-fashioned, bothersome petty cash tin!
Note: Xero allows two separate options for processing expense claims. The free (and original or ‘classic’) option is called Expense Claims, and how to use it is outlined in this section. Many advisers recommend their clients not to use the Expense Claims feature, because if you make an error, it can be almost impossible to correct. The new or modern option is called Xero Expenses, and an additional charge is incurred to access functionality. Organisations created after 10 July 2018 can only access the new Xero Expenses. For more on this new option, see the section ‘Understanding Xero Expenses Functionality’, later in this chapter.
Xero’s Expense Claims dashboard (accessed via the bottom right corner of the home dashboard) is where you process petty-cash type claims. All claims need to go through the same process. A new expense claim is first added as a Draft claim. It then needs to be submitted for approval, approved, and authorised for payment. Finally, the claim is paid and archived.
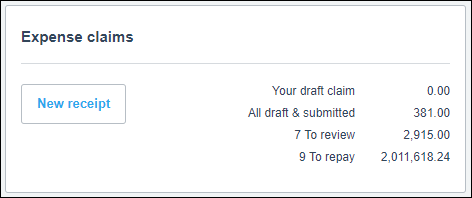
The Expense Claims summary dashboard (see Figure 7-10) contains four headings summarising the current status of expense claims, and an add New Receipt option.
Source: Xero 2019
FIGURE 7-10: The Expense Claims summary dashboard.
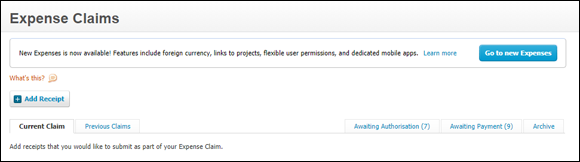
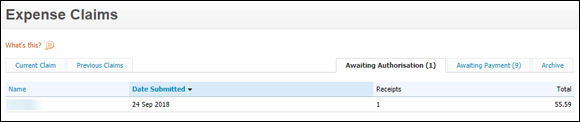
Click through on the hyperlinks to drill down to the Expense Claims dashboard. Here’s a summary of the five headings on the Expense Claims dashboard (see Figure 7-11), and the information they provide:
- Current Claim: This field is context-sensitive to the user who has logged into Xero, so if you’re logged in, this field shows any expense claim you’ve lodged that’s still current. If you’re peeking over the shoulder of another user, this field displays that user’s current expense claim.
- Previous Claims: This field is the total of all the logged-in user’s current expense claims in the business. If you’re a micro business with only one user, this amount always equals the total shown under your Current Claim. At this stage, you can’t access the underlying detail for the expense claims of other users.
- Awaiting Authorisation: This field details the total expense claims awaiting authorisation. The user must have the required authority level (assigned via their user role within Xero) to authorise and approve the expense claim.
- Awaiting Payment: This field details the total expense claims awaiting payment.
- Archive: This field lists archived expense claims.
Source: Xero 2019
FIGURE 7-11: The Expense Claims dashboard.
Clicking the hyperlinks on the Expense Claims dashboard takes you through to the Expense Claims summary dashboard.
Several people may be involved in the processing of expense claims: The user who makes the claim, a first-level manager who authorises the claim, a second-level manager who approves the claim and the financial controller who makes the payment. Of course, if your business is very small, you may be wearing all the hats and performing most or even all these roles.
Adding a new expense claim
The process of claiming an expense starts with the user entering the payment as a New Receipt in Xero.
To enter a New Receipt, do the following:
-
Scan your receipt.
You don’t need to be able to upload a copy of your receipt to Xero to process your claim, but storing receipts safely is always a good idea — rather than leaving them on the car dashboard to fade away! Xero allows .pdf, .jpg, .png and .gif digital formats for the scanned receipts.
-
Go to Classic Expenses from the dashboard, go to the Expense Claims box, click on the Expense Claims heading, and then click the Add Receipt button.
The Add Receipt window opens (see Figure 7-12). Multiple expenses can be entered and processed as a single batch at a later date.
-
Attach a scanned copy of the receipt to the transaction by clicking on the document icon.
The source document is stored online in a retrievable format. This is an efficient method of storing source documents and legal in many jurisdictions. Plus, the expense approval process may require it. Check your own local laws and requirements. This step is optional but it’s a good habit to adopt.
-
Enter the relevant receipt data and save the transaction.
In the Receipt From field, enter the supplier name. If you have more than one receipt to enter, select the blue Save & Add Another Receipt button, return to Step 1 and repeat the process. To record a single receipt (or once you’ve entered your last claim), click on the green Save button.
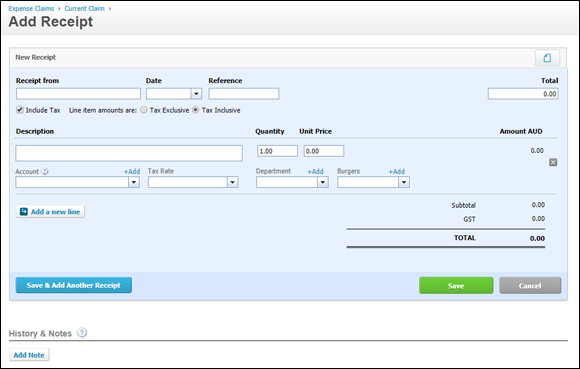
Source: Xero 2019
FIGURE 7-12: The Add Receipt window.
Saving your last claim takes you to an expanded view of the Current Claim window, listing a summary of current expense claims. Note: The status of the claim at this stage will be Draft, and the claim now needs to be approved (see the section ‘Submitting a claim for approval’, later in this chapter).
Making mobile expense claims
Keep on top of expenses while enjoying a latte by scanning and uploading expense receipts to Xero on your mobile device. (Now, to me, this sounds geektastic!)
Flatten your receipts and grab your mobile device — here’s how to upload the basics of an expense on your iPhone:
-
Tap on the Xero icon, enter your four-digit passcode or fingerprint and click the Receipts icon at the bottom of the screen.
A list of current receipts appears.
-
Click the + in the top right corner of the screen.
If you’re adding subsequent purchases after this, you’ll just need to click the grey cross on the top right.
A receipt entry form appears.
-
Enter the purchase description in the first line of the What Was It For? field.
The field draws from popular receipts — so, you may be able to select an existing reason, or enter your own.
-
Enter your name in the Where’d You Spend? field.
The field draws from your existing list of contacts, so you may be able to select an existing contact. However, in reality, expense claims can come from lots of little suppliers that you don’t want populating your Contacts list, so you may prefer to just add your own name here and add the supplier name at Step 3 (in the description field). - Select the date of the receipt when you click the Spent Today field.
-
In the How Did You Pay? field, select I Want to Be Repaid.
This receipt entry is for an expense claim. At this field, select the business account it was paid from and record it as a Spend Money transaction. You can also add a Tracking code if you know it; otherwise, leave the Tracking code field blank. (However, I suspect many employees are in a better position to know what account the expense should actually be allocated to than the bookkeeper, so allowing them to code expenses could be another time saver.) - Enter the amount, and edit the tax status of the Amounts, if required.
-
Click the grey Add Files button in the bottom right corner. Three options appear: Take Photo, Choose Photo or Choose from Xero Files. Choose Take Photo and take a photo of the receipt.
The image of the receipt attaches itself to the claim. In many jurisdictions, this is a legally acceptable storage method for paper receipts. (If unsure, check with your accountant.)
Click the optional details section to access three additional options:
- Assign Expense to a Customer
- Split into Items & Quantities
- Add Reference
-
Click the Add hyperlink on the top right of the screen.
And you’re done.
Here’s how to upload expenses on an Android device:
-
Tap on the Xero icon on your mobile device, and enter your four-digit passcode.
The home dashboard screen opens. Across the top are four headings: Dashboard, Invoices, Expenses and Contacts. Note: If you move away from the mobile version of Xero, when you return you need to re-enter your four-digit passcode.
-
Click on the Receipts heading at the top of the screen.
A list of current receipts appears.
-
Click the + on the top right corner of the screen.
A numbered Receipt screen opens. Refer to the section ‘Adding a new expense claim’, earlier in this chapter, for more. The fields available are What Was It For?, Where’d You Spend?, Date, How Did You Pay? and Categorise to an Account. Click the three dots (…) on the top right of the screen to add additional details: Split, Assign to a Customer, and Add a Reference.
As you’re entering the information, a comic image appears on the receipt to reflect the expense. For example, for a taxi charge, a man and dog in a yellow taxi appears!
On the middle right is a camera symbol to facilitate taking a photo or adding a file to the receipt.
- Click the arrow that looks like a paper dart on the top right corner to save the receipt.
- Click the Xero icon at the top of the screen and then, on the top right, click Logout to securely log out of Xero.
What I’ve shown in the preceding steps is the bare basics, to get you (and your employees) in the habit of recording expenses straightaway. You can complete more fields in this type of expense claim — refer to the section ‘Creating a new bill’, earlier in this chapter, for guidance.
Submitting a claim for approval
Once the claim has been entered (refer to preceding sections), it needs to be submitted for approval, as follows:
-
Go to the Expense Claims dashboard and click on the Current Claim link.
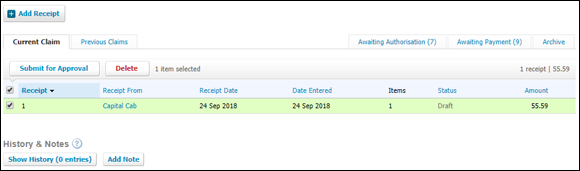
This brings up the Current Claim table (see Figure 7-13).
-
Select the check box to the left of the expense claims that you want to submit for first-level approval and click the Submit for Approval button.
A confirmation box opens, informing you that you have selected items to be submitted for approval.
-
Click OK.
This moves the claim to the Awaiting Authorisation area in the Expense Claims window.
To view a summary of the claims awaiting authorisation, click on the Awaiting Authorisation link on the Expense Claims dashboard. Note: If you select multiple expenses for approval at the same time, they’re batched together in a single claim, so you only see one line here.The claim still needs to be approved so the expense can be paid and included in the business financial statements — see the following section.
Source: Xero 2019
FIGURE 7-13: The Current Claim table.
Reviewing and authorising the claim
After an expense claim has been created and submitted for approval (refer to preceding sections), a first-level manager needs to authorise the claim.
Users with Read Only and Invoice Only (Draft Only or Sales Only) roles (refer to Chapter 4) can’t authorise expense claims in Xero.
To select the transaction that needs to be authorised, click the Awaiting Authorisation link on the Expense Claims dashboard. This takes you to the Awaiting Authorisation table (see Figure 7-14). Click through to the detail. Select the expense claim to be approved by clicking the check box to the left of the Receipt and click the Approve button. (I know this is a little bit confusing — this transaction was sitting under the Awaiting Authorisation link, so you probably would expect an Authorise button instead — but an Approve button it is!)
Source: Xero 2019
FIGURE 7-14: The Awaiting Authorisation table.
After clicking the Approve button, the status for the claim changes from Awaiting Review to Approved.
At the Awaiting Authorisation stage, you or the first-level manager who’s reviewing the claim can decline or delete the expense claim — if, for example, you decide it’s not an appropriate business expense.
Declining the expense doesn’t notify the person who submitted the expense.
Once the claim has been approved, it can be authorised by the second-level manager.
To authorise a claim, go to the bottom of the Expense Claims screen on the home dashboard and click on the Awaiting Authorisation link. Click though on a claim to see the underlying detail. Below this detail, the Authorise Expense Claim block appears with two fields to complete: Payment Due Date and Reporting Date (see Figure 7-15).
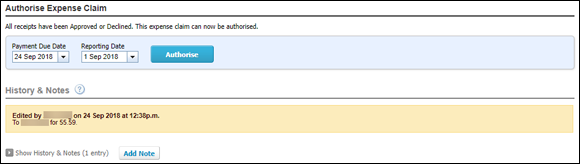
Source: Xero 2019
FIGURE 7-15: The Authorise Expense Claim block.
Even though you’re processing the claim now, the expense may actually have occurred earlier in the year. To be correctly reflected in your financial reports, you can make the date in the Reporting Date field in the Authorise Expense Claim block different to the Payment Due Date (the date the payment is actually made).
Complete the two fields and click the blue Authorise button, and claims are now ready for payment (covered in the following section).
Paying the claim
Finally, you’re ready to pay the expense claim. Click on the Awaiting Payment link on the Expense Claims dashboard to view a list of expense claims awaiting payment. Click anywhere along the row to drill down to see the detail of the expense claim you wish to pay.
To complete the payment, you need to fill out the following four fields at the bottom of the Expense Claims window:
- Amount Paid: This is the actual amount the claimant will be paid. Note: The expense claim can be partially paid, with the unpaid amount remaining in Xero as awaiting payment.
- Date Paid: This is the actual date the expense payment will be paid.
- Paid From: This is the account the expense claim will be paid out of.
- Reference: For audit purposes, always include a detailed reference.
US and Canadian users have the check box option to Pay by Check.
After completing the four fields, click the green Paid button. If opting to pay by check, the Pay by Check window appears. Refer to the earlier section ‘Recording an individual payment’ for details on how to fill out this window. The processed expense claim now sits in the archive summary area within Xero, and the claimant needs to be reimbursed for the claim, if that hasn’t already happened.
Understanding Xero Expenses Functionality
Xero Expenses offers a more streamlined process and increased functionality to the ‘classic’ Expenses functionality (refer to preceding sections), including simple data extraction via the mobile app, enhanced editing options, notification if an expense claim is rejected, the ability to limit the accounts that can be associated with an expense claim, and the ability to assign unique User labels so the individual users can track their own expenses. The new Xero Expenses is only available for an additional subscription fee, but if your business processes a lot of expense claims, paying the extra amount may be worthwhile. This section runs through how to process claims within the new Xero Expenses.
Note: If you have an older file and have activated the classic expense claims feature, you can still access the classic features, while using the new Xero Expenses. However, that could end up being confusing. Items entered through the classic expense claims feature, for example, will not flow through to the new Xero Expenses. I recommend only using either the classic expenses or the new Xero Expenses.
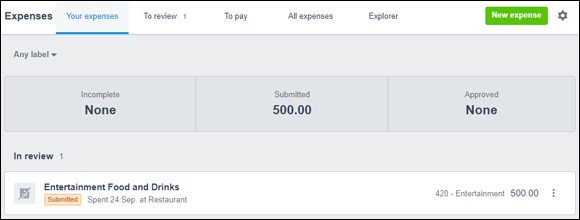
The Xero Expenses summary dashboard (see Figure 7-16) contains four headings summarising the status of expense claims, an Explorer area, a New Expenses option, and a Settings icon.
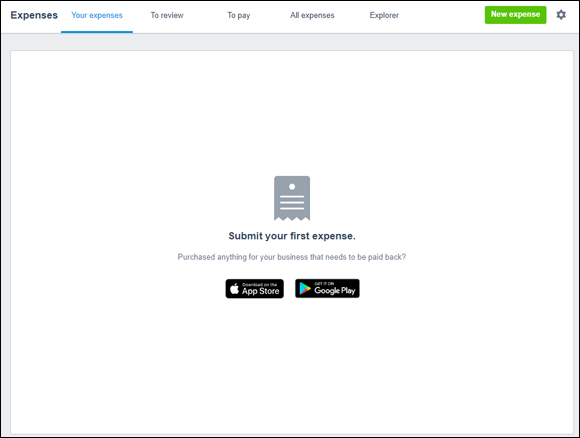
Source: Xero 2019
FIGURE 7-16: The Xero Expenses summary dashboard.
Here’s a summary of the four headings on the Expense Claims dashboard and the information they provide:
- Your Expenses: This area is context-sensitive to the user who has logged into Xero, so if you’re logged in, this field shows any expense claim you’ve entered. The claims are colour coded to easily identify if their status is Draft, Submitted, Approved or Paid. Claims can be sorted by Labels allocated to the claims.
- To Review: This area details expense claims that have been submitted, awaiting approval.
- To Pay: This area details the approved expense claims awaiting payment. The user must have the required authority level to pay the expense claim.
- All Expenses: All claims can be viewed by the parameters User and Status. This is useful for checking if an expense claim has gone missing.
The Explorer area shows a vertical bar graph of expenditure, which can be displayed by user or account expensed. (This will only show information after an expense has been submitted.)
Defining Xero Expense Settings
Click the Settings icon on the top right (it looks like a cog wheel), to access the Expense Settings dashboard, which opens at the General tab (see Figure 7-17). Tick the check box to enable receipt processing. When an image is uploaded via the Xero Expenses mobile app, some data is extracted and used to populate relevant fields. This minimises data entry; however, make sure you still review details for accuracy.
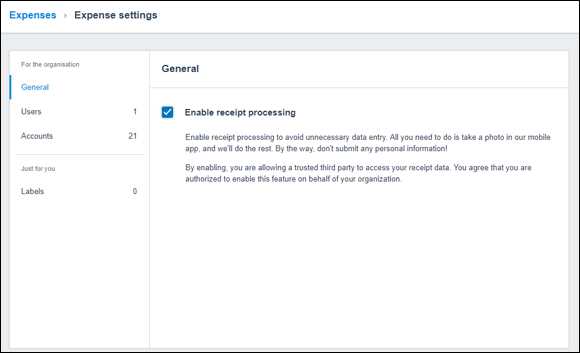
Source: Xero 2019
FIGURE 7-17: The Expense Settings window.
Click Users on the Expense Settings window to review and edit who can access Xero Expenses. Users need to be given specific access to Xero Expenses to submit claims. Three levels of access are available within Xero Expenses:
- Submitter: Users with this access can submit and view their own expenses only; they cannot authorise claims.
- Approver: In addition to the Submitter role, these users can manage and authorise all user expenses.
- Admin: Expanding on the Approver role, Admin users can manage expense settings.
Click on Accounts to see which accounts have been selected to be available in the expense claims process. Typically, a business sets expense claims rules, governing what a staff member can claim back, so it may be expenses like petrol, parking and food, incurred while travelling. Therefore, to simplify the process, via this Accounts area in Xero Expenses, users can be only given access to restricted expense account codes.
Click on Labels to add, edit or delete labels, or view expenses associated with labels. Labels are unique to the individual, so you could monitor expenses incurred on a personal level, such as staff members’ expenses incurred while attending a conference.
Adding a new expense claim in Xero Expenses
The process of claiming an expense starts by entering the payment as a new expense in Xero.
To enter a new expense, do the following:
- Scan your receipt.
-
Go to the Expense Claims dashboard, go to Business → Expenses, and click the New Expense button.
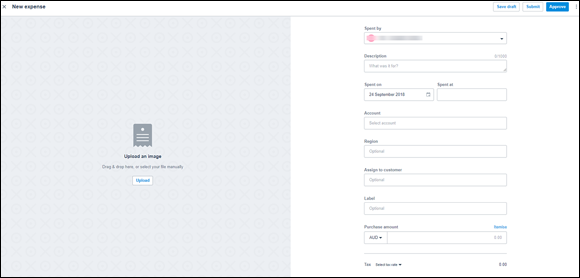
The New Expense window opens (see Figure 7-18).
-
Drag and drop a scanned copy of the receipt to the Upload an Image area.
The details of the source document appear neatly on the left side, assisting in completing the expense information fields. Click the pencil icon in the bottom right corner to replace or remove the receipt, if it needs to be corrected.
-
Enter the relevant receipt data and save the transaction as a draft.
In the Spent By field, select the relevant User. The Supplier details can be entered in the Spent At field. If the expense needs to be split across multiple accounts, click the Itemise hyperlink, to add additional account lines. Splitting across multiple accounts cannot be done on the mobile app. Select the Save Draft option.
To record another receipt, return to Step 2, and click the New Expense button again.
Source: Xero 2019
FIGURE 7-18: The New Expense window.
Saving the last claim takes you to the Your Expenses area, within the Expenses dashboard.
Note: The status of the claim at this stage will be Draft, and the claim now needs to be approved (see the section ‘Submitting a claim for approval in Xero Expenses’, later in this chapter).
Making mobile expense claims in Xero Expenses
Embrace expense Zen and utilise those spare moments during the day by scanning and uploading expense receipts to Xero on your mobile device!
To start processing mobile expenses if you’re using Xero Expenses, you also need to download the Xero Expenses app from the Apple store.
Note: Four separate Xero apps are now available: the main Xero app (mentioned throughout this book), the Xero Expenses app (only for expense claims and what is covered in this section), the Xero Projects app (only for Projects and covered in Chapter 12) and the Xero Me app for Payroll.
Flatten your receipts and grab your mobile device — here’s how to upload the basics of an expense on your iPhone:
-
Tap on the Xero Expenses icon, initially enter your password and then your authentication code.
You are then given the option to, in future, enter your four-digit passcode or fingerprint.
-
Click the + in the centre bottom of the screen.
On the bottom left is a toggle button, which when turned on will try to auto-detect the receipt and take a photo. Capture and preview a photo of the receipt. If satisfied, select Use image.
-
Enter the purchase description in the first line of the What Was It For? field.
The field has space for 1000 characters. Select Save draft and the receipt is pushed across into processing. During the processing stage, data is extracted from the receipt and relevant expense fields populated, if permission was given for this to happen. Once processing has finished, click on the receipt again and check the fields are correct, including account allocation, and overwrite where relevant.
This receipt entry is for an expense claim. You can also add a Tracking code and Label if you know it; otherwise, leave the field blank. (However, I suspect many employees are in a better position to know what account the expense should be allocated to than the bookkeeper, so allowing them to code expenses could be another time saver.) -
Select Save, in the top right corner.
Check the settings icon in the top left of the screen and click Logout to securely log out of Xero Expenses.
To start processing mobile expenses if already using Xero Expenses, download the Xero Expenses app from the Google Play store.
Here’s how to upload expenses on an Android device:
-
Tap on the Xero Expenses icon, initially enter your password and then your authentication code.
You are then given the option to, in future, enter your four-digit passcode or fingerprint.
-
Click the + in the bottom right of the screen.
The options Manual Entry, Photo Library and Take a Photo appear.
- Select Take a Photo, and capture and preview a photo of the receipt.
-
Enter the purchase description in the first line of the What Was It For? field.
The field has space for 1000 characters, so you have room to be descriptive. Once satisfied, click the arrow that looks like a paper dart on the top right corner to save a draft of the receipt. The receipt is then pushed across into processing. During the processing stage, some data is extracted from the receipt and used to populate relevant expense fields. Once processing has finished, click on the receipt again and check the fields are correct, including account allocation, and overwrite where relevant.
You can also add a Tracking code and Label if you know it; otherwise, leave the fields blank. (However, I suspect many employees are in a better position to know what account the expense should be allocated to than the bookkeeper, so allowing them to code expenses could be another time saver.) - Click the arrow that looks like a paper dart on the top right corner to save a draft of the receipt.
- Click the three bars at the top left of the screen and click Logout to securely log out of Xero.
What I’ve shown in the preceding steps is the bare basics, to get you (and your employees) in the habit of recording expenses straightaway. You can complete more fields in this type of expense claim — refer to the section ‘Creating a new bill’, earlier in this chapter, for guidance.
Submitting a claim for approval in Xero Expenses
Once the claim has been entered (refer to preceding sections), it needs to be submitted for approval, as follows:
-
Go to the Expense Claims dashboard and click on the Your Expenses tab.
This brings up any expense claim you’ve entered (see Figure 7-19).
-
Click on the draft expense claims that you want to submit for first-level approval and click the Submit button in the top right corner.
You have the opportunity to edit the claim before submitting.
Clicking Submit moves the claim to the To Review area in the Expense dashboard.
To view a summary of the claims awaiting authorisation, click on the To Review tab on the Expense dashboard.The claim still needs to be approved so the expense can be paid and included in the business financial statements — see the following section.
Source: Xero 2019
FIGURE 7-19: The Your Expenses tab.
Reviewing and authorising the claim in Xero Expenses
After an expense claim has been created and submitted for approval (refer to preceding sections), a User with Approver or Admin Expenses access can authorise the claim.
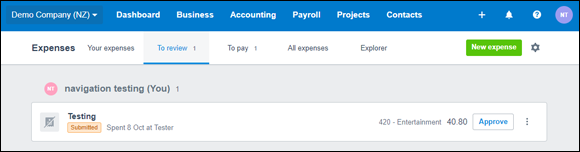
To select the transaction that needs to be authorised, click the To Review tab on the Expense Claims dashboard. Summary details of expense claims awaiting approval can be seen here (see Figure 7-20). Click through to the detail. To approve an individual claim, click the Approve button to the right of the specific claim. To approve all claims, click Approve All at the top right of the list.
Source: Xero 2019
FIGURE 7-20: The Awaiting Authorisation table.
After clicking the Approve button, the status for the claim changes from Submitted to Approved.
At the review stage, Users with Approver or Admin Expenses access can decline or delete the expense claim — if, for example, you decide it’s not an appropriate business expense.
Deleting the expense doesn’t notify the person who submitted the expense.
Once the claim has been approved, it is ready to be paid.
Even though you’re processing the claim now, the expense may have occurred earlier in the year. On an accruals basis, once paid, the expense is reflected in the period it occurred, not when it was paid.
Paying the claim in Xero Expenses
When payments are approved, they are created as a bill awaiting payment in the Purchases area. They are slightly different to a typical bill, in that they cannot be edited and can only be voided.
Note: The From field is the name of the user who submitted the claim. If, say, the claim was for a named petrol station, no expense is associated specifically with that petrol station.
The Expense Claims bills can be paid individually or as a batch, as you would typical pay a bill.
At the very bottom of many of the Xero windows sits the History & Notes area, which details the history of user activity in this area. You (and other users) can also add explanatory notes to this area, and these notes are tagged with the date and the user name. They’re excellent for audit tracking because they can’t be edited or deleted. All History & Notes activity can be searched for under Accounting → Advanced → History & Notes.