
Chapter 13
Managing Your Inventory Items
IN THIS CHAPTER
![]() Working out how inventory items can be organised and maintained
Working out how inventory items can be organised and maintained
![]() Establishing an inventory item within Xero
Establishing an inventory item within Xero
![]() Organising items in your inventory
Organising items in your inventory
![]() Changing inventory values and quantities after stocktake
Changing inventory values and quantities after stocktake
![]() Finding out about compatible cloud app solutions
Finding out about compatible cloud app solutions
I worked with a client who provided computer information technology support to businesses around Brisbane. It bought in various low-value items such as cords, wires, adapters and connectors, which could be used to set up and maintain information technology installations on client sites. These accessories are high volume and low cost, so the business invoiced its customers without tracking the inventory volume — as such, the business managed this inventory using the untracked inventory function in Xero. Occasionally, my client bought and sold hardware such as laptops and iPads for its customers. These items are high in value, and so my client monitored the number on hand using tracked inventory in Xero — at any point in time, it knew the value and volume of its stock of these high-value items.
In this chapter, I introduce you to the Inventory Items dashboard in Xero, where tracked and untracked items are created and pricing is set. (Details of how invoices and bills are dealt with are provided in Chapters 6 and 7.)
 Xero offers a simple inventory management solution for monitoring and processing services and uncomplicated physical inventory. Even if you don’t use inventory, understanding how items are used can help save data-processing time. However, if you have a retail store or significant physical inventory to manage, don’t try to get Xero to manage business processes it was never meant to. Instead, integrate Xero with one of the many compatible cloud-based inventory management solutions available. (I cover these solutions briefly in this chapter, and in more detail in Chapter 16.)
Understanding Inventory Items
From Xero’s home dashboard, you can access the inventory functions by clicking Business → Products and Services. From here, items can be created, imported, exported or searched for. A list details the Item Code, Item Name, Cost Price, Sales Price and Quantity. Clicking column headers sorts the columns.
I cover creating an inventory item later in this chapter, so you can skip ahead if you like. However, if you’d prefer to get more of an understanding of inventory and how it’s reported, read on.
Periodic and perpetual inventory
Two methods of managing inventory are generally accepted: Periodic and perpetual.
A periodic inventory system doesn’t keep a count of the inventory as it is purchased or sold. Inventory is recognised as a direct cost when it’s purchased and sales income when it’s sold. A stocktake is needed to update the value of any inventory reported on the balance sheet. In Xero, this is known as untracked inventory.
A perpetual inventory system undertakes continuous counts of inventory within the business, updating inventory values, and applying the cost of the item against the sale price in the month it’s sold. In Xero, this is known as tracked inventory.
Depending on your business, you may have a mixture of both periodic (untracked) and perpetual (tracked) inventory.
Defining inventory accounts
Grouping different sorts of items helps you in your decision-making process around inventory, giving a clearer idea of income, cost of sales and gross profit at a group level in your Profit and Loss reports. You can also monitor the performance of groups of inventory items using Xero’s Tracking feature (covered in Chapter 12).
However, Xero only allows two Tracking categories, and perhaps you’ve used them already — maybe you’re tracking sales by sales location and by sales staff. If so, here’s a workaround that gives you additional reporting functionality. Note: If you have an available tracking category, use that! Only use this suggestion if you’re using tracking categories elsewhere.
 The method suggested in this section of grouping inventory accounts isn’t suitable for a retail store!
One of my client’s income streams is self-published books; she has self-published three books, and each book is defined as a different grouping. This means inventory can be split into three groups: Book 1, Book 2 and Book 3. Her Chart of Accounts includes additional general ledger accounts to reflect the inventory groupings, as you can see in Table 13-1.
TABLE 13-1 Example of Grouped Inventory Accounts
|
Group |
Sales Income |
Direct Cost |
Asset |
|
Book 1 |
Book 1 income |
Book 1 direct cost |
Book 1 inventory |
|
Book 2 |
Book 2 income |
Book 2 direct cost |
Book 2 inventory |
|
Book 3 |
Book 3 income |
Book 3 direct cost |
Book 3 inventory |
When items are created, setting up inventory groupings means transactions are automatically posted to the appropriate account. This is easy to set up and quickly generates useful information. (Refer to Chapter 2 for guidance on setting up general ledger accounts, and Chapter 9 for more information on grouping similar accounts using report layouts.)
When it comes to considering the best inventory groupings for your business, the process may take some thought — and it could be something that you come back to. At a minimum, I suggest three groups, and probably at a maximum ten groups. Detailing each individual item in the Chart of Accounts isn’t required, and doing so means your reports become noisy and you’re unable to glean useful information. By setting up the Chart of Accounts with basic groupings, you can view inventory at a group-detail level, or create subtotals and view the information at a summary level.
 If you’re unsure how to allocate your inventory, speak to your Xero Adviser.
Setting Up a Xero Inventory Item
In order to set up inventory items within Xero, gather together details relating to the items, including description, and purchase and sales information.
Creating inventory items
To create a new item, follow these steps:
-
From the home dashboard, click Business → Product and Services.
This takes you to the Inventory dashboard.
-
Click the + New Item button.
The New Item window opens (see Figure 13-1).
-
Enter the item code in the mandatory Item Code field.
Think about how you plan to name inventory items — make sure they’re identifiable and easy to find. Mnemonic codes that utilise informative alphanumeric combinations are useful when deciding on a naming convention. For example, using AU, USA or NZ to suffix an inventory item could indicate a source country. When products are sourced from a single main supplier, consider using the supplier number as the item code or name. Note: Some reports display item lists in item code/name order. If the item code/name starts with zeros, the zeros are dropped from the code when exported to Excel. This may have knock-on effects elsewhere. - Fill out the Item Name field.
-
If you want to track the item, check the box marked I Track This Item. (If you don’t intend to track the value or quantity of your inventory items on hand, you don’t need to enter tracking details and can skip to Step 6.)
It’s good practice to allocate inventory to an asset account, and you need to select the Inventory Account Type if you intend to use Tracked Inventory. If you’re using Xero’s default Chart of Accounts, the asset account is called 630: Inventory. If you’ve imported or created your own chart of accounts, you may need to create a new account if you don’t already have one. Refer to Chapter 2 for guidance on setting up accounts. After you record an inventory transaction, you can’t change the allocated asset account. Refer to the section ‘Defining inventory accounts’, earlier in this chapter, when selecting an account. -
If the item will be purchased, complete the next five steps; otherwise, jump to Step 12.
If you’re using inventory items to record standard service descriptions to quickly populate your invoices, you don’t need to enter purchase details and can skip to Step 12.
-
Leave the box beside I Purchase This Item checked.
The purchase detail fields remain.
-
Enter the unit price of up to four decimal places in the Unit Price field.
Some businesses have contractual purchase agreements in place. It’s useful to enter the agreed price here, as a crosscheck that supplier bills are indeed correct.
-
Select the purchase account from the drop-down Purchases Account field.
Refer to the section ‘Defining inventory accounts’, earlier in this chapter, when selecting an account. If you intend to track the inventory, the account is a Cost of Goods Sold account; if you don’t intend to track the inventory, the account is a Purchases account.
-
Select the default tax rate from the drop-down Tax Rate field.
This rate can be overridden when processing a bill.
-
Enter a detailed item description in the Purchases Description field.
The description automatically appears on bills and can be overridden. Including extensive details here, which can be edited when the bill is created, can save data entry time.
For example, a bookkeeping business could create a service item called ‘Bookkeeping’ with the description, ‘Data entry, filing, bank reconciliation, review accounts payable, review accounts receivable, payroll, stock control and training’. When the description autofills on the invoice, additional details can be added (for example, ‘bank reconciliation — savings account’), or some descriptions could be deleted (for example, ‘filing’). This saves you (or other users) time, and prompts you to leave a detailed invoice.
- If the item will be sold, complete the next five steps; otherwise, untick the box beside I Sell This Item and jump to Step 18.
-
Leave the box beside I Sell This Item checked.
The sales detail fields remain.
-
Enter the unit price of up to four decimal places in the Unit Price field.
This amount appears on invoices and bills. Changing the Tax Inclusive/Tax Exclusive option on the invoice/bill affects how the item is treated for consumer tax and the total for the transaction.
-
Select the sales account from the drop-down Sales Account field.
Refer to the section ‘Defining inventory accounts’, earlier in this chapter, when selecting an account.
-
Select the default tax rate from the drop-down Tax Rate field.
This rate can be overridden when processing an invoice.
-
Enter a detailed item description in the Sales Description field.
The description automatically appears on invoices and can be overridden.
- Click the green Save button.
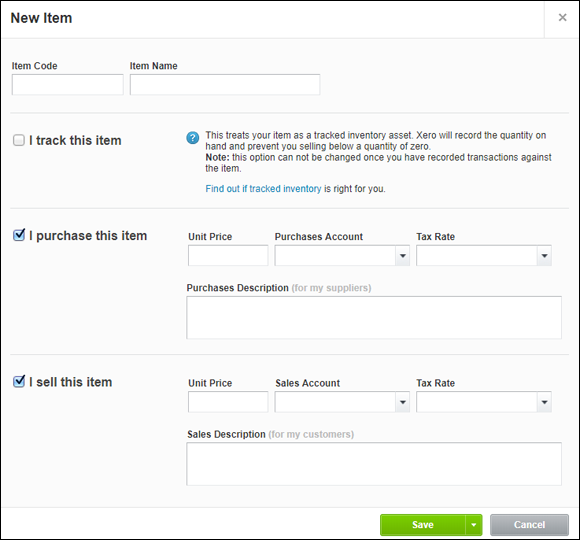
Source: Xero 2019
FIGURE 13-1: The New Item window.
Importing and exporting item details and importing opening balances
Inventory item details can be exported from and imported into Xero, and opening balances for tracked items can be imported into Xero. This is a useful feature if you have existing data and are converting to Xero, or if you need to make bulk changes to item details (such as increasing selling prices). Inventory files can be exported to CSV and PDF files and can be imported from CSV files. Refer to Chapter 3 for instructions on how to export and import CSV files into Xero, how to convert CSV files into an editable spreadsheet format, and how to import opening balances.
To export the inventory items as a PDF report, go to the Inventory Items dashboard, click on the Export button and select Export to PDF from the drop-down list. You can then locate the Inventory Items PDF in your downloads folder.
Managing Inventory Items
Once set up, you may need to occasionally review and update your inventory in Xero. The following sections show you how.
Making use of inventory items reports
Xero has five reports relating to inventory item information. Xero’s inventory items reports detail the following:
- Inventory Item Details (New): This report shows inventory item details, including value movement, quantity on hand, unit cost and sales price, and the margin and profit per item.
- Inventory Item List (New): This report lists all the core details of the inventory items, including average cost, total value and quantity on hand.
- Inventory Item Summary (New): This report shows purchase and sales details, including quantity and profit per item.
- Inventory Item Summary: This report shows purchase and sales details, including net total. In the old-style reports, you also have the option to show inventory in the currency it was purchased or sold.
- Sales by Item: This report details current unit price, quantity sold, total sales and the average price of the inventory item for a selected period. The last two values are exclusive of consumer tax. Below the inventory sales information is an interesting summary, splitting out sales between item sales, other sales, cash sales and credits. Drilling down on the Item Name displays details of sales during the period selected of that item. In the old-style reports, you also have the option to show inventory in the currency it was sold.
The two old-style reports — the Inventory Item Summary report and the Sales by Item report — don’t include tracked inventory items. If you use tracked inventory in your business, refer to the three new-style reports.
To access the inventory reports, go to the home dashboard menu bar, click on Accounting → Reports and select the relevant report from the Reports dashboard.
Searching for and reviewing inventory items
To locate an item, go to the Inventory dashboard and use the search bar. As you start to enter a description, Xero automatically searches and starts making suggestions.
Editing and deleting inventory items
To access an individual inventory item, simply go to the Inventory dashboard and click on the relevant item.
To attach a file, click on the file storage symbol on the top right and follow the process of adding a file. Note: This facility is not available when creating a new inventory item.
At the bottom is a section headed Recent Transactions, which lists transactions against the selected inventory item, including details of the quantity and unit price. If you have multi-currency, you click on the foreign currency unit in the Total column to reveal the exchange rate used. (For further insights into multi-currency, see Chapter 15.)
To edit an item, click the Edit Item button. The Edit Item window appears (see Figure 13-2). Make any changes here as required and, once satisfied, click the Save button to record the changes.
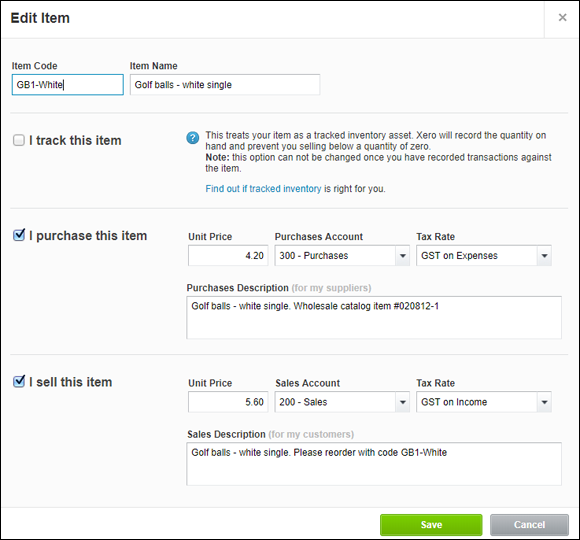
Source: Xero 2019
FIGURE 13-2: The Edit Item window.
Items on repeating bills and invoices can’t be deleted. The repeating bill or invoice needs to be deleted, or the item removed from the repeating template, before the item can be deleted. (Refer to Chapter 6 for information on invoices and Chapter 7 for more on bills.)
To delete an item, go to the Inventory Items dashboard, check the box to the left of the item and click on the Delete option. A confirmation window opens, and you just need to click the red Delete button to confirm that the items should be deleted. Tracked items that have transactions, adjustments or opening balances recorded against them can’t be deleted.
Once deleted, items are no longer available to allocate to transactions and can’t be viewed on the Inventory Items dashboard. Furthermore, if you edit an approved bill, invoice or credit note (adjustment note) or have transactions in Draft or Awaiting Approval status, the item does a Bermuda Triangle on your records and vanishes!
To mark an item as inactive, go to the Inventory Items dashboard, check the box to the left of the item and click the Mark as Inactive option. The item turns grey. If you later change your mind, follow this process and opt for Mark as Active instead.
Adjusting Inventory Balances
While living in Toronto, I had a friend who managed a warehouse of expensive make-up and perfumes. He’d tell me of the creative way stock was pilfered by staff. They’d carve pages out of books to encase perfume bottles perfectly, wear overcoats during summer or bring massive lunch boxes to work! (My friend also used to invite me to awesome VIP discount days, so my make-up bag misses him big time!)
Inventory requires adjusting for a variety of reasons — including recognising an opening balance, damage, theft and technological obsolescence. Adjustments to quantity and/or dollar values of inventory need to be reflected in your records.
Periodic stocktakes
Every year around the world, accountants gather clipboards, travel to distant locations, put on yellow safety vests and infiltrate storage rooms, with the purpose of counting stock. Stocktakes happen in the weirdest of places: I’ve donned winter coats, boarded cherry pickers and travelled through massive warehouse freezers counting frozen sausage rolls and party pies. (I much preferred the times I was counting chocolate bars or make-up sets. Fortunately, my client who distributes guano — the poo from cave-dwelling bats, and a highly effective fertiliser — has never called me in for a stocktake!)
A stocktake is a count of the business inventory on hand, typically done at the end of the financial year, though some businesses do it more regularly. A periodic inventory system (refer to the section ‘Periodic and perpetual inventory’, earlier in this chapter) relies on stocktakes to manually update the Asset and Direct Cost accounts in Xero.
The update provided by the stocktake gives the business an accurate idea of stock quantity owned by the business, and so allows your accountant to reconcile physical stock to the inventory records and calculate the difference. With accurate knowledge about stock movements and stock on hand, you can make informed decisions about your inventory.
Determine a regular date to undertake a stocktake. Typically, this date is at the end of a period — for example, the end of the financial year. Determine actual stock levels and multiply the results by the purchase value to determine actual value.
Use a connected inventory solution to determine whether inventory adjustments should happen directly into the connected solution or directly into Xero, and process accordingly.
Before you adjust your stock values, check that your accountant agrees with the changes you propose. (Yearly opening and closing stock values need to be included in your Profit and Loss report.)
Adjusting untracked inventory values
To adjust stock values, you first need to undertake a physical stocktake to determine the actual value of inventory on hand (refer to the preceding section). You then follow these steps to adjust untracked inventory values:
- Check the current stock value in Xero by reviewing Inventory Accounts on the Balance Sheet as at the stocktake date.
- Compare the actual value determined from the stocktake to the book value of inventory and calculate the difference (if any).
-
Record a manual journal to adjust inventory account values.
Refer to Chapter 12 for details on how to enter a manual journal. For specific fields within the manual journal, note the following:
- Narration field: Add a clear description, such as Adjusting Stock Value
- Date field: Add the date of the stocktake
- Amounts: Select Tax Exclusive
Typically, the debit entry is written above the credit entry in a journal entry. -
Check the Inventory Accounts on the Balance Sheet as at the stocktake date reflect the actual stocktake value.
If balances don’t match, check and correct the journal entry.
Adjusting tracked inventory quantities
To adjust the quantity of tracked inventory items, follow these steps:
- From the home dashboard, click Business → Products and Services, and then from the Inventory dashboard click on the tracked inventory item to open it.
-
Click on the button labelled Options and, from the drop-down menu, select New Adjustment.
The New Adjustment window opens.
- At the Adjustment Type drop-down menu, select Decrease Quantity or Increase Quantity.
-
Select the date of the adjustment from the Date field.
The inventory journal’s entry is as per this date; however, the change in quantity reflects the date when it’s recorded.
-
Enter the adjustment details in the next block.
The quantity adjustment is entered in the Adjustment field (or alternatively in the New Qty on Hand field). When adjusting for increasing quantity, enter the cost price per item in the Cost Price field. When adjusting for decreasing quantity, the cost price is dependent on the average cost at the exact moment of the transaction. This value is exclusive of consumer tax.
As an example, if you make a quantity adjustment to reduce inventory by 50 units, and the value of each unit is $2, the valuation of the inventory reduces by $100 while the volume of the inventory reduces by 50 units.
-
Select the Adjustment Account that the revaluation should be allocated to at the block below.
Refer to Chapter 2 for guidance on setting up new accounts. Typically, the account type will be a Direct Cost account.
- Enter the reason for the adjustment in the compulsory Notes field.
-
Save the revaluation by clicking the blue button labelled Review Adjustment.
The Review Adjustment window opens, with a summary of the adjusting inventory journal entry you’re making. Click the green button labelled Post Adjustment to accept the revaluation into your records. Click Back if you wish to make changes.
Note: This process creates an inventory journal. You can view it in the Journal Report on the Reports dashboard (not via the Manual Journal dashboard).
Xero processes the transaction as a quantity adjustment. To ensure that you end up with the desired quantities, check the Inventory Item Summary report. If you can’t find the adjustment, review the entry you recorded.
The quantity or value can never fall below zero; therefore, you can never sell more stock than you have on hand. However, some businesses sell their stock and raise a Sales Invoice before they’ve purchased the stock; if this happens, the value falls below zero. If your business operates like this, you may need to explore an inventory solution that integrates with Xero.
Adjusting tracked inventory values
If you need to change both the quantity and the value of inventory, first change the quantity and check your records (refer to the preceding section) before adjusting the value. To adjust the value of tracked inventory items, follow these steps:
- From the home dashboard, click Business → Products and Services, and then from the Inventory dashboard click on the tracked inventory item to open it.
-
Click on the button labelled Options and, from the drop-down menu, select New Adjustment.
The New Adjustment window opens.
- At the Adjustment Type drop-down menu, select Revaluation.
- Select the date of the revaluation from the Date field.
-
Enter the revaluation in the next block.
This is the total revised value of this inventory item. The value is exclusive of consumer tax. You can make the entry in the Average Cost or Total Value fields.
-
Select the Adjustment Account that the revaluation should be allocated to at the block below.
Refer to Chapter 2 for guidance on setting up new accounts. Typically, the account type will be the Direct Cost account.
- Enter the reason for the adjustment in the compulsory Notes field.
-
Save the revaluation by clicking the blue button labelled Review Adjustment.
The Review Adjustment window opens, with a summary of the adjusting journal entry you’re making. Click the green button labelled Post Adjustment to accept the revaluation into your records. Click Back if you wish to make changes.
To ensure that you end up with the desired valuation of the Inventory account, check the Balance Sheet report. To ensure that you end up with the desired valuation of your inventory items, check the Inventory Items List report. If you can’t find the adjustment, review the entry you recorded.
Accessing Cloud-Based App Solutions
If you want to manage a robust inventory management system, you need to use Xero with a compatible cloud-based app solution. All solutions offer comprehensive inventory management solutions, and in some cases they have extensive capabilities in other areas. See Chapter 16 for more, and visit https://www.xero.com/marketplace/ for the latest list of inventory systems.