Now that your room is set up, your computer is tweaked to near perfection, you have the basic components such as monitors and a good audio interface in place (with up-to-date manufacturer drivers installed prior to plug-in, of course), and you have Live installed and authorized, it’s time to get your hands dirty and explore your studio’s central work environment: the Live GUI (graphic user interface).
As you’ve seen, it’s important to thoroughly know the gear you’re working with in your Ableton Live studio. Just look back at the attention given to your computer before you even installed Live, for example. This approach also extends to working with Live itself. It’s imperative you know your central DAW’s every move from the ground up to get the most out of it as well as troubleshoot it when problems arise—and they will. This will all start with a probe into Live’s main file and related folder hierarchy, beginning with a look into the filing architecture that most every digital audio application uses. From there, you’ll take a look into the cornerstone of Ableton Live—the clip—and the two main views in which you’ll be working with clips, called Session View and Arrangement View. After getting introduced to these core components, you’ll delve into the ever-important Browser view and file-management system.
Once you have a grasp on the basic elements of digital audio and how Live works, you’ll take a good look at the rest of the GUI. You’ll discover Live’s workflow mojo is an interface that consists of one main screen that centers itself on the Session and Arrangement Views as well as cleverly integrating various hidden views, including the Browser and File Manager. Even when all these views are exposed, they never overcrowd the overall scheme of Live; you can still work seamlessly. Rest assured: By the time you complete this chapter, you will have a solid understanding of how Live is laid out.
Take note: This chapter, as well as the rest of the book, is written from a Live 8 perspective. Even so, if you have Live Intro, Suite, or even any one of the versions included with a hardware peripheral such as an audio interface or control surface such as the Akai APC40 or Novation Launchpad, you’ll be able to utilize this text to the fullest extent.
Creating audio on a computer is in some ways is much like creating a text document. With a text document, first a file is created and then text is entered into the file. This file lives in RAM until you perform the first save, which writes the file to a user-defined location on the hard drive. That file can be identified by its icon and the name you give it in the saving process, which is displayed along with said icon. From this point, no matter what you add to the document, the media stays in the single dimension as it was when it was created.
This is where the similarities between word processing and digital audio end. No matter what you add to the text document—images, hyperlinks, etc.—they will be embedded into the text file, keeping it one dimensional. With audio production, this is not the case. The files in which you work are merely the first layer of a multi-dimensional environment. In fact, when you make the first save, it’s not just a file that’s created, but a filing system that lives in a parent folder. As you add content—pre-recorded samples, recorded audio, rendered processes—the content is placed in various locations to which the top-layer document (the one you’re working in) points. This filing system is basically how all DAWs work, and it’s this section’s job to hip you to how Ableton Live makes use of it. Let’s start with that top-layer file.
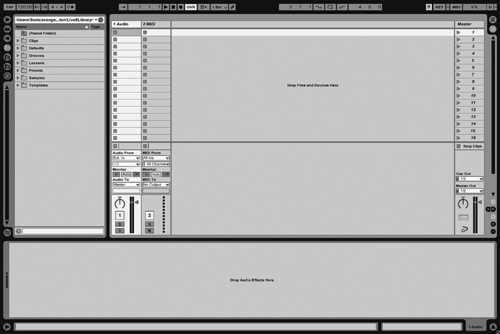
Like most programs on your computer, the first step in your workflow is to create a new file. In Live, it’s called a Live Set. The simplest and most direct method of creation is to simply start Live. Depending on your computer platform and the location of Live’s startup file, everyone will have a different approach to this first step. If you’re going to be working with Live often, it’s a good idea to create either a desktop shortcut to the startup file (PC) or place it in your computer’s dock (Mac) for quick and easy access. Shortly after the initial splash screen appears (see Figure 4.1), you’ll be looking at a newly created Live Set (see Figure 4.2) in what’s called Session View. (This and Arrangement View will be covered in the “Core Components” section later in the chapter.) From there, subsequent new files can be created via Live’s File menu or by pressing Cmd + N (Mac)/Ctrl + N (PC). This Live Set is the aforementioned top-layer file, and it’s where you will do your work. From importing audio to recording new audio to editing to mixing—it’s all done in the Live Set. Be aware: With the exception of any MIDI performance data that’s created in the Live Set, this is not where the content lives. Let’s find out where that goes.

Whatever method you employ to create a Live Set, it’s merely sitting in your computer’s RAM until you issue the first Save command. While Live offers several ways to initiate this command, let’s start with the simple keyboard shortcut: Cmd + S (Mac)/Ctrl + S (PC). After you’ve made the first save and you’ve assigned a name and folder in which to save your work, a few things are now in place. First, your Live Set now lives in a Project folder (see Figure 4.3). Within that Project folder will initially be the Live Set; in addition to the file icon, you can identify a Live Set by its .als (Ableton Live set) file extension. There will also be a folder called Ableton Project Info (see Figure 4.4), which contains files that are pertinent to the overall project.

Figure 4.3. When you save a Live Set for the first time, a Project folder is created. This Project folder houses not only the Live Set but also all related media associated with that file. Its color (white) makes it easy to spot a Live Project folder on a crowded desktop.

Figure 4.4. Every Project folder contains an Ableton Project Info folder. The .cfg file inside contains information about the entire project, such as what version of Live was used to create the project, when it was created, and which method of saving was employed.
Once you start to add content to your Live Set, a folder called Samples will be created. The types of content you add to the Live Set will determine what and how many subfolders will be created in the Samples folder. For instance, if you record any audio into the Live Set, a subfolder called Recorded will be created and will store every last audio file you create. If you pull any pre-recorded sample content into Live from the many ways Live allows that to happen, and you tell Live to collect and save those files, you will then find a subfolder called Imported within the Samples folder alongside the Recorded subfolder. Whatever the content may be, it’s important that the Samples folder stay put, as that is where your Live Set will expect it to be when it goes to play those files. If at any time you need to get at these without having to go the Project folder, Live has you covered with a built-in file-management system, which is explored in the “File-Management System” section. But, first things first: It’s time to look at what makes Live do what it does. It’s time to discover the clip!
Ableton Live has changed the game big time in the digital-audio world, both in the studio and on the gig. At the same time, Live is a formidable DAW in traditional respects as well. For evidence of these proclamations, you can simply look at just three core components. To break them all down, this section will first introduce you to the center of it all: the clip. Once you have a grasp on the fundamentals of the clip, you’ll take a first look at the two main areas of the Live GUI in which you’ll be working with clips: Session View and Arrangement View. Throughout this section, you should start to realize there’s a lot going on within your Live Sets and Project folders. The parts that make up the engine that propels your work in Live and digital audio as a whole are files of many types—and lots of them. To keep tabs on them all and do what you gotta do, Ableton created a superb file-management system that doesn’t in any way feel as corporate and sterile as the name implies. But first, let’s go right to the heart of the matter and dig into the concept of the clip.
The central element within Live is the clip (see Figure 4.5), of which there are two types: audio and MIDI. It is to these multi-colored rectangular blocks of action that you’ll devote most of your attention; within these stacked Lego-looking components is where it all happens. The “it” is the noise, the music, the everything in your Live Sets! Think of clips as independent miniaturized boom boxes that can be made to play the audible media in your Live Set in any way you need them to. What main view you’re working in determines how clips are launched (played) and how they’re assembled. Clips in a Live Set can be launched at the same time or at different times and can vary in length, making a collection of clips assembled in a Live Set completely flexible. That said, clips do much more than just play files, as you’ll discover in Chapter 5, “Making Music with Ableton Live,” and Chapter 6, “Working with Ableton Live.”

Figure 4.5. Live’s cornerstone is the clip. It comes in two varieties—audio and MIDI—and much of your work in Live will center on this rectangular block of genius.
On the surface, a clip is a colored rectangular block with a name. But underneath this is the real deal. A clip serves as the coating, if you will, for the two types of media that are played in a Live Set. Relating to the ideas introduced back in the section titled “The Project Folder,” the clip is what’s pointing to the location of the audio file being played.
Double-clicking a clip opens a view at the bottom of Live’s main screen that reveals under the hood (see Figure 4.6). Which of the two types of clips you’re dealing with determines what you’ll see. If you see waveforms like what you have in Figure 4.6, you’re working with an audio clip. If you see a vertical piano roll–looking interface with various sized four-sided polygons strewn across it, you’re working with a MIDI clip (see Figure 4.7).
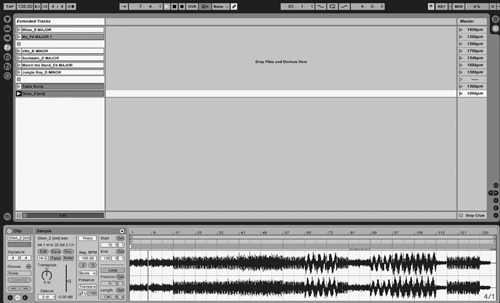
Figure 4.6. Double-clicking a clip opens the Clip View at the bottom of the Live’s main screen. From here, you can manipulate clips to do just about anything, as you’ll see in Chapters 5 and 6.
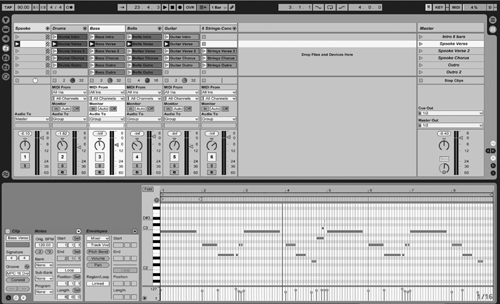
Figure 4.7. MIDI clips actually contain the data you see before you, whereas audio clips point toward the location of the audio file they’re playing and controlling.
Much like any product of computer code, clips of both types are digitally flexible. The color can be changed at any time and its name changed or deleted altogether. You can cut, copy, paste, duplicate, and/or delete clips at will. They can be dragged to new locations and even Opt-dragged (Mac)/Ctrl-dragged (PC) for quicker copying. Clips can be saved to the Live Library or to other Live Sets or Project folders, enabling you to use them in multiple projects.
With these basic fundamentals laid out for you, let’s check out the two main areas of Live—Session and Arrangement Views—where you’re going to work with audio and MIDI clips. Examining these central areas of the main screen will reveal even more about clips while at the same time start to show you how Live simultaneously serves both as a completely innovative DAW and traditional DAW.
As stated in the section on Live Sets, when you open Live fresh or open a new Live Set after the application has been launched, you’ll be looking at Session View by default. This is because most of your work in Live will take place in this innovative work environment. And, the lion’s share of that work is centered on clips. In actuality, though, Session View is just one part of the overall picture, albeit a large one where all the action happens. In fact, everything else in the GUI is there to support or contribute to whatever is going on in Session View—so much so that the entire screen is identified by what view this main area is set to. (The same goes for Arrangement View.)
For some, Session View is the only view, as this is where you actually play Live both on a gig and in the studio. Much of what makes that possible is attributed to what’s contained within the vertical strips, called tracks, that occupy the insides of Session View’s borders (see Figure 4.8). If you’re familiar or have worked with hardware mixers designed for studio and live-sound reinforcement and/or other DAW packages, you can expect to see the usual suspects with regard to components—mixer controls, track sends, etc. If you’re completely new to all this audio speak, think of a track as a hallway that allows audio or MIDI to pass through it separate from all the other tracks. At the exit is where the audio and/or MIDI is combined and sent (bussed) to their final destination as a two-channel stereo mix, where you hear the summed audio as a whole. That destination more times than not is the Master track, located to the far right of Session View.

Figure 4.8. In Session View lies much of the playability that so many producers and musicians are raving about, making Live a uniquely powerful DAW.
Following is a list of components found in audio tracks in Session View (MIDI tracks are examined in Chapters 5 and 6), along with brief descriptions to get you properly introduced. Later, in Chapters 5 and 6, you’ll delve deeper into Session View tracks and their interface functions. For now let’s start to see what you’ll be working with:
Clip slot grid. At the top of a track, right under its title bar, is where Live throws tradition to the wind with regard to what you may expect to see in a track. Here you have the clip slot grid (see Figure 4.9), which is a grid of rectangular slots in which an array of clips can be assembled. You can either drag audio/MIDI files from the Browser (covered in the next section) into a slot or record new audio/MIDI material into a slot. Both methods garner the same result: the creation of a clip. Once a clip is loaded, it can be launched by way of the Play button. It sounds simple, but the possibilities are vast, as you will soon see in Chapters 5 and 6.
In/Out (I/O) section. If you’re recording new clips or wanting to reroute the output of existing clips, you’ll make use of the In/Out (I/O) section (see Figure 4.10), which is just below the clip slot grid. As you can predict from the Audio From and Audio To labels, these drop-down menus are where you’ll make your routing assignments. In either case, the top drop-down enables you to choose the type of input/output and, if applicable, the bottom drop-down gives the option to choose the channel. The middle section is for monitoring. In lets you hear what’s coming into a track without being set up to record while Auto lets audio pass through when a track is record enabled, and then “automatically” switches to the audio coming for a clip when launched. Off is, well, off, disallowing anything coming into a track to be heard (although launched clips will still be heard).
Sends section. Below the I/O section is the Sends section (see Figure 4.11), where you can route a track’s signal to a secondary destination that will eventually make its way to the Master track as well. The knob adjusts the level of what’s being fed to the send’s destination: a return track, which is always piled up to the left of the Master track. Why would you do this? Sends serve a few useful purposes, such as routing multiple tracks’ send signals to a common destination (the return track) so you have global control over the summed signals. It could be as simple as creating a headphone mix separate from the main mix all the way to batch-processing multiple tracks with a single effect such as reverb. In Chapter 7, “Accessorizing Ableton Live With…,” you’ll learn more about working with sends and effects.
Session Mixer. The Session Mixer section (see Figure 4.12) features the essentials in track control, including a vertical Track Volume slider for adjusting a track’s output signal, a Track Pan knob for adjusting a track’s placement in the stereo field, a Track Activator button for quick and easy muting, a Solo/Cue button for discretely listening to specific tracks (among other functions), and an Arm Session Recording button, allowing the track to record the signal set in the Input Type/Channel choosers in the I/O section.
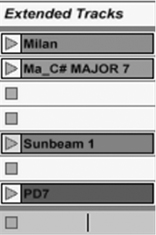


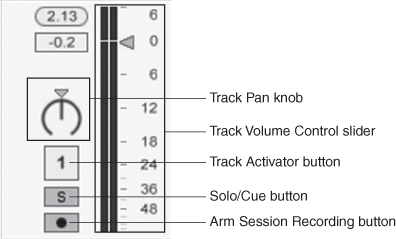
Figure 4.12. In the Session Mixer section, you have control over each individual track’s volume and pan settings, among others.
Continuing to look at Session View, this time in the lower-right corner (see Figure 4.13), you’ll notice a series of small Show/Hide buttons. These provide one way to bring into focus all the aforementioned Session View track elements with the exception of the clip slot grid. At the bottom of that stack are two buttons that make two more Session View components appear (also seen in Figure 4.13), this time underneath the Session Mixer. They are as follows:
Track Delay section. As you’ll soon discover, several challenges lie ahead when it comes to working with digital audio—and for many, none are more frustrating than when you have multiple tracks that are not playing in sync with each other. This could be a result of one or more factors, but no matter what the cause, you may be able to quickly remedy the situation by delaying or even pre-delaying a track’s output in the Track Delay section.
Crossfader Assign section. The presence of a crossfader option is a big reason Ableton Live is considered a digital DJ’s gift from the binary gods. The options are simple enough, as you can see with the lone A and B buttons. With this GUI component at your disposal, all you need are two tracks, a MIDI controller with a horizontal fader, and some groovin’ clips to keep things movin’ all night long.
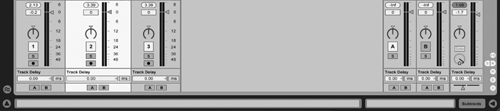
Figure 4.13. Nestled in the lower-right corner of Session View is a stack of small circular Show/ Hide buttons that enable you to toggle the view of various track-related components. To conserve screen real estate, try hiding Session View components such as Track Delay and Crossfader Assign, either using the Session View Show/Hide buttons or the corresponding commands found in the View menu.
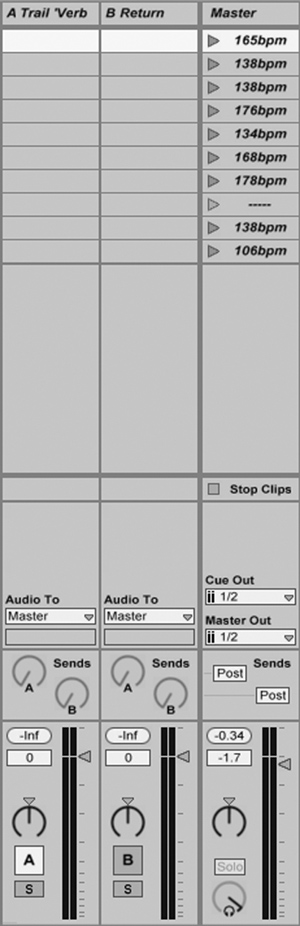
Before you move on to Arrangement View, there are two more elements over to the right of the Session View GUI that demand proper introductions: return tracks and the Master track. Although both are vertical tracks and have some fundamental similarities to the ones you just examined, it’s the differences that need some attention. Take a look at both types in Figure 4.14. The first difference is the clip slot grids. While both return tracks seem barren, you’ll notice that there are Play buttons, but no clips, in the Master track. This is because return tracks and the Master track do not host clips. With regard to the latter, this grid-like section is called the Scene Launcher; there, you can easily launch entire horizontal rows of clips in multiple tracks (Session View scenes are discussed thoroughly in Chapter 5). As for return tracks, they will be looked into more in Chapter 7. For now, let’s take a tour of the ever-important Master track. As you read the list, refer to Figure 4.14. From top to bottom, you have the following:
Track title bar. This cannot be renamed.
Scene Launcher section. This replaces the clip slot grid. Notice the various tempo settings throughout this section. Typing in a tempo with the appropriate conventions instructs Live to play that row of clips (called a Scene) at that tempo.
Stop Clips button. Situated right below the Scene Launch section, this button, when clicked, will stop any and every clip in Session View at the same time.
I/O section. This is like the aforementioned I/O section, but with different controls for assigning outs only. If your interface has the appropriate I/O, you can use the Cue Out chooser to route one or more tracks discretely to a pair of headphones, enabling you to pre-listen before triggering another clip or scene. The next chooser down lets you route the final two-channel stereo mix to a final destination (most likely out through your audio interface to your studio monitors).
Sends section. Here, you tell Live’s return tracks to either tap an audio track for a send signal before (Pre) of after (Post) the Track Volume control slider.
Mixer section. This section features a global volume slider and pan knob as well as a knob for controlling the volume of audio files previewed in the Browser (explained in later in this chapter and further explained in Chapter 5), the aforementioned Cue Out function, and Live’s Metronome feature, located in the first section of buttons up top in the Control Bar (explained later in the chapter).
While some of you may look to Live more for its real-time performance aspects and spend most of your time in Session View, there’s a whole other side to Live that awaits you in Arrangement View (see Figure 4.15). Here, you can create music along a timeline just like with other popular DAWs such as Pro Tools or Logic, but this time with the power of clips at your side—er, in front of you.

Figure 4.15. Arrangement View is Live’s other side, where you can not only create your projects from the ground up but you can further tweak a recorded Session View jam into perfection for final rendering and on to platinum record sales!
There are several ways to assemble clips into to this non-linear–based scenario, such as drag and dropping clips from the Browser (covered in the next section) or simply recording new ones (covered in Chapter 5). But, just as many aspects of Live have changed the way digital audio is produced, Arrangement View offers yet another innovative workflow option. By clicking the Global Record button in the Control Bar at the top of Live’s main screen (covered later in this chapter), you can record whatever you do in Session View, capturing anything and everything into Arrangement View. Every last launched clip all the way to the slightest movement of a knob or slider will all be captured in Arrangement View for you to further tweak in the form of rearranging, overdubbing, punch-recording, automation editing, and more. Moreover, you’ll be able to do all kinds of editing not possible in Session View as well as render final mixes to disk. If some of these concepts are going over your head at this point, don’t worry, Chapters 5 and 6 will put all the pieces together and have you up and running in no time.
When you’re working in Arrangement View and in Live in general, it’s important to realize both views are closely related to each other and work hand-in-hand. These are not separate entities. For instance, the track count is always the same. This is because they are the same tracks. That is, if you create a track in one view, it will automatically show up in the other. As for the Master track, it’s always there in both views, and it too is the same track. In case you’re wondering which view overrides the other, the winner is Session View. Even with these constructs in place, you can still improvise in Arrangement View by playing an arranged sequence of clips and then proceeding to launch clips and make tweaks of all types in Session View. If at any time you want to return to the arrangement, it’s as easy as clicking the Back to Arrangement button, located two doors down from the Global Record button in the Control Bar, which you’ll thoroughly look into later in this chapter.
With regard to the GUI, most every control is displayed in both views—albeit in different manners. For instance the Session View’s mixer controls, shown at the bottom of each track as graphical controls, are positioned toward the right side of the horizontally placed tracks in Arrangement View. What’s more, they’re all depicted as horizontal rectangles, and their settings are represented by numeric values.
At the top of Arrangement View is a nested view called Overview (see Figure 4.16), which is a condensed horizontal depiction of your arrangement. This enables you to quickly and easily navigate through your project no matter how long it is. (While this view can be seen in Session View, it’s most relevant in Arrangement View.)
Figure 4.16. At the top of Arrangement View (as well as Session View if you choose) sits Overview. This musical-staff-looking depiction of your entire arrangement allows you to navigate your sequence of clips in various ways with ease.
Much of what’s been presented thus far will be reinforced in Chapters 5 and 6, where you learn more about clips and how to actually use Live. But before that can happen, it’s important to know how Live handles the plethora of files involved in making music digitally. That’s where Ableton’s ingenious file-management system comes in.
Now that you’re starting to get hip to the basics of Live, you can appreciate this thought: You’re going to be working with a lot of files. Because of that, there’s a bigtime need for an efficient way to deal with them all. To manage the many file types—audio files, MIDI files, and program-centric files such as Live Sets and more—Live has a built-in file-management system that makes your workflow do just that: flow! This system is composed of the Browser and File Manager.
The Browser (see Figure 4.17) is a hidden view that can be accessed in several ways; with regard to the GUI, you can just click the Show/Hide button in the top-left corner. Once this is clicked, Live opens a resizable view that gives you access to many folder locations both inside and outside of Live. Of the six buttons below the Show/Hide button, the ones most pertinent to file management are the ones numbered 1, 2, and 3 in Figure 4.17. These are selector buttons for the File Browsers, where you can peruse user-defined disk locations within your computer’s hard drive or other connected external drives for audio and MIDI files to use in your Set. Once in those folders, the Browser offers several more useful functions in addition to browsing such as book-marking locations, searching, and previewing audio files. You can also perform various file-maintenance functions such as moving files around by way of drag and drop and cut or copy and paste. You can even rename or delete files as well as create and/or delete folders.
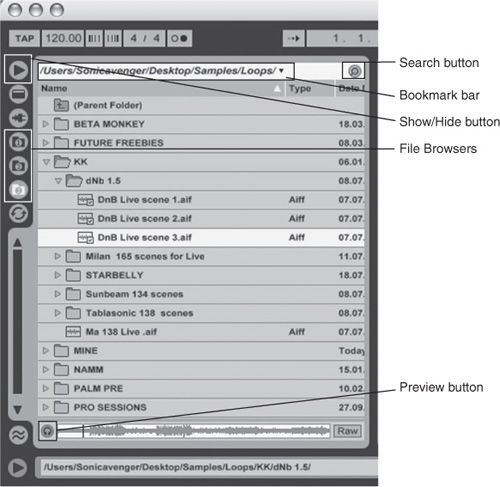
Figure 4.17. Live’s Browser connects you to any and all locations within your computer’s hard drive and/or external drives that contain audio files as well as other useful media pertaining to your Set. In addition to browsing, you can preview audio files, perform searches, and organize your directories—all without ever leaving the Live environment.
The File Manager (see Figure 4.18) enables you to take an overall look at your entire project’s contents. To get to this view, which opens on the right side of whichever main view you’re working in (Session or Arrangement), choose the Manage Files command in the File menu or the File Manager command in the View menu. From there, you can call up an overview of the entire Project’s file collection as well any Live Sets contained within. You can even jump into the Live Library (see the upcoming sidebar). If need be, you can locate missing audio files, tell Live to collect any files that are currently outside the Project folder, list unused files for deletion, and more (see Figure 4.19).
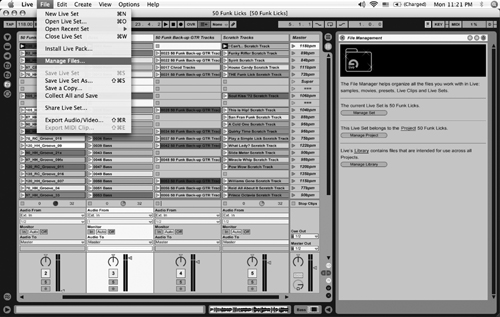
Figure 4.18. When you choose the Manage Files command in the File menu, the File Manager opens on the right side of the main Live screen, no matter what main view you’re working in (Session or Arrangement). From there, you can choose to manage the Live Set, the entire Live Project, or even the Live Library. Take note: There’s no keyboard shortcut for opening the File Manager, but you can also access it from the File Manager command in the View menu.

Although it has been noted that when you open a new Live Set, you’ll looking at the Session View by default, there’s more to it than that. In actuality, the Session View is merely a part—albeit a large one—of a bigger picture. That picture is the main Live screen. Think of the main screen as the solid-colored background on top of which many views sit. This main screen includes the four sections of horizontal buttons known as the Control Bar along the top and a short horizontal section at the bottom called the Status Bar. In the following sections, you’ll take a good look at each of Live’s main screen components. It’s important to have a good grasp on all of Live’s main GUI components so you can get the most out of working with the program. Besides, you will use them.
As you’ve already discovered, the main screen is primarily made up of various segments called views. Two main views—Session and Arrangement—are the focal points and how you will identify what mode the main screen is in. The remaining views are interchangeable, customizable, and resizable. For the most part, they can be accessed in multiple ways, including the View menu, keyboard shortcuts, and Show/Hide buttons. Following is a list of all the possible views along with an explanation of their purpose and, for some that have already been introduced, supplemental information in the form of additional navigational options. As you read through the list, refer to Figure 4.20.

Figure 4.20. As you can see, with most every view in Live open, the overall layout of the GUI is still extremely manageable and easy to work with.
Session/Arrangement View. As stated, your workflow in Live will be centered upon this area of the GUI, which can be one of two main views: Session or Arrangement (pictured). One of these views is always in sight. As a result, when all other views are closed, either Session or Arrangement View will occupy most of the GUI. Remember, you can toggle these views by either clicking the View Selector buttons in the upper-right corner (the top button with the horizontal lines brings in Arrangement View, and the bottom button with the vertical lines activates Session View) or simply pressing the Tab key on your computer’s keyboard.
Browser. In addition to letting you peruse and audition files, the Browser also provides you a way to browse Live’s built-in plug-ins called devices (discussed in Chapter 6) as well as third-party VST and AU (Mac only) plug-ins (discussed in Chapter 8). You can open the view by clicking the Show/Hide button in the top-left corner or by pressing Opt + Cmd + L (Mac)/Alt + Ctrl + L (PC).
Groove Pool. The Groove Pool (as well as the Live Library) is a storage bin for files that contain data documenting timing and feel. The files have an .agr extension and can be extracted from a Live clip and dragged and dropped onto another, transferring the first clip’s “groove” data. This view can be activated by its corresponding button, which has two wavy horizontal lines and is located in the lower-left corner of that area of the main screen; via the View menu’s Browser sublist; or by its keyboard shortcut, Opt + Cmd + G (Mac)/Alt + Ctrl + G (PC).
Info view. Wondering what something is? Before you click the Help menu or reach for the hard-copy manual, try pressing Shift + ? to open Info view. Then, all you have to do is place your cursor over an item in question within the GUI and voilà—a short yet succinct explanation appears in Info view. You can also toggle this view’s appearance by clicking the Show/Hide Info View button in the lower-left corner of the main screen.
Detail view. This bipolar view, which you were first turned on to in the section that introduced clips, has two identities: Track view and Clip View. To open the view, you can either click the Show/Hide Detail View button in the lower-right corner of the main screen or press Opt + Cmd + L (Mac)/Alt + Ctrl + L (PC)—although, as you’ve already discovered, the most direct and intuitive way to access Detail view is to double-click the subject to be viewed. For instance, double-clicking a track’s title bar will open the Detail view in Track View mode. From there, you can toggle between the two modes by clicking the two tabs to the left of the corresponding Show/Hide button, by pressing Shift + Tab or F12 on both Mac and PC, or by clicking the elements you want to view. When in Clip View, you’ll see the audio waveforms or MIDI data contained in that clip and have total control over its properties. In Track view, you can see and work with whatever Live Device (Chapter 6) or third-party plug-in (Chapter 8) has been inserted into that track.
When reading about the File Manager, you saw a good portion of the main screen’s right side open up in yet another view. Much like Detail view, this portion of the main screen has multiple identities, with the most significant alternative to the File Manager being Help view (see Figure 4.21). In Help view, you have access not only to the Live manual in PDF form as well as other standard software informational utilities, but more importantly to the collection of informative built-in lessons that Ableton provides with the program. One other purpose you may see this view serve is a location for additional media (images, text) that may be connected to a Live Set.

Whether you’re working in Session or Arrangement View, and whether you have one or more hidden views open, at the top of the main screen will always be the Control Bar. In addition to that constant, down below will be a skinny view (as compared to the ones you’ve explored already) called the Status Bar. Both of these areas of the main screen will always be present and cannot be adjusted in any way. This section will break down the Control Bar’s four series of buttons and provide you with brief explanations pertaining to each control. It will also hip you to the seemingly random messages that appear in the Status Bar. Let’s start with the left side of the Control Bar, where you have total control of your Set’s time-related properties.
At the far left of the Control Bar, you have several controls geared toward the element of time within your projects (see Figure 4.22). Most of these controls make adjustments to your Set’s tempo. They are from left to right as follows:
Tap Tempo button. Simply click the Tap Tempo button twice, and the tempo changes according to the time interval between those two clicks. Click that same button four times, and the Set will begin to play at that tempo.
Tempo field. This is where you view the tempo in beats per minute (BPM). Ranging from 20 to 99 BPM, you can make adjustments to it by either typing in a tempo or by click-dragging up or down.
Tempo Nudge Down/Up buttons. The next two buttons come into play when using Live in live performance. When clicked, the Tempo Nudge Down/Up buttons temporarily adjust Live’s tempo to match a source whose time properties are fluctuating. This is great for when you’re playing with a live band or a DJ spinning vinyl.
Time Signature button. The Time Signature button lists a fractional numerator and denominator that can be adjusted independently in the same manner as the Tempo button. The top number is the beats per measure or meter and can range from 1 to 99, while the bottom number determines the beat unit. The possible beat units are as follows: 1, 2, 4, 8, and 16.
Metronome button. The final button is the Metronome button. When activated, the Metronome provides a click whose tempo always matches the tempo of your Set. Use the Metronome to help record new material in time or to determine a prerecorded sample’s rhythm state. You can adjust the volume of the Metronome in the Master track with the Preview/Cue volume knob (the one with the headphones).
The next set of controls (see Figure 4.23) is mostly dedicated to playback, with the exception of two buttons that serve a pivotal role with regard to MIDI and automation. From left to right, they are as follows:
Follow switch. When playing back Sets in Arrangement View, you can click this button to have the display scroll along to help keep your place. This is a great tool for viewing playback during elongated sequences of clip arrangements.
Arrangement Position field. During playback in either main view, this field displays the current Arrangement View position in bars-beats-sixteenths. When not in playback mode, you can dial in a specific location and play back an arrangement from there. You can either type in a location and press the comma or period key to advance to the next segment or individually click and drag up or down to change the values.
Play button. Although there are several ways to initiate playback in Live, there will always be a good ol’ GUI Play button up top just in case.
Stop button. The same goes for stopping playback.
Figure 4.23. Along with traditional transport controls, this section of the Control Bar features some important Live-specific controls, such as the Back to Arrangement button. It’s imperative that you understand these in order to effectively work with Live.
Global Record button. Engaging Global Record enables you to capture your every move in Arrangement View. This could range from recording new clips to recording an entire performance in Session View.
Overdub switch. When recording MIDI clips or augmenting existing ones, you can activate this button and add to the data that’s already there instead of overwriting it. This works really well when sequencing MIDI drum parts.
Back to Arrangement button. Perhaps the most important button in the Control Bar—yet difficult (at first) to understand—is the Back to Arrangement button. Put simply, it tells you whether Live is utilizing the current state of the saved arrangement. If you have nothing in Arrangement View and you launch but a single clip in Session View, this button will light up. Depressing it will revert Live, well, back to the Arrangement status.
Quantization menu. This is where you globally set the quantization of clip launching, ensuring everything plays in sync and fires away in rhythmic harmony. The subject of global quantization will be explored in the next chapter.
Draw Mode switch. This function will become clearer to you in Chapter 6, where the concepts of automation and clip envelopes will be further discussed. For now, just know that this button will change your cursor in some scenarios to a pencil, enabling you to literally draw within various parts of the GUI.
Of the four sections of buttons in the Control Bar, this one is the most symmetrical, with its pattern of identical outer and middle segments (see Figure 4.24). The purpose of the outer-most buttons is determined by which inner buttons are activated. Starting with the central buttons and going outward, they are as follows:
Loop switch. At the heart of the five segments is a single button for turning one of Live’s looping functions on/off.
Punch In/Out switches. These two buttons, which surround the Loop Switch button, activate the Live Punch-In Record function.
Loop Start/Punch-In Point field. Located at the far left, this field has a dual purpose, which is dictated by the inner three buttons. When the Loop switch is engaged, this is where you set the start point of an Arrangement View loop. If the Punch-In/Out switches are lit, this is where you set the start point for the punch-record region. (Take note: This is also the case if only the Punch-In switch is lit.) Whichever function you’re utilizing—looping or punching in—the values can be set the same as described in the previous section’s “Arrangement Position field” bullet.
Loop End/Punch-Region Length field. Located at the far right, this field also has dual purposes, which are also dictated by the inner three buttons. But don’t jump to conclusions just yet, as it’s not what you think. When the Loop switch is engaged, this is where you set the length of an Arrangement View loop—not the end point. Following suit, if the Punch-In/Out switches are lit, this is where you set the length of the punch-record region. As with the Loop Start/Punch-In Point field, whichever function you’re utilizing—looping or punching in—the values can be set the same as described in the previous section’s “Arrangement Position field” bullet.
Out of the four sections of buttons displayed in the Control Bar, this one has the most unrelated collection (see Figure 4.25), but they are nonetheless important. In fact, you need to train yourself to keep a close eye on a few of these controls, as they will warn you of an impending meltdown. Going from left to right, they are as follows:
Computer MIDI Keyboard button. Of all the keyboard controllers available to you, sometimes your computer’s keyboard is all you need. Click this button and you have a range of a little over one octave to do what you gotta do when you’re in a pinch or on the go with a laptop.
Key Map Mode switch. Live not only lets you use your computer’s keyboard as a performance device, you can also use it to control Live’s GUI, too. Just depress this button or press Cmd + K (Mac)/Ctrl + K (PC) and look for anything that’s highlighted in orange. From there, you click on the highlighted area and press a key to assign it to that control. It’s that simple, and it can be done without interrupting your work.
Key/MIDI In/Out indicators. The top square indicator flashes when Live receives a computer keyboard or MIDI message as assigned in Key or MIDI Map mode. The bottom indicator fires when Live sends messages out to a control device as a result of a control change. The latter will become clearer in Chapter 7, when you’re checking out the Akai APC40 and Novation Launchpad.
MIDI Map Mode switch. Similar to the Key Map Mode switch, this button lights up assignable controls in a dark-blue hue. Following the same procedure, you click a desired control to highlight it; then just touch the control on your hardware controller you want to assign and you’re done. If you want to skip mousing to the Control Bar to activate this mode, then just press Cmd + M (Mac)/Ctrl + M (PC).
CPU Load meter. This is a view you need to keep close watch on, as it tells you the load you’re imposing on your computer’s central processing unit (CPU). At a certain level, you’ll start to hear playback dropouts and/or distortions. In Chapter 6, you’ll find some valuable tips on how to reduce CPU load and get more out of Live and your computer.
Hard Disk Overload indicator. If the disk storing your audio files is having trouble loading the data into Live as fast as it demands, this indicator will light up. Unfortunately, that’s not the only consequence; you’ll also experience dropouts. But there are ways around this, as you’ll discover in Chapters 5 and 6.
MIDI Track In/Out indicators. These indicators light up when Live’s tracks effectively receive and send MIDI messages.
On the bottom of the main screen is a long, rectangular view called the Status Bar (see Figure 4.26), which will be also present regardless of what main view you’re working in. Live uses this condensed view to display text conveying such things as alert messages pertaining to crucial items like missing files and letting you know where a certain control is set if Live doesn’t provide another way. With regard to the latter, if you think you saw a blip of text appear only to quickly disappear, it’s because for the most part, the Status Bar only displays selected information when pass your mouse over certain items in the GUI. Of all the info the Status Bar displays, the most important is the location of files. For instance, if you mouse over an audio file in the Browser, the file’s location all the way down to your system’s root directory is displayed for quick and easy viewing.

Figure 4.26. The Status Bar not only delivers information about program-related activities, it lets you mouse over controls for which Live does not provide a way to measure their position so you can see it here. You can also place your cursor over an audio file and see its exact location in the view.