Now it’s time to get to work in your Ableton Live studio. This chapter shows you the many things you can do with Live to make the program work for you. From more deeply probing into clips to discovering the vastness of Live’s built-in devices all the way to scoring music for video, there’s plenty of work to be done. By this chapter’s end, you’ll have some valuable insight as to how get started working with Ableton Live with both audio and MIDI.
Let’s get started by going inside the Clip View. This section goes deeper inside clips to help you understand some of the ways Live lets you tweak your audio to perfection. The Clip View is where an assortment of interesting things can be set in motion. Looking at Figure 6.1, you can see there are four areas of action. From left to right, they are as follows:
Clip Box
Launch Box (Session View only)
Sample Box (audio clip) or Notes Box (MIDI clip)
Envelopes Box

Figure 6.1. In Clip View, you have four panels: the always-present Clip Box, the Launch Box, the Sample Box (audio clip), and the Envelopes Box.
Except for the Clip Box, you can toggle these panels of controls in and out of view by the clicking the circular switches in the lower-left corner (see Figure 6.2). From setting up a clip to loop to manually programming and editing MIDI to working with Warp markers (Live’s all-powerful tools for changing the timing of digital audio), there’s a lot of power packed in those segmented areas.
Figure 6.2. While the Clip Box is always visible, the other Clip View boxes can be displayed or hidden via these switches.
The following sections focus on a few of the more prominent features such as Transpose and Warping. You shouldn’t stop there, however. Once you have a solid grasp on Live and feel as if you’re really getting your groove on when it comes to working in your Ableton Live studio, make it a point to fully explore what’s contained in each box.
Note
In addition to checking out the Live manual, be sure to look into what has become a must-read for anyone wishing to become a high-level Live user: Live 8 Power!, published by Cengage Learning. If you’re more of a visual learner, then feast your eyes on the Ableton Live 8 Course Clips DVD, also from Cengage Learning.
One of the things that makes Live unique is the ease with which it can independently manipulate the tempo and pitch of audio material. One of the simplest controls to demonstrate that claim is the Transpose knob, located in the Sample Box (see Figure 6.3). This allows you to change the pitch of an audio clip plus or minus 48 semitones (four octaves) without changing the tempo. That said, adjustments of more than a few semitones in either direction could produce some seriously strange results. For sound designers and other experimental types, getting bizarre sound effects by radically transposing material is a big part of the fun. Whether you’re transposing for practical or experimental purposes, you’ll get very different results depending on the Warp mode you’re using, covered in the next section.

Warping is Ableton’s technology for tempo-synchronizing your audio clips. You’ll find the Warp switch in the Sample Box (see Figure 6.4). When this feature is engaged, Live will attempt to match the tempo of the clip to the master tempo. Depending on the material you are working with, this tempo matching may happen automatically or it may require some additional fine-tuning. Turning the Warp switch off causes Live to play back the audio at its original tempo regardless of Live’s master tempo setting.

Figure 6.4. With the flick of this switch, Live will wrestle, or warp, your audio file into Master Tempo–based submission.
To get a feel for the power of warping, try adjusting Live’s master tempo while playing back some clips you’ve recorded. You’ll find that you can adjust them across the totally insane range of 20–999 BPM, although some audio artifacts may infiltrate your production if you make dramatic changes to the tempo. With smaller adjustments, you’ll realize how seamlessly the tempo can be changed. (Even with small changes, you’ll want to keep an ear on sound quality.)
Depending on the sort of material you are tempo shifting, Live offers different Warp modes to keep everything sounding smooth (see Figure 6.5). You access these modes via a drop-down menu, located in the middle section of the Sample Box, below the Warp switch. Following is a list of the modes you have to work with:
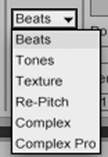
Figure 6.5. When changing the tempo or transposition of audio clips, the Warp mode you choose will have a big impact on the sound quality.
Beats. This mode is designed to work with rhythmic loops with a more percussive quality. In addition to the obvious drum and percussion samples, it’s also great for anything with a strong attack and short sustain such as a funk rhythm guitar part.
Tones. This mode tends to smear the attack of sounds, meaning it doesn’t work well for preserving the transient response of percussive sounds. But it’s great for bass guitars, synthesizers, vocals, keyboards, or other long-sustaining instruments where transients are not as defined.
Texture. Like Tones mode, Texture mode works well for long sustaining sounds, but is optimized for sounds with a dense and complex character such as field recordings and thick keyboard pads.
Re-Pitch. Unlike the other modes, the aptly named Re-Pitch does not maintain the original pitch of the audio as the tempo changes. Much like moving the pitch slider on a DJ turntable, with Re-Pitch, the pitch rises as the tempo increases and descends as it decreases.
Complex/Complex Pro. Optimized for fully mixed songs, the Complex modes are effective on a wide variety of material and are the go-to choice when none of the other modes do the trick. The caveat is that both Complex modes use significantly more CPU power than the others, with Pro using the most but thankfully yielding the best results. Complex Pro has the added bonus of formant correction, which means you can transpose a vocal track without making your singer sound like a chipmunk or a troll.
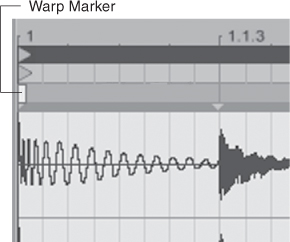
When the Warp switch is engaged, you’ll notice there is always at least one rectangular yellow marker above the waveform display (see Figure 6.6). This integral component of Live’s tempo-mashing greatness is called a Warp marker. Before getting into the practicalities of working with Warp markers, let’s take a moment to understand what they are all about.
The audio in a clip is like a rubber band that can be stretched (slowed down) or contracted (played faster). Think of Warp markers as a pin that you can stick through that rubber band, enabling you to mark various stretch and contract points. Warp markers are placed in an audio clip to fasten a certain piece of audio to a particular place in time. Once a Warp marker is placed, the audio at that location is locked down. At the same time, the rubber band can continue to be stretched and pinched wherever it’s not pinned down. At first, this may be hard to comprehend; the best way to get the idea across is to look at a practical example. Be sure to put the time in here; if you don’t, you could miss the point and create a frustrating cat-and-mouse–type back-and-forth scenario when trying to warp your audio.
Looking back at Figure 6.6, you’ll see a drum file with some timing fluctuations. Notice that the hits at beats 1, 1.1.3, and 1.3 are perfectly lined up with the grid, but beats 1.2 and 1.2.3 are a bit off. One way to fix this is to simply move beat 1.2 by clicking the gray marker above it (called a Transient) and dragging it until it lines up with the vertical line that signifies beat 1.2. Alas, taking a look at Figure 6.7, you’ll see that this solves one problem, but creates another. When beat 1.2 was moved, beat 1.3 was pushed off its alignment, with its vertical line marker now making it late! See the cat-and-mouse scenario brewing? This is where Warp markers come in, and here’s how you use them:
If you’ve been following along, be sure to undo what was just described or simply press Cmd+Z (Mac)/Ctrl+Z (PC) so the Clip View displays the waveform as it was in Figure 6.6.
Double-click above beat 1.3 to create a Warp marker. That locks that beat in place.
Double-click above beat 1.2 to create a Warp marker.
Click and drag the Warp marker at beat 1.2 and move the badly timed hit over to the right to line it up with the proper vertical grid point. Notice how doing so stretches the audio to either side a bit, but leaves the hit at beat 3 alone. (See Figure 6.8.)
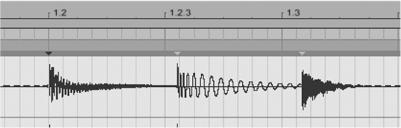
Figure 6.7. Simply dragging the drum hit that seems like it should be lined up with beat 1.2 with no regard for the concept of Warp markers solves one problem, but creates another by throwing off the timing of other beats such as beat 1.3.
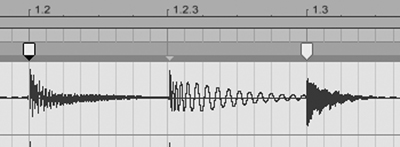
Figure 6.8. Strategically placed Warp markers make all the difference when adjusting transient placement against the grid. With Warp markers in play, moving beat 1.2 solves the timing issue while maintaining the correct placement of beat 1.3. As a bonus, beat 1.2.3 was also shifted into the correct location according to the grid!
You’ll find that not only are Warp markers easy to create (by double clicking), they’re also easy to delete (again, by double-clicking). You can use them to make minor timing corrections all the way up to radical variations that change the clip entirely. If this all still seems a little strange, don’t worry; working with Warp markers takes some getting used to. So, be sure to set aside some time to experiment.
After looking into some of these important audio clip features, let’s shift over to MIDI clips and check out some of the basic knowledge to get you started working with them.
Chapter 5, “Making Music with Ableton Live,” covered the steps for recording new MIDI clips. Once you have created a MIDI clip by either capturing your performance from a MIDI controller or simply creating one from thin air, the sky is the limit as to what you can do with it. To start on your rise to infinite creativity, you’ll need to know how to work with MIDI clips. In this section, you’ll learn about some basic tools to get you started. Let’s start with what was mentioned at the tail end of the “MIDI Clips” section in the previous chapter, where the process of manually inputting MIDI data was introduced. If at any time you feel a little lost, refer to the entire “MIDI Clips” section in the previous chapter as well as the information laid out for you with regard to MIDI back in Chapter 2, “More Must-Haves.”
There are two ways to input notes in the MIDI Editor, but you may find one more advantageous than the other. The most direct way is to double click in the MIDI Editor to draw a note manually. (Conversely, double-clicking an existing note will erase it.) But Live also has another entry method, called Draw Mode, that is much more efficient and intuitive. To enable this mode, click the switch with the pencil icon (seen Figure 6.9), located in the middle section of the Control Bar. With Draw Mode turned on, you create or delete notes using a single click. Additionally, you can draw in a row of notes by dragging horizontally while holding down the mouse button.
Figure 6.9. Turning on Draw Mode enables the pencil tool, which you can use to create and delete notes in the MIDI Editor with a single click.
Figure 6.10 shows a few notes already in the MIDI Editor grid. These could have been entered using either of the aforementioned methods. Notice that each note is the length of one grid cell, which is set to 1/16. How do you know that? Just look down at the lower-right corner of the MIDI Editor, which always displays the grid resolution. If you want to create notes of different lengths, there are a couple of options. You can edit note lengths after the notes are drawn, or the size of the grid can be changed. Let’s see how you do that.
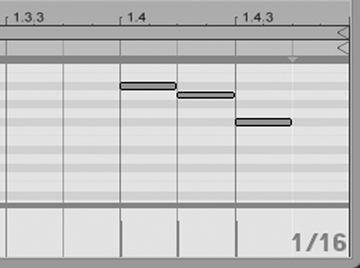
Figure 6.10. The resolution of the MIDI Editor grid is always displayed in the lower-right corner of the MIDI Editor.
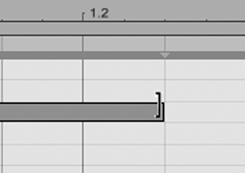
To change the length of a note after you’ve drawn it in is simple. First, you have to make sure Draw Mode is turned off. From there, hover the mouse pointer over either the left or right boundary of a note. Notice how the cursor turns into a bracket (see Figure 6.11). You can click and drag the bracket horizontally to make the note longer or shorter. If you have multiple notes selected, you can change their lengths all at once if need be.
Another way to influence MIDI note lengths is to change the grid size (resolution). To do that, you’ll need to be aware of the two modes for the grid size: adaptive and fixed. Adaptive mode adjusts the grid size according to the zoom level, enabling you to zoom in to draw shorter notes and zoom out to draw longer ones. Fixed grid, as you might guess, is fixed to a certain size. It changes only when you explicitly tell it to. To select a grid mode, right-click in the MIDI Editor and select one of the Adaptive Grid modes, or a Fixed Grid resolution (see Figure 6.12). You can also make the grid wider or narrower using keyboard shortcuts. First click in the MIDI Editor and then press Cmd+1 (Mac) or Ctrl+1 (PC) to make it narrower or Cmd+2 (Mac) or Ctrl+2 (PC) to make it wider.

One of the coolest aspects of working with MIDI in any DAW is you can freely move the notes around the piano roll, which contributes to that limitless potential. In Live, moving around notes is simple in the MIDI Editor. A single click selects a note; alternatively, you can click and drag to select multiple notes. You can even click a note in the piano roll to the left to select every instance of that note in one click. Once they’re selected, not only can you drag around the notes as you might expect, but you can also move them around using the left-, right-, up-, and down-arrow keys.
The MIDI Editor isn’t used just for drawing in note data. It’s also used to edit what’s known as velocity. While this term may conjure up images of revving up your rocket car to break the new land-speed record, sadly it’s not quite as cool as that. Velocity is the MIDI-related term for the measurement of how hard a key on a MIDI controller is struck. Most synthesizers use the velocity message to adjust the volume of the sound. MIDI is quite flexible, however, enabling you to use velocity to modulate any parameter or to ignore it entirely if you so desire.
Note velocities are shown as a vertical line below each note in the Velocity lane (see Figure 6.13). To change note velocity, you have to adjust the height of a velocity stalk using either the standard mouse pointer or Draw Mode. Just like with notes, with Draw Mode on, you can paint in velocity by dragging across the Velocity lane while holding down the mouse button. As you change velocities, you’ll also notice that the color of the note itself changes. As the velocity gets lower, the shade of the note gets lighter and vice versa.

A common frustration with the Velocity Editor occurs when you try to edit the velocity for a single note when several notes are stacked up on the same beat. Just drawing in the Velocity lane changes the velocity for all of them simultaneously. There are two easy solutions to this problem. First, using the standard mouse pointer, click a note to select it. (Make sure Draw Mode is off.) You’ll notice that not only is the note highlighted, but the velocity indicator is highlighted as well. Now you can change its height without altering the other notes.
You can also edit velocities without using the Velocity lane at all. Hover the mouse pointer over a note and press the Cmd key (Mac) or the Alt key (PC). The mouse pointer changes into a Splitter tool and a numeric box appears, showing the note’s current velocity. Click and drag vertically to change the velocity. If you get into the habit of editing note velocities this way, you can hide the Velocity lane entirely using the fold switch in the lower-left corner. You’ll still be able to see the velocity changes from note to note by paying attention to the shading of the notes (see Figure 6.14).

The term envelope is geek-speak for “something changing over time.” By using clip envelopes, you can make a clip’s parameters change automatically as the clip plays back. For instance, you can create a volume envelope to automatically make parts of a clip louder or softer, or a transposition envelope to change the pitch in certain spots.
To create a Clip envelope, make sure the Envelopes Box is showing. (Click the E button in the lower-left corner of Clip View, as shown in Figure 6.2.) Then, click in the title bar of the Envelopes Box. The waveform display will become the Envelope Editor, as shown in Figure 6.15. (If you want to get back to the normal waveform display to work with Warp markers and the like, just click in the title bar of the Sample Box.)

Figure 6.15. Superimposed above the waveform display is the clip’s volume envelope. The pink shading represents the volume level. You can use dramatic volume changes like the ones shown here to create rhythmic gating effects.
You can create envelopes for many properties of the clip and Live’s mixer, as well as for every device on that clip’s track. To select an envelope for editing, use the menus shown in Figure 6.16; alternatively, use the shortcut buttons below to jump directly to the Transpose, Volume, or Pan envelopes. Once you’ve selected an envelope for editing, you draw in the envelope according to the grid with Draw Mode on. You can also edit the envelope using breakpoints by turning Draw Mode off. For more information on breakpoint editing, see the section “All About Automation.”
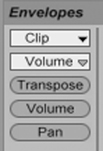
Figure 6.16. A clip can have many different envelopes including envelopes for clip properties (such as transposition) and device properties (such as the Auto Filter’s cutoff frequency). Use the choosers and the three Live mixer control shortcut buttons to locate the parameter for which you want to create an envelope.
You access Live’s devices via the Device Browser. These devices are broken into three categories: Instruments, MIDI Effects, and Audio Effects (see Figure 6.17). If you’re using Live primarily to record vocals and real instruments, you’ll spend most of your time in the Audio Effects category. On the other hand, if the computer is your main instrument and you’re looking to become a synth wizard, then the Instruments and MIDI Effects categories are going to be central to your world. Let the fun begin!

Adding a device to a track is just a matter of dragging it out of the Browser and into the track where you want it. Once added, the device appears in the Track View, which shares the space along the bottom of the screen occupied by the Clip View (see Figure 6.18). To reveal Track View, double-click the title bar of the track you want to view. Alternatively, you can use the Shift+Tab keyboard shortcut to switch back and forth between the Clip and Track Views.

Unfolding a device in the Browser reveals that device’s presets (see Figure 6.19). The presets can be dragged directly into a track or loaded into a device after it’s been added to a track. To load a preset from the Track View, use the device’s Hot Swap switch (shown in Figure 6.20). Clicking this switch opens the Hot Swap Browser, which displays the presets for that particular device. Double-click to load presets and click the switch marked with an X when you’re finished.

Figure 6.19. Unfolding a device in the Device Browser displays its presets. Sometimes these presets are organized into additional subfolders.
Figure 6.20. Clicking this little guy makes the Browser show you all of a device’s presets, providing a way to easily peruse the choices.
Once you’ve added a device into a track, there are a couple of different ways to remove it. The upper-left corner of each device contains an Activator switch for temporarily bypassing the device (see Figure 6.21). This is handy for testing a sound with and without the effect on it so you can really hear what’s going on. If you want to permanently get rid of a device, just click the title bar and press Delete.
Okay, now that you know a bit more about what Live’s devices have in common, let’s take a look at what makes different types unique. What follows is an overview of everything you’ll find in the Device Browser, starting with audio effects.
Regardless of the style of music, audio effects are an important part of every producer’s toolbox. An audio effect is a software or hardware unit that transforms an audio signal in some way. Effects are used during the songwriting process as a sound-design tool, and then again during the mixing process to create clarity and impact. Audio effects range from reverbs and delays used to impart a sense of space and dimension to a sound, to over-the-top sound manglers like waveshapers and ring modulators, to incredibly subtle dynamic compression. If you’re new to producing and engineering, the road to learning effects is a long one. The good news is, it’s an enjoyable road to say the least! Expect to spend lots of time experimenting. If you’re looking to use effects for creative sound design make, sure to really spend some time with each device rather than try to learn them all at once—you’ll be amazed at what’s possible.
In the Audio Effects folder, you’ll find 29 effect devices (32 if you have the Live Suite or have added on the Collision instrument) plus an Audio Effect Rack (used to combine multiple effects into mega-effects, covered later in the chapter) and External Audio Effect (used to interface with external audio hardware). Following is a list of basic effect types and what they do to your sound. In those descriptions, you’ll learn which Live device falls into what category so you can get an idea as to how to start using them. Be sure to have the Live manual close by when starting to work with any device to learn what every last control does. From there, it’s up to you to tweak and tweak and tweak some more in order to get a grasp on what each device will do.
EQ. With Live’s EQ Eight and EQ Three devices, you’ll be able to make changes to the frequency spectrum of a given piece of audio. Whether you cut some highs off a trebly guitar track or boost the mids of vocals that need some extra honk, EQs can change things for the better in many ways. EQ’ing will come into play in all facets of your work, but it should be used with caution and restraint. If you find you’re going for either EQ device a lot, try to record your source better.
Filtering. While filtering (cutting frequencies) is half of what EQ’ing is, there exist effects that take the notion of frequency subtraction to a whole other place. One method is to have a device that attenuates a given frequency range—low, high, or mid—that also features an envelope follower or LFO that modulates the filtered signal resulting in some massively funky pa-wow type sounds. To do this, Live gives you Auto Filter.
Dynamics processors. Dynamics processors are used to control a signal’s dynamic range—the distance between its highest and lowest volumes. For example, Compressor and Limiter are used to automatically turn down a signal’s loudest peaks, making the dynamic range smaller. Gate listens for the quieter parts of a signal and turns them down even further. (This is often used for removing noise.) Multiband Dynamics is a powerhouse for advanced users that can be used to compress or expand a signal’s dynamics in a variety of ways. Learning to use these processors takes time, but can help add polish to your productions when used judiciously.
Time-based effects. Manipulating time produces some of the coolest sounds around. From echo to innovative delay processing like grain delay, you can create some serious audio with this stuff. At the heart of all time-based effects is pure delay. For that, Live gives you Simple Delay. Building upon that, Live features endlessly cool delays such as Ping Pong delay, which sends feedback trails (echoes) back and forth between your right and left channels; Filter Delay, which runs those same feedback trails through various filters; and the perplexing Grain Delay, which slices the input signal into tiny particles that are individually delayed and spit back out in various ways for incredible sounds.
Reverb. The phenomenon known as reverb is a product of initial soundwaves that bounce frantically off surfaces, creating a pattern of delayed sounds coming together to make one lush-sounding bed of awesome. Live’s Reverb device covers this effect quite well, but just like EQ’ing, it’s important to be careful not to overuse or misuse it. That said, when used correctly, reverb is a hugely powerful effect, and the device that Live provides you is one nice piece of virtual gear.
Modulation. In many cases a subset of time-based effects, modulators take the delay effect and add pitch modulation, giving you sweeteners such as chorus and flanging. Both effects give the audio a new sense of dimension and color that you have to hear to fully understand. Think of chorusing as a thickening of the sound and flanging as a more metallic, airy addition to the sound. Live comes with the aptly named Chorus and Flanger, giving you two great-sounding modulation devices to work with. Though not delay based, but a modulation effect nonetheless, you have a phat-sounding phaser in Live that, judging by the past names, shouldn’t be hard to predict. Phaser combines the output signal with a copy of the signal that is slightly out of phase, which causes something called comb filtering. Regardless, it sounds delicious. Lastly, there’s Auto Pan, which manipulates both amplitude and panning to create vertigo-inducing tremolo-type effects that can be beat synchronized.
Gain related. These are effects meant to emulate the results of pushing a piece of audio hardware past the limit to where it distorts the sound in a raucous and truly awesome way. (If you’re a guitar player you know exactly what this means.) Live gives you some very cool devices to add grit to your audio, with Dynamic Tube, Saturator, Overdrive, and Vinyl Distortion. While all these gain-related effects have various approaches to beefing things up with some crunch, just be sure to learn how to use the controls so you can get the best results.
Utility. Though not as fun sounding as Grain Delay or Vinyl Distortion, there will come a time when you will need devices such as Live’s Utility and Spectrum. For instance, if you need to find a way to mute a series of effects from anywhere in the chain, to drastically adjust signal level, or to pan signals, then you’ll need Utility. Need to perform some real-time frequency analysis of incoming signals? You’ll need Spectrum for that.
Get-you-fired. There’s a slew of effects out there that are meant to cause trouble. Sound designers and audio tweakers can’t get enough of these deviants—although the general public would really appreciate you taking the time to learn how best to use these evil toys. In Live, you have such devices as Erosion, which degrades the input signal and adds noisy artifacts for a more digital sound; Frequency Shift, which moves the frequencies of incoming audio up or down, creating subtle tremolo effects all the way to dissonant metallic sounds much like a ring modulator; and Redux, which reduces a signal’s sample rate and bit resolution.
Other. Then there’re effects that defy conventional categorization, such as Live’s too-cool Beat Repeat, which takes incoming signals and creates randomized or controlled repetitions, making for some incredible results on both percussive and non-percussive samples. One of Live’s most popular effects, Looper, is exactly what it sounds like: an effect based on classic real-time looping devices—except now you have the power of Live and your computer to make your looping excursions that much deeper. If you’re into the robot-voice thing, Live has you covered with Vocoder. For even more fun, you can make some noise with Resonators, which produce sounds resembling such things as plucked strings!
As stated, all you need to do to get a device loaded into a track is drag it from the Device Browser. Most of the time, you’ll just drop the effect into the track containing the clips you want to process. This is commonly referred to as using the effect as an insert, because the effect is inserted directly into the signal path. There’s also the option of dropping the effect into a Return track and using Sends to route the signal into the effect, as shown in Figure 6.22. Return track effects are a great workflow enhancement as well as another way to back off your computer’s CPU. For example, after you’ve loaded a Reverb device into Return track A, you can add reverb to any track by turning up its send A knob. This makes it possible to apply the same reverb setting to a group of tracks—say, a drum kit that was miked separately. Plus, you now have only one instance of the device. That’s a far better scenario for your computer, especially when it comes to a notorious resource hog like reverb.

Figure 6.22. Instead of inserting a Reverb device on both the Percussion and Vox tracks, a Reverb device has been loaded into Return track A. Send A has been turned up slightly on the percussion to add a small amount of reverb, while the vocal track has it turned up higher for a more dramatic effect.
Here’s the lowdown on the two methods of loading effects:
Insert. The audio effect is loaded directly into an audio or MIDI track (only after a MIDI instrument). The signal coming into that specific track goes through whatever devices you’ve loaded. Inserting an effect into a track makes it possible to completely transform the sound, replacing the original signal with the processed sound. Some effects have a Dry/Wet knob that enables you to blend the original, unprocessed signal with the signal produced by the effect.
Send/return. The audio effect is loaded into a Return track. You send a signal into the effect by turning up the associated send on any track to which you want to add the effect. This approach is not well suited to radical sound transformations because the effect is added to the unprocessed signal instead of replacing it. When an effect with a Dry/Wet knob is used in a Return track, it is almost always set to 100-percent wet.
The next signal-flow consideration is what’s going on when there’s more than one device loaded. Multiple devices in a single track create what’s called a chain of effects or effects chain. You can load as many effects as you want; the only limit is your computer’s CPU power. Whether you have loaded a chain of devices into a Live track to process that track’s audio exclusively or you have loaded a device chain in a Return track to process multiple tracks via various tracks’ send controls, the signal will pass through the chain from left to right, as shown in the Track View. More often than not, changing the order of the effects chain can have a big impact on the sound. You can easily do this by clicking the device’s title bar and dragging the device horizontally from left or right. To take the concept of multiple of effects even further, Live gives you the all-powerful racks, discussed in detail later in the chapter.
As you can see, stepping into using audio effects is a big to-do for those starting out, but a fun one. Let’s shift over to the MIDI-based devices, starting with the built-in Live instruments.
Instruments are devices that receive MIDI as input, and output sound in response. You can only add them to MIDI tracks. The basic version of Live comes with five instrument devices. Let’s take a quick look at each one’s basic specs.
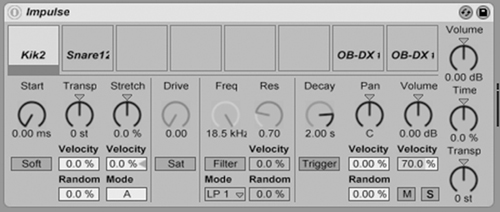
Impulse. This is Live’s basic drum sampler (see Figure 6.23). You can drag one sample into each of the eight cells that run along the top. You can then edit the characteristics of each sound using the controls that run along the bottom. If you want to play Impulse using a MIDI controller, it responds to the notes of the C major scale starting at C3.
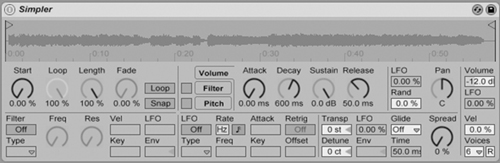
Simpler. Named as such because it’s a simple sampler, the Simpler (see Figure 6.24) is actually a very flexible sample playback device. You can drag any one audio file into its sample area that runs along the top. The Simpler is as varied as the sound loaded into it, and can be used to emulate acoustic instruments, synthesizers, or just about anything you can imagine.
Drum Racks. When Impulse just isn’t cutting it, you can step things up by letting Drum Racks step in. Drum Racks are incredibly powerful beasts that can hold up to 128 different sounds, allow you to layer sounds, and add effect devices to individual sounds as well.
Instrument Racks. Like Drum Racks, you can use instrument racks to make complex sounds by layering instruments and adding effects. Ironically, Instrument Racks are also used to simplify the user’s experience. When you load up an Instrument Racks preset, you’ll be presented with eight knobs (called macros) that you use to tweak the most important parameters of the sound without having to know all the details of how the rack is designed.
External Instrument. This isn’t really an instrument, but rather a utility for advanced users who want to use Live to sequence an external hardware synthesizer. External Instrument can also be used to communicate with ReWire instruments, which are explained in Chapter 8, “Accessorizing Ableton Live with….”
If you own Live Suite, there are six additional devices that will appear in the Instruments folder which are described in Chapter 8.
MIDI effects are interesting little beasts that process an incoming MIDI signal and transform it in some way before it reaches the instrument. Following is a list of Live’s MIDI devices along with a brief explanation of what they do.
Arpeggiator. This takes sustained chord input and outputs the notes in a sequenced, rhythmic pattern. You set the order of the notes using the Style menu, while you set the rhythm with the Rate knob.
Chord. Taking a single note input with Chord, you can add up to six extra notes to form a chord. The Shift knobs have a range of plus or minus 48 semitones. If you’re a one-finger keyboard player, this one can be really helpful and a lot of fun.
MIDI Effect Rack. Just like Audio Effect Rack, this device enables you to combine multiple MIDI effects into a mega-effect monster of your own devising.
Note Length. Use this device to force all incoming MIDI notes to the same length. Use the Length knob to set the length and the Mode switch to choose either milliseconds or divisions of the beat.
Pitch. Instant transposition! This device shifts all incoming MIDI notes up or down to change the key of a part.
Random. Instant chaos! This device generates random note output. As the Chance knob is turned up, the likelihood that the incoming note will be replaced with a random note increases. You determine the range of notes that can be randomly generated by the Choices, Scale, and Sign controls.
Scale. This device forces all notes to conform to a musical scale. The interface for Scale can be tricky at first, so make sure to load up some presets. The Base knob can be used to transpose the scale once you’ve got a preset scale loaded.
Velocity. Similar to a dynamics processor (such as a compressor), Velocity acts on MIDI velocity instead of audio volume. It also has a nifty Random knob, which can be used to randomize the velocity of incoming MIDI notes.
Racks are one of Ableton Live’s most powerful features (see Figure 6.25). But unlike many “powerful” pieces of technology, racks are just as capable of doing some simple, elegant things as well as the mind-bending stuff. In a nutshell, racks group together multiple devices into a single device, affording you myriad-sound processing and instrument-creation options. They’re also capable of some sophisticated internal-routing maneuvers that enable you to create layered instruments and otherworldly multieffects processors. The devices and whatever routing schemes assembled in a rack can then be saved together as a preset to be loaded at any time.
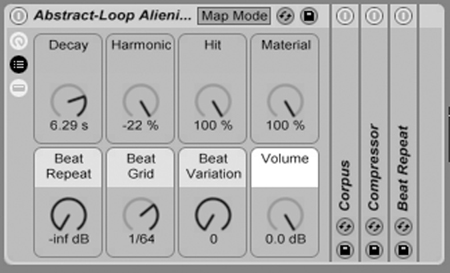
Figure 6.25. If you thought the devices presented in the previous section look fun, get a load of this! This audio-effects rack preset combines Corpus, Compressor, and Beat Repeat. It also provides you with a simplified set of eight knobs called macros for tweaking the sound.
There are three types of racks:
Audio Effect Rack. This can contain Live’s audio effects and/or third-party plug-in effect devices.
Instrument Rack. This can be composed of Live instruments and/or third-party plug-in instruments plus MIDI effects or audio effects.
MIDI Effect Rack. This contains only MIDI effects.
Just like other Live devices, you access racks of all types and configurations (including empty ones) from the Device Browser. (Under Audio Effects, you’ll find Audio Effect Racks at the top of the list.) Unlike some plug-ins that look like the cockpit of an F-15 before you make a single sound, however, an empty rack only gains functionality and complexity as you add devices into it. To add devices into an empty a rack, such as the Audio Effect Rack in Figure 6.26 for example, you would just drag them out of the Browser and drop them into either of the areas marked “Drop Audio Effects Here.”
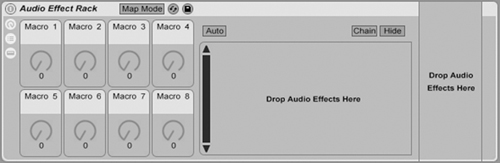
Figure 6.26. In their most basic form, empty racks seem pretty harmless—that is, until you start loading them up with devices from the Device Browser.
In addition to dragging an empty rack into a track, you can create racks from an existing chain of devices. All you have to do is take any existing group of devices and perform two easy steps. Check it out:
Select all the devices you want to group into a rack by clicking their title bars while holding down the Shift key.
Use the Edit menu’s Group command or use the keyboard shortcut—Cmd+G (Mac) or Ctrl+G (PC).
All the devices are now contained in a rack.
To help control this seemingly convoluted beast, racks feature macro controls (see Figure 6.27), which are assignable knobs used to adjust the most important parameters of the devices contained in it. Even better is the fact that you can assign these macros to more than one parameter and across multiple devices. In preset racks that come with Live or ones you acquire from third-party sources, you’ll find the macros have been set up for you. You can change those assignments at any time. And if you delve into creating your own racks, you can start with a clean slate and assign all the macros yourself.

Figure 6.27. Mapping device parameters to macro knobs is easy. Just right click the parameter and choose which macro you want to assign it to. You can even have one macro control several different parameters simultaneously.
Whether or not you ever build a rack from scratch, you’ll definitely want to explore the various rack presets—especially if you own Live Suite or some of Ableton’s add-on instruments. For example, unfolding the Instrument Rack icon (located in the Device Browser’s Instruments folder) reveals numerous folders full of presets. Many of these presets involve some complex synth programming along with a chain of effects. When one is loaded into a track, you’ll first be presented with the rack’s macros. This means you can get down to tweaking knobs and having some fun with the sound without having to know everything about how it was programmed. Sure, you can dig in further if you want, but the beauty of it that you don’t have to.
If you’re using Live as a music-production tool rather than strictly for Live performance, you’ll always end up in Arrangement View to complete your musical ideas. The Arrangement View is where you’ll make final decisions about the flow of your song from start to finish.
While it’s possible to start out in Arrangement View from the beginning of your production process, the most common workflow in Live is to start out in Session View to develop your ideas and then switch over into Arrangement View to complete a song. That may include making final edits, tweaking automation, and doing a final mix before exporting the arrangement into a stereo file that can be converted to MP3 or sent off for mastering and CD manufacturing.
As mentioned earlier in this book, the trick for getting from a stack of clips in Session View to a timeline-based arrangement is the Global Record button. If you haven’t given this a try yet, now is the time! Simply enable Global Record and start playing back some clips in Session View. Every clip you launch will turn up in Arrangement View. When you’re finished, press the spacebar once to stop recording and then again to start playback. You’ll hear your exact performance just as you played it and see it laid out in Arrangement View (see Figure 6.28).

Figure 6.28. Every time you launch a clip during global recording, a copy of it gets put into Arrangement View.
Now, if you’re anything like the rest of us human beings, your performance won’t be a perfectly arranged song. That’s why you’ll need some basic knowledge of arrangement editing. You can easily extend or remove sections entirely. You can move, slice, and dice clips in pretty much any way you can imagine. Whether you start in Session View or drag clips in from the Browser or beyond right into Arrangement View, the following techniques are going to play a big part in your production process. So pay attention!
You can easily move clips around Arrangement View using drag and drop. When you hover the mouse pointer over either the left- or right-most edge of a clip, the pointer turns into a Trimmer tool, which looks like a bracket. You can click and drag with the Trimmer to shorten or elongate clips. You can elongate clips that have their Loop switch turned on indefinitely, but non-looping clips cannot be elongated beyond the clip’s intended duration.
You can fold or unfold any track in Arrangement View using the triangular switch next to the track’s title. It’s great to keep tracks folded when you want to see an overview of an arrangement with a high track count. When the track is unfolded, you’ll be able to see the waveform of an audio clip or the MIDI notes in a MIDI clip (see Figure 6.29). Unfolding tracks does more than show you the contents of the clips; it also opens up editing options that aren’t possible (or are much trickier) when the tracks are folded.

Before getting into the exact editing possibilities, you’ll need to know a little bit about making Arrangement View selections and placing the insert marker. It’s important to understand both of these because many commands in Live (such as Copy, Duplicate, and Split) can only be used after making a selection or placing the insert marker. They also control the arrangement’s playback position.
The easiest way to make an arrangement selection is to click a folded clip (or in the title bar of an unfolded one). When you do this, you select the clip for editing and update the playback position for the arrangement. That means the next time you click Play, the arrangement will play back from the left-most edge of the clip. You can also make an arrangement selection by clicking and dragging in an empty area of the arrangement or in an unfolded clip (see Figure 6.30). Finally, there’s also the insertion marker, which appears as a blinking orange cursor (see Figure 6.31). You place it by clicking in an unfolded clip or in an empty area of the arrangement. It not only gives you a visual marker telling you where playback will start, it also comes in handy when performing some editing, as you’ll see next.


Now that you know the basics of getting around Arrangement View and making selections, you’ll want to know a bit more about doing some actual editing! Following is a short list of commands any master editor must know. Be on the lookout for any keyboard shortcuts, as these will speed up your workflow considerably.
Duplicate. This command places a copy of a clip (or a selection in a clip) directly to the right. Duplicate is a versatile command because it’s not limited to just clips. You can use Duplicate to make copies of tracks or effects as well. To make things faster, use the keyboard shortcut Cmd+D (Mac) or Ctrl+D (PC).
Option/Alt-Drag. A great shortcut for making duplicates, this command lets you make a copy of a clip and drag that copy to a new location in one step.
Duplicate Time. This command operates on every track, regardless of the track in which the arrangement selection is made. A copy is made of everything in the selected range of time and placed directly to the right of the selection. All the material to the right of the selection is moved over to make room for the duplicated material. The keyboard shortcut is Shift+Cmd+D (Mac) or Shift+Ctrl+D (PC).
Delete Time. Like Duplicate Time, this command operates on a range of time in the arrangement rather than clips in a single track. It removes everything in the time range of the selection and all material to the right of the selection slides to the left to close the gap that would be left by the deleted material. The keyboard shortcut is Shift+Cmd+Delete (Mac) or Shift+Ctrl+Delete (PC).
Insert Silence. You use this command to insert a range of empty time into the arrangement. If you invoke it after creating an arrangement selection, an amount of time equal to the selection is placed to the right. Alternatively, you can invoke this command after placing the insertion marker; Live will present you with a dialog box into which you can enter the exact number of bars you want to add. The keyboard shortcut (Arrangement View only) is Cmd+I (Mac) or Ctrl+I (PC).
Split. This command divides a single clip into multiple clips. If you execute it with the insertion marker placed, the clip will be split in two at the insertion marker. If an arrangement selection is made first, two splits will be made—one at the left boundary of the selection and one at the right boundary. The keyboard shortcut (Arrangement View only) is Cmd+E (Mac) or Ctrl+E (PC).
When you use Global Record to capture a Session View performance into Arrangement View, there’s a bit more going on than just laying out clips along the timeline. Live is also capturing automation data, which means it’s recording every parameter tweak you make. When you play back the arrangement, any mixer setting you adjusted and every effect knob you tweaked will be played back just as you performed them.
Automation is an essential part of any good mix. You can use it for a simple utilitarian purpose like adjusting volume to compensate for dynamic changes in a singer’s vocal performance or to create dramatic effects like filter sweeps and all sorts of things in between. Needless to say, this is an important part of your production workflow, so read the following section carefully. Let’s start with making sure you can identify the automation data you record.
After you’ve recorded an arrangement, there are a few things to look for to determine where automation has been recorded. First, you’ll notice that any automated control shows up in Live’s GUI with a red LED-looking graphic next to it (see Figure 6.32). While that lets you know automation is present, to really get into it, you’ll need to view the automation itself. This is done in Arrangement View.
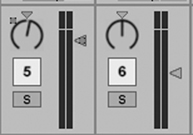
Figure 6.32. The markers by the Pan and Volume controls in the track on the left indicate that there is both pan and volume automation recorded in that track.
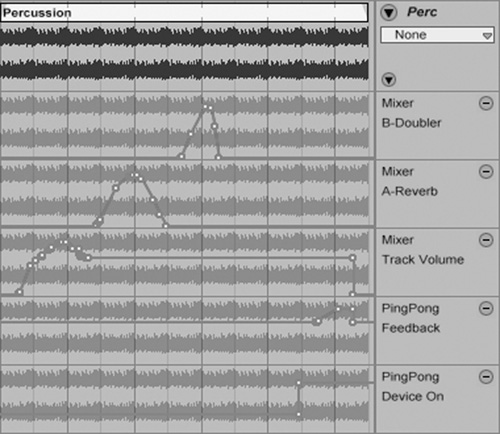
When a track is unfolded in Arrangement View, its track automation can be viewed and edited. You control the display of automation by the pair of choosers immediately to the right of the track. In the top chooser, select the device for which you want to display automation; the chooser below will show you every available parameter for that device. So for example, if you wanted to show the volume automation for the track, you would select Mixer from the first menu and Track Volume for the second, as shown in Figure 6.33.

Just like the clips in an arrangement, automation data is also freely editable. There are two ways of editing automation:
Using Draw Mode
Using the breakpoints that appear when Draw Mode is off
Take a look at Figure 6.33. The automation shown there is a line with a series of small circles along it called breakpoints. You use these breakpoints to manipulate the automation data just recorded. To do this, you simply click inside a circle and drag it, moving that portion of the automation line. To further edit breakpoints, you can do some double-clicking. Double-clicking an existing breakpoint deletes it; double-clicking anywhere on an automation line where there are no breakpoints creates one.
Note
When dragging a breakpoint, you’ll find you can’t drag it past the breakpoints to its left and right. To get around this, hold down the Shift key while dragging; every breakpoint in your path will be deleted as you go, making way for the new shape.
When Draw Mode is turned on, the breakpoints disappear. Then, you use the Pencil to draw automation in chunks the size of the current Arrangement View grid, as shown in Figure 6.34. This is a great way to create dramatic changes, especially if you want them in time. It’s also a great way to make edits to parameters that have only an on/off setting. In contrast, this type of automation editing is not so good for making the smooth transitions that breakpoints are great for.
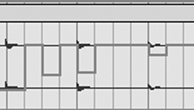
Figure 6.34. Draw Mode is useful for drawing in automation in grid-sized chunks, especially if you need the automation to be time-synced.
Note
If you want to draw larger or smaller chunks, you’ll have to change the grid resolution. You change the resolution of the Arrangement View using the exact same set of techniques used in the MIDI Editor. Make sure to reread the “MIDI Editing” section earlier in this chapter if you need a refresher.
Bear in mind that there’s no need to record automation using Global Record if you’d rather just draw it in. All you have to do is use the menus to find the parameter you want to draw automation for and start clicking. In Figure 6.35, you’ll see some manually drawn automation to create a sweep of the Auto Filter’s cutoff parameter. (Take note: Auto Filter is chosen in the top chooser and Cutoff in the bottom.) It takes three clicks and one drag to make what you see in the image—one click to create each breakpoint, then a drag of the second one to create the sweep.

Figure 6.35. If you know the sound you’re looking for, it’s sometimes faster to draw in automation rather than record it.
Finally, it’s important to note that once you really start getting busy with automation, you may find it too limiting to only view one parameter at a time. You will want to get a broad overview of all the automation in a track. This is where Live’s Automation lanes come in handy. These appear directly below Arrangement View tracks and only display automation data—no clips (see Figure 6.36). To quickly see all of a track’s automation, right-click the title bar and choose Add Lane for Each Automated Envelope. Automation lanes are fully editable using the techniques described earlier but have the added advantage that they will allow you to use the standard Cut, Copy, Paste, and Duplicate commands for editing.
There have never been more opportunities to make music for moving pictures than there are now. With abundant video-production tools and self-publishing on the Internet, video is produced in quantities never before seen. That means most music producers these days will at some point get asked to do various forms of work for picture. Be it composing, audio editing, or sound design, the work is out there.
With Ableton Live, you’ve got a powerful and easy-to-use tool for scoring. Not only can Live import video and display it, it enables you to export video with the sound you’ve created embedded in the video file. It also offers some basic editing capabilities for video, enabling you to create videos for your original compositions.
Live’s video support is powered by Apple’s QuickTime technology. Don’t worry, PC users: It works just fine on both platforms. However, while Macs come with Quick-Time preinstalled, Windows users will have to head over to http://www.apple.com/quicktime/download/ to download a copy. With QuickTime installed, any video that can be played by the QuickTime software can be opened in Live. Files with the extensions .mov and .mp4 generally work just fine. Some videos will require that you download an additional codec so the video can be decoded. For more information on this subject, go to http://www.apple.com/quicktime/extending/components.html.
To get started, drag a video file into Arrangement View. (Although videos can be dropped into Session View, only the audio will play back.) Live’s Video window opens as soon as you drop the video in, and video playback begins when you click Play (see Figure 6.37). You can double-click the title bar of the video window to expand it to full screen, so if you’ve got a second monitor, you can get a nice, big video image while using your main monitor to work in Live.

Figure 6.37. Live’s Video window in action. Notice the video clip to the left. It looks just like an audio clip except it has tiny sprocket holes along the title bar to let you know it’s a video.
What you do next depends on the task at hand. If you’re placing audio into an existing video, you may find yourself doing a lot of spotting sound to picture. To achieve this, put a piece of audio into a new track and drag it along the timeline. As you do, you’ll see the video zip along so it’s always displaying the picture that lines up with the leftmost edge of the clip you’re dragging. Try using the Cmd+4 (Mac) or Ctrl+4 (PC) keyboard shortcut to turn off the grid completely. This gives you a high degree of precision as to where you drop the audio so that dramatic sound effect comes at just the right point in the video.
If you’re using Live to put video to an existing piece of music, you’ll find that all the editing commands we’ve discussed will work on the video track. In fact, the only thing that differentiates a video track from an audio track is the sprocket-holes graphic running along the clip’s title bar. Other than that, it’s just like an audio clip. You can split, rearrange, warp, and loop to your heart’s content. You can also cut together multiple video files by placing them on the same track.
It’s technically possible to have more than one video track, but Live can only play back one at a time—sorry, no fancy video crossfades or dissolves here. If there are multiple video tracks playing back simultaneously, the clip on the bottom-most track in Arrangement View will play back, while ones above will play back audio only.
Once you’ve recorded, edited, and arranged all your parts, you’re faced with the task of creating a final mix. If you find creating a good final mix to be difficult, don’t get discouraged. Mixing is a specialized task with a lot of history behind it. So bear in mind that when you’re listening to a commercial recording, you’re often listening to the work of a dedicated mixing engineer—someone who does nothing but mix records all day, every day. That said, there has never been a better time to record, mix, and master an entire record on your home computer. With some patience and a willingness to learn the tools of the trade, you can make a professional-sounding recording. Remember: Your goal is to release music that gets your message across, not to have it sound exactly like recording x.
In recent years, some confusion has arisen with the terms mixing and mastering. This is likely the result of the emergence of entire records being made in home studios. In the olden days (say, 15 years ago), many of the tasks we now perform on a laptop at our kitchen tables—especially mastering—were left to professionals with gigantic piles of expensive analog gear. Now that everyone has the tools to record, mix, and master everything at home, it’s not surprising that these distinctions aren’t as clear as they once were.
Mixing refers to the process of starting out with a multi-track recording and ending up with a good-sounding stereo file. Actually creating the stereo file is easy, as you’ll soon learn later in this chapter. The tricky part is to get it sounding good. What constitutes “good” is giving all the parts clarity, creating a sense of dimension and space, and imparting impact and aggression to some sounds and smoothness and subtlety to others. Once the mixdown is done, then a track is ready for mastering.
Mastering refers to taking a fully mixed song, or a group of songs, and doing final processing to prepare them for duplication and distribution. While this usually involves making subtle EQ adjustments and can also include tweaks to the stereo image and other subtle voodoo, the most obvious result of mastering is a change in overall loudness. It’s crucial you understand this concept: No matter how good your mixdown is, it will never be as loud as a commercially mastered recording because it shouldn’t be. To produce good mixes, you need to go easy on the levels. Go for clarity and avoid distortion. Once you’ve done this, the mix can be made louder with a mastering pass.
This section goes over the basic elements of creating clarity and dimension in a mix. Be aware, these are general principles meant to get you started. Like mastering, mixing is an art form unto itself, and you’ll be forever learning new ways to produce great mixes. The sections that follow are but a tip of the iceberg (read: glacier), and you should be prepared to embark on a serious mixing knowledge quest when you get to this point in your Ableton Live studio.
That said, don’t waste too much time trying to figure out if you’re doing everything “right.” In other words, there’s no “right” level for a vocal track or a “right” way to pan multiple guitar tracks or “right” device setting for this or that. If you listen carefully, you’ll hear that there are records where the vocals are way out front, and others where they are buried in a wall of screaming guitars. You’ll hear guitars only on the left channel or split between the left and right, etc. Instead of wondering what’s the “right” way to do things, spend that energy figuring out what you like. In many ways, going through your record collection and developing your critical listening abilities is one of the most important things you’ll ever do to become a good mixer. Finally, keep in mind the old mixing engineer adage “A good arrangement is a good mix.” The bottom line is, anything that’s really hard to mix probably has too many layers going on. If you’re finding that your mixes are coming out like mud no matter what you do, go back to the arrangement and start subtracting. You’ll be amazed at how much bigger a mix can end up sounding when you reduce it to fewer parts.
Your first job as a mixing engineer is to get all the levels right. That means you can hear everything and that the overall level of the mix is on point. A good overall level means you’re not overloading the Master track, thus turning the meter red. If you’re in fact seeing red, your first inclination may be to turn the Master fader down, but that’s not really the ideal way to do it. You should be able to leave your Master track at zero (unity gain) or very close to it. If you’re turning it down more than a decibel or two, you’re probably mixing too loud and all the tracks in the mix should be turned down, not the Master.
The next thing to be aware of in your mixing is using the stereo field. As mentioned, listen carefully to some records you like and you’ll find some sounds off to the sides, others dead center, and others that seem to be spread across the outer sides of both speakers with nothing in the center. To get the best results, listen with headphones (and watch your volume). There are no hard and fast rules about what goes where, but there are some good principles to start with. Plan on leaving kick drum, snare drum, bass, and lead vocals dead center. Then, scan through your mix and look for parts that have similar frequency characteristics—such as two rhythm guitar parts or a hi hat and a shaker—and pan them opposite each other. You can try hard panning them (all the way left and right) or any amount in between. This should open up your mix quite a bit and create a sense that there is more room for all the parts.
A next-level mixing concept is sorting out your mix with regard to the overall frequency content. Simply put, it’s scanning your mix from the lowest frequencies to the highest to make sure all the components of your arrangement are sitting in the mix evenly. No matter how carefully you design or record your sounds, you’ll always do some final tweaking using an equalizer device or plug-in to even things out. Again, the key part here is in critical listening and decision-making. You’ll hear songs where the snare is a big splat with lots of low midrange and others where it’s papery and high pitched. Some guitars are jangly and sit in the high midrange frequencies, while others are meaty and distorted with a lot of low end.
Even though there’s no magical solution to EQ or one end-all-be-all approach, there are two basic principles everyone should know:
It’s important to understand that low frequencies are extremely unforgiving. They consume a lot of headroom in your mix and can get muddy and indistinct when layered. Therefore, one of the easiest things you can do to create more clarity in your mix is to remove low frequencies wherever possible. You can mostly leave your bass and kick-drum parts alone, as they’re supposed to have a lot of low end. But guitars, synth leads, and other drum sounds generally have some low-frequency content that can be removed to trim the low-frequency fat, so to speak.
Resist the urge to extensively boost frequencies and become a master of cutting instead. Too much boosting can produce harsh, unpleasant-sounding mixes. First learn how to cut out frequencies that sound muddy or harsh or compete with another track in the mix. Once you’ve gotten rid of frequencies that sound bad, you can use some gentle boosting to sweeten the good stuff that’s left.
Good mixes deal in contrasts. Everything we’ve discussed so far is some sort of opposition: left versus right, low versus high, loud versus soft. The final contrasting issue to understand is sounds that are processed with reverbs and delays (wet) against less processed sounds (dry). Reverb and delay are powerful effects that have a huge ability to add a sense of depth and lushness to a mix, but when overused they turn everything into a wash and cause an overall loss of impact.
To get a sense of this, first try setting up your mix with no delay or reverb whatsoever. Then pick one sound and lay it on thick. Try it out on different sounds, one at a time, to get a sense of what the overall effect is on your mix. Once you’ve developed an ear for contrasting dry and wet sounds, you’ll have a much easier time getting your mixes to sound polished and professional.
Looking back at the previous four sections, every one of them can have automation included in the workflow to enhance whatever is going on. It could be recording volume fader movements in a vocal track, where you’re adjusting the level throughout the arrangement to better suit the vocal’s placement in the mix. It could be automating the pan controls of any part of the mix to create motion. Or it could go as far as creating a special effect such as a pickscrape on a guitar running from left to right. When it comes to effects and the parameters you might automate, the possibilities are endless—filter sweeps, delay times, gain controls, and so much more. Be sure to read the previous section on automation (“All About Automation”) to get started on one of the coolest aspects of working with audio in the digital realm.
To get your finely tuned mix out of Live and into a format that allows you to share it with the rest of the world, you’ll have to open the Export Audio/Video window (see Figure 6.38) from the File menu. For quicker access, press the keyboard shortcut—Shift+R (Mac) or Shift+Ctrl (PC). Before you do, be sure Arrangement View is showing. If you invoke this command from Session View, a slightly different version of the Export window will open—one oriented toward exporting loops, which is not our focus here.

Figure 6.38. For your adoring fans to hear what you’ve been cookin’ in your Ableton Live studio, you’ll have to export your production out of Live. That’s done here in the Export Audio/Video window.
Here’s a rundown of the various options offered in the Export Audio/Video window:
Rendered Track. This determines the source of the output file. When creating a final mixdown, leave it set to Master, which means every sound coming through the Master track will be rendered into the exported file. This menu also offers options to render all tracks individually or any single track in the set.
Normalize. This raises the volume of the output file until the loudest peak is exactly 0dB. Leave this off for a standard mixdown.
Render as Loop. This is useful for exporting loops that have delay effects or reverb tails that would be abruptly cut off otherwise. Once more, leave this off for a standard mixdown.
File Type. Select WAV or AIFF. From a sound-quality standpoint, these file types are identical. For broadest cross-platform compatibility, use WAV. If you need to create an MP3, you can’t—at least not with Live. It doesn’t presently offer that option. You’ll need to render out as a WAV or AIFF and then convert in a different program, such as iTunes.
Convert to Mono. This is useful for exporting individual tracks that have only mono content. This is one more option you want to leave off for a standard mixdown.
Sample Rate. If you’re going to have your completed mix mastered professionally, you should leave the sample rate equal to the highest sample rate used in your set. For example, if you’ve been recording at 48,000, then export the mix at 48,000. Otherwise, set this to 41,000 for files that will ultimately be distributed as MP3s or on CD or 48,000 if the files are being used with digital video or DVD.
Bit Depth. Select 16 bit when exporting files destined for CD or MP3. If you’re sending your songs out to be mastered professionally, ask the mastering engineer what bit depth to use.
Dither Options. Dithering is a process used to reduce the audibility of artifacts that occur when reducing bit depth. Live’s internal mixer is 32 bit, so you should use dithering whenever exporting 16-bit files. POW-r 2 is a safe dither mode for most popular music. If you’re not sure, go for triangular. There’s no need to dither when exporting 24- or 32-bit files.
Create Analysis File. Selecting this generates a file with an .asd extension containing tempo and waveform data during the render process. This is useful if the file you’re exporting is going to be imported back into Live. It facilitates quicker read times by Live, making the action that much faster and stable.
To really get a handle on the options laid out for you in the Export Audio/Video window, it’s a good idea to render the same content multiple times with various settings to see what happens and what they sound like. The unglamorous chore of rendering is actually as important as any other part of your production workflow and can make or break the final product. Learn to get it right, and you’ll render good-sounding results every time.
At this point, you have your studio set up and have taken Live for a test drive and then some. With that knowledge in hand, it’s time to learn how to take your studio to the next level with one simple word: accessorize!