
Chapter 4: Forms, File Uploads and Security with Node.js and Express
by Mark Brown
If you’re building a web application, you’re likely to encounter the need to build HTML forms on day one. They’re a big part of the web experience, and they can be complicated.
Typically the form handling process involves:
- displaying an empty HTML form in response to an initial
GETrequest - user submitting the form with data in a
POSTrequest - validation on both the client and the server
- re-displaying the form populated with escaped data and error messages if invalid
- doing something with the sanitized data on the server if it’s all valid
- redirecting the user or showing a success message after data is processed.
Handling form data also comes with extra security considerations.
We’ll go through all of these and explain how to build them with Node.js and Express — the most popular web framework for Node. First, we’ll build a simple contact form where people can send a message and email address securely and then take a look what’s involved in processing file uploads.
Setup
Make sure you’ve got a recent version of Node.js installed; node -v should return 8.9.0 or higher.
Download the starting code from here with git:
git clone https://github.com/sitepoint-editors/node-forms.git
cd node-forms
npm install
npm start
There’s not too much code in there. It’s just a bare-bones Express setup with EJS templates and error handlers:
// server.js
const path = require('path')
const express = require('express')
const layout = require('express-layout')
const routes = require('./routes')
const app = express()

app.set('views', path.join(__dirname, 'views'))
app.set('view engine', 'ejs')

const middleware = [
  layout(),
  express.static(path.join(__dirname, 'public')),
]
app.use(middleware)

app.use('/', routes)

app.use((req, res, next) => {
  res.status(404).send("Sorry can't find that!")
})

app.use((err, req, res, next) => {
  console.error(err.stack)
  res.status(500).send('Something broke!')
})

app.listen(3000, () => {
  console.log(`App running at http://localhost:3000`)
})
The root url / simply renders the index.ejs view.
// routes.js
const express = require('express')
const router = express.Router()

router.get('/', (req, res) => {
  res.render('index')
})

module.exports = router
Displaying the Form
When people make a GET request to /contact, we want to render a new view contact.ejs:
// routes.js
router.get('/contact', (req, res) => {
  res.render('contact')
})
The contact form will let them send us a message and their email address:
<!-- views/contact.ejs -->
<div class="form-header">
  <h2>Send us a message</h2>
</div>
<form method="post" action="/contact" novalidate>
  <div class="form-field">
    <label for="message">Message</label>
    <textarea class="input" id="message" name="message" rows="4" autofocus>
    </textarea>
  </div>
  <div class="form-field">
    <label for="email">Email</label>
    <input class="input" id="email" name="email" type="email" value="" />
  </div>
  <div class="form-actions">
    <button class="btn" type="submit">Send</button>
  </div>
</form>
See what it looks like at http://localhost:3000/contact.
Form Submission
To receive POST values in Express, you first need to include the body-parser middleware, which exposes submitted form values on req.body in your route handlers. Add it to the end of the middlewares array:
// server.js
const bodyParser = require('body-parser')

const middlewares = [
  // ...
  bodyParser.urlencoded()
]
It’s a common convention for forms to POST data back to the same URL as was used in the initial GET request. Let’s do that here and handle POST /contact to process the user input.
Let’s look at the invalid submission first. If invalid, we need to pass back the submitted values to the view so they don’t need to re-enter them along with any error messages we want to display:
router.get('/contact', (req, res) => {
  res.render('contact', {
    data: {},
    errors: {}
  })
})

router.post('/contact', (req, res) => {
  res.render('contact', {
    data: req.body, // { message, email }
    errors: {
      message: {
        msg: 'A message is required'
      },
      email: {
        msg: 'That email doesn‘t look right'
      }
    }
  })
})
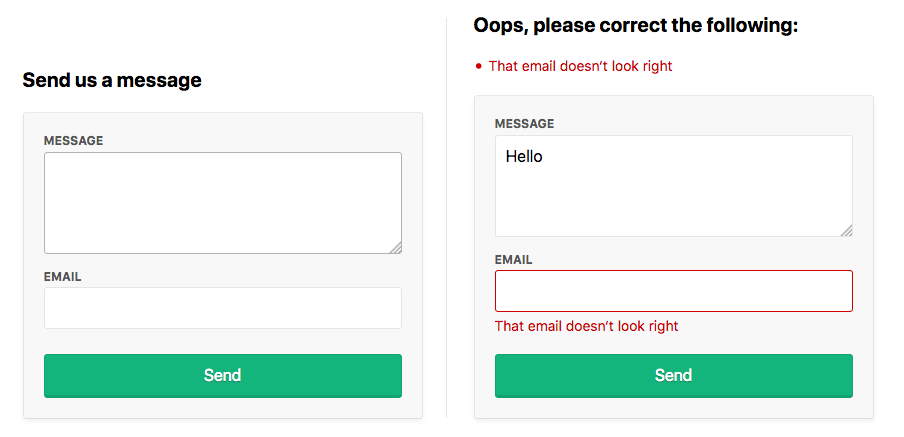
If there are any validation errors, we’ll do the following:
- display the errors at the top of the form
- set the input values to what was submitted to the server
- display inline errors below the inputs
- add a
form-field-invalidclass to the fields with errors.
<!-- views/contact.ejs -->
<div class="form-header">
  <% if (Object.keys(errors).length === 0) { %>
    <h2>Send us a message</h2>
  <% } else { %>
    <h2 class="errors-heading">Oops, please correct the following:</h2>
    <ul class="errors-list">
      <% Object.values(errors).forEach(error => { %>
        <li><%= error.msg %></li>
      <% }) %>
    </ul>
  <% } %>
</div>

<form method="post" action="/contact" novalidate>
  <div class="form-field <%= errors.message ? 'form-field-invalid' : '' %>">
    <label for="message">Message</label>
    <textarea class="input" id="message" name="message" rows="4" autofocus>
    <%= data.message %></textarea>
    <% if (errors.message) { %>
      <div class="error"><%= errors.message.msg %></div>
    <% } %>
  </div>
  <div class="form-field <%= errors.email ? 'form-field-invalid' : '' %>">
    <label for="email">Email</label>
    <input class="input" id="email" name="email" type="email"
    ➥value="<%= data.email %>" />
    <% if (errors.email) { %>
      <div class="error"><%= errors.email.msg %></div>
    <% } %>
  </div>
  <div class="form-actions">
    <button class="btn" type="submit">Send</button>
  </div>
</form>
Submit the form at http://localhost:3000/contact to see this in action. That’s everything we need on the view side.
Validation and Sanitization
There is a handy middleware express-validator for validating and sanitizing data using the validator.js library, let’s include it in our middlewares array:
// server.js
const validator = require('express-validator')

const middlewares = [
  // ...
  validator()
]
Validation
With the validators provided we can easily check that a message and a valid email was provided:
// routes.js
const { check, validationResult } = require('express-validator/check')

router.post('/contact', [
  check('message')
    .isLength({ min: 1 })
    .withMessage('Message is required'),
  check('email')
    .isEmail()
    .withMessage('That email doesn‘t look right')
], (req, res) => {
  const errors = validationResult(req)
  res.render('contact', {
    data: req.body,
    errors: errors.mapped()
  })
})
Sanitization
With the sanitizers provided we can trim whitespace from the start and end of the values, and normalize the email into a consistent pattern. This can help remove duplicate contacts being created by slightly different inputs. For example, ' [email protected]' and '[email protected] ' would both be sanitized into '[email protected]'.
Sanitizers can simply be chained onto the end of the validators:
const { matchedData } = require('express-validator/filter')

router.post('/contact', [
  check('message')
    .isLength({ min: 1 })
    .withMessage('Message is required')
    .trim(),
  check('email')
    .isEmail()
    .withMessage('That email doesn‘t look right')
    .trim()
    .normalizeEmail()
], (req, res) => {
  const errors = validationResult(req)
  res.render('contact', {
    data: req.body,
    errors: errors.mapped()
  })

  const data = matchedData(req)
  console.log('Sanitized:', data)
})
The matchedData function returns the output of the sanitizers on our input.
The Valid Form
If there are errors we need to re-render the view. If not, we need to do something useful with the data and then show that the submission was successful. Typically, the person is redirected to a success page and shown a message.
HTTP is stateless, so you can’t redirect to another page and pass messages along without the help of a session cookie to persist that message between HTTP requests. A “flash message” is the name given to this kind of one-time-only message we want to persist across a redirect and then disappear.
There are three middlewares we need to include to wire this up:
const cookieParser = require('cookie-parser')
const session = require('express-session')
const flash = require('express-flash')

const middlewares = [
  // ...
  cookieParser(),
  session({
    secret: 'super-secret-key',
    key: 'super-secret-cookie',
    resave: false,
    saveUninitialized: false,
    cookie: { maxAge: 60000 }
  }),
  flash()
]
The express-flash middleware adds req.flash(type, message) which we can use in our route handlers:
// routes
router.post('/contact', [
  // validation ...
], (req, res) => {
  const errors = validationResult(req)
  if (!errors.isEmpty()) {
    return res.render('contact', {
      data: req.body,
      errors: errors.mapped()
    })
  }

  const data = matchedData(req)
  console.log('Sanitized: ', data)
  // Homework: send sanitized data in an email or persist in a db

  req.flash('success', 'Thanks for the message! I‘ll be in touch :)')
  res.redirect('/')
})
The express-flash middleware adds messages to req.locals which all views have access to:
<!-- views/index.ejs -->
<% if (messages.success) { %>
  <div class="flash flash-success"><%= messages.success %></div>
<% } %>

<h1>Working With Forms in Node.js</h1>
You should now be redirected to index view and see a success message when the form is submitted with valid data. Huzzah! We can now deploy this to production and be sent messages by the prince of Nigeria.
Security considerations
If you’re working with forms and sessions on the Internet, you need to be aware of common security holes in web applications. The best security advice I’ve been given is “Never trust the client!”
TLS over HTTPS
Always use TLS encryption over https:// when working with forms so that the submitted data is encrypted when it’s sent across the Internet. If you send form data over http://, it’s sent in plain text and can be visible to anyone eavesdropping on those packets as they journey across the Internet.
Wear Your Helmet
There’s a neat little middleware called helmet that adds some security from HTTP headers. It’s best to include right at the top of your middlewares and is super easy to include:
// server.js
const helmet = require('helmet')

middlewares = [
  helmet()
  // ...
]
Cross-site Request Forgery (CSRF)
You can protect yourself against cross-site request forgery by generating a unique token when the user is presented with a form and then validating that token before the POST data is processed. There’s a middleware to help you out here as well:
// server.js
const csrf = require('csurf')

middlewares = [
  // ...
  csrf({ cookie: true })
]
In the GET request we generate a token:
// routes.js
router.get('/contact', (req, res) => {
  res.render('contact', {
    data: {},
    errors: {},
    csrfToken: req.csrfToken()
  })
})
And also in the validation errors response:
router.post('/contact', [
  // validations ...
], (req, res) => {
  const errors = validationResult(req)
  if (!errors.isEmpty()) {
    return res.render('contact', {
      data: req.body,
      errors: errors.mapped(),
      csrfToken: req.csrfToken()
    })
  }

  // ...
})
Then we just need include the token in a hidden input:
<!-- view/contact.ejs -->
<form method="post" action="/contact" novalidate>
  <input type="hidden" name="_csrf" value="<%= csrfToken %>">
  <!-- ... -->
</form>
That’s all that’s required.
We don’t need to modify our POST request handler as all POST requests will now require a valid token by the csurf middleware. If a valid CSRF token isn’t provided, a ForbiddenError error will be thrown, which can be handled by the error handler defined at the end of server.js.
You can test this out yourself by editing or removing the token from the form with your browser’s developer tools and submitting.
Cross-site Scripting (XSS)
You need to take care when displaying user-submitted data in an HTML view as it can open you up to cross-site scripting(XSS). All template languages provide different methods for outputting values. The EJS <%= value %> outputs the HTML escaped value to protect you from XSS, whereas <%- value %> outputs a raw string.
Always use the escaped output <%= value %> when dealing with user submitted values. Only use raw outputs when you’re sure that’s is safe to do so.
File Uploads
Uploading files in HTML forms is a special case that requires an encoding type of "multipart/form-data". See MDN’s guide to sending form data for more detail about what happens with multipart form submissions.
You’ll need additional middleware to handle multipart uploads. There’s an Express package named multer that we’ll use here:
// routes.js
const multer = require('multer')
const upload = multer({ storage: multer.memoryStorage() })

router.post('/contact', upload.single('photo'), [
  // validation ...
], (req, res) => {
  // error handling ...

  if (req.file) {
    console.log('Uploaded: ', req.file)
    // Homework: Upload file to S3
  }

  req.flash('success', 'Thanks for the message! I’ll be in touch :)')
  res.redirect('/')
})
This code instructs multer to upload the file in the “photo” field into memory and exposes the File object in req.file which we can inspect or process further.
The last thing we need is to add the enctype attribute and our file input:
<form method="post" action="/contact?_csrf=<%= csrfToken %>"
        ➥novalidate enctype="multipart/form-data">
  <input type="hidden" name="_csrf" value="<%= csrfToken %>">
  <div class="form-field <%= errors.message ? 'form-field-invalid' : '' %>">
    <label for="message">Message</label>
    <textarea class="input" id="message" name="message" rows="4" autofocus><%=
    ➥data.message %></textarea>
    <% if (errors.message) { %>
      <div class="error"><%= errors.message.msg %></div>
    <% } %>
  </div>
  <div class="form-field <%= errors.email ? 'form-field-invalid' : '' %>">
    <label for="email">Email</label>
    <input class="input" id="email" name="email" type="email" value="<%=
    ➥data.email %>" />
    <% if (errors.email) { %>
      <div class="error"><%= errors.email.msg %></div>
    <% } %>
  </div>
  <div class="form-field">
    <label for="photo">Photo</label>
    <input class="input" id="photo" name="photo" type="file" />
  </div>
  <div class="form-actions">
    <button class="btn" type="submit">Send</button>
  </div>
</form>
Unfortunately, we also needed to include _csrf as a GET param so that the csurf middleware plays ball and doesn’t lose track of our token during multipart submissions.
Try uploading a file, you should see the File objects logged in the console.
Populating File Inputs
In case of validation errors, we can’t re-populate file inputs like we did for the text inputs. A common approach to solving this problem involves these steps:
- uploading the file to a temporary location on the server
- showing a thumbnail and filename of the attached file
- adding JavaScript to the form to allow people to remove the selected file or upload a new one
- moving the file to a permanent location when everything is valid.
Because of the additional complexities of working with multipart and file uploads, they’re often kept in separate forms.
Thanks For Reading
I hope you enjoyed learning about HTML forms and how to work with them in Express and Node.js. Here’s a quick recap of what we’ve covered:
- displaying an empty Form in response to a GET request
- processing the submitted POST data
- displaying a list of errors, inline errors and submitted data
- checking submitted data with validators
- cleaning up submitted data with sanitizers
- passing messages across redirects with a flash message
- protecting yourself against attacks like CSRF and XSS
- processing file uploads in multipart form submissions.