
There are various types of Content Management Systems (CMS) which are widely used for building and managing a website. Although Zen Cart is very good for running an online shop, it cannot be used for building a company website. Your organization may have a website running a CMS, and as you are going to open an online shop, you may need to integrate Zen Cart with that existing CMS.
In this chapter, you will learn:
In which cases you can integrate Zen Cart with a CMS
What you need to consider before integration
What the basic principles of integration are
How to integrate Zen Cart with popular CMSs
This chapter will give you the conceptual and practical know-how required to integrate Zen Cart with other CMS.
Every CMS has its own merits. If you consider the features of other CMSs, you will find a particular one that you like the most. After having tested so many CMSs you may be interested in getting all the best features of your favorite one. In spite of this, you may also need to add shop functionality to your existing website, or you may need more than a shop. You may be tempted to use the best CMS in order to have a better website and may want to start an online shop later. In these cases, you need to use both Zen Cart and a CMS.
The general principles of integrating web-applications are as follows:
Seamless integration: The Integration of any two CMSs should be such that users see it as a single application. Both applications' look and feel and workings should be integrated to give this impression to the users.
Data integrity: Data of both applications should be synchronized instantly. For example, when a user registers at a Zen Cart shop, the same user should be created or replicated to the other CMS. Attempts to synchronize databases by running periodic updates such as cron or scheduler applications should be avoided.
Integration codes should be as simple as possible: For all integration attempts, code should be minimized. This will help maintain the code as well as develop the integration quickly.
No forking: All the applications should maintain their own code and should support their own upgrade path. The core files for the applications should not be modified. Instead, attempts should be made to develop some plug-ins for which code will be maintained separately.
The following sections illustrate some scenarios where you may need to integrate Zen Cart with a CMS.
You may have been running a website for a long time and now you may want to sell products from this site. As you want to sell products directly from your site, you may think of adding Zen Cart.
In real life, it is most likely that your organization will establish a website first, to prove its online presence. When the website becomes popular and your organization observes the benefits of the website, it may be tempted to start an online shop. If the website has been established for a long time, it becomes branded for your company. Switching over from that site may become harder due to various other reasons. Now, you may want to start the online shop and integrate that shop with the existing site with a similar look and feel.
Zen Cart or osCommerce is well suited for running an online shop. But in some cases, you may want to establish a site which is more than a shop. Suppose that you are producing e-books and selling those in a Zen Cart shop. Now you think that adding a blog will be appropriate as authors will be able to write articles on their favorite topics, and these articles will add value to the e-books you publish.
In that case, keeping the online shop intact, you have to establish a blog. From your experience, you know that WordPress is feature-rich and will meet your expectations. Now the challenge is to integrate Zen Cart with WordPress. You have to integrate these two so that customers think that the blog and the shop are the same site—it is crucial for your web branding.
One of the benefits of integrating one or more CMS or shopping carts is a single sign-in facility. A single sign-in provides users with the benefit of having logged into one CMS and use the other CMS without logging in again. If we integrate Zen Cart with some other CMS, it may happen that logging in into either Zen Cart or the CMS will allow you to use both Zen Cart and that CMS. You may want to integrate both Zen Cart and the existing CMS to give a single sign-in facility to your visitors.
While attempting integration of one CMS with another, some simple principles should be remembered. For all integration attempts, you have to consider the following aspects:
Master—slave relationship: While integrating one CMS with the other, one of the applications act as the master and the other as the slave. If you integrate application A to application B, then application B will be considered as master. Master applications maintain authentication and sessions for both applications. While integrating Zen Cart with some other CMS, first consider whether Zen Cart will be the master or the slave. If you are integrating Zen Cart with an existing website, Zen Cart is going to be the slave. On the other hand, when you are adding blogging functionality to the Zen Cart shop by integrating WordPress with Zen Cart, Zen Cart is going to be the master.
User and Group Management: One purpose of integrating two CMSs is to have a common user and group management system. Zen Cart integration may be tight, where both Zen Cart and an other CMS will use the same database for user and group management. On the other hand, loose integration will allow periodic or event-based synchronization of user or group databases. Tight integration becomes easier when both CMSs use the same type of user database. If the user databases are very different from each other, then tight integration may not be possible and some sort of fallback solution such as synchronizing the databases may be used.
Visual integration: Users see the integration only through the visual integration. In fact, visual integration should be such that users will be unaware of integration attempt. While integrating the two CMSs, the visual template of the master should preferably be used for both CMSs. However, using a master's template system is difficult and a central template system should be developed which can be used for both applications.
Now, we will see how to integrate Zen Cart with other CMSs. You will notice that at least one of the above-mentioned aspects is present in such integrations.
If you are using Joomla!/Mambo and want e-commerce functionality, you have a number of choices. Among these, the best one is using the VirtueMart component. The VirtueMart component for Joomla!/Mambo is quite similar to Zen Cart or osCommerce. Only a few features of Zen Cart or osCommerce are missing in VirtueMart. However, if you still want to integrate Zen Cart into the existing Joomla!/Mambo website, you have two options—and neither is easier than the other: Use Zen Cart as a wrapper or, develop a component based on Zen Cart.
Using Zen Cart as a wrapper is in its true sense not an integration. It runs separately and Joomla! provides a menu link. Clicking on this link will show Zen Cart in a wrapper window. If you are experienced with Joomla! or Mambo, you can figure out how a menu item can be added to show the application in a wrapper. However, adding a wrapper may appear to be an integration if you modify the Zen Cart template accordingly. As the Zen Cart shop appears in the wrapper, it would be wise not to use headers and sidebars in the Zen Cart template. Links to the categories and other menus can be provided in the headers. A separate login mechanism should also be provided in the Zen Cart template.
Note
Developing a bridge for Zen Cart and Joomla! is a hot topic in the Zen Cart forum. Users of both Joomla! and Zen Cart agree that integration or bridging of these two will be of great value. However, due to the framework of these two systems, developing such a bridge has some complexities and takes some time. Recently, a discussion on this topic has led to the development of such a bridge by the open-source enthusiasts. Please watch the following thread: http://tinyurl.com/65ypyu.
Another possibility is JFusion plug-in for Joomla! (available at www.jfusion.org) which is a framework for integrating several forums to Joomla!. The developer of JFusion has proposed developing such a plug-in for Zen Cart as well. It is hoped that JFusion will be able to integrate Zen Cart to Joomla! soon.
Drupal is a powerful CMS and is widely used. There are a wide range of modules available for Drupal and it is used for different types of websites. There are a great number of Drupal users who want to integrate Drupal and Zen Cart—as both are considered useful in their category. Until recently, there was no easy way to integrate Drupal and Zen Cart. Very recently, Zen Cart Integration module has been released as a development version. For now, it works on Drupal 5.x and Zen Cart 1.3.7. Once this module is installed and configured, you can create Zen Cart categories and products from Drupal. As other nodes, these products and categories will be displayed as nodes in Drupal. When visitors click on these products they see product details as a Drupal node, but when the product is added to cart, it redirects to the Zen Cart shop. This module also provides a single sign-on facility.
For integrating Zen Cart into Drupal, download the module from http://drupal.org/project/zencart. Before we proceed with the integration of Drupal and Zen Cart, assume that you have installed Drupal and Zen Cart on the same server. Let us suppose, Drupal is installed in e:wwwdrupal57 directory and Zen Cart 1.3.7 is in e:wwwzc directory, and these two uses separate database on the same MySQL server.
Follow these steps:
Download and unzip Zen Cart integration module: For integrating Zen Cart into Drupal, download the module from http://drupal.org/project/zencart. On your computer, unzip the
zencart-5.x-1.x-dev.tar.gzpackage. You will get a folder namedzencart, under which there are some files and a subfolder namedzencart.Copy files for Zen Cart: Inside the
zencartsubfolder you will find theincludesfolder. Copy this subfolder, that is/zencart/includes, to your Zen Cart installation directory, that ise:wwwzc. This will overwrite thee:wwwzcincludesdirectory, but will not overwrite any files. Once you have copied all the files in this folder, you are finished with Zen Cart.Install Zen Cart installation module in Drupal: Copy the
zencartdirectory with all the files inside it, except thezencartsubfolder, to Drupal's installation directory, that ise:wwwdrupal57. As an administrator in Drupal, you can install this module from Drupal's Administer | Site Building | Modules section. In the module list you will see the Zen Cart Integration module group. You will find the following modules in this group:Zencart—This is the main module for integrating Zen Cart shopping cart to Drupal. This is required by other modules in this group.
Zencart Catalog—This module allows creation of Drupal nodes for Zen Cart products and categories.
Zencart Category Node Hierarchy—This module depends on the Node Hierarchy module and organizes Zen Cart products and categories. Download the Node Hirarchy module from http://drupal.org/project/nodehierarchy and install it before enabling this module.
To enable these modules, select checkboxes in Enabled column and click Save configuration button at the bottom of the list.

Configure Zencart Integration module in Drupal: After enabling the modules, you can configure those from Administer | Site Configuration | Zencart Integration screen.
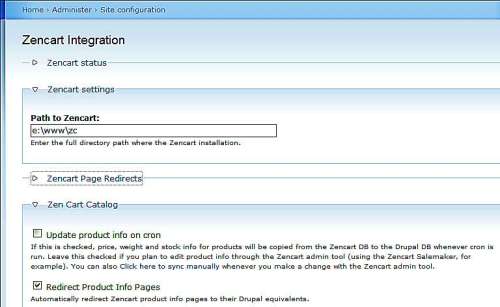
The Zencart Integration screen has the following sections:
The Zen Cart Status section will provide you information about your Zen Cart installation. The module will search and find the Zen Cart installation and show its version, path to Drupal installation and other information.
The Zen Cart Settings section will give you the opportunity to mention the Zen Cart installation directory path. Type it into the Path to Zencart field.
The Zen Cart Page Redirects section allows you to configure page redirects from the Zen Cart page to Drupal node.
Zen Cart Catalog section allows you to configure redirect from the Zen Cart catalog items to Drupal. While using this integration module, you create Zen Cart catalog and products from Drupal. If you want to create these categories and products from inside Zen Cart and synchronize those with Drupal, then check Update product info on cron. This will synchronize product information both on Drupal and Zen Cart by running cron command on linux/unix. Checking Redirect Product Info Pages will automatically redirect visitors from the Zen Cart product info pages to equivalent Drupal nodes. Similarly, checking Redirect Category Listing Pages will automatically redirect visitors from the Zen Cart category pages to equivalent Drupal nodes.
The Zen Cart Users section allows you to configure single sign-on options for Drupal and Zen Cart. If you want to allow Zen Cart existing customers to login to Drupal, then check the Allow Zen Cart Customers to login to Drupal checkbox. On the other hand, if you want to allow Drupal users to login to Zen Cart as customers, check Allow Drupal Users Customers to login to Zen Cart as Customers. Checking Allow Single Sign-On will allow users to login once and access both Drupal and Zen Cart.
Once you have configured these options, click the Save configuration button, or revert to defaults by clicking the Reset to defaults button.
Create Content Type in Drupal for Zen Cart categories and products: If you have ever used Drupal, you know how to create content types in Drupal. You can add new content type from Administer | Content Management | Content types | Add content type. Now you will get a Zen Cart Catalog group. From this section you can define whether this type will be used as a Zen Cart product or category. You can also configure node hierarchy—ability to be parent or child (default is parent). In the Identification section, type a human readable name, for example Zen Cart Product, in the Name field. Then type a machine readable name of this content type, for example zc_product, in the Type field. Provide a description of this content type in the Description field.
In the Submission Form section, provide a label for the title and body field, minimum number of words, and explanation or submission guidelines. Configure default options in the Workflow section. Finally, click the Save content type button.
Create two content types—one for the Zen Cart category and another for the Zen Cart product.
Add Category and Product in Drupal: You can create categories and products from Create Content section. In the list, click on Zen Cart Category. This will open Submit Zen Cart Category form. In this form, type the category name in Title field, type a description of this category in Body field. In the Node Hierarchy section, you can select a parent category. Check Category is Active to make this category visible. Configure other options like Menu settings, URL path settings, Publishing options, and so on and click the Submit button to create the category.
Similarly, you can create Zen Cart products by clicking on the Zen Cart Product content type. This will display the Submit Zen Cart Product form.
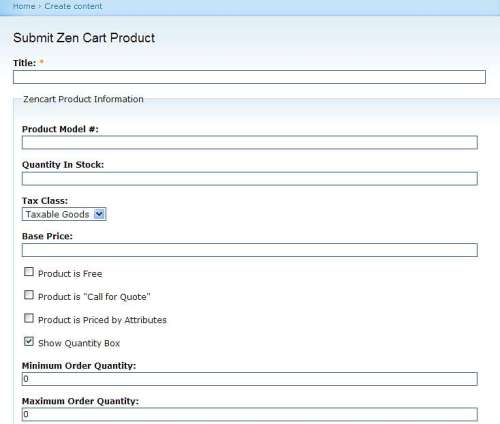
Fill in the Submit Zen Cart Product form with appropriate information, such as product name, model, quantity in stock, tax class, base price, and so on. You can select its parent category in the Node Hierarchy section. Check the Create Menu option to make a menu item for this product. Configure other options like Menu settings, URL path settings, Publishing options, and so on and click the Submit button to create the product.
Test Zen Cart Integration to and from Drupal: Now it is time to test whether the Drupal-Zen Cart integration is working or not. First, go to your Zen Cart shop, for example,
http://localhost/zc. There you will find the categories and products you have added. Click on any of these, and you will be redirected to the respective Drupal node. Again, in the Drupal, click on a product link, type a quantity and click the Add to Cart button. That will redirect you to the Zen Cart shop's Your Shopping Cart Contents page.
Similarly you can test single sign-on features by signing in to either Drupal or Zen Cart and trying to purchase items from these two shops.
Gallery2 is a web-based software product that lets you manage photos on your own website. It creates a catalog of photos which visitors can view as thumbnails as well as in its original size. It has an intuitive interface to create and maintain albums. It can create thumbnails automatically and can be used for image resizing, rotation, ordering, captioning, searching, and some other functions.
You can use Gallery2 to build a community site for sharing photos. You can create the community using Gallery2 and registered users can share their photographs by uploading their own photos.
You need to integrate Gallery2 with Zen Cart if you want to sell photos from your photo gallery. Gallery2 has a great mechanism to integrate with Zen Cart. The Gallery2/Zen Cart integration module is available at the Gallery2 download site http://dakanji.com/g2stuff/zcg2-3_2_1a-full.zip. Using it, users can organize their photos and other multimedia files into Gallery2, and offer them for sale through Zen Cart.
In integrating Gallery2 with Zen Cart, you have to configure Zen Cart first. Follow these steps for Zen Cart:
Download the Gallery2/Zen Cart Integration module and extract it.
Copy the
zencart/includesfolder into your Zen Cart installation directory. This directory contains some templates for Zen Cart. Copying these files will not overwrite any existing file.Login to your Zen Cart administration panel and create a new product category, such as Photographs. Photo items from Gallery2 will go to this category.
Select Tools | Template Selection and choose one of the Gallery2 Integration templates provided. You can take a copy of the template folder
(../includes/templates/pgxxx)and modifystylesheet.css. You can modify these templates as described in Chapter 4, Customizing Look and Feel.Edit
../includes/languages/pgxxx/english.phpif you want to change language strings or date formats.Replace
../includes/templates/pgxxx/images/logo.gifwith your site's logo.
Remember that for Gallery2/Zen Cart integration, both Zen Cart and Gallery2 data tables need to be in one database.
In Gallery2, you need to make the following changes:
Upload the module files in the
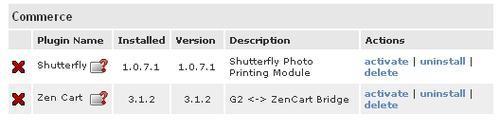
gallery2/directory to your Gallery2 installation's modules directory.In Gallery2 Site Administration, click on Plugins and find Zen Cart under the Commerce heading. Then click Install.

After Installation, click Configure.
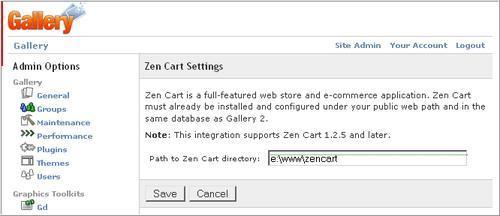
Enter the entire server path to your Zen Cart installation, for example,
/home/your_name/public_html/zencart/.Select the category you created in Zen Cart earlier (for example Photographs)from the drop-down menu.

Click activate next to the Zen Cart listing on the module page.
Refresh the page and click on the Zen Cart link under Admin Options to edit product details.
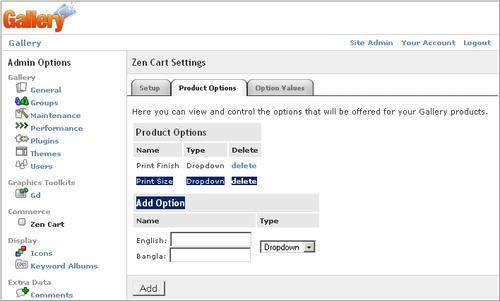
Edit permissions for the individual items as you wish. The module will have assigned permissions to non-album items on activation.
If you do not want to sell an item, you will need to disable that item in Zen Cart as the module adds all data items in your gallery to Zen Cart.
You can add photograph items from Gallery2. Adding any item to the Gallery2 album will simply show that item in Zen Cart. You can add product options from Gallery2 by clicking on the Zen Cart link in your Gallery2 site administration menu.
When you have installed the Gallery2/Zen Cart bridge, you will find a product type in Zen cart named Product-Gallery. All the items from Gallery2 need to be of this type. If you edit any item from Zen Cart and change the product type of any Gallery2 item, the link with the Gallery2 will be broken. Also, note that the Gallery2 bridge will co-exist with Zen Cart image handler and lightbox add-on for Zen Cart. These will handle product images for Zen Cart, whereas Gallery2 add-on only handles images added in Gallery2.
Note
You cannot assign the Main category in Zen Cart as the root product category for Gallery2. The category you are selecting in the Gallery2 bridge configuration must be a sub-category product.
Once the configurations are done, you can see the photographs from Zen Cart. Visitors can also order photographs from Zen Cart. While you are in Gallery2, you can also place an order by clicking the add to cart link, which is redirected to Zen Cart.
WordPress is an extremely powerful and widely used open-source blogging platform. It has a wide community of developers and users, and almost all kinds of plugins are available for it. Although there are some shopping cart plugins for WordPress, they are not full-blown shopping carts like Zen Cart or osCommerce. E-commerce plug-ins available for WordPress have limited features.
Those who are running blogs using WordPress may want to integrate it with Zen Cart to provide e-commerce functionality to their blogs. In fact, there is a Zen Cart module for integrating these two. You can download that module from www.zen-cart.com.
After downloading the plug-in WordPress on Zen Cart, you have to install it on the webserver. You can install the plug-in in two ways: first, in an environment where you have a working WordPress installation, and second, when you have not installed WordPress.
When you have an existing installation of WordPress, generally it will be in a separate directory from that of the Zen Cart installation. If your web document root directory is public_html, then the installation directories may be: /public_html/blog and /public_html/shop. Follow these procedures to install WordPress on Zen Cart plug-in:
If you have not installed WordPress yet, then download the WordPress files from www.wordpress.org and unzip the files. Then, upload the files to your webserver's /public_html/blog directory. Now, change the permission of this directory to 777 and point your browser to http://yourdomain.com/blog/wp-admin/ setup-config.php. The installation wizard for WordPress will be displayed. Follow the instructions on the wizard and give the necessary information. Once all of the information is given, WordPress will be installed.
During installation, an administrative account will be created. Note the username and password for this account. Then, point your browser to http://yourdomain.com/blog/wp-admin/. The login page will be displayed. Type the username and password for the administrative account and click on the Login button.
You will see the dashboard for administering WordPress. Go to Options | General. Now, change the Blog Address (URL) to Zen Cart's URL http://yourdomain.com/shop/. From the administration dashboard, go to Presentation | Themes and select WordPress Default 1.6.
When you unzip the WordPress on Zen Cart plug-in zip file, you will find that there is a directory called ZC_ROOT and WP_ROOT. Now, upload the contents of ZC_ROOT directory to Zen Cart's installation path on the server, that is, /public_html/shop/. Similarly, upload the contents of the WP_ROOT directory to WordPress' installation path, that is, /public_html/blog. Before uploading the contents of the ZC_ROOT directory, please change the name of the /ZC_ROOT/includes/templates/MY_TEMP/ directory to that of the template directory you are using for your Zen Cart shop.
For older versions of WordPress, you may need to edit the /wp-include/template-loader.php file. Open the file in a text editor and replace all exit; with return;. However, you may not need this for the newer versions of WordPress. WordPress 2.3.1 can work without this modification. First, try without this modification.
You also need to edit another file in the Zen Cart installation. Open the /includes/extra_configures/wordpress-config.php file under the Zen Cart installation folder and find the following line:
define ('ABSPATH','/var/www/vhost/example.com/public_html/blog/'),
Type the appropriate WordPress path, that is, /home/username/public_html/blog/. The above line will look like this:
define ('ABSPATH','/home/suhreed/public_html/blog/'),
If you are trying it on Windows, you may need to put the absolute path, as in, e:/www/blog.
Once the file modifications have been done, login to the Zen Cart administration panel. Go to Tools | Layout Boxes Controller. The screen will notify you that some new sideboxes—wp_cats.php, wp_archives.php, wp_pages.php, wp_links.php, and wp_sidebar.php—have been found. To use these sidebars, click on the reset button at the bottom. To show these sideboxes on your Zen Cart shop, click on the sidebar and change its left/right column status.
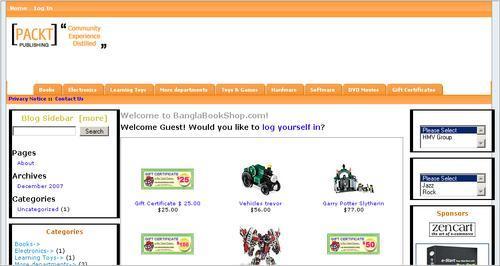
Now, it's your time to see how the Zen Cart and WordPress integration works. Point your browser to your Zen Cart shop, that is, http://yourdomain.com/shop/. If everything is ok, you will find the screen as shown in the following screenshot:
If the ABSPATH value in wordpress-config.php file is not entered appropriately, you will get a message saying that wp-config.php file in a particular path is not found. In that case, edit the wordpress-config.php file and enter the correct path to the WordPress installation.
Note that a left sidebox named Blog Sidebar is shown in your Zen Cart shop. You will find links to pages in the blog, links to archives, and links to categories. Click on a link and that category, archive or page will be displayed.
You may be disappointed when you look at the result because the whole WordPress page with headers, footers, and sidebars is displayed. If you have some knowledge of customizing WordPress themes, you can work out a nice solution by removing the header, the footer, and the sidebar from the theme layout.
Note
For learning WordPress theming, check the excellent tutorials at www.wordpress.org. You can also read WordPress Themes, published by Packt.

You can also install WordPress and Zen Cart in the same directory. In such a case, install Zen Cart first. Configure it for normal use, and then proceed with the installation of WordPress. For example, if your Zen Cart installation is in /public_html/shop/, then WordPress will also be installed at /public_html/shop/. First, download the WordPress installation package, unzip it, and upload all files, except index.php.
After uploading the files to the Zen Cart directory, i.e. /public_html/blog/, change the access permission of these to 777. Now, point your browser to http://yourdomain.com/shop/wp-admin/setup-config.php. The installation wizard for WordPress will be displayed. Follow the instructions of the wizard and provide the necessary information. Once all information is made available, WordPress will be installed.
Now, follow Steps 2 to 7 as described in the previous section. In this case, the paths to Zen Cart and WordPress will be same.
XOOPS is a CMS written in PHP. It uses a modular architecture allowing users to customize, update, and theme their websites. XOOPS is an acronym of eXtensible Object Oriented Portal System. It aims to serve as a web framework for use by small, medium, and large sites through the installation of modules. For example, a small XOOPS installation can be used as a personal weblog or journal, but this can be expanded upon and customized. For example, users might add the appropriate modules (freeware and commercial) to store content in news, forums, downloads, and more.
If you have a XOOPS-based website and want to add e-commerce functionality to that website, you can use Zen Cart with XOOPS. There is a Zen Cart XOOPS Integration module which can be used to integrate Zen Cart with XOOPS.
After downloading the module, upload the files to your XOOPS installation directory. Then, install it as a normal module for XOOPS. Ensure that the Use custom session value in Preferences | System | General Settings is on.
You need to change the permissions of some files and folders. CHMOD the following folders to 777:
shop/imagesshop/images/bannersshop/images/categories/shop/images/uploadsshop/blocks/cache/englishshop/blocks/cache/additional_language
The default admin URL for the Zen Cart shop will be shop/admin with username and password admin.
XOOPS Zen Cart has a built-in Zen Cart installation. Zen Cart files are included with this module and are installed as a module of XOOPS. This module has the following features:
It integrates the languages of both XOOPS and Zen Cart. When selecting a language at the XOOPS site, Zen Cart's language is also changed. However, the same language needs to be installed in both XOOPS and Zen Cart. Extra language packs for Zen Cart can be downloaded from www.zen-cart.com.
It also integrates the XOOPS theme with Zen Cart. The template applied to XOOPS site also applies to the Zen Cart shop. You can use the template variable
$isshopto determine if the module is currently open through your theme.It also integrates blocks. You can select all the static sideboxes of Zen Cart which can be seen through the Zen Cart blocks. Once the blocks are assigned to show in Zen Cart blocks, these must be rebuilt in the Zen Cart XOOPS administration panel through Tools | Layout Boxes Controller.
This module is based on Zen Cart v.1.2.7d and supports the feature of Zen Cart v.1.2.7d.
e017 is a comparatively new CMS with lots of features, and ease of use. It has hundreds of plug-ins through which you can extend its capability. You will find a plug-in to bridge with Zen Cart too. Bridging through this plug-in is easier for the layperson.
This plug-in is available at: http://plugins.e107.org/e107_plugins/psilo/psilo.php?artifact.178. Download it, unzip it and copy the zencart_bridge folder in your e107 installations e107_plugins folder. Then, install the plug-in from the administration panel's Plugins | Plugin Manager. You will see the list of installed and available plug-ins. Click on the Install button beside the ZenCart Bridge plug-in. It will be installed without any prompt.

Once the Zen Cart bridge is installed, you will see the list of installed plug-ins in the main administration panel. You can also access configuration options by selecting Plugins | ZenCart Bridge. You have to configure the following options:
Try to create ZenCart user account on e107 signup event: Selecting Yes will create a Zen Cart user account when a user registers on e107 CMS.
Try to update existent ZenCart user account when found on e107 signup event: Select Yes if you want to update the existing user account in Zen Cart when a user registers with the same name in e107. For example, suppose that a user registers with the name 'borhan' in e107, and Zen Cart has an account named 'borhan'. Zen Cart bridge will update user 'borhan' in Zen Cart. If the password chosen for e107 user is different from that of the Zen Cart user password, the password in Zen Cart will be changed for that user.
Try to update existing ZenCart user account on e107 profile update event (Zen Cart password will be synchronized only if the user changes his or her e107 password): Select Yes if you want to update the Zen Cart user profile from e107. Whenever a user in e107 changes profile information, including password, the user profile at Zen Cart will also be changed.
Go online—Try to synchronize e107 and ZenCart user sessions on e107 login/logout events: Select Yes if you want to keep e107 and Zen Cart user databases synchronized always. Selecting Yes in this field will automatically synchronize user accounts when the user logs in or logs out from e107.
Synchronize e107 site admins as well: Selecting Yes for this option will also synchronize administrative accounts in e107 with Zen Cart. If you want the administrators to be the same for both e107 and Zen Cart, select Yes in this field.
Gender: This field indicates what will be the default value for the Salutation field in Zen Cart while synchronizing the accounts between e107 and Zen Cart. If the account in e107 does not have a gender indication, this default value will be used.
Disable ZenCart Newsletter (no matter the user's choice): Both e107 and Zen Cart have newsletters. While registering, you may decide to use only e107 newsletters. Selecting Yes in this field will disable Zen Cart newsletters for the user accounts. Select Yes only when you use e107 newsletter for advertising your products.
Default value for missing Extended User fields: If your e107 users have extended fields, specify the defaults for those.
The main configuration for bridging e107 and Zen Cart is configuring the database options. However, it is also automated, and can be used easily. You can configure the Zen Cart database connection from Plugins | ZenCart Bridge | ZenCart Connection.
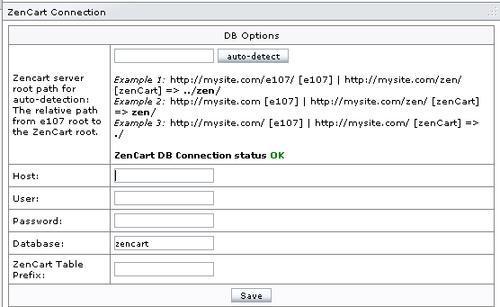
The following are the options for the database configuration:
ZenCart server root path for auto-detection: You can use auto detection for Zen Cart database connection settings by mentioning the Zen Cart installation path. For example, if your Zen Cart installation is in the
/shopdirectory of your webserver root, then you have to type http://yourserver.com/shop/ in this field. Then, click the autodetect button. It will locate theconfiguration.phpfile and read the database connection information from this file. Once it is detected, you are done.Host: If auto-detection does not work, type the database host name, for example, localhost, in this field.
User: Type the database username in this field. This username will be used to connect to the database. So, make sure that this user has permission to do so.
Password: Type the password used for the above user account.
Database: Type the name of the database. If you are using cPanel and a shared Linux server, remember that the database names are prefixed with usernames. For example, if you have an account named bob, the database will be named bob_zencart.
ZenCart Table Prefix: Your Zen Cart tables may use a prefix. If so, type the prefix in this field. Generally, for separate databases, table prefixes are not used. But when you are using the same database for separate CMSs, table prefixes, such as
zen_are used.
The Zen Cart Bridge works well with e107. However, it acts only as bridge. Using e107, users can also login and purchase products from the Zen Cart shop. This kind of bridge is good when you have kept the shop as a linked site with the e107 site.
phpBB is a bulletin board service for creating communities of common interest. This is widely used on the Internet, and I hope you have seen one or two by this time. You can integrate a phpBB bulletin board service with a Zen Cart shop. This can be done while you are installing Zen Cart.
If you want the forum or bulletin board service, download and install phpBB. You can download phpBB2 or phpBB3 from www.phpbb.com/downloads/. Install phpBB on the same server. Then, start installing Zen Cart. There will be a step asking you whether you want to integrate phpBB or not. Choose Yes in this screen, and then specify the phpBB directory path. This way, phpBB will be integrated to Zen Cart during installation.
If you do not integrate phpBB during the Zen Cart installation, you can do it at a later stage. Whenever you think that you need to add a forum to your shop, just install the phpBB forum and follow these instructions to integrate it with the Zen Cart shop.
Install phpBB and test whether it works properly. For ease of configuration, it is recommended that you install phpBB to the root of your server, perhaps like this: http://mysite.com/forums or http://mysite.com/phpbb.
Edit the
/includes/configure.phpfile for Zen Cart and enter the path to your phpBB folder on this line:define('DIR_WS_PHPBB', '/phpBB2/'),It needs to be the full exact path to your forum folder, including the
/var/www/client/public_html/(or whatever it is on your server). Look at your DIR_FS_CATALOG for a hint, and then adjust by adding your phpBB or forum to that. Or it may be in a different folder. If it is in different folder, you can just mention../phpBB2/, or something similar. Remember to include the '/' at the end.In Zen Cart's Admin area, go to Configuration | My Store, and set Enable phpBB Linkage? to True. Now, any new user created will be asked to select a forum username during signup.
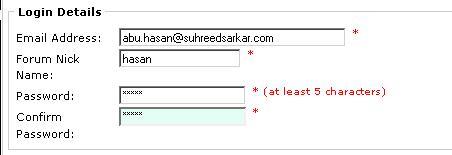
Integration with phpBB means, when a user registers with Zen Cart, the same account is created on the phpBB. While creating an account on Zen Cart, the user is prompted to choose a nickname for the phpBB forum. Users can also see a link to the phpBB in the Information sidebox. Clicking on this link will take you to the phpBB forum where a user can login using his or her nickname and password.
In this chapter, we have learned about the integration of Zen Cart with other CMSs. We have discussed the necessity of integration, characteristics of successful integration, and ways to integrate CMS. Then, we have seen ways to integrate Zen Cart with other CMSs such as Drupal, WordPress, Gallery2, e107, and phpBB. Bridge or connectors are used for such integration. The development of such bridges or connectors for other CMSs such as Joomla! are under consideration. Keep an eye on those community forums for solutions.
In the next chapter, we are going to discuss maintenance and troubleshooting tasks in Zen Cart.