
If you are not using Zen Cart or have not installed it yet, then you need to learn about installing Zen Cart, before proceeding to the next chapter. In fact, installation of Zen Cart takes very little effort. If you are familiar with other shopping carts/ CMS installations, it will not be very difficult for you. In this chapter, you are going to learn about installing Zen Cart on your server and making the required configuration.
On completion of this chapter, you will be able to:
Describe the prerequisites for installing Zen Cart
Install Zen Cart using Fantastico
Install Zen Cart by uploading files
Upgrade from previous versions
Configure shop for your use
Note
If you have already installed Zen Cart, or you have been using it for a long time, then you may skip this chapter.
Before installing Zen Cart on your server, ensure that you have the required server environment. As prerequisites, you need a web server that can support PHP and run MySQL database server. The following sections describe the prerequisites for installing Zen Cart in more detail.
The minimum recommended server requirements for Zen cart installation is:
PHP 4.3.2 or higher (PHP 4.4.x for optimal performance),
Apache 1.3.x and higher; and
MySQL 3.2.x or higher.
Although Register Globals may be on or off, it is recommended to keep safe_mode off. For many shipping and payment modules, CURL has to be installed/compiled with PHP.
Support for HTTPS may be required depending on the payment methods being accepted. The use of SSL during account creation and check out is also recommended.
At present, Zen Cart does not officially support PHP5. However, many shops are successfully running on servers, using PHP5. In August 2007, it was announced on Zen Cart's website that Zen Cart version 1.4 and higher will require PHP 5.2 as the minimum.
You can use Zen Cart on Apache, Microsoft IIS and other web servers that can support PHP. If you are using Zen Cart for development or testing purposes, you may have local web servers—such as Apache or IIS—installed. For live shops, you must have a web server running for live websites. You may have a dedicated web host server or a shared web server for hosting. There are a lot of web hosting companies offering budget web hosting on Linux-Apache-MySQL-PHP hosting. On windows server, PHP or MySQL may not be available in a standard hosting package.
For your local computer, you may install web server, PHP and MySQL server separately, or install one of the following bundled packages :
WAMP: WAMP is a package of Apache-MySQL-PHP for Windows computers. You can download it from www.wampserver.com and install it as a windows application. You can get Apache, MySQL and PHP running within a few minutes. You will also have phpMyAdmin pre-installed to administer MySQL databases.
EasyPHP: EasyPHP, a package of Apache-MySQL-PHP, is simple to install and use. You can download it free of charge at www.easyphp.org.
XAMPP: XAMPP is an easy-to-install Apache distribution containing MySQL, PHP and Perl. XAMPP is very easy to install and use—just download, extract and start. You can download a version for Linux, Windows, Mac, or Solaris. It is available at www.apachefriends.org/en/xampp.html.
Installing any of these packages will ease your administration task for web server and MySQL database. However, you are free to install and configure Apache, MySQL, and PHP separately.
Note
If you are playing around with Zen Cart, I recommend using a development server. You will also need a development environment for customizing themes and testing third party contributions. In Linux, you can set it up by installing Apache, MySQL, and PHP packages. For Windows machines, you need to use one of the above-mentioned Apache-MySQL-PHP packages. In Appendix A, we will show how to set up a development environment by installing and configuring WAMP on a Windows machine.
If you plan to use Zen Cart, I am sure that you know about PHP. PHP is the hot scripting language for the web. You can get the latest version of PHP from www.php.net. You can download and install PHP package with your web server. For IIS, PHP can be configured as CGI or ISAPI; you can use either modes. For Linux, Apache-PHP-MySQL is installed by default. If you use WAMP, EasyPHP, or XAMPP web server package, you don't have to install and configure PHP separately.
At present, Zen Cart supports only MySQL. MySQL version 4.1.x is recommended. However, Zen Cart can run on MySQL 5 server, but advanced features of MySQL 5 cannot be used in Zen Cart tables.
The data structure of Zen Cart is given in the mysql_zencart.sql file located in the zc_install/sql directory. Database tables will automatically be built during installation. However, you have to create the database and the user for login to that database before hand.
If you have installed WAMP or XAMPP, you will get MySQL server installed automatically. You can also use phpMyAdmin for managing databases in MySQL server. If you are using Linux hosting and cPanel, you can also use cPanel's database management tool and phpMyAdmin to create, delete, and manage databases and users.
Once all prerequisites have been met, you can proceed to the installation of Zen Cart. The following sections describe the installation process for Zen Cart systematically, by using Fantastico and by uploading files to the server.
Fantastico is an excellent tool for installing a number of PHP applications on a server. Most of the Linux hosting services will give you access to your account through cPanel. Along with cPanel, you may also get Fantastico support. One of the benefits of installing a PHP application using Fantastico is that you don't need to bother about creating databases and uploading Zen Cart files separately.
Note
A detailed discussion of use of cPanel is beyond the scope of this book. It is assumed that you know how to login and use cPanel. To learn more about cPanel administration, please refer to cPanel User Guide and Tutorial, published by Packt.
Step-by-step guidelines for installing Zen Cart using Fantastico are given below:
Login to cPanel and click on the Fantastico icon.
A list of available PHP applications will be displayed. Go to the E-commerce section and click on Zen Cart link.
A short description of Zen Cart, current installations, and a link for new installation will be displayed. You will be informed about the space required for the new installation too. Click on the New Installation link to install Zen Cart.

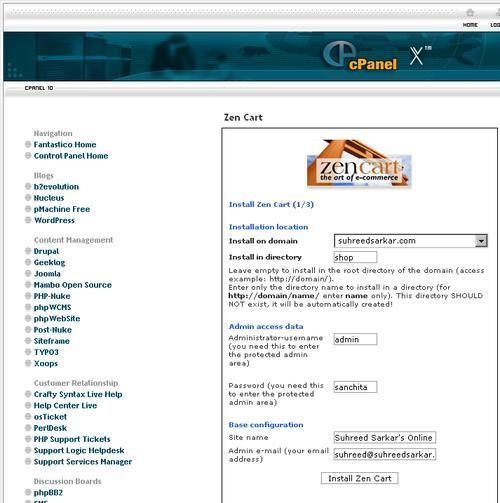
Steps 1 to 3 for Zen Cart installation will be shown. Then , you have to provide the following information:
Install on domain: Select the domain on which Zen Cart will be installed. If you have a sub-domain of, say,
shop.yourdomain.com, you can select it, or you can install on yourdomain.com domain.Install on directory: Enter the name of the directory on which Zen Cart will be installed. The directory should not already-exist; Fantastico will create a new one. If you want to install Zen Cart in the
shopdirectory under your domain's root directory, just typeshopin this field. Keep it blank to install it in that domain's root directory.Administrator-username: Enter the name of administrative account. This will be used to login to Zen cart administration panel.
Password: Enter a password in this field. This will be needed to access the administrative panel.
Site name: Give your shop an attractive name, which will be displayed in the browser title bar.
Admin email: Enter the email address of the administrative user. All emails regarding administration will be sent to this address. If you forget the administrator account's password, a new password will be sent to this email address.
Once these fields are filled in, click on the Install Zen Cart button.
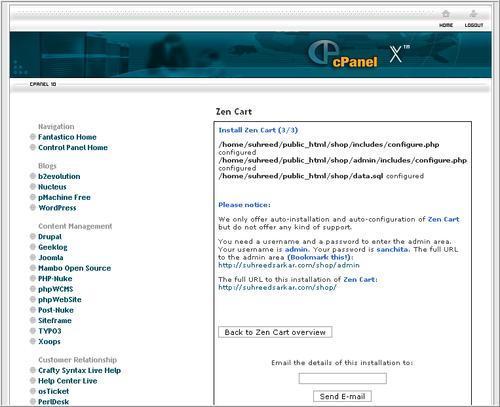
In the next step, a summary of your chosen configuration will be displayed. Click on the Finish Installation button.

On clicking Finish Installation, the required files are copied to the target directory and a database is created with a user and password. The configuration file for Zen cart will also be created automatically. Then, a screen will indicate that you have installed Zen Cart successfully. You can notify others about this installation by entering their email address and pressing Send E-mail Button. You will also see links to your shop catalog and the administrative area in this screen.
If you do not have Fantastico, do not worry. You can easily install Zen Cart by uploading the required files to the web server. Before doing this, you must download the latest version of Zen Cart from www.zen-cart.com. Unzip the zipped or gzipped package on your computer. Then, create the directory on your web server's webroot, and a database for Zen Cart on the MySQL server. Also, configure a database user to have the appropriate permissions (SELECT, INSERT, UPDATE, DELETE, CREATE, ALTER, INDEX, DROP) on this database. If you are using cPanel, you can use its tools such as phpMyAdmin for this.
You need an FTP program for uploading files to the server. FileZilla is a nice choice for this.
Web hosts have their preferences in naming folders for running a website. You can have many files that don't even get shown to the public. The ones that are available for access via a browser are usually in a specific folder, for example, /home/yourname/public_html or /var/www/yourname/httpdocs or /usr/accounts/a/b/yourname/httpd and so on.
You need to upload your files to one of these folders. If you want the shop to be in a directory different to that of the webroot, you must create a directory, say shop, in the webroot.
Before running the installer, you need to know the following facts:
The physical path to your new Zen Cart directory, for example,
/home/suhreed/public_html/shopThe Virtual HTTP path (the URL of your domain and the directory for your shop), for example, http://www.suhreedsarkar.com/shop
The Virtual HTTPS server or the secure URL to your domain, for example, https://www.suhreedsarkar.com. You can have a shared certificate on a virtual server, for example, https://suhreedsarkar.secureservername.net/ or https://secure.sharedservername.net/~suhreed.
The Virtual HTTPS path or the secure URL to your domain and directory for your shop, for example, https://www.suhreedsarkar.com/shop or https://secure.sharedservername.net/~suhreed/shop.
You must take note of these paths before starting the installation. You should also know your database name, username, and the password to access it. You have now uploaded the files to the shop directory, and you will use it for the following examples.
Once you have all of the information at hand, and have completed uploading all the files to the web server, you must start the installation with the following steps:
Open the browser and point to http://www.yourdomain.com/shop/ zc_install/. You will find the following Zen Cart Setup, Welcome screen :

You can see a brief description in the Welcome page. To see the full description, you must scroll down and click on the Continue button to start the installation. On clicking the Continue button, the following License Confirmation page is shown:
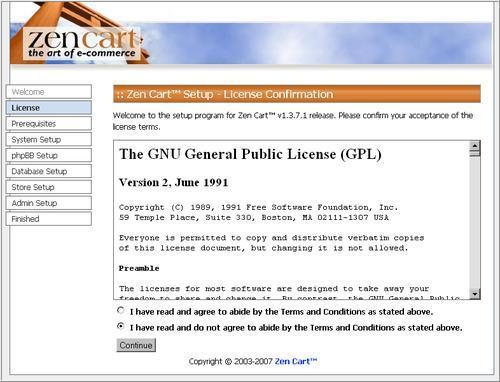
Zen Cart uses GNU General Public License (GPL). To accept the licensing conditions, you must read and select I have read and agreed to abide by the Terms and Conditions as stated above. On clicking the Continue button, the System inspection screen will be shown.

The System Inspection screen will show your server environment variables. Variables suitable for Zen Cart installation are shown in green. Any variable configuration not suitable for Zen Cart installation will be shown in red. To know about that variable's desired configuration click on Click here for more info link. If you find any variable in red, you must reconfigure it on your server and click on the Recheck button at the bottom. If everything is alright, then click on the Install button. The following Database Setup screen is then shown:
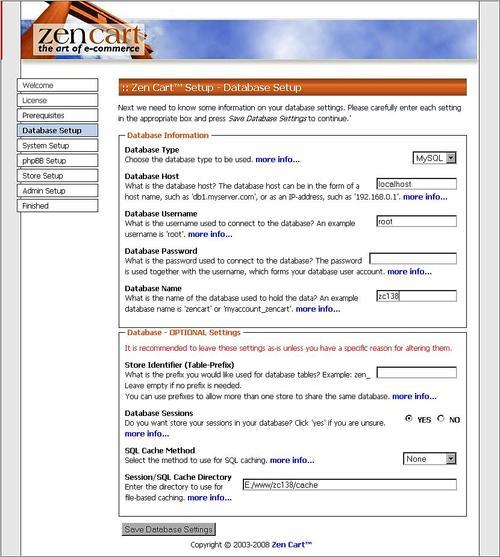
In the Database Setup screen, you have to configure the following options for the database:
Database Type: Select the type of database to be used for the Zen Cart shop. At present, you can only select MySQL as the Database Type.
Store Identifier (Table-Prefix): If you are using the same database for another application, it is better to separate Zen Cart tables with a prefix. Type a prefix for the tables, for example, zen, in this field.
Database Host: Enter the database server's name in this field. Usually, it is localhost. If not, you can enter the hostname as
dbserver.yourdomain.comin the Database Host field.Database Username: For connecting to the database, you need a database username. Remember that for shared hosting on the linux server, the username used to log into cPanel is prefixed to the database username, for example
suhreed_zen, wheresuhreedis the account on that server, andzenis the database username.Database Password: Enter password for that database user in this field. This password must match with the existing database user's password.
Database Name: You have to specify the name of the database that will be used for the Zen Cart Shop, for example,
zencartoryourname_zencart. You must provide the name of an existing database. Therefore, you need to create this database beforehand. However, Zen Cart Setup can create the tables in the database.Database Sessions: You can store your session information in the database or separate file system. For storing sessions in the database, select Yes in this field.
SQL Cache method: Caching SQL queries improves the performance of the Zen Cart shop. You can store SQL queries in the database or in file systems. Select the method that you want to use.
Session/SQL Cache Directory: If you select a file system as SQL Cache method, specify the directory to be used for caching. By default, this is the cache directory under the Zen Cart installation.
Click on the Save Database Settings button to proceed to the next step. The installation process will create the database structures for Zen Cart. You will see an Installation in progress ... message while the database creation is ongoing. Once the database creation is complete, the following System Setup screen is shown:
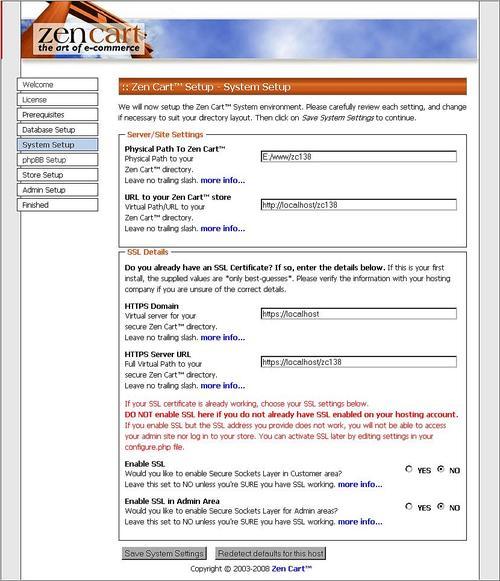
You have to provide some more information on the System Setup screen. First, enter the physical path to your Zen Cart directory in the Physical Path field. This will look like
/home/Suhreed/public_html/shopor, for windows host,e:/www/shop. Then, enter the virtual path/URL of your Zen Cart shop in URL to your Zen Cart™ store field, For all paths, do not include a trailing slash, '/ ' at the end of the path. For an explanation of a fields, click on the more info... link beside the field. In the SSL Details section enter the URL of virtual directory for secure Zen Cart shop in HTTPS Domain field. The full virtual path of this secure directory should be mentioned in HTTPS Server URL field. If you want to use SSL to provide enhanced security for your shop, select Yes in the Enable SSL field. Select Yes in the Enable SSL in Admin Area field if you want to use SSL for access to the admin section. Usually, this screen will show the detected values for your server as defaults. Click on the Redetect defaults for this host button to get new values for these fields. Once you have entered all required paths and configurations, click on the Save System Settings button. The following phpBB Setup screen is shown: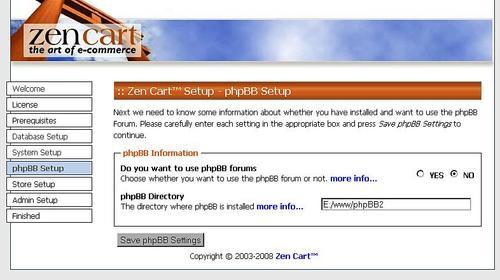
The phpBB screen gives you an option to integrate the phpBB forum with your shop. If you want to use phpBB with Zen Cart shop, select YES and then type the path of the phpBB installation in phpBB Directory field. You can get an explanation of these setting by clicking on the more info... link. Now, click on the Save phpBB settings button. The Store Setup screen is shown.
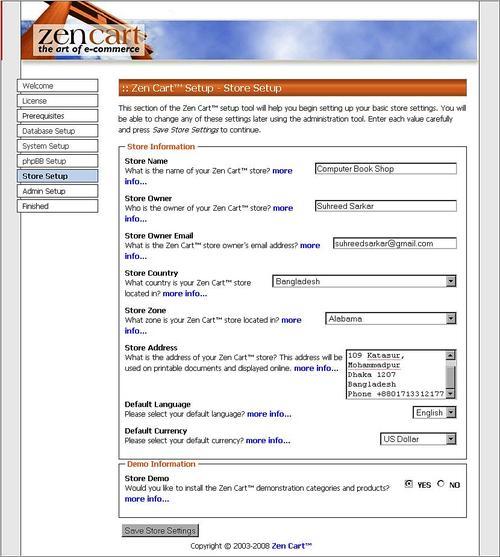
In the Store Setup screen, you must provide the Store Name, Store Owner, Store Owner Email, Store Country, Store Zone, Store Address, Default Language and Default Currency. Zen Cart comes with some example products and categories. To load these demo categories and products, select Yes in the Store Demo field. If you want to build a completely new product catalog, select No. Once these options are configured, click on the Save Store Settings button to proceed to the next step. The Administrator Account Setup screen appears, as shown below:
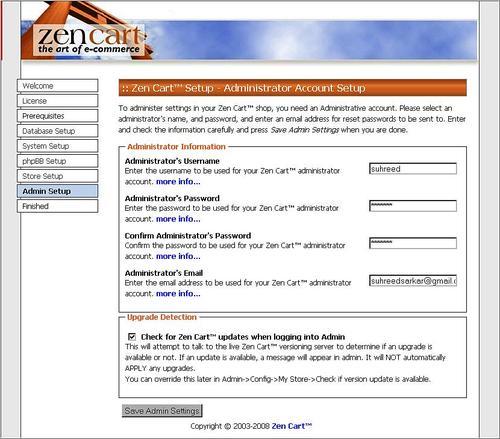
In the Administrator Account Setup screen, enter an Administrator's Username, Administrator's Password and Administrator's email. These will be used to login into the Administration panel for your shop. You have to confirm the administrator's password by retyping it in the Confirm Administrator's Password field. If you select Check for Zen Cart updates when logging into Admin, you will be notified about new versions of the Zen Cart release when you (as the administrator) log on. Click on the Save Admin Settings button.
Now, the Zen Cart Setup Finished screen is displayed. This screen will congratulate you on the successful installation of Zen Cart. It will also tell you about the next steps—setting permissions to the
configure.phpfile,zc_installandadmin/includes/folders. It will also show you some links for getting help. At the bottom of this page, you will see two buttons: Click here to go to the Store and Click here to open the Admin area. First check the store, and then try the admin area. You are going to explore these in a few minutes.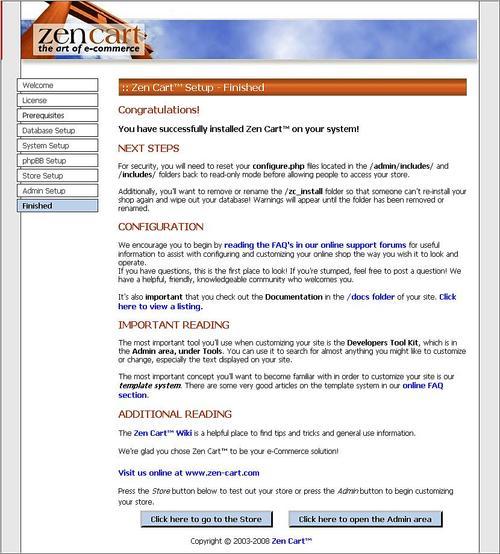
Although installation of Zen Cart is very straightforward, you have to think twice before upgrading to a newer version of Zen Cart. The main concern during upgrading is to keep the existing product catalog and customer base intact. As you are running a live shop, you must always try to minimize offline time for maintenance. You will also need to ensure that your custom look and feel for the shop works flawlessly with the newer version of Zen Cart.
Before starting the upgrade, you need to experiment with it to ensure that it does not disrupt your shop's operations. For each new release, there are important documents in the /docs folder of the Zen Cart ZIP file. Please check the 2.readme_how_to_upgrade.html file for any special notes about the version you are upgrading from and upgrading to. Always keep a backup of your database and your files before starting the upgrade.
Note
During the upgrade, a file-comparison tool such as WinMerge, Beyond Compare or ExamDiff (Linux) may be very helpful to you. These tools will help you compare file changes, and understand implication of these changes. Once you understand the changes, you may have a clearer picture of what to expect after upgrading.
It is better if you can install the new version as a separate shop, with demo data, and browse through it to understand the new features. Doing so will help you understand whether that version will be compatible with your previous version of Zen Cart.
First, unzip a copy of the new version of Zen Cart, upload it on to your web server, into a demo folder, install the new version into a separate database, and also include the demo products (these can be deleted after the conversion is complete).
Then, study the new features, and the changes to the template structures, as well as the change log. Use the demo products in the demo shop as examples. Also read the supporting documentation provided with the new release.
Take a full backup of your database by exporting it to an SQL file. Then, make a full backup of all of your site files and keep the backup on your computer. You may want to call this backup zen_backup.
Now, unzip a copy of the original Zen Cart files for your installed version. This should be placed in a separate working folder on your PC, perhaps zen_orig. Then, make a list of any add-ons that you may have installed, for later reference.
Run a tool such as WinMerge to compare the original Zen Cart files in zen_orig against your working backup files in zen_backup. Note all of the files that are different - these are the files that you have changed or configured. In WinMerge, double-click on each file and note what the differences are. If the differences are just language definitions for display text, they will be simple to carry forward.
If the differences are actual programming/code differences, you will need to make detailed notes in order to replicate those changes in the new version. Any mods/add-ons you've installed are likely to contain many programming changes, and may not be fully compatible with the newer Zen Cart release.
After identifying the changed files, go through each changed file, and copy your changes from the old version into the new version. Simple language edits will be just a matter of copy and paste. Programming changes to core components will be more difficult and may require significant testing.
Note that there will be several changes you will have to make to files that you have overridden using the template overrides system. Thus, you'll want to compare files from /includes/templates/MYTEMPLATE/* to /includes/template/template_default/*. Similarly, you will have to compare and change language files and sidebox overrides.
As indicated earlier, it is better to have a new database for the upgraded version, as the database structure may be different to the previous version. Therefore, you have to create a new database in which to install the new version of Zen Cart. Make a fresh database backup for your existing shop to include the last order that might have been processed, or the last customer registration. Now, restore your database to the new database you just created.
Now, you have to edit the includes/configure.php file to reflect the new database. If your /zen_new folder doesn't have /includes/configure.php and /admin/includes/configure.php files, copy them from the old store folder. Then, edit the/zen_new/includes/configure.php file to ensure that your DATABASE_NAME matches the new database that you have created. Make sure that the database username and password have also been changed. Now, save these changes so that you can upload the files to the web server.
Upload the modified files from the /zen_new folder to your web server into an alternate folder, for example, /zen_138. Once you have uploaded the files, run the /zc_install/index.php file, and choose Upgrade when prompted. Don't select Install at this stage as it will overwrite your database. If you do not find the upgrade option, then it may be the case that the installer was unable to connect to your database and confirm the database's version. In this case you should check your configure.php settings and correct accordingly.
Before going live, place the shop in Down for Maintenance mode from the admin area. Then, you need to add your IP address to the list of allowed addresses to get into the site for previewing. You must test the site to ensure that things are operating as planned. If you have any small problems to repair, turn Down for Maintenance on and off again as required.
On finishing the installation or upgrade, you may be tempted to check the new face of your shop. You may go straight to the store on completion of the installation process by clicking a button. Alternatively, you could open your browser and point it to http://www.yourdomain.com/shop/. Here, shop is the folder where you have installed Zen Cart. This will show the store with the demo categories and products and using the default design of of the store.

Note that, at the top, there are two warnings in red. These warnings ask you to remove the zc_install directory and make the includes/configure.php file read-only. You must resolve these problems before proceeding to change anything else.
The first step after installation is to remove the installation directory, zc_install. Keeping this directory threatens the security of your site, as other people may point their browser to www.yourdomain.com/shop/zc_install/ and override the installation settings. Therefore, you should either delete the whole directory, or rename it (in which case the name should be complex and hard to guess).
Some of the files and folders need special permissions to be set. For security reasons, you need to ensure that appropriate permissions are set to these files and folders. If appropriate permissions are not set, the browser will issue some warning messages. This section describes how to set up appropriate permissions on the Zen Cart folders and files.
Most of the FTP programs allow you to change file permissions. Connect to your site using the FTP program, navigate to your public_html directory, and perhaps into your zencart folder underneath public_html. Then, look for a Properties command that can be applied to that directory. If you right-click on the folder, you will find Properties as one of the options.
If you are using FileZilla, you have to right-click on the folder and select File Attributes. Then, you change the permissions to the required settings for the following folders, as indicated below:

Set 777 (read, write, execute for all) to all of these folders:
/cache/pub/images/includes/languages/english/html_includes/admin/backups/admin/images/graphs
Set 444 (read only) or 644 (read-write for owner, for others read-only) to these files:
/includes/configure.php/admin/includes/configure.php
If you are using cPanel, you can use its file manager to set permissions on the files and folders. Open File Manager, and browse to the folder where you have put your Zen Cart files. Click on the link of the file or folder (not on the icon), and then click on the Change Permission link on the right. You will see a permission setting box on the right, as shown below.

Set permissions to read, write and execute for the User, Group, and World groups by checking the appropriate nine checkboxes. You will see the permissions as numerical values (such as 644) in the Permission field. If there is an option to process all files under this subdirectory, check that box. Then, click Change or OK (or whatever) button to process the changes.
If you have SSH access instead of cPanel, you could type the following commands:
chdir /home/suhreed/public_html/shop(substitute your actual working directory).
chmod -R 777 ./cache
chmod -R 777 ./pub
chmod -R 777 ./images
chmod -R 777 ./includes/languages/english/html_includes
chmod -R 777 ./admin/backups
chmod -R 777 ./admin/images/graphs
chmod 444 ./includes/configure.php
chmod 444 ./admin/includes/configure.php
Note that, uppercase R is important in these commands.
If you are using shared hosting, access to your server through SSH may not be available. In that case, using cPanel file manager is the best choice.
If you are using Windows server for your Zen Cart shop, you can set permissions to the folders and files as follows:
Navigate to the
wwwrootfolder or to the path where your Zen Cart files are in.From the list of folders and files, right-click on a particular file or folder.
Choose Properties from the pop-up menu.
Click on the Security tab.
Now, add the IUSR_xxxx user account where xxxx is the computer name and give it read write permissions. IUSR_xxxx account is the local account for accessing your folders.
Click on OK to close the Properties box.
If you do not see a Security tab in step 4 above, you have to simply select the Read and Write boxes. Deselect the read-only checkbox if it is already select.
Repeat these steps for all required files/folders, as indicated earlier in this section.
You can also try your Zen Cart on Windows PC (Windows 2000 Professional, Windows XP, and so on). In such cases, you have to set the following folder and files permissions:
Navigate to the
wwwrootfolder or the path your Zen Cart files are in.Right-click on the required files or folders as listed earlier.
Choose Properties.
Set the read-only flag on or off depending on your requirements
Click Apply or OK.
Repeat for all the required files/folders.
Note
You may be interested to know more about CHMOD and the permission system. For getting a good lesson on CHMOD and linux permission system, you can—visit the following sites: http://en.wikipedia.org/wiki/Chmod and http://en.wikipedia.org/wiki/File_system_permissions. You can also use this online CHMOD calculator to calculate CHMOD values: http://www.classical-youbdesigns.co.uk/resources/whatchmod.html.
Zen Cart's configuration options are set in the database. However, for connecting to the database and locating the required files and directories, a configuration file is used. Zen Cart's main configuration file is includes/configure.php. This file contains the directory and database connectivity variables. Usually, you don't have to edit this file manually - it is configured during installation. However, you may need to edit it manually if you want to change the database name, user, or password. If you relocate a directory, you will also need to reflect this in the file.
Now, let's have a look at the main variables in this file and understand what each variable means:
// Define the webserver and path parameters
// HTTP_SERVER is your Main webserver: eg, http://www.yourdomain.com
// HTTPS_SERVER is your Secure webserver: eg, https://www.yourdomain.com
define('HTTP_SERVER', 'http://www.suhreedsarkar.com'),
define('HTTPS_SERVER', 'https://www.suhreedsarkar.com'),
// Use secure webserver for checkout procedure?
define('ENABLE_SSL', 'false'),
// NOTE: be sure to leave the trailing '/' at the end of these lines // if you make changes!
// * DIR_WS_* = webserver directories (virtual/URL)
// these paths are relative to top of your webspace ... (ie: under the // public_html or httpdocs folder)
define('DIR_WS_CATALOG', '/shop/'),
define('DIR_WS_HTTPS_CATALOG', '/shop/'),
define('DIR_WS_IMAGES', 'images/'),
define('DIR_WS_INCLUDES', 'includes/'),
define('DIR_WS_FUNCTIONS', DIR_WS_INCLUDES . 'functions/'),
define('DIR_WS_CLASSES', DIR_WS_INCLUDES . 'classes/'),
define('DIR_WS_MODULES', DIR_WS_INCLUDES . 'modules/'),
define('DIR_WS_LANGUAGES', DIR_WS_INCLUDES . 'languages/'),
define('DIR_WS_DOWNLOAD_PUBLIC', DIR_WS_CATALOG . 'pub/'),
define('DIR_WS_TEMPLATES', DIR_WS_INCLUDES . 'templates/'),
define('DIR_WS_PHPBB', '/'),
// * DIR_FS_* = Filesystem directories (local/physical)
// the following path is a COMPLETE path to your Zen Cart files.
// eg: /var/www/vhost/accountname/public_html/store/
define('DIR_FS_CATALOG', '/home/suhreed/public_html/shop/'),
define('DIR_FS_DOWNLOAD', DIR_FS_CATALOG . 'download/'),
define('DIR_FS_DOWNLOAD_PUBLIC', DIR_FS_CATALOG . 'pub/'),
define('DIR_WS_UPLOADS', DIR_WS_IMAGES . 'uploads/'),
define('DIR_FS_UPLOADS', DIR_FS_CATALOG . DIR_WS_UPLOADS);
define('DIR_FS_EMAIL_TEMPLATES', DIR_FS_CATALOG . 'email/'),
// define your database connection
define('DB_TYPE', 'mysql'),
define('DB_PREFIX', ''),
define('DB_SERVER', 'localhost'),
define('DB_SERVER_USERNAME', 'suhreed_shop'),
define('DB_SERVER_PASSWORD', '******'),
define('DB_DATABASE', 'suhreed_zencart'),
define('USE_PCONNECT', 'false'), // use persistent connections?
define('STORE_SESSIONS', 'db'), // use 'db' for best support, or '' for file-based storage
// The next 2 "defines" are for SQL cache support.
// For SQL_CACHE_METHOD, you can select from: none, database, or file
// If you choose "file", then you need to set the DIR_FS_SQL_CACHE to
// a directory where your apache or webserver user has write privileges
// (chmod 666 or 777). We recommend using the "cache" folder inside
// the Zen Cart folder ie: /path/to/your/webspace/public_html/zen/ // cache -- leave no trailing slash
define('SQL_CACHE_METHOD', 'none'),
define('DIR_FS_SQL_CACHE', '/home/suhreed/public_html/shop/cache'),
This file is self-explanatory. For most of the variables, instructions are given inside comments (lines starting with //). In most cases, you may need to change the DIR_WS_CATALOG and DIR_WS_HTTPS_CATALOG variables to reflect your installation directory. Also, you may need to change the DB_SERVER_USERNAME, DB_SERVER_PASSWORD, and DB_DATABASE variables. Note the differences between DIR_WS_* and DIR_FS_* variables. DIR_WS_* variables are for the webserver. This means that DIR_WS_CATALOG represents the webserver path to the catalog directory, for example, http://www.suhreedsarkar.com/shop. On the other hand, DIR_FS_* is for the file system path. This means that DIR_FS_CATALOG represents the path in the files system, for example, /home/suhreed/public_html/shop/.
There is another file for the admin section—admin/includes/configure.php. This file is completely different from the includes/configure.php file and must not be accidentally overwritten. The admin/includes/configure.php file contains settings for the secured admin area. Some of the variables in this file are:
//following settings are webserver paths
define('DIR_WS_ADMIN', '/shop/admin/'),
define('DIR_WS_CATALOG', '/shop/'),
define('DIR_WS_HTTPS_ADMIN', '/shop/admin/'),
define('DIR_WS_HTTPS_CATALOG', '/shop/'),
define('DIR_WS_IMAGES', 'images/'),
define('DIR_WS_ICONS', DIR_WS_IMAGES . 'icons/'),
define('DIR_WS_CATALOG_IMAGES', HTTP_CATALOG_SERVER . DIR_WS_CATALOG . 'images/'),
define('DIR_WS_CATALOG_TEMPLATE', HTTP_CATALOG_SERVER . DIR_WS_CATALOG . 'includes/templates/'),
define('DIR_WS_INCLUDES', 'includes/'),
define('DIR_WS_BOXES', DIR_WS_INCLUDES . 'boxes/'),
define('DIR_WS_FUNCTIONS', DIR_WS_INCLUDES . 'functions/'),
define('DIR_WS_CLASSES', DIR_WS_INCLUDES . 'classes/'),
define('DIR_WS_MODULES', DIR_WS_INCLUDES . 'modules/'),
define('DIR_WS_LANGUAGES', DIR_WS_INCLUDES . 'languages/'),
define('DIR_WS_CATALOG_LANGUAGES', HTTP_CATALOG_SERVER . DIR_WS_CATALOG . 'includes/languages/'),
//following settings are file system settings
define('DIR_FS_ADMIN', '/home/suhreed/public_html/shop/admin/'),
define('DIR_FS_CATALOG', '/home/suhreed/public_html/shop/'),
define('DIR_FS_CATALOG_LANGUAGES', DIR_FS_CATALOG . 'includes/languages/'),
define('DIR_FS_CATALOG_IMAGES', DIR_FS_CATALOG . 'images/'),
define('DIR_FS_CATALOG_MODULES', DIR_FS_CATALOG . 'includes/
odules/'),
define('DIR_FS_CATALOG_TEMPLATES', DIR_FS_CATALOG . 'includes/
templates/'),
define('DIR_FS_BACKUP', DIR_FS_ADMIN . 'backups/'),
define('DIR_FS_EMAIL_TEMPLATES', DIR_FS_CATALOG . 'email/'),
define('DIR_FS_DOWNLOAD', DIR_FS_CATALOG . 'download/'),
There are also settings for the database and cache folders. Database settings are the same as the includes/configure.php file.
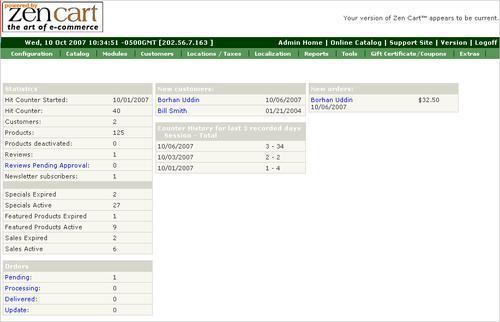
Once you have installed Zen Cart, you can try to log in to the admin area. Point your browser to http://www.youdomain.com/shop/admin/. Then, type the administrative username and password, which you had defined during installation. You can click on the Login button to proceed.
The administration panel is the area from where you will configure your store for public use, and add products to your catalog. This panel will also be used for managing customers, products, and orders.
When you first enter the administration panel, you will see a dashboard with a summary of products available, orders received, orders unfulfilled, new customers, new orders, and other statistics for your shop. This information is very useful for a shop owner for monitoring day to day operations.
To make your store usable for others, you have to configure your store first, that is configure its name, address, shop owner's email, email transportation method, and so on. You can configure your shop from Configuration | My Store. We will learn about these configuration options in the next chapter.

In this chapter, you have learned about prerequisites to installing Zen Cart. You have also learned the step-by-step procedures for installing Zen Cart using Fantastico, and by file uploading. Then you learned about upgrading from an older version to a newer version of Zen Cart.
You have also learned about the file and folder permissions that need to be set for effective operation of the Zen Cart shop. You have seen that certain files and folders need special permission for read and write. Finally you have learned how to login to the admin areas and configure the shop's name, address, and so on.
Once the installation is complete, the shop has to be configured for the customers' use. Zen Cart includes a lot of configuration options. In the next chapter, you will learn about configuring the shop. Until then, you can reward yourself with a mug of coffee for having installed Zen Cart successfully!