
91Zero to Genetic Engineering Hero - Chapter 4 - Genetic Engineering Your E. coli Cells
Bubbles in your Agar Pro-tip
Genetic Engineering Heroes will often use a ame from a bunsen burner, torch, or a heat gun in order to
pop bubbles in their agar plates. To do this, right after you’ve poured the LB agar into the petri dish, and
before it solidies, you point the heat source at the plate with bubbly agar. The heat causes the air within the
bubbles to expand, making the bubbles pop. This is generally only done when creating many plates (20 or
more) and it is inevitable to have some bubbles in the agar. To prevent most of them, simply be aware of how
vigorously you mix your LB agar powder into the sterile water! Always be very careful with open ames.
Making your own LB Agar Plates - LB agar powder Pro-tip
You can buy LB agar powder from a supplier to make LB agar plates. Typically, you want to make a ~4%
solution of LB agar. This % describes the desired concentration of a solution, typically a measure of
weight / volume (w/v) or volume/volume (v/v). In this case, LB agar powder is measured as weight/mass
(in grams) and the sterile distilled water is measured in volume (mL). To make a 4% solution, you would
add 4 g of LB agar to 100 mL of sterile water.
Concentration (%) = {mass (g) / volume (mL)} x 100
Making your own LB Agar Plates - Antibiotics Pro-tip
The Engineer-it Kits include an innovative pre-measured way to add antibiotics to your agar. As you
advance as a Genetic Engineering Hero, you may need to create your own antibiotic mixtures. Table 4-1
identies commonly used antibiotics, the concentrations required to make stock and during experiments.
Note: it is often difcult to get access to 100% ethanol. A replacement solvent is 99% USP isopropyl alcohol
(rubbing alcohol) that can be obtained from a pharmacy.
Table 4-1 - Common Antibiotics and Concentrations used for Bacterial Selection
Antibiotic (abbreviation)
Working
Concentration*
1000x Stock
Concentration**
Solvent*** Color Code****
Ampicillin (Amp; A) 100 ug/mL 100 mg/mL (286 mM) 50% ethanol Orange
Chloramphenicol (Clr; C) 35 ug/mL 35 mg/mL (108 mM) 100% ethanol Green
Kanamycin (Kan; K) 35 ug/mL 35 mg/mL (74 mM) distilled water Red
Tetracycline (Tet; T) 15 ug/mL 15 mg/mL (34 mM) 50% ethanol Yellow
*Working Concentration is the concentration of the chemical that you want in the actual samples. In the example above, this is the
concentration of antibiotic after they are added to the molten LB agar.
**Stock Concentration is the concentration of a master “tube” that you will keep for long-term storage in the freezer. From this
stock master tube, you would take a small quantity to add to your LB agar to get to your working concentration. For example, this
is similar to the food coloring you would buy in a store. The bottle you get from the store is highly concentrated, and you only need
to add a few drops to a large quantity of water to get the color. The important thing to note is that with a stock method, you do not
need to make the antibiotic solution from scratch every time.
***Solvent is the liquid that you typically dissolve the antibiotic into to make your stocks.
****Universal color codes are assigned for different antibiotics. Instead of writing the name or abbreviation of an antibiotic on
plates, you can use a colored marker to put a notch of the relevant color on the plate. This saves time and still informs you and
others what antibiotic is used.
Book _genetic engineering hero-AUG2021.indb 91Book _genetic engineering hero-AUG2021.indb 91 8/18/21 12:03 PM8/18/21 12:03 PM

92 Zero to Genetic Engineering Hero - Chapter 4 - Genetic Engineering Your E. coli Cells
Flour dilution Practice Breakout Session 2
The next step of your genetic engineering experiment is to diluting the
number of cells you deposit on a plate through a streaking technique
involving three inoculation loops. Dilution is the act of reducing the
concentration or amount of something. To better understand how the
dilution happens through streaking, let’s practice dilution with our.
First, deposit a teaspoon amount of our (or any similar powder) on
a contrasting surface like a wooden table or coloured paper. In this
practice, your nger will be your inoculating loop. Have a look at the
streaking stencil included in your Engineer-it kit and seen in Figure 4-3;
You will want to follow a similar pattern when you dilute your our. Use
your nger to run through the our pile once, extending the line outwards from the pile. Wipe your nger,
and again, trace a line going through the end of your rst line, extending outwards. You can even add a few
zig-zag, just like on the stencil. Clean your nger again and trace a third and nal line that drags through
the end of your second line. Extend that third line outwards and add a few zig-zag to further spread the
our. Notice how by the end of your third line, the amount of our on the surface is much less? You’ve
just successfully diluted our!
3G
3H
3G
3H
3G
3H
Step 5. Streaking E. coli and the negative control plates
For this step you will be spreading ‘blank’ K12 E. coli onto two plates: A. onto a non-selective (N.S.) plate for use
in 12 to 24 hours for the transformation experiment and B. on a selective plate S(-) for a negative control sample.
A. You will be using a different streaking method for K12 E. coli bacteria this time. In Chapter 3, you streaked
each color of your bacteria paint with one yellow loop in a zig-zag onto the petri dish with the goal of obtaining
lots of growing bacteria. For this exercise with the Engineer-it Kit, your goal is different. Like in the Virtual
Bioengineer Engineer-it Kit Edition, you will be streaking onto the non-selective (NS) plate, using three yellow
inoculating loops, following the streaking stencil pattern.
This type of streaking is a method used to obtain single colonies of bacteria. A colony is a small mound of bacte-
ria that results from of a single bacterium growing and dividing into millions of bacteria. This means all of the
bacteria in that mound are the same.
The goal of this step is to get well-separated colonies of ‘Blank Cells’. We call them Blank Cells since they have
not yet been engineered - like a blank paper ready for new information. Now that you are initiated into the
world of genomic DNA vs. DNA plasmids, you will see this is an oversimplication used for beginners; the cells
are not entirely blank, but they are not yet engineered.
3G
3H
3G
3H
Figure 4-3. Use the streaking stencil to streak one of your plates with the cells included in the kit.
Book _genetic engineering hero-AUG2021.indb 92Book _genetic engineering hero-AUG2021.indb 92 8/18/21 12:03 PM8/18/21 12:03 PM
93Zero to Genetic Engineering Hero - Chapter 4 - Genetic Engineering Your E. coli Cells
On your N.S. plate, streak out cells using the stencil and the procedure you learned in Virtual Bioengineer. The
stencil included in your Engineer-it Kit has the same multi-colored lines as in Virtual Bioengineer. You should
place the stencil under your N.S. plate and follow these instructions (Figure 4-3):
Get a yellow inoculating loop. Dip it into the Blank Cells tube (called a stab of cells). Inspect the loop to see if it
looks “wet”, indicating that you’ve dipped into the cells/agar. Then trace over Line 1. Discard the loop in your
inactivation bag.
Get a new yellow loop (DO NOT DIP IT IN THE STAB OF CELLS!!!). Follow Line 2 by dragging the new loop through
Line 1 and completing the zig zag. Because you are dragging a new loop through a small segment of line 1, you
will drag only a small amount of line 1 cells with the loop and spread them out across the rest of the zig zag.
There will be far fewer cells in Line 2. Discard the loop.
Repeat with a new yellow loop following Line 3. The third line will have even fewer cells on it. The aim is for
you to end up with single bacteria that will grow into mounds called colonies. Discard your loop and place the
lid back on the plate.
B. To create your negative control, you will use the simple one-loop zig-zag method from the Canvas Kit exer-
cise. Using one yellow loop, you will once again dip into the tube of Blank Cells and then drag the loop all over
the surface of your S(-) plate. Place the lid back on the plate and discard your loop. Learn more about negative
controls in the Going Deeper 4-3 on the next page.
Once you have completed the streaking on your N.S. plate and S(-) plate, invert them and incubate at 37˚C for
12 to 24 hours. Do not incubate for longer than 24 hours before doing the next step or your experiment
will not work.
Streaking Going Deeper 4-2
Streaking: It is important to streak the plates to get well-separated colonies because the bacteria in these
colonies grow the fastest. The faster the bacteria are growing, the easier DNA can cross their membranes
and get into the cytoplasm.
While bacteria grow, they send chemical signals
out into the LB agar plate. Some of these signals
tell other bacterial colonies to slow down and
“stay away from my food”, or “Hey! There are a
lot of us here, so slow down, don’t eat as much”.
When bacteria receive these signals, they slow
their growth and even start bolstering up their
membranes in preparation for starvation. By
creating different lipids, cholesterol, and proteins,
their membranes become rigid and make it harder
for you to get DNA into the cells. Well-separated
colonies grow much faster because they don’t get
the “slow down” signals. Their membranes stay
more uid because the cells are dividing fast. This,
in turn, makes it easier for you to get DNA into the
cells.
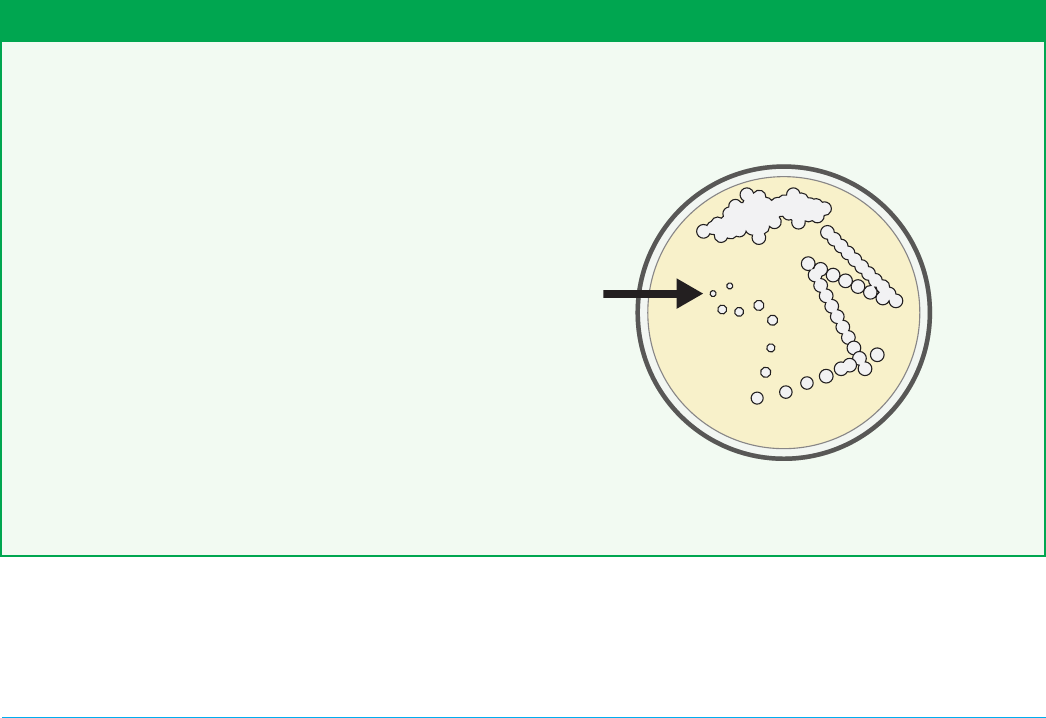
Figure 4-4. Well-separated colonies are found at the “end”
of the zig zag dilution pattern, as identied by the arrow.
Book _genetic engineering hero-AUG2021.indb 93Book _genetic engineering hero-AUG2021.indb 93 8/18/21 12:03 PM8/18/21 12:03 PM

94 Zero to Genetic Engineering Hero - Chapter 4 - Genetic Engineering Your E. coli Cells
Lawn
Colonies
Figure 4-5. Streaked E. coli K12 cells, after 16 hours of incubation.
Negative Control Going Deeper 4-3
Negative Control: What is a negative control? In scientic experiments, ‘controls’ are used to help ensure
important components of the experiment – for example, cells, other materials, and cellular processes –
are performing as expected. In this exercise, we are going to use controls to help you make sure things are
working properly and to help troubleshoot if the experiment doesn’t go as expected.
A negative control refers to an experimental sample that you don’t expect to respond if it’s working prop-
erly, hence the word ‘negative’. In this negative control exercise, you will be ‘plating’ (streaking) Blank Cells
without antibiotic resistance onto a selective LB agar plate, which has antibiotics. The expected result, if
the selective plates were correctly made, is that the Blank Cells should not grow (a negative result). This is
because the antibiotics will kill them.
What is the importance of this control for your experiment? This negative control will let you know if the
selective plates you need to grow the engineered bacteria in the next steps were made correctly. For exam-
ple, if you accidentally forgot to add the antibiotics, then the selective plates would not have any antibiotics
in them! This would affect your results in a signicant way as you would not be able to grow your engineered
bacteria optimally. Even if you engineered the cells correctly, you would not likely see engineered cells at
the end of the exercise. This control helps you conrm that the selective petri dishes were made correctly,
allowing you to have built-in check points to ensure you do not waste materials and time. For example, if
your negative control plate has growth on it, you know something is wrong and could make new selective
LB agar plates before moving forward with the engineering.
Check Point!
After incubating your Blank Cells for 12 to 24 hours, you should be able to see bacterial colonies growing on
your NS plate (Figure 4-5). In the next step, you will be collecting several of these colonies to program them with
DNA (insert DNA plasmids into them). Be sure to start Step 6 only after seeing growth similar to what is shown
in Figure 4-5 on your own plate. Also, verify that your S(-) negative control plate does not have any growth on
it. The S(-) plate tests whether your selective LB agar has enough antibiotics. If your S(-) plate does have Blank
Cells growing on it, you will need to make new selective agar plates that are actually selective.
Book _genetic engineering hero-AUG2021.indb 94Book _genetic engineering hero-AUG2021.indb 94 8/18/21 12:03 PM8/18/21 12:03 PM

95Zero to Genetic Engineering Hero - Chapter 4 - Genetic Engineering Your E. coli Cells
Step 6. Making chemically competent cells
We have been discussing inserting DNA into cells in simple terms, but it is important to know that E. coli cells do
not readily take up new DNA. You will need to use chemistry to “help” the E. coli cells take DNA plasmids inside
their cytoplasm. Once the DNA is in the cytoplasm, it is “inserted” in the cells. Once you’ve used chemistry to
get your E. coli ready to take in DNA, but before you add the DNA, the cells are said to be ‘competent’.
A. Tap the tube of Transformation Buffer (T. Buffer) on the table to bring all the liquid to the bottom. Then,
cool it by placing it on the Cold Station set to ‘Ice’ on the Minilab. It is important for the transformation buffer
to remain cold throughout this process. The salts inside the T. Buffer are harmful and can kill the cells at room
temperature, yet are necessary to engineer the cells with new DNA plasmids. Keeping the T. Buffer and the cells
that will be added in the next step cold helps to maintain cell stability and survival. To prepare for later steps,
turn on the Hot Station to Shock 42°C so that it warms up.
B.
Collect “Blank Cells” and mix them into the cold T. Buffer: Using a small blue 1 uL inoculation loop, gently
scrape the surface of the non-selective LB agar plate and collect some well-separated cells. Colonies that are
about 1 mm in diameter or smaller are great! Collect about 10-20 of these colonies so that the center of the
loop is full of cells.
C. Mix Blank Cells in cold T. Buffer: Insert the end of the loop with the cells into the cold transformation buffer
while keeping the tube on the cold station. Vigorously spin the inoculating loop as though you’re making re!
This will cause the cells to fall off the loop and mix in with the cold Transformation Buffer. Mix well so that you
see a cloudy solution and no cell clumps (Figure 4-9). This takes about 15 seconds.
Figure 4-9. At the end of Step 6, your T. Buffer should be cloudy with well-suspended cells - no clumps!
Add more cells Keep mixing Cloudy & ready!
Figure 4-6. Step 6A. Tap the tube of
Transformation Buffer on the table
to bring all the liquid to the bottom
and place it on the Cold Station.
Figure 4-7. Step 6B. Collect Blank Cells - use the
well-separated colonies from the NS plate you incu-
bated overnight.
Figure 4-8. Step 6C. Mix your cells
in the T. Buffer thoroughly. You
should not see any more clumps.
Book _genetic engineering hero-AUG2021.indb 95Book _genetic engineering hero-AUG2021.indb 95 8/18/21 12:03 PM8/18/21 12:03 PM
..................Content has been hidden....................
You can't read the all page of ebook, please click here login for view all page.