Chapter 14
Increase Profits with Photography and Other Strategies
IN THIS CHAPTER
![]() Adding pictures to your listing
Adding pictures to your listing
![]() Taking picture-perfect images with a smartphone
Taking picture-perfect images with a smartphone
![]() Uploading your smartphone pictures to eBay
Uploading your smartphone pictures to eBay
![]() Letting others meet you on your Profile
Letting others meet you on your Profile
You may be enjoying most of what eBay has to offer, and you’re probably having some good buying adventures. If you’re selling, you’re experiencing the excitement of making money. But there’s more.
Once you are on eBay for any length of time, you’ll notice that listings with good pictures are more attractive. By saying “good pictures,” I mean detailed photos taken by the seller of the actual item that’s up for sale. People don’t trust what they can’t see, and often just using stock photography doesn’t instill very much.
Although eBay requires you to have at least one photo of your item (at least 500 pixels on the longest side), the more images you add to your listing, the more it will be noticed.
In this chapter, you go to the head of the class by discovering some insider tips on how to enhance your listings with images and descriptive text. Successful eBay sellers know that pictures (also called images) really help sell items. This chapter gives you the basics on how to create great images. I also give you advice on linking pictures to your items so that buyers around the world can view them.
Using Images in Your Listings
Would you buy an item you couldn’t see? Most people won’t, especially if they’re interested in purchasing items that they want to display or clothes they intend to wear. Without a picture, you can’t tell whether a seller’s idea of good quality is anything like yours — or if the item is really what you’re looking for.
 I coined this phrase ages ago when adding pictures to eBay listings was just an option. It is even truer today: “Take your pictures as if you have no description and write your description as if you had no pictures.” As we know, some people are visual and others prefer to read the facts. By making this your mission, you will reach anyone who wants to know about what you have for sale. (There’s more tips for writing a description in Chapter 3.)
Welcome to the cyberworld of imaging, where pictures are called not pictures but images, and your monitor or screen isn’t a monitor but a display. (Certainly your smartphone isn’t exactly just a “phone” either, but a tiny computer.) With a smartphone, digital camera, or scanner and software, you can manipulate your images — spin, crop, and color-correct — so that they grab viewers by the lapels. Even cooler: When you’re happy with your creation, you can add it to your eBay listing for others to see.
 Don’t rule out using smartphone images on eBay. These days, pictures taken on many smartphones rival those taken on bigger digital cameras. Consider the top phones from manufacturers like Samsung, Apple, Huawei, and Google. Many tech news websites feature a page that offers updated reviews and compares smartphone cameras head to head. Be sure to check out the latest before you buy by searching Google for “top smartphone cameras.”
Sellers, take heed and read these other reasons why you should use your own well-made digital images in your item pages, as well as eBay’s stock photos (when available for new items only):
- If you don’t have your own picture, potential buyers or bidders may wonder whether you’re deliberately hiding the item from view because you know something is wrong with it. Paranoid? Maybe. Practical? You bet.
- Some fickle shoppers don’t even bother reading an item description if they can’t see multiple pictures of the item for sale. Maybe they were traumatized in English class.
- Taking your own pictures shows that you actually have the item in your possession — and shows the item details. By contrast, some sellers take images from a manufacturer’s website to illustrate their bogus sales. Why risk appearing suspect? Snap a quick picture!
- Everyone’s doing it. I hate to pressure you, but lots of digital images are de rigueur for items on eBay, so if you’re not using more than one, you’re not reaching the widest possible number of people who would buy your item. eBay requires that you use at least one. From that point of view, if you don’t use multiple images, you’re not doing the most you can to serve your potential customers’ needs; it’s just smart business to shoot the works (so to speak).
So which is better for capturing images: smartphones, digital cameras, or digital scanners? As with all gadgets, here’s the classic answer: It depends. For convenience, it’s hard to beat a good quality smartphone camera. But before you go snag one, decide what kind of investment (and how big) you plan to make in your eBay sales.
Whether you buy new or used digital equipment on eBay, consider buying a warranty from SquareTrade (squaretrade.com). If you don’t get a warranty, Murphy’s Law practically ensures that your digital equipment will break the second time you use it. There’s more about SquareTrade in Chapter 20.
Choosing your camera
Having a dedicated home studio for your eBay photography is not just a luxury but a necessity once you start listing many items at a time. For your home studio, use the highest-quality digital camera you can afford, especially if you plan to use images for items that vary in size and shape. By highest quality, I don’t necessarily mean a camera with vast amounts of megapixels; I mean a camera from a quality manufacturer that has a high-power optical zoom and a good (nonplastic) lens.
You can buy a used smartphone on eBay and use that with your home Wi-Fi exclusively for listing eBay items.
A great place to shop for these devices is (surprise!) eBay. Just do a search of some popular manufacturers, and you’ll find pages of listings of both new and used digital cameras.
When shopping for a smartphone or digital camera, look at the following features:
Resolution: Look for a camera that has a lower resolution setting (3MB is fairly common). This isn’t hard to find because new cameras tout their strength in multiple megabytes (which translates to millions of pixels). You don’t need that high a resolution for eBay because your pictures will not be printed; instead, they’re shown ultimately on a monitor. A pixel is a tiny dot of information that, when grouped with other pixels, forms an image onscreen. The more pixels an image has, the clearer and sharper the image is. When you upload images to eBay, the site compresses them for optimum viewing and loading as part of the item page.
The minimum requirement (eBay’s rules) is that your image must be 500 pixels on the longest side; they recommend images to be at least 1600 pixels for best reproduction. 1600 pixels will generally be 1200 in the other direction (2MB). That’s about perfect for any monitor or mobile device. You can always crop the picture if it’s too large. eBay picture hosting will accept an image file of up to 7MB.
You want only high-pixel, high-resolution images for printing. The terms ppi and dpi (pixels per inch and dots per inch, respectively, found when you scan photos) only affect the printed size of the final picture. The human eye sees photo prints with printer-output resolutions over 240 ppi (pixels per inch) as continuous-tone images, even though the image is actually made up of slightly overlapping dots of ink.Optical zoom: Here’s where some camera manufacturers pull the wool over consumer’s eyes. They sell cameras with an optical and a digital zoom. The optical zoom is a true zoom done by the camera, using its lens and its built-in CCD (computer chip in cameras that converts light into electronic data) — but a digital zoom is virtual; it’s interpolated through software in the camera. That means it makes up data to fill in any holes it doesn’t capture. You’ve seen this effect if you’ve ever tried to enlarge a picture from the web in a software program — it gets all blurry. A hybrid zoom works very well in the newest smartphone cameras.
If you ever plan on shooting close-ups in macro format, opt for a high-quality optical zoom.Storage type: Smart card? SDHC? MicroSD card? CompactFlash card? Memory stick? (Whew.) The instructions that come with your camera explain how to transfer images from your media type to your computer. (No instructions? Check the manufacturer’s website.) Many computers have card slots into which you can insert your camera’s memory card; the computer reads the card like it’s a teeny-tiny disk drive. I rarely take out my camera’s card; I upload my images directly to eBay or to OneDrive via Wi-Fi, and then edit if necessary on my computer.
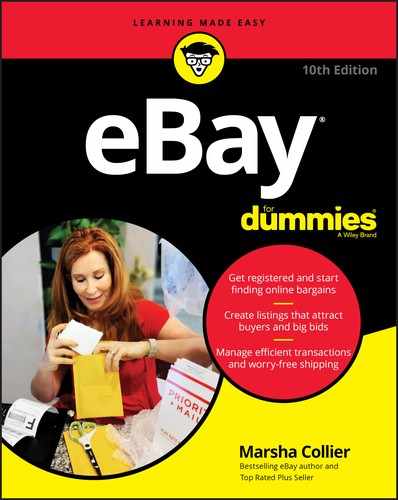
Using a light diffuser (versus using a flash) and a small tripod is an easy way to get the best images of items that require extreme close-ups (such as jewelry, stamps, currency, and coins). When photographing complex items, no matter how good your camera is, you may find it difficult to capture the item cleanly and exactly (especially the colors and brightness of gems and metals). Try using a diffuser like a photo tent or light box; your camera on a tripod points inside and takes pictures of the product inside the device. Figure 14-1 shows you my setup with a tent.
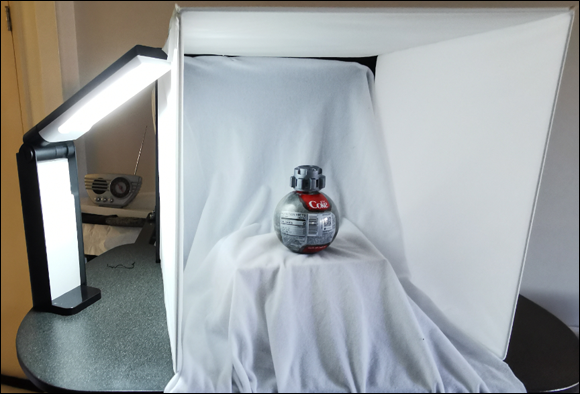
FIGURE 14-1: Taking pictures with a diffuser, in this case, a light box (or photo tent).
Choosing a scanner
If you plan to sell flat items such as autographs, stamps, books, or documents — or if you need a good piece of business equipment that can double as a copier, printer, and fax machine — consider getting an all-in-one printer that has a digital scanner. I have a laser (versus inkjet) because I resent paying for ink refills continually, and it was quite reasonably priced. Whether you choose inkjet or laser, you can find used all-in-ones on eBay for around $100, or a brand new one for about $200.
Here’s what you need to look for when you buy a scanner:
Resolution: As with printers and copiers, the resolution of digital scanning equipment is measured in dots per inch (dpi). The more dpi, the greater the resolution.
Some scanners can provide resolutions as high as 12800 dpi, which looks awesome when you print the image, but all the rez you need to dress up your eBay listings is (are you ready?) 72 or 96 dpi (dots or pixels per inch)! That’s it. Your images will look great and won’t take up much storage space on your computer’s hard drive. Basic scanners can scan images at resolutions of up to 1200 dpi, so even they are far more powerful than you need for your eBay images.
- Flatbed: If you’re planning to use your scanner to scan pictures of documents (or even items in boxes), a flatbed scanner is your best bet. Flatbeds work just like old-school copiers: You simply lay your item or box on the glass and scan away.
Making Your Picture a Thing of Beauty
The idea behind using images in your listings is to attract tons of potential buyers. With that goal in mind, you should try to create the best-looking images possible, no matter what kind of technology you’re using to capture them.
Get it on camera
Point-and-shoot may be okay for a group shot at some historical monument, but illustrating your sale is a whole different idea. Your digital camera or smartphone might be best used in manual mode (versus auto) so you can make adjustments to your images. Now that we have gone digital, experimenting takes a lot less time, especially because newer smartphone cameras integrate artificial intelligence to get the right snaps every time. However you use your camera, there are some basic photographic guidelines that can give you better results.
For more on using scanners, read ahead to the next section, “Yes, I scan.” Then c’mon back to these picture do’s and don’ts to ensure that your image is a genuine enhancement to your online sale:
- Do take the picture of your item in daylight whenever possible. That way the camera can catch all possible details and color.
- Do forget about fancy backgrounds; they distract viewers from your item. Put small items on a neutral-colored (preferably white), nonreflective towel or cloth; put larger items in front of a neutral-colored wall or curtain. You might even buy an infinity board on eBay to use as a background. You’ll cut out almost all the background anyway when you crop your images. (This chapter explains how to prepare your picture.)
- Do turn off your flash and use extra lighting. You can do this with extra photo lighting on stands or even desk lamps. Consider using extra lighting even when you’re taking the picture outside. The extra lighting acts as fill light — it adds more light to the item, filling in some of the shadowed spots.
- Don’t get so close to the item that the additional light washes out (overexposes) the image. The easiest way to figure out the best distance is by trial and error. Start close and keep moving farther away until you get the results you want. You can see the picture seconds after you shoot it, keep it and modify it, erase it, and start again.
- Do take many acceptable versions of your image; you can choose the best ones later before you upload them.
- Don’t use incandescent light bulbs or fluorescent kitchen lighting to illuminate your photos. Incandescent lighting can make items look yellowish, and fluorescent lights lend a bluish tone to your photos. Some sellers use LED lighting; LEDs throw a good-quality light which, when combined with natural daylight, produces an even tone.
- Do set the white balance setting on your camera or phone to Auto. You may see this as AWB, and this setting will often compensate for lighting differences.
- Do take a wide shot of the entire item if your item relies on detail (for example, an engraved signature or detailed gold trim). Then take a tight close-up or two of the detailed areas that you want buyers to see, and include them in your description.
- Do make sure that you focus the camera by tapping on the object on your smartphone screen; nothing is worse than a blurry picture. Most cameras today are auto-focus, so holding the camera still is (as ever) the biggest challenge for a shutterbug.
Taking pictures of your item from different angles gives the prospective buyer more information. When you have several images to upload to eBay, you can also use your photo-editing program to put them in a single composite image for your description, as shown in Figure 14-2.
Some eBay sellers, out of laziness, steal images from other eBay members. (They simply make a digital copy of the image and use it in their own listings. This is bad form because then the copied image doesn’t represent the actual item being sold.) If you find yourself in a position where somebody has lifted one of your pictures, use the Ask a Question link below their description and ask them to remove your photo. If you don’t get any cooperation, you can try using the Report Item link.

FIGURE 14-2: Take several pictures from different angles to give the buyer a better idea of how your item looks.
Yes, I scan
If you use a scanner to create images for your eBay items, you’ve come to the right place. (Also check out the tips in the preceding section.) Here’s how to get crisp scans of your items:
- Select items to scan on glossy paper if you have an option; it scans best.
- Scan the box that the item came in by laying it on the flatbed, or if there’s a photo of the item on the box, scan that portion of the box.
- If you’re scanning a three-dimensional item (such as a doll, jewelry item, or box) and you can’t close the scanner lid, drape a black or white T-shirt over the item after you place it on the scanner’s glass plate; that way you get a clean background and good light reflection from the scanner.
- If you want to scan an item that’s too big to put on your scanner all at once, scan the item in sections and assemble the digital pieces with your image-editing software. The instructions that come with your software should explain how to do this.
Software that adds the artist’s touch
After you take the picture (or scan it), you can upload it to eBay immediately or edit it in your smartphone with its native tools first. But if you’re selling a high-ticket item (and you’re a perfectionist), transfer it to your computer according to the manufacturer’s instructions and edit the picture. You have to approach the image as a book or magazine editor would: Cut, fix, resize, and reshape your picture until you think it’s good enough to be seen by the public. If you’re a non-techie type, don’t get nervous; many programs have one-button magical corrections that make your pictures look great.
A software program puts at your disposal an arsenal of editing tools that help you turn a basic image of your item into something special. Although each program has its own collection of features, a few basic tools and techniques are common to all:
- Image quality: Enables you to enhance or correct colors, sharpen images, remove dust spots, and increase or reduce brightness or contrast.
- Size: Reduces or increases the size or shape of the image.
- Orientation: Rotates the image left or right; flips it horizontally or vertically.
- Crop: Trims your picture to show the item, rather than extraneous background.
- Create an image format: Gives your edited picture a specific format, such as JPG, GIF, or others when you save it. The best format for putting photos on the web (and thus the preferred format on eBay and the one I strongly recommend) is JPG (pronounced “JAY-peg”).
 Copying a manufacturer’s text or images without permission can constitute copyright infringement, which may result in a very unfriendly “Cease and Desist” letter. If the copyright holder alerts eBay through the VeRO program, that action may end your listing.
Making Your Images Web-Friendly
Because digital images are made up of pixels — and every pixel has a set of instructions that has to be stored someplace — you have two difficulties facing you right after you take the picture:
- Digital images contain computer instructions, so bigger pictures take up more memory.
- Very large digital images take longer to build (appear) on the buyer’s screen, and time can be precious on a web page.
Keep in mind that when you upload an image to eBay for your Gallery pictures (the ones that appear at the top of your listing and next to your item’s title in search results), you really don’t need to worry about size. eBay will standardize their size after you upload them, but they must be a minimum of 500 pixels on the longest side — with 1600 being optimal. That said, be sure your images aren’t larger than 7MB.
There are some sellers who want to include more than the 12 pictures permitted by eBay. (Although I think 12 pictures is just fine). To get around this, when you add additional photos to your description, think small. Here’s a checklist of tried-and-true techniques for preparing your fast-loading images to display on eBay:
- Set your scanner image resolution at 96 pixels per inch. You can do this with the settings for your scanner. Although 96 ppi may seem like a low resolution, it only nibbles at bandwidth, shows up fast on a buyer’s screen, and looks great on eBay.
- When using a digital camera, set the camera no lower than the 2MB setting. At about 1600 x 1200, this gives you room to crop and edit the image to eBay’s image size.
- If you add images to your description, be sure they are no larger than 480 pixels wide. When you size your picture in your image software, it’s best to keep it no larger than 300 x 300 pixels or 4 inches square, even if it’s a snapshot of a classic 4 x 4 monster truck. These dimensions are big enough for people to see without squinting, and the details of your item show up nicely.
- Crop any unnecessary areas of the photo. You need to show your item only; everything else is a waste. No props and no extraneous decoration. You can do this directly on the eBay listing page too.
- Use your software to brighten or change the photo’s contrast. When the image looks good on your computer screen, the image looks good on your eBay item page.
- Save your image as a JPG file. When you finish editing your picture, save it as a JPG. (To do this, follow the instructions that come with your software.) JPG is the best format for eBay; it compresses information into a small file that builds fast and reproduces nicely on the Internet.
- Reduce the size of an image used in your description if it’s larger than 50K. Small is fast, efficient, and beautiful. Big is slow, sluggish, and dangerous: Impatient eBay users will move on to the next listing if they have to wait to see your image. Software like Pixby, mentioned earlier in this chapter, can reduce images easily.
The Image Is Perfect — Now What?
Now that your masterpiece is complete, you want to emblazon it on your item page for all the world to see. You can upload your images to eBay, but they will only be kept on the site for a short period of time — then poof!
Although the best way to display your listing pictures is through the eBay uploader at the top of the listing, you may want to store your images as an archive. Stay tuned … .
Trade secret: Keep an archive of your pictures. Should you ever want to use them again (or to link to them from your description), you need to store the originals off eBay. This way you have your original images, no matter what; meanwhile, eBay makes optimized copies of your images to use in your listing — and stores them for the requisite 90 days.
If you have your image stored on the web, all you have to do is type its URL address in the picture uploader section of the “Sell” listing form. Just click the Import From web link in the picture uploader, and then type the address in the URL text field. Then, by clicking the Import button, you tell eBay to go ahead and copy your photos into your listing.
If you use eBay’s picture uploader, your photo will reside on eBay’s servers and will upload once, directly from your computer. I talk more about that in just a minute.
You can highlight your image’s URL with your cursor, right-click your mouse, and copy the image to your computer’s clipboard. Then go to the item page you’re filling out on eBay, put your cursor in the Picture URL box, and paste the address into the box.
A typical address (for someone using a WordPress blog) looks something like this:
http://www.coolebaytools.com/wp-content/uploads/marsha.jpg
Because your image needs an address, you have to find it a good home online. You have several options:
- Your own website or blog: If you have a website, why not set up a separate folder for eBay pictures? Web hosts give you so much space that there’s generally plenty to spare. You’re already paying for the space, so you can park pictures there at no extra charge.
- An image-hosting website: Websites that specialize in hosting pictures are popping up all over the Internet. Some charge a small fee; others are free. The upside here is that they’re easy to use.
- Your server: If you have your own server (those of you who do, well, you know who you are), you can store those images right in your own home.
- eBay: You can find out about using eBay’s photo uploader later in this chapter. It’s the simplest and easiest way to go.
Getting Pictures from Your Smartphone to eBay
These days I take all my photos with my smartphone camera. I have a great camera and rarely have to do any editing. Even if I need more editing than my camera’s app provides, there are further tools I can use after I upload the pictures to eBay. You have two options to get your images on eBay (note that these screenshots were taken on an Android phone; iOS looks a bit different):
Take pictures using the camera that comes with the eBay app.
To begin a listing and use the eBay mobile app
Tap Selling on the opening page and tap List an Item (shown in Figure 14-3).
Don’t worry that you are listing an item for sale. It may seem that you are listing an item, but what we are doing is creating a draft listing that you can edit later.- Type in a few keywords to describe your item for sale, then tap the magnifying glass on your keyboard.
- eBay shows you active listings that may be a duplicate of your item. If you find an exact duplicate, tap on it and eBay will begin a listing for that particular item. Once you do, you see a sample listing like the one in Figure 14-3.
- If you don’t find a duplicate of your item, tap Create a New Listing at the bottom of the screen.
- Select the condition of your item.
- On the next page, select the condition of your item and you will be shown an upload (or take) photo option.

FIGURE 14-3: A close duplicate of what I want to sell, but I will edit the title and description later.
Figure 14-4 illustrates the steps.

FIGURE 14-4: Within the app, decide if you want to take or upload an image. To add photos, click the + sign and you’ll be taken to your phone’s gallery.
Don’t worry if your photos are not centered or even need editing. Once you open up the draft listing on eBay with a computer, you can take care of that.If your smartphone camera has a particularly good quality camera, I recommend using the native one. I’m using a Huawei P30 Pro that’s known for the quality of the camera. It has AI (artificial intelligence) built in and takes incredible pictures of my products (see Figure 14-5).
If you haven’t taken the pictures in the eBay Mobile App, open it now, start the listing, then click the photo box to go to your photos.
Select which ones you want to use for your listing and tap to upload.
Once you’ve selected and uploaded your images as in Figure 14-5, scroll to the bottom of the screen and tap Save for Later.
Do not tap List Your Item, or the listing will go live on the site.
Open eBay in your computer’s web browser and go to your drafts, which will be found either in your My eBay ⇒ Selling Overview or in the Seller’s Hub ⇒ Drafts.
The My eBay page is shown in Figure 14-6.
- Find the draft you want to complete and click Complete Draft.
- The Create your listing page appears; fill in all the information to complete the listing or just go to the photos you’ve uploaded.
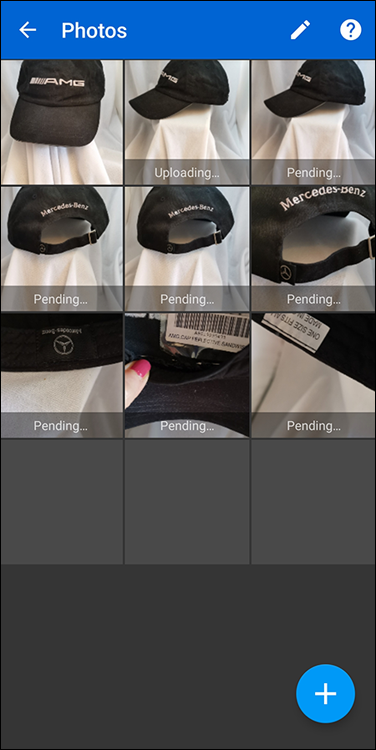
FIGURE 14-5: After you select your photo, it will be ready for uploading. You can upload as many as 12 at a time.

FIGURE 14-6: Pending drafts are safely waiting for you.
As you can see in Figure 14-7, your unedited photos are ready for editing.
To select and edit a photo
- Click a photo to put it into the edit box.
- Use the first symbol below the image to crop your photo to the appropriate size.
- If you need to rotate the photo, use the circular arrow. Click it to turn the photo.
- Before you use the sun icon (for brightness and contrast) or the triangle (for sharpening), try tapping the magic wand icon. That usually corrects your image without guesswork. Click Save after your editing is done.
FIGURE 14-7: One photo edited, four more to go.
- Click the other images to perform the edits as needed.
- To change the order of the images, just click and drag them to a different spot.
Double check that all your details are correct for your listing, then go to the bottom of the page (shown in Figure 14-8) and tap List item.
If you’d still rather fill in the details later, tap Save as draft and revisit the draft when you want to list it.

FIGURE 14-8: Tap List item to launch the listing now or Save as draft to finish later.
Using Your Website to Store Images
If you have a website, you can easily upload your images from there. A simple website where you can blog and post promotions to your eBay images can be as inexpensive as $3 to $4 a month. All you need to do is set up an eBay folder for your item’s pictures and get FTP (file transfer protocol) login information from your webhost.
After you’ve uploaded your images to your website folder, get the address of your item’s location and type it in the Picture URL box of eBay’s Sell form. You can use the uploaded images for your main eBay pictures or within descriptions. The pictures appear whenever someone views your item pages. Figure 14-9 shows you a description with an embedded brand image.
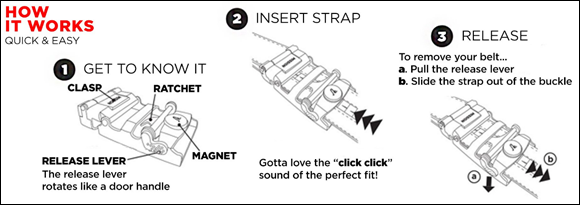
FIGURE 14-9: Mission Belt Company (of Shark Tank fame) embedded an instructional image in their description.
If your images are stored on a WordPress site, just upload them and use your own version of the URL as referenced earlier.
You can also use a service like Photobucket to host your images. More on image-hosting services in Chapter 20.
Using the Photo Uploader
eBay hosts up to 12 images per listing for free. The first photo (you can change the order after you have uploaded them) appears as your main Gallery photo in search results and as the featured photo on the listing page. Under the featured photo, a viewer appears where the buyer can scroll and click to enlarge your other images; the enlarged views automatically appear in the larger photo area.
When you upload photos to eBay, keep these tips (rules) in mind:
- Every item for sale on eBay is required to have at least one image to display the item.
- Photos must be a minimum of 500 pixels on the longest side. eBay recommends that they be at least 1600 pixels.
- You can choose from several image types: JPG (JPEG), PNG, TIF (TIFF), BMP, or GIF. Most sellers use photos with the
.jpgfile extension. - Do not get fancy. Images with borders, text, or graphics embedded in them are a violation of policy (plus they’re supposed to be pictures of your items, not ads).
- When you export your JPG images for eBay, and your software gives you a choice, select an image quality of 90 or more. Then eBay will optimize it for viewing on the site.
When you prepare to list an item for sale, you will be asked whether to add photos. If you don’t want to upload from your computer — but have product images on your website — eBay gives you the option of copying your website images. Just input the URL of your picture in the tab called Copy Your Photos from a Web Address in the enhanced photo uploader. Then follow the directions onscreen to upload your image from your computer to eBay.
To post your photo, you have options:
- Click Add/Edit Photos to use the photo uploader.
After clicking the Classic Uploader link, click the Browse box.
An Open File dialog box appears.
Find your image on your computer and click Open.
The name of the image appears in the Pictures list (but not in your listing). Figure 14-10 shows the upload page.

FIGURE 14-10: Click Add Photos and you’re on your way.
- Add more pictures if you want, and click Add Photo.
- At this point, follow the same process described previously in “Getting Pictures from Your Smartphone to eBay” for editing and arranging.
Here are a couple things to keep in mind:
- eBay keeps an image online for the duration of your listing and for up to 90 days (as long as you have the link available to access the page). After that, the image disappears (unless you relist the item).
- You can always post the image again if you need it later; be sure to archive a copy of the image on your computer.
When you do your own photo hosting on eBay, you can use a different photo for your Gallery image.
Tell Your Story on Your Profile Page
If staying social is the key to the new web, your eBay profile is the hub of your eBay user interaction. Your profile page is there for customers and the eBay community. People like to know about other people, and your eBay pages let folks know with whom they are transacting.
Although my editors would love for me to give you a long, drawn-out, step-by-step list to show you how to get to your profile page, I won’t. It’s all too simple: To get to your profile page, click your User ID on your My eBay page — or on any eBay page, for that matter — even when you click your User ID after clicking “Hi” at the top left of any page.
When your profile page appears, it will be pre-populated with items you’re selling, your reviews (if you’ve reviewed an item on eBay), your bio, and a profile picture (provided you previously uploaded the bio and photo to the now-defunct My World page). If you have no profile picture, read further on.
Remember: Whenever you click your name or User ID, you arrive at your own profile page. Your profile page contains basic information about you as a seller, your recent feedback, your eBay Store (if you have one), and some further handy details:
- Items for sale: Images and links to your current listings.
- Following: When you choose to follow an item search, or an eBay seller, they will show up here.
If you’re following a search or seller for your own personal research, you can choose to make those selections private by clicking Settings on the right side of the page, then the word Private under the image on the profile page.
Take an opportunity to edit the page. Here’s the lowdown on what you can do to personalize your page after clicking the Edit Profile button under your User ID. When you click that button, small pen icons appear, showing you where you can edit the page:
- Upload a profile photo: Click the pen icon in the corner of the square next to your User ID. The page will prompt you to upload your profile image. Choose a profile photo that portrays you and your personality. There are no set requirements for size at this point, so I suggest using a close-to-square headshot. If you do not select a headshot, your face might be too small for folks to see.
- Upload a cover photo: Just as on Facebook, you may upload a photo for the top of your page. Keep in mind that text covers a good deal of the cover photo, so don’t select a picture where the most important spot is at the bottom. When you’re selecting (or cropping) an image for use as a cover photo, also keep in mind eBay’s recommended 1200 pixels x 270 pixels size for best viewing. Also, eBay requires cover-photo image files to be smaller than 4MB.
- Add content: Here you have 250 characters to talk about yourself, your eBay life, or the items you enjoy selling or buying.
It is easy to share a link to your profile or find other buyers and sellers by typing an eBay ID into an eBay URL, like this: http://www.ebay.com/usr/marsha_c (pictured in Figure 14-11). I can’t wait to see your creativity on your eBay profile page!
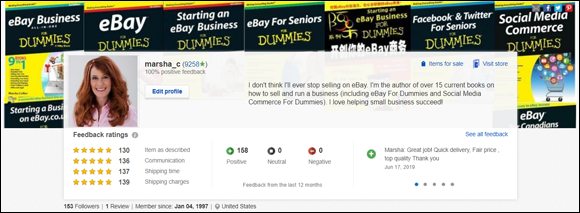
FIGURE 14-11: Welcome to my eBay profile page!