
Planning and Building the Prototype
Before you start to write the first line of code, it’s important to have a mock-up to see what the app looks like, what the user experience is like, what are the features are, and how they are organized. In this chapter, I will show you how to prototype the sample e-commerce iPhone app by using Xcode.
The Apple Store iPhone app uses a UITTabBarController-based user interface (UI) design pattern. This pattern is quite standard and powerful for an e-commerce app; other apps such as Target and EAT24 also use this UI pattern. The good thing about the tab bar interface is that each view controller’s state of each tab is automatically persistent. It means that whenever we leave a screen from one tab and play around with other tabs, when we return back to the tab it will always show the content we just left.
This chapter is largely about planning. I won’t be giving instructions and showing you figures about how you can drag and drop a UIViewController or a UI Control to UIStoryboard, but in some instances, I will reveal the tricks I have used.
This chapter covers the following:
- User interface and experience
- The proximate total amount of view controllers
- The view controller’s type, UITableViewController, or UIViewController
- Custom views
- The appearance of the app
Designing the User Experience
The goal for the sample app that accompanies this book is to present users/customers with an experience that is similar to what they get from the Apple Store iPhone app. The Apple Store app is based on a tabbed design, so you want to use a tapped application template in Xcode. To get started, launch Xcode, and follow these steps:
- Create a new project based on the Tabbed Application template, and name it, for example, “Chapter 2.” In general, the Tabbed Application template is a good fit for an e-commerce mobile app.
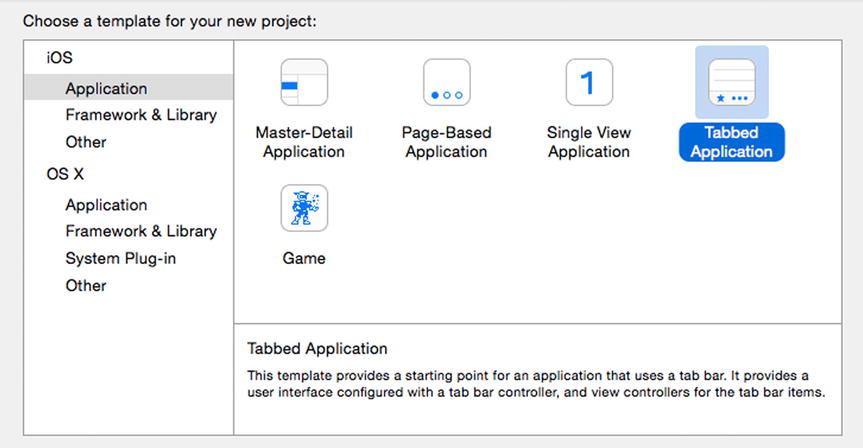
Figure 2-1. Create a Tabbed Application with Xcode
- Next, open the Main.storyboard file. The default nib file is freestyle size. Let’s change to iPhone 4-inch on Simulated Metrics, shown in Figure 2-2.
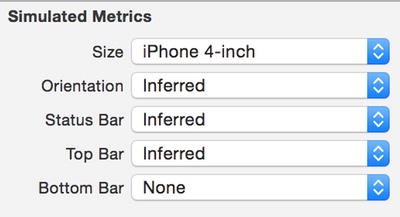
Figure 2-2. Change Simulated Metrics to iPhone 4-inch
- Add three navigation controllers.
- Holding “control” key, drag the root TabController to the three navigation controllers. A UITabBar shows up on each UINavigationController, as shown in Figure 2-3.
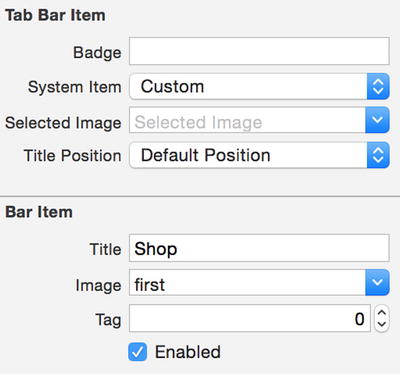
- Change the title of the three UITabBars to “Shop,” “My Account,” and “Bag,” respectively (see Figure 2-3).
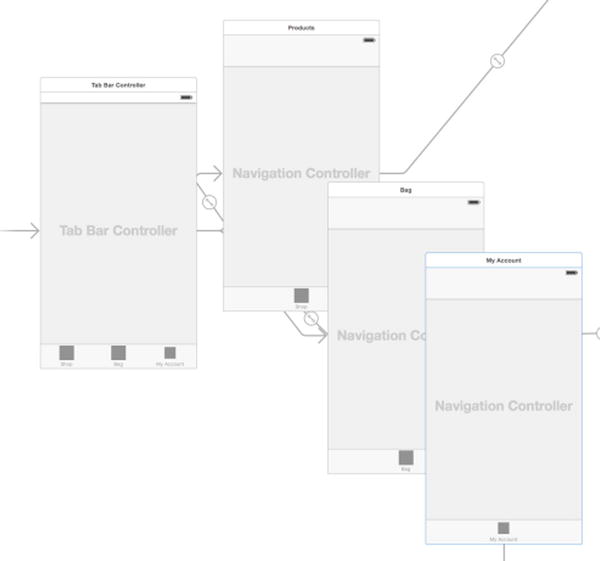
Figure 2-3. Connect the three UINavigationControllers to the TabController
Shop
The root view controller of the Shop NavgationController is the Shop TableViewController. You will use this controller to display the beauty products category.
- For this example, set the cell numbers to three (see Figure 2-5). For each cell, use the Basic Style of UITableViewCell. It means that each cell will only have a title label. The text for these three labels is Bath & Body, Makeup, and Skincare respectively, as shown in Figure 2-6.
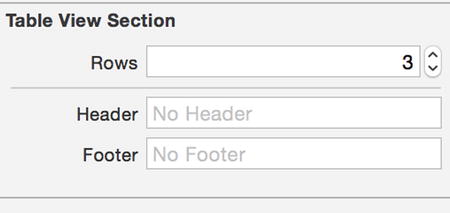
Figure 2-5. Set three static rows for a UITableView
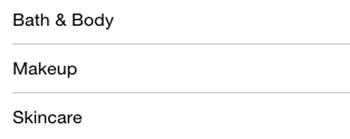
Figure 2-6. The is the partial user interface of Shop TableViewController
- The sample will show a list of products under each product category, so you want to add another UITableViewController to the UIStoryboard. Give it an identifier of ProductsTableViewController and a title of Products, as shown in Figure 2-7.

Figure 2-7. Set Identifier for a UITableViewController
- Next, you want to connect the “Bath & Body” cell of the ShopTableViewController to the ProductsTableViewController. Hold the Control key and drag-and-drop mouse cursor between the cell and the target view controller to connect the two controllers.
- Build and run the project on an iPhone simulator. When you tap the Bath & Body cell in the first screen of the app, you should see an empty Products table titled Products, as shown in Figure 2-8.
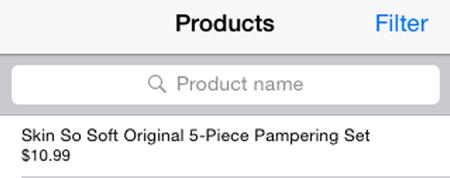
Figure 2-8. This is the user interface of Products UITableViewController
Next, you will work on the Products UITableViewController. The view controller will show information about the product, such as the product name and unit price. You can also add search and filter features to it.
- For each cell, use the Subtitle style, as shown in Figure 2-9, which means there will be a subtitle label under the main text label. Use “Skin So Soft Originals 5-piece Pampering Set” as the main text label, and “$10.99” as the content of the subtitle label.
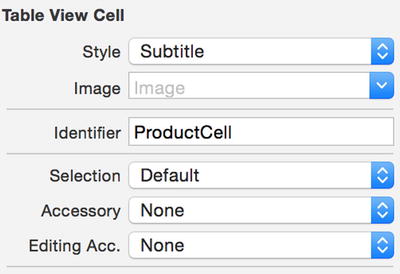
Figure 2-9. Use “Subtitle” Style for UITableViewCell
- Drag a UISearchBar to the ProductsTableViewController, and set the placeholder text to “Product name.” See Figure 2-10. This provides a hint to users that search terms entered by them will only search for product names.
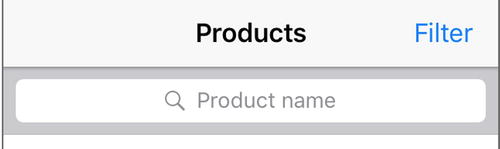
Figure 2-10. Add a UISearchBar to UITableView
- In the “Beauty & Me” sample app, the user can filter products based on the price range. Add a UIBarButtonItem to the Products TableViewController and change its title to “Filter.” Add a new UIViewController, set “FilterViewController” as its identifier, and set “Price Filter” as the title. Connect the Filter UIBarButtonItem with the new FilterviewController. Presenting the view controller modally is a better user experience. You will also want to add a system Cancel UIBarButtonItem to the left and a system Done UIBarButtonItem to the right of the view controller.
- In order to let the user quickly change the price range, use two UISlider controls: one is for setting the minimum price; the other is for setting the maximum price. You also need two UILabel controls to show the current minimum UISlider’s value and the current maximum of the UISlider’s value. Add a few other UILabels to tell users what ranges he can adjust, as shown in Figure 2-11.
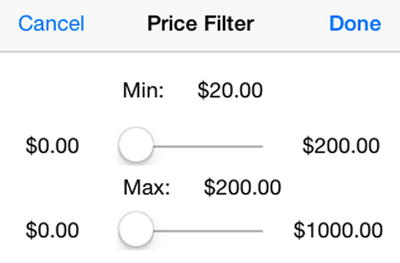
Figure 2-11. The is the user interface of FilterViewController
- When a user taps a product cell, the product’s detail is displayed, as shown in Figure 2-12. Add a new UIViewController with identifier of “ProductDetailViewController” to the UIStoryboard, and connect any cell on the ProductsTableViewController to the new view controller. The title of the ProductDetailViewController should be the product name you selected, and it needs to be changed based on the user’s selection. Right now, let’s just put “Skin So Soft Original 5-piece Pampering Set” as its title.
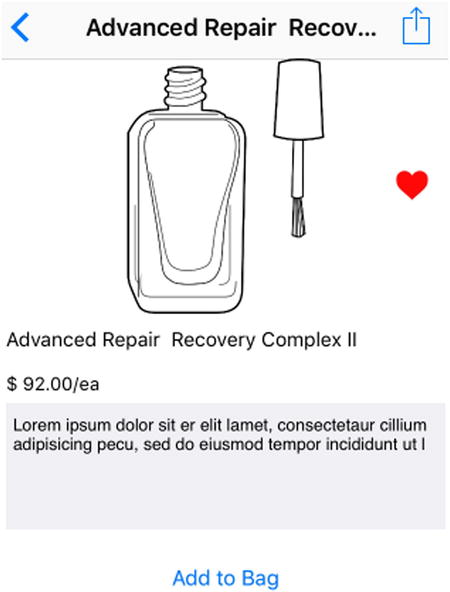
Figure 2-12. The is the user interface of ProductDetailViewController
- The product detail view controller will show a full-size image of the product, product name, price, and description; you also need a button to let a user add the product to her shopping bag. Finally, you want the user to be able to add the product to the favorites list, so add another button with a title “Favorite it.”
- Build the project and run it on the simulator again. Even though you have not added the real search, filter, add-to-bag, and favorite-it functionality, it still gives you some idea what the app will look like. And most important, you can do more about the user interface design.
Figure 2-13 shows the all UIViewControllers for the “Shop” feature.
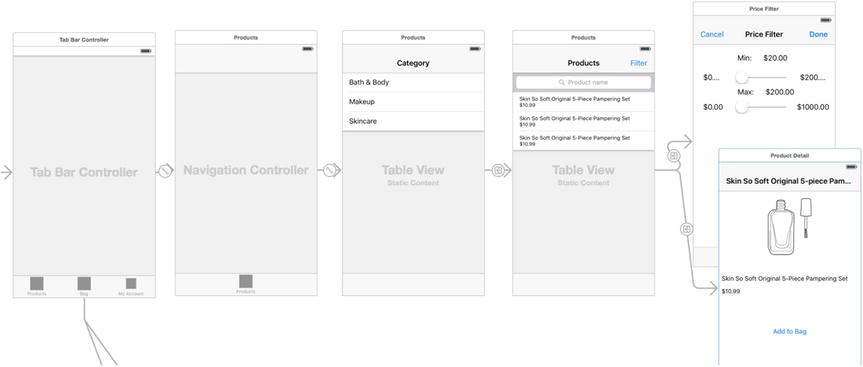
Figure 2-13. This is the view controllers used in Shop
The root view controller, MyAccountTableViewController, is the place to have all users’ activities, such as the shipping and payment address, the order history, and payment methods. We also use this place to show information about the app, privacy policy, contact information, and app version – just like the Apple Store iPhone app.
For the MyAccuntTableViewController, let make its UITableView the Grouped Style, and set three sections. For each cell, we set it as Static and Basic style. Figure 2-14 illustrates what the view controller looks like.
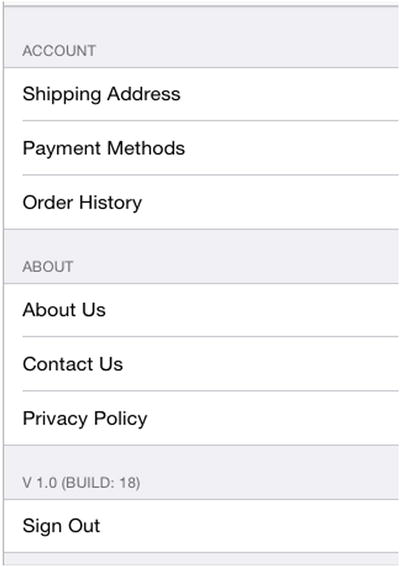
Figure 2-14. Practical user interface of MyAccountTableViewController
The “Sign Out” cell is to log the user out. When the cell is tapped, a screen is displayed to ask the user to log in again. This will involve some programming so we will cover it later.
First, I will focus on prototyping in the first “Account” section.
- Add another UITableViewController to the main UIStoryboard, use “UserAddressTableViewController” as its identifier, and use “Shipping Address” as its title, as in Figure 2-15.
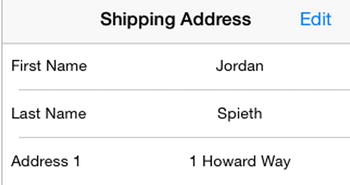
Figure 2-15. This is part of the user interface of UserAddressTableViewController
- This time, customize the UserAddressTableViewController’s UITableViewCell a bit. Ideally, users should be able to edit their shipping address information. For each cell, use a UILabel to tell what the cell is about, and use a UITextField to take the user’s input. On the other hand, a better user experience is to make the UITextField uneditable by default if we know the user has complete address information. Use an Edit system UIBarButtonItem to ask the user to tap the button to edit one’s information to avoid editing this information by mistake.
- Connect the first cell of the first section on “MyAccountTableViewController” to the new “UserAddressTableViewController.”
- Build and run the project; then we should be able to play with the new features.
Next, let’s work on the payment methods UI. You technically can’t store a user’s credit card number or CVC numbers, but you can store a credit card’s type such as Visa, Master Card, or American Express; the last four digits; and expiration month and year. Usually a user adds a few credit cards into his account. So you want to use a UITableViewController to show all cards linked to the account.
- Add a new UITableViewController to your main UIStoryboard, and name it “UserPaymentMethodsTableViewController.” For the UITableView, make it Plain style and Static Cells as its Content. You will need one section and two cells.
- Set each cell as “Subtitle Style.” For the first cell, set the content for its TextLabel: Visa XXXX-XXXX-XXXX-4242, 04/20 as the subtitle text; use MasterCard XXXX-XXXX-XXXX-XXXX-4444 and 05/18 for the second cell, as shown in Figure 2-16.

Figure 2-16. Practical user interface of UserPaymentMethodsTableViewController
- Typically, when a user first signs up for an account with us, there will be no credit card information on file. You should provide a way for the user to add a new card. Drag a UIBarButtonItem to the left bar button item of the view controller, and set it to the system “Add” bar button item.
- Another use case is that you need to set a default credit card for the user to help speed up the checkout process. Set the first credit card as the default and use a checkmark representing it. But allow the user to set any card as the default.
- Next, let’s prototype a user’s order history. Add another UITableViewController to the UIStoryboard, name it “UserOrderHistoryTableViewController” as its identifier, and use “Order History” as the title of the controller.
- Typically, you will show when the order is placed; a total amount of the purchase; items ordered if there is enough room and an order status; or at a minimum, you need to highlight some canceled orders. First, make the cell height taller, 66. Then put three UILabels on a single cell: one label is for the order date, the other one is for the total amount, and the other one is the product name. For the label, set the number of lines to 0 and the line breaks to Word Wrap. It’s pretty common that a user would order multiple products so the product name label won’t show all the product’s names. Use gray text color to represent a canceled order, as shown in Figure 2-17.

Figure 2-17. This is a partial user interface of UserOrderHistoryTableViewController
This is all you need for “MyAccount.” Now you can build the project and run it. Figure 2-18 shows each view controller used in My Account.
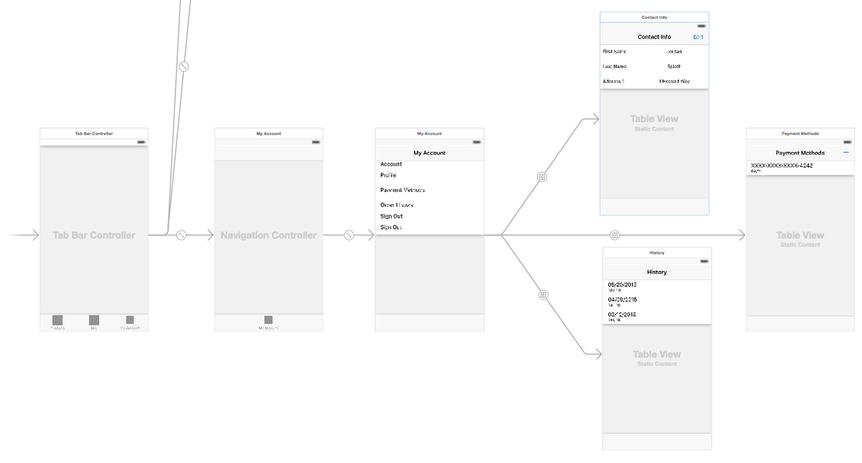
Figure 2-18. Here are the My Account view controllers
The root view controller of the BagNavigationController is a UITableViewController. To show what’s in the user’s bag, use the UITableviewController and name it “BagTableViewController” and “Bag” as its title.
In addition, the following requirements need to be met. The user has to be able to check out; the user should be able to change the quantity of an item or remove an item from the bag; and the bag should show the total amount, which needs to change automatically according to an item’s unit price and quantity.
- First, work on the UITableViewCell. There’s quite a lot of content to show so let’s make the cell taller. in this example, set it to 66.
- You also need three UILabels: One is for the product name, the other is for the unit price, and the third is for the quantity. Also add a UIStepper control to the cell so that a user can change the quantity she wants to purchase, as shown in Figure 2-19.
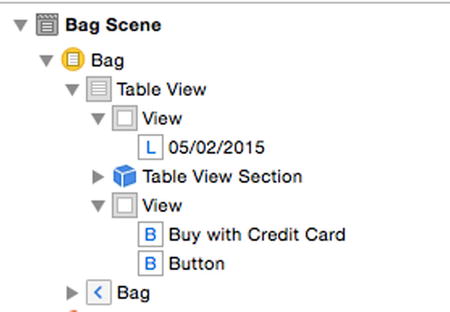
Figure 2-19. View hierarchy of BagTableViewController
- You also need a UITableViewCell to show the total amount the user should pay. Add another cell and set its style as Right Detail and set a total amount of $36.00 as the subtitle for the cell.
- It’s quite common that the user wants to leave an instruction about the order, so add a Compose system UIBarButtonItem to the view controller. It doesn’t’ really do anything right now, but at least it shows we have this feature in mind.
- Drag two UIViews: one is for the header view of the UITableView, the other is the footer view.
- Add a UILabel to the table header view. The UILabel will be used to show when those items have been added into the bag.
- Add two UIButtons to the footer view. One button has a title “Buy with Credit Card,” and the other one is for “Buy with Apple Pay.” We need to download the graphic asset for the button from Apple’s web site. It comes with our chapter source code. Figure 2-20 illustrates what Bag UITableViewController looks like. Figure 2-21 shows all view controllers for Shopping Bag.
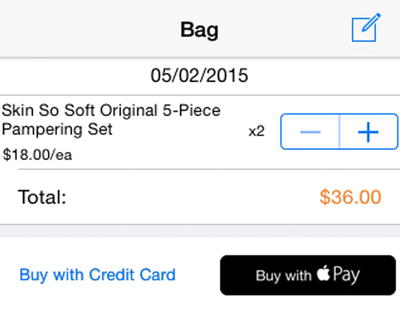
Figure 2-20. This is the partial user interface of BagTableViewController
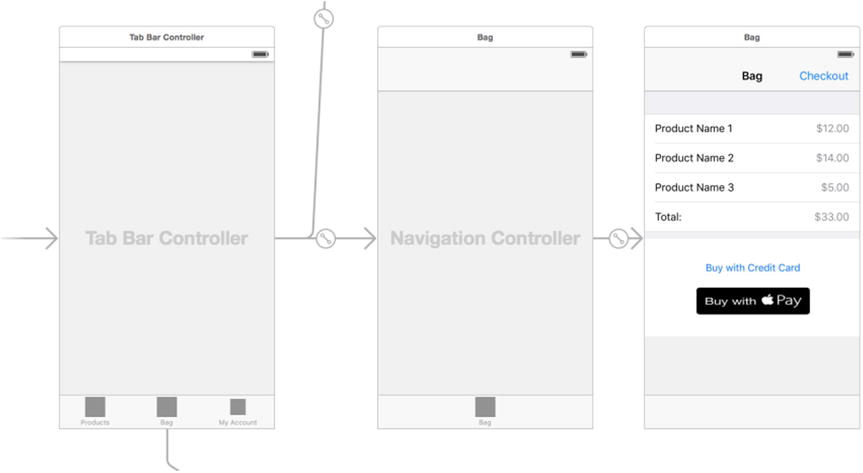
Figure 2-21. The view controllers used in Shopping Bag
Sign Up or Log In
A user-friendly app doesn’t always require a user to create an account from the beginning. It gives a user the chance to understand what the app is about and what value the app can add to the user’s life. Our Beauty & Me is no exception.
For this prototype, ask the user to create an account or log in when one of the following conditions is met. The user taps one of the following:
- “My account” tab
- “Shopping Bag” tab
- “Add To Bag" button on ProductDetailViewController
Let’s create another storyboard to handle the login and sign-up work flow.
- Open the existing project. From the Xcode File menu, select New
 File. A dialog window is shown as in Figure. 2-22. Next, choose User Interface and select Storyboard. Name the UIStoryboard LoginSignup.storyboard.
Figure 2-22. Create a UIStoryboard file
- Add a UINavigationController on the storyboard, set its identifier “DispatchNavigationController,” and check “Is Initial View Controller”, as shown in Figure 2-23. Delete its default root view controller, a UITableViewController.
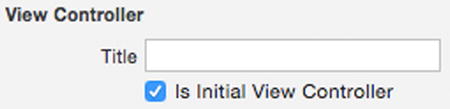
Figure 2-23. Set the DispatchNavigationController as an initial View Controller
- Add a UIViewController, and set it to the root view controller of the DispatchNavigationController. Name the new root view controller with an identifier of “DispatchViewController” and set “Beauty & Me” as its title.
- Add three buttons on the view of the DispatchViewController, and give the title for each button—“Log In with Facebook,” “Sign Up,” and “Log In,” respectively. The reason you want to put the “Log In with Facebook” button on top is that you really want to encourage users to create an account with us.
- The DispatchNavigationController will be presented modally so a user will have a chance to cancel the process. Add a system cancel UIBarButtonItem to the left of the UIBarButtonItem.
This feature will only work once you have implemented what happens when a user taps the “Log In with Facebook” button. Right now, it won’t do anything.
- Add another UIViewController, and name it “SignUpViewController” with “Sign Up” as the title. Connect the “Sign Up” button with the SignUpViewController. On the view controller, let a user enter his or her e-mail and password to sign up for an account with you. To make sure the user can remember his password, let the user enter his or her password one more time. A standard way to create the user experience is to use a UITableView with three cells. Use each cell to hold a UITextField. Put a placeholder text on each UITextField to indicate what the cell is for, as seen in Figure. 2-24. Add a UIButton with the title “Sign Up” under the UITableView, and add a UIBarButtonItem with a title “Sign Up” to the right bar button item so a user can tap either one to sign up.
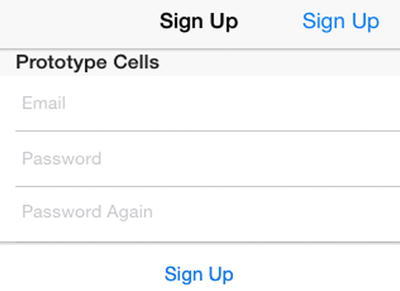
Figure 2-24. This is a partial user interface of SignupViewController
- In similar fashion, add another UIViewController, and name it “LoginViewController” with a title “Log In.” Add a UITableView with two static cells. This time you only need the user’s e-mail and password to log in with you. Figure 2-25 shows what it looks like.
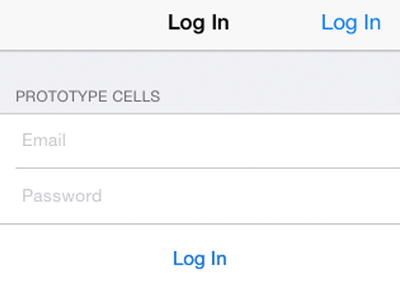
Figure 2-25. This is a partial user interface of LoginViewController
Figure 2-26 shows the whole LoginSignup.storyboard
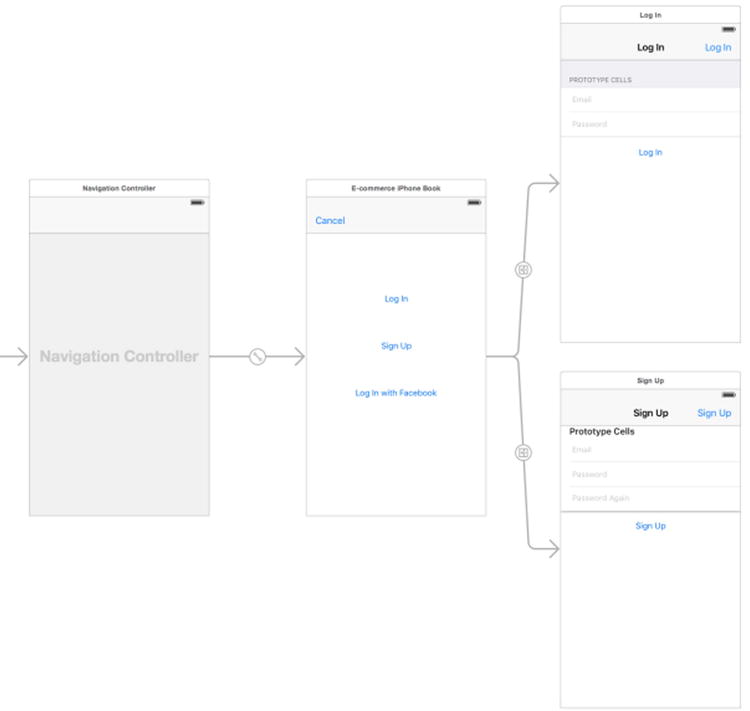
Figure 2-26. The view controllers used in LoginSignup.storyboard
Put It All Together
To make our prototype work like the real thing, you need to write a little bit of code to handle cases:
- A user has not created an account but tapped “My Account” or “Add to Bag.”
- A user logs out.
You may wonder whether you can ask a user to register an account with you when he/she just opens the app? Technically, yes, you can, but it’s not a good user experience. A user doesn’t know what the app is and what it can do, and you already ask him or her to register an account? Most likely the user will quit and delete the app.
Use NSUserDefault to save the login/logout status of a customer. When the app just opens, assume the user is not a registered user. Here is the code:
When the user taps “My Account” or “Shopping Bag” tab, show our DispatchViewController. To do this, you need to a little bit more work.
First, In AppDelegate, you need to declare UITabBarContollerDelegate:
UITabBarController *tabBarController = (UITabBarController*)self.window.rootViewController;
    tabBarController.delegate = self;
When the user taps a tab other than “My Account” or “Shopping Bag,” don’t ask the user to sign up or log in.
Here is how to implement one of UITabBarControllerDelegates to respond to a tab selected:
- (void)tabBarController:(UITabBarController *)tabBarController didSelectViewController:(UIViewController *)viewController{
    UINavigationController *navViewController = (UINavigationController *)viewController;
    if (![navViewController.title isEqualToString:@"Shop"]) {
        if (!([[NSUserDefaults standardUserDefaults] boolForKey:kIsLoggedInfKey])) {
            UIStoryboard *dispatchStoryboard = [UIStoryboard storyboardWithName:@"LoginSignup" bundle:nil];
            UINavigationController *navController = (UINavigationController *)[dispatchStoryboard instantiateInitialViewController];
            [self.window.rootViewController presentViewController:navController animated:YES completion:nil];
        }
    }
}
First, check which tap is selected by checking the title of navigation controllers. Then ask whether the user is logged in or not; If not, grab the Dispatch navigation controller by its storyboard identifier, then present it.
In Dispatch view controller, implement two IBActions: A user logs in by using the “Log In with Facebook” feature, or a user cancels the login or sign-up process:
-(IBAction)onFacebookLogin:(id)sender{
    [[NSUserDefaults standardUserDefaults] setBool:YES forKey:kIsLoggedInfKey];
    [[NSUserDefaults standardUserDefaults] synchronize];
    [self dismissViewControllerAnimated:YES completion:nil];
}
Here you simply set the kIsLoggedInKey of NSUserDefaults to Yes then dismiss the Dispatch navigation view controller.
-(IBAction)onCancel:(id)sender{
    [self dismissViewControllerAnimated:YES completion:nil];
}
Once the user taps the “Cancel” UIBarButtonItem, we dismiss the Dispatch navigation view controller.
Note A complete implementation can be found in the Chapter 2 source code.
Summary
In this chapter, I cover how to use UIStoryboard to create the prototype for the app used in this book. I have used the Tabbed Application template. Three tabs, namely, “Shop”, “Shopping Bag,” and “My Account” lead to three different main features for the app. I also showed how to set up a sign-up or login UIStoryboard. With some code to fake a signed-in user, I created a prototype of the app.