
In this chapter, you will learn how to implement the Products screen. More specifically, you will learn how to display products and let users search your product list and filter products based on certain criteria. The first thing, however, is to create a product model.
The Product Model
Following the pattern introduced in earlier chapters, specify the model name in the EMABConstants helper class:
NSString *const kProduct= @"Product";
Next, create a new PFObject subclass, and name it “EMABProduct.” If you look at a typical makeup product, you might need a lot of properties to describe a product. For example, EMABProduct model has the following properties: name, unit price, price unit, detail, thumbnail image, and full-size image. You also have to build a one-to-many relationship between product category and products so another important property is brand.
For this tutorial, use the following properties: name, detail (don’t use description), price, priceUnit, thumbnail (for performance reason), and fullsizeImage; we have a pointer “brand” to EMABCategory. You will build a one-to-many relationship between EMABCategory and EMABProduct. One brand can have many products under this brand. Parse provides a few options and you can just directly use a pointer.
The last thing you need to do is to define a custom static method to query all products under one brand:
+(PFQuery *)queryForCategory:(EMABCategory *)brand;
When the properties of the priceUnit and the unitPrice are already defined (as I have done here), it’s common to display a product price (e.g., $3.50/ea). You have to keep using the following format method when presenting the price on a UILabel:
[NSString stringWithFormat:@%@/%.2f, product.unitPrice, product.priceUnit];
To make things easier for yourself, create a helper method:
-(NSString *)friendlyPrice;
This suffices for now. You can add more helper methods or properties later if necessary. Next, continue with the implementation of the EMABProduct class.
Besides importing the necessary header files and the dynamic properties declaration, the +(NSString *)parseClassName will be:
+(NSString *)parseClassName
{
    return kProduct;
}
The +(PFQuery *)basicQuery method looks like this; here you will also sort all products by product name, as you have done with the brand.
+(PFQuery *)basicQuery {
    PFQuery *query = [PFQuery queryWithClassName:[self parseClassName]];
    [query orderByAscending:@"name"];
    return query;
}
If you want to sort products based on when each one is added to the Parse data store, you can use the following:
[query orderByDescending:@"createdAt"];
Your next query helper method is to query all products under one brand. The implementation might look like this:
+(PFQuery *)queryForCategory:(EMABCategory *)brand{
    PFQuery  *query = [self basicQuery];
    [query whereKey:@"brand" equalTo:brand];
    return query;
}
In this query method, the input parameter is an EMABCategory object. Make sure the brand property in EMABProduct is equal to this object.
[query whereKey:@"brand" equalTo:brand];
On the other hand, the +(PFQuery *)basicQuery method defines how you want to sort query results. It helps you create all kinds of query helper methods without having to repeat writing the same code over and over again.
The last method is -(NSString *)friendlyPrice:
-(NSString *)friendlyPrice{
    return [NSString localizedStringWithFormat:@"$ %.2f/%@", self.unitPrice, self.priceUnit];
}
You will use a UITableView to display the product list. The key view for a UITableView is its cell. In Xcode, create a PFTableViewCell subclass and name it “EMABProductTableViewCell.”
In the header file, add a helper method:
-(void)configureItem:(EMABProduct *)product;
to connect the EMABProduct model and this view. Here is the complete header file:
Figure 6-1 shows what the product cell looks like.
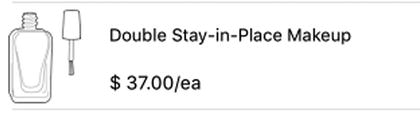
Figure 6-1. The Product TableView cell
This product cell consists of three UI elements: a UILabel to show the product name, a UILabel to show the product price, and a PFImage to show the product thumbnail.
Again, use EMABProductTableViewCell category to declare the properties:
@interface EMABProductTableViewCell()
@property (nonatomic, weak) IBOutlet UILabel *nameLabel;
@property (nonatomic, weak) IBOutlet UILabel *priceLabel;
@property (nonatomic, weak) IBOutlet PFImageView *thumbnailImageView;
@end
In the EMABProductTableViewCell cell, there is only one method -(void)configureItem:(EMABProduct*) product you need to implement.
At this point, your EMABProduct has the properties of name, unitPrice, priceUnit, and thumbnail; all you need to do is to assign the value of a product object to the EMABProductTableViewCell UI properties. EMABProduct has a helper method to generate a price with unit; you can use it as the text of priceLabel. To display the product’s thumbnail, use the file of thumbnailImageView, and call the loadInBackground. The following code shows the complete implementation.
As discussed in Chapter 5, be sure to set thumbnailImageView to nil before you set its file to be the product’s thumbnail. This ensures that ImageView will not show the old image before it displays the new image due to the UITableViewCell reuse nature. This is not the only way you can achieve this goal. For example, use -(void)prepareForUse method in UITableViewCell to handle this case.
-(void)prepareForReuse{
[super prepareForReuse];
self.nameLabel.text = @"";
self.priceLabel.text = @"";
self.thumbnailImageView.image = nil;
}

-(void)configureItem:(EMABProduct *)product{
    self.nameLabel.text = product.name;
    self.priceLabel.text = [product friendlyPrice];
    self.thumbnailImageView.image = nil;
    if (product.thumbnail) {
        self.thumbnailImageView.file = product.thumbnail;
        [self.thumbnailImageView loadInBackground];
    } else
        self.thumbnailImageView.image = [UIImage imageNamed:@"default_product_thumbnail"];

}
If there is no thumbnail file in the EMABProduct object, use a default image that comes with the project.
You finished the view part. Now you can move to building the controller. In Xcode, create a new PFQueryTableViewController subclass EMABProductsTableViewController.
In the generated header file, declare a EMABCategory property. When a user selects a brand, show the product’s view controller. In this view controller, you create a product query based on a brand. Use this brand property to connect a brand table view controller and products table view controller.
@property (nonatomic, strong) EMABCategory *brand;
Here is the complete EMABProductsTableViewController header file:
In the implementation file, you need to have a brand setter method:
-(void)setBrand:(EMABCategory *)brand
{
    if (_brand != brand) {
        _brand = brand;
    }
}
The –(void)awakeFromNib method will look like this:
- (void)awakeFromNib {
    [super awakeFromNib];
    self.parseClassName = kProduct;
    self.objectsPerPage = 20;
    self.paginationEnabled = YES;
    self.pullToRefreshEnabled = YES;
}
Also, the –(PFQuery *)queryForTable method needs to take brand property into account:
- (PFQuery *)queryForTable {
    PFQuery *query = [EMABProduct queryForCategory:self.brand];
   if ([self.objects count] == 0) {
        query.cachePolicy = kPFCachePolicyCacheThenNetwork;
    }
    return query;
}
Next, customize the UITableView Datasource; in this case, set the cell height to 80.0 point:
-(CGFloat)tableView:(UITableView *)tableView heightForRowAtIndexPath:(NSIndexPath *)indexPath
{
    return 80.0;
}
In the same way, use the PFQueryTableViewController custom method –tableView:cellForRowAtIndexPath: to customize each cell based on given EMABProduct object. Since we load 20 objects each page, we add “Load more…” text on cell 21. The following code shows a complete implementation of the method. This method will return an instance of EMABProductTableViewCell. You also use the –(void)configureItem:(EMABProduct *)object method to connect a product object and its view.
- (EMABProductTableViewCell *)tableView:(UITableView *)tableView cellForRowAtIndexPath:(NSIndexPath *)indexPath object:(EMABProduct *)object{
    EMABProductTableViewCell *cell = [tableView dequeueReusableCellWithIdentifier:@"ProductCell" forIndexPath:indexPath];
    if (indexPath.row == [[self objects] count]) {
        cell.textLabel.text = NSLocalizedString(@"Load More…", @"");
    } else {
        [cell configureItem:object];
    }
    return cell;
}
The last method handles what happens when a user taps one of the cells. When the user taps a project cell, the app is supposed to display a product detail page. Since I have not discussed the product detail page yet, insert a comment ( //todo) placeholder for now. When a user taps the “Load more…” cell, the next 20 products are loaded. Here is the complete implementation:
-(void)tableView:(UITableView *)tableView didSelectRowAtIndexPath:(NSIndexPath *)indexPath{
    if (indexPath.row == [[self objects] count]) {
        [self loadNextPage];
    } else {
        //todo
    }
}
@end
You are almost ready to run the app in a simulator or on your device. Only one more implementation in EMABCategoriesTableViewController is missing. After a user taps a brand cell, the Products table view controller should be loaded. Go to EMABCategoriesTableViewController.m and add the following code:
-(void)tableView:(UITableView *)tableView didSelectRowAtIndexPath:(NSIndexPath *)indexPath{
    if (indexPath.row == [[self objects] count]) {
        [self loadNextPage];
    } else {
            EMABProductsTableViewController *viewController = [self.storyboard instantiateViewControllerWithIdentifier:@"EMABProductsTableViewController"];
NSIndexPath  *indexPath = [self.tableView indexPathForSelectedRow];
            [viewController setBrand:self.objects[indexPath.row]];
[self.navigationController pushViewController:viewController];
  }
}
Now you can build and run your project, to make sure there is no error.
So far, you have not added any product for any brand yet, so there is nothing to show after you tap a brand. You need to add some product data to the Parse back end.
Go to Parse.com, log in, and browse to “Core” page of the sample project. Then click “Add Class” and give it a name “Product.”
Next, click “+Col”; for the first col, select the String type and set its value to “name,” then click “Create Column.” In the same way, add “detail” column with String type, “unitPrice” with Number type, “priceUnit” with String type, “thumbnail” with PFFile type, and “fullsizeImage” with PFFile type. The last one is important; we add a column with a “brand” column with Pointer Type, which should point to “Category” class. See Figure 6-2 to see the details.

Figure 6-2. Add a Pointer type in Parse
Now it’s time to add product data. I have prepared three Esta Louder products. You can also find images for these brands for demo purposes. Or just use the images I have prepared for the Chapter 6 project source code.
Next, click the “+Row” button. Parse creates an empty row with an “undefined” placeholder for each column. You have multiple columns to fill. One of the most important ones is the “brand” column.
First, tap “Category” class and find the row for Esta Louder. Copy the value of the “objectId” column for this row. Then move to “Product” class, tap the “(undefined)” area in “brand” column, and paste the “objectId” value. Now you can add a product name, product summary, unit price, and use “ea” for priceUnit; then upload a thumbnail and full-size image for this product.
Following the previous steps, add two more rows.
Return to your Xcode project or open the app on the simulator or your device. Now, on the brand screen, when you tap the Esta Louder cell, you should see the three products you just added.
One of the required features for the app is that a customer can search products based on part of a product name in the product list view. When dealing with searching, one can implement to only search from loaded data, or search your back-end data store to find all matches. Obviously searching from loaded data is much quicker, but the results are also limited. It might turn out results are not found. So the best approach is to search on the back end.
Currently search in the app is limited. A user can only search products based on product names. For example, an Esta Louder product name contains the “Night Repair” string. If a user enters “Night” in a search box, the app won’t find all products whose name or detail contains “Night.” And the search keyword is case sensitive. If a user enters “night” instead of “Night,” all products whose names contain “Night” won’t be returned. To get around this limitation, you can preprocess the user’s input and capitalize each word.
First, add a new query method to the EMABProduct model class. Declare this method in the header file:
In its implementation, call the +(PFQuery *)queryForCategory:(EMABCategory *)brand method, and add another query condition:
– whereKey:containsString:
Here is the complete implementation:
+(PFQuery *)queryForCategory:(EMABCategory *)brand keyword:(NSString *)keyword
{
    PFQuery *query = [self queryForCategory:brand];
    [query whereKey:@"name" containsString:keyword];
    return query;
}
Next, to the controller. There are a few places you need to implement.
First, you need to keep track of the user’s search keyword; add a new property in the EMABProductsTableViewController category:
@property (nonatomic, copy) NSString *keyword;
Second, you also need to declare UISearchBar delegate protocol in the class category:
@interface EMABProductsTableViewController()<UISearchBarDelegate>
Third, you need to connect the UISearchbar to view controller delegate (you already added a UISearchBar in controller xib file in Chapter 5). Figure 6-3 shows how to connect it.
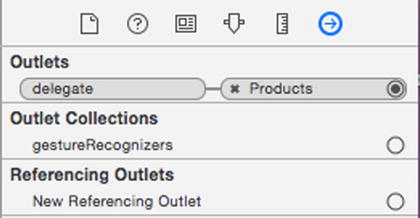
Figure 6-3. The UISearchBar delegate
Here is the complete implementation:
Fourth, implement the UISearchBar delegate method:
- (void)searchBarSearchButtonClicked:(UISearchBar *)searchBar
{
    if ([searchBar.text length] > 0) {
        [searchBar resignFirstResponder];
        self.keyword = searchBar.text;
        [self clear];
        [self loadObjects];
    }
}
Check if there is any text in the search bar (searchBar). If there is, dismiss the keyboard, let the keyword be the searchBar’s text, and call the PFQueryTableViewController’s method, –(void)clear, to clear the UITableView. Finally, use another PFQueryTableViewController’s method –(void)loadObjects to fire up another query. This time, use a different query for this search purpose.
Fifth, modify – (PFQuery *)queryForTable as shown here:
- (PFQuery *)queryForTable {
    PFQuery *query = [EMABProduct queryForCategory:self.brand];

    if (self.keyword) {
        query = [EMABProduct queryForCategory:self.brand keyword:self.keyword];
    }
    if ([self.objects count] == 0) {
        query.cachePolicy = kPFCachePolicyCacheThenNetwork;
    }
    return query;
}
In this implementation, the default query is [EMABProduct queryForCategory:self.brand]. A search query is done only if self.keyword is not equal to nil. In step 4, [self loadObjects] will use –(PFQuery *)queryForTable again; that’s how you use the queryForCategory: keyword:
if (self.keyword) {
        query = [EMABProduct queryForCategory:self.brand keyword:self.keyword];
}
For this reason, you need to set self.keyword to nil after we finish the search. You can do it at –(void)viewWillAppear
-(void)viewWillAppear:(BOOL)animated
{
    [super viewWillAppear:animated];
    self.keyword = nil;
}
Sometimes a user intents to perform a search, taps the UISearchBar, but then decides to give up. Tapping UISearchBar will bring up the soft keyboard; so you need to dismiss the keyboard.
As part of the product feature, a user can filter products based on properties such as price. Similarly, you can filter products from loaded results, or query the remote server to get new results based on query criteria. In this implementation, you learn how to query your remote server.
In the sample app’s UI design, when a user taps a “Filter” bar button item, and a new UIViewController will be shown. The user will slide two sliders to determine the minimum and maximum price he or she is interested in. Once the price range is set, the user taps the “Done” bar button item. This view controller will be dismissed and the product list view controller will be updated with new search results. Figure 6-4 shows all UI elements.
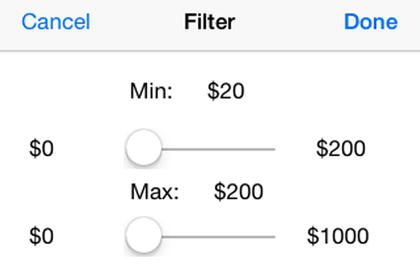
Figure 6-4. The EMABProductsFilterViewController UI elements
First, add a new method in the EMABProduct model class. In the header file, declare this method as shown here:
In this method, you query a brand based on the minimum price and the maximum price a user specifies.
For the implementation, use PFQuery’s –whereKey:lessThanOrEqualTo: and –whereKey:greaterThanOrEqualTo: to help filter products from server.
Next, create a new UIViewController subclass “EMABProductsFilterViewController.” In its header file, create one typedef to make the code a bit more readable:
typedef void (^ViewControllerDidFinish)(EMABProductsFilterViewController *viewController, float minPrice, float maxPrice);
The one is used to handle after a user taps the “Done” bar button item.
Continue to create two interface properties:
@property (nonatomic, copy) ViewControllerDidFinish finishBlock;
There are quite a few things you need to do just to handle the set of price ranges. First, use two ivars to keep track of the minimum and the maximum price. Since you also need to update your view controller UI of what the current slider value is, you also need another UILabels. Furthermore, to keep track of UISlider’s value, create two properties for them. Here is the complete implementation:
@interface EMABProductsFilterViewController (){
    float minPrice;
    float maxPrice;
}

@property (nonatomic, weak) IBOutlet UILabel *minLabel;
@property (nonatomic, weak) IBOutlet UILabel *maxLabel;
@property (nonatomic, weak) IBOutlet UISlider *minSlider;
@property (nonatomic, weak) IBOutlet UISlider *maxSlider;

@end
In the implementation, initialize your ivars in –(void)viewDidLoad:
- (void)viewDidLoad {
    [super viewDidLoad];

    minPrice = 0.0;
    maxPrice = 0.0;
}
Create an IBAction method for two UISliders, call it onSlider. When a user slides any of the sliders, update its value to UILabel. Also let minPrice and maxPrice keep track of the sliders’ value.
-(IBAction)onSlider:(id)sender{
    UISlider *slider = (UISlider *)sender;
    NSString *friendlySliderValue = [NSString stringWithFormat:@"%.0f",slider.value];;
    if (slider.tag == 99) {
        minPrice = slider.value;
        self.minLabel.text = friendlySliderValue;
    } else {
        maxPrice = slider.value;
        self.maxLabel.text = friendlySliderValue;
    }
}
Add an IBAction for the “Cancel” bar button item as shown in the following snippet; basically, you just pop the current view controller:
-(IBAction)onCancel:(id)sender{

    [self.navigationController popViewControllerAnimated:YES];
}
Finally, add an IBAction for the “Done” bar button item as shown in the following snippet. How do you handle the case when a user has not done anything but just tap “Done”? In this scenario, you will remind the user that you need more information or the user needs to enter his or her input more accurately.
-(IBAction)onDone:(id)sender{
    if (minPrice > 0 && minPrice < maxPrice) {
        UIAlertView *alertView = [[UIAlertView alloc] initWithTitle:NSLocalizedString(@"Error", @"Error") message:NSLocalizedString(@"Please make sure your
        max price is greater than your min price.", @"") delegate:nil cancelButtonTitle:NSLocalizedString(@"OK", @"OK") otherButtonTitles:nil, nil];
        [alertView show];
    } else {
        self.finishBlock(self, minPrice, maxPrice);
        [self.navigationController popViewControllerAnimated:YES];
    }
}

@end
Finally, return back to EMABProductsViewController. In a similar fashion, add two ivars:
@interface EMABProductsTableViewController()<UISearchBarDelegate>{
    float minPrice;
    float maxPrice;
}
Next, add the following IBAction method to handle while a user taps “Filter” bar button item. In this method, you will need to do a few things. First, present the EMABProductsFilterViewController; then, handle the minimum and maximum price a user sets; next, clear the current table view; and finally, perform a query. Here is the complete implementation.
-(IBAction)onFilter:(id)sender
{
    EMABProductsFilterViewController *viewController = (EMABProductsFilterViewController *)[self.storyboard instantiateViewControllerWithIdentifier:@"EMABProductsFilterViewController"];

  viewController.finishBlock = ^(EMABProductsFilterViewController *viewControlle, float minValue, float maxValue){
        minPrice = minValue;
        maxPrice = maxValue;
        self.keyword = nil;
        [self clear];
        [self loadObjects];
    };

    [self.navigationController presentViewController:viewController animated:YES completion:nil];
}
Lastly, you need to modify -(PFQuery *)queryForTable as shown here:
- (PFQuery *)queryForTable {
    PFQuery *query = [EMABProduct queryForCategory:self.brand];

    if (self.keyword) {
        query = [EMABProduct queryForCategory:self.brand keyword:self.keyword];
    }

  if (minPrice > 0 && maxPrice>0) {
   query = [EMABProduct queryForCategory:self.brand minPrice:minPrice maxPrice:maxPrice];
}
    if ([self.objects count] == 0) {
        query.cachePolicy = kPFCachePolicyCacheThenNetwork;
    }
    return query;
}
Don’t forget to connect “Filter” UIBarButtonItem to the method.
Now it’s time to build and run the project.
Summary
In this chapter, I covered the topics of showing a product list under a product category, searching products based on name, and filtering products based on price.