
Chapter 8
How Can I Have Fun with Photos?
The sharp display on the iPad and iPad mini make them the perfect portable photo album. No more whipping out wallet shots of your kids — just show people your on-screen photo albums. The iPad and iPad mini also come with some great features that make it a breeze to browse photos and run slide shows. However, your tablet is capable of more than just viewing photos. It’s actually loaded with cool features that enable you to manipulate and take photos, and use them to enhance other parts of your digital life. This chapter is your guide to these features.

Syncing and Importing Photos
No iPad or iPad mini media collection is complete without a few choice photos to show off around the water cooler. If you have some good pics on your computer, you can use iTunes to send those images to the tablet. Note that Apple supports a number of image file types — the usual TIFF and JPEG formats that you normally use for your photos as well as BMP, GIF, JPG2000 or JP2, PICT, PNG, PSD, and SGI.
Syncing computer photos to your tablet
If you use your computer to process a lot of photos and you want to take copies of some (or all) of those photos with you on your tablet, then follow these steps to get synced:
1. Connect your iPad or iPad mini to your computer.
2. In iTunes, click your tablet in the Devices list.
3. Click the Photos tab.
4. Select the Sync Photos from check box.
 If you have another photo-editing application installed on your computer, chances are good that it also appears in the Sync Photos from list.
5. Choose one of the following options from the drop-down menu:
• iPhoto (Mac only). Choose this item to sync the photos, albums, and events you’ve set up in iPhoto.
• Choose Folder. Choose this command to sync the images contained in a folder you specify.
• Pictures (or My Pictures in some versions of Windows). Choose this item to sync the images in the Pictures (or My Pictures) folder.
6. Select the photos you want to sync. The controls you see depend on which of the following options you chose in step 5:
• Pictures (or My Pictures) or Choose folder. If you chose either of these, select either the All photos option or the Selected Folders option. If you select the latter, select the check box beside each subfolder you want to sync.
• iPhoto. If this is what you chose, you get two additional options: Select the All photos, albums, Events, and Faces option to sync your entire iPhoto library. Select the Selected albums, Events, and Faces, and automatically include option, and then select the check box beside each item that you want to sync, as shown in Figure 8.1. Choose the number of events from the pop-up menu you want automatically synced.
7. Click Apply. iTunes syncs the photos using the new settings.
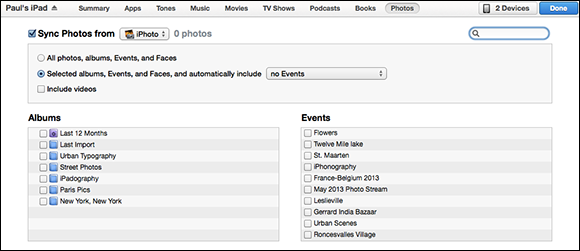
8.1 With iPhoto on your Mac, you can sync specific albums and events to your iPad or iPad mini.
iTunes doesn’t sync exact copies of your photos to the tablet. Instead, it creates what Apple calls TV-quality versions of each image. These are copies of the images that have been reduced in size to match the iPad or iPad mini screen size. This makes syncing faster and the photos take up much less room on your tablet.
Syncing iPad or iPad mini photos to your computer
If you create a Safari bookmark on your iPad or iPad mini, and then sync with your computer, that bookmark is transferred from the tablet to the default web browser on your computer. That’s a sweet deal that also applies to contacts and appointments. Unfortunately, it doesn’t apply to media files which, with two exceptions, travel along a one-way street from your computer to your iPad or iPad mini.
Ah, but then there are those two exceptions, and they’re good ones. If you take any photos using the built-in cameras in your iPad or iPad mini, or if you receive any photos on your tablet (via, say, an e-mail message or AirDrop), the sync process reverses itself and enables you to send some (or all) of those images to your computer. Sign me up!
The tablet-to-computer sync process bypasses iTunes entirely. Instead, your computer deals directly with the iPad or iPad mini, and treats it just as though it’s some garden-variety media storage device. How this works depends on whether your computer is a Mac or a Windows PC, so I’ll use separate sets of steps.
To sync your tablet photos to your Mac, follow these steps:
1. Connect your iPad or iPad mini to your Mac. iPhoto opens, adds your tablet to the Devices list, and then displays the photos from your Camera Roll album, as shown in Figure 8.2.
2. Use the Event Name text box to name the event that these photos represent.
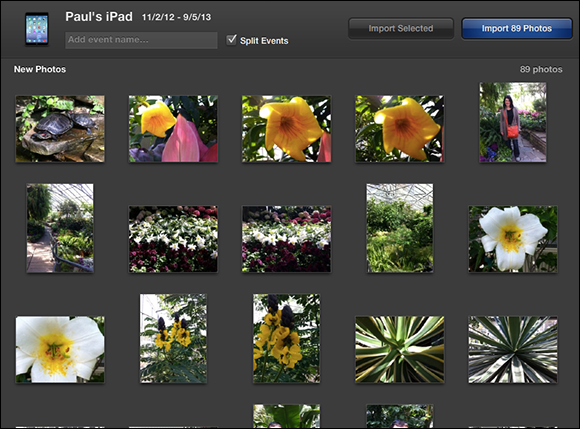
8.2 When you connect your iPad or iPad mini to your Mac, iPhoto shows up to handle importing photos.
 If you’ve imported some of your iPad or iPad mini photos in the past, you probably don’t want to import them again. That’s very sensible of you, and you can prevent that by hiding those photos. Select the Hide Photos Already Imported check box.
3. Choose from the following import options:
• If you want to import every photo, click Import X Photos, where X is the number of images in your tablet’s Camera Roll album. Technically, X is the number of Camera Roll photos that you have not yet imported.
• If you want to import only some of the photos, select those that you want to import, and then click Import Selected.
4. In the dialog that appears after the import is complete, choose which of the following options you want iPhoto to perform with the photos on your iPad or iPad mini:
• If you want to leave the photos on your tablet, click Keep Photos.
• If you prefer to clear the photos from your tablet, click Delete Photos.
Follow these steps if you’re syncing with a Windows 8.1 PC:
1. Connect your tablet to your Windows 8 PC. If Windows 8.1 displays a notification, ignore it.
2. Open File Explorer and click This PC. In the Devices and Drives section, File Explorer displays an icon for your iPad or iPad mini.
3. Right-click the icon for your iPad or iPad mini, and then click Import pictures and videos. The Import Pictures and Videos dialog box appears.
4. Select the Import all new Items now option. If you prefer to select the photos you want to Import, select the Review, organize, and group Items to import option. Click Next, use the dialog box to choose the photos that you want, and then go to step 6.
5. Type a tag for the photos. A tag is a word or short phrase that identifies the photos.
6. Click Import. Windows 8.1 imports the photos.
Follow these steps if you’re syncing with a Windows 8 PC:
1. Connect your tablet to your Windows 8 PC. When Windows 8 detects the device, it displays a notification.
2. Click the notification. Windows 8 displays a list of actions that you can take.
3. Click Import Photos and Videos. Windows 8 opens the Photos app and displays a list of the photos on the tablet’s Camera Roll.
4. Click Clear Selection.
5. Select each photo that you want to import. The Photos app adds a check mark to the upper-right corner of each selected photo.
6. Use the text box at the bottom of the screen to type a name for the folder that Windows 8 will use to store the photos.
7. Click Import. Windows 8 imports the photos to your PC.
Follow these steps if you’re syncing with a Windows 7 PC and have installed Windows Live Photo Gallery from the Windows Live Essentials site:
1. Connect your tablet to your Windows 7 PC. If you see the AutoPlay dialog box, click Import pictures and videos using Windows Live Photo Gallery and skip to step 5.
2. Open Windows Live Photo Gallery.
3. Choose Home → Import. The Import Photos and Videos dialog box appears.
4. Click the icon for your iPad or iPad mini, and then click Import. Windows Live Photo Gallery connects to your device to gather the photo information.
5. Select the Import all new Items now option. If you prefer to select the photos you want to Import, select the Review, organize, and group Items to import option. Click Next, use the dialog box to choose the photos that you want, and then go to step 7.
6. Type a tag for the photos. A tag is a word or short phrase that identifies the photos.
7. Click Import. Windows Live Photo Gallery imports the photos.
You can also access your iPad or iPad mini photos in Windows 8.1, 8, or 7 directly. In Windows 8.1 or 8, click Desktop, click File Explorer, and then click either This PC (Windows 8.1) or Computer (Windows 8). In Windows 7, choose Start → Computer, and then double-click your tablet in the Portable Devices group. Open the Internal Storage folder, the DCIM folder, and then the folder that appears (which has a name like 800AAAAA) to display your Camera Roll photos.
Preventing your tablet from sending photos to your computer
Each and every time that you connect your tablet to your computer, you see iPhoto (on your Mac) or the AutoPlay dialog box (in Windows 8.1, 8, or 7 without iTunes installed). This is certainly convenient if you actually want to send photos to your computer, but you may find that you do that only once in a blue moon. In that case, having to deal with iPhoto or a dialog every time could cause even the most mild-mannered among us to start pulling out our hair. If you prefer to keep your hair, you can configure your computer not to pester you about getting photos from your iPad or iPad mini.
Follow these steps to set this up on your Mac:
1. Connect your tablet to your Mac.
2. Choose Launchpad → Other → Image Capture. The Image Capture application opens.
3. Click your iPad or iPad mini in the Devices list.
4. Click the Connecting this iPad opens menu, and then click No application, as shown in Figure 8.3.
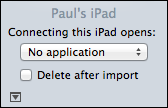
8.3 Choose No application to prevent iPhoto from starting when you connect your iPad or iPad mini.
5. Choose Image Capture → Quit Image Capture. Image Capture saves the new setting and shuts down. The next time that you connect your tablet, iPhoto ignores it.
Configuring your computer not to download photos from your iPad or iPad mini means that in the future, you either need to reverse the setting or manually import your photos.
Follow these steps to convince Windows 8 or Windows 7 not to open the AutoPlay dialog box each time that you connect your iPad or iPad mini:
1. Open the Default Programs window and perform one of the following steps:
• Windows 8.1 or 8. In the Start screen, type default, and then click Default Programs.
• Windows 7. Choose Start → Default Programs to open the Default Programs window.
2. Click Change AutoPlay Settings. The AutoPlay dialog box appears.
3. In the Devices section, open the list beside your tablet’s name and choose Take No Action.
4. Click Save. Windows saves the new setting.
Syncing photos via iCloud
Syncing photos from your computer isn’t difficult, but it seems more than a little old-fashioned in this increasingly wireless age. Fortunately, if you have an iCloud account you can place your feet firmly in the modern era by using the Photo Stream feature to sync photos without even looking at a USB cable. Photo Stream automatically syncs photos you take with your iPad or iPad mini camera to your iCloud account, which then downloads them to your computer, your iPhone, or any other device associated with your account. Similarly, if you upload photos to iCloud using another device, those photos are automatically synced to your tablet.
Follow these steps to activate Photo Stream on your iPad or iPad mini:
1. In the Home screen, tap Settings to open the Settings app.
2. Tap Photos and Camera.
3. Tap the My Photo Stream switch to On.
Importing photos from a camera
If you have a stack of photos on a digital camera or iPhone, you may think the only way to get them onto your tablet is to first sync the photos to your Mac or PC, and then sync them from your computer to your tablet. And you’d be right — most of the time. However, Apple offers a way to avoid this time-consuming route by using an adapter designed to get photos directly from a camera on to an iPad or iPad mini. Apple offers the following two adapters:
![]() Lightning to USB Camera Adapter. Connect this adapter’s Lightning connector to the Lightning port on the iPad or iPad mini, and then connect the USB connector to the USB port on the digital camera.
Lightning to USB Camera Adapter. Connect this adapter’s Lightning connector to the Lightning port on the iPad or iPad mini, and then connect the USB connector to the USB port on the digital camera.
![]() Lightning to SD Card Camera Reader. Connect this adapter’s Lightning connector to the Lightning port on the iPad or iPad mini, and then insert the digital camera’s SD (Secure Digital) card. Actually, if you have photos on another SD card — for example, one from another camera, one someone else has given you, or one you’ve used to copy photos from a computer — you can also insert that card into the reader.
Lightning to SD Card Camera Reader. Connect this adapter’s Lightning connector to the Lightning port on the iPad or iPad mini, and then insert the digital camera’s SD (Secure Digital) card. Actually, if you have photos on another SD card — for example, one from another camera, one someone else has given you, or one you’ve used to copy photos from a computer — you can also insert that card into the reader.
The Photos app recognizes the connection, and you can then import some (or all) of the photos to the iPad or iPad mini.
Browsing and Viewing Your Photos
After you dump a bucketful of photos onto your iPad or iPad mini, you can start messing around with them by tapping the Photos icon on the Home screen. In the Photos app, you use the three tabs at the bottom of the screen — Photos, Shared, and Albums — to view your photos from different angles, so to speak. However, there are lots of other browsing and viewing tricks up your tablet’s sleeve, and I cover them in the next few sections.
Scrolling, rotating, zooming, and panning
You can do so much with your photos after they’re on your iPad or iPad mini, and it isn’t your normal photo-browsing experience. You aren’t just a passive viewer because you can actually take some control over what you see and how the pictures are presented.
You can use the following techniques to navigate and manipulate your photos:
![]() Scroll. You view your photos by flicking. If you’re in landscape mode, flick left to view the next photo and flick right to view the previous shot. If you’re in portrait mode, flick up to see the next image and flick down to display the previous image. Alternatively, tap the screen to display a sequence of thumbnails at the bottom of the Photos app window and run your finger along those thumbnails to quickly peruse the photos.
Scroll. You view your photos by flicking. If you’re in landscape mode, flick left to view the next photo and flick right to view the previous shot. If you’re in portrait mode, flick up to see the next image and flick down to display the previous image. Alternatively, tap the screen to display a sequence of thumbnails at the bottom of the Photos app window and run your finger along those thumbnails to quickly peruse the photos.
![]() Rotate. When a landscape shot shows up in the Photos app, it is letterboxed at the top (that is, you see black space above and below the image). To get a better view, rotate the screen into the landscape position and the photo rotates right along with it, filling the entire screen. When you come upon a photo with a portrait orientation, rotate the tablet back to the upright position for best viewing.
Rotate. When a landscape shot shows up in the Photos app, it is letterboxed at the top (that is, you see black space above and below the image). To get a better view, rotate the screen into the landscape position and the photo rotates right along with it, filling the entire screen. When you come upon a photo with a portrait orientation, rotate the tablet back to the upright position for best viewing.
![]() Flip. To show a photo to another person, flip the iPad or iPad mini so that the back is toward you and the bottom is now the top. The Photos app automatically flips the photo right-side up.
Flip. To show a photo to another person, flip the iPad or iPad mini so that the back is toward you and the bottom is now the top. The Photos app automatically flips the photo right-side up.
![]() Zoom. Zooming magnifies the shot that’s on the screen. You can do this in either of the following ways:
Zoom. Zooming magnifies the shot that’s on the screen. You can do this in either of the following ways:
• Double-tap the area of the photo on which you want to zoom in. The Photos app doubles the size of the portion you tapped. Double-tap again to return the photo to its original size.
• Spread and pinch. To zoom in, spread two fingers apart over the area you want magnified. To zoom back out, pinch two fingers together.
![]() Pan. After you zoom in on the photo, drag your finger across the screen to move it along with your finger.
Pan. After you zoom in on the photo, drag your finger across the screen to move it along with your finger.
You can scroll to another photo if you’re zoomed in, but it takes much more work to get there because the Photos app thinks you’re trying to pan. For faster scrolling, return the photo to its normal size and then scroll.
Creating a custom photo slide show
In the Photos app, you can open the Camera Roll or an album, tap Slideshow, and then tap Start Slideshow to run through the album images automatically. The basic slide show is pretty cool, but the Photos app also offers a few settings for creating custom slide shows. For example, you can set how long each photo lingers on-screen and you can configure the slide show to display your photos randomly.
To customize your slide show settings, tap the Settings icon in the Home screen. When the Settings app opens, tap Photos & Camera to display the Photos & Camera settings. You can configure your custom slide show to perform in any of the following ways:
![]() Play Each Slide For. Use this setting to set the amount of time that each photo appears on-screen. Tap Play Each Slide For, and then tap a time: 2 Seconds, 3 Seconds (this is the default), 5 Seconds, 10 Seconds, or 20 Seconds.
Play Each Slide For. Use this setting to set the amount of time that each photo appears on-screen. Tap Play Each Slide For, and then tap a time: 2 Seconds, 3 Seconds (this is the default), 5 Seconds, 10 Seconds, or 20 Seconds.
![]() Repeat. This setting determines whether the slide show repeats from the beginning after the last photo is displayed. To turn on this setting, tap the Repeat switch to the On position.
Repeat. This setting determines whether the slide show repeats from the beginning after the last photo is displayed. To turn on this setting, tap the Repeat switch to the On position.
![]() Shuffle. You use this setting to display the album photos in random order. To turn on this setting, tap the Shuffle switch to the On position.
Shuffle. You use this setting to display the album photos in random order. To turn on this setting, tap the Shuffle switch to the On position.
Creating a photo album
If you have been taking a lot of pictures on your iPad or iPad mini, the Photos app enables you to create your own photo albums right on your device. These albums aren’t transferred to your computer when you sync, but they’re handy if you need to organize your photos quickly.
Follow these steps to create a photo album:
1. In the Photos app, tap Albums.
2. Tap New Album (the + icon). The Photos app prompts you for an album name.
3. Type the name, and then tap Save. The Photos app displays a list of all of your tablet images.
4. Tap each image that you want to include in your new album. The Photos app adds a check mark to each selected photo.
To remove an album you no longer need, tap Albums, tap Edit, and then tap the X button in the upper-left corner of the album.
5. Tap Done. The Photos app creates the new album and adds it to albums.
Streaming photos to Apple TV
If you have an Apple TV that supports AirPlay, you can use AirPlay to stream your photos or a photo slide show from your tablet to your TV.
Follow these steps to stream photos to Apple TV:
1. Make sure your Apple TV is turned on.
2. Using the Photos app, display the album that you want to stream.
3. Open the first photo you want to stream.
4. Swipe up from the bottom of the screen. The Control Center appears.
5. Tap the AirPlay button, which appears to the left of the Brightness slider. The Photos app displays a menu of output choices, as shown in Figure 8.4.
6. Tap the name of your Apple TV device. The Photos app streams the photo to that device, and hence, to your TV.
To stream a slide show, make sure your Apple TV is on, tap Actions, and then tap Slideshow. In the Slideshow Options dialog that appears, tap your Apple TV in the list of output devices, and then configure and start the slide show.

8.4 In the Control Center, tap the AirPlay button to stream photos to your Apple TV.
Getting More Out of Photos
Working with Photos on your iPad or iPad mini seems quite straightforward: you take some shots with the cameras or import photos, and then you view those photos. Enough said, right? Actually, no. Your tablet is bristling with photo-related features, so there’s plenty more to explore. The next few sections take you through a few of the more interesting features of the Photos app.
Adding an existing photo to a contact
You can assign a photo to a contact in two ways: straight from a photo album or through the Contacts app. Follow these steps to assign a photo from a photo album:
1. Tap Photos in the Home screen. The Photos app appears.
2. Locate the image you want to use and tap it. The Photos app opens the photo and reveals the photo controls.
3. Tap the Actions button. The Actions button is the arrow that appears on the left side of the menu bar. If you don’t see it, tap the screen to reveal the controls. The Photos app displays a list of actions you can perform.
4. Tap Assign to Contact. A list of all of your contacts appears.
5. Tap the contact you want to associate with the photo. The Move and Scale screen appears.
6. Drag the image so it’s positioned on the screen the way you want.
7. Pinch or spread your fingers over the image to set the zoom level you want.
8. Tap Choose. The Photos app assigns the photo to the contact and returns you to your photo album.
To assign a photo using the Contacts app, follow these steps:
1. On the Home screen, tap the Contacts icon to open the Contacts app.
2. Tap the contact to which you want to add a photo. The Contacts app displays the contact’s Info screen.
3. Tap Edit to put the contact into Edit mode.
4. Tap Add Photo, and then tap Choose Photo. You see a list of photo albums.
5. Tap the album that contains the photo you want to use.
6. Tap the photo you want. The Move and Scale screen appears.
7. Drag the image so it’s positioned on the screen the way that you want.
8. Pinch or spread your fingers over the image to set the zoom level you want.
9. Tap Choose. The Contacts app assigns the photo to the contact and returns you to the Info screen.
10. Tap Done. The Contacts app saves your changes.
Taking screenshots
You might come across a situation in which you need to take a picture of your iPad or iPad mini screen. For example, you might see an error message while using an app. Instead of writing down the error message, it’s easier to take a screenshot of it and then send it to the app’s technical support department. Similarly, if you’re playing a game and achieve a high score or pull off some spectacular feat, take a screenshot to show off to your friends and fellow gamers.
To take a screenshot, press and hold the Sleep/Wake button, press the Home button, and then release Sleep/Wake. Your iPad or iPad mini captures the screen, and then saves it as a PNG file in the Camera Roll.
Deleting a photo
If you mess up a photo using one of the cameras, you should delete it before people think you have shoddy camera skills (because we all know it was the tablet’s fault, right?).
You might think that deleting a photo would be a straightforward proposition. Nope, not even close. That’s because your tablet differentiates between the following two types of photos:
![]() Photos that you add to the iPad or iPad mini via syncing with iTunes.
Photos that you add to the iPad or iPad mini via syncing with iTunes.
![]() Photos that you create directly on the iPad or iPad mini by using the cameras, taking a screenshot, saving a photo from an e-mail or web page, and so on.
Photos that you create directly on the iPad or iPad mini by using the cameras, taking a screenshot, saving a photo from an e-mail or web page, and so on.
Synced photos can’t be deleted directly, but photos that you create on the iPad or iPad mini can be deleted. Clear as mud, I know. To delete a photo, follow these steps:
1. Tap Photos in the Home screen. The Photos app appears.
2. Locate the image you want to blow away. For example, if you know the photo is part of a particular event, open that event stack.
3. Tap the doomed photo. The Photos app opens the photo.
4. Tap the screen to reveal the controls.
5. If you see the Delete button (the trash can icon), tap it. If you don’t see the Delete button, it means that you can’t delete the photo directly. Otherwise, the Photos app asks you to confirm the deletion.
6. Tap Delete Photo. The Photos app tosses the photo into the trash, wipes its hands, and returns you to the photos.
What happens if you have duplicate synced photos on your iPad or iPad mini and you can’t delete the copies? The way to fix this is to connect the tablet to your computer, click the device in iTunes, click the Photos tab, deselect Sync Photos, and then click Apply. This removes all synced photos from the tablet. You then reselect Sync Photos and click Apply. You should end up with no duplicates on the iPad or iPad mini.
Printing a photo with AirPrint
How do you print an iPad or iPad mini photo? The obvious answer would be to sync the photo to your Mac or Windows PC, and then print it from there. That works, of course, but it seems like a lot of extra work, and what if you don’t have a Mac or PC handy? The better answer is that, if you have a printer that supports the AirPrint standard for wireless printing, you can follow these steps to send a photo directly from your tablet to that printer:
1. Use the Photos app to display the photo you want to print.
2. Tap the screen to display the controls.
3. Tap Actions. A menu of web page actions appears.
4. Tap Print. The Printer Options dialog appears. If the Printer field already shows the printer you want to use, you can skip to step 7.
5. Tap Printer. The Photos app looks for wireless printers on your network, and then displays a list of any that are available.
6. Tap the printer that you want to use. The Photos app adds the printer to the Printer Options dialog, and then enables the other controls, as shown in Figure 8.5.
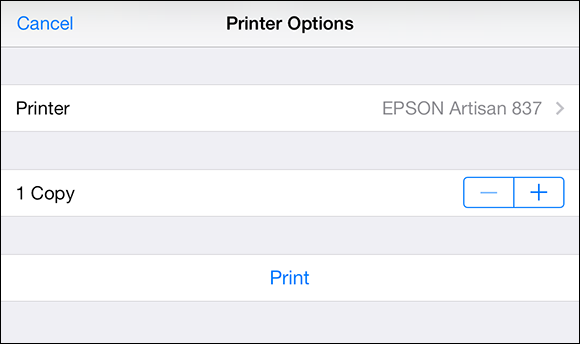
8.5 Use the Printer Options dialog to configure and print a photo.
7. In the Copy field, tap the plus sign (+) to set the number of copies you want to print.
8. Configure the other printer options as needed. Note that the options you see vary from printer to printer.
9. Tap Print. The Photos app sends the photo to the printer.
Editing Photos
The iPad and iPad mini aren’t the easiest devices in the world to use as cameras — the iPad is a bit too big and unwieldy to hold steady, and the iPad mini is only a bit easier to use thanks to its lighter weight. As a result, you might end up with a few less-than-perfect shots. There’s not much you can do to fix blurry images (the biggest iPad or iPad mini photo faux pas), but other problems can be fixed by enhancing the color or brightness, removing red-eye, and cropping out extraneous elements.
In the old days, you first had to sync your photos to your computer, make the fixes using iPhoto, the Windows 8 Photos app, or Photo Gallery, and then sync the fixed photos back to your tablet. Now, however, iOS lets you make these kinds of adjustments right on your iPad or iPad mini. The next three sections provide the details.
Enhancing a photo
If you have a photo that’s too bright in some spots or if the color is washed out in others, the Photos app comes with an Enhance tool that can automatically adjust the color and brightness. Follow these steps to use the Enhance tool:
1. In the Photos app, open the photo that you want to fix.
2. Tap the photo to display the controls.
3. Tap Edit. The Photos app displays its editing tools at the bottom of the screen.
4. Tap Enhance. The Photos app adjusts the color and brightness.
5. Tap Save. The Photos app saves your changes.
Removing red eye
When you use a flash to take a picture of one or more people, in some cases the flash may reflect off the subjects’ retinas. The result is the common phenomenon of red eye, where each person’s pupils appear red instead of black. Some cameras come with a red-eye reduction feature, which is usually a double flash: one to make the pupils contract before the shot and then another for the actual picture.
If you have a photo on your iPad or iPad mini in which one or more people have red eye because of the camera flash, you can use the Photos app to remove it and give your subjects a more natural look.
Follow these steps to remove red eye:
1. In the Photos app, open the photo that contains the red eye you want to remove.
2. Tap the photo to display the controls.
3. Tap Edit. The Photos app displays its editing tools.
4. Tap Red-Eye.
5. Tap the red eye that you want to remove. The Photos app removes the red eye.
6. Repeat step 5 until you’ve removed all of the red eye in the photo.
7. Tap Apply. The Photos app applies the changes to the photo.
Cropping and straightening
If you have a photo containing elements that you do not want or need to see, you can often cut them out. This is called cropping and you can use the Photos app to do this. When you crop a photo, you specify a rectangular area of it that you want to keep. The Photos app then discards everything outside of the rectangle. Cropping is a useful skill because it can help you give focus to the true subject of a photo. Cropping is also useful for removing extraneous elements that appear on or near the edges of a photo.
As you probably know from hard-won experience, getting your iPad or iPad mini camera perfectly level when you take a shot is very difficult. It requires lots of practice and a steady hand. Despite your best efforts, you might still end up with a photo that is not quite level. To fix this problem, you can also use the Photos app to rotate the photo clockwise or counterclockwise so that the subject appears straight.
If your iPad photos are consistently askew, turn on the Camera grid, which adds lines that divide the Camera screen into nine rectangles (that is, a 3 × 3 grid). Open the Settings app, tap Photos & Camera, and then tap the Grid switch to On. The grid is also useful for composing pictures using the Rule of Thirds, where you place your subject on one of the grid lines instead of in the middle of the screen.
Follow these steps to crop and straighten a photo:
1. In the Photos app, open the photo that you want to edit.
2. Tap the photo to display the controls.
3. Tap Edit. The Photos app displays its editing tools.
4. Tap Crop. The Photos app displays a grid for cropping and straightening, as shown in Figure 8.6.

8.6 Tap Crop to display the cropping and straightening tools.
5. Tap-and-drag a corner of the grid to set the area you want to keep.
6. To straighten the photo, place two fingers on the screen and rotate them clockwise or counterclockwise until the image is level.
7. Tap Crop. The Photos app applies the changes to the photo.
The fastest way to crop some photos is to tell the Photos app the dimensions you want to use for the resulting photo. Tap Aspect Ratio, and then tap either a specific shape (Original or Square), or a specific ratio (such as 5 × 7 inches or 8 × 10 inches). You then drag the photo (not the grid!) so that the portion you want to keep is within the grid.
Applying a filter
The stunning popularity of the Instagram app and similar apps such as Hipstamatic has created a mania for applying filters to photos. A filter is a special effect applied to a photo’s colors to give it a different feel. The iOS 7 version of the Camera app comes with a Filters icon, as does the Photos app in Edit mode. When you tap Filter, you see nine effects that you can apply to your photo, including Mono (which gives you a black-and-white photo) and Instant (which makes the photo look as though it was taken by an old Polaroid film camera). Here’s how to apply a filter to a photo using the Photos app:
1. Open the photo you want to edit.
2. Tap the photo to display the controls.
3. Tap Edit. The Photos app displays its editing tools.
4. Tap Filters. Photos displays thumbnail versions of the photo that demonstrate each effect.
5. Tap the effect you want to use.
6. Tap Apply. The Photos app applies the filter to the photo.
Sharing Photos
You probably use the Photos app most often for personal trips down Memory Lane, and there’s nothing wrong with that. However, photos are for sharing, and with the big, bright iPad or iPad mini screen, it’s easy to gather a few nearby folks and show off your digital masterpieces. That’s fine for nearby victims, uh, people, you can cajole into huddling around your tablet, but far-flung folks are another matter. How can you share your photo goodness with people across town or across the country? There are lots of ways, actually: You can send a photo via e-mail, include one in a text message, beam it via AirDrop, or post it to a social network.
Sending a photo via e-mail
More often than you’d think, being able to send photos from your iPad or iPad mini to someone’s e-mail is a handy trick. This is particularly true if it’s a photo you’ve just taken with one of the cameras or received on your tablet (say, via an e-mail message), because then you can share the photo pronto without having to trudge back to your computer. You can e-mail any existing photo from one of your photo albums.
Follow these steps to send one or more photos from your iPad or iPad mini via e-mail:
1. If necessary, use the Camera app to take the photo you want to send, then tap the Camera Roll button to open the Camera Roll photo album. Otherwise, open Photos and then display the photo album that has the image you want to send.
2. Tap Select. The Photos app displays the Select Photos screen.
3. Tap each photo that you want to send. The Photos app selects each photo.
4. Tap Actions, and then tap Mail. In the New Message screen that appears, the photo appears in the body of the message.
5. Choose your message recipient and type a Subject line.
6. Tap Send. The Mail app sends the message and returns you to the Photos app.
Saving a photo from an e-mail
If someone sends you a nice photo in an e-mail message, you might want to save it to your iPad or iPad mini, so you can check it out whenever you want, assign it to a contact, sync it to your computer, and so on. Follow these steps to save a photo from an e-mail message:
1. On the Home screen, tap Mail. The Mail app appears.
2. Tap the mailbox that contains the photo message. The Mail app opens the mailbox.
3. Tap the message that contains the photo. The Mail app opens the message for viewing.
If you’re just sending a single photo, a quicker way to attach it to an e-mail message is to open the photo using the Photos app, tap the Actions button, and then tap Mail.
4. Tap and hold the image. After a couple of seconds, the Mail app displays a list of actions you can perform for the image.
5. Tap Save to Camera Roll. If the message contains multiple images, tap Save Image instead. If you want to save all of the images, tap Save X Images (where X is the number of images in the message). The Mail app saves the image (or images) to the Camera Roll.
Sending and receiving a photo via AirDrop
Sharing a photo via e-mail or text message works well, but it has a slightly primitive feel to it. After all, your iPad or iPad mini is the ultimate wireless device, so surely there must be some way to send a photo directly from one device to another? Happily, the answer to that question is now a resounding “Yes!” An iOS 7 feature called AirDrop, a Bluetooth service that lets two nearby devices — specifically, an iPhone 5s, 5c, or 5; a fourth-generation iPad or later; an iPad mini; or a fifth-generation iPod touch or later — now enables you to exchange photos directly. Here are the steps to follow:
1. Use the Photos app to open the photo you want to share.
2. Tap the Actions icon. The AirDrop section shows an icon for each nearby device.
3. Tap the icon for the person with whom you want to share the photo. The other person sees a dialog asking for permission to accept the photo. When she taps Accept, her version of the Photos app loads and displays the photo.
Posting a photo to Facebook
If you set up your Facebook account on your iPad or iPad mini (which I cover in Chapter 3), you can follow these steps to post a photo:
1. In the Photos app, open the photo you want to post.
2. Tap the Actions button.
3. Tap Facebook. The Photos app displays the Facebook dialog.
4. Type your post text in the large text box, as shown in Figure 8.7.
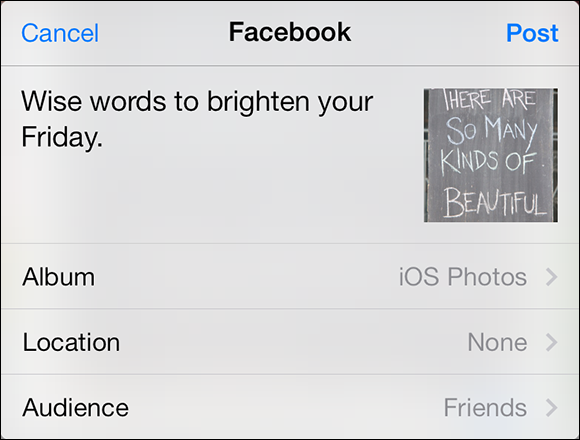
8.7 Include a bit of explanatory text with your Facebook photo.
5. To change the Facebook album in which the photo will appear, tap Album to open the Choose Album dialog, and then tap the album you want to use.
6. If you want to include your present whereabouts as part of the post, tap Location.
7. To choose who can see the photo, tap Audience to open the Audience dialog, and then tap the group you want to use.
8. Tap Post. The Photos app posts the photo to your Facebook Timeline.
Tweeting a photo
If you set up your Twitter account (or accounts) on your tablet (again, see Chapter 3), you can follow these steps to tweet a photo to your followers:
1. In the Photos app, open the photo you want to tweet.
2. Tap the Actions button.
3. Tap Twitter. The Photos app displays the Twitter dialog.
4. If you added more than one account to the Twitter settings, tap the username in the Account section, and then tap the name of the account that you want to use to send the tweet.
5. Type your tweet text in the large text box.
6. If you want to include your present whereabouts as part of the tweet, tap Location.
7. Tap Post. The Photos app posts the photo as a tweet.
Texting a photo
The Messages app sends text messages outside of a cellular provider’s messaging system. This means that you can use the Messages app to send unlimited (yes, that’s right: unlimited) text messages via Wi-Fi or a cellular connection to other people using iOS devices, including iPhones, iPod touches, and other iPads, as well as Macs running OS X Mountain Lion or later. You can also follow these steps to send a photo in a text message:
1. On the Home screen, tap Messages. The Messages screen appears.
2. Tap New Message.
3. Select your recipient.
4. Tap the Photo button that appears to the left of the text box.
5. Select or take a photo by performing one of the following actions:
• If you want to send a photo that’s already on your tablet, tap Choose Existing. Locate and tap the photo, and then tap Use.
• If you want to take a new photo, tap Take Photo or Video. Take the shot and then tap Use Photo.
6. Type your message text.
7. Tap Send. The Messages app sends the message with the photo attached.
Saving a photo from a text message
If someone sends you a nice photo in a text message, you might want to save it to your iPad or iPad mini, so that you can check it out whenever you want, assign it to a contact, sync it to your computer, and so on. Follow these steps to save a photo from a text message:
1. On the Home screen, tap Messages. The Messages screen appears.
2. Tap the conversation that contains the photo message. The Messages app opens the conversation screen.
3. Tap the photo. Your iPad or iPad mini opens it for viewing.
4. Tap the screen and then tap the Actions button. The Actions options appear.
5. Tap Save Image. The Messages app saves the image to the Camera Roll.
Using the Cameras
Your iPad or iPad mini comes with a couple of built-in digital cameras that you can use while you’re running around town. Taking a picture is straightforward. First, on the Home screen, tap Camera. (Alternatively, from any screen, swipe up from the bottom to display the Control Center, and then tap the Camera icon.)
When your iPad or iPad mini is locked, you can get to the Camera app in seconds flat by double-pressing the Home button and then dragging up the Camera icon that appears in the bottom-right corner of the Lock screen.
If this is the first time you’ve opened the Camera app, it asks if it can use your current location. This is an excellent idea because it tags your photos with your present whereabouts, so be sure to tap OK.
When the Camera app appears, make sure that the Mode switch (see Figure 8.8) is set to Photo instead of Video. Next, just line up your shot and tap either the Shutter button (see Figure 8.8) or the Volume Up switch, which appears on the top edge of the tablet when you hold it in the landscape position with the Home button on the left. To view your photo, tap the Camera Roll button, which appears in the lower-right corner of the Camera app screen.
Understanding the iPad or iPad mini camera features
While using the camera itself may be simple, what you can do with photos on your iPad or iPad mini is pretty cool. For example, you can take a photo to use as wallpaper, or you can shoot a portrait of a friend or family member and use it as that person’s contact photo. Before getting to those tasks, though, take a second to go over the following list of the iPad and iPad mini camera features:
![]() Rear- and front-facing cameras. The iPad and iPad mini come with two cameras: a 5-megapixel FaceTime HD camera on the back for regular shots, and a 1.2-megapixel camera on the front for taking self-portraits. In the Camera app, tap the Switch Camera button, shown in Figure 8.8, to switch between the front and rear cameras.
Rear- and front-facing cameras. The iPad and iPad mini come with two cameras: a 5-megapixel FaceTime HD camera on the back for regular shots, and a 1.2-megapixel camera on the front for taking self-portraits. In the Camera app, tap the Switch Camera button, shown in Figure 8.8, to switch between the front and rear cameras.
![]() Autofocus. The rear camera automatically focuses on whatever subject is in the middle of the frame.
Autofocus. The rear camera automatically focuses on whatever subject is in the middle of the frame.
![]() Tap to focus. If the subject you want to focus on is not in the middle of the frame, tap it, and the rear camera automatically moves the focus onto that object. It also automatically adjusts the white balance and exposure.
Tap to focus. If the subject you want to focus on is not in the middle of the frame, tap it, and the rear camera automatically moves the focus onto that object. It also automatically adjusts the white balance and exposure.
![]() Face detection. This feature balances focus and exposure across any face that it detects in the frame; it works on both cameras.
Face detection. This feature balances focus and exposure across any face that it detects in the frame; it works on both cameras.
![]() 5X digital zoom. You can zoom using the rear camera. Pinch two fingers together on the screen to display the zoom slider, as shown in Figure 8.8. Then, drag the slider right to zoom in or left to zoom out.
5X digital zoom. You can zoom using the rear camera. Pinch two fingers together on the screen to display the zoom slider, as shown in Figure 8.8. Then, drag the slider right to zoom in or left to zoom out.
![]() Geotagging. The iPad or iPad mini can use its built-in GPS sensor to add location data to each photo, a process called geotagging. This means that you can organize your photos by location, which is great for vacation snaps and other trip-related photos.
Geotagging. The iPad or iPad mini can use its built-in GPS sensor to add location data to each photo, a process called geotagging. This means that you can organize your photos by location, which is great for vacation snaps and other trip-related photos.
 Geotagging makes it easy to map your photos, but it also raises privacy issues because it means that each photo comes with its location embedded in the photo data. This can be a big problem if you post photos online (especially of kids) because it means that strangers might be able to extract the photo location. You can control whether the Camera app uses your location by launching the Settings app, tapping Privacy, tapping Location Services, and then tapping the Camera switch On or Off.

8.8 The features of the Camera app.
Taking a wallpaper photo
You can create an on-the-fly wallpaper image using one of the iPad or iPad mini cameras by following these steps:
1. On the Home screen, tap Camera. The Camera app appears.
2. Line up your subject and tap the Shutter button to take the picture.
3. Tap the Camera Roll button in the lower-left corner. The Camera app opens the Camera Roll photo album and displays a preview of the photo.
4. Tap the Actions button. The Actions button is the button to the right of the Slideshow button in the menu bar (if you don’t see the menu bar, tap the screen). You see a list of actions you can perform.
5. Tap Use as Wallpaper. The Move and Scale screen appears.
6. Drag the image so that it’s positioned on the screen the way that you want.
7. Pinch or spread your fingers over the image to set the zoom level you want.
8. Tap either Set Lock Screen or Set Home Screen. If you prefer to see the photo on both screens, tap Set Both.
Taking a contact’s photo
If you don’t have a picture of a contact handy, that’s not a problem because you can take advantage of the rear camera on your iPad or iPad mini and snap his image the next time you get together.
To take and assign a photo from the Camera app, follow these steps:
1. In the Home screen, tap the Camera button to enter the Camera app. A shutter appears on the screen.
2. If necessary, tap the Switch Camera button to activate the rear camera.
3. Frame the person on your screen.
4. Tap the Shutter button (or the Volume Up button, if that’s easier) to snap the picture.
5. Tap the Camera Roll button in the bottom-left corner. This opens the Camera Roll screen and displays the photo you just took.
6. Tap the Actions button. The Photos app displays a list of actions that you can perform.
7. Tap Assign to Contact. A list of all of your contacts is displayed.
8. Tap the contact you want to associate with the photo. The Move and Scale screen appears.
9. Drag the image so that it’s positioned on the screen the way that you want.
10. Pinch or spread your fingers over the image to set the zoom level you want.
11. Tap Choose. The Photos app assigns the photo to the contact and returns you to the photo.