
Chapter 7
How Do I Manage My E-book Library?
Chances are good that, as you read these words, you’re holding a physical book in your hands. Physical books are an awesome invention: they’re portable and fully showoffable. Books aren’t going away anytime soon, but the age of e-books is upon us. The Amazon Kindle lit a fire under the e-book category, but it’s clunky and tied to Amazon. The iPhone and iPod touch are actually the most popular eReaders, but they’re a bit too small. The iPad and iPad mini fill in these gaps by supporting an open e-book format and having screens that are tailor-made for reading.

Understanding E-book Formats
If there was one reason why e-books took a long time to take off (in the same way that, say, digital music now rules the planet), it would be because the e-book world started out as hopelessly, headachingly confusing. At its worst, at least two dozen (yes, two dozen!) e-book formats were available, and new formats jumped on the e-book bandwagon with distressing frequency.
That was bad enough, but it got worse when you considered that some of these formats required a specific eReading device or program. For example, the Kindle e-book format required either the Kindle eReader or the Kindle app. Similarly, the Microsoft LIT format required the Microsoft Reader program. Finally, things turned positively chaotic when you realized that some formats came with built-in restrictions that prevented you from reading e-books on other devices or programs, or sharing e-books with other people.
What the e-book world needed was the simplicity and clarity that comes with having a near-universal e-book format (such as the MP3 format in music). Well, I’m happy to report that one format has emerged from the fray: EPUB. This is a free and open e-book standard created by the International Digital Publishing Forum (IDPF; see www.idpf.org/). EPUB files (which use the .epub extension) are supported by most eReader programs and by most eReader devices (with the Amazon Kindle being the very noticeable exception). EPUB is leading the way, not only because it’s free and nonproprietary, but also because it offers the following cool features:
![]() Text is resizable, so you can select the size that’s most comfortable for you.
Text is resizable, so you can select the size that’s most comfortable for you.
![]() The layout and formatting of the text are handled by Cascading Style Sheets (CSS). This is an open and well-known standard that makes it easy to alter the look of the text, including changing the font.
The layout and formatting of the text are handled by Cascading Style Sheets (CSS). This is an open and well-known standard that makes it easy to alter the look of the text, including changing the font.
![]() Text is reflowable. When you change the text size or the font, the text wraps naturally on the screen to accommodate the new character sizes (as opposed to some e-book formats that simply zoom in or out of the text).
Text is reflowable. When you change the text size or the font, the text wraps naturally on the screen to accommodate the new character sizes (as opposed to some e-book formats that simply zoom in or out of the text).
![]() A single e-book can have alternative versions in the same file.
A single e-book can have alternative versions in the same file.
![]() E-books can include high-resolution images right on the page.
E-books can include high-resolution images right on the page.
![]() Publishers can protect book content by adding digital rights management (DRM) support. DRM refers to any technology that restricts the usage of content to prevent piracy. Of course, depending on where you fall in the “information wants to be free” spectrum, DRM may not be cool and may not even be considered a feature.
Publishers can protect book content by adding digital rights management (DRM) support. DRM refers to any technology that restricts the usage of content to prevent piracy. Of course, depending on where you fall in the “information wants to be free” spectrum, DRM may not be cool and may not even be considered a feature.
So the first bit of good news is that the iBooks app supports the EPUB format, so all of the features in the previous list are available in the iBooks app.
 For the record, I should also mention that you can use the iBooks app to read books in three other formats: plain text, HTML, and PDF.
The next bit of good news is that iBooks’ support for EPUB means that a vast universe of public domain books is available to you. On its own, the Books section of Google Play (https://play.google.com/store/books) offers more than a million public-domain e-books. Several other excellent EPUB sites exist on the web, and I tell you about them, as well as how to get them onto your iPad or iPad mini, a bit later in this chapter.
By definition, public-domain e-books are DRM-free, and you can use them any way you see fit. However, lots of the EPUB books you find come with DRM restrictions. In the case of iBooks, the DRM scheme of choice is called FairPlay. This is the DRM technology that Apple used on iTunes for many years. Apple phased out DRM on music a while ago, but still uses it for other content, such as movies, TV shows, and audiobooks.
FairPlay means that many of the e-books you download through iBooks face the following restrictions:
![]() You can access your books on a maximum of five computers, each of which must be authorized with your iTunes Store account info.
You can access your books on a maximum of five computers, each of which must be authorized with your iTunes Store account info.
![]() You can read your e-books only on your iPhone, iPad or iPad mini, iPod touch, or a computer that has iTunes installed.
You can read your e-books only on your iPhone, iPad or iPad mini, iPod touch, or a computer that has iTunes installed.
It’s crucial to note the following two restrictions that you trip over with DRM-encrusted e-books:
![]() FairPlay e-books do not work on other eReader devices that support the EPUB format, including the Sony Reader and the Barnes & Noble NOOK.
FairPlay e-books do not work on other eReader devices that support the EPUB format, including the Sony Reader and the Barnes & Noble NOOK.
![]() EPUB-format books that come wrapped in some other DRM scheme do not work on iPad or iPad mini.
EPUB-format books that come wrapped in some other DRM scheme do not work on iPad or iPad mini.
However, remember that DRM is an optional add-on to the EPUB format. Although it’s expected that most publishers will bolt FairPlay DRM onto books they sell in the iBookstore, it’s not required. So, you should be able to find DRM-free e-books in the iBookstore (and elsewhere).
If you have an Amazon Kindle, I’m afraid it uses a proprietary e-book format, so Kindle e-books won’t transfer to the iBooks app (or any other eReader). However, Amazon does offer a Kindle app for the iPad and iPad mini that you can use to download and read any Kindle book, even those you purchased earlier.
Syncing E-books
If you’ve used your computer to grab an e-book from the iBookstore or to add a downloaded e-book to the iTunes library, you probably want to get that book onto your iPad or iPad mini as soon as possible. Similarly, if you’ve downloaded a few e-books on your tablet, it’s a good idea to back them up on your computer.
Syncing via iTunes
You can do both by following these steps to sync e-books between your computer and your tablet:
1. Connect your iPad or iPad mini to your computer. iTunes opens and accesses the device. If you added e-books to your tablet, be sure to wait until iTunes syncs them to your computer.
2. In iTunes, click your iPad or iPad mini in the Devices list.
3. Click the Books tab.
4. Select the Sync Books check box.
5. To sync only some of your books, select the Selected books option.
6. In the book list, select the check box beside each book that you want to sync.
7. Click Apply. iTunes syncs the iPad or iPad mini.
Syncing via iCloud
If you purchase an e-book on your iPhone, Mac, or PC, getting it onto your tablet requires a lot of connecting and syncing. This all seems a tad primitive in this modern age. However, if you have an iCloud account, you can configure it to automatically download any new e-book purchases directly to your tablet, without a cable or your computer’s iTunes application in sight.
Follow these steps to sync your e-books via iCloud:
1. On your iPad or iPad mini, tap Settings in the Home screen to launch the Settings app.
2. Tap iTunes and App Store.
3. If you haven’t signed in to the iTunes Store, enter your iCloud username and password, and then tap Sign In.
4. Tap the Books switch to On, as shown in Figure 7.1.
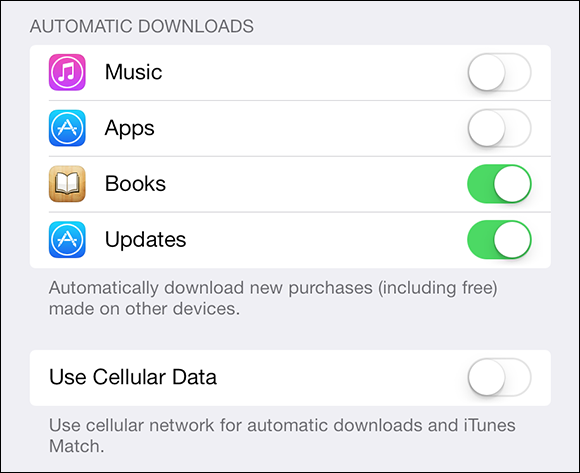
7.1 Tap the Books switch to On to sync e-books via iCloud.
5. If you have a cellular iPad or iPad mini, and you want iCloud to sync e-books even when you have a cellular-only connection, tap the Use Cellular Data switch to On.
Now, each time that you purchase an e-book via iTunes on another device, that book is automatically sent to the iBooks library on your tablet, usually within a few seconds.
Managing Your iBooks Library
In this chapter, I concentrate on iBooks, which is the Apple eReader app. However, it’s important to stress right off the bat that you’re not restricted to using iBooks for reading e-books on your tablet. Tons of great e-book apps are available (l mention a few of them at the end of this chapter), so feel free to use any or all of them in addition to (or even instead of) iBooks.
The iBooks app comes with a virtual wooden bookcase, as shown in Figure 7.2. It’s a nice bit of eye candy, for sure, but it’s certainly no more than that because the real point is to fill it with your favorite digital reading material. So, your first task is to add a few titles to the bookcase and the next few sections show you how to do just that.

7.2 The iBooks library is designed to mimic a real bookcase.
Unlike the other apps I talk about in this book, iBooks isn’t part of the default iOS app collection. Instead, you have to install it (it’s free) from the App Store.
Browsing books in the iBookstore
What if you’re out and about with your iPad or iPad mini, you have a bit of time to kill, and you decide to start a book? That’s no problem, because iBooks has a direct link to the Apple book marketplace, the iBookstore. Your tablet can establish a wireless connection to the iBookstore anywhere that you have Wi-Fi access or a cellular signal (ideally LTE or 3G for faster downloads, assuming that you have a cellular version of the iPad or iPad mini).
You can browse or search for books, read reviews, and purchase any book you want (or grab a title from the large collection of free books). The e-book downloads to your tablet and adds itself to the iBooks bookcase. You can start reading within seconds! To access the iBookstore, display the iBooks library. If you haven’t yet loaded the app, tap the iBooks icon to open it. If you’re in the iBooks app reading a book, tap the screen to display the controls, tap Library, and then tap the Store button.
As you can see in Figure 7.3, iBooks organizes the iBookstore similar to the App Store. That is, you get four browse buttons in the menu bar located at the bottom of the screen — Featured, Top Charts, Top Authors, and Purchased. You use these buttons to navigate the iBookstore.
Here’s a summary of what each browse button does for you:
![]() Featured. Tap this button to display a list of books picked by the iBookstore editors. The list shows each book’s cover, title, author, category, star rating, number of reviews, and price. Tap the categories at the top of the screen to browse books by subject (tap More to see the full list).
Featured. Tap this button to display a list of books picked by the iBookstore editors. The list shows each book’s cover, title, author, category, star rating, number of reviews, and price. Tap the categories at the top of the screen to browse books by subject (tap More to see the full list).
![]() Top Charts. Tap this button to see charts for the Top Paid books and the Top Free books. You can also tap All Categories to see the top paid and free books in a specific category, such as Non-Fiction.
Top Charts. Tap this button to see charts for the Top Paid books and the Top Free books. You can also tap All Categories to see the top paid and free books in a specific category, such as Non-Fiction.
![]() Top Authors. Tap this button to browse through the bookstore using an alphabetical list of author names that is also divided into the Paid and Free lists.
Top Authors. Tap this button to browse through the bookstore using an alphabetical list of author names that is also divided into the Paid and Free lists.
![]() Purchased. Tap this button to see a list of the books you’ve purchased using your iTunes account. Tap the cloud icon beside any book to download it to your iPad or iPad mini.
Purchased. Tap this button to see a list of the books you’ve purchased using your iTunes account. Tap the cloud icon beside any book to download it to your iPad or iPad mini.
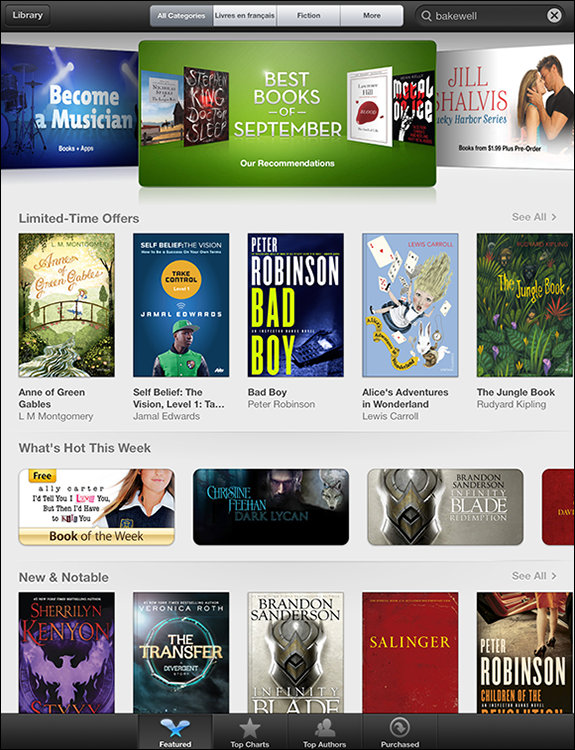
7.3 Use the browse buttons in the iBookstore menu bar to locate and manage e-books for your iPad or iPad mini.
The iBookstore also includes a Search box in the upper-right corner so you can search for the book you want.
Tap a book to get more detailed information about it. The Info screen that appears is divided into three tabs: The Details section shows standard book data, such as the title, author, cover, publisher, number of pages, and a description of the book; the Ratings and Reviews tab offers user ratings and reviews of the book; and the Related tab offers more books by the same author, as well as a list of related books.
Adding a PDF attachment to your library
If you receive an e-mail with an attached PDF file, you can open the attachment right from the Mail app. However, the iBooks app now supports PDFs, so if you’d prefer to read the file in the friendly confines of iBooks (where you can search the PDF and bookmark your current location), you can follow these steps to transfer it to your iBooks Library:
1. In the Mail app, open the message that contains the PDF attachment.
2. Tap and hold the PDF attachment. Mail displays a menu of commands.
3. Tap Open in iBooks. Your iPad or iPad mini opens the iBooks app and displays the PDF.
Working with collections
iBooks supports both e-books and PDF documents. In a welcome burst of common sense, the iBooks programmers decided not to combine e-books and PDFs on the same part of the library. Instead, iBooks supports separate library sections called collections. It comes with three default collections: One for e-books (called Books), one for your purchased items (called Purchased Books), and one for PDF documents (called PDFs).
You can use the following techniques to work with your iBooks collections:
![]() Switch to another collection. Tap the Collections button and then tap the name of the collection you want to use.
Switch to another collection. Tap the Collections button and then tap the name of the collection you want to use.
![]() Create a new collection. Tap the Collections button, tap New, type the name of your collection (such as Fiction or Nonfiction), and then tap Done.
Create a new collection. Tap the Collections button, tap New, type the name of your collection (such as Fiction or Nonfiction), and then tap Done.
![]() Move an item to a different collection. Tap the Edit button, tap the item you want to move, and then tap the Move button. In the list of collections that appears, tap the collection you want to use as the item’s new iBooks home.
Move an item to a different collection. Tap the Edit button, tap the item you want to move, and then tap the Move button. In the list of collections that appears, tap the collection you want to use as the item’s new iBooks home.
![]() Delete a collection. Tap the Collections button, tap Edit, tap the red Delete button beside the collection you want to remove, and then tap Delete. If the collection isn’t currently empty, tap Remove when iBooks asks you to confirm. For a nonempty collection, iBooks returns the items to their original locations (for example, e-books to the Books collection).
Delete a collection. Tap the Collections button, tap Edit, tap the red Delete button beside the collection you want to remove, and then tap Delete. If the collection isn’t currently empty, tap Remove when iBooks asks you to confirm. For a nonempty collection, iBooks returns the items to their original locations (for example, e-books to the Books collection).
Adding EPUB e-books to your library
With the apparent ascendance of the EPUB format, publishers and book packagers are tripping over each other to make their titles EPUB-friendly. As a result, the web is awash in EPUB books, so you don’t have to get all of your iPad or iPad mini e-book content from the iBookstore. The following is a short list of some sites where you can download EPUB files to your computer:
![]() epubBooks: www.epubbooks.com. This is a terrific site for all things related to the EPUB format. It offers a wide selection of public-domain EPUB books.
epubBooks: www.epubbooks.com. This is a terrific site for all things related to the EPUB format. It offers a wide selection of public-domain EPUB books.
![]() eBooks.com: www.ebooks.com. This site has a variety of books in various e-book formats. However, most won’t work in the iBooks app because most of the EPUB books use the DRM scheme from Adobe. You can go to the Search Options page and search for the Unencrypted EPUB file format to see the iBooks-friendly titles it offers.
eBooks.com: www.ebooks.com. This site has a variety of books in various e-book formats. However, most won’t work in the iBooks app because most of the EPUB books use the DRM scheme from Adobe. You can go to the Search Options page and search for the Unencrypted EPUB file format to see the iBooks-friendly titles it offers.
![]() Feedbooks: www.feedbooks.com. This site offers public-domain titles in several formats, including EPUB.
Feedbooks: www.feedbooks.com. This site offers public-domain titles in several formats, including EPUB.
![]() Books on Google Play: https://play.google.com/store/books. This site offers more than a million public-domain titles (many of which are free), plus lots of current releases that you can buy.
Books on Google Play: https://play.google.com/store/books. This site offers more than a million public-domain titles (many of which are free), plus lots of current releases that you can buy.
![]() ManyBooks.net: http://manybooks.net. This site offers a nice collection of free e-books in a huge variety of formats. When you download a book, be sure to choose the EPUB (.epub) format in the Select Format drop-down list.
ManyBooks.net: http://manybooks.net. This site offers a nice collection of free e-books in a huge variety of formats. When you download a book, be sure to choose the EPUB (.epub) format in the Select Format drop-down list.
![]() Smashwords: www.smashwords.com. This intriguing site offers titles by independent and self-published authors. All e-books are DRM-free and available in the EPUB format.
Smashwords: www.smashwords.com. This intriguing site offers titles by independent and self-published authors. All e-books are DRM-free and available in the EPUB format.
![]() Snee: www.snee.com/epubkidsbooks. This site offers lots of children’s picture books in the EPUB format.
Snee: www.snee.com/epubkidsbooks. This site offers lots of children’s picture books in the EPUB format.
After you download an EPUB title to your computer, import the book into iBooks or iTunes using the Add to Library dialog:
![]() In OS X Mavericks. Open iBooks, choose File → Add to Library (or press ⌘+Shift+O), locate and click the EPUB file you downloaded, and then click Add. iBooks adds the e-book to the All Books section of the library.
In OS X Mavericks. Open iBooks, choose File → Add to Library (or press ⌘+Shift+O), locate and click the EPUB file you downloaded, and then click Add. iBooks adds the e-book to the All Books section of the library.
![]() In earlier versions of OS X; all versions of Windows. Open iTunes, choose File → Add to Library (or press ⌘+O), locate and click the EPUB file you downloaded, and then click Open. iTunes adds the e-book to the Books section of the library.
In earlier versions of OS X; all versions of Windows. Open iTunes, choose File → Add to Library (or press ⌘+O), locate and click the EPUB file you downloaded, and then click Open. iTunes adds the e-book to the Books section of the library.
Editing the library
When you add a book to the iBooks library, the app clears a space for the new title on the left side of the top shelf of the bookcase. The rest of the books are shuffled to the right and down.
This is a sensible way to go about things if you read each book as you download it because it means the iBooks library displays your books in the order that you read them. Of course, life isn’t always that orderly and you might end up reading your e-books more haphazardly, which means that the order that the books appear in the library won’t reflect the order in which you read them.
Similarly, you may have one or more books in your iBooks library that you refer to frequently or are reading piecemeal (such as a book of poetry or a collection of short stories). In that case, it would be better to have such books near the top of the bookcase where they’re slightly easier to find and open.
For these and similar library maintenance chores, iBooks lets you shuffle the books around to get them into the order that you prefer. Follow these steps to rearrange your iBooks library:
1. Display the iBooks library in one of the following ways:
• If you haven’t yet loaded the app, tap the iBooks icon to open the iBooks app.
• If you’re in the iBooks app reading a book, tap the screen to display the controls, and then tap Library.
2. Tap Edit. iBooks opens the library for editing, as shown in Figure 7.4.
3. Tap and drag the book covers to the bookcase positions you prefer.
4. If you want to remove a book from your library, tap Edit, tap the book cover, tap the Delete button, and then tap either Delete This Copy (to remove it from just your tablet) or Delete From All Devices (to remove it from every device that has a copy).
5. Tap Done. iBooks closes the library for editing.
To organize books by list, tap the Lists button (the three horizontal lines to the right of the Search box) in the library screen. Tap the buttons on the bottom of the screen to organize your books by Titles, Authors, or Categories. Tap Bookshelf to view your books in the order in which they appear in the library. Tap the Bookshelf button (the four squares to the right of the Search box) to return to the Bookshelf view.
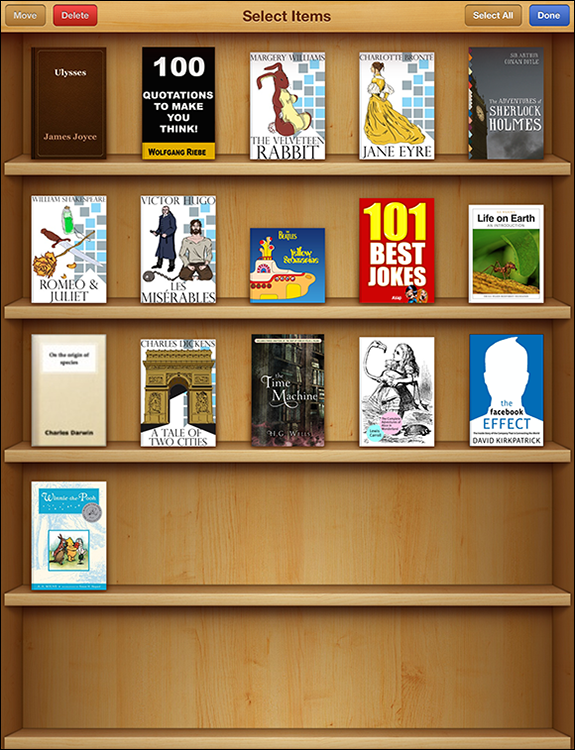
7.4 With the library open for editing, you can move and remove books.
Creating a custom e-book cover
If you’ve obtained any free books from the iBookstore or if you’ve downloaded public-domain books to iTunes, you’ve no doubt noticed that many (or really, most) of these books use generic covers. That’s no big deal for a book or two, but it can get monotonous if you have many such books in your iBooks library (as well as making it hard to find the book you want). To work around this, you can create custom book covers from your own photos.
 Creating a custom e-book cover only works if you’re using a version of iTunes that supports e-books. If you are using OS X Mavericks, e-books are handled by the new iBooks application, which doesn’t support custom e-book covers.
Your first task is to convert a photo (or any image) to something that’s usable as a book cover. This involves loading the image into your favorite image-editing program, and then doing the following three things:
![]() Crop the image so that it’s 420 pixels wide and 600 pixels tall.
Crop the image so that it’s 420 pixels wide and 600 pixels tall.
![]() Use the text tool in the image-editing program to add the book title to the image.
Use the text tool in the image-editing program to add the book title to the image.
![]() Save the image as a JPEG file. If the image is already a JPEG, be sure to save it under a different name so you don’t overwrite the original.
Save the image as a JPEG file. If the image is already a JPEG, be sure to save it under a different name so you don’t overwrite the original.
Now you’re ready to use the new image as a book cover. Follow these steps to import the cover image into iTunes on your computer:
1. In iTunes, click the Books category. iTunes displays your e-books.
2. Right-click the book you want to customize, and then click Get Info. iTunes displays the book Info dialog.
3. Click the Artwork tab. This tab includes a large box for the book cover image.
4. Use Finder (on a Mac) or Explorer (on a Windows PC) to locate the new cover image. On a Mac, you can also locate the image in iPhoto.
5. Click the new image and drop it inside the large box in the Artwork tab.
6. Click OK. iTunes applies the new image as the book cover.
Reading with iBooks
If you’re a book lover like me, and your iBooks library is groaning under the weight of all of your e-books, you may want to spend some time looking at all the covers sitting prettily in the bookcase. Or not. If it’s the latter, then it’s time to get some reading done. The next few sections show you how to control e-books and modify the display for the best reading experience.
Controlling e-books on the reading screen
When you’re ready to start reading a book using iBooks, getting started couldn’t be simpler. First, you just need to display the iBooks library. If you haven’t loaded the app yet, tap the iBooks icon to open it. If you’re in the iBooks app reading a book, tap the screen to display the controls, and then tap library. Next, tap the book you want to read and iBooks opens it.
The following is a list of techniques you can use to control an e-book while reading it:
![]() View one page at a time. Orient the tablet in portrait mode.
View one page at a time. Orient the tablet in portrait mode.
![]() View two pages at a time. Orient the tablet in landscape mode.
View two pages at a time. Orient the tablet in landscape mode.
![]() Flip to the next page. Tap the right side of the screen.
Flip to the next page. Tap the right side of the screen.
![]() Flip to the previous page. Tap the left side of the screen.
Flip to the previous page. Tap the left side of the screen.
![]() Manually turn a page. Flick the page with your finger. Flick left to turn to the next page; flick right to turn to the previous page.
Manually turn a page. Flick the page with your finger. Flick left to turn to the next page; flick right to turn to the previous page.
![]() Access the iBooks controls. Tap the middle of the screen. To hide the controls, tap the middle of the screen again.
Access the iBooks controls. Tap the middle of the screen. To hide the controls, tap the middle of the screen again.
![]() Access the Table of Contents. Display the controls and tap the Contents button, pointed out in Figure 7.5. You can then tap an item in the Table of Contents to jump to that section of the book.
Access the Table of Contents. Display the controls and tap the Contents button, pointed out in Figure 7.5. You can then tap an item in the Table of Contents to jump to that section of the book.
![]() Go to a different page in the book. Display the controls and tap a dot at the bottom of the screen.
Go to a different page in the book. Display the controls and tap a dot at the bottom of the screen.
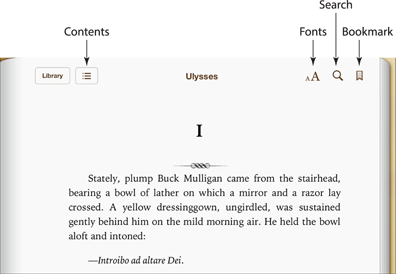
7.5 Tap the middle of the screen to display the controls.
![]() Search the book. Display the controls, tap the Search button in the upper-right corner, type your search text, and then tap Search. In the search results that appear, tap a result to display that part of the book.
Search the book. Display the controls, tap the Search button in the upper-right corner, type your search text, and then tap Search. In the search results that appear, tap a result to display that part of the book.
![]() Return to the iBooks library. Display the controls, and then tap Library in the upper-left corner.
Return to the iBooks library. Display the controls, and then tap Library in the upper-left corner.
 Rather than flipping left and right through the pages, you might prefer to scroll the pages up and down. To set this up, tap the screen to reveal the controls, tap Fonts, tap Themes, and then tap Scroll.
Formatting e-book text
I mentioned near the top of the show that the EPUB format supports multiple text sizes and multiple fonts, and that the text reflows seamlessly to accommodate the new text size. In the iBooks app, you can take advantage of EPUB features by following these steps:
1. While reading an e-book, tap the middle of the screen to display the controls.
2. Tap the Fonts icon (see Figure 7.5). iBooks displays the Font options.
3. Drag the slider to decrease or increase the screen brightness.
4. Tap the larger A to increase the text size. Tap the smaller A to reduce it.
5. Tap Fonts. iBooks displays a list of typefaces, as shown in Figure 7.6.
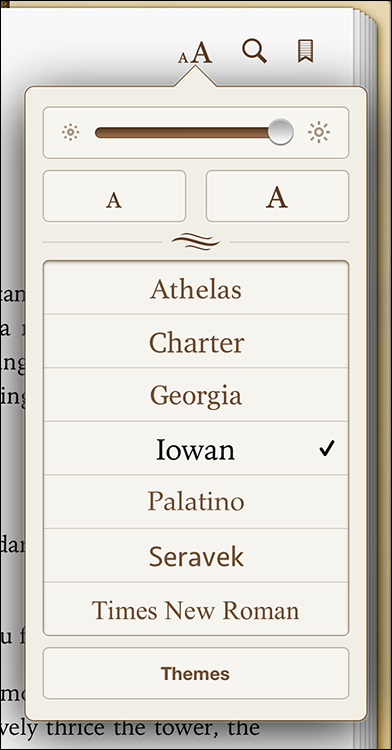
7.6 Tap the Fonts icon, and then tap Fonts to display the iBooks typefaces.
6. Tap the typeface you want to use. iBooks reformats the e-book for the new typeface.
7. Tap Themes, and then tap the color scheme that you want to use. For example, tap Sepia to switch to a sepia-colored background, or tap Night to switch to white text on a black background for easier reading in the dark.
8. To remove the book interface elements that appear on the top, right, and bottom edges of the iBooks app, tap the Full Screen switch to On.
9. Tap the middle of the screen to hide the controls.
Adding a bookmark
Reading an e-book with the iBooks app is so pleasurable you may not want to stop! However, you have to eat at some point. So, when it’s time to set your book aside, follow these steps to mark your spot with a bookmark:
1. Navigate to the spot you want to mark.
2. Tap the screen to display the controls.
3. Tap the Bookmark button (see Figure 7.5). iBooks saves your spot by creating a bookmark at the current page.
To return to your place, follow these steps:
1. Tap the page. iBooks displays the reading controls.
2. Tap the Contents button (see Figure 7.5). iBooks displays the Table of Contents.
3. Tap the Bookmarks tab. iBooks offers a list of the saved bookmarks.
4. Tap the bookmark. iBooks returns you to the bookmarked page.
Looking up a word in the dictionary
As you peruse an e-book, you may come across an unfamiliar word. You can look it up using any of the umpteen online dictionaries but there’s no need for that with iBooks. To look up a definition:
1. Tap and hold the word that has you furrowing your brow. iBooks displays a set of options.
2. Tap Define. iBooks looks up the word and then displays its definition.
3. Tap outside of the definition to close it.
Highlighting text or adding a note
If you come across a word, phrase, sentence, paragraph, or section of text that strikes your fancy, you might want to return to it later on. The easiest way to do that is to highlight the text. This not only makes it stick out from the surrounding prose by displaying it with a yellow background, but iBooks also bookmarks it, so you can quickly find it again by using the same steps I described earlier to return to a regular bookmark.
Follow these steps to highlight text in iBooks:
1. Tap and hold a word in the text you want to highlight. iBooks selects the word and displays a set of options. If the word is all you want to highlight, skip to step 3.
2. Use the selection controls to expand the selection to include all the text you want to highlight.
3. Tap Highlight. iBooks adds a yellow background to the text and creates a note for it.
4. Tap the highlight color you want to use or tap the Note button to enter a note for the text.
If you change your mind about the highlight background color, you can change it. Tap the highlight and then tap the color you prefer.
Sometimes when you’re reading a book you feel an irresistible urge to provide your own two cents. With a paper book, you can grab the nearest writing implement and jot a margin note, but that’s not going to work too well with an e-book! Fortunately, the iBooks programmers have taken pity on inveterate margin writers and provided a Note feature. This allows you to add your own comments and asides. Even better, iBooks also creates a bookmark for each note, so you can quickly find your additions.
Follow these steps to create a note with iBooks:
1. Tap and hold a word in the text on which you want to comment. iBooks selects the word and displays a set of options. If the word is all you want to work with, skip to step 3.
2. Use the selection controls to expand the selection to include all of the text you want to use.
3. Tap Note. iBooks displays a text box that looks like a sticky note.
4. Type your note.
5. Tap outside the note. As shown in Figure 7.7, iBooks adds a yellow background to the text, displays a note icon in the margin, and creates a bookmark for the text.
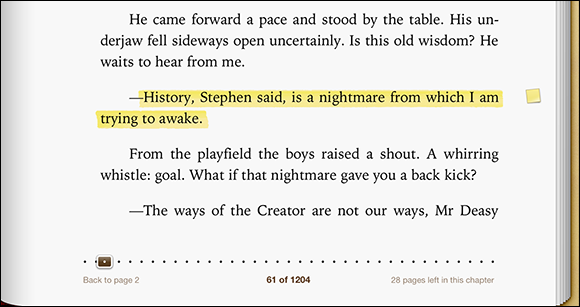
7.7 You can highlight passages and add notes to your e-books.
Reading e-books is no exception to the inevitable social network component that now gets applied to every activity under the sun. If you come across a passage that’s particularly funny, witty, profound, or downright shareable, follow these steps to pass it along to either your Twitter followers or Facebook friends:
1. Tap and hold a word in the text that you want to share. iBooks selects the word and displays a set of options.
2. Use the selection controls to expand the selection to include all of the text that you want to share.
3. Tap Share. For some reason, the first time you do this, iBooks asks permission to access your photos. This is a head-scratcher, for sure, so tap Don’t Allow.
4. Tap either Twitter or Facebook. iBooks opens a new tweet or post and adds the selected text in quotation marks, as well as a link to the book in the iBookstore.
5. Type an optional note to accompany the quotation.
6. Tap Send. iBooks posts the tweet or status update.
Reading Other E-books
In this chapter, I focus on the iBooks app. This is mostly because it’s an excellent app that is optimized for the iPad or iPad mini, and integrates seamlessly with iTunes. However, the iPad and iPad mini are, arguably, the best eReaders available, so it seems a shame to ignore the massive universe of e-books that aren’t iBooks-compatible. If you want to turn your tablet into an ultimate eReader — capable of reading practically any e-book in practically any format — then just head for the App Store and install the appropriate eReader apps.
A complete list of eReader apps would extend for pages, so the following list just hits the highlights:
![]() eBookMobi. This powerful app (it costs $1.99) supports an amazing variety of e-book formats, including EPUB, PDF, and Mobipocket.
eBookMobi. This powerful app (it costs $1.99) supports an amazing variety of e-book formats, including EPUB, PDF, and Mobipocket.
![]() eReader. This app supports the eReader format.
eReader. This app supports the eReader format.
![]() i2Reader. This app supports EPUB books and PDF documents.
i2Reader. This app supports EPUB books and PDF documents.
![]() iSilo. This app (which costs $9.99) supports the iSilo and Palm Doc formats.
iSilo. This app (which costs $9.99) supports the iSilo and Palm Doc formats.
![]() Kindle. Amazon’s Kindle app is the way to go if you want to read Kindle e-books on your iPad or iPad mini.
Kindle. Amazon’s Kindle app is the way to go if you want to read Kindle e-books on your iPad or iPad mini.
![]() Kobo. This app is supplied by the same folks who make the Kobo eReader, and it supports both EPUB books and PDF documents.
Kobo. This app is supplied by the same folks who make the Kobo eReader, and it supports both EPUB books and PDF documents.
Reading Magazines with Newsstand
The iPad just might be the perfect medium for reading magazines. It’s just a bit smaller than a regular print magazine, so the pages look natural and uncluttered on the iPad screen. The iPad mini is a bit smaller, of course, but it’s still a great device for perusing digital magazines. Plus magazine publishers have been coming up with all kinds of innovative new tools and techniques that make reading a digital version of a magazine a more interactive and media-rich experience than reading the print version.
If there’s a problem with tablet-based magazines, it’s that you have to manage a different app for each magazine, which gets clumsy once you have more than a half dozen or so magazine apps scattered around your Home screens. You can try plopping all your magazine apps into a single folder, but then it makes it hard to see the icon badges that tell you a new issue is available.
To solve these kinds of problems, iOS offers Newsstand, an app specifically designed to manage magazines. Newsstand is really a special folder, and when you tap it you see a replica of a magazine shelf, as shown in Figure 7.8. For magazine apps that know how to work with Newsstand (in the App Store, open the Newsstand category), when you install such an app, it loads the most recent issue in the Newsstand, which lets you browse your available issues in a single spot. As I write this, a number of magazine publishers have signed on to support Newsstand, including Condé Nast (Wired, The New Yorker, Vanity Fair, and many more), National Geographic, Hearst, Bloomberg, and Disney. Newsstand also supports newspaper subscriptions, so you’ll also see the likes of The New York Times, The Wall Street Journal, and other major newspapers.
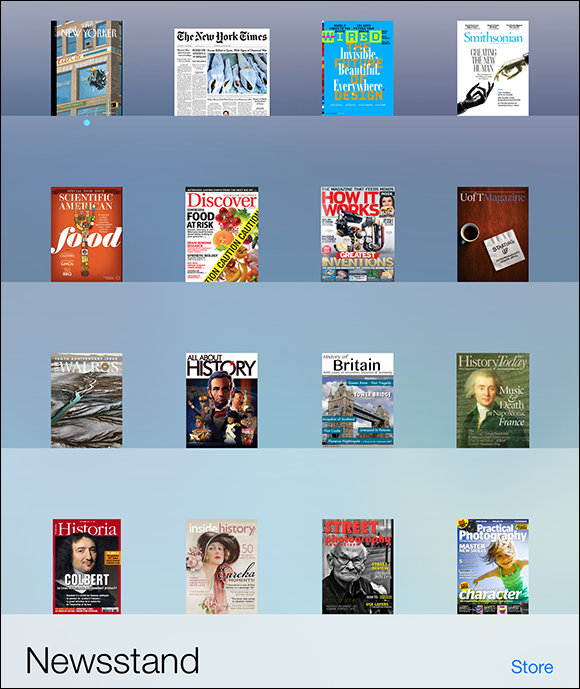
7.8 Use the Newsstand app to organize your iOS magazine subscriptions.