
Chapter 11
People and Appointments
IN THIS CHAPTER
![]() Understanding Calendar’s different views and functions
Understanding Calendar’s different views and functions
![]() Mingling with contacts
Mingling with contacts
We hate to break the news to you, but your iPad isn’t only for fun and games; it also has a serious side. The iPad can remind you of appointments and help you keep all your contacts straight.
Working with the Calendar
The Calendar program lets you keep on top of your appointments and events (birthdays, anniversaries, and the like). You open it by tapping the Calendar icon on the Home screen. The icon is smart in its own right because it changes daily, displaying the day of the week and the date right in the app icon on your home screen.
You can display five calendar views: year, month, day, week, and a searchable list view, which shows current and future appointments.
Tap one of the four tabs at the top of the screen — Day, Week, Month, or Year — to choose a view. A Today button in the lower-left corner of the screen returns you to the current date in any view. (Also at the bottom of the screen are the Calendars button and Inbox button, which we get to shortly.)
To get to list view, tap the search icon — a little magnifying glass — in the upper-right corner of the screen.
We take a closer look at these views in the following sections.
Year view
There’s not much to the yearly view, but it does let you see the current calendar year with today’s date circled in red. You can scroll up or down to see prior or future years, but that’s about it; unfortunately, you can’t tell on which days you have appointments in year view. Boo. Hiss.
Month view
Tap any of the months visible in year view to jump to that specific month, as shown in Figure 11-1. When your iPad is in month view, you can see which days have appointments or scheduled events. Tap a day to see the list of activities on the agenda for that day, which leads nicely into the next section.
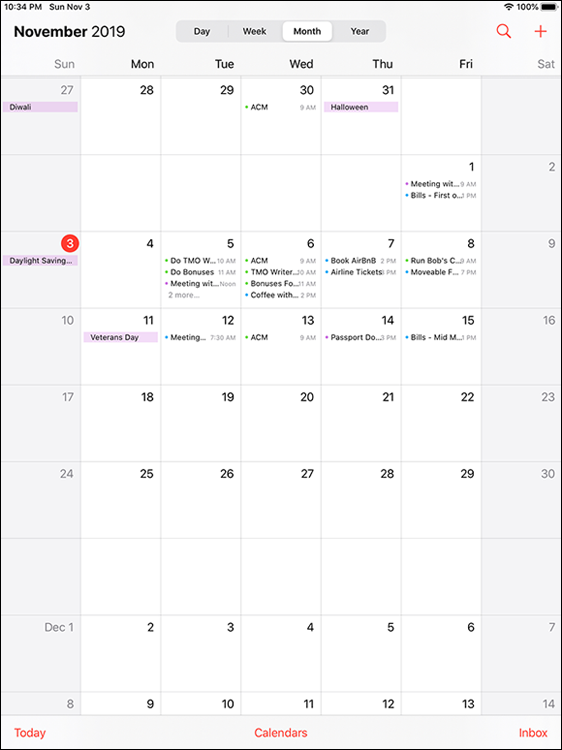
FIGURE 11-1: Month view.
Day view
As we just mentioned, you have to tap a date with an entry to see what you have going on in a 24-hour period — though to see an entire day’s worth of entries, you might have to scroll up or down depending on how many entries you have. You can swipe to the left to advance to the next day of the week and beyond; swipe to the right to retreat one or more days; or tap a day near the top of the screen to jump to it.
In the day view, all-day events, birthdays, and events pulled from your Facebook account (if you provide your Facebook credentials) appear in a narrow strip above the timeline for the day.
Your daily appointments span the entire time in which they’ve been scheduled on your calendar. For example, if an appointment runs from 12:00 p.m. to 1:00 p.m., that hour will be blocked off on the calendar like the Meeting with Editor entry shown in Figure 11-2.
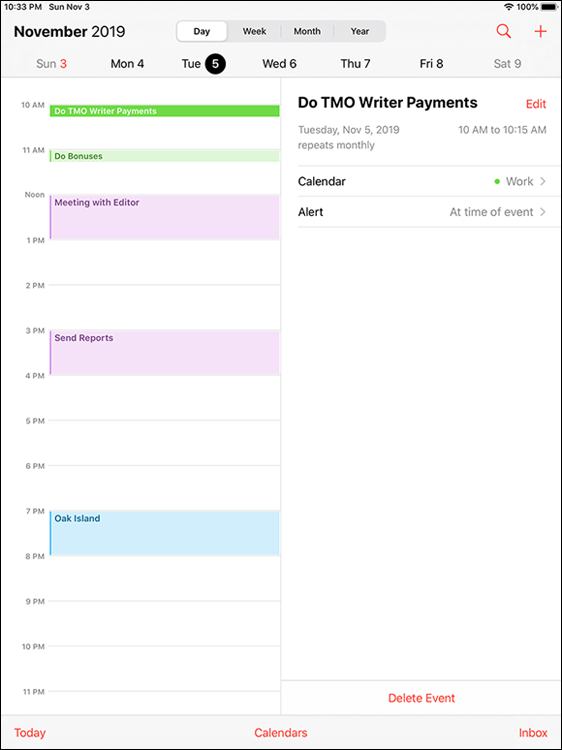
FIGURE 11-2: Day view.
You find out how to create calendar entries in a moment, but for now know that you can press on an event and drag it to a new time slot should your plans change. If you have overlapping appointments, you’ll see more than a single entry claim a given time slot.
Finally, calendars are color-coded according to the calendar in which you scheduled the appointment. These color codes will help you distinguish an appointment you made on your travel calendar versus, say, a work, family, or Facebook calendar.
Week view
In week view, shown in Figure 11-3, you can see an entire week at a glance. The current date is circled in red.
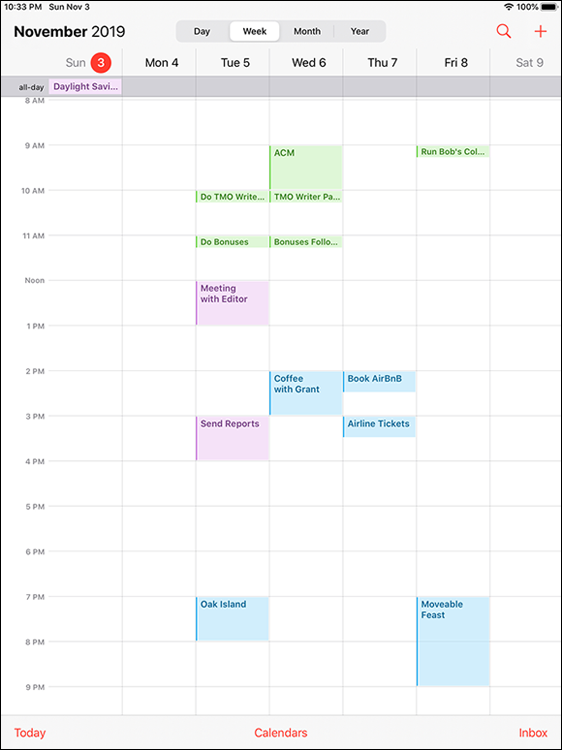
FIGURE 11-3: Week view.
 You can arrange to start your weekly view on any day of the week. Tap Settings ⇒ Calendars ⇒ Start Week On, and then tap the day on which you want to start your week. (Sunday is the default in the United States.)
List view
List view isn’t complicated. You can get to this view by tapping the search icon (magnifying glass) in the upper-right corner of the screen. As you would expect, all your calendar appointments are listed chronologically, as shown in Figure 11-4. If you have a lengthy list, drag up or down with your finger or flick to rapidly scroll through your appointments. If you’re looking for a specific calendar entry, you can search for appointments by typing the title, invitee names, location, or note in the search box above your list of entries.
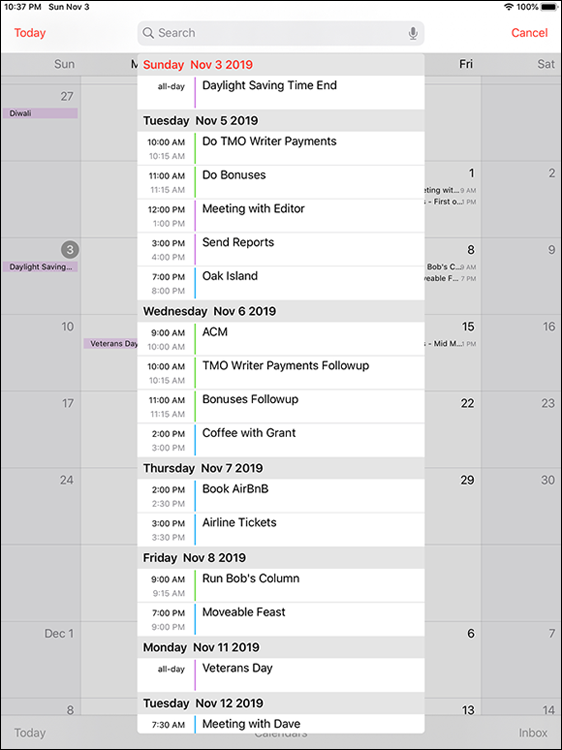
FIGURE 11-4: List view.
Tap any of the listings to get meeting or appointment details for that entry. If you tap a person’s birthday, you see his or her contact information. Sorry, but you just ran out of excuses for not sending a card.
Adding Calendar Entries
In Chapter 3, you discover pretty much everything there is to know about syncing your iPad, including syncing calendar entries from your Windows machine (using the likes of Microsoft Outlook) or Mac (using Calendar or Outlook) or Google Calendar. If you’re syncing your calendar entries with iCloud, you can also manage your calendars at https://www.icloud.com/ from any computer or device with a web browser.
In plenty of situations, you can enter appointments on the fly. Adding appointments directly to the iPad is easy:
- On the Home screen, tap the Calendar icon, and then (optionally) tap the Year, Month, Week, or Day view.
-
Tap the + icon in the upper-right corner of the screen.
The New Event overlay appears, as shown in Figure 11-5.
-
Tap the Title and Location fields in turn and type as much or as little information as you feel is necessary.
Tapping displays the virtual keyboard (if it’s not already shown).
Don’t forget you can use dictation or Siri to add a calendar entry. See Chapter 14 for more on dictation and Siri. -
To add start and end times:
- Tap the Starts field. A carousel wheel, like the one shown for the Ends time in Figure 11-6, appears below the field you tapped.
- Choose the time the event starts. Use your finger to roll separate carousel controls for the date, hour, and minute (in 1-minute intervals) and to specify AM or PM. The process is a little like manipulating a combination bicycle lock or an old-fashioned date stamp used with an inkpad.
- Tap the Ends field and choose the time the event ends.
To enter an all-day milestone (such as a birthday), tap the All-Day switch to turn it on (green). Because the time is no longer relevant for an all-day entry, you won’t see Starts, Ends, or Time Zone options. - When you’re finished, tap Add.
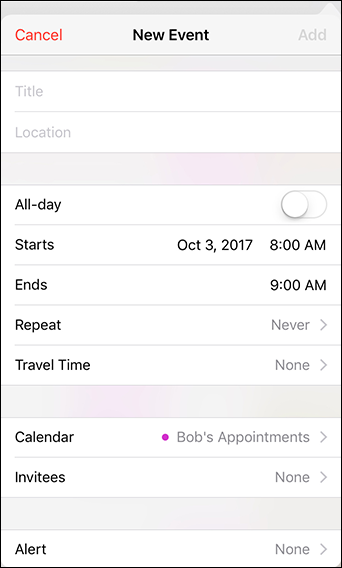
FIGURE 11-5: The screen looks like this just before you add an event to your iPad.
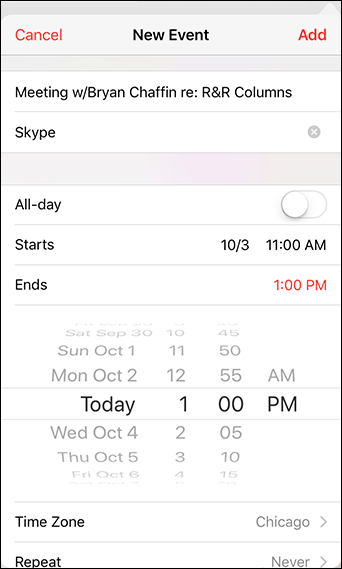
FIGURE 11-6: Controlling the Starts and Ends fields is like manipulating a bike lock.
We can’t think of any easier way to add an entry than to instruct Siri along the lines of “Set a lunch appointment for tomorrow at noon with the Smiths.” Siri will be pleased to comply.
That’s the minimum you have to do to set up an event. But we bet you want to do more. The Calendar app makes it easy:
- Change the time zone. If the correct location isn’t already present, tap the Time Zone field and type the name of the city where the appointment is taking place.
-
Set up a recurring entry. Tap the Repeat field. Tap to indicate how often the event in question recurs. This setting is good for everything from a weekly appointment, such as an allergy shot, to a yearly event, such as an anniversary.
The options are Every Day, Every Week, Every 2 Weeks, Every Month, and Every Year. Tap the Custom field if you want to further refine those options. Tap Never if you are planning to never repeat this entry again.
- Add travel time to and from events. Tap the Travel Time field and enable the Travel Time switch. A list of durations appears, ranging from five minutes to two hours. Tap a duration to specify your travel time.
- Assign the entry to a particular calendar. Tap Calendar, and then tap the calendar you have in mind (Home or Work, for example).
- Invite people to join you. Tap Invitees to specify who among your contacts will be attending the event.
-
Set a reminder or alert for the entry. Tap Alert and tap a time.
Alerts can be set so that you arrive at the time of an event, or 1 week before, 2 days before, 1 day before, 2 hours before, 1 hour before, 30 minutes before, 15 minutes before, or 5 minutes before the event. If it’s an all-day entry, you can request alerts 1 day before (at 9:00 a.m.), 2 days before (at 9:00 a.m.), or 1 week before.
When the appointment time rolls around, you hear a sound and see a message like the one shown in Figure 11-7.
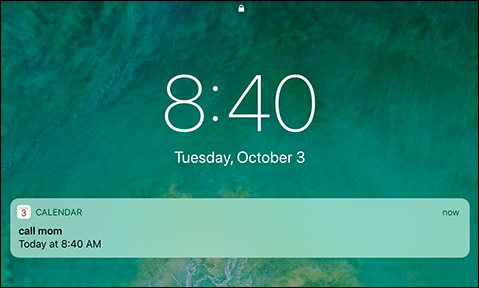
FIGURE 11-7: Alerts make it hard to forget.
If you’re the kind of person who needs an extra nudge, set another reminder by tapping the Second Alert field (which you’ll see only if a first alert is already set). - Indicate whether you’re busy or free by tapping Show As. If you’re invited to an event, you can tap Availability and then tap Free (if it’s shown on your iPad).
- Enter a web address. Tap the URL field (at the bottom of the New Event screen) and type or copy and paste the web address.
- Enter notes about the appointment or event. Tap the Notes field (at the bottom of the screen) and type your note.
Tap Done after you finish entering everything.
Managing your calendars
When you have the hang of creating calendar entries, you can make the task much easier with these tips:
- Choose a default calendar. Tap Settings ⇒ Calendar ⇒ Default Calendar and select the calendar you want to use as the default for new events.
-
Make events appear according to whichever time zone you selected for your calendars. In the Calendar settings, tap Time Zone Override to turn it on, and then tap Time Zone. Type the time zone’s location, using the keyboard that appears. If you travel long distances for your job, this setting comes in handy.
 When Time Zone Override is turned off, events are displayed according to the time zone of your current location.
 - Turn off calendar alert sounds. Tap Settings ⇒ Sounds ⇒ Calendar Alerts, and then make sure the selected alert tone is set to None.
- Set default alert times for birthdays, all-day events, or certain other events. Tap Settings ⇒ Calendar, and scroll down to Default Alert Times. For birthdays or other all-day events, you can choose to be alerted at 9:00 a.m. on the day of the event, at 9:00 a.m. one day before, at 9:00 a.m. two days before, or a week before. For other alerts, you can choose a default alert time at the time of event, 5, 10 15, or 30 minutes before, 1 hour before, 2 hours before, 1 day before, 2 days before, or 1 week before the event.
- Modify an existing calendar entry. Tap the entry, tap Edit, and then make whichever changes need to be made.
- Wipe out a calendar entry. Scroll down to the bottom of the event (if necessary) and then tap Delete Event. You have a chance to confirm your choice by tapping either Delete Event (again) or Cancel. If it’s a repeating event, you can choose to Delete This Event Only or Delete All Future Events.
Letting your calendar push you around
If you work for a company that uses Microsoft Exchange ActiveSync, calendar entries and meeting invitations from coworkers can be pushed to your device so they show up on the screen moments after they’re entered, even if they’re entered on computers at work. Setting up an account to facilitate this pushing of calendar entries to your iPad is a breeze, although you should check with your company’s tech or IT department to make sure your employer allows it. Then follow these steps:
- Tap Settings ⇒ Passwords & Accounts ⇒ Add Account.
- From the Add Account list, tap Microsoft Exchange.
- Fill in the email address and account description, and then tap Next.
- Fill in your password and tap Next.
-
If required, enter your server address on the next screen that appears.
The iPad supports the Microsoft Autodiscovery service, which uses your name and password to automatically determine the address of the Exchange server. The rest of the fields should be filled in with the email address, username, password, and description you just entered.
- Tap Next.
-
Tap the switch to turn on each information type you want to synchronize using Microsoft Exchange.
The options are Mail, Contacts, Calendars, and Reminders. You should be good to go now, although some employers may require you to add passcodes to safeguard company secrets.
If you have a business-issued iPad and it's lost or stolen — or you’re a double agent working for a rival company — your employer’s IT administrators can remotely wipe your device clean after you set up Microsoft Exchange.
One more thing: If you sync via iCloud, Google, or Microsoft Exchange, your calendar entries are automatically pushed to your iPad by the server when received.
Displaying multiple calendars
By tapping the Calendars button at the bottom of the yearly, monthly, weekly, or daily view, you can choose the calendar or calendars to display on your iPad. Merely tap each calendar you want to include so that a check mark appears next to it, as shown in Figure 11-8. To remove the check mark, tap again.
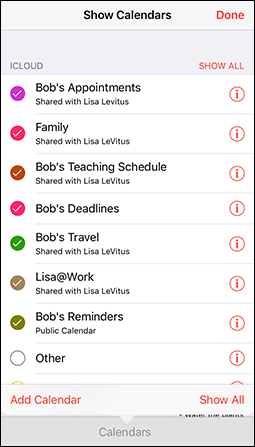
FIGURE 11-8: Choosing the calendars to display.
You can tap the Show All button (upper right) when you want your entire schedule to be an open book.
From the Calendars list, tap the i-in-a-circle for even more tricks. You can assign a color to your calendar, share the calendar with a given individual (tap Add Person to do so), make a calendar public (by flipping a switch), or delete the calendar.
Responding to meeting invitations
The iPad has one more important button in the Calendar app. It’s the Inbox button, located at the bottom-right corner of the yearly, monthly, weekly, and daily views. If you partake in iCloud, have a Microsoft Exchange account, or have a calendar that adheres to the CalDAV Internet standard, you can send and receive a meeting invitation.
If you have any pending invitations, you’ll see them when you tap the Inbox, which is separated into new invitations and invitations to which you’ve already replied. You can tap any of the items in the list to see more details about the event to which you’ve been invited. (Note that the Calendar's Inbox is not the same as your email inbox.)
Suppose a meeting invitation arrives from your boss. You can see who else is attending the shindig, check scheduling conflicts, and more. Tap Accept to let the meeting organizer know you’re attending, tap Decline if you have something better to do (and aren’t worried about upsetting the person who signs your paycheck), or tap Maybe if you’re waiting for a better offer.
And as we point out previously, you can also invite other folks to attend an event you yourself are putting together.
Meantime, if you run into a conflict, why not ask Siri to change your schedule? For that matter, you can also call upon Siri to remind you when you have your next appointment. Visit Chapter 14 for more on this clever feature.
You can choose to receive an alert every time someone sends you an invitation. Tap Settings ⇒ Notifications ⇒ Calendar ⇒ Invitations and tap Allow Notifications to turn notifications on (green).
As mentioned, if you take advantage of iCloud, Google, or Microsoft Exchange, you can keep calendar entries synchronized between your iPhone, iPad, iPod touch and your Mac or PC. When you make a scheduling change on your iPad, it’s automatically updated on your computer and other devices, and vice versa.
Subscribing to calendars
You can subscribe to calendars that adhere to the CalDAV and iCalendar (.ics) standards, which are supported by the popular Google and Yahoo! calendars and by the Mac’s Calendar app. Although you can read entries on the iPad from the calendars you subscribe to, you can’t create entries from the iPad or edit the entries that are already present.
To subscribe to one of these calendars, tap Settings ⇒ Passwords & Accounts ⇒ add Account. Tap Other and then choose Add CalDAV Account, Add Subscribed Calendar, Add LDAP Account, or Add CardDAV account. Next, enter the server where the iPad can find the calendar you have in mind, and if need be, a username, a password, and an optional description.
Finally, some apps, websites, and email messages will offer to add calendar events and subscriptions.
Sifting through Contacts
If you read the chapter on syncing (see Chapter 3), you know how to get the snail-mail addresses, email addresses, and phone numbers that reside on your Mac or PC into your iPad. Assuming you went through that drill already, all those addresses and phone numbers are hanging out in one place. Their not-so-secret hiding place is revealed when you tap the Contacts icon on the Home screen. The following sections guide you from the main screen to whatever you want to do with your contacts’ information.
Adding and viewing contacts
To add contacts to your Contacts app, tap the + icon at the top of the screen and type as much or as little profile information as you have for the person. Tap Add Photo to add a picture from your photo albums or collections (or to take a snapshot with your iPad camera). You can edit the information later by tapping the Edit button when a contact’s name is highlighted.
A list of your contacts appears on the left panel of the screen, with the one you’re currently viewing shown in gray; see Figure 11-9. At the top on the right, you can see a mug shot of your contact — if you added one — with his or her address. Below that you’ll see the contact’s phone number, email address, home and another address, and birthday (all blurred in Figure 11-9 to protect Jacob’s privacy). You also find an area to scribble notes about a contact.
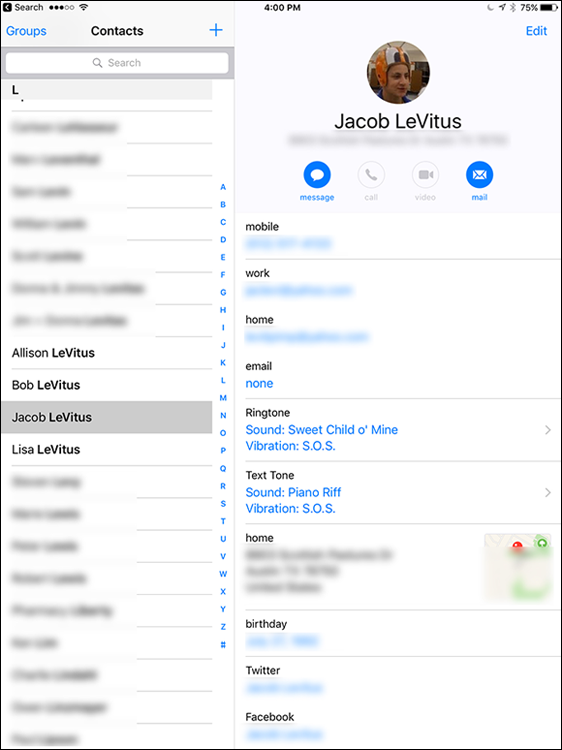
FIGURE 11-9: A view of all contacts.
You have three ways to land on a specific contact:
- Flick your finger so that the list of contacts on the left side scrolls rapidly up or down, loosely reminiscent of the spinning Lucky 7s and other pictures on a Las Vegas slot machine. Think of the payout you’d get with that kind of power on a one-armed bandit.
- Slide your thumb or another finger along the alphabet on the right edge of the contacts list or tap one of the teeny-tiny letters to jump to names that begin with that letter.
-
Start to type the name of a contact in the search field near the top of the contacts list. Or type the name of the place where your contact works. When you’re at or near the appropriate contact name, stop the scrolling by tapping the screen.
When you tap to stop the scrolling, that tap doesn’t select an item in the list. This may seem counterintuitive the first few times you try it, but we got used to it and now we really like it this way. Just think of that first tap as applying the brakes to the scrolling list.
You can change the way your contacts are displayed. Tap Settings ⇒ Contacts. Tap Sort Order or Display Order, and for each one, choose the First, Last option or Last, First option to indicate whether you want to sort or display entries by a contact’s first or last name. You can also choose First Name & Last Initial or First Initial & Last Name.
Searching contacts
You can search contacts by entering a first or last name in the search field or by entering a company name.
You can locate people on your iPad without opening the Contacts app. Swipe down from the middle of the Home screen to pull down your iPad’s Siri Search field. Type a name in the Search field, and then tap the name in the search results. You can also ask Siri to find people for you, and even have her compose and send them an email or iMessage, or call them via FaceTime video or audio chat.
If you’re searching contacts with a Microsoft Exchange account, you may be able to search your employer’s global address list (GAL for short). This search typically works in one of two ways:
- Tap the Groups button in the upper-left corner of the All Contacts screen and then tap the appropriate Exchange server name to find folks. Groups on your computer might reflect, say, different departments in your company, friends from work, friends from school, and so on.
-
 You can search an LDAP (Lightweight Directory Access Protocol) server. It strikes us that nothing is “lightweight” about something called an LDAP server, but we digress. Similarly, if you have a CardDAV account, you can search for any contacts that have been synced to the iPad.
Contacting and sharing your contacts
You can initiate an email from Contacts by tapping an email address under a contact’s listings. Doing so fires up the Mail program on the iPad, with the person’s name already in the To field. For more on the Mail app, we direct you to Chapter 5.
You can also share a contact’s profile with another person. Tap the Share Contact button (you may have to scroll down to see it), and use the Mail or Messages app to send the contact’s vCard, which is embedded in the body of a new Mail or Messages message. Just add an address and send it on its merry way. A vCard, in case you were wondering, is kind of like an electronic business card. You can identify it by its .vcf file format.
You can also share a contact’s vCard with iPadOS’s drag-and-drop feature. Just press and hold down on a contact in the list, and then drag it to another app (such as Messages or Mail).
Finally, you can tap a contact’s snail-mail address to launch the Maps app and see it pinned to a map.
Linking contacts
The people you know most likely have contact entries in more than one account, meaning you might end up with redundant entries for the same person. The iPad solution is to link contacts. Find the contact in question, tap Edit, scroll to the bottom of the Edit screen, and tap Link Contact. Choose the related contact entry and then tap Link. It’s worth noting that the linked contacts in each account remain separate and aren’t merged.
Removing a contact
Hey, it happens. A person falls out of favor. Maybe he’s a jilted lover. Or maybe you just moved cross-country and will no longer call on the services of your old gardener.
Removing a contact is easy, if unfortunate. Tap a contact and then tap Edit. Scroll to the bottom of the Edit screen and tap Delete Contact. You get one more chance to change your mind.
And that, gentle reader, should be pretty much all you need to work with Contacts. Onward!