Chapter 4. Compose a Soundtrack in GarageBand
You don’t have to be a musician to create music for your movies. Using Apple’s GarageBand app on the iPhone or iPad, you can easily assemble a song or specific musical cues out of pre-recorded loops.
If the included loops don’t cut it, GarageBand also includes a bunch of Smart Instruments that let you play preset grooves or individual notes that seamlessly conform to the song’s tempo and key.
If you are a musician, even better! Connect an instrument—like a guitar or a MIDI keyboard—or a microphone to the iOS device and record your own compositions. GarageBand Includes guitar amp simulations that can make you and your electric guitar sound like anything from a surf-rocker to a hair-metal god. It also has vocal effects that can give a professional polish to your voice or make you sound like a monster or a robot. And for you keyboard players, the included piano, synthesizer, and string sounds will add lush beauty or a techno edge to your movie soundtrack.
Open the Garage(Band)
Don’t be intimidated if you can’t even fumble through “Chopsticks.” GarageBand has a few tricks up its sleeve even for the musically inept.
The app is built around what Apple calls Touch Instruments. These are instruments you can play directly on the iPad or iPhone, and they’re a natural for the Multi-Touch interface. You need to open one of the instruments in order to get to the included loops, so let’s start there.
Open GarageBand. If this is your first time in the app, it will open to the Touch Instrument browser (4.1). Choose Keyboard.

![]() Note
Note
If you’ve played with GarageBand before, you may wind up on a different screen. If you see a group of song previews, possibly with names like “My Song” and “My Song 2,” tap the + in the upper-left corner of the screen to create a new song and open the Touch Instrument browser. In most other screens, tap the word Instruments in the upper-left corner to open the browser.
Test-Drive the Touch Instruments
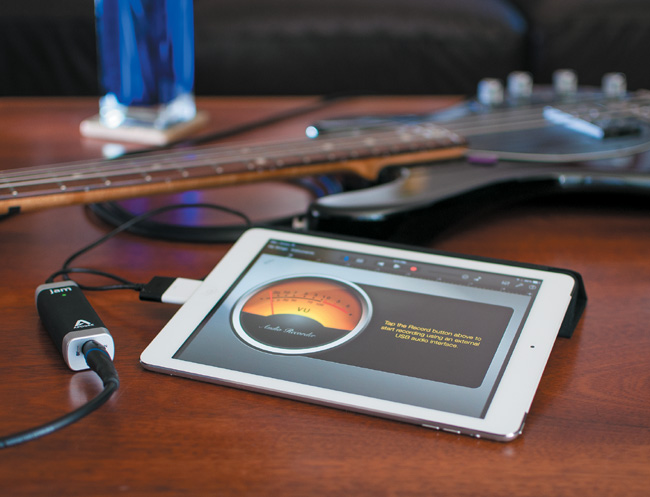
1. Tap the Scale button to the right of the screen, above the keyboard. It shows two musical notes. On the iPad, it conveniently says “Scale.”
2. Choose Major Blues from the list of options (4.2).
3. The keyboard changes from the usual collection of black and white keys to a set of all white keys with periodic gray keys labelled C3, C4, and so on. Slide your finger back and forth along the keyboard and the piano plays a jazzy scale that sounds like a smoky St. Louis bar in the 1930s.
4. Tap the Grand Piano icon in the top half of the screen to change to a different keyboard instrument; on the iPhone, tap the triangle in the upper left and then tap Grand Piano. In addition to pianos, you’ll find two electric pianos, a few organs, and a bunch of synthesizers. To find the synths, tap one of the category tabs (such as Classics or Bass). Each reveals a different species of synth sound. Try out a few and see what they each sound like.
Calculate Tempo from Movie Length
While working in iMovie, you’ll no doubt encounter a situation where you need a piece of music to fill a specific chunk of time. While GarageBand on the Mac lets you change the ruler to show minutes and seconds, the iOS version does not. There are ways around this restriction, though, if you’re willing to do a few easy calculations.
If you know you have, say, 8 seconds of video to fill, and you need to create a piece of music to fit, the trick is figuring out how many measures and what tempo your song needs to be. Fortunately, an app called Audiofile Calc can calculate this for you. The app conveniently includes a song length calculator (4.3). In most cases, you need to use a little trial and error to get a workable solution, since the length is a product of the equation and not a variable you can enter yourself.

The vast majority of songs (and almost all the Apple Loops in GarageBand) are four beats per bar, so you can usually leave the last field set to 4.
Working backwards, the number of bars refers to the length of your piece in musical “measures.” A measure is a segment of musical time defined by the number of beats per bar, set in the bottom field. Each measure, or each count of “1-2-3-4,” helps define the musical pulse of a song and the pattern of strong and weak beats that give a song its rhythm. Most Western music is broken up into subsections of four, eight, or sixteen measures, so sticking with multiples of four is a good idea unless you have a good reason to do otherwise.
The Tempo field determines how fast your piece is. Anything below 70 or 80 beats per minute (BPM) is considered slow, 80–112 BPM is a medium tempo, and 112–140 BPM is fast. Anything above 140 BPM or so is quite fast, and 180 BPM and above is extremely fast. If you haven’t already worked out a rough tempo in GarageBand, it may be useful to play with some options and see what feels right for your movie. Tempo is an important consideration and has a huge impact on the emotional impact of the music.
Once you’ve entered all the required information, Audiofile Calc gives you the resulting length. Adjust the Tempo and Bars fields until you arrive at your video length, then input the resulting information into GarageBand.
Open the Settings menu (on the iPad, tap the wrench icon; on the iPhone, tap the gear and then choose Song), and tap the Tempo button (4.4). Listen to how it works musically. You may find that the tempo is too fast or that the number of bars doesn’t feel right and you need to adjust accordingly.

![]() Tip
Tip
It’s not difficult to calculate the exact BPM yourself using a simple math formula: BPM = Number of Measures x 240 / Length in Seconds. 240 is the number of beats per measure (4) times 60 (seconds in a minute), and dividing that by the ultimate length of the piece gives you the number of beats per minute of your GarageBand song. Easy!
Build a Soundtrack Using Loops
Okay, it’s time to build a soundtrack for your video. In addition to playable instruments, GarageBand includes a number of pre-recorded loops that make it easy to build a song from scratch. The trick is, the Loop browser is a bit harder to find on the iPad and iPhone version of GarageBand than it is on the Mac. It also has fewer loops available, but there are still plenty to get you started.
Create a New Song
When you opened the Keyboard instrument earlier, GarageBand automatically created a new song using that instrument. Since you’re building a brand new song, you want to make sure you begin with an empty canvas.
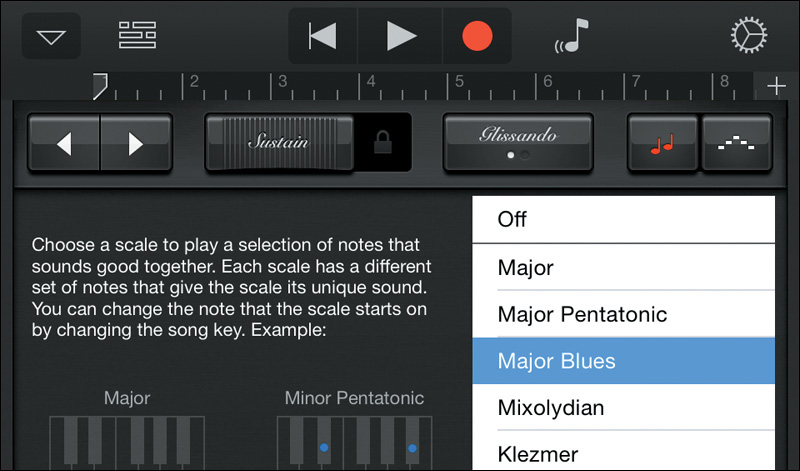
1. In the upper-left corner of the Keyboard window, tap My Songs; on the iPhone, tap the disclosure triangle to reveal My Songs. GarageBand automatically saves your current creation as “My Song,” but that’s okay. You can delete it later if you like.
2. Tap the + icon in the upper-left corner to create a new, empty song and reopen the Touch Instrument browser (4.5). Since you’re going to be working with loops, it doesn’t really matter which instrument you choose.
3. Tap Keyboard again to open the Keyboard instrument.
Browse Through the Loops
Since the Loop browser isn’t available from any of the Instrument screens, switch to Tracks view by tapping the Tracks view button in the control bar across the top of the screen. Tracks view shows your song as a timeline, much like iMovie displays your movie. The left side of the screen is the beginning of your song, and the instruments stack from top to bottom.
On the iPhone, Tracks view isn’t visible in a new song until you record something. Tap the Record button, play a few notes, and tap Play again to stop recording. Now the View button should be visible on the left side of the control bar.
At first, you see a fairly empty screen, with a timeline across the top and a small piano icon in the upper-left corner. In the control bar, tap the Loop browser button (4.6). The Loop browser contains several hundred Apple Loops in a wide variety of musical genres, from rock and electronic to orchestral and world music. These can be great starting points for your own compositions or can even form complete soundtracks in their own right. Tap a few of the loop names to hear what they sound like.

![]() Tip
Tip
Use the volume slider at the bottom of the Loop browser to audition loops at a louder or softer volume (4.7).

Add Loops to Your Song
As you’re about to see, building a song from loops is a fast and easy way to create a simple soundtrack for your video. You don’t need any musical skill, and there are no rules to follow. The only requirement is that you end up with something that you like and that works with your video project. I’m going to build a song using specific loops by way of example, but of course you can use whichever loops you want.
1. In the Loop browser, scroll through the list until you get to Cheerful Mandolin 10. Tap the name to preview it. Tap the loop again to stop playback.
2. Drag the loop below the piano track in the timeline (4.8). Align the left edge of the loop—which at this point looks like an empty blue rectangle—with the left edge of the timeline, so it starts at 1 on the ruler.

3. Tap the Play button at the top of the screen to hear your song so far.
If you hear a tick-tock sound as your mandolin is playing, that’s the metronome. It’s turned on by default to make it easier to play Touch Instruments in time with the beat. Since you’re using loops, which are automatically in time, turn off the metronome by tapping the Settings button in the upper-right corner and turning the Metronome switch off. Now you should only hear the mandolin.
Before you add another track to the piece, it might look nicer if you delete the empty piano track at the top of the timeline. Tap the piano icon in the track header, then tap it again. Tap Delete to remove the track (4.9).

Build the Soundtrack
The mandolin is a great start, but it’s a little boring on its own. It would sound better if it had some company. Drums could add some energy. Let’s find a good drum beat to add to the song.
1. Tap Play in the control bar to hear your song, which continues to play until you tap Stop. This lets you audition new loops in context with the mandolin part.
2. Open the Loop browser.
3. Since there are hundreds of loops in the list, it can be helpful to narrow down your selection to make it easier to find what you’re looking for. At the top of the Loop browser, tap Instrument, then tap Kits to hide all the loops except drum kits.
4. Tap Crowd Groove Drumset 06 to hear it alongside the mandolin.
5. Drag it to the timeline under the mandolin. Remember to align the beginning of the loop with the 1 on the ruler (4.10).

6. With the song still playing, tap the Loop browser again.
7. Tap Instrument at the top of the browser, then tap Tambourine.
8. Drag Tambourine 02 to the timeline under the drum track.
![]() Tip
Tip
If you need more precision while editing, zoom in on the timeline by pinching out with your fingers from anywhere in the arrange area.
![]() Tip
Tip
While many Apple Loops sound great together, not all of them will work in every context. If you come across two loops that sound awful together, don’t panic. This is the nature of making music with loops. You never know if two loops will work together until you try them, and sometimes a combination that makes no sense on paper will end up being the best part of your song.
Change the Duration of a Loop
In some cases, you may not want a loop to continue through the entire section. To shorten a loop, tap to select it; a tiny circular arrow appears on the right handle. Drag the handle to the left to shorten it (4.11).

Change the Volume of a Track
The piece is getting more interesting, but it still needs more. One of my favorite techniques when writing soundtracks is to mix instruments that don’t technically belong together. So far, you’ve got a fairly mellow acoustic song. What would happen if you added a distorted guitar? Open the Loop browser again, narrow your selection to Guitars, and drag Classic Attitude Rock 18 to the beginning of the song.
When you play back your piece now, the electric guitar dominates the other instruments and sounds far too loud. Wouldn’t it be great if there were a way to turn it down without affecting the volume of the other instruments? This is where having each instrument on its own track becomes helpful. If one instrument is too loud or too quiet, you can adjust the volume of that one instrument while keeping the others at their original levels.
Drag one of the track icons to the right to reveal the track controls (4.12).
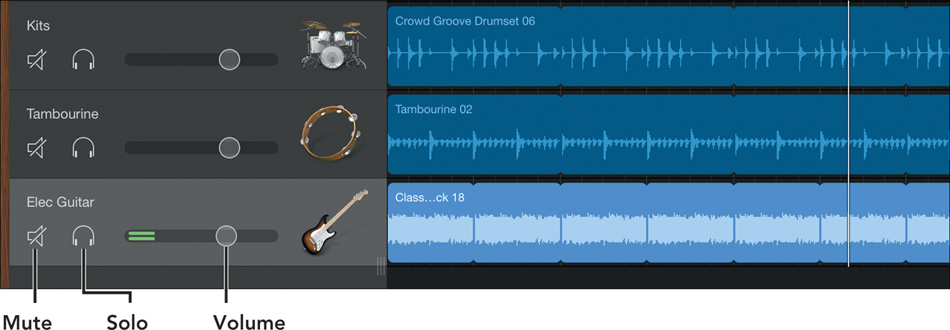
In addition to the instrument name, the track controls feature a Mute button, which mutes the track, a Solo button, which mutes all the other tracks and allows you to hear one track in isolation, and a volume slider, which adjusts the volume of the track.
Turn down the Electric Guitar track by dragging the volume slider to the left until it sits nicely in the background. While you’re at it, adjust the volume of other tracks if you wish. I turned down the tambourine a little as well.
![]() Tip
Tip
To hear your song with and without the electric guitar, tap the Mute button on the guitar track. That silences the guitar and grays out the region to make it easy to see which tracks are muted (4.13). Un-mute the track to hear the energy and bite the guitar adds to the song.

Add a Bassline
To finish the song, it might be good to have a bass for some low-frequency grounding. Instead of adding a loop this time, you’re going to experiment with Smart Instruments. Smart Instruments are a bit like loops, but they give you a lot more flexibility to add your own spin to a track. They’re perfect for non-musicians who don’t know how to play a particular instrument but still want the chance to be creative and do something a bit more personal than just adding loops to a song.
1. Tap Instruments in the control bar. Scroll through the Smart Instruments until you find Smart Bass, and tap the icon to open the instrument.
2. Tap the Liverpool icon in the upper-left corner of the screen and select the Picked bass (4.14).
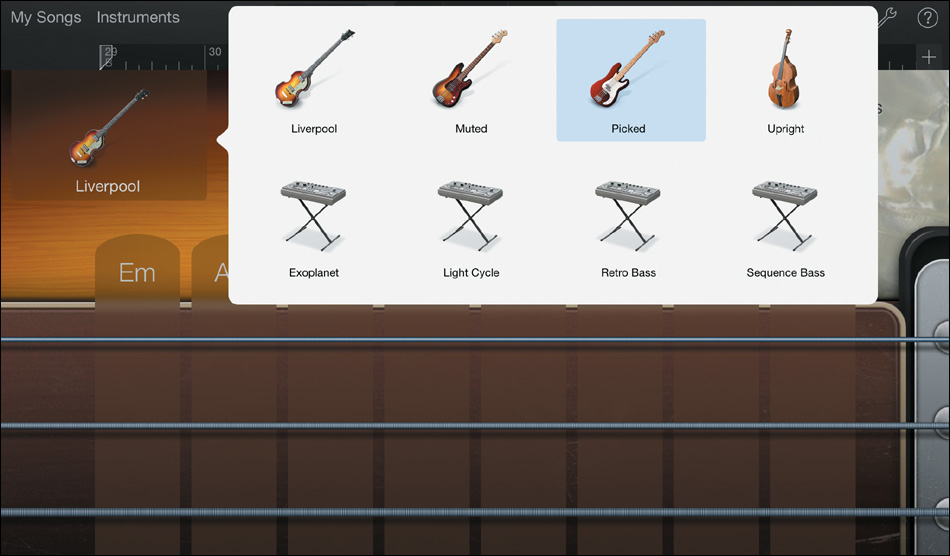
Notice that instead of a normal bass guitar neck, the Smart Bass displays four strings intersected by vertical gray stripes. Each of these stripes is labeled with the name of a chord in the key of your song.
Smart Instruments have several playback options including an Autoplay mode, which plays back pre-recorded sequences of notes in whatever chord you choose. This makes them act a bit like loops but with a lot more flexibility.
By default, new GarageBand songs open in the key of C, which uses all the white keys on a piano. The “C” stripe on the Smart Bass instrument represents the C chord, which is the root, or “home,” key in C. The other chords are all in the key of C as well, meaning that whatever chord you choose will sound harmonious.
3. Tap the 1 on the Autoplay knob (4.15). The strings disappear from the fretboard.

4. Tap the C chord and listen to the fancy groove.
To record the bassline and add it to the song, you have to do something a little different than you did when adding loops. You need to actually record the bass to add it to the song.
5. Tap the Go to Beginning button in the control bar to make sure you start recording from the start of the song.
6. Tap the Record button and then quickly tap the C chord on the bass. You should hear the metronome count in for four beats and then hear the song start playing with the new Smart bassline.
Once the recording reaches the end of the eight-bar section, playback loops back to the beginning of the song and GarageBand stops recording the bass and switches to playback mode.
7. Switch back to Tracks view to see the new track in place (4.16).

![]() Tip
Tip
The current song sounds good with the bass playing just one chord, but the idea behind Smart Instruments is that you can tap a new chord every measure or two to build a harmonic framework to your song. If you choose to play more with Smart Instruments, make sure you tap each chord a little early to give GarageBand a chance to change chords before the start of the new measure.
![]() Note
Note
Notice that the new bass track is green instead of blue like the other tracks. That’s because it’s what Apple calls a Software Instrument. The blue tracks are actual recordings of mandolins, drums, and tambourines—audio files that can’t be modified aside from changing their volume. Green Software Instrument regions, on the other hand, are made up of individual notes that GarageBand plays back in real time. This means you can edit the notes in these regions if you want to change the part that a Smart Instrument played.
Extend Your Song Using Sections
• You can extend the current section by tapping the arrow to the right of Section A. The Automatic option is available for the last section in a song. It allows you to improvise as you record and lets GarageBand adjust the length of the new section to match your playing. With Automatic disabled, tap or swipe the number in the Manual field to shorten or lengthen the current section (4.17).
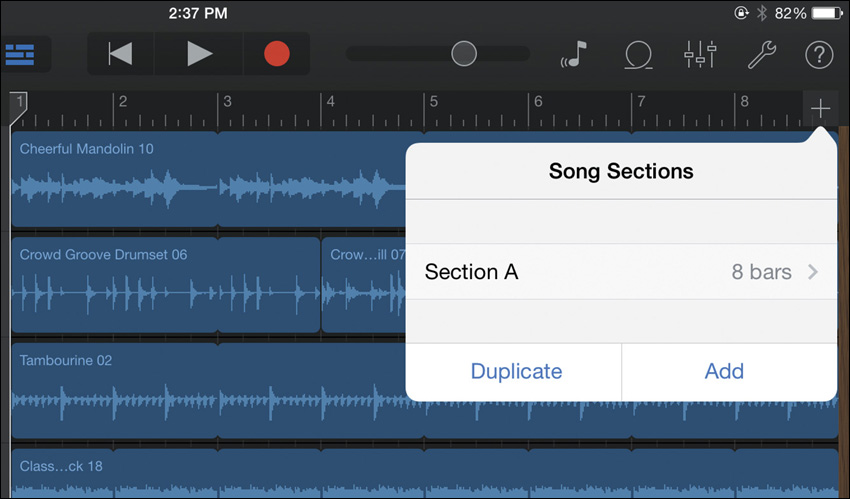
• Duplicate creates a copy of the current section and adds it to the end of the piece. This is handy if you want to create a variation of an existing section and don’t want to redo all your hard work. To adjust the length of the new section, tap the Info button next to the section length.
• Add creates a new, blank section at the end of the song. Again, tapping the Info button allows you to alter the length of the new section.
• Once you have created new sections, tapping Edit lets you delete or rearrange them.
Add Loops to Existing Tracks
Now that all the tracks are in place, the song is beginning to sound a bit repetitive. It might be appropriate to add a drum fill or two to break up the monotony. Fortunately, GarageBand comes with drum loops specifically recorded for this purpose. Scroll through the Loop browser and notice the names of the two loops directly after Crowd Groove Drumset 06. Crowd Groove Fill 04 and Crowd Groove Fill 07 sound like they’ll work perfectly.
Adding these loops to the existing drum track is extremely easy. Just as you did with the other loops, simply drag the loop from the browser into the timeline, only this time, drag it on top of the existing drum loop. GarageBand intelligently makes room for the new loop, and even continues the existing drum loop after the fill. Add Crowd Groove Fill 07 at measure 4 on the ruler, and Crowd Groove Fill 04 at measure 8 (4.18). If you need help lining up the loops as you drag them, remember to use the yellow line marking the beginning of the loop. Line it up with the 4 and the 8 on the ruler and the fills will be in perfect sync.

Much of Western music is written in phrases of four, eight, or sixteen bars. In pop music, ornamentation like drum and guitar fills are often used at the end of these phrases to add excitement and anticipation and to lead the listener into the next section.
Change Loop Duration
Sometimes, an Apple Loop you add to your song isn’t the correct length. Perhaps you only want to use the first half of the loop and have that repeat. Or maybe you recorded a Smart Instrument track and want to loop only a portion of it. In these cases, you can edit the length of your region to customize the part.
In the case of Apple Loops that are already looping two or more times, tap the region to select it, then tap it again. Select Trim from the options that appear to select the original region and exclude the portion that’s looping. Drag the end of the selected region to shorten it (4.19).

Rearrange Regions
In certain cases, you may want to rearrange the regions in your song—perhaps an active section needs to appear one measure earlier. When dealing with a track that’s already full, this requires a bit of fancy maneuvering, but it’s easy once you know the technique. If you just drag one region to a new spot on top of another, that deletes the second region. Instead, copy that region first.
This techniques works for regions that are separate (not looped copies of the same region).
1. Tap the region you want to move once to select it, tap it again, and choose Cut (4.20).

2. Drag the other region into the now vacant section.
3. Now drag the playhead to the beginning of the new opening, tap the vacant area in the track, and select Paste. Voilà! Regions swapped.
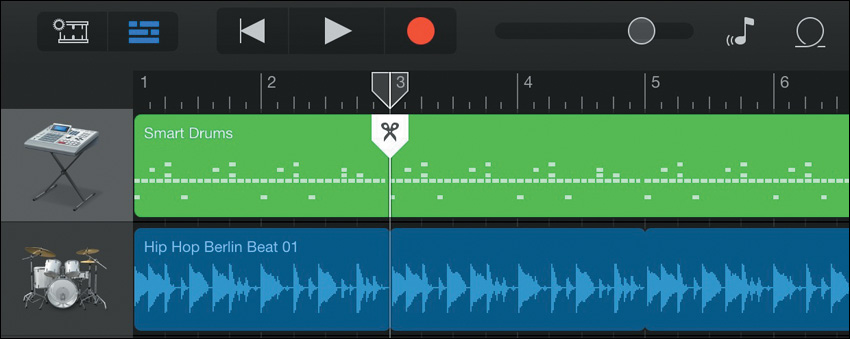
If you instead need to rearrange parts of a longer contiguous region, you need to split the region into pieces. Tap the region to select it, and tap it again to bring up the editing menu. Select Split, and drag the Split marker to the point where you want to split the regions (4.21). Drag the Split marker down to make the cut. You can continue to move the Split marker and make additional cuts as long as they’re in the same region. To split a different region, select the region and choose Split again. Finally, to rearrange the resulting regions, follow the steps on the previous page.
Mix the Song
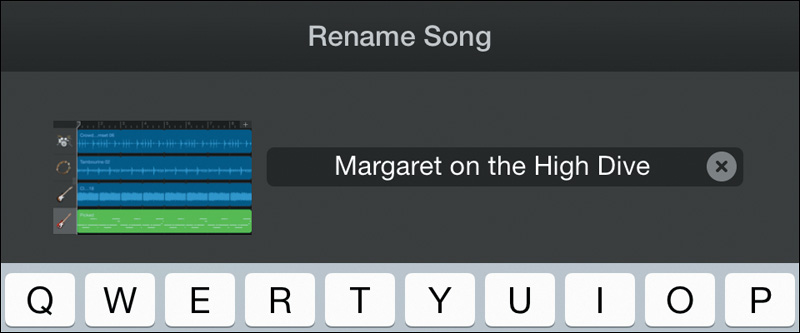
Listen to the song a few times and use the volume sliders to adjust the levels of the various tracks until they sound good together. When you feel good about the final mix, tap My Songs to save your creation. In the My Songs browser, tap the name of your new song to rename it (4.22). It’s a good idea to rename songs you like, otherwise you may end up with “My Song 1” through “My Song 418” and it will become very difficult to locate a particular piece. If you recorded a song for a specific movie, it makes sense to put the movie name in the song title.
Record Your Own Material
If you happen to sing or play a musical instrument, GarageBand becomes an even more powerful tool. Not only can you build a song from loops and Smart Instruments, you can also record your own performance. In some cases, this requires an extra piece of gear or two, but many of these accessories are quite affordable, and should be within the range of even modest budgets.
Record Acoustic Instruments
If you sing or play piano, acoustic guitar, violin, or any other acoustic instrument, adding yourself to a recording isn’t difficult. You can either use the built-in mic on the iPad or iPhone or purchase a better-sounding option that connects to your device. Numerous options are available, from small mics that plug into the headphone jack to larger, more professional options that connect to the dock. In general with audio gear, the more you spend the better quality you get, so don’t expect a professional-sounding recording from a $10 microphone. But with some care you can achieve excellent recordings with mics costing $150 or less.
![]() Tip
Tip
Before you make a purchase, think about what options you want from a microphone. In many cases, acoustic instruments sound better recorded in stereo—guitars and pianos in particular. If you’d like the option of recording in stereo, make sure the mic you choose offers that option. If you’re mostly going to be recording yourself singing or speaking, a mono microphone may be all you need.
Once you have a microphone, recording an acoustic instrument is a fairly easy process.
1. Find a good spot to record in. Generally speaking, you want a quiet location with good acoustics. Recordings of acoustic instruments always include at least some of the sound of the room. If you like the sound of your guitar in your living room, record yourself there. If it sounds even better in the closet, try that. The one thing you don’t want to do is plop yourself somewhere without any consideration of how the environment sounds.
2. Connect your mic or use the built-in microphone. If you do use the built-in mic, know that the recording quality will not be as high as it would be with an external microphone.
3. Tap Instruments and select the Audio Recorder.
The Audio Recorder is the simplest instrument in GarageBand. It has no controls, and the interface consists entirely of a large VU (volume unit) meter measuring the level of the incoming sound (4.23).

4. Play or sing at the same volume you will be recording. Watch the VU meter. If it peaks into the red, turn down the input on the microphone (if possible), play or sing more quietly, or move the mic farther away.
5. If this is the first instrument in a new song, you may want to turn on the metronome to make it easier to sync other instruments with your playing. Tap the Song Settings button and turn on the metronome. You can also enable Count In if you want the metronome to tap for one measure before recording begins. This helps you internalize the tempo and lets you know when to start playing.
Headphones are useful when you need to hear the metronome or the other tracks in your song (an argument against a mic that uses the headphone jack). Otherwise, the recording will pick up the sound of the metronome.
6. When you’re ready to record, tap the Go to Beginning button to move the playhead to the start of the section.
7. Tap Record and start playing or singing. Tap Stop when you’re done.
Carefully listen to the recorded take with headphones or speakers, and make sure the recording sounds the way you want it to. If you made a mistake, re-record the section. If the sound quality is poor, try to assess what went wrong:
• Is the recording too loud? If so, it will likely sound distorted and look like a block of sound rather than distinct waveforms (4.24). Turn down the mic or move it farther from the source, and re-record your part.

• Is the recording too quiet? In this case, turn up the mic, play or sing louder, or move the mic closer to the source.
• Is the sound echoey or boomy? You may be recording in too “live” a room. Large rooms with hard surfaces often sound quite reverberant and may not be right for certain instruments. Try moving to a different location.
• Is the sound quality poor? If you’re using the built-in mic or a cheap external option, you may need a better alternative. Try moving the mic to a different location relative to the instrument. Sometimes even an inch or two can make a huge difference.
![]() Tip
Tip
To add preset effects to your voice or recorded instrument, double-tap its track header. This opens up the previously viewed Audio Recorder, but now with eight effect options to choose from. Small Room and Large Room sound great on vocals, and Telephone is a favorite of mine on drum loops. If you’re looking for additional effects, see “Going Further with GarageBand” to learn how to export your project to GarageBand for Mac.
![]() Note
Note
If you want to get really wacky, try out the Sampler instrument. It lets you record any sound you want and play it back on a musical keyboard. You can record yourself sneezing or your cat meowing and play it back melodically. It’s a great, fun way to make almost any sound musical.
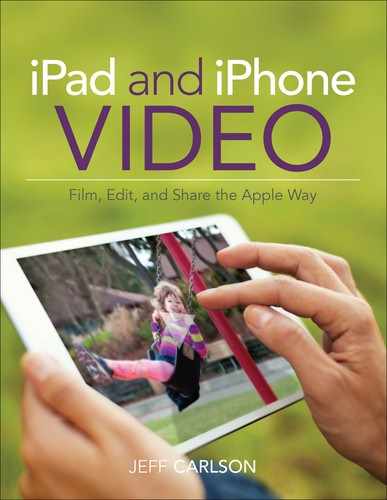
Connect an Electric Guitar or Bass
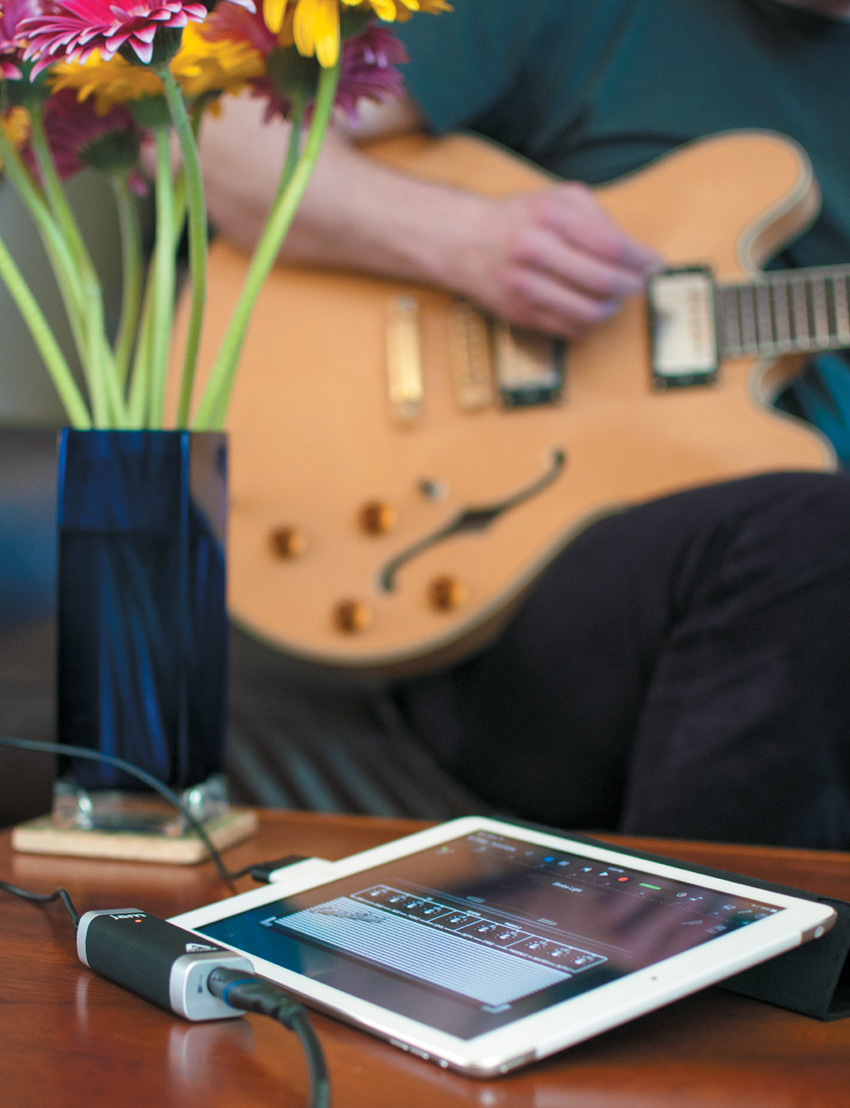
If you’re the axe-wielding type, it’s also a snap to use GarageBand to record your guitar or bass, provided you have the right tools. Since the iPad doesn’t have an audio input, you need an audio interface designed for use with an iPad or iPhone (4.25). Apogee Digital and IK Multimedia make some of the more popular options, and many other companies have similar offerings. Most are plug-and-play, meaning all you have to do is plug the interface into your iPhone or iPad and you’re ready to start jamming.

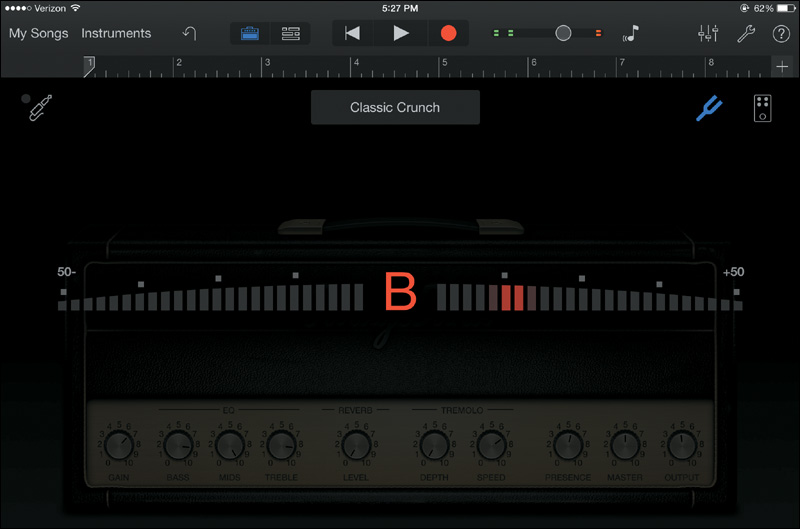
For guitarists, a great recording option is GarageBand’s virtual guitar amp collection (4.26). GarageBand comes with eight different amps, all emulations of classic guitar rigs from the likes of Vox, Fender, Marshall, and Orange. With this kind of variety on offer, it’s possible to get a huge range of sounds even if you only have one guitar. GarageBand includes clean tones, crunchy and distorted options, and even heavily processed sounds.

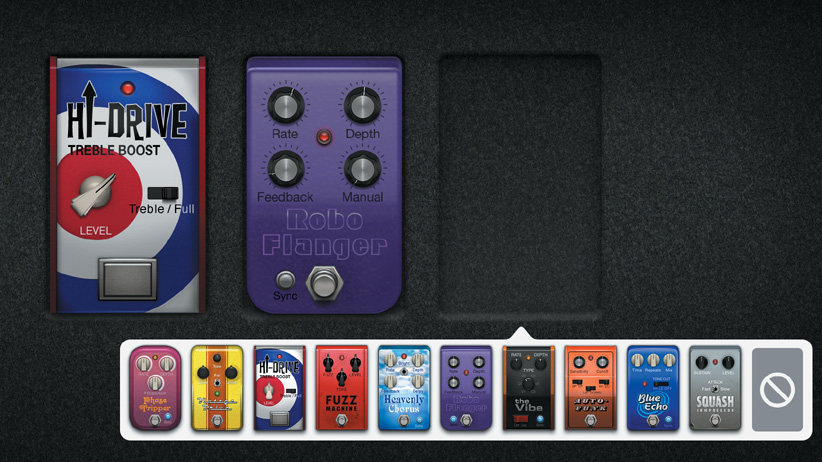
In addition to amps, the Guitar Amp instrument includes 10 virtual stomp boxes (4.27). Many of the most popular effects are represented, including fuzz and distortion, chorus, and echo. To find all these goodies, tap the Stompbox button in the upper-right corner of the guitar amp screen. The guitar amp also includes a tuner so you can quickly tune your guitar between takes (4.28).
If you’re a bass player, your options are more limited. Unlike the Mac version of GarageBand, the iOS version doesn’t include any bass amps. But that doesn’t mean you can’t record your bass. You still have the option of choosing the Audio Recorder, which is a basic audio track with no bells and whistles.
The process is simple. Connect your bass as you would an electric guitar, and instead of choosing the Guitar Amp instrument, select Audio Recorder. Tap the Record button and groove!
Don’t be disappointed about the lack of bass amps in the iOS version of GarageBand. Thousands of famous recordings feature bass recorded directly into the recording console instead of through an amp, and many bass players prefer the cleaner, punchier sound that results from recording this way.
Share the Song with iMovie
When it’s time to get your musical masterpiece out of GarageBand and into iMovie, you can share the song directly between apps.
Sharing a song with iMovie is a relatively simple process.
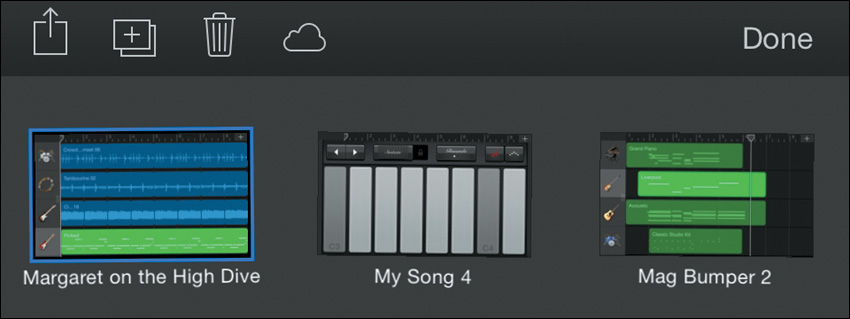
1. Open the My Songs browser.
2. Tap Select, and tap the song you want to open in iMovie (4.29).
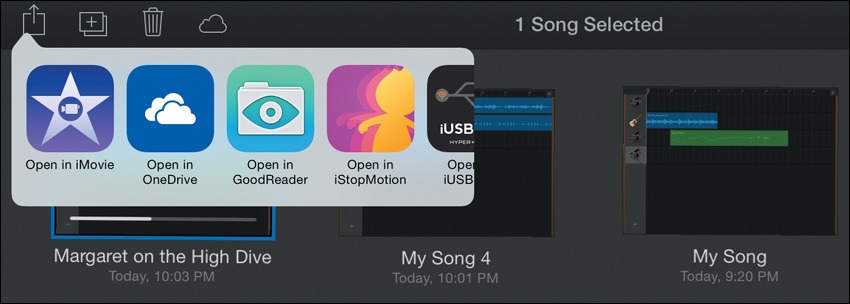
3. Tap the Share button.
4. Tap the Open In button.
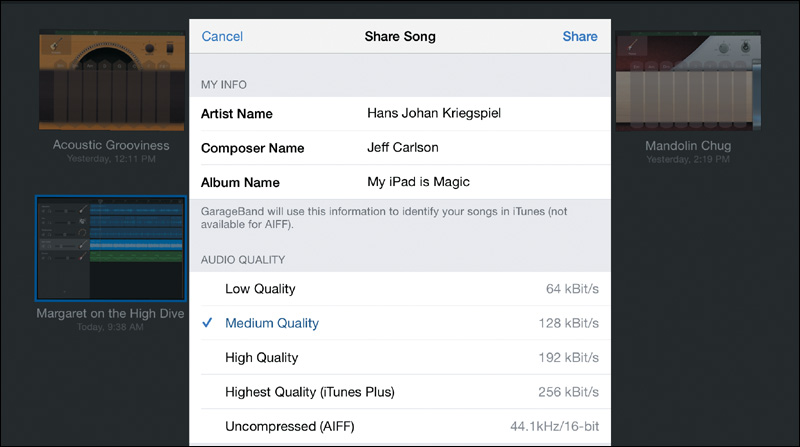
5. Enter the optional artist, composer, and album info, and select an appropriate audio quality (4.30).
6. Tap Share. GarageBand exports the song.
7. When prompted, select Open in iMovie (4.31).
8. In iMovie, select a project or create a new movie (4.32). The song is dropped onto the audio track (4.33).


Higher quality settings result in larger audio files, and often you’ll need to balance quality and size. For final audio, select High Quality and above. If your song isn’t finished and you just need to check timing and feel, one of the lower quality settings will work fine.
![]() Tip
Tip
Your soundtrack doesn’t need to be completely finished to add it to your video. You’ll often want to import a rough version into iMovie to make sure everything lines up or that the music feels right. In these cases, follow the same instructions for sharing with iMovie, but know that you may need to open the song again in GarageBand, make changes, and then re-share (possibly even multiple times) in order to finalize your soundtrack.
Going Further with GarageBand
Since this book is about video and not music, it isn’t possible to cover all the nuances of GarageBand here. There are, however, great resources available, even within the program itself. The manual is always only a few taps away. On the iPad, tap the Info button, and then tap “Learn more about the control bar.” You can access the complete manual by tapping the Table of Contents icon in the upper left, or search the manual by tapping the Search button. On the iPhone, tap the Settings button and scroll to the bottom of the Song settings to open GarageBand Help.
The iOS version of GarageBand has a lot of great features, but many more editing and mixing options are available on the Mac version. To share a GarageBand for iOS project with GarageBand for Mac, you have two options: iCloud and iTunes.
Share via iCloud
To share a project via iCloud, navigate to the My Songs window and tap Select. Choose the song, tap the iCloud button, and choose Upload Song to iCloud (4.34, on the next page). The song becomes available on all devices that use your iCloud account.

Share via iTunes
In this scenario, iTunes acts as a go-between to transfer the project file from the iPhone or iPad to GarageBand on the Mac.
1. Open the My Songs window and select the project.
2. This time, tap the Share icon and select iTunes, then choose the GarageBand option to save the multitrack GarageBand project (4.35).

The song’s file is saved in a special storage area of the device reserved for GarageBand that iTunes can access.
3. Connect your iOS device to your computer.
4. On your Mac, select the device in iTunes and click the Apps tab.
5. Scroll down to the File Sharing section and click the GarageBand icon.
6. Select the project and drag it to your desktop; or, click the Save To button and choose a location (4.36).

You may see a message saying that GarageBand has to download additional content to your Mac for compatibility. This shouldn’t take long, and only has to happen the first time you open GarageBand for iOS projects on your Mac.