Chapter 8. Maps, Apps, & iBooks
Your Home screen comes already loaded with the icons of about 20 programs. These are the essentials, the starting points; eventually, of course, you’ll fill that Home screen, and many overflow screens, with additional programs you install yourself.
The starter programs include major gateways to the Internet (Safari), critical communications tools (Phone, Messages, Mail, Contacts), visual records of your life (Photos, Camera), Apple shopping centers (iTunes, App Store), and a well-stocked entertainment center (iPod).

Most of those programs get chapters of their own. This chapter covers the smaller programs: Calendar, YouTube, Stocks, Maps, Weather, Voice Memos, Notes, Clock, Calculator, and Compass.
Calendar
What kind of digital companion would the iPhone be if it didn’t have a calendar program? In fact, not only does it have a calendar—but it even has one that syncs with your computer.
If you maintain your life’s schedule on a Mac (in iCal or Entourage) or a PC (in Outlook), then you already have your calendar on your iPhone. Make a change in one place, and it changes in the other, every time you sync over the USB cable.
Better yet, if you have a MobileMe account or work for a company with an Exchange server (Chapters Chapter 13 and Chapter 14), then your calendar can be synchronized with your computer automatically, wirelessly, over the air.
Or you can use Calendar all by itself.

Tip
The Calendar icon on the Home screen shows what looks like one of those paper Page-a-Day calendar pads. But if you look closely, you’ll see a sweet touch: It actually shows today’s day and date!
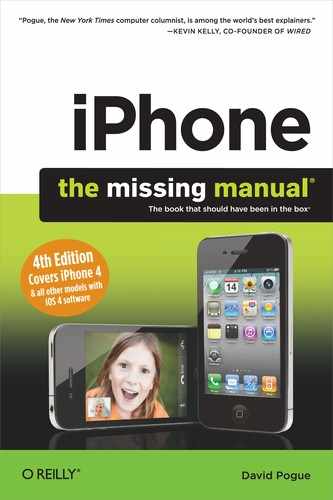
Working with Views
By clicking one of the view buttons at the bottom of the screen, you can switch among these views:
List view offers you a tidy chronological list of everything you’ve got going on, from today forward. Flick or drag your finger to scroll through it.
Day shows a single day’s events, broken down by time slot. Tap the
 and
and  buttons to move backward or forward a day at a time.
Month shows the entire month, as shown on the previous page. Dots on the date squares show you when you’re busy. Tap a date square to read, in the bottom part of the screen, what you’ve got going on that day. (You can flick or drag that list to scroll it, although this list isn’t what you’d call roomy.)

In all three views, you can tap Today (bottom left) to return to today’s date.
Making an Appointment
The basic calendar is easy to figure out. After all, with the exception of one unfortunate Gregorian incident, we’ve been using calendars successfully for centuries.
Even so, recording an event on this calendar is quite a bit more flexible than entering one on, say, one of those “Hunks of the Midwest Police Stations” paper calendars.
Start by tapping the ![]() button (top-right corner of the screen). The Add Event screen pops
up, filled with tappable lines of information. Tap one (like Title/Location,
Starts/Ends, or Repeat) to open a configuration screen for that element.
button (top-right corner of the screen). The Add Event screen pops
up, filled with tappable lines of information. Tap one (like Title/Location,
Starts/Ends, or Repeat) to open a configuration screen for that element.

For example:
Title/Location. Name your appointment here. For example, you might type Fly to Phoenix.
The second line, called Location, makes a lot of sense. If you think about it, almost everyone needs to record where a meeting is to take place. You might type a reminder for yourself like My place, a specific address like 212 East 23rd, a contact phone number, or a flight number.
Use the keyboard as usual. When you’re finished, tap Save.
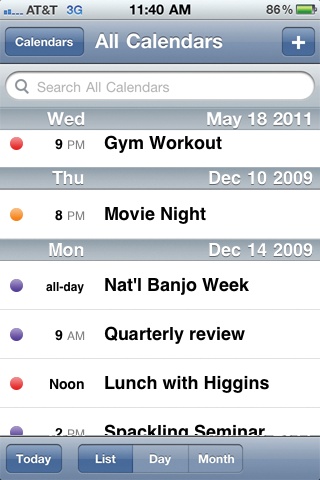
Starts/Ends. On this screen, tap Starts, and then indicate the starting time for this appointment, using the four spinning dials at the bottom of the screen. The first sets the date; the second, the hour; the third, the minute; the fourth, AM or PM. If only real alarm clocks were so much fun!
Then tap Ends, and repeat the process to schedule the ending time. (The iPhone helpfully presets the Ends time to one hour later.)
An All-day event, of course, has no specific time of day: a holiday, a birthday, a book deadline. When you turn this option on, the Starts and Ends times disappear. The event appears at the top of the list for that day.
Tip
Calendar can handle multiday appointments, too, like trips away. Turn on All-day—and then use the Starts and Ends controls to specify beginning and ending dates. On the iPhone, you’ll see it as a list item that repeats on every day’s square. Back on your computer, you’ll see it as a banner stretching across the Month view.
Tap Save when you’re done.
Repeat. The screen here contains common options for recurring events: every day, every week, and so on. It starts out saying None.
Once you’ve tapped a selection, you return to the Edit screen. Now you can tap the End Repeat button to specify when this event should stop repeating. If you leave the setting at Repeat Forever, you’re stuck seeing this event repeating on your calendar until the end of time (a good choice for recording, say, your anniversary, especially if your spouse might be consulting the same calendar).
In other situations, you may prefer to spin the three dials (month, day, year) to specify an ending date, which is useful for car and mortgage payments.
Alert. This screen tells Calendar how to notify you when a certain appointment is about to begin. Calendar can send any of four kinds of flags to get your attention. Tap how much notice you want: 5, 15, or 30 minutes before the big moment; an hour or two before; a day or two before; or on the day of the event.

When you tap Save and return to the main Add Event screen, you see that a new line, called Second Alert, has sprouted up beneath the first Alert line. This line lets you schedule a second warning for your appointment, which can occur either before or after the first one. Think of it as a backup alarm for events of extra urgency. Tap Save.
Once you’ve scheduled these alerts, you’ll see a message appear on the screen at the appointed time(s). (Even if the phone was asleep, it appears briefly.) You’ll also hear a chirpy alarm sound.
Note
The iPhone doesn’t play the sound if you turned off Calendar Alerts in Settings→Sounds. It also doesn’t play if you silenced the phone with the silencer switch on the side.
Calendar. Tap here to specify which color-coded calendar (category, like Home, Kids, or Work) this appointment belongs to. Turn the page for details on the calendar concept.
Notes. Here’s your chance to customize your calendar event. You can type any text you want in the notes area—driving directions, contact phone numbers, a call history, or whatever. Tap Save when you’re finished.


When you’ve completed filling in all these blanks, tap Done. Your newly scheduled event now shows up on the calendar.
Editing, Rescheduling, and Deleting Events
To examine the details of an appointment in the calendar, tap it once. The Event screen appears, filled with the details you previously established.
To edit any of these characteristics, tap Edit. You return to what looks like a clone of the New Event screen shown on Making an Appointment.
Here, you can change the name, time, alarm, repeat schedule, or any other detail of the event, just the way you set them up to begin with. (Except the calendar category. For some reason, you can’t change that once you’ve set it.)
This time, there’s a big red Delete Event button at the bottom. That’s the only way to erase an appointment from your calendar.
Tip
The Calendar program doesn’t have a to-do list, as you may have noticed. It may someday, as Apple adds new software features via free updates.
In the meantime, you can always fire up Safari and head over to www.tadalist.com, a free, iPhone-friendly, online To Do–list program.
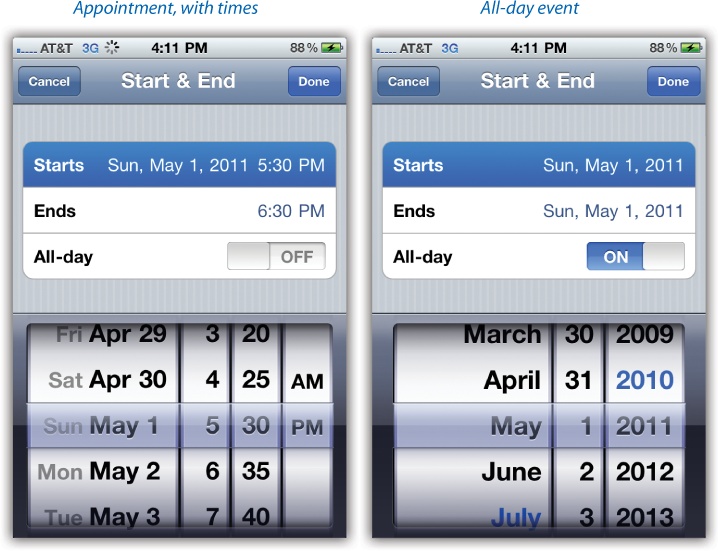
The Calendar (Category) Concept
A calendar, in Apple’s somewhat confusing terminology, is a color-coded sub-set—a category—into which you can place various appointments. They can be anything you like. One person might have calendars called Home, Work, and TV Reminders. Another might have Me, Spouse ’n’ Me, and The Kidz. A small business could have categories called Deductible Travel, R&D, and R&R.
You can’t create calendar categories, or change their colors, on the iPhone—only in your desktop calendar program. Or, if you’re a MobileMe member, you can also set up your categories at www.me.com; all your categories and color codings show up on the iPhone automatically.
What you can do, in iOS 4 for the first time, is choose which subset of categories you want to see. Just tap Calendars at the top of any Calendar view. You arrive at the big color-coded list of your categories.
This screen exists partly as a reference, a cheat sheet to help you remember what color goes with which category, and partly as a tappable subset-chooser. That is, if you tap the Work category, you return to the calendar view you were just viewing, but now all categories are hidden except the one you tapped.
Tip
You can set up real-time, wireless connections to calendars published on the Web in the CalDAV format—notably your Yahoo or Google calendar. Just tap your way to Settings→Mail, Contacts, Calendars→Add Account→Other→Add CalDAV Account. For Server, type (for example) www.google.com; fill in your account info.
Now you have a two-way synced calendar between your iPhone and (in this case) your Google calendar. To read about other ways of syncing the iPhone with online calendars, including read-only .ics files (like sports-team schedules), download the PDF appendix called “Syncing Calendar with .ics Files” from this book’s “Missing CD” page at www.missingmanuals.com.
YouTube
YouTube, of course, is the stratospherically popular video-sharing Web site where people post short videos of every description: funny clips from TV, homemade blooper reels, goofy short films, musical performances, bite-sized serial dramas, and so on. YouTube’s fans watch 200 million little videos a day.

Of course, there’s a Web browser on the iPhone. So why does it need a special YouTube program? (Especially when YouTube now offers a specialized Web site, m.youtube.com, that many iPhoners actually prefer to the app?)
Long story: When the iPhone debuted, YouTube movies were in a format called Flash, which the iPhone didn’t (and still doesn’t) recognize. (Apple says Flash video is a buggy battery-drainer.)
So Apple persuaded YouTube to re-encode all of its millions of videos into H.264, a much higher-quality format? Amazingly enough, YouTube agreed—and you are the lucky benefactor. (Here’s what a Flash video and an H.264 video look like, so you can see the difference.)

Finding a Video to Play
The YouTube program is basically a collection of lists. Tap one of the icons at the bottom of the screen, for example, to find videos in any of these ways:
Featured. A scrolling, flickable list of videos handpicked by YouTube’s editors. You get to see the name, length, star rating, and popularity (viewership) of each one.
Most Viewed. A popularity contest. Tap the buttons at the top to look over the most-viewed videos Today, This Week, or All (meaning “of all time”). Scroll to the bottom of the list and tap Load 25 More to see the next chunk of the list.
Favorites. A list of videos you’ve flagged as your own personal faves, as described in a moment.
Search. Makes the iPhone keyboard appear so you can type a search phrase. YouTube produces a list of videos whose titles, descriptions, keywords, or creator names match what you typed.
If you tap More, you get some additional options:
Most Recent. These are the very latest videos posted on YouTube.
Top Rated. Whenever people watch a video on YouTube, they have the option of giving it a star rating. (You can rate videos right from the iPhone, too.) This list rounds up the highest-rated videos. Beware—you may be disappointed in the taste of the masses.
History. This is a list of videos you’ve viewed recently on the iPhone—and a Clear button that nukes the list, so people won’t know what you’ve been watching.
My Videos, Subscriptions, Playlists. These options appear only if you have a YouTube account (which is free at www.youtube.com) and have logged into it on your iPhone. My Videos are, of course, the videos you’ve posted on YouTube. Subscriptions are videos you’ve signed up to receive in installments (many YouTubers produce a new video every week, for example). And Playlists are handpicked sets of videos you’ve grouped together yourself. Details follow.

Tip
Once you’ve tapped More to see the additional options, you also get an Edit button. It opens a Configure screen that works exactly like the one described on Customizing List Land. That is, you can now rearrange the four icons at the bottom of the YouTube app’s screen, or you can replace those icons with the ones that are usually hidden (like Most Recent or Top Rated) just by dragging them into place.

Each list offers a ![]() button at the right side. Tap it to open the Details screen for
that video, featuring a description, date, category, tags (keywords), uploader name,
play length, number of views, links to related videos, and so on.
button at the right side. Tap it to open the Details screen for
that video, featuring a description, date, category, tags (keywords), uploader name,
play length, number of views, links to related videos, and so on.
Also on this screen are Add to Favorites, which adds this video to your own personal list of favorites (tap Favorites at the bottom of the screen to see it); Add to Playlist, which opens a Playlist screen where you can add, edit, and delete these self-playing sequences of videos; and Share Video, which creates an outgoing message containing a link to that video.
Address it and send it along to anyone you think would be interested, thus fulfilling your duty as a cog in the great viral YouTube machine.
Playing YouTube Videos
To play a video, tap its row in any of the lists. Turn the iPhone 90 degrees
counterclockwise—at least if you want to see the video full-screen. The video begins
playing automatically; you don’t have to tap the ![]() button. (In iOS 4, you can turn the iPhone upright once the video
starts, but that makes it play all shrunken in the screen, with huge, black, empty areas
above and below.)
button. (In iOS 4, you can turn the iPhone upright once the video
starts, but that makes it play all shrunken in the screen, with huge, black, empty areas
above and below.)

Here, you’ll discover a basic truth about the YouTube app on the iPhone: Videos look great if you’re connected to the Internet through a WiFi hot spot or the 3G network. They look not so great if you’re connected over AT&T’s cellular EDGE network. When you’re on EDGE, you get a completely different version of the video—smaller, coarser, and grainier. In fact, you may not be able to get videos to play at all over EDGE.
When you first start playing a video, you get the usual iPhone playback controls
(![]()
![]()
![]() ) the volume slider, and the progress scrubber at the top. Here
again, you can double-tap the screen to magnify the video slightly, just enough to
eliminate the black bars on the sides of the screen (or tap the
) the volume slider, and the progress scrubber at the top. Here
again, you can double-tap the screen to magnify the video slightly, just enough to
eliminate the black bars on the sides of the screen (or tap the ![]() button at the top-right corner to do the same).
button at the top-right corner to do the same).
The controls fade away after a moment so they don’t block your view. You can make them appear and disappear with a single tap on the video.
There are two icons on these controls, however, that don’t also
appear when you’re playing iPod videos. First is the ![]() button, which adds the video you’re watching to your Favorites list so you won’t have to hunt for it later.
button, which adds the video you’re watching to your Favorites list so you won’t have to hunt for it later.
Second is the ![]() button, which pauses the video and sends you to the Mail app, where
a link to the video is pasted into an outgoing message for you.
button, which pauses the video and sends you to the Mail app, where
a link to the video is pasted into an outgoing message for you.
The ![]() button at the top-left corner takes you out of the video you’re
watching and back to the list of YouTube videos.
button at the top-left corner takes you out of the video you’re
watching and back to the list of YouTube videos.
Stocks
This one’s for you, big-time day trader. The Stocks app tracks the rise and fall of the stocks in your portfolio. It connects to the Internet to download the very latest stock prices.

(All right, maybe not the very latest. The price info may be delayed as much as 20 minutes, which is typical of free stock-info services.)
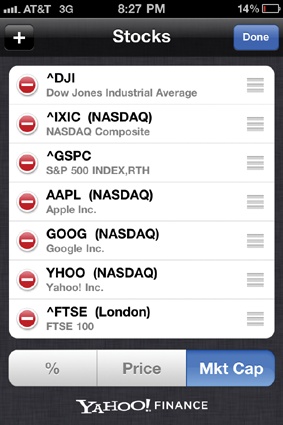
When you first fire it up, Stocks shows you a handful of sample high-tech stocks—or, rather, their abbreviations. (They stand for the Dow Jones Industrial Index, the NASDAQ Index, the S&P 500 Index, Apple, Google, and Yahoo. AT&T, one of the starter listings on the original iPhone, has been dumped.)
Next to each, you see its current share price, and next to that, you see how much that price has gone up or down today. As a handy visual gauge to how elated or depressed you should be, this final digit appears on a green background if it’s gone up, or a red one if it’s gone down.
Tap a stock name to view its stock-price graph at the bottom of the screen. You can even adjust the time scale of this graph by tapping the little interval buttons along the top edge: 1d means “one day” (today); 1w means “one week”; 1m, 3m, and 6m refer to numbers of months; and 1y and 2y refer to years.
Finally, to get more detailed information about a stock, tap its name and then tap the
![]() button in the lower-left corner. The iPhone fires up its Web browser
and takes you to the Yahoo Finance page for that particular stock, showing the company’s
Web site, more detailed stock information, and even recent news articles that may have
affected the stock’s price.
button in the lower-left corner. The iPhone fires up its Web browser
and takes you to the Yahoo Finance page for that particular stock, showing the company’s
Web site, more detailed stock information, and even recent news articles that may have
affected the stock’s price.
Landscape View
If you turn the iPhone sideways, you get a much bigger, more detailed, widescreen graph of the stock in question. (Flick horizontally to view the previous or next stock.)
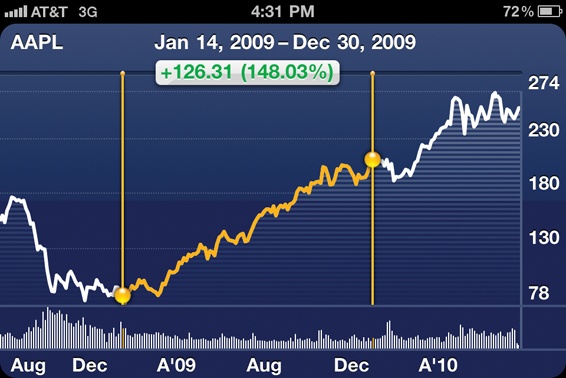
Better yet, you can pinch with two fingers or two thumbs to isolate a certain time period; pop-up bubbles show you how much of a bath you took (or how much of a windfall you received) during the interval you highlighted. Cool!
Customizing Your Portfolio
It’s fairly unlikely that your stock portfolio contains just Apple, Google, and Yahoo. Fortunately, you can customize the list of stocks to reflect the companies you do own (or you want to track).
To edit the list, tap the ![]() button in the lower-right corner. You arrive at the editing
screen, where the following choices await:
button in the lower-right corner. You arrive at the editing
screen, where the following choices await:
Delete a stock by tapping the
 button and then the Delete confirmation button.
Rearrange the list by dragging the grip strips on the right side.
Add a stock by tapping the
 button in the top-left corner; the Add Stock screen and the
keyboard appear.
button in the top-left corner; the Add Stock screen and the
keyboard appear.The idea here is that you’re not expected to know every company’s stock-symbol abbreviation. So type in the company’s name, and then tap Search. The iPhone shows you, just above the keyboard, a scrolling list of companies with matching names. Tap the one you want to track. You return to the stocks-list editing screen.
Choose %, Price, or Numbers. You can specify how you want to see the changes in stock prices in the far-right column: as percentages (“+ 0.65%”), numbers (“+2.23”) or as market capitalization (“120.3B,” meaning $120 billion total corporate value). Tap the corresponding button at the bottom of this screen.

When you’re finished setting up your stock list, tap Done.
Maps
Google Maps on the Web is awesome already. It lets you type in any address or point of interest in the U.S. or many other countries—and see it plotted on a map. You have a choice of a street-map diagram or an actual aerial photo, taken by satellite. Google Maps is an incredible resource for planning a drive, scoping out a new city before you travel there, investigating the proximity of a new house to schools and stores, seeing how far a hotel is from the beach, or just generally blowing your mind with a new view of the world.


And now you’ve got Google Maps on the iPhone, with even more features—like turn-by-turn driving directions, a live national Yellow Pages business directory, GPS that pinpoints your current location, and real-time traffic-jam alerts, represented by color coding on the roads shown on the map.
Browsing the Maps
The very first time you open Maps, you see a miniature U.S. map. Double-tap to zoom in, over and over again, until you’re seeing actual city blocks. You can also pinch or spread two fingers to magnify or shrink the view. Drag or flick to scroll around the map.
To zoom out again, use the rare two-finger tap. So—zoom in with two taps using one finger; zoom out with one tap using two fingers.
At any time, you can tap the curling-page button in the corner of the screen
(![]() ) to open a secret panel of options. Here you can tap your choice of
amazing map views: Map (street-map illustration), Satellite (stunning aerial photos), or Hybrid
(photos superimposed with street names).
) to open a secret panel of options. Here you can tap your choice of
amazing map views: Map (street-map illustration), Satellite (stunning aerial photos), or Hybrid
(photos superimposed with street names).


There’s no guarantee that the Satellite view provides a very recent photo—different parts of the Google Maps database use photography taken at different times—but it’s still very cool.
Location, Location, Location
If any phone can tell you where you are, it’s the iPhone. It has not one, not two, but three ways to determine your location.
GPS. First, the iPhone contains a traditional GPS chip, of the sort that’s found in automotive navigation units from Garmin, TomTom, and other companies.
Don’t expect it to work as well as those car units, though. This is a cellphone, for goodness’ sake—not some much bigger, single-purpose, dedicated-GPS car unit.
Still, Apple’s designers used every trick in the book to maximize the iPhone’s sensitivity, including using the tiny metal ring around the camera lens as part of the GPS antenna. If the iPhone has a good view of the sky, and isn’t confounded by skyscrapers or the metal of your car, then it can do a decent job of consulting the 24 satellites that make up the Global Positioning System and determining its own location.
But what if it can’t see the sky? Or what if you have an original iPhone, which has no GPS chip? Fortunately, all iPhones have two other fallback location features.
Skyhook’s Wi-Fi Positioning System. Metropolitan areas today are blanketed by overlapping WiFi signals. At a typical Manhattan intersection, you might be in range of 20 base stations. Each one broadcasts its own name and unique network address (its MAC address—nothing to do with Mac computers) once every second. Although you’d need to be within 150 feet or so to actually get onto the Internet, a laptop or phone can detect this beacon signal from up to 1,500 feet away.
A company called Skyhook had a huge idea: Suppose you could correlate all those beacon signals with their physical locations. Why, you’d be able to simulate GPS—without the GPS!
So since 2003, 500 full-time Skyhook employees have been driving every road, lane, and highway in major cities around the world, measuring all those WiFi signals, noting their network addresses and locations. (Neither these vans nor the iPhone ever has to connect to these base stations. They’re just reading the one-way beacon signals.)
So far, Skyhook’s database knows about 50 million hot spots—and the precise longitude and latitude of each. The company licenses this information to companies, like Apple, who want to build location services into their gadgets.
If the iPhone can’t get a fix on GPS, then it sniffs around for WiFi base stations. If it finds any, it transmits their IDs back to Skyhook (via cellular network), which looks up those network addresses—and sends coordinates back to the iPhone.
That accuracy is good only to within 100 feet at best, and of course the Skyhook system fails completely once you’ re out of populated areas. On the other hand, it works indoors, which GPS definitely doesn’t.
Google’s cellular triangulation system. Finally, as a last resort, any iPhone can turn to a system of location-guessing based on your proximity to the cellphone towers around you. Software provided from Google works a lot like Skyhook’s software but relies upon its knowledge of cellular towers’ locations rather than WiFi base stations. The accuracy isn’t as good as Skyhook or GPS—you’re lucky if it puts you within a block or two of your actual location—but it’s something.
Tip
The iPhone’s location circuits eat into battery power. To shut them down when you’re not using them, use the Settings switch described on General.
Finding Yourself
All right—now that you know how the iPhone gets its location information, here’s how you can use it. It does not give you GPS-like navigation instructions, with a voice saying, “Turn left on Elm Street”—at least not unless you get an app that does that from the App Store. (Most require a monthly fee, but not all; try MapQuest 4 Mobile, for example.)
What it can do, though, is show you where you are. Tap the Locate button
(![]() ) at the bottom of the Maps screen. The button turns blue, indicating that the iPhone is consulting
its various references—GPS, WiFi network, cellular network—to try to figure out where
you are.
) at the bottom of the Maps screen. The button turns blue, indicating that the iPhone is consulting
its various references—GPS, WiFi network, cellular network—to try to figure out where
you are.
What you see now depends on what kind of luck the phone is having (read the illustration below from right to left):
Good: The Location circle pulsates. The first thing that usually happens when you tap the
 button is that a big, crosshairs-like circle appears on the
map. That’s the iPhone’s first guess, a quick stab based on triangulation of the
local cell towers. As long as it’s bouncing inward and outward, it’s saying: “I
think you’re around here. But hold on—let me see if I can be a little more
specific.”
button is that a big, crosshairs-like circle appears on the
map. That’s the iPhone’s first guess, a quick stab based on triangulation of the
local cell towers. As long as it’s bouncing inward and outward, it’s saying: “I
think you’re around here. But hold on—let me see if I can be a little more
specific.”Note
Actually, the first thing that may happen is you may be asked: “‘Maps would like to use your current location.” (A similar query appears the first time you use any program that uses the iPhone’s location info.) It’s just a little heads-up for the privacy-conscious. Unless you’re paranoid, tap OK.
Better: The circle sits still. The blue circle stops pulsing when it’s exhausted all the iPhone’s location technologies. It’s saying: “You’re in here somewhere, mate, but I’m afraid this is the best I can do.”
Best: The blue pushpin appears—and moves with you. If you’re outdoors (so that the GPS can work), or indoors in a big city (so that the WiFi location circuit works), the iPhone may drop a blue pushpin onto the map. That’s it saying, “OK, pal, I’ve got you. You’re here.”
The iPhone is now tracking you, moving along the map with you as you drive, ride, or walk. (The smoothness of the animation depends on the iPhone’s success at getting a good location signal.)
The iPhone keeps tracking you until you push the
button again.Sometimes a blue, see-through disc appears around the pushpin, indicating the iPhone’s degree of uncertainty. Still, in times of navigational confusion, that guidance can be extremely useful. It’s not just seeing where you are on a map—it’s seeing which way you’re going on the map.

Tip
Once you’ve found something on the map—your current position, say, or something
you’ve searched for—you can drop a pin there for future reference. Tap the
![]() button; when the page curls up, tap Drop Pin. A blue pushpin
appears on the map.
button; when the page curls up, tap Drop Pin. A blue pushpin
appears on the map.
You can drag the pin to move it, or tap ![]() to add it to your Bookmarks (described in a moment), or use it as
a starting point for directions. And if you tap Directions, the iPhone lists “Dropped
Pin” as your starting point—usually a good guess.
to add it to your Bookmarks (described in a moment), or use it as
a starting point for directions. And if you tap Directions, the iPhone lists “Dropped
Pin” as your starting point—usually a good guess.
Orienting the Map
It’s great to see a blue pin on the map, and all—but how do you know which way you’re facing? Legions of iPhone fans have developed a peculiar ritual known as the iPhone Circle, in which they run the perimeter of an imaginary 50-yard circle, holding out the iPhone before them, in an attempt to figure out which way is up on the map.

If you have an iPhone 3GS or iPhone 4, you don’t have to bother. Thanks to the built-in magnetometer (compass), the map can orient itself for you.
Just tap the ![]() button twice. The map spins so that the direction you’re facing is
upward. A “flashlight beam” emanates from your blue dot; its width indicates the
iPhone’s degree of confidence. (The narrower the beam, the surer it is.)
button twice. The map spins so that the direction you’re facing is
upward. A “flashlight beam” emanates from your blue dot; its width indicates the
iPhone’s degree of confidence. (The narrower the beam, the surer it is.)
Searching the Maps
You’re not always interested in finding out where you are; often enough, you know that much perfectly well. Instead, you want to see where something else is. That’s where the Search button comes in.
Tap it to summon the Search box and the iPhone keyboard. (If there’s already
something in the Search box, tap the ![]() button to clear it out.)
button to clear it out.)
Here’s what Maps can find for you:
An address. You can skip the periods (and usually the commas, too). And you can use abbreviations. Typing 710 w end ave ny ny will find 710 West End Avenue, New York, New York. (In this and any of the other examples, you can type a Zip code instead of a city and a state.)
An intersection. Type 57th and lexington, ny ny. Maps will find the spot where East 57th Street crosses Lexington Avenue in New York City.
A city. Type chicago il to see a map of the city. You can zoom in from there.
A Zip code. Type 10024 to see that region.
A point of interest. Type washington monument or niagara falls.
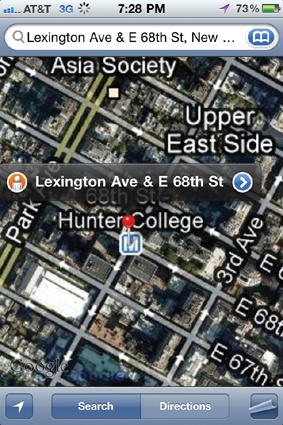

When Maps finds a specific address, an animated, red-topped pushpin comes flying down onto its precise spot on the map. A translucent bubble identifies the location by name.
Finding Friends and Businesses
Maps is also plugged into your Contacts list, which makes it especially easy to find a friend’s house (or just to see how ritzy his neighborhood is).
Instead of typing an address into the empty Search bar, tap the ![]() button at the right end of it. You arrive at the
Bookmarks/Recents/Contacts screen, containing three lists that can save you a lot of
typing.
button at the right end of it. You arrive at the
Bookmarks/Recents/Contacts screen, containing three lists that can save you a lot of
typing.
Two of them are described in the next section. But if you tap Contacts, you see your master address book (Chapter 3). Tap the name of someone you want to find. In a flash, Maps drops a red, animated pushpin onto the map to identify that address.
Tip
If you’re handy with the iPhone keyboard, then you can save a few taps. Type part of a person’s name into the Search bar. As you go, the iPhone displays a list of matching names. Tap the one you want to find on the map.
That pushpin business also comes into play when you use Maps as a glorified national Yellow Pages. If you type, for example, pharmacy 60609, those red pushpins show you all the drugstores in that Chicago Zip code. It’s a great way to find a gas station, a cash machine, or a hospital in a pinch. Tap a pushpin to see the name of the corresponding business.
As usual, you can tap the ![]() button in the map pin’s label bubble to open a details screen. If
you’ve searched for a friend, then you see the corresponding Contacts card. If you’ve
searched for a business, then you get a screen containing its phone number, address, Web
site, and so on. Remember that you can tap a Web address to open it, or tap a phone
number to dial it. (“Hello, what time do you close today?”)
button in the map pin’s label bubble to open a details screen. If
you’ve searched for a friend, then you see the corresponding Contacts card. If you’ve
searched for a business, then you get a screen containing its phone number, address, Web
site, and so on. Remember that you can tap a Web address to open it, or tap a phone
number to dial it. (“Hello, what time do you close today?”)
Tip
If the cluster of map pins makes it hard to see what you’re doing, then tap
List. You see a neat text list of the same businesses. Tap one
to see it alone on the map, or tap ![]() to see its details card.
to see its details card.


In both cases, you get two useful buttons, labeled Directions To Here and Directions From Here. Turn the page for details.
You also get buttons like Add to Bookmarks and Create New Contact, which save this address for instant recall (read on).
Bookmarks and Recents
Let’s face it: The iPhone’s tiny keyboard can be a little fussy. One nice thing about Maps is the way it tries to eliminate typing at every step.
If you tap the ![]() button at the right end of the Search bar, for example, you get the
Bookmarks/Recents/Contacts screen—three lists that spare you from having to type
stuff.
button at the right end of the Search bar, for example, you get the
Bookmarks/Recents/Contacts screen—three lists that spare you from having to type
stuff.
Bookmarks are addresses you’ve flagged for later use by tapping Add to Bookmarks, an option that appears whenever you tap the
 in a push-pin’s label. For sure, you should bookmark your home
and workplace. They’ll make it much easier to request driving directions.
in a push-pin’s label. For sure, you should bookmark your home
and workplace. They’ll make it much easier to request driving directions.Recents are searches you’ve conducted. You’d be surprised at how often you want to call up the same spot again later—and now you can, just by tapping its name in this list. You can also tap Clear to empty the list (if, for example, you intend to elope and don’t want your parents to find out).
Contacts is your iPhone address book. One tap maps out where someone lives.

Directions
If you tap Directions, the Search bar turns into two Search bars: one labeled Start and the other, End. Plug in two addresses—if you’ve used the Location function, the Start address already says “Current Location”—and let Google Maps guide you from the first to the second.
The iPhone does give you turn-by-turn directions—but only as written instructions on the screen, not as a spoken voice. Also, you have to ask for each successive instruction; this app doesn’t display them automatically based on your current position. It’s not a Garmin, in other words.
Still, for a phone, it’s not bad.
Begin by filling in the Start and End boxes. You can use any of the address
shortcuts on pages 215-216, or you can tap ![]() to specify a bookmark, a recent search, or a name in Contacts. (Or,
after performing any search that produces a pushpin, you can tap the
to specify a bookmark, a recent search, or a name in Contacts. (Or,
after performing any search that produces a pushpin, you can tap the ![]() button in its label bubble and then tap Directions To Here or
Direction From Here on the details screen.)
button in its label bubble and then tap Directions To Here or
Direction From Here on the details screen.)
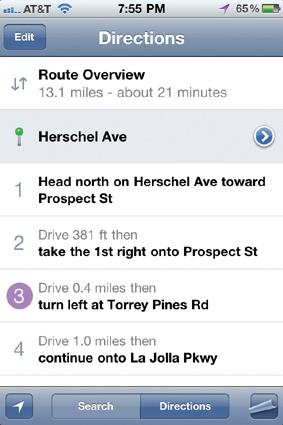
Then tap Route. In just a moment, Maps displays an overview of the route you’re about to drive. At the top of
the screen, you see the total distance and the amount of time it’ll take (if you stay
within the speed limit). Amazingly, you also see buttons for ![]() (public transportation) and
(public transportation) and ![]() (walking) directions. These usually take you longer, and public
transport isn’t always available, but it’s amazing that they’re even an option.
(walking) directions. These usually take you longer, and public
transport isn’t always available, but it’s amazing that they’re even an option.
Tap Start to see the first driving instruction. The map also zooms in to the actual road you’ll be traveling, which looks like it’s been drawn in with purple highlighter. It’s just like having a printout from MapQuest—the directions at the top of the screen say, for example, “Head east on Canterbury Ln toward Blackbird Ave – go .5 mi.” Unlike MapQuest, though, you see only one instruction at a time (the current step)—and you don’t have to clutch and peer at a crumpled piece of paper while you’re driving.

Tap the ![]() or
or ![]() buttons to see the previous or next driving instruction. At any time, you can also tap
buttons to see the previous or next driving instruction. At any time, you can also tap ![]() and then List to see the master list of turns. Tap an instruction
to see a closeup of that turn on the map.
and then List to see the master list of turns. Tap an instruction
to see a closeup of that turn on the map.
To adjust one of the addresses, tap the current driving instruction; the Search
boxes reappear. And to exit the driving mode, tap the ![]() button again.
button again.
Traffic
How’s this for a cool feature? Free, real-time traffic reporting—the same
information you’d have to pay Sirius XM Satellite Radio $10 a month for. Just tap
![]() (lower-right corner), and then tap Show Traffic. Now the stretches
of road change color to indicate how bad the traffic is.
(lower-right corner), and then tap Show Traffic. Now the stretches
of road change color to indicate how bad the traffic is.
Green means the traffic is moving at least at 50 miles an hour.
Yellow indicate speeds from 25 to 50 mph.
Red means the road is like a parking lot. The traffic is moving under 25 mph. Time to start up the iPod mode and entertain yourself.
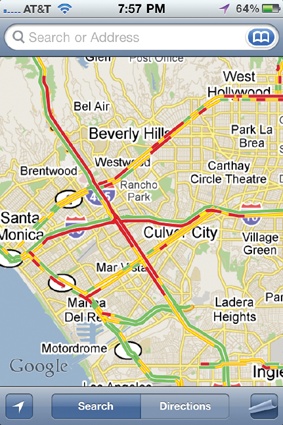
If you don’t see any color-coding, it’s because Google doesn’t have any information for those roads. Usually, the color-coding appears only on highways, and only in metropolitan areas.
Street View
OK, if your brain isn’t already boggled by the iPhone, this’ll do it.
Most people think of Google Maps as an overhead view, like any other map. But these days, there’s more
to it than that. And it’s all lurking in the little ![]() icon. Look for him on the red pushpin label after any search. He’s
likely to appear whenever you search for a street address in a suburb or city (or when
you search for the city itself).
icon. Look for him on the red pushpin label after any search. He’s
likely to appear whenever you search for a street address in a suburb or city (or when
you search for the city itself).
When you tap this guy, you open up Street View. It’s a 360-degree photographic view of the entire area at street level. You can actually perform a virtual walk-through of an entire city this way! The illustration below tells you all you need to know.

What a great way to check out a neighborhood before you visit, shop—or move—there.
Weather
This little widget shows a handy current-conditions display for your city (or any other city) and, at your option, even offers a six-day forecast.
Before you get started, the most important step is to tap the ![]() button at the lower-right corner. The widget flips around.
button at the lower-right corner. The widget flips around.
On the back panel, shown below on the right, you can delete the sample city
(Cupertino, California, which is Apple’s headquarters) by tapping ![]() and then Delete. And you can add your own city, or cities of interest, by tapping
and then Delete. And you can add your own city, or cities of interest, by tapping ![]() . The Add Location screen and keyboard appear so you can type your
city and state or Zip code. You can rearrange the sequence of cities by dragging the grip
strips up or down.
. The Add Location screen and keyboard appear so you can type your
city and state or Zip code. You can rearrange the sequence of cities by dragging the grip
strips up or down.
Tip
This Weather widget is world-friendly. You can type the name of any reasonably sized city on earth to find out its weather. Remember to check before you travel.


When you tap Search, you’re shown a list of matching cities; tap the one whose weather you want to track. When you return to the configuration screen, you can also specify whether you prefer degrees Celsius or degrees Fahrenheit. Tap Done.
Now the front of the widget (facing page, left) displays the name of your town, today’s predicted high and low, the current temperature, a six-day forecast, and a graphic representation of the sky conditions (sunny, cloudy, rainy, and so on).
There’s nothing to tap here except the ![]() icon at lower left. It fires up the Safari browser, which loads
itself with Yahoo’s information page about that city. Depending on the city, you might see
a City Guide, city news, city photos, and more.
icon at lower left. It fires up the Safari browser, which loads
itself with Yahoo’s information page about that city. Depending on the city, you might see
a City Guide, city news, city photos, and more.
If you’ve added more than one city to the list, by the way, just flick your finger right or left to shuffle through the Weather screens for the different cities on your list. The tiny bullets beneath the display correspond to the number of Weather cities you’ve set up—and the white bold one indicates where you are in the sequence.
Voice Memos
This audio app is ideal for recording lectures, musical performances, notes to self, and cute child utterances. The best part: When you sync your iPhone, all of your voice recordings get copied back to the Mac or PC automatically. You’ll find them in iTunes, in a folder called Voice Memos.
Tip
On a new iPhone, the Voice Memos app comes in a folder called Utilities on the first Home screen.
Start by doing a “testing, testing” check, and make sure the VU meter’s needle is moving. (If it’s not, maybe the iPhone thinks you’re recording from the wrong source—a Bluetooth headset, for example.)
Tap the red Record button to start recording. You can pause at any time by pressing
the same button—which now bears a pause symbol (![]() ). Stop recording by tapping the Stop button (
). Stop recording by tapping the Stop button (![]() ) on the right.
) on the right.
You can also switch out of the app to do other work. A red banner across the top of the screen reminds you that you’re still recording. (You can make very long recordings with this thing. Let it run all day, if you like. Even your most long-winded friends can be immortalized.)
To review your recordings, tap what used to be the Stop button, which now looks like a list
(![]() ). This opens the recordings list. Tap one to hear it; tap Delete to
get rid of it; tap Share to send it by email or MMS. (If the recording is too long for
email or MMS, you’re offered the chance to edit it, as described next.)
). This opens the recordings list. Tap one to hear it; tap Delete to
get rid of it; tap Share to send it by email or MMS. (If the recording is too long for
email or MMS, you’re offered the chance to edit it, as described next.)


Editing Your Recording
You might not guess that such a tiny, self-effacing app might actually offer some
basic editing functions, but it does. Tap the ![]() button to the right of any recording to open its Info
screen.
button to the right of any recording to open its Info
screen.
Here, you can give yourself some clue what it is by choosing a label (Podcast, Interview, and so on, shown on the facing page at left). Or tap Custom and type in any name you prefer.
If you tap Trim Memo, you get the display shown below at right. Drag the endpoints
of the scroll bar inward to cut the dead air off the beginning and end, playing the
sound as necessary to guide you (![]() ). Tap Trim Voice Memo.
). Tap Trim Voice Memo.


Notes
The Notes app is the iPhone’s answer to a word processor. It’s simple in the extreme—there’s no formatting, for example; let’s hope you love that Marker Felt font. Still, it’s nice to be able to jot down lists, reminders, and brainstorms. (You can email them to yourself when you’re finished—or sync them right to your Mac or PC’s email program.)
Tip
You can’t change the font in Notes. But you can change the font size. See General.
The first time you open Notes, you see what looks like a yellow, lined legal pad. Tap on the lines to make the keyboard appear so you can begin typing.
Tip
Turn the iPhone! This is one of the blessed apps where you can get a much larger, widescreen keyboard by rotating the phone 90 degrees counterclockwise.
When you’re finished with a note for now, tap Done. The keyboard goes away, and a
![]() button appears at the top right. It opens a new note.
button appears at the top right. It opens a new note.
Whenever you put away the keyboard by tapping Done, a handy row of icons appears at the bottom of your Notes page. The rundown:

 . These buttons let you skip to the previous or next page without
requiring a detour to the master Notes list.
. These buttons let you skip to the previous or next page without
requiring a detour to the master Notes list. . Tap to send your note by email to someone. The iPhone creates a
new outgoing message, pastes the first line of the note into the Subject line, and
then pastes the note’s text into the body. All you have to do is address the note,
edit the body if necessary, and hit Send. Afterward, the iPhone politely returns you
to the note you were editing.
. Tap to send your note by email to someone. The iPhone creates a
new outgoing message, pastes the first line of the note into the Subject line, and
then pastes the note’s text into the body. All you have to do is address the note,
edit the body if necessary, and hit Send. Afterward, the iPhone politely returns you
to the note you were editing. . Tap to delete the current note. After you confirm your decision,
the Trash’s lid opens, the note folds itself up and flies in, and then the lid closes
up again. Cute—real cute.
. Tap to delete the current note. After you confirm your decision,
the Trash’s lid opens, the note folds itself up and flies in, and then the lid closes
up again. Cute—real cute.
As you create more pages, the Notes button (top left) becomes more useful. It’s your
table of contents for the Notes pad. It displays the first lines of your notes (most
recent at the top), along with the time or date you last edited it. (The
![]() button appears here, too.) To open a note, tap its name.
button appears here, too.) To open a note, tap its name.


There’s a Search box hiding here, too. Drag down on the Notes list to bring the Spotlight box into view. Tap it to open the keyboard. You can now search all your notes instantly—not just their titles, but also the text inside them.
Syncing Notes
The iPhone can synchronize your collection of notes with all kinds of other notes sources, so the same notes are waiting for you everywhere you look.
For example, most email programs let you create notes. To that end, you can set up iTunes to sync your iPhone notes with Mail (Apple’s email program for the Mac) or with Microsoft Outlook 2003, 2007, or 2010 on a PC. The “Two-Mailbox Problem” has the details.
Your notes can also sync wirelessly with the Notes modules on MobileMe, Google, Yahoo, AOL, or another IMAP email account. To set this up, open Setings→Mail, Contacts, Calendars. Tap the account you want (MobileMe, Gmail, Yahoo, AOL, or whatever); finally, turn the Notes switch On.
That should do it. Now your notes are synced, both ways, with Mail or Outlook when you connect the iPhone to your computer with the cable.With a MobileMe account, notes are synced nearly instantly, wirelessly, both directions.
One catch: Notes you create at gmail.com, aol.com, or yahoo.com don’t wind up on the phone. Those accounts sync wirelessly in one direction only: from the iPhone to the Web site, where the notes arrive in a Notes folder. (There’s no problem, however, if you get your AOL or Gmail mail in an email program like Outlook or Gmail. Then it’s two-way syncing as usual.)
Clock
It’s not just a clock—it’s more like a time factory. Hiding behind this single icon on the Home screen are four programs: a world clock, an alarm clock, a stopwatch, and a countdown timer.
World Clock
When you tap World Clock on the Clock screen, you start out with only one clock, showing the current time in Apple’s own Cupertino, California.
The neat part is that you can open up several of these clocks, and set each one up to show the time in a different city. The result looks like the row of clocks in a hotel lobby, making you look Swiss and precise.


By checking these clocks, you’ll know what time it is in some remote city, so you don’t wind up waking somebody up at what turns out to be 3 a.m.
To specify which city’s time appears on the clock, tap the ![]() button at the upper-right corner. The keyboard pops up so you can
type the name of a major city. As you type, a scrolling list of matching city names
appears above the keyboard; tap the one whose time you want to track.
button at the upper-right corner. The keyboard pops up so you can
type the name of a major city. As you type, a scrolling list of matching city names
appears above the keyboard; tap the one whose time you want to track.
As soon as you tap a city name, you return to the World Clock display. The color of the clock indicates whether it’s daytime (white) or night (black). Note, too, that you can scroll the list of clocks. You’re not limited to four, although only four fit on the screen at once.
Note
Only the world’s major cities are in the iPhone’s database. If you’re trying to track the time in Squirrel Cheeks, New Mexico, consider adding a major city in the same time zone instead—like Albuquerque.
To edit the list of clocks, tap Edit. Delete a city clock by tapping
![]() and then Delete, or drag clocks up or down using the
and then Delete, or drag clocks up or down using the
![]() as a handle. Then tap Done.
as a handle. Then tap Done.
Alarm
If you travel much, this feature could turn out to be one of your iPhone’s most useful functions. It’s reliable, it’s programmable, and it even wakes the phone first, if necessary, to wake you.
To set an alarm, tap Alarm at the bottom of the Clock program’s screen. Tap the ![]() button at the upper-right corner to open the Add Alarm
screen.
button at the upper-right corner to open the Add Alarm
screen.
You have several options here:
Repeat. Tap to specify what days this alarm rings. You can specify, for example, Mondays, Wednesdays, and Fridays by tapping those three buttons. (Tap a day-of-the-week button again to turn off its checkmark.) Tap Back when you’re done.
Sound. Here’s where you specify what sound you want to ring when the time comes. You can choose from any of the iPhone’s 25 ringtone sounds, or any you’ve added yourself. Tap Back.
Snooze. If this option is on, then at the appointed time, the alarm message on the screen offers you a Snooze button. Tap it for 10 more minutes of sleep, at which point the iPhone tries again to get your attention.
Label. Tap to give this alarm a description, like “Get dressed for wedding” That message appears on the screen when the alarm goes off.
Time dials. Spin these three vertical wheels—hour, minute, AM/PM—to specify the time you want the alarm to go off.


When you finally tap Save, you return to the Alarm screen, which lists your new
alarm. Just tap the On/Off switch to cancel an alarm. It stays in the list, though, so
you can quickly reactivate it another day, without having to redo the whole thing. You
can tap the ![]() button to set another alarm, if you like.
button to set another alarm, if you like.
Note, too, that the ![]() icon appears in the status bar at the top of the iPhone screen.
That’s your indicator that the alarm is set.
icon appears in the status bar at the top of the iPhone screen.
That’s your indicator that the alarm is set.
To delete or edit an alarm, tap Edit. Tap ![]() and then Delete to get rid of an alarm completely, or tap the
alarm’s name to return to the setup screen, where you can make changes to the time,
name, sound, and so on.
and then Delete to get rid of an alarm completely, or tap the
alarm’s name to return to the setup screen, where you can make changes to the time,
name, sound, and so on.
So what happens when the alarm goes off? The iPhone wakes itself up, if it was asleep. A message appears on the screen, identifying the alarm and the time.
And, of course, the sound rings. This alarm is one of the only iPhone sounds that you’ll hear even if the silencer switch is turned on. Apple figures that if you’ve gone to the trouble of setting an alarm, you probably really want to know about it, even if you forget to turn the ringer back on.
In that case, the screen says, slide to stop alarm.
To cut the ringing short, tap OK or Snooze, or press the Sleep switch, or tap a volume button. After the alarm plays (or you cut it short), its On/Off switch goes to Off (on the Alarm screen).
Tip
With some planning, you can also give yourself a silent, vibrating alarm. It can be a subtle cue that it’s time to wrap up your speech, conclude a meeting, or end a date so you can get home to watch Lost.
You have to set this up right, though. If you just turn on the iPhone’s silencer switch, then the alarm will ring and vibrate. If you choose None as the alarm sound, it won’t ring or vibrate.
Here’s the trick, then: Do choose an alarm sound. And don’t turn off your ringer. Instead, use the volume keys to crank the iPhone’s volume all the way to zero. Now the phone vibrates at the appointed time—but it won’t make a sound.
Stopwatch
You’ve never met a more beautiful stopwatch than this one. Tap Start to begin timing something: a runner, a train, a long-winded person who’s arguing with you.
While the digits are flying by, you can tap Lap as often as you like. Each time, the list at bottom identifies how much time elapsed since the last time you tapped Lap. It’s a way for you to compare, for example, how much time a runner is spending on each lap around a track.
(The tiny digits at the very top measure the current lap.)
You can do other things on the iPhone while the stopwatch is counting, by the way. In fact, the timer keeps ticking away even when the iPhone is asleep! As a result, you can time long-term events, like how long it takes an ice sculpture to melt, the time it takes for a bean seed to sprout, or the length of a Michael Bay movie.
Tap Stop to freeze the counter; tap Start to resume the timing. If you tap Reset, you reset the counter to zero and erase all the lap times.
Timer
The fourth Clock mini-app is a countdown timer. You input a starting time, and it counts down to zero.

Countdown timers are everywhere in life. They measure the time of periods in sports and games, of cooking times in the kitchen, of stunts on Survivor. But on the iPhone, the timer has an especially handy function: It can turn off the music or video after a specified amount of time. In short, it’s a Sleep timer that plays you to sleep, then shuts off to save power.
To set the timer, open the Clock app and then tap Timer. Spin the two dials to specify the number of hours and minutes you want to count down.
Then tap the When Timer Ends control to set up what happens when the timer reaches 0:00. Most of the options here are ringtone sounds, so you’ll have an audible cue that the time’s up. The top one, though, Sleep iPod, is the aforementioned sleep timer. It stops audio and video playback at the appointed time, so that you (and the iPhone) can go to sleep. Tap Set.
Finally, tap Start. Big clock digits count down toward zero. While it’s in progress, you can do other things on the iPhone, change the When Timer Ends settings, or just hit Cancel to forget the whole thing.
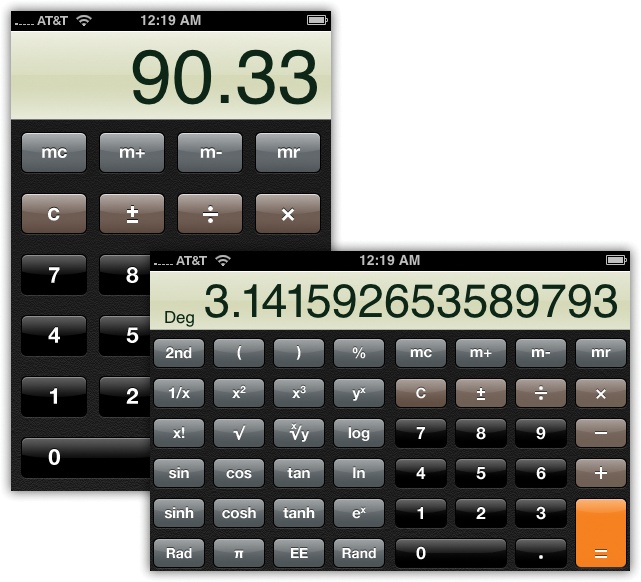
Calculator
The iPhone wouldn’t be much of a computer without a calculator, now would it? And here it is, your everyday memory calculator—with a secret twist.
In its basic four-function mode, you can tap out equations (like 15.4 x 300 =) to see the answer at the top. (You can paste things you’ve copied into here, too; just hold your finger down until the Paste button appears.)
Tip
When you tap one of the operators (like x, +, –, or ÷) it sprouts a white outline to help you remember which operation is in progress. Let’s see an ordinary calculator do that!
The Memory function works like a short-term storage area that retains numbers temporarily, making it easier to work on complicated problems. When you tap m+, whatever number is on the screen gets added to the number already in the memory; the mr/mc button glows with a white ring to let you know you’ve stored something there. Press m-to subtract the currently displayed number from the number in memory.
And what is the number in memory? Press mr/mc to display it—to use it in a subsequent calculation, for example. Finally, tap mr/mc twice to clear the memory and do away with the white ring.
Now the twist: If you rotate the iPhone 90 degrees in either direction, the Calculator morphs into a full-blown HP scientific calculator, complete with trigonometry, logarithmic functions, exponents, roots beyond the square root, and so on. Go wild, ye engineers and physicists!
Compass
Yeah, yeah: WiFi, camera, Bluetooth, music, touchscreen, tile sensor—all phones have that stuff these days. But the iPhone still has something the alsorans lack: A compass.
There’s an actual magnetometer in the iPhone 3GS and iPhone 4—a magnetic-field sensor. When you open the Compass app, you get exactly what you’d expect: a classic Boy Scout wilderness compass that always points north.
Except it does a few things the Boy Scout compasses never did. Like displaying a
digital readout of your heading (shown below, right) or displaying your precise geographical coordinates at the
bottom, or offering a choice of true north (the “top” point of the
Earth’s rotational axis) or magnetic north (the spot traditional
compasses point to, which is about 11 degrees away from true north). (Tap the ![]() to specify which north you prefer.)
to specify which north you prefer.)
The very first time you use the Compass (or anytime you’re standing near something big and metal—or magnetic, like stereo speakers), you get the little message shown on the facing page at left. It’s telling you to move away from the big metal thing, and to de-confuse the Compass by moving it through 3-D space in a big figure 8. (Yes, you look like a deranged person, but it’s good exercise.)
Once the Compass is working, hold it roughly parallel to the ground, and then read it like…a compass.


For many people, the real power of the Compass isn’t even on display here. It’s when you’re using the Maps program.
(You can jump directly from Compass to Maps by tapping the ![]() button in the lower-left corner.)
button in the lower-left corner.)
The Compass powers the map-orientation feature—the one that shows you not just where you are on the map, but which way you’re facing (Street View). That’s a rather critical detail when you’re lost in a city, trying to find a new address, or emerging from the subway with no idea which way to walk.
But there’s more magic yet. People who write iPhone programs can tap into the Compass’s information, too, and use it in clever new ways. There’s an “augmented reality” app called New York Nearest Subway, for example. By using the Compass, GPS, and tilt-sensor information, it knows exactly where you are, which way you’re facing, and how you’re holding the phone—and so it superimposes, in real time, arrows that show you where to find the nearest New York subway stop, and which line it’s on. Freaky.
iBooks
iBooks is Apple’s ebook reading program. It’s a free download from the App Store, and it turns the iPhone into a sort of pocket-sized Kindle. With iBooks, you can carry around dozens or hundreds of books in your pocket, which, in the pre-ebook days, would have drawn some funny looks in public.
Most people think of iBooks as a reader for books that Apple sells on its iTunes bookstore—bestsellers and current fiction, for example—and it does that very well. But you can also load it up with your own PDF documents, as well as millions of free, older, out-of-copyright books.
Tip
iBooks is very cool and all. But in the interest of fairness, it’s worth noting that Amazon’s free Kindle app, and Barnes & Noble’s free B&N eReader app, are much the same thing—but offer much bigger book libraries at lower prices than Apple’s.
Buying Books
To shop the iBooks bookstore, open the iBooks app. Tap Store in the upperright corner. Here’s the literary equivalent of the App Store, complete with the icons across the bottom. Tap Featured to see what Apple’s plugging this week; Browse to see the most popular books in each category (tap Categories at top left to specify which category); Charts to see this week’s bestsellers, including what’s on the New York Times Best Seller list; Search to search by name; and Purchases to see what you’ve bought.
Tip
once you’ve bought a book from Apple, you can download it again on other iPhones, iPod Touches, iPads, and (someday, when Apple releases the necessary reader software), Macs and PCs. Buy once, read many.

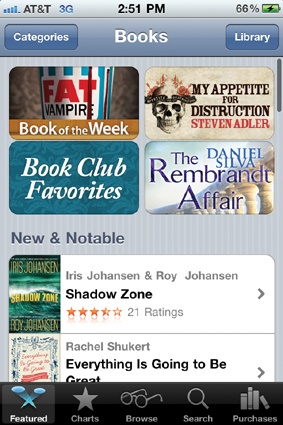
Once you find a book that looks good, you can either tap Get Sample to download a free chapter, read ratings and reviews, or tap the price itself to buy the book and download it straight to the phone.
PDFs and ePub Files
Apple’s bookstore isn’t the only way to get books. You can also load up your ebook reader from your computer, feeding it with PDF documents and ePub files.
Note
ePub is the normal iBooks format. It’s a very popular standard for ebook readers, Apple’s and otherwise. The only difference between ePub documents you create and the ones Apple sells is that Apple’s are copy-protected.
As usual, iTunes is the most convenient loading dock for files bound for your iPhone. Open the program on your Mac or PC. Click Books in the Library list at the left side. Here you’ll see all the books, PDF documents, and ePub files that you’ve slated for transfer.
To add to this set, just drag files off of your desktop and directly into this window, as shown here.
And where are you supposed to get all these files? Well, PDF documents are everywhere—people send them as attachments, and you can turn any document into a PDF file. (For example, on the Mac, in any program, choose File→Print; in the resulting dialog box, click PDF→Save as PDF.)
Tip
If you get a PDF document as an email attachment, adding it to iBooks is even easier. Tap the attachment to open it; now tap Open in iBooks in the corner of the page. (The iPhone may not be able to open really huge PDFs, though.)
But free ebooks in ePub format are everywhere, too. There are 33,000 free downloadable books at gutenberg.org, for example, and over a million at books.google.com—oldies, but classic oldies, with lots of Mark Twain, Agatha Christie, Herman Melville, H.G. Wells, and so on.

Tip
You’ll discover that these freebie books usually come with generic-looking covers. But once you’ve dragged them into iTunes, it’s easy to add a good-looking cover. Use images.google.com to search for the book’s title. Right-click (or Control-click) the cover image in your Web browser; from the shortcut menu, choose Copy Image. In iTunes, right-click (or Control-click) the generic book; choose Get Info; click Artwork; and paste the cover you copied. Now that cover will sync over to the iPhone along with the book.
Once you’ve got some books loaded up in iTunes, you specify which ones you want synced to the phone by connecting the iPhone, clicking its icon in the list at left, clicking the Books tab at top, and turning on the checkboxes of the books you want to transfer. (Details are on The Podcasts & iTunes U Tabs.)
Your Library
Once you’ve supplied your iBooks app with some reading material, the fun begins. When you open the app, you see a handsome wooden bookshelf, with your own personal library represented as little book covers. Mostly what you’ll do here is tap a book to open it. But there are all kinds of other activities waiting for you:
You can reorganize your bookshelf. Hold down your finger on a book until it swells with pride, then drag it into a new spot.
If you’ve loaded some PDF documents, you can switch between Books and PDFs bookshelves by tapping the buttons at top.
If you drag your finger down, you reveal a
 icon, which switches the book-cover view to a much more boring
(but more compact) list view. (Buttons at the bottom let you sort the list by
author, title, category, and so on.) And there’s a Search box, too, which lets you
search your books’ titles—helpful if you have an enormous library.
icon, which switches the book-cover view to a much more boring
(but more compact) list view. (Buttons at the bottom let you sort the list by
author, title, category, and so on.) And there’s a Search box, too, which lets you
search your books’ titles—helpful if you have an enormous library.Tap Edit if you want to rearrange the book thumbnails (just drag them around without having to hold your finger down) or delete a book (tap the
 icon in the thumbnail corner). Of course, deleting a book from
the phone doesn’t delete your safety copy in iTunes.
icon in the thumbnail corner). Of course, deleting a book from
the phone doesn’t delete your safety copy in iTunes.
Reading
But come on—you’re a reader, not a librarian. Here’s how you read an ebook.
Open the book or PDF by tapping the book cover. Now the book opens, ready for you to read. Looks great, doesn’t it? (If you’re returning to a book you’ve been reading, iBooks remembers your place.)
In general, reading is simple: Just read. Turn the page by tapping the edge of the page—or swiping your finger across the page. (If you swipe slowly, you can actually see the “paper” bending over—in fact, you can see through to the “ink” on the other side of the page! Amaze your friends.) You can tap or swipe the left edge (to go back a page) or the right edge (forward).
Tip
This, incidentally, is the Rotation Lock’s big moment. When you want to read lying down, you can prevent the text from rotating 90 degrees using the Rotation Lock (Two Quick Presses, Part 2: The Widget Bar).
But if you tap a page, a row of additional controls appear:
Library takes you back to the bookshelf view.
 opens the Table of Contents. The chapter or page names are
“live”—you can tap one to jump there.
opens the Table of Contents. The chapter or page names are
“live”—you can tap one to jump there. opens a screen-brightness slider (next page, left). That’s a
nice touch, because the brightness of the screen makes a big difference in the
comfort of your reading—and going all the way to Settings to make the change is a
real pain. (The brightness you set here doesn’t affect the brightness level of all
the other apps—only iBooks.)
opens a screen-brightness slider (next page, left). That’s a
nice touch, because the brightness of the screen makes a big difference in the
comfort of your reading—and going all the way to Settings to make the change is a
real pain. (The brightness you set here doesn’t affect the brightness level of all
the other apps—only iBooks.) lets you change the type size. That’s a huge feature for people
with tired or over-40 eyes. And it’s something paper books definitely can’t
do.
lets you change the type size. That’s a huge feature for people
with tired or over-40 eyes. And it’s something paper books definitely can’t
do.The same pop-out panel offers a Fonts button, where you can choose from five different typefaces for your book, as well as a Sepia On/Off button, which lets you specify whether the page itself is white or off-white.
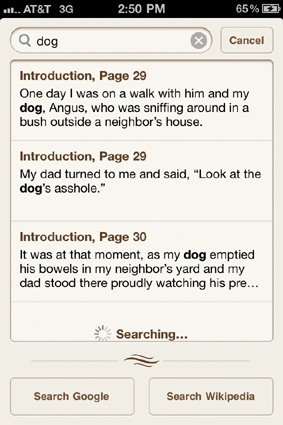
 opens the Search box (next page, right). It lets you search for
text within the book you’re reading, which can be extremely useful. As a bonus,
there are also Search Google and Search Wikipedia buttons, so that you can hop
online to learn more about something you’ve just read.
opens the Search box (next page, right). It lets you search for
text within the book you’re reading, which can be extremely useful. As a bonus,
there are also Search Google and Search Wikipedia buttons, so that you can hop
online to learn more about something you’ve just read.Page dots. At the bottom of the screen, the row of horizontal dots represent the pages of your book. Tap or drag the slider to jump around in the book. (If you’ve magnified the font size, of course, your book suddenly consumes more pages.)

When you’re reading a PDF document, by the way, you can do something you can’t do when reading regular books: zoom in and out using the usual twofinger pinch-and-spread gestures. Very handy indeed.
Notes, Bookmarks, Highlighting, Dictionary
Here are some more stunts that you’d have trouble pulling off in a printed book. If you hold your finger down on a word, you get this effect:
Dictionary. Opens up a graceful, elegant page from iBooks’ built-in dictionary. You know—in the unlikely event that you encounter a word you don’t know.
Highlight. Adds yellow transparent highlighting to the word you tapped. For best results, don’t tap the Highlight button until you’ve first grabbed the blue dot handles and dragged them to enclose the entire passage you want highlighted.
Note. This feature creates highlighting on the selected passage and opens an empty yellow sticky note, complete with keyboard, so you can type in your own annotations. When you tap Done, your note collapses down to a tiny yellow post-it peeking out from the right edge of the margin. Tap it to reopen it.
To delete a note, tap the highlighted text. Tap Remove Note.
Search opens the same Search box that you’ d get by tapping the
icon—except this time, the highlighted word is already filled
in, saving you a bit of typing. adds a bookmark to the current page. This isn’t like a physical
bookmark, where there’s only one in the whole book; you can use it to flag as many
pages, for as many reasons, as you like.
adds a bookmark to the current page. This isn’t like a physical
bookmark, where there’s only one in the whole book; you can use it to flag as many
pages, for as many reasons, as you like.

There are a couple of cool things going on with your bookmarks, notes, and highlighting, by the way. Once you’ve added them to your book, they’re magically and wirelessly synced to any other copies of that book—on other gadgets, like the iPad or iPod Touch (or other iPhones). Very handy indeed.
Furthermore, if you tap the ![]() button to open the Table of Contents, you’ll see a Bookmarks tab.
It presents a tidy list of all your bookmarked pages, notes, and highlighted passages.
As usual, tap a page to jump there.
button to open the Table of Contents, you’ll see a Bookmarks tab.
It presents a tidy list of all your bookmarked pages, notes, and highlighted passages.
As usual, tap a page to jump there.
Tip
iBooks can actually read to you! Just turn on VoiceOver (see VoiceOver, which also explains some of the other changes in your lifestyle that are required when VoiceOver is turned on).
Then open a book. Tap the first line (to get the highlighting off the buttons at top).
Now swipe down the page with two fingers to make the iPhone start reading the book to you, out loud, with a synthesized voice. It even turns the pages automatically and keeps going until you tap with two fingers to stop it.
Yes, this is exactly the feature that debuted in the Amazon Kindle and was then removed when publishers screamed bloody murder—but somehow, so far, Apple has gotten away with it.