
Chapter 7
How Do I Synchronize My iPhone?
Your iPhone can function perfectly well on its own. After all, you can use it to create your own bookmarks, e-mail accounts, contacts, and appointments; you can download music and other media from the iTunes Store; and you can take your own photos using its built-in cameras. If you want to use your iPhone as a stand-alone device, no one can stop you, but I’m not sure why you’d want to. With all the great iPhone synchronization features, you can also share tons of useful and fun content on your computer using your iPhone. This chapter shows you how to master syncing your iPhone and your Mac or Windows computer.
Connecting Your iPhone to Your Computer
When the iPhone was first released, it looked as though we might have finally arrived at that glorious day when computers and devices could just sort of sense each other’s presence and begin a digital conversation without requiring something as inelegant as a physical connection. Ugh. However, even though the fancy-schmancy iPhone supported three wireless technologies — Wi-Fi, Bluetooth, and cellular — exchanging data between it and a Mac or PC required a wired connection.
Well, I’m happy to report that those days are behind us. Sort of. Yes, you can still use a cable to connect your iPhone and your computer, but iOS also supports wireless connections via Wi-Fi. The next couple of sections provide the details.
Connecting via USB
Although iOS supports Wi-Fi syncing, USB connections are still important for those times when you want to use iTunes to change your sync settings. To make an old-fashioned USB-style connection, you can proceed in a couple of ways:
![]() USB cable. Use the cable that came with your iPhone 5s, 5c, or 5 to attach the USB connector to a free USB port on your Mac or Windows PC. Then attach the other end of the cable to the 8-pin Lightning connector port on the bottom of the iPhone.
USB cable. Use the cable that came with your iPhone 5s, 5c, or 5 to attach the USB connector to a free USB port on your Mac or Windows PC. Then attach the other end of the cable to the 8-pin Lightning connector port on the bottom of the iPhone.
![]() Dock. Use the cable that come with your iPhone 5s, 5c, or 5 to attach the USB connector to a free USB port on your Mac or Windows PC and then attach the other end of the cable to the Lightning port on the back of the dock. Now insert your iPhone into the dock cradle.
Dock. Use the cable that come with your iPhone 5s, 5c, or 5 to attach the USB connector to a free USB port on your Mac or Windows PC and then attach the other end of the cable to the Lightning port on the back of the dock. Now insert your iPhone into the dock cradle.
The first time you connect your iPhone to your computer, iTunes displays a dialog telling you that you haven’t chosen to have your iPhone trust this computer. Meanwhile, on your iPhone, you see a Trust This Computer? dialog. Tap Trust to proceed, and in iTunes click Continue.
Connecting via Wi-Fi
As long as your iPhone and your computer are connected to the same Wi-Fi network, the Wi-Fi connection happens automatically, but only if you prepare your iPhone. Specifically, you need to follow these steps:
1. Connect your iPhone to your computer.
2. In iTunes, when your iPhone appears in the Devices list, click it. In iTunes 11, the Devices list appears just to the left of the iTunes Store button.
3. In the Summary tab, select the Sync with this iPhone over Wi-Fi check box.
4. Click Apply. iTunes configures your iPhone to sync over Wi-Fi.
5. Click Done.
6. Disconnect your iPhone. Your iPhone remains in the iTunes Devices list without being physically connected to your computer.
After you do all that, you’re ready to sync over Wi-Fi, as I describe a bit later in this chapter.
Synchronizing Your iPhone Automatically
Start with the look-ma-no-hands syncing scenario, where you don’t have to pay the slightest attention: automatic syncing. If the amount of iPhone-friendly digital content you have on your Mac or Windows PC is less than the capacity of your iPhone, then you have no worries because you know it’s all going to fit. All you have to do is turn on your iPhone and connect it to your computer.
That’s it! iTunes opens automatically and begins syncing your iPhone (and, as an added bonus, it also begins charging the iPhone battery). Your iPhone displays the Sync icon in the menu bar (see Figure 7.1) while the sync runs, and, unlike in older versions of iOS, you can use your iPhone while the sync is running.
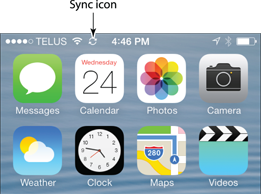
7.1 While your iPhone is in midsync, you see the Sync icon in the menu bar.
Bypassing the automatic sync
What do you do if you want to connect your iPhone to your computer, but you don’t want it to sync? I’m not talking about switching to manual syncing full time (I get to that in a second). Instead, I’m talking about bypassing the sync one time only. For example, you might want to connect your iPhone to your computer just to charge it (assuming you either don’t have the optional dock or don’t have it with you). Or perhaps you just want to use iTunes to eyeball how much free space is left on your iPhone or check for software updates.
 You don’t need to use iTunes to see how much free space is left on your iPhone. On the Home screen, tap Settings, tap General, and then tap About. In the About screen that slides in, the Available value tells you how many gigabytes (or megabytes) of free space you have to play with.
Whatever the reason, you can tell iTunes to hold off the syncing this time by using one of the following techniques:
![]() Mac. Connect the iPhone to the Mac and then quickly press and hold the Option and ⌘ keys.
Mac. Connect the iPhone to the Mac and then quickly press and hold the Option and ⌘ keys.
![]() Windows. Connect the iPhone to the Windows PC and then quickly press and hold the Ctrl and Shift keys.
Windows. Connect the iPhone to the Windows PC and then quickly press and hold the Ctrl and Shift keys.
When you see that iTunes has added your iPhone to the Devices list, you can release the keys.
Troubleshooting automatic syncing
Okay, so you connect your iPhone to your computer and then nothing happens. iTunes doesn’t wake from its digital slumber or, if iTunes is already running, it sees the iPhone but refuses to start syncing. What’s up with that?
It could be a couple of things. First, connect your iPhone, switch to iTunes on your computer, and then click your iPhone in the Devices list. On the Summary tab (see Figure 7.2), make sure the Automatically sync when this iPhone is connected check box is selected.

7.2 Select the Automatically sync when this iPhone is connected check box.
If that check box was already selected, then you need to delve a bit deeper to solve the mystery. Follow these steps:
1. Open the iTunes preferences:
• Mac. Choose iTunes → Preferences, or press ⌘+. (period).
• Windows. Choose Edit → Preferences, or press Ctrl+. (period).
2. Click the Devices tab.
3. Deselect the Prevent iPods, iPhones, and iPads from syncing automatically check box.
4. Click OK to put the new setting into effect and enable automatic syncing once again.
Synchronizing Your iPhone Manually
One fine day, you’ll be minding your own business and performing what you believe to be a routine sync operation when a dialog like the one shown in Figure 7.3 will rear its nasty head.
Groan! This most unwelcome dialog means just what it says: There’s not enough free space on your iPhone to sync all the content from your computer. You have a couple of ways you can handle this:

7.3 You see this dialog if iTunes can’t fit all your stuff on your iPhone.
![]() Remove some of the content from your computer. This is a good way to go if your iPhone is really close to having enough space. For example, the dialog may say that your computer wants to send 100MB of data, but your iPhone has only 98MB of free space. In this case, you can get rid of a few megabytes of stuff on your computer, and you’re back in the sync business.
Remove some of the content from your computer. This is a good way to go if your iPhone is really close to having enough space. For example, the dialog may say that your computer wants to send 100MB of data, but your iPhone has only 98MB of free space. In this case, you can get rid of a few megabytes of stuff on your computer, and you’re back in the sync business.
![]() Synchronize your iPhone manually. This means that you no longer sync everything on your computer. Instead, you handpick which playlists, podcasts, audiobooks, and so on are sent to your iPhone. It’s a bit more work, but it’s the way to go if there’s a big difference between the amount of content on your computer and the amount of space left on your iPhone.
Synchronize your iPhone manually. This means that you no longer sync everything on your computer. Instead, you handpick which playlists, podcasts, audiobooks, and so on are sent to your iPhone. It’s a bit more work, but it’s the way to go if there’s a big difference between the amount of content on your computer and the amount of space left on your iPhone.
The rest of this chapter shows you how to manually sync the various content types: contacts, calendars, e-mail, bookmarks, documents, music, podcasts, audiobooks, movies, TV shows, e-books, photos, and videos.
Synchronizing Your iPhone via Wi-Fi
The capability to sync your iPhone with your computer without a wire in sight is one of the nicest iOS features. If you’re sitting in your easy chair or relaxing on the front porch, who wants to get up, go to the computer, connect your iPhone, and then run a sync just to get, say, the latest podcasts? As long as your iPhone is plugged in and is connected to the same Wi-Fi network as your computer, you can run the sync by barely moving a muscle.
Follow these steps to sync with iTunes right where you are by using Wi-Fi:
1. Make sure your computer is running and connected to the same Wi-Fi network as your iPhone.
2. On the iPhone Home screen, tap Settings. The Settings app appears.
3. Tap General.
4. Tap iTunes Wi-Fi Sync.
5. Tap Sync Now. Your iPhone syncs with iTunes on your computer.
Synchronizing Information with Your iPhone
If you step back a pace or two to take in the big picture, you see that your iPhone deals with two broad types of data: media — all that audio and video stuff — and information such as contacts, appointments, e-mail, websites, and notes. You need both types of data to get the most out of your iPhone investment and, happily, both types of data are eminently syncable. I get to the media syncing portion of the show a bit later. For now, the next few sections show you how to take control of syncing your information between your iPhone and your computer.
 The version of iTunes that comes with OS X Mavericks does not support syncing information such as contacts, calendars, e-mail accounts, and bookmarks directly between iTunes and an iPhone. Instead, you must configure your Mac to sync this data to your iCloud account, and then configure your iPhone to have this data synced from your iCloud account. See Chapter 13 for the details.
Syncing your contacts
Although you can certainly add contacts directly on your iPhone — and I show you how to do just that in Chapter 10 — adding, editing, grouping, and deleting contacts is a lot easier on a computer. So, a good way to approach contacts is to manage them on your Mac or Windows PC, and then sync them with your iPhone.
However, do you really need to sync all your contacts? For example, if you only use your iPhone to contact friends and family, then why clog your phone’s Contacts list with work contacts? I don’t know!
You can control which contacts are sent to your iPhone by creating groups of contacts and then syncing only those that you want. Here are some quickie instructions for creating groups:
![]() Contacts (OS X Mountain Lion) or Address Book (earlier versions of OS X). Choose File → New Group, type the group name, and then press Return. Now populate the new group by dragging and dropping contacts on it.
Contacts (OS X Mountain Lion) or Address Book (earlier versions of OS X). Choose File → New Group, type the group name, and then press Return. Now populate the new group by dragging and dropping contacts on it.
![]() Windows Contacts (Windows 8.1, 8, 7, and Vista). Click New Contact Group, type the group name, and then click Add to Contact Group. Choose all the contacts you want in the group and then click Add. Click OK.
Windows Contacts (Windows 8.1, 8, 7, and Vista). Click New Contact Group, type the group name, and then click Add to Contact Group. Choose all the contacts you want in the group and then click Add. Click OK.
If you’re an Outlook user, note that iTunes doesn’t support Outlook-based contact groups, so you’re stuck with syncing everyone in your Outlook Contacts folder. Also note that iTunes doesn’t support the Windows 8 People app or Windows Live Mail at all, so you can’t use those applications to sync your contacts.
With your group (or groups) all figured out, follow these steps to sync your contacts with your iPhone:
1. Connect your iPhone to your computer.
2. In iTunes, click your iPhone in the Devices list.
3. Click the Info tab. Remember that you won’t see the Info tab if you’re running OS X Mavericks.
4. Turn on contacts syncing by using one of the following techniques:
• OS X Mountain Lion. Select the Sync Contacts check box.
• Earlier versions of OS X. Select the Sync Address Book Contacts check box.
• Windows. Select the Sync Contacts with check box, and then use the list to choose the program you want to use (such as Outlook). For Yahoo! contacts, see Step 7; for Google contacts, see Step 8.
5. Select an option:
• All contacts. Select this option to sync all your contacts.
• Selected groups. Select this option to sync only the groups you pick. In the group list, select the check box beside each group that you want to sync, as shown in Figure 7.4.

7.4 You can sync selected contact groups with your iPhone.
6. If you want to make the sync a two-way street, select the Add contacts created outside of groups on this iPhone to check box, and then choose a group from the menu.
7. Click Apply. iTunes syncs the iPhone using your new contacts settings.
Syncing your calendar
When you’re tripping around town with your trusty iPhone at your side, you certainly don’t want to be late if you’ve got a date. The best way to ensure that you don’t miss an appointment, meeting, or rendezvous is to always have the event details at hand, which means adding those details to your iPhone Calendar. You can add the appointment to Calendar right on the iPhone (a technique I take you through in Chapter 10), but it’s easier to create it on your computer and then sync it to your iPhone. This gives you the added advantage of having the appointment listed in two places, so you’re sure to arrive on time.
Most people sync all appointments, but it’s not unusual to keep track of separate schedules — for example, business and personal. You can control which schedule is synced to your iPhone by creating separate calendars and then syncing only those that you want. In the Calendar application on your Mac, choose File → New Calendar, type the calendar name, and then press Return.
Although you can create extra calendars in Outlook, iTunes doesn’t recognize them, so you have to sync everything in your Outlook Calendar folder. Also, iTunes doesn’t support the Windows 8 Calendar app or the Vista Windows Calendar program, so you’re out of luck if you use either application to manage your schedule.
Now follow these steps to sync your calendar with your iPhone:
1. Connect your iPhone to your computer.
2. In iTunes, click your iPhone in the Devices list.
3. Click the Info tab. Remember that you won’t see the Info tab if you’re running OS X Mavericks.
4. Turn on calendar syncing by using one of the following techniques:
• OS X Mountain Lion. Select the Sync Calendars check box.
• Earlier versions of OS X. Select the Sync iCal Calendars check box.
• Windows. Select the Sync Calendars with check box, and then use the list to choose the program you want to use (such as Outlook).
5. Select an option:
• All calendars. Select this option to sync all your calendars.
• Selected calendars. Select this option to sync only the calendars you pick. In the calendar list, select the check box beside each calendar that you want to sync, as shown in Figure 7.5.

7.5 You can sync selected calendars with your iPhone.
6. To control how far back the calendar sync goes, select the Do not sync events older than X days check box. Next, type the number of days of calendar history you want to see on your iPhone.
7. Click Apply. iTunes syncs the iPhone using your new calendar settings.
Syncing your e-mail account
By far the easiest way to configure your iPhone with an e-mail account is to let iTunes do all the heavy lifting. If you have an existing account — whether it’s a Mail account on your Mac or an Outlook or Windows Mail account on your PC — you can convince iTunes to gather all the account details and pass them along to your iPhone. Here’s how it works:
1. Connect your iPhone to your computer.
2. In the iTunes Devices list, click the iPhone.
3. Click the Info tab. Remember that you won’t see the Info tab if you’re running OS X Mavericks.
4. In the Mail Accounts section, use one of the following techniques:
• Mac. Select the Sync Mail Accounts check box, and then select the check box beside each account you want to add to your iPhone, as shown in Figure 7.6.
• Windows. Select the Sync Mail Accounts from check box, select your e-mail program from the drop-down list, and then select the check box beside each account you want to add to your iPhone.

7.6 Make sure you click both the Sync Mail Accounts check box and at least one account in the Selected Mail accounts list.
5. Click Apply. You may see a message asking if AppleMobileSync can be allowed access to your keychain (your Mac’s master password list).
6. If you see that message, click Allow. iTunes begins syncing the selected e-mail account settings from your computer to your iPhone.
Syncing your bookmarks
The easiest way to get bookmarks for your favorite sites into your iPhone is to take advantage of your best bookmark resource: the Safari browser on your Mac (or PC) or the Internet Explorer browser on your Windows PC (which calls them Favorites). Whichever browser you prefer, you’ve probably used it for a while and have all kinds of useful and fun bookmarked sites at your metaphorical fingertips. To get these at your literal fingertips — that is, on your iPhone — you need to include bookmarks as part of the synchronization process between the iPhone and iTunes.
Having used Safari or Internet Explorer for a while means having a lot of great sites bookmarked, but it also likely means that you have a lot of digital dreck — that is, sites you no longer visit or that have gone belly-up. Before synchronizing your bookmarks with the iPhone, consider taking some time to clean up your existing bookmarks. You’ll thank yourself in the end.
Follow these steps to activate bookmark syncing:
1. Connect your iPhone to your computer.
2. In the iTunes Devices list, click the iPhone.
3. Click the Info tab. Remember that you won’t see the Info tab if you’re running OS X Mavericks.
4. Scroll down to the Other section, and then use one of the following techniques:
• Mac. Select the Sync Safari bookmarks check box, as shown in Figure 7.7. Note that this is the OS X Lion version of the Other section; as I discuss next, you won’t see the Sync Notes check box if you’re running OS X Mountain Lion.

7.7 Make sure the Sync Safari bookmarks check box is selected.
• Windows. Select the Sync bookmarks with check box, and then select your web browser from the drop-down list.
5. Click Apply. iTunes begins syncing the bookmarks from your computer to your iPhone.
What’s that? You’ve already synced your bookmarks to your iPhone and you now have a bunch of useless sites clogging up the Safari app’s bookmark arteries? Not a problem! Return to your desktop Safari (or Internet Explorer), purge the bogus bookmarks, and then resync your iPhone by following the bookmark syncing steps. Any bookmarks you blew away will also be trashed from your iPhone.
Syncing your notes
If you use the Notes app on your iPhone to jot down quick thoughts, ideas, and other mental tidbits, you might want to transfer them to your computer so you can incorporate them into another document, add them to a to-do list, or whatever. To do this in early versions of the iPhone OS, you had to e-mail the notes to yourself, which wasn’t exactly convenient. Now, however, notes are full-fledged members of the iPhone information pantheon, which means you can sync your notes to your computer.
Oddly, OS X Mountain Lion removed the ability to sync items from the Notes app directly between your Mac and your iPhone. (And, as you know, OS X Mavericks went all the way and also removed the ability to sync contacts, calendars, e-mail accounts, and bookmarks.) Instead, you must take the more indirect route of syncing your Mac and iPhone notes with your iCloud account:
![]() Mac. Open System Preferences, click iCloud, and then select the Notes check box.
Mac. Open System Preferences, click iCloud, and then select the Notes check box.
![]() iPhone. Tap Settings, tap iCloud, and then tap the Notes switch to On.
iPhone. Tap Settings, tap iCloud, and then tap the Notes switch to On.
You can still sync notes via iTunes if you’re running an earlier version of OS X or if you’re running Windows by following these steps:
1. Connect your iPhone to your computer.
2. In the iTunes Devices list, click the iPhone.
3. Click the Info tab. Remember that you won’t see the Info tab if you’re running OS X Mavericks.
4. Scroll down to the Other section (as shown previously in Figure 7.7), and then use one of the following techniques:
• Mac. Select the Sync notes check box.
• Windows. Select the Sync notes with check box, and then select an application from the drop-down list (such as Outlook).
5. Click Apply. iTunes begins syncing the notes between your computer and your iPhone.
Merging data from two or more computers
Long gone are the days when your information resided on a single computer. Now it’s common to have a desktop computer (or two) at home, a work computer, and perhaps a notebook computer to take on the road. It’s nice to have all that digital firepower, but it creates a big problem: You end up with contacts, calendars, and other information scattered over several machines. How are you supposed to keep track of it all?
The latest solution from Apple is iCloud, which provides seamless information integration across multiple computers (Mac and Windows) and, of course, the iPhone. This is the topic I cover in Chapter 13.
However, if you don’t have an iCloud account, you can still achieve a bit of data harmony. That’s because iTunes offers the welcome capability of merging information from two or more computers on the iPhone. For example, if you have contacts on your home computer, you can sync them with your iPhone. If you have a separate collection of contacts on your notebook, you can also sync them with your iPhone, but iTunes gives you two choices:
![]() Merge Info. With this option, your iPhone keeps the information synced from the first computer and merges it with the information synced from the second.
Merge Info. With this option, your iPhone keeps the information synced from the first computer and merges it with the information synced from the second.
![]() Replace Info. With this option, your iPhone deletes the information synced from the first computer and replaces it with the information synced from the second.
Replace Info. With this option, your iPhone deletes the information synced from the first computer and replaces it with the information synced from the second.
Here are the general steps to follow to set up your merged information:
1. Sync your iPhone with information from one computer. This technique works with contacts, calendars, e-mail accounts, and bookmarks.
2. Connect your iPhone to the second computer.
3. In iTunes, click your iPhone in the Devices list.
4. Click the Info tab. Remember that you won’t see the Info tab if you’re running OS X Mavericks.
5. Select the Sync check boxes that correspond with information already synced on the first computer. For example, if you synced contacts on the first computer, select the Sync Contacts check box.
6. Click Apply. iTunes displays a dialog like the one shown in Figure 7.8.
7. Click Merge Info. iTunes syncs your iPhone and merges the second computer’s information with the existing information from the first computer.

7.8 You can merge contacts, calendars, e-mail accounts, bookmarks, and notes from two or more computers.
Handling sync conflicts
When you sync information between your iPhone and a computer, any edits you make to that information are included in the sync. For example, if you change someone’s e-mail address on your iPhone, the next time you sync, iTunes updates the e-mail address on the computer, which is exactly what you want.
However, what if you already changed that person’s address on the computer? If you made the same edit, then it’s no biggie because there’s nothing to sync. But what if you made a different edit? Ah, that’s a problem, because now iTunes doesn’t know which version has the correct information. In that case, it shrugs its digital shoulders and passes off the problem to a program called Conflict Resolver, which displays the dialog shown in Figure 7.9.
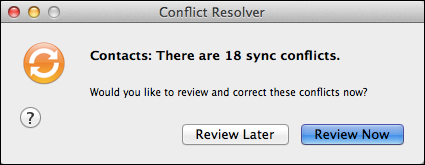
7.9 If you make different edits to the same bit of information on your iPhone and your computer, the Conflict Resolver springs into action.
If you want to deal with the problem now, click Review Now. Conflict Resolver then offers you the details of the conflict. For example, in Figure 7.10 you can see that a contact’s work e-mail address is different in Contacts and on the iPhone. To settle the issue once and for all (you hope), click the correct version of the information and then click Continue to move on to the next conflict. When you’ve gone through all the conflicts, click Done. When Conflict Resolver tells you it will fix the problem during the next sync, click Sync Now to make it happen right away.
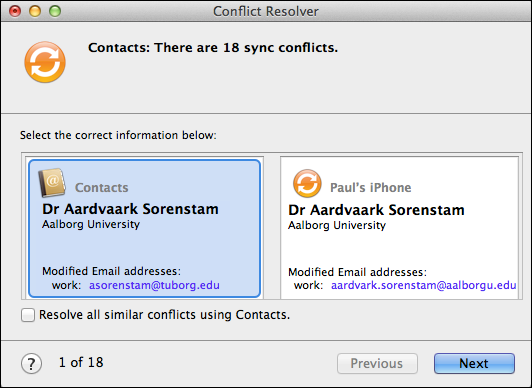
7.10 Clicking Review Now shows you the details of any sync conflicts.
Handling large iPhone-to-computer sync changes
Syncing works both ways, meaning that not only does your iPhone receive content from your computer, but your computer also receives content from your iPhone. For example, if you create any bookmarks, contacts, or appointments on your iPhone, those items are sent to your computer during the sync.
However, it’s implied that the bulk of the content flows from your computer to your iPhone, which makes sense because, in most cases, it’s easier to add, edit, and delete stuff on the computer. So that’s why, if you make a lot of changes to your iPhone content, iTunes displays a warning that the sync is going to, likewise, change a lot of the content on your computer. The threshold is 5 percent, which means that if the sync changes more than 5 percent of a particular type of content on your computer — such as bookmarks or calendars — the warning appears, as shown in Figure 7.11.
If you’re expecting this (because you did change a lot of stuff on your iPhone), click the Sync Whatever button (where Whatever is the type of data you want to sync: Bookmarks, Calendars, and so on). If you’re not sure, click Show Details to see what the changes are. If you’re still scratching your head, click Cancel to skip that part of the sync.

7.11 iTunes warns you if the sync will mess with more than 5 percent of your computer’s content.
If you’re running iTunes for Windows, you can either turn off this warning or adjust the threshold. (For some unfathomable reason, iTunes for Mac doesn’t offer this handy option.) Follow these steps:
1. Choose Edit → Preferences, or press Ctrl+, (comma). The iTunes dialog box appears.
2. Click the Devices tab.
3. If you want to disable the sync alerts altogether, deselect the Warn when check box. Otherwise, leave that check box selected and move on to Step 4.
4. Use the Warn when percent of the data on the computer will be changed list to set the alert threshold, where percent is one of the following:
• any. Select this option to see the sync alert whenever syncing with the iPhone will change data on your computer. iPhone syncs routinely modify data on the computer, so be prepared to see the alerts every time you sync. (Of course, that may be exactly what you want.)
• more than X. Where X is 5% (the default), 25%, or 50%. You’ll see the alert only when the sync will change more than the chosen percentage of data on the computer.
5. Click OK to put the new settings into effect.
Replacing your iPhone data with fresh info
Once you know what you’re doing, syncing contacts, calendars, e-mail accounts, and bookmarks to your iPhone is a relatively bulletproof procedure that should happen without a hitch each time. Of course, this is technology you’re dealing with here, so hitches do happen every now and then. As a result, you might end up with corrupt or repeated information on your iPhone.
Or perhaps you’ve been syncing your iPhone with a couple of different computers, and you decide to cut one of the computers out of the loop and revert to a single machine for all your syncs.
In both of these scenarios, you need to replace the existing information on your iPhone with a freshly baked batch of data. Fortunately, iTunes has a feature that lets you do exactly that. Here’s how it works:
1. Connect your iPhone to your computer.
2. In the iTunes Devices list, click the iPhone.
3. Click the Info tab. Remember that you won’t see the Info tab if you’re running OS X Mavericks.
4. Select the Sync check boxes for each type of information you want to work with (contacts, calendars, e-mail accounts, or bookmarks). If you don’t select a check box, iTunes won’t replace that information on your iPhone. For example, if you like your iPhone bookmarks just the way they are, don’t select the Sync Safari bookmarks check box.
5. In the Advanced section, select the check box beside each type of information you want to replace. As shown in Figure 7.12, there are five check boxes: Contacts, Calendars, Mail Accounts, Bookmarks, and Notes.

7.12 Use the check boxes in the Advanced section to decide which information you want replaced on your iPhone.
6. Click Apply. iTunes replaces the selected information on your iPhone.
If a check box in the Advanced section is disabled, it’s because you didn’t select the corresponding Sync check box. For example, in Figure 7.12 you see that the Sync Safari bookmarks check box in the Other section is deselected, so in the Advanced section, the Bookmarks check box is disabled.
Synchronizing Media with Your iPhone
The brainy Phone app and the sleek Safari browser may earn the lion’s share of kudos for the iPhone, but many people reserve their rave reviews for its Music app. The darn thing is just so versatile! It can play music, of course, but it also happily cranks out audiobooks and podcasts, as well as music videos, movies, and TV shows. Ear and eye candy all in one package!
If there’s a problem with this digital largesse, it’s that the Music app might be too versatile. Even if you have a big 64GB iPhone, you may still find its confines a bit cramped, particularly if you’re also loading up your iPhone with photos, contacts, and calendars, and you just can’t seem to keep your hands out of the App Store cookie jar.
All this means is that you probably have to pay a bit more attention when it comes to syncing your iPhone, and the following sections show you how to do just that.
Syncing music and music videos
The Music app is a digital music player at heart, so you’ve probably already loaded up your iPhone with a lot of audio content and music videos. To get the most out of the Music app’s music and video capabilities, you need to know all the ways you can synchronize these items. For example, if you use the Music app primarily as a music player and your iPhone has more disk capacity than you need for all your digital audio, feel free to throw all your music onto the player. On the other hand, your iPhone might not have much free space, or you might only want certain songs and videos on the player to make it easier to navigate. Not a problem! You can configure iTunes to sync only the songs that you select.
Something I like about syncing playlists is that you can estimate in advance how much space your selected playlists will usurp on the iPhone. In iTunes, click the playlist and then examine the status bar, which tells you the number of songs in the playlist, its total duration, and — most significantly — its total size.
Before getting to the specific sync steps, you need to know that there are three ways to manually sync music and music videos:
![]() Playlists. With this method, you specify the playlists that you want iTunes to sync. Those playlists also appear on your iPhone Music app. This is by far the easiest way to manually sync music and music videos because you usually just have a few playlists to select. The downside is if you have large playlists and run out of space on your iPhone, the only way to fix the problem is to remove an entire playlist. Another bummer with this method is that you can only sync all or none of your music videos.
Playlists. With this method, you specify the playlists that you want iTunes to sync. Those playlists also appear on your iPhone Music app. This is by far the easiest way to manually sync music and music videos because you usually just have a few playlists to select. The downside is if you have large playlists and run out of space on your iPhone, the only way to fix the problem is to remove an entire playlist. Another bummer with this method is that you can only sync all or none of your music videos.
![]() Check boxes. With this method, you specify which songs and music videos are synced by selecting the little check boxes that appear beside every song and video in iTunes. This is precise syncing for sure, but because your iPhone can hold thousands of songs, it’s also a lot of work.
Check boxes. With this method, you specify which songs and music videos are synced by selecting the little check boxes that appear beside every song and video in iTunes. This is precise syncing for sure, but because your iPhone can hold thousands of songs, it’s also a lot of work.
![]() Drag and drop. With this method, you click and drag individual songs and music videos, and drop them on the iPhone icon in the iTunes Devices list. This is an easy way to get a bunch of tracks on your iPhone quickly. However, iTunes doesn’t give you any way of tracking which files you’ve dragged and dropped.
Drag and drop. With this method, you click and drag individual songs and music videos, and drop them on the iPhone icon in the iTunes Devices list. This is an easy way to get a bunch of tracks on your iPhone quickly. However, iTunes doesn’t give you any way of tracking which files you’ve dragged and dropped.
What do you do if you only want to select a few tracks from a large playlist? Waste a big chunk of your life deselecting a few hundred check boxes? Pass. Here’s a better way: Press ⌘+A (Mac) or Ctrl+A (Windows) to select every track, right-click any track, and then click Uncheck Selection. Voila! iTunes deselects every track in seconds flat. Now you can select only the tracks you want. You’re welcome.
Here are the steps to follow to sync music and music videos using playlists:
1. In iTunes, click your iPhone in the Devices list.
2. Click the Music tab.
3. Select the Sync Music check box. iTunes asks you to confirm that you want to sync music.
4. Click Sync Music.
5. Select the Selected playlists, artists, albums, and genres option.
6. Select the check box beside each playlist, artist, album, and genre you want to sync.
7. Select the Include music videos check box if you also want to add your music videos into the sync mix.
8. Select the Include voice memos check box if you also want to sync voice memos recorded on your iPhone.
If you have a lot of music that has been ripped at a high bit rate (say, 256 Kbps or higher), those songs will take up a lot of space on your iPhone. To fix this, click the Summary tab and then select the Convert higher bit rate songs to X AAC check box, where X is the converted bit rate you want to use: 128, 192, or 256 Kbps.
9. If you want iTunes to fill up any remaining free space on your iPhone with a selection of related music from your Library, select the Automatically fill free space with songs check box.
10. Click Apply. iTunes syncs your iPhone using the new settings.
Here are the steps to follow to sync using the check boxes that appear beside each track in your iTunes Music Library:
1. In iTunes, click your iPhone in the Devices list.
2. Click the Summary tab.
3. Select the Sync only checked songs and videos check box.
4. Click Apply. If iTunes starts syncing your iPhone, click the Cancel button (X) in the iTunes status window to stop it.
5. Either click Music in the Library list or click a playlist that contains the tracks you want to sync. If a track’s check box is selected, iTunes syncs it with your iPhone. If a track’s check box is deselected, iTunes doesn’t sync it with your iPhone. If the track is already on your iPhone, iTunes removes it.
6. In the Devices list, click your iPhone.
7. Click the Summary tab.
8. Click Sync. iTunes syncs just the selected tracks.
If you download a music video from the web and then import it into iTunes (by choosing File → Import), iTunes adds the video to its Movies library. To display it in the Music library instead, open the Movies library, right-click the music video, and then click Get Info. Click the Video tab and use the Kind list to choose Music Video. Click OK. iTunes moves the music video to the Music folder.
You can also configure iTunes to let you drag tracks from the Music library (or any playlist) and drop them on your iPhone. Here’s how this works:
1. In iTunes, click your iPhone in the Devices list.
2. Click the Summary tab.
3. Select the Manually manage music and videos check box.
When you select the Manually manage music and videos check box, iTunes automatically deselects the Sync music check box in the Music tab. However, iTunes doesn’t mess with the music on your iPhone. Even when it syncs after a drag and drop, it only adds the new tracks — it doesn’t delete any of your phone’s existing music.
4. Click Apply. If iTunes starts syncing your iPhone, click the Cancel button (X) in the iTunes status window.
5. Either click Music in the Library list or click a playlist that contains the tracks you want to sync.
6. Choose the tracks you want to sync:
• If all the tracks are together, Shift+click the first track, hold down Shift, and then click the last track.
• If the tracks are scattered all over the place, hold down ⌘ (or Ctrl in Windows) and click each track.
7. Click and drag the selected tracks to the Devices list that appears (see Figure 7.13) and drop them on the iPhone icon. iTunes syncs the selected tracks.

7.13 When you drag a song, playlist, or album, iTunes displays the Devices list, which enables you to sync the music by dropping it on your iPhone.
 If you decide to return to playlist syncing by selecting the Sync music check box in the Music tab, iTunes removes all tracks that you added to your iPhone via the drag-and-drop method.
Syncing podcasts
In many ways, podcasts are the most problematic of the various media you can sync with your iPhone. Not that the podcasts themselves pose any concern. Quite the contrary: They’re so addictive that it’s not unusual to collect them by the dozens. Why is that a problem? Because most professional podcasts are at least a few megabytes in size and many are tens of megabytes. A large-enough collection can put a serious dent in the remaining storage space on your iPhone.
All the more reason to take control of the podcast syncing process. Here’s how you do it:
1. In iTunes, click your iPhone in the Devices list.
2. Click the Podcasts tab.
3. Select the Sync Podcasts check box.
4. If you want iTunes to choose some of the podcasts automatically, select the Automatically include check box and proceed to Steps 5 and 6. If you prefer to choose all the podcasts manually, deselect the Automatically include check box and skip to Step 7.
5. Choose an option from the first pop-up menu:
• All. Choose this item to sync every podcast.
• X most recent. Choose this item to sync the X most recent podcasts (where X is a number you choose).
• All unplayed. Choose this item to sync all the podcasts you haven’t yet played.
• X most recent unplayed. Choose this item to sync the X most recent podcasts that you haven’t yet played.
• X least recent unplayed. Choose this item to sync the X oldest podcasts that you haven’t yet played.
• All new. Choose this item to sync all the podcasts published since the last sync.
• X most recent new. Choose this item to sync the X most recent podcasts published since the last sync.
• X least recent new. Choose this item to sync the X oldest podcasts published since the last sync.
A podcast episode is unplayed if you haven’t yet played at least part of it, either in iTunes or on your iPhone. If you play an episode on your iPhone, the player sends this information to iTunes when you next sync. Even better, your iPhone also lets iTunes know if you paused in the middle of an episode, so when you play that episode in iTunes, it starts at the point where you left off.
6. Choose an option from the second pop-up menu:
• All podcasts. Select this to apply the option from Step 5 to all your podcasts.
• Selected podcasts. Select this to apply the option from Step 5 only to the podcasts you select.
7. Select the check box beside any podcast or podcast episode you want to sync.
8. Click Apply. iTunes syncs the iPhone using your new podcast settings.
To mark a podcast episode as unplayed, in iTunes choose the Podcasts library, right-click the episode, and then choose Mark as New.
Syncing audiobooks
The iTunes sync settings for your iPhone have tabs for Music, Photos, Podcasts, and Video, but not one for Audiobooks. What’s up with that? It’s not, as you might think, some sort of antibook conspiracy or even forgetfulness on the part of Apple. Instead, iTunes treats audiobook content as a special type of book (not surprisingly). To get audiobooks on your iPhone, follow these steps:
1. In iTunes, click your iPhone in the Devices list.
2. Click the Books tab.
3. Select the Sync Audiobooks check box.
4. Select the Selected audiobooks option.
5. Select the check box beside each audiobook you want to sync.
6. Click Apply. iTunes syncs your audiobooks to your iPhone.
Syncing movies
It wasn’t all that long ago when technology prognosticators and pundits laughed at the idea of people watching movies on a screen that was a mere 3.5 inches (measured diagonally). Who could stand to watch even a music video on such a tiny screen? The pundits were wrong, of course, because now it’s not at all unusual for people to use their iPhones (particularly their iPhone 5s, 5c, or 5, with its bigger 4-inch screen) to watch not only music videos but also short films, animated shorts, and even full-length movies.
The major problem with movies is that their file size tends to be quite large — even short films lasting just a few minutes weigh in at dozens of megabytes, and full-length movies are several gigabytes. Clearly there’s a compelling need to manage your movies to avoid filling up your iPhone and leaving no room for the latest album from your favorite band.
Follow these steps to configure and run the movie synchronization:
1. In iTunes, click your iPhone in the Devices list.
2. Click the Movies tab.
3. Select the Sync Movies check box. iTunes asks you to confirm that you want to sync movies.
4. Click Sync Movies.
5. If you want iTunes to choose some of the movies automatically, select the Automatically include check box and proceed to Step 6. If you prefer to choose all the movies manually, deselect the Automatically include check box and skip to Step 7.
6. Choose an option from the pop-up menu:
• All. Choose this item to sync every movie.
• X most recent. Choose this item to sync the X most recent movies you’ve added to iTunes (where X is a number you choose).
• All unwatched. Choose this item to sync all the movies you haven’t yet played.
• X most recent unwatched. Choose this item to sync the X most recent movies you haven’t yet played.
• X least recent unwatched. Choose this item to sync the X oldest movies you haven’t yet played.
7. Select the check box beside any other movie you want to sync.
A movie is unwatched if you haven’t yet viewed it either in iTunes or on your iPhone. If you watch a movie on your iPhone, the player sends this information to iTunes when you next sync.
8. If you want to watch rented movies on your iPhone, in the Rented Movies section, click the Move button beside the rented movie you want to shift to your iPhone. iTunes adds it to the On iPhone list (where iPhone is the name of your iPhone).
9. Click Apply. iTunes syncs the iPhone using your new movie settings.
Syncing TV show episodes
If the average iPhone is at risk of being filled by a few large movie files, it’s probably also at grave risk of being overwhelmed by a large number of TV show episodes. A single half-hour episode can eat up approximately 250MB, with HD versions weighing in at closer to 650MB, so even a modest collection of shows will consume multiple gigabytes of precious iPhone space.
This means it’s crucial to monitor your TV episode collection and keep your iPhone synced with only the episodes you need. Fortunately, iTunes gives you a decent set of tools to handle this:
1. In iTunes, click your iPhone in the Devices list.
2. Click the TV Shows tab.
3. Select the Sync TV Shows check box. iTunes asks you to confirm that you want to sync TV shows.
4. Click Sync TV Shows.
5. If you want iTunes to choose some of the episodes automatically, select the Automatically include check box and proceed to Steps 6 and 7. If you prefer to choose all the episodes manually, deselect the Automatically include check box and skip to Step 8.
6. Choose an option from the pop-up menu:
• All. Choose this item to sync every TV show episode.
• X newest. Choose this item to sync the X most recent episodes (where X is a number you choose).
• All unwatched. Choose this item to sync all the episodes you haven’t yet viewed.
• X newest unwatched. Choose this item to sync the X most recent episodes that you haven’t yet viewed.
• X oldest unwatched. Choose this item to sync the X oldest episodes that you haven’t yet viewed.
A TV episode is unwatched if you haven’t yet viewed it either in iTunes or on your iPhone. If you watch an episode on your iPhone, the player sends this information to iTunes when you next sync.
7. Choose an option from the second pop-up menu:
• All shows. Select this option to apply the choice from Step 6 to all your TV shows.
• Selected shows. Select this option to apply the choice from Step 6 to only the TV shows you select.
8. Select the check box beside any TV show or episode you want to sync.
9. Click Apply. iTunes syncs the iPhone using your new TV show settings.
To mark a TV episode as unwatched, in iTunes choose the TV Shows library, right-click the episode, and then choose Mark as New.
Syncing e-books
If you’ve used your computer to purchase e-books from the iTunes Store or to add some downloaded e-books to the iTunes library, you’ll want to get those onto your iPhone as soon as possible. Similarly, if you’ve grabbed some e-books from the iBookstore on your iPhone, it’s a good idea to back them up to your computer.
You can do both by syncing e-books between your computer and your iPhone:
1. In iTunes, click your iPhone in the Devices list.
2. Click the Books tab.
3. Select the Sync Books check box.
4. In the book list, select the check box beside each book that you want to sync.
5. Click Apply. iTunes syncs the iPhone using your new books settings.
Syncing computer photos to your iPhone
No media collection on an iPhone is complete without a few choice photos to show off around the water cooler. One way to get those photos is to take them with the built-in digital cameras on your iPhone. However, if you have some good pics on your computer, you can use iTunes to send them to the iPhone. Note that Apple supports a number of image file types in addition to the most common TIFF and JPEG formats, including BMP, GIF, JPG2000 or JP2, PICT, PNG, PSD, and SGI.
If you have another photo-editing application installed on your computer, chances are it will also appear in the Sync photos from list.
If you use your computer to process a lot of photos and you want to take copies of some (or all) of them with you on your iPhone, then follow these steps to sync them:
1. In iTunes, click your iPhone in the Devices list.
2. Click the Photos tab.
3. Select the Sync Photos from check box.
4. Choose an option from the pop-up menu:
• iPhoto (Mac only). Choose this item to sync the photos, albums, and events you’ve set up in iPhoto.
• Choose folder. Choose this command to sync the images contained in a folder you specify.
• Pictures (or My Pictures in some versions of Windows). Choose this item to sync the images in the Pictures (or My Pictures) folder.
5. Select the photos you want to sync. The controls you see depend on what you chose in Step 4:
• If you chose iPhoto. In this case, you get two further options: Select the All photos, albums, Events, and Faces option to sync your entire iPhoto library. Select the Selected albums, Events, and Faces, and automatically include option, and then select the check box beside each item you want to sync, as shown in Figure 7.14.
• If you chose either Pictures or Choose folder. In this case, select either the All photos option or the Selected folders option. If you select the latter, select the check box beside each subfolder you want to sync.
6. Click Apply. iTunes syncs the iPhone using your new photo settings.
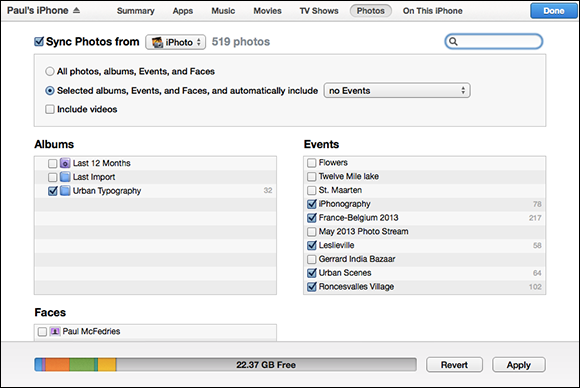
7.14 If you have iPhoto on your Mac, you can sync specified albums, Events, and Faces to your iPhone.
iTunes doesn’t sync exact copies of your photos to the iPhone. Instead, it creates what Apple calls TV-quality versions of each image. These are copies of the images that have been reduced in size to match the iPhone screen size. This not only makes the sync go faster, but it also means the photos take up much less room on your iPhone.
Syncing iPhone photos to your computer
If you create a Safari bookmark on your iPhone and then sync with your computer, that bookmark is transferred from the iPhone to the default web browser on your computer. That’s a sweet deal, and it also applies to contacts and appointments. Unfortunately, it doesn’t apply to media files that, with one exception, travel along a one-way street from your computer to your iPhone.
Ah, but then there’s that one exception, and it’s a good one. If you take any photos using the built-in cameras on your iPhone, the sync process reverses itself and enables you to send some (or all) of those images to your computer.
Actually, there’s a second exception to the one-way media syncing rule. If you use the iTunes app on your iPhone to purchase or download music, those files are transferred to your computer during the next sync. iTunes creates a Store category called Purchased on iPhone (where iPhone is the name of your iPhone). When the sync is complete, you can find your music there, as well as in the Music library.
The iPhone-to-computer sync process bypasses iTunes entirely. Instead, your computer deals directly with your iPhone and treats it just as though it was some garden-variety digital camera. How this works depends on whether your computer is a Mac or a Windows PC, so I use separate sets of steps.
To sync your iPhone camera photos to your Mac, follow these steps:
1. Connect your iPhone to your Mac. iPhoto opens, adds your iPhone to the Devices list, and displays the photos from the Camera Roll album for your iPhone, as shown in Figure 7.15.
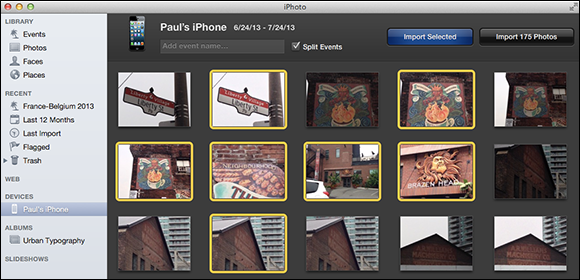
7.15 When you connect your iPhone to your Mac, iPhoto shows up to handle the import of the photos.
2. Use the Add event name text box to name the event that these photos represent.
3. If you don’t want iPhoto to split the synced photos into multiple events based on the date each photo was taken, deselect the Split Events check box.
4. Choose how you want to import the photos:
• If you want to import every photo, click Import X Photos, where X is the number of photos in your iPhone Camera Roll. Technically, it’s the number of photos in your iPhone Camera Roll that you haven’t previously imported. Any photos that you’ve already imported appear separately in the Already Imported section.
• If you want to import only some of the photos, select those you want and then click Import Selected.
5. Using the dialog that appears after the import is complete, choose what you want iPhoto to do with the photos on your iPhone:
• If you want to leave the photos on your iPhone, click Keep Photos.
• If you prefer to clear the photos from your iPhone, click Delete Photos.
Here’s how things work if you’re syncing with a Windows 8 or Windows 7 PC (these steps assume you’ve installed Windows Live Photo Gallery from the Windows Live Essentials site):
If you don’t have Windows Live Photo Gallery installed, you can still access your iPhone photos in Windows 8 or 7. In Windows 8, click Desktop, click Windows Explorer, and then click Computer; in Windows 7, choose Start → Computer. Double-click your iPhone in the Portable Devices group. Open the Internal Storage folder, then the DCIM folder, and then the folder that appears (which will have a name such as 800AAAAA). Your iPhone photos appear and you can then copy them to your computer.
1. Connect your iPhone to your Windows PC.
2. Open Windows Live Photo Gallery.
3. Choose Home → Import. The Import Photos and Videos dialog box appears.
4. Click the icon for your iPhone, and then click Import. Windows Live Photo Gallery connects to your iPhone to gather the photo information.
5. Select the Import all new Items now option. If you’d prefer to select the photos you want to import, select the Review, organize and group Items to import option. Then click Next, use the dialog box to choose the photos you want, and skip to Step 7.
6. Type a tag for the photos. A tag is a word or short phrase that identifies the photos.
7. Click Import. Windows Live Photo Gallery imports the photos.
Here’s how things work if you’re syncing with a Windows 8.1 or 8 PC that doesn’t have Windows Live Photo Gallery:
1. Connect your iPhone to your Windows 8.1 or 8 PC. The AutoPlay notification appears.
2. Click the notification and then click Import Photos and Videos. The Photos app loads and displays the photos from your iPhone’s Camera Roll. If you don’t see the notification, open Photos, right-click the screen, click Import, and then click Apple iPhone.
3. Click each photo you want to import. You can also click Select All to import everything.
4. Click Import. Windows imports the photos and then opens the import folder.
Syncing photos via iCloud
Syncing photos from your computer isn’t difficult, but it seems more than a little old-fashioned in this increasingly wireless age. Fortunately, if you have an iCloud account, you can place your feet firmly in the modern era by using the Photo Stream feature to sync photos without even looking at a USB cable. Photo Stream automatically syncs photos you take using your iPhone cameras to your iCloud account, which then downloads them to your computer, your iPad, or any other device associated with your account. Similarly, if you upload photos to iCloud using another device, those photos are synced automatically to your iPhone.
Follow these steps to activate Photo Stream on your iPhone:
1. In the iPhone Home screen, tap Settings. The Settings app appears.
2. Tap Photos & Camera.
3. Tap the My Photo Stream switch to On.
Preventing your iPhone from sending photos to your computer
Each time you connect your iPhone to your computer, you see iPhoto (on your Mac), the AutoPlay dialog box (in Windows 8, 7, or Vista), or the Scanner and Camera Wizard (in Windows XP). This is certainly convenient if you actually want to send photos to your computer, but you might find that you only do that once in a blue moon. In that case, having to deal with iPhoto or a dialog box every time could cause even the most mild-mannered among us to start pulling hair out.
If you prefer to keep your hair, you can configure your computer not to pester you about getting photos from your iPhone.
Configuring your computer not to download photos from your iPhone means that in the future, you’ll either need to reverse the setting to get photos or manually import them.
Here’s how you set this up on your Mac:
1. Choose Launchpad → Other → Image Capture. The Image Capture application opens.
2. In the Devices list, click your iPhone.
3. Click the Connecting this iPhone opens menu, and then choose No application, as shown in Figure 7.16.
4. Choose Image Capture → Quit Image Capture. Image Capture saves the new setting and then shuts down. The next time you connect your iPhone, iPhoto ignores it.
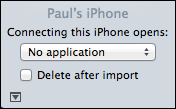
7.16 In the Image Capture Preferences window, choose No application to prevent iPhoto from starting when you connect your iPhone.
Follow these steps to convince Windows 8.1, Windows 8, Windows 7, and Windows Vista not to open the AutoPlay dialog box each time you connect your iPhone:
1. Open the Default Programs window:
• Windows 8. In the Start screen, type default and then click Default Programs.
• Windows 7 or Windows Vista. Choose Start → Default Programs to open the Default Programs window.
2. Click Change AutoPlay settings. The AutoPlay dialog box appears.
3. In the Devices section, open the Apple iPhone list and choose Take no action, as shown in Figure 7.17.
4. Click Save. Windows saves the new setting. The next time you connect your iPhone, you won’t be bothered by the AutoPlay dialog box.

7.17 In the Apple iPhone list, choose Take no action to prevent the AutoPlay dialog box from appearing when you connect your iPhone.
Syncing media with two or more computers
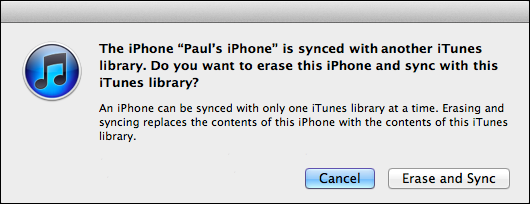
It’s a major drag, but you can’t sync the same type of content to your iPhone from more than one computer. For example, suppose you’re syncing photos from your desktop computer. If you then connect your iPhone to another computer (your notebook, for example), crank up iTunes, and then select the Sync photos from check box, iTunes coughs up the dialog in Figure 7.18. As you can see, iTunes is telling you that if you go ahead with the photo sync on this computer, it will blow away all your existing iPhone photos and albums!
7.18 Syncing the same type of content from two computers is a no-no in the iTunes world.
So there’s no chance of syncing the same iPhone with two different computers, right? Not so fast, my friend! Let’s try another thought experiment. Suppose you’re syncing your iPhone with your desktop computer, but you’re not syncing movies. Once again, you connect your iPhone to your notebook computer (or whatever), crank up iTunes, and then select the Sync movies check box. Hey, no ominous warning dialog! What gives?
The deal here is that if iTunes sees that you don’t have any examples of a particular type of content (such as movies) on your iPhone, it lets you sync that type of content, no questions asked.
In other words, you can sync your iPhone with multiple computers, although in a roundabout kind of way. The secret is to have no overlapping content types on the various computers you use for the syncing. For example, let’s say you have a home desktop computer, a notebook computer, and a work desktop computer. Here’s a sample scenario for syncing your iPhone with all three machines:
![]() Home desktop (music and video only). Select the Sync Music check box in the Music tab, and select the Sync Movies check box in the Movies tab. Deselect the Sync Photos and Sync Podcasts check boxes on the Photos and Podcasts tabs, respectively.
Home desktop (music and video only). Select the Sync Music check box in the Music tab, and select the Sync Movies check box in the Movies tab. Deselect the Sync Photos and Sync Podcasts check boxes on the Photos and Podcasts tabs, respectively.
![]() Notebook (photos only). Select the Sync Photos check box on the Photos tab. Deselect all the Sync check boxes in the Music, Podcasts, and Movies tabs.
Notebook (photos only). Select the Sync Photos check box on the Photos tab. Deselect all the Sync check boxes in the Music, Podcasts, and Movies tabs.
![]() Work desktop (podcasts only). Select the Sync Podcasts check box in the Podcasts tab. Deselect the Sync check boxes in the Music, Photos, and Movies tabs.
Work desktop (podcasts only). Select the Sync Podcasts check box in the Podcasts tab. Deselect the Sync check boxes in the Music, Photos, and Movies tabs.