Chapter 4
How Can I Get More Out of the Phone App?

The iPhone is chock-full of great apps that enable you to surf the web, send and receive e-mail messages, listen to music, take photos, organize your contacts, schedule appointments, and much, much more. These features put the smart in its status as a smartphone, but let’s not forget the phone part! So, while you’re probably familiar with the basic steps required to make and answer calls, the powerful phone component in your iPhone is loaded with amazing features that can make the cell phone portion of your life easier, more convenient, and more efficient. This chapter takes you through these features.
Understanding Cellular Speeds
When we need data, I suspect most of us connect our iPhones to a nearby Wi-Fi network. Of course, there are plenty of us who are more mobile and need data while we’re out and about and can’t always rely on finding a convenient Wi-Fi hotspot. Older versions of the iPhone supported EDGE (Enhanced Data rates for GSM Evolution) cellular networks, EVDO (Evolution-Data Optimized) networks, and HSPA (High Speed Packet Access) networks, which have theoretical maximum download speeds of 0.38 megabits-per-second (Mbps), 3.1 Mbps, and 14.4 Mbps, respectively. EVDO and HSPA are known as 3G (third generation) cellular standards.
The iPhone 5s, 5c, and 5 go further and also include support for the HSPA+ (Evolved High Speed Packet Access) and DC-HSDPA (Dual-Carrier High Speed Downlink Packet Access) networks, which offer theoretical maximum download speeds of 21 Mbps and 42 Mbps, respectively, as well as LTE (Long-Term Evolution), which tops out at an eyebrow-raising 100 Mbps. Note that although some marketing types call LTE a 4G (fourth generation) cellular technology, it in fact doesn’t quite meet the standards for 4G (which is why some folks refer to LTE as “3.9G”).
That’s the good news. The bad news is that super-fast cellular downloads mean that you might burst through your data plan bandwidth limit at high-speed, as well. For example, if you have a 2GB monthly cap, and you managed to achieve 100 Mbps on an LTE network, you would bump up against your plan’s ceiling after just two minutes and 30 seconds! So, yes, by all means enjoy life in the fast lane with your new iPhone 5s, 5c, and 5. Just remember to keep an eye on your data usage (tap Settings and then tap Cellular).
Working with Outgoing Calls
You can do much more with your iPhone than just make a call the old-fashioned way — by dialing the phone number. There are speedy shortcuts you can take, and even settings to alter the way your outgoing calls look on the receiver’s phone.
Making calls quickly
The iPhone has a seemingly endless number of methods you can use to make a call. It’s nice to have the variety, but in this have-your-people-call-my-people world, the big question is not how many ways can you make a call, but how fast can you make a call? Here are my favorite iPhone speed-calling techniques:
 Favorites list. This list acts as a kind of speed dial for the iPhone because you use it to store the phone numbers you call most often, and you have space to add your top 20 numbers. To call someone in your Favorites list, tap the Phone icon on the Home screen, tap Favorites, and then tap the number you want to call. I show you how to manage your Favorites later in this chapter.
Visual Voicemail. If you’re checking your voicemail messages (from the Home screen, tap Phone, and then tap Voicemail) and you want to return someone’s call, tap the message and then tap Call Back.
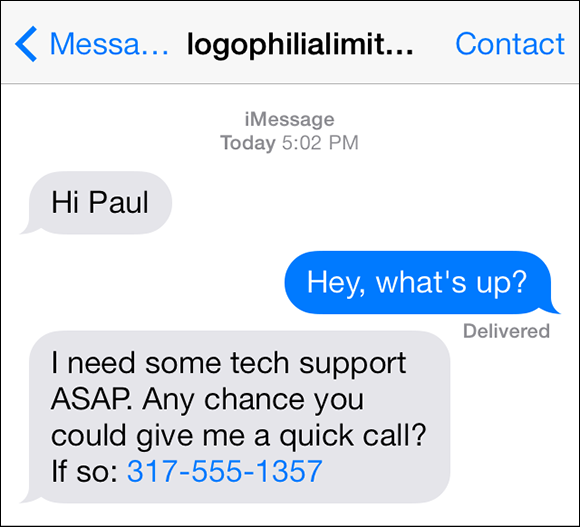
4.1 Your iPhone is kind enough to convert a phone number in a text message into a link that you can tap to call.
Text message. If someone includes a phone number in a text message, your iPhone handily converts it into a link. The number appears in blue text, much like a link on a web page, as shown in Figure 4.1. Tap the phone number to call it. You can also use a similar technique to call numbers embedded in web pages (see Chapter 5) and e-mail messages (see Chapter 6).
 You can do a lot more than just call a number in a text message. Tap Contact in the upper-right corner and then tap the blue Info icon (the circled, lowercase i) to see a menu of actions you can take with the phone number, including e-mailing the sender, initiating a FaceTime call, creating a new contact, and adding the number to an existing contact.
Recent numbers. The Recent Calls list (from the Home screen, tap Phone and then tap Recents) shows your recent phone activity: calls you’ve made, calls you’ve received, and calls you’ve missed. Recent Calls is great because it enables you to quickly redial someone with whom you’ve had recent contact. To call the person using a different phone number, tap the Info icon (the arrow to the right of the name or number), and then tap the phone number you want to use to make the call. If you want to return a missed call, tap Missed and then tap the call.
 If your Recent Calls list is populated with names or numbers that you know you won’t ever call back, you should clear the list and start fresh. In the Recent screen, tap Edit, tap Clear, and then tap Clear All Recents.
Automatically dialing extensions or menu options
If you’re calling a family member or friend at work, or if you’re phoning a particular department or person in a company, chances are you have to dial an extension once the main number connects. Similarly, many businesses require you to negotiate a series of menus to get information or connect with a particular employee or section (“Press 1 for Sales; press 2 for Customer Service”, and so on). This normally requires you to display the keyboard, listen for the prompts, enter the numbers, and repeat as necessary.
However, if you know the extension or phone menu sequence, you can program it into the number and have the Phone app do all the hard work for you. The Phone app can do either of the following:
Pause. This option, which is represented by a comma (,) in the phone number, means that the Phone app dials the main number, waits for two seconds, then dials whatever extension or menu value that appears after the comma. You can add multiple commas to the number if you need a longer delay.
Wait. This option, which is represented by a semicolon (;) in the phone number, means that the Phone app dials just the main number and also displays a button labeled Dial “extension”, where extension is whatever digits appear after the semicolon. When the phone system prompts you to enter the extension, just tap the Dial button.
There are two ways to set these up:
Contacts list. When you’re entering a phone number using the Contacts list, type the full number and then tap the +*# key that appears in the lower left corner of the onscreen keyboard. This temporarily adds two new keys: pause and wait. Tap pause to add a comma, then tap the extension or menu value, and repeat as needed; tap wait to add a semicolon, and then tap the extension.
Keypad. Using the keypad in the Phone app, type the full number. To add a comma to tell the Phone app to pause, tap and hold the * key until a comma appears, then tap the extension or menu value; to add a semicolon to tell the Phone app to wait, tap and hold the # key until a semicolon appears, then tap the extension.
Voice dialing a call with Siri
Tapping a favorite number, a recent number, or a text message phone number link are all pretty easy methods to launch a phone call, but there’s an even easier way that doesn’t require a single tap on your part. I speak, of course, of voice dialing, which is yet another hat worn by Siri, the voice-activated assistant. To voice dial, you tell Siri the name of the person you want to call (if she’s in your Contacts list) or the number you want to call (for everyone else), and Siri does the rest. Here are the details:
1. Tap and hold the Home button. You can also press and hold the center button of the iPhone headset. The Siri screen appears.
2. Say “Call” (or “Phone” or “Telephone” or “Dial”) and then specify who or what:
• If the person is in your Contacts list, say the person’s first and last name. If the contact is a business, say “company,” where company is the business name as given in your Contacts list. If you have multiple numbers for the contact, also say the label of that number (such as “mobile” or “home”). If you’re not sure of the correct label, skip that part and Siri will let you know which labels are available.
• If the person is in your Contacts list and has a unique first name, say the person’s first name.
• If the person has a relationship with you that you’ve defined with Siri, say “relationship,” where relationship is the connection you’ve defined (such as brother or mother).
• If you want to call one of your own numbers, say “Call label,” where label is the label of the number in your Contacts data that you want to call.
• For anyone else, say the full phone number you want to dial.
You can be fairly casual about the syntax you use when specifying a label. For example, you can say something like “Call Belinda Gray at home” or “Call my sister on her mobile phone.”
3. If the person has multiple numbers and you didn’t specify a label, Siri displays a list of the available numbers, as shown in Figure 4.2. You now need to say the label of the number you want to dial. Conveniently, Siri also responds verbally by listing the available labels for that person, so you don’t have to guess which one to use.
That’s it. For a contact, Siri responds with “Calling name label” (where name is the person’s name and label is the label assigned to the phone number). For a phone number, Siri responds with “Calling number” (where number is the phone number you specified).

4.2 You see this screen if the person you’re calling has multiple numbers and you don’t specify a label.
Configuring your iPhone not to show your caller ID
When you use your iPhone to call someone, and the called phone supports Caller ID, your number and often your name appear. If you’d rather hide your identity for some reason, you can configure your iPhone not to show your caller ID:
1. On the Home screen, tap Settings. The Settings app appears.
2. Tap Phone. The Phone screen appears.
3. Tap Show My Caller ID. The Show My Caller ID screen appears.
4. Tap the Show My Caller ID switch to Off. Your iPhone disables Caller ID.
You might have good reasons to hide your caller ID when making a call, but just beware that many people automatically ignore incoming calls that don’t specify the caller’s name (the reasonable assumption being that someone who hides their caller ID is likely up to no good).
Handling Incoming Calls
When a call comes in to your iPhone, you answer it, right? What could be simpler? You’d be surprised. Your iPhone gives you quite a few options for dealing with that call, aside from just answering it. After all, you don’t want to talk to everyone all the time, do you?
If you have a Verizon or Sprint cellular plan, remember that these providers use the CDMA cellular protocol, which is a monotasking system. This means, for example, that if you’re on the phone, you can’t surf the web or perform any data-related activities. Similarly, if you’re surfing the web, you can’t send calls and if a call comes in, your iPhone stops your web session to receive it. If you’re on a non-CDMA network, such as AT&T, you can get simultaneous voice and data, but not using the LTE protocol. When you’re on a call, your data connection falls back to HSPA+.
Silencing an incoming call
When you’re in a situation where the ringing of a cell phone is inappropriate, bothersome, or just plain rude, you, of course, practice celliquette (that is, cell etiquette) and turn off your ringer. (On your iPhone, position the phone in portrait mode with the Home button at the bottom and then flick the Silent/Ring switch on the left side panel to the silent position.) However, we’re merely human and we all forget to turn off our phone’s ringer once in a while.
Your job in that situation is to grab your phone and answer it as quickly as possible. However, what if you’re in a situation where answering the call is bad form? Or what if you’d prefer to delay answering the call until you can leave the room or get out of earshot? That’s a stickier situation, for sure, but the iPhone designers have been there and they’ve come up with a simple solution: press either the Sleep/Wake button on the phone’s top panel (again, assuming you have the phone in portrait mode with the Home button at the bottom) or one of the Volume buttons on the left side panel. Either of these actions stops your iPhone from ringing (or vibrating). The ringing is still going on (your caller hears it on her end), so you’ve still got the usual four rings to answer the call should you decide to.
Sending an incoming call directly to voicemail
Sometimes you just don’t want to talk to someone. Whether that person is your sister calling to complain, an acquaintance who never seems to have anything to say, or someone who calls while you’re indisposed, you might prefer to ignore the call.
That’s not a problem on your iPhone because it gives you several ways to decline a call:
If the phone isn’t locked, tap the red Decline button on the touchscreen.
If you’re using the EarPods, squeeze and hold the center button for 2 seconds.
Press the Sleep/Wake button twice in quick succession.
Each of these methods sends the call directly to voicemail.
If you ignore a call, as with any phone, the caller will know that you’ve done so when voicemail kicks in before the normal four rings. If you don’t want someone to know you’re ignoring his or her call, press the Sleep/Wake button once to silence the ring. The caller still hears the standard four rings before the voicemail and will be none the wiser that you just didn’t pick up your phone.
Replying with a message
In the previous section you learned how to send an unwanted call directly to voicemail. That’s great for calls you want to ignore, but there are plenty of situations where you can’t answer the phone, but you also don’t want to ignore the caller. For example, if you’re expecting a call but get dragged into a meeting in the meantime, it would be rude to still answer the call when it comes in, but if you just send the call to voicemail your caller might wonder what’s going on. Similarly, you might be a bit late for an appointment, and on your way there you see a call come in from the person you’re meeting. Again, it might not be convenient to answer the call, but letting voicemail handle it might lead your caller to wonder if you’re going to show up for the meeting.
iOS offers a feature that gives you an easy way to handle these sticky phone situations. It’s called Respond with Text and it enables you to simultaneously decline a call and send the caller a prefab text message. That way, you avoid a voice conversation (which, depending on your current situation, might be rude or inconvenient) but you give the caller some feedback.
By default, Respond with Text comes with three ready-to-send messages:
I’ll call you later.
I’m on my way.
What’s up?
Each of these is automatically preceded with “Can’t talk right now...”. There’s also an option to send a custom message if none of these is quite right. Here’s how to decline an incoming call and send the caller a text message:
1. When the call comes in, tap Respond with Text, shown in Figure 4.3. Your iPhone displays a button for each of the prefab text messages.
2. Tap the reply you want to send. If you want to send a different message, tap Custom, type your message, and then tap Send.

4.3 Tap Respond with Text to see the text messages.
The caller sees User Busy in the Phone app and then receives a text message.
You must have call display on your phone plan to see the Respond with Text button.
If you’re not all that fond of the default replies, you can forge your own. Tap Settings, tap Phone, tap Respond with Text, and then use the three text boxes to type your own messages.
Setting a callback reminder
The Respond with Text feature is a handy trick to have up your iPhone sleeve, but it suffers from the same problem that plagues straight-up declining a call: If you want to talk to that person later, you have to remember to call back. In older versions of iOS, my solution was to use the Reminders app to nudge myself in an hour (or whenever) to make the return call. Now, however, I don’t need to perform that extra step because the Phone app has a feature that lets you decline a call and automatically create a callback reminder. You can set up the reminder to fire in one hour or when you leave your current location.
Here’s how to decline an incoming call and set a callback reminder:
1. When the call comes in, tap Remind Me Later. Your iPhone displays the callback reminder options.
2. Tap the type of reminder you want to set.
• In 1 hour. Tap this option to set a time-based reminder.
• When I leave. Tap this option to set a location-based reminder that triggers when you leave your current location.
• When I get home. Tap this option to set a location-based reminder that triggers when you arrive at your home address.
Rather than declining all incoming calls, you might be in a situation where you want to decline all calls except for those from a particular person or group. A better way to handle this is to set up the Do Not Disturb feature to allow calls from just those people. For more details, see Chapter 2.
Turning off the call waiting feature
If you’re already on a call and another one comes in, your iPhone springs into action and displays the person’s name or number, as well as three options: Decline Incoming Call, Answer & Hold Current Call, and Answer & End Current Call. (See the section about handling multiple calls later in this chapter for more info on these options.) This is part of the call waiting feature on your iPhone, and it’s great if you’re expecting an important call or if you want to add the caller to a conference call that you’ve set up.
However, the rest of the time you might just find it annoying and intrusive (and anyone you put on hold or hang up on to take the new call probably finds it rude and insulting). In that case, you can turn off call waiting by following these steps:
1. On the Home screen, tap Settings. The Settings app appears.
2. Tap Phone. The Phone screen appears.
3. Tap Call Waiting. The Call Waiting screen appears.
4. Tap the Call Waiting switch to Off. Your iPhone disables call waiting.
Blocking incoming calls
Using your iPhone is a blast until you get your first call from a telemarketer, cold-calling salesperson, or someone similarly annoying. Landlines have had a call blocking feature for years, but until now that useful innovation was absent from the iPhone, despite being on just about everyone’s wish list more or less from the day the iPhone was released. In iOS 7, Apple has finally heeded our call, so to speak, and now offers the welcome ability to block people from calling you. If you’re getting unwanted calls from an old flame, an old schoolmate, or anyone else you used to know but no longer want to, you can follow these steps to block those calls:
1. On the Home screen, tap Settings to open the Settings app.
2. Tap Phone to display the Phone settings.
3. Tap Blocked to open the Blocked screen.
4. Tap Add New. Your Contacts list appears.
5. Tap the person you want to block. Your iPhone adds that person’s phone numbers and e-mail address to the Blocked list.
The blocking feature also applies to FaceTime calls and to text messages. So an alternative method for adding someone to the Blocked list is to open Settings, tap Messages, tap Blocked, tap Add New, and then tap the person in your Contacts list.
What about people not in your Contacts list? No problem. Open the Phone app, tap Recents, and then tap the blue Info icon to the right of any call placed by the person you want to block. In the Info screen, tap Block this Caller and then tap Block Contact when you’re asked to confirm.
Forwarding calls to another number
What do you do about incoming calls if you can’t use your iPhone for a while? For example, if you’re going on a flight, you must either turn off your iPhone or put it in Airplane mode (as described in Chapter 3) so incoming calls won’t go through. Similarly, if you have to return your iPhone to Apple for repairs or battery replacement, the phone won’t be available if anyone tries to call you.
For these and other situations where your iPhone can’t accept incoming calls, you can work around the problem by having your calls forwarded to another number, such as your work or home number. Here’s how it’s done:
1. On the Home screen, tap Settings. The Settings app appears.
2. Tap Phone. The Phone screen appears.
3. Tap Call Forwarding. The Call Forwarding screen appears.
4. Tap the Call Forwarding switch to On. Your iPhone displays the Forwarding To screen.
5. Tap the phone number to use for the forwarded calls.
6. Tap Call Forwarding to return to the Call Forwarding screen. Figure 4.4 shows the Call Forwarding screen set up to forward calls. In the status bar at the top of the screen, note the little Phone icon with an arrow that appears to the left of the time to let you know that call forwarding is on.
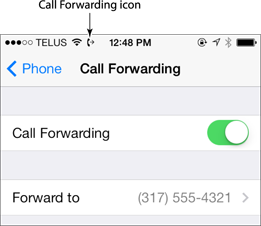
4.4 Activate call forwarding to have your iPhone calls forwarded to another number.
Juggling Multiple Calls and Conference Calls
We all juggle multiple tasks and duties these days, so it’s not surprising that sometimes this involves juggling multiple phone calls:
You might need to call two people on a related issue, and then switch back and forth between the callers as the negotiations (or whatever) progress.
You might already be on a call and another call comes in from a person you need to speak to. So you put the initial person on hold, deal with the new caller, and then return to the first person.
You might need to speak to two people at the same time on the same phone call — in other words, a conference call.
In the real world, juggling multiple calls and setting up conference calls often requires a special phone or a fancy phone system. In the iPhone world, however, these things are a snap. In fact, the way the iPhone juggles multiple calls really is something spectacular. Jumping back and forth between calls is simple, putting someone on hold to answer an incoming call is a piece of cake, and creating a conference call from incoming or outgoing calls is criminally easy.
When you’re on an initial call, your iPhone displays the Call Options screen, as shown in Figure 4.5. To make another call, tap add call and then use the Phone app to place your second call.

4.5 When you’re on a call, your iPhone displays these call options.
You may be wondering how you put a phone call on hold. For reasons that remain mysterious, your iPhone hides this useful feature. To see it, press and hold the mute button, shown in Figure 4.5. After a few seconds, your iPhone replaces this icon with a hold icon and puts the caller on hold. To take the caller off hold, tap that icon.
Once the second call goes through, the Call Options screen changes: The top of the screen shows the first caller’s name (or number) with HOLD beside it, and below that you see the name (or number) of the second caller and the duration of that call. Figure 4.6 shows the new screen layout. To switch to the person on hold, tap the swap button. iPhone puts the second caller on hold and returns you to the first caller. Congratulations! You now have two calls going at once.
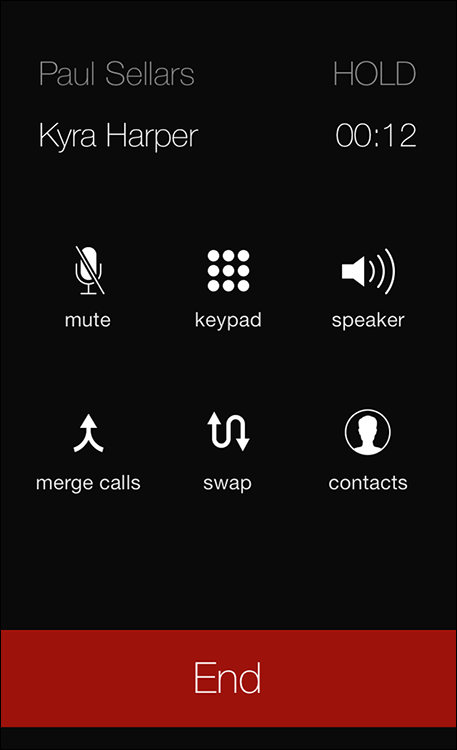
4.6 The iPhone Call Options screen with two phone calls on the go.
If you’re already on the phone and another call comes in, your iPhone displays the number (and the name if the caller is in your Contacts list), and gives you three ways to handle the call:
Answer & Hold Current Call. Tap this option to put the first call on hold and answer the incoming call. You’re working with two calls again in this scenario, so you can tap swap to switch between the callers.
Answer & End Current Call. Tap this option to drop the first call and answer the incoming call.
Decline Incoming Call. Tap this option to send the incoming call directly to voicemail.
If you have two calls going, you might prefer that all three of you be able to talk to each other in a conference call. Easier done than said — just tap the merge calls option. iPhone combines everyone into a single conference call and displays Conference at the top of the Call Options screen. Tap the Info arrow and iPhone displays the participants’ names (or numbers) in the Conference screen, as shown in Figure 4.7.
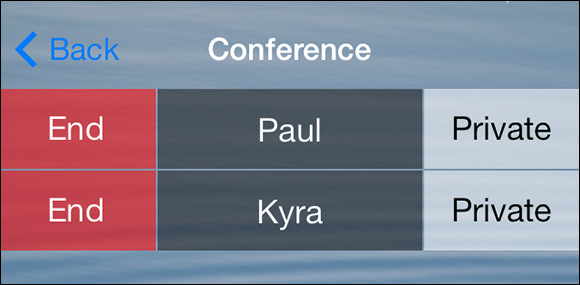
4.7 When you merge two phone calls, the participants’ names or numbers appear in the Conference screen.
From here, there are a few methods you can use to manage your conference call:
To speak with one of the callers privately, tap the Private key to the right of that person’s name or number. This places you in a one-on-one call with that person and places the other caller on hold.
To drop someone from the conference call, tap the End key to the left of that person’s name or number. Your iPhone drops that caller and you resume a private call with the other party.
To add someone else to the conference call, tap Back to return to the Call Options screen. Tap add call and then make the call. Once the call goes through, tap merge calls.
To add an incoming caller to the conference call, tap Answer & Hold Current Call. Once you’re connected, tap merge calls.
Clearly, juggling multiple calls on a phone has never been easier. The iPhone does a remarkable job of organizing calls and giving you an admirably easy process to swap, add, drop, or combine calls in conference.
 You can hold a conference call with up to five people at once by repeating the steps outlined for conference calls. However, remember that conference calls use up your minutes faster — two callers use them up twice as fast, three callers use them up three times as fast, and so on — so you may want to be judicious when using this feature.
Managing Your Favorites List
The Favorites list on your iPhone is great for making quick calls because you can often get someone on the horn in just three finger gestures (from the Home screen, tap Phone, tap Favorites, and then tap the number). Of course, this only works if the numbers you call most often appear on your Favorites list. Fortunately, your iPhone gives you a lot of different ways to populate the list. Here are the easiest methods to use:
In the Favorites list, tap + to open the All Contacts screen and then tap the person you want to add. If that person has multiple phone numbers, tap the number you want to use as a favorite. When the iPhone asks how you want to call the person, tap Voice Call, FaceTime Audio, or FaceTime.
This is a good place to remind you that the Favorites list isn’t a list of people; it’s a list of numbers. That’s why the list shows both the person’s name and the type of phone number (work, home, mobile, and so on).
In the Recent Calls list, tap the More Info icon to the right of the call from (or to) the person you want to add and then tap Add to Favorites. If the person has multiple phone numbers, tap the number you want to use as the favorite, and then tap Voice Call, FaceTime Audio, or FaceTime. iPhone adds a star beside the phone number to remind you that it’s a favorite.
In Visual Voicemail, tap the More Info icon beside a message, tap Add to Favorites, and then tap Voice Call, FaceTime Audio, or FaceTime.
In the Contacts list, tap the person you want to add and then tap Add to Favorites. If the person has multiple phone numbers, tap the number you want to use as the favorite, and then tap Voice Call, FaceTime Audio, or FaceTime. iPhone adds a star beside the phone number to remind you that it’s a favorite.
You can add up to 20 numbers in the Favorites list, but the iPhone screen only shows eight at a time. This means that if you want to call someone who doesn’t appear in the initial screen, you need to scroll down to bring that number into view. Therefore, your Favorites list is most efficient when the people you call most often appear in the first eight numbers. Your iPhone adds each new number to the bottom of the Favorites list, so chances are that at least some of your favorite numbers aren’t showing up in the top eight. Follow these steps to fix that:

4.8 In Edit mode, the Favorites list shows Delete icons on the left and Drag icons on the right.
1. In the Favorites list, tap Edit. Your iPhone displays Delete icons to the left of each favorite and Drag icons to the right, as shown in Figure 4.8.
2. If you want to get rid of a favorite, tap its Delete icon.
3. To move a favorite to a new location, tap and drag the Drag icon up or down until the favorite is where you want it, and then release the icon.
4. Tap Done.
Converting a Phone Number into a Contact
Your iPhone is at its most efficient when the numbers you call are part of your Contacts list. Then, not only can you add contacts to the Favorites list for quick, speed-dial-like access, but you can also use the index (the letters A, B, C, and so on that run down the right side of the Contacts list). Then, it just takes a few finger flicks to rapidly find and tap the person with whom you want to chin-wag.
You can also convert a phone number on your Recent Calls list to a contact. On the Home screen, tap Phone, and then tap Recents to open the Recent Calls list. Locate the name or phone number you want to convert to a contact and then tap the blue More Info icon. Tap Create New Contact, fill in the other contact info, and then tap Done.
I talk about ways to add contacts in Chapter 10. For now, here’s a quick way to add a contact right from the Phone app keypad:
1. In the Home screen, tap Phone. The Phone app appears.
2. In the menu bar, tap Keypad. The Keypad screen appears.
3. Type the phone number of a person you want to add as a contact.
4. Tap Add to Contacts, which appears just below the phone number, as shown in Figure 4.9.
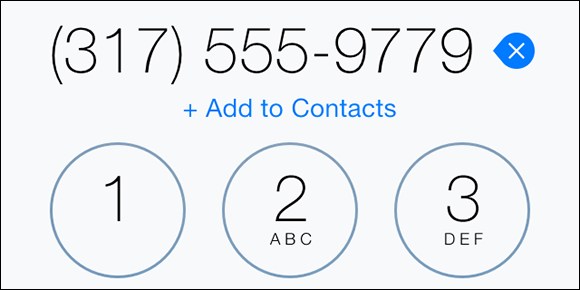
4.9 After you type a phone number using the keypad, tap Add to Contacts to create a contact for the number.
5. Tap Create New Contact. The New Contact screen appears.
6. Fill in the other contact info as needed.
7. Tap Done. Your iPhone adds the new contact and returns you to the Keypad screen.
8. Tap Call to proceed with the phone call.
The phone number you’re dialing might be an alternative number of an existing contact. For example, you may already have set up the contact with a home number, but now you’re dialing that person’s cell number. In that case, tap the Add Contact icon and then tap Add to Existing Contact. Use the Contacts list to tap the contact, choose the phone type (such as mobile), and then tap Done.
Video Calling with FaceTime
One of the most welcome features in the iPhone is a front-mounted camera, which means you can take pictures of yourself without guessing where the shutter button is! Fortunately, that’s not all the front camera is good for. With the FaceTime app, you can use your iPhone to make video calls where you can actually see the other person face to face. It’s an awesome feature, but to use it, the other person must be using an iPhone 4 or later, an iPad 2 or later, a fourth-generation (or later) iPod touch, or a Mac with a video camera and the FaceTime application installed.
Note that the front-mounted camera in the iPhone, iPad, and iPod touch, as well as the video camera on a Mac, are only required if you use FaceTime for video calling. In iOS 7, you can also use FaceTime for audio-only calls.
In iOS 7 (as in iOS 6), you can conduct FaceTime calls over a cellular connection, but you need to turn on this feature. Tap Settings, tap Cellular, and then tap the FaceTime switch to On. Note, as well, that some providers restrict cellular FaceTime calls to certain data plans. For example, as I write this, AT&T only allows FaceTime calls over cellular connections if you’re subscribed to one of its Mobile Share data plans.
The good news about FaceTime (besides how cool it is), is that it’s a complete no-brainer to use. You don’t have to activate any options, configure any settings, download any software, or connect to any servers.
Initiating a FaceTime call
To initiate a FaceTime call, you have a wide variety of choices:
Call the other person normally, and once you’re connected, tap the FaceTime icon.
If the other person is in your Contacts list, open the contact and tap the FaceTime video camera icon for a video call, or the FaceTime phone icon for an audio call.
In the Messages app, start a new conversation with the person — or open an existing one — scroll to the top of the window, and then tap FaceTime.
Press and hold the Home button until you see the Siri app. Then, say “FaceTime name label” (where name is the name of the other person and label is the label associated with the phone number or the e-mail address you want to use for the connection).
If you’ve recently made a FaceTime call to someone, tap the Phone app’s Recents icon, and then tap the FaceTime call (which the Phone app indicates with a FaceTime icon).
If the person has the same label applied to both a phone number and an e-mail address, then you need to add either “phone” or “e-mail” to the instruction. For example, “FaceTime Mom home e-mail.”
If another FaceTime user calls you, you see the message “Name would like FaceTime” (where Name is the caller’s name if he is in your Contacts list), as shown in Figure 4.10.
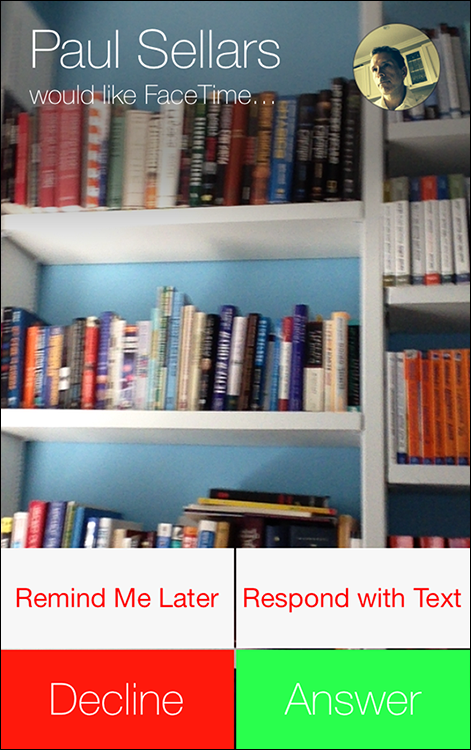
4.10 When a FaceTime user calls you, tap Answer to initiate a FaceTime video call.
Tap Answer and your video call connects, just like that. You see your caller’s (hopefully) smiling face in the full iPhone screen, and your own mug in a picture-in-picture (PIP) window.
The FaceTime calling screen includes three buttons in the menu bar:
Mute. Tap this icon (it’s the one on the left) to mute the sound from your end of the conversation (you can still hear sound from the other person’s end).
End. Tap this button (it’s the one in the middle) to end the call.
Switch cameras. Tap this button to switch your video output to the rear camera (for example, to show your caller something in front of you).
Your PIP window appears by default in the upper-right corner. If you prefer a different position, tap and drag the PIP window to any corner of the screen.
Mute is the FaceTime equivalent of hold. Note, however, that there’s no way to put a FaceTime caller on hold while you answer another call. If a new call comes in while you’re on FaceTime and you accept the call, your iPhone disconnects the FaceTime call.
Disabling FaceTime
There will certainly be times when you simply don’t want a face-to-face conversation, no matter who’s calling. Perhaps you’re in a secret location or you just don’t look your best that day. Whatever the reason, you can follow these steps to turn off FaceTime:
1. In the Home screen, tap Settings. The Settings app appears.
2. Tap FaceTime. The FaceTime screen appears.
3. Tap the FaceTime switch to Off.
Now, when people try to call you using FaceTime, they see a message saying that you’re “not available for FaceTime.”
