In Chapter 7, you looked at a number of basic controls that allow your user to input data to your app. Ultimately, controls are all about either putting data in or rendering data out. In this chapter, you’ll explore some more sophisticated data entry controls in which the user is given the ability to enter complex information by choosing it from a list. This process, in iOS generally called “picking,” presents the user with a list of information from which the user picks what they want. A common form of picking is to choose a date using separate spinners for day, month, and year, instead of having the user type them in. Xcode provides a control for that, which you’ll look at first. You’ll then learn how to use the generic “UIPicker” control to create your own set of input options, rendered in the same way, and how to catch the user’s input from it.
Date Input with the Date Picker
The date picker is a common user interface component for entering date and/or time information. You can see an example of a date picker in the “Contacts” app on your iPhone when you try to add a new contact and set their birthday. See Figure 8-1.

Figure 8-1. The date picker in action
Depending on where the user places their finger, they can spin the month, day, and year columns independently, making it very easy, and very quick, to choose a specific date.
The same control is used when you want to pick a specific time. For example, in the “Alarms” app that ships with your device, you can set the time that you want an alarm to go off. You can see this in Figure 8-2.
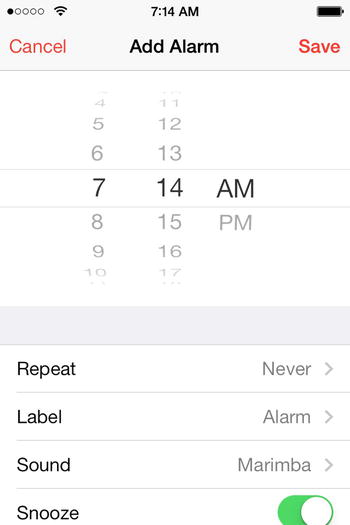
Figure 8-2. Using the date picker for a time
As you can see, the UI paradigm is very similar—there are separate spinners for the hour, minute, and AM/PM settings, which allow the user to enter a time value very quickly.
Creating this interface is very simple thanks to the “UIDatePicker” control. You’ll see how to do that in the next section.
To get started, create a new single view app and called it “datePickerDemo .” If you’re not familiar with this process, go back to Chapter 2 and review how to create a simple app, including how to do actions and outlets. You’ll be using those techniques extensively throughout this chapter.
Create the User Interface for the “Date Picker” App
You’ll be editing the design surface for your view controller. Open Main.storyboard, and you’ll get this (see Figure 8-3):
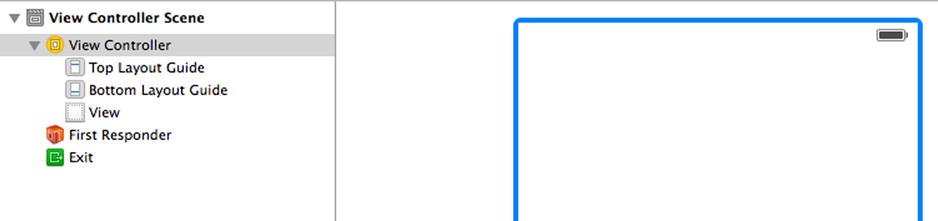
Figure 8-3. Selecting the view controller
On the right of your Xcode window, near the bottom, you’ll see the list of controls. Scroll through this list until you see “Date Picker.” It should look like Figure 8-4. You can take a shortcut by typing “Picker” in the search box at the bottom, and Xcode will show you all controls with the word “Picker” in their name.
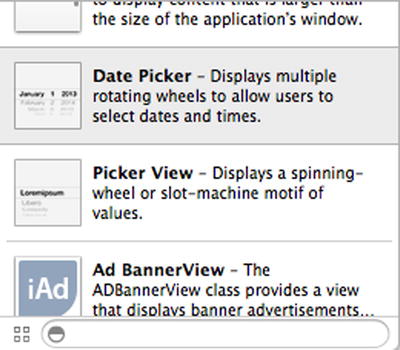
Figure 8-4. The date picker control
Drag the control and drop it on your design surface near the top. It will fit across the entire width of the iPhone screen. See Figure 8-5 for an example.
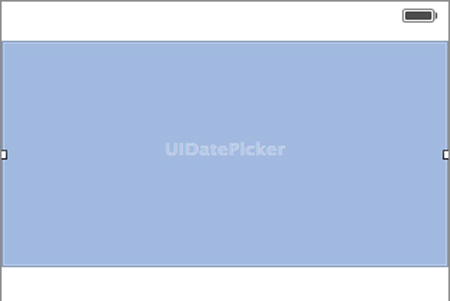
Figure 8-5. Adding the UIDatePicker
Next, find the “Label” control and drag and drop a label beneath the “UIDatePicker” control. You will use this to render whatever date the user picks in the UIDatePicker. Stretch the label to the full width of the design surface.
Switch to the assistant view and CTRL-drag a connection from the UIDatePicker to your “ViewController.h” file to create an action called “dateChosen.” Make sure that the event setting is “Value Changed.” See Figure 8-6.
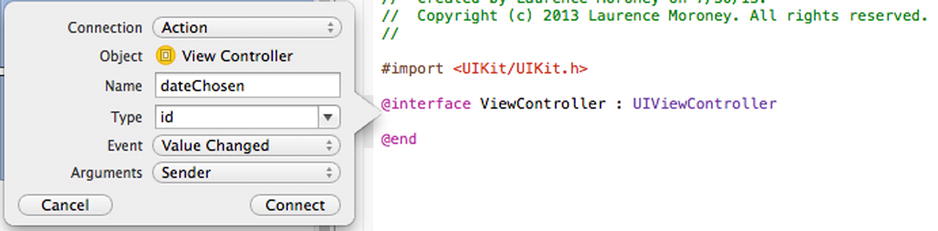
Figure 8-6. Click “Connect” to insert the action
Next, CTRL-drag the UIDatePicker to ViewController.h to create an outlet called “dateChooser .” See Figure 8-7.
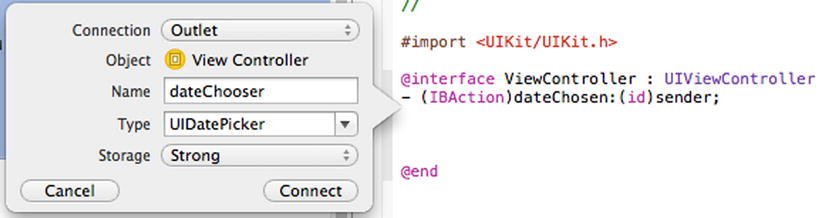
Figure 8-7. Adding the outlet for the UIDatePicker
Finally, create an outlet for the label and call it “lblOutput .” See Figure 8-8.
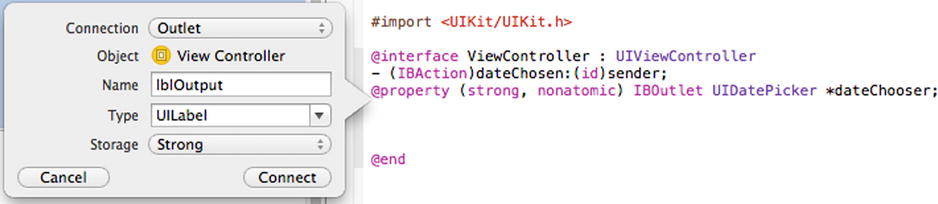
Figure 8-8. Adding an outlet for the UILabel
Now that your user interface is wired up, you’re ready to start coding.
Write the Code for Your “Date Picker” App
Close the assistant and open your “ViewController.m” file. Because you created an action called dateChosen, you’ll see the following function near the bottom of the file:
- (IBAction)dateChosen:(id)sender {
}
This function will get called whenever the value of the picker changes. Fortunately, this will only happen once any of the spinning wheels stops moving. So, for example, with the date picker, you’ll notice on your device that you can slide your finger over the day value, and the values will spin like a slot machine. The change event doesn’t happen while it is spinning. When it stops and settles on a date, the event will fire.
You can get the value of the date picker at this point using its date property, which is of type NSDate.
Here’s the code:
NSDate *chosenDate = _dateChooser.date;
Dates are one of the most complex data types in software, because there are so many rules around them. Think about how many days there are in a month, or which years are leap years, or even the difficulties in keeping track of what day a particular date has. As a result, the NSDate object has a lot of complex functionality and isn’t just a simple representation of a date such as “1 January 2010.” To get the representation, a helper object called an NSDateFormatter is needed. It’s this object’s job to take the complex date information and render it in a human-readable way. It also handles turning the date into different formats. You might prefer your date to read “1-1-2010” or “2010, January 1,” or one of many other options. The NSDateFormatter is designed to give you this flexibility.
The NSDateFormatter provides two main ways for you to turn an NSDate into a human-readable string. You can either use a style, which is one of a number of built-in formats, or you can use a format, which is a string that defines how you want your date to appear. The best resource we’ve found for this string format is Microsoft’s developer site for C# developers, MSDN, which you can find here: http://msdn.microsoft.com/en-us/library/az4se3k1.aspx, or by searching the web for “Standard Date and Time Format Strings.”
The format string takes specifiers to determine how it should look, so for example you could specify a format string of “dd/MM/yyyy” to get a British-style date or “MM/dd/yyyy” to get an American-style one.
Objective-C also has a number of built-in styles that you can use with the NSDateFormatter to get common date formats. For the sake of simplicity in this app, we’re going to use these.
First, you’ll need to create, allocate, and initialize your NSDateFormatter.
NSDateFormatter *dateFormat = [[NSDateFormatter alloc]init];
Once you’ve done this, you can specify your desired style using the setDateStyle message.
[dateFormat setDateStyle:NSDateFormatterFullStyle];
You’ll see as you type the code that there are a number of NSDateFormatter styles available to you. These are documented for you at https://developer.apple.com/library/mac/#documentation/Cocoa/Reference/Foundation/Classes/NSDateFormatter_Class/Reference/Reference.html, and you can see from this documentation that if you choose the NSDateFormatterFullStyle, your date will look like “Tuesday, April 12, 1952AD.”
Now that we have our formatter set up, all we have to do is use that to format our chosen date and then assign the value to our label.
Here’s the code:
_lblOutput.text = [dateFormat stringFromDate:chosenDate];
And that’s everything you need for the action. Here’s the full code for it:
- (IBAction)dateChosen:(id)sender {
    NSDate *chosenDate = _dateChooser.date;
    NSDateFormatter *dateFormat = [[NSDateFormatter alloc]init];
    [dateFormat setDateStyle:NSDateFormatterFullStyle];
    _lblOutput.text = [dateFormat stringFromDate:chosenDate];

}
So now you can run your app and choose a date. The date will be rendered in the label. See Figure 8-9.
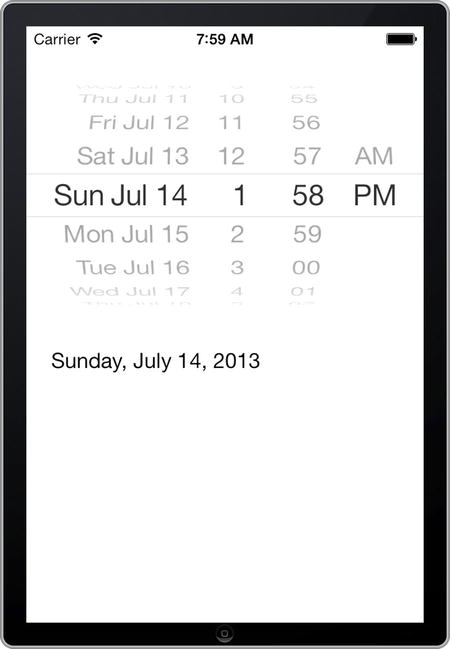
Figure 8-9. Your “Date Picker” app
But wait, there’s a problem. Your “Date Picker” app is different from the one in the “Calendar” app. It’s picking both date and time. And when you render the result, you only get the date and not the time! So let’s fix this to turn it into a date-only picker.
Exploring Options on the UIDatePicker
Stop your app and go back to Main.storyboard. Open the attributes inspector and you’ll see that there’s a “Mode” setting, which by default is set to “Date and Time.” See Figure 8-10.
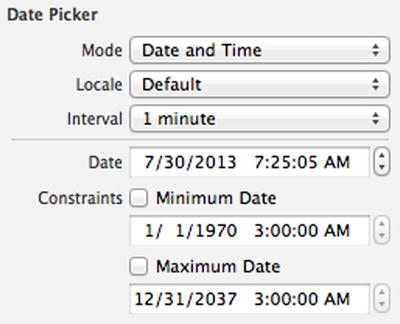
Figure 8-10. Date picker options
Change the mode to “Date” and re-run your app. You’ll see that now you just have date entry, and that the label is correct. See Figure 8-11.
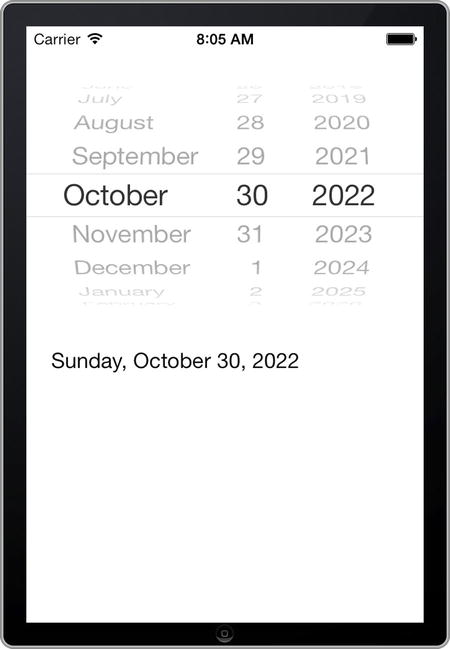
Figure 8-11. The date picker in “Date” mode
Stop your app and then go back to ViewController.m and change the NSDateFormatter to use NSDateFormatterLongStyle so that your dateChosen function looks like this:
- (IBAction)dateChosen:(id)sender {
    NSDate *chosenDate = _dateChooser.date;
    NSDateFormatter *dateFormat = [[NSDateFormatter alloc]init];
    [dateFormat setDateStyle:NSDateFormatterLongStyle];
    _lblOutput.text = [dateFormat stringFromDate:chosenDate];

}
Now re-run your app. You’ll see that the date format has changed a little—it no longer shows the day of the week, just the date. See Figure 8-12.
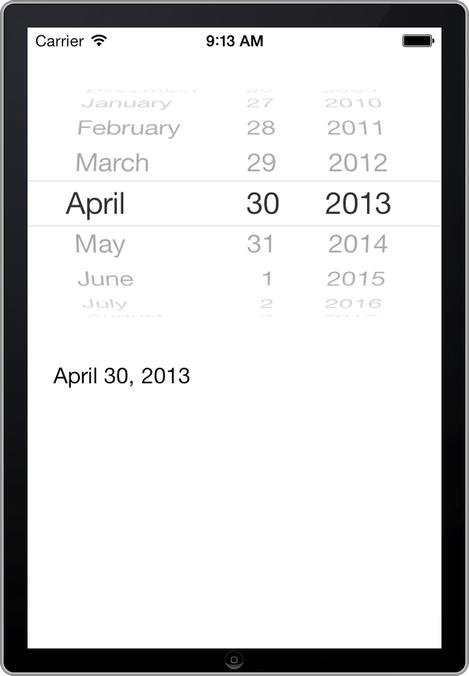
Figure 8-12. The reformatted output
This shows us a separate date, but what about just using the picker for a time? To do this, stop the app, go back to the attributes inspector for the UIDatePicker, and change the mode setting to “Time.” See Figure 8-13.
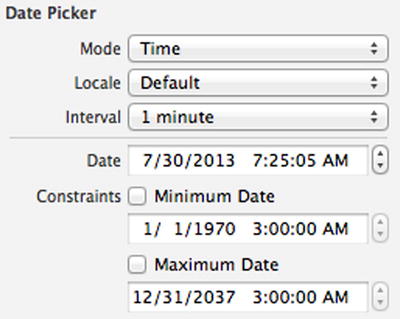
Figure 8-13. Setting the UIDatePicker mode to “Time”
Now you’ll need to let your NSDateFormatter know that you’re interested in showing a time, but not a date. You can do this by setting the date style to “NSDateFormatterNoStyle” to indicate that you don’t want anything. You then need to tell it how to render a time, which you do with the setTimeStyle message. Here’s the full code:
- (IBAction)dateChosen:(id)sender {
    NSDate *chosenDate = _dateChooser.date;
    NSDateFormatter *dateFormat = [[NSDateFormatter alloc]init];
    [dateFormat setDateStyle:NSDateFormatterNoStyle];
    [dateFormat setTimeStyle:NSDateFormatterLongStyle];
    _lblOutput.text = [dateFormat stringFromDate:chosenDate];

}
Now re-run the app, and you’ll see that your picker is now a time picker like that in the alarm app, and that your output text format is correct. See Figure 8-14.

Figure 8-14. The time picker
By experimenting with the settings in the attributes inspector, you can tweak the UIDatePicker to suit your app’s needs, including setting time and date constraints and the granularity of the interval you can change.
Now you might have noticed the same type of user interface on other types of picker, but using much more flexible data, such as city names. You’ll see how to build one of those in the next section.
In this chapter you’ve seen how to use the UIDatePicker to have a user experience that allows your users to input date and/or time values easily. The same user interface experience can be made available for any data, and in this section you’ll learn how to do that. This section is going to use delegates, and if you aren’t familiar with this technique, you should look back to Chapter 5 to review patterns and delegates.
Create a new single view application with Xcode and call it “uipickerDemo.” Open Main.storyboard and find the “Picker View” control, as seen in Figure 8-15.
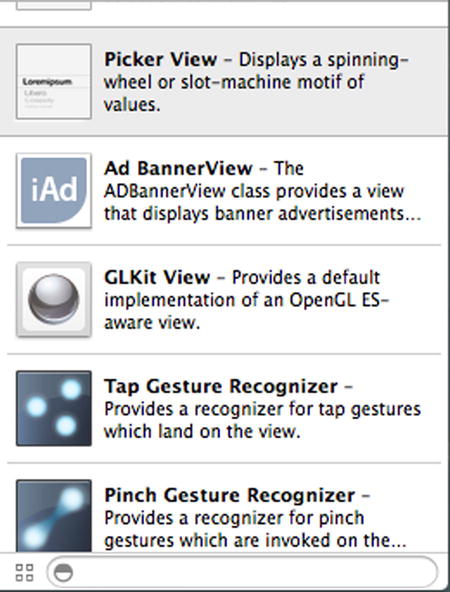
Figure 8-15. The UIPicker control, called “Picker View”
Drag and drop it onto the design surface of your view controller. It will get populated with some sample data, but this is only for design time to show you the dimensions of the control. When you run the app, this data will be blank; having the data at design time is useful to help you place controls around it. See Figure 8-16.
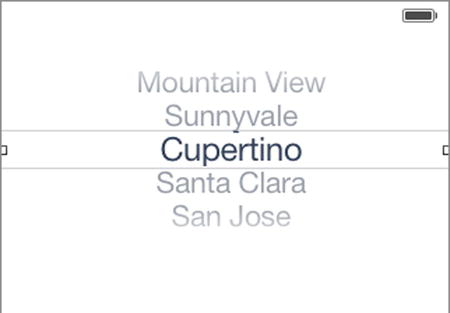
Figure 8-16. The UIPicker control with dummy data at design time
Before we start coding, there are just a couple more things you should do to the user interface. First, drag a label and place it below the “UIPicker” control. Make sure it’s full width. See Figure 8-17.
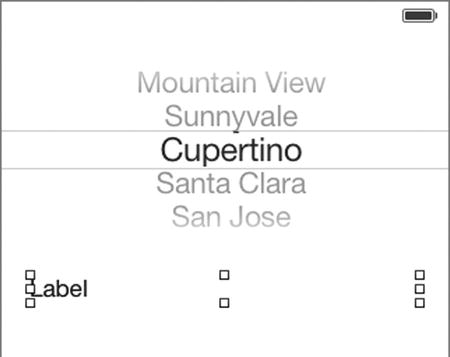
Figure 8-17. Adding an output label
Next you should create an outlet for the label, called “lblOutput,” and an outlet for the UIPicker, called “myPicker .”
In order to use custom data in a UIPicker, your app needs to be able to handle delegated functionality from the control, so your view should also have a data source for the control. To do this you use the same syntax as a delegate. So, edit your ViewController.h to add the delegate and the data source like this:
#import <UIKit/UIKit.h>

@interface ViewController : UIViewController<UIPickerViewDelegate, UIPickerViewDataSource>

@end
Now your ViewController.m can create the data for the UIPickerView, and it can accept events for the UIPickerView.
Now that you’ve configured your view controller to be a data source, you can add code to ViewController.m to set up how your UIPicker will look. To do this, you’ll create an NSArray and load it with a number of data items, which in this case will be the names of soccer teams.
Open ViewController.m and, right under the line that reads @implementation, declare your NSArray .
It should look like this:
@implementation ViewController
NSArray *teamNames;
This will make the “teamNames” array available to all functions in ViewController.m, which is perfect for our needs. Let’s initialize it with some data. We can do this in the viewDidLoad function.
You can initialize an NSArray using the initWithObjects message and passing it a list of objects, in this case strings, with a nil at the end. Here’s an example:
teamNames = [[NSArray alloc] initWithObjects:@"Liverpool",
                 @"Manchester United",
                 @"Manchester City",
                 @"Cardiff City",
                 @"Arsenal",
                 @"Chelsea",
                 @"Spurs", nil];
Also, in your viewDidLoad function, tell the picker that it’s going to use this view (a.k.a. self) as its delegate and data source. Here’s the full viewDidLoad function:
- (void)viewDidLoad
{
    [super viewDidLoad];
        // Do any additional setup after loading the view, typically from a nib.
    teamNames = [[NSArray alloc] initWithObjects:@"Liverpool",
                 @"Manchester United",
                 @"Manchester City",
                 @"Cardiff City",
                 @"Arsenal",
                 @"Chelsea",
                 @"Spurs", nil];
    _myPicker.delegate = self;
    _myPicker.dataSource = self;
}
When you configure a view as a data source, there are three functions that you need to implement in your view, otherwise your app won’t know how to set up your view. These are to set up the number of columns or components that the control will display, to set up the number of rows per component, and to set up the data to be rendered in a particular row within a component.
Setting the Number of Components
The first of these is to configure the number of components in the picker. This is the number of columns of data that the control will display. So, if you look back at the date picker, there were three columns—one for the day, one for the month, and one for the year. Similarly, the time picker had three columns—one for the hours, one for the minutes, and one for AM/PM.
When a view controller is a data-source delegate, it will call the numberOfComponentsInPickerView method automatically when it loads. You’ll need to implement it so it returns the number of components that you want. Fortunately Xcode makes it easy for you to do this.
Near the bottom of your code window, above @end, start typing –(NSInteger)n. You’ll notice that a hint pops up, prompting that you might want to insert the numberOfComponentsInPickerView function.
Note Sometimes Xcode doesn’t give you the popups as shown in Figure 8-18. If you encounter this, try closing and reopening Xcode.

Figure 8-18. Configuring the number of components
Press the “tab” key and the rest of the line will be written for you. All you have to do now is type the braces (the curly brackets that look like { and } ), and the code, to return 1, like this:
-(NSInteger)numberOfComponentsInPickerView:(UIPickerView *)pickerView
{
    return 1;
}
If you want more than one column, you can just return a different number. But as our sample only has one column, which allows us to pick a soccer team, we’ll return a 1 here. In the next section, you’ll see how to specify the number of rows.
Setting the Number of Rows
Next, your UIPicker needs to know how many rows of data it should render. If you look back to where we created the data, we created seven items in the array, so we want the UIPicker to give us seven items to choose from. Similar to the number of rows, there’s a function we need to write that tells the view how many rows we’ll have. This function is called numberOfRowsInComponent. This is because each component (a.k.a. column) will have a number of items, and not every column will have the same number. Consider, for example, the time picker. The hours component will have twelve items, the minutes will have sixty, and the AM/PM will have two. Thus, each will need to be configured separately, and when a UIPicker has more than one component, the function numberOfRowsInComponent will be called multiple times—once for each component.
You’ll typically check the component number and return a value for the number of rows in that component. As we only have one component, it’s a little easier for us—we just need to return the length of our NSArray of teams.
To create the function, type –(NSInteger)p and the hint should pop up. See Figure 8-19.

Figure 8-19. The numberOfRowsInComponent function
Press the “tab” key and the function will be written for you. Now all you need to do is create the return value. We have seven items in our array, so we could return “7,” but it’s a bit nicer to return the count of items of the array. That way if we change the array later, we don’t need to know how many items are in it. To do this, you can edit the method to return the count of your array.
Here’s the code:
-(NSInteger)pickerView:(UIPickerView *)pickerView numberOfRowsInComponent:(NSInteger)component
{
    return [teamNames count];

}
Now you’ve told your picker how many columns and how many rows, so the next and final step in setting it up is telling it what data should go in each item. You’ll see that in the next section.
Setting the Values for Rows and Components
Each component (or column) in your UIPicker has a number of rows. You specified the number of columns and the number of rows per column in the previous sections. To set the text for the row title, you use the titleForRow function. As your view loads, this function will be called for every row in every component. You’d typically have to check the number of the component and the number of the row and return a string for what should data should go into that particular row and component.
As we only have one component, it’s a bit easier for us; we just need to return element X on our team names array for row X on our UIPicker.
To write the function, start typing -(NSString *)p, and the hint will pop up for this function. See Figure 8-20.

Figure 8-20. Setting the titleForRow function
As before, press the “tab” key, and the function will be filled out for you.
This function passes in a parameter row, which is the number of the row we want to fill data out for. Our NSArray object allows us to pull a string out of the array using the objectAtIndex message. So, if we pass that the row value, we can get that element on our array. Thus, row 0 on the picker will be element 0 on the array, row 1 on the picker, row 1 on the array, and so on.
To do this in code, we just use the following message:
-(NSString *)pickerView:(UIPickerView *)pickerView titleForRow:(NSInteger)row forComponent:(NSInteger)component
{
    return [teamNames objectAtIndex:row];
}
And that’s everything needed to set up the data source for the picker. Now, all we need to do is determine whatever the user picked. As the UIPicker control delegated to the view controller, we need to write a method to catch the event.
Handling Delegated Events on the UIPicker
Now that you’ve created the data, your UIPicker will render your data for you. But we also want to make the control useful, so that we know what the user has selected. To do this, you have to write the didSelectRow function. When the user selects an item, this function will be called by the delegate, and it will tell the function which row and which component were picked.
To implement it, start typing –(void)p, and a hint will appear. There are a few void functions that begin with the letter “p,” but Xcode is smart enough to figure out that you probably want didSelectRow . See Figure 8-21.
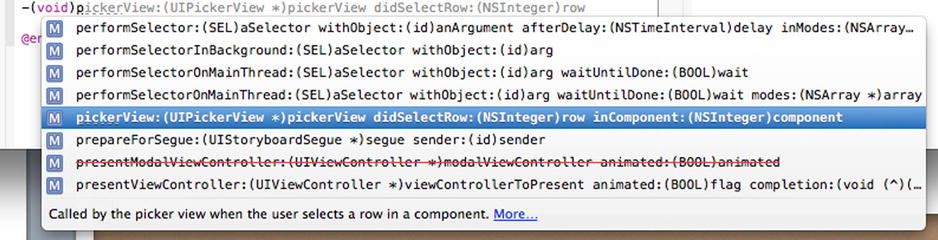
Figure 8-21. The didSelectRow function hint
Press “tab” a couple of times and the code will be filled out for you. The function knows the row that will be selected, and, if you remember from the previous section, we set it up so that row X in the picker has the data from element X in the array. So, to set the output label to the name of the team that was picked, you just need to use code like this:
-(void)pickerView:(UIPickerView *)pickerView didSelectRow:(NSInteger)row inComponent:(NSInteger)component
{
    _lblOutput.text = [teamNames objectAtIndex:row];
}
Before running the app, just double check that you have ViewController.h looking like this:
#import <UIKit/UIKit.h>

@interface ViewController : UIViewController<UIPickerViewDelegate, UIPickerViewDataSource>

@property (strong, nonatomic) IBOutlet UIPickerView *myPicker;
@property (strong, nonatomic) IBOutlet UILabel *lblOutput;

@end
ViewController.m should look like this:
#import "ViewController.h"

@interface ViewController ()

@end

@implementation ViewController
NSArray *teamNames;

- (void)viewDidLoad
{
    [super viewDidLoad];
        // Do any additional setup after loading the view, typically from a nib.
    teamNames = [[NSArray alloc] initWithObjects:@"Liverpool",
                 @"Manchester United",
                 @"Manchester City",
                 @"Cardiff City",
                 @"Arsenal",
                 @"Chelsea",
                 @"Spurs", nil];
    _myPicker.delegate = self;
    _myPicker.dataSource = self;
}

- (void)didReceiveMemoryWarning
{
    [super didReceiveMemoryWarning];
    // Dispose of any resources that can be recreated.
}

-(NSInteger)numberOfComponentsInPickerView:(UIPickerView *)pickerView
{
    return 1;
}

-(NSInteger)pickerView:(UIPickerView *)pickerView numberOfRowsInComponent:(NSInteger)component
{
    return [teamNames count];
}

-(NSString *)pickerView:(UIPickerView *)pickerView titleForRow:(NSInteger)row forComponent:(NSInteger)component
{
    return [teamNames objectAtIndex:row];
}

-(void)pickerView:(UIPickerView *)pickerView didSelectRow:(NSInteger)row inComponent:(NSInteger)component
{
    _lblOutput.text = [teamNames objectAtIndex:row];
}
@end
If you’re all good, run the app, and you should see something like Figure 8-22.
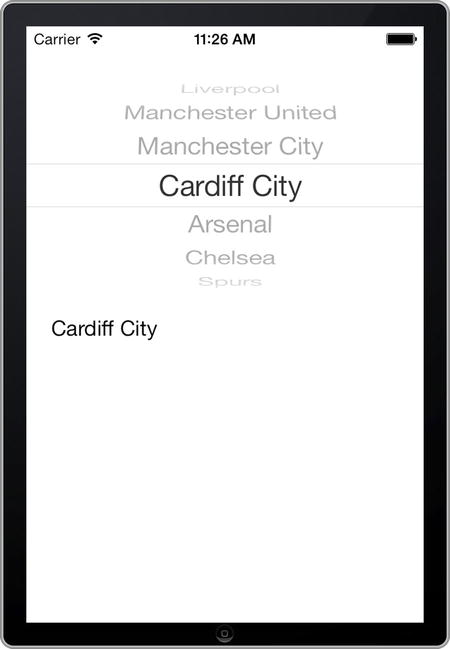
Figure 8-22. Running the custom UI picker
When the user selects an item, the label is set to the team for that item.
This was a simple case with a single column. In the next section you’ll see how to edit the picker for multiple components.
Using a Multi-component UIPicker
In the previous sections you built a custom UIPicker with a single column that allowed you to pick a data item that you specified. In this section you’ll take that to the next level, making a multi-column picker.
For multiple columns, you will have multiple items of data. Earlier, we created an NSArray of teamNames, with seven teams in it. Now let’s create another one, containing predicted outcomes for teams at the end of the season.
Under the declaration of teamNames, add a new one for teamPredictions, like this:
@implementation ViewController
NSArray *teamNames;
NSArray *teamPredictions;
Then, in viewDidLoad, set up the array of predictions, like this:
teamPredictions = [[NSArray alloc] initWithObjects:@"will be champions.",
                       @"will qualify for Europe",
                       @"will win the FA Cup",
                       @"will be relegated", nil];
There are only four entries here, and the teams array has seven entries, so we can demonstrate components of different size in the numberOfRowsInComponent function later.
Here’s the entire viewDidLoad function:
- (void)viewDidLoad
{
    [super viewDidLoad];
        // Do any additional setup after loading the view, typically from a nib.
    teamNames = [[NSArray alloc] initWithObjects:@"Liverpool",
                 @"Manchester United",
                 @"Manchester City",
                 @"Cardiff City",
                 @"Arsenal",
                 @"Chelsea",
                 @"Spurs", nil];

    teamPredictions = [[NSArray alloc] initWithObjects:@"will be champions.",
                       @"will qualify for Europe",
                       @"will win the FA Cup",
                       @"will be relegated", nil];

    _myPicker.delegate = self;
    _myPicker.dataSource = self;
}
Next you’ll have to update the number of components, because we’ll have two columns, one for the team and one for the predictions.
Updating the Number of Components
Earlier we had only one component in our UIPicker, the list of teams, so our function returned the value 1. Now we have two, one for the teams and one for the predictions, so we need to update the numberOfComponentsInPickerView method to return a value of 2 instead.
Here’s the code:
-(NSInteger)numberOfComponentsInPickerView:(UIPickerView *)pickerView
{
    return 2;
}
And now the app will know that the UIPicker will be created with two columns.
Updating the Number of Rows per Column
The numberOfRowsInComponent function takes in a parameter component for the current component. So, when we create a UIPicker with two components (or more), this function will be called once for each component. You saw in the last section that we returned 2, so the numberOfRowsInComponent method is going to be called twice, once with the component value of 0 and once with the component value of 1. Depending on this value, we can then return the correct number of rows. When the component parameter is 0, we have one row for each of the team names, and when it is 1, we have one row for each of the predictions, which we can do in code, like this:
-(NSInteger)pickerView:(UIPickerView *)pickerView numberOfRowsInComponent:(NSInteger)component
{
    int numberOfRows;
    switch(component)
    {
        case 0:
            numberOfRows = [teamNames count];
            break;
        case 1:
            numberOfRows = [teamPredictions count];
            break;
    }
    return numberOfRows;
}
We create an integer called numberOfRows and then set it to the count of either teamNames or teamPredictions based on the component parameter.
The titleForRow function is called once for each row in every component, and it expects you to return the string that will be put in that row for that component. It gives you parameters row and column that you can use to determine which data you want to use. We can use this to return the teamNames when the column is 0 and the teamPredictions when the column is 1.
Here’s the code:
-(NSString *)pickerView:(UIPickerView *)pickerView titleForRow:(NSInteger)row forComponent:(NSInteger)component
{
    NSString *title;
    switch(component)
    {
        case 0:
            title = [teamNames objectAtIndex:row];
            break;
        case 1:
            title = [teamPredictions objectAtIndex:row];
            break;
    }
    return title;
}
Catching the Selection
Before going further, add another label to Main.storyboard and create an outlet for it called “lblOutput2 .”
Now you can update the didSelectRow function to update one label when the “teams” component is picked and the other when the “predictions” component has a selection. Here’s the code:
-(void)pickerView:(UIPickerView *)pickerView didSelectRow:(NSInteger)row inComponent:(NSInteger)component
{
    switch(component)
    {
        case 0:
            _lblOutput.text = [teamNames objectAtIndex:row];
            break;
        case 1:
            _lblOutput2.text = [teamPredictions objectAtIndex:row];
            break;
    }

}
Now when you run your app, you’ll see that the picker has two components, and based on what you select, the user interface will be updated. See Figure 8-23.
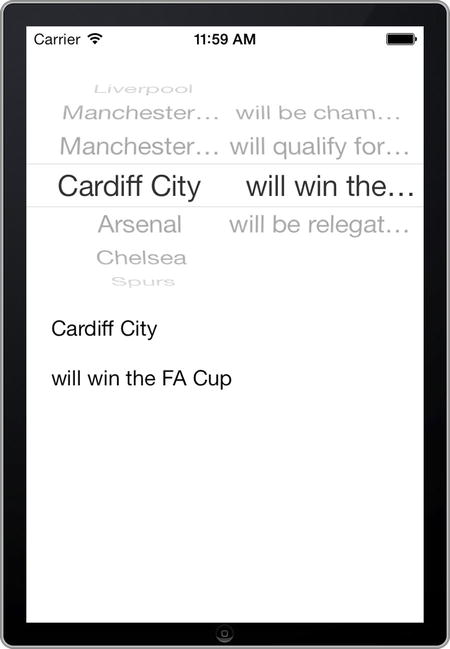
Figure 8-23. The multi-column picker
This isn’t the friendliest, because the text is heavily cropped. The UIPicker delegate offers a function called viewForRow that allows you to override the view that is used to render each text “cell,” which is a pretty advanced technique. As this is a beginners’ book, we won’t go into the details, but if you want to tidy up the UI for this application, you can do so with the following code:
-(UIView *)pickerView:(UIPickerView *)pickerView viewForRow:(NSInteger)row forComponent:(NSInteger)component reusingView:(UIView *)view
{
    UILabel* tView = (UILabel*)view;
    if(view==nil)
    {
        tView = [[UILabel alloc] initWithFrame:CGRectZero];
        switch(component)
        {
            case 0:
                tView.text = [teamNames objectAtIndex:row];
                break;
            case 1:
                tView.text = [teamPredictions objectAtIndex:row];
                break;
        }
        [tView setTextAlignment:NSTextAlignmentCenter];
        tView.adjustsFontSizeToFitWidth = YES;
    }
    return tView;
}
Using this, if you run the app, you’ll see that the text is automatically sized to fit the available space. You can see this in Figure 8-24.
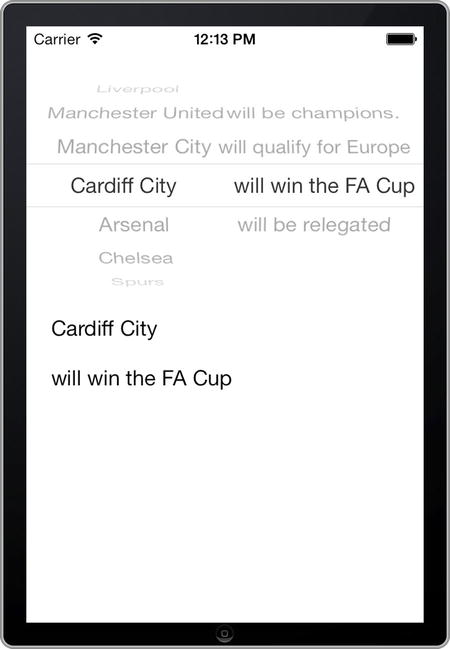
Figure 8-24. The tidied-up UIPicker
For the sake of completeness, here’s the code for ViewController.h with the multi-component UIPicker:
#import <UIKit/UIKit.h>

@interface ViewController : UIViewController<UIPickerViewDelegate, UIPickerViewDataSource>

@property (strong, nonatomic) IBOutlet UIPickerView *myPicker;
@property (strong, nonatomic) IBOutlet UILabel *lblOutput;
@property (strong, nonatomic) IBOutlet UILabel *lblOutput2;

@end
Here’s ViewController.m:
#import "ViewController.h"

@interface ViewController ()

@end

@implementation ViewController
NSArray *teamNames;
NSArray *teamPredictions;

- (void)viewDidLoad
{
    [super viewDidLoad];
        // Do any additional setup after loading the view, typically from a nib.
    teamNames = [[NSArray alloc] initWithObjects:@"Liverpool",
                 @"Manchester United",
                 @"Manchester City",
                 @"Cardiff City",
                 @"Arsenal",
                 @"Chelsea",
                 @"Spurs", nil];

    teamPredictions = [[NSArray alloc] initWithObjects:@"will be champions.",
                       @"will qualify for Europe",
                       @"will win the FA Cup",
                       @"will be relegated", nil];

    _myPicker.delegate = self;
    _myPicker.dataSource = self;
}

- (void)didReceiveMemoryWarning
{
    [super didReceiveMemoryWarning];
    // Dispose of any resources that can be recreated.
}

-(NSInteger)numberOfComponentsInPickerView:(UIPickerView *)pickerView
{
    return 2;
}

-(NSInteger)pickerView:(UIPickerView *)pickerView numberOfRowsInComponent:(NSInteger)component
{
    int numberOfRows;
    switch(component)
    {
        case 0:
            numberOfRows = [teamNames count];
            break;
        case 1:
            numberOfRows = [teamPredictions count];
            break;
    }
    return numberOfRows;
}

-(NSString *)pickerView:(UIPickerView *)pickerView titleForRow:(NSInteger)row forComponent:(NSInteger)component
{
    NSString *title;
    switch(component)
    {
        case 0:
            title = [teamNames objectAtIndex:row];
            break;
        case 1:
            title = [teamPredictions objectAtIndex:row];
            break;
    }
    return title;
}

-(void)pickerView:(UIPickerView *)pickerView didSelectRow:(NSInteger)row inComponent:(NSInteger)component
{
    switch(component)
    {
        case 0:
            _lblOutput.text = [teamNames objectAtIndex:row];
            break;
        case 1:
            _lblOutput2.text = [teamPredictions objectAtIndex:row];
            break;
    }

}

-(UIView *)pickerView:(UIPickerView *)pickerView viewForRow:(NSInteger)row forComponent:(NSInteger)component reusingView:(UIView *)view
{
    UILabel* tView = (UILabel*)view;
    if(view==nil)
    {
        tView = [[UILabel alloc] initWithFrame:CGRectZero];
        switch(component)
        {
            case 0:
                tView.text = [teamNames objectAtIndex:row];
                break;
            case 1:
                tView.text = [teamPredictions objectAtIndex:row];
                break;
        }
        [tView setTextAlignment:NSTextAlignmentCenter];
        tView.adjustsFontSizeToFitWidth = YES;
    }
    return tView;
}

@end
Hopefully you’ve been able to keep up, because you are getting into some complex stuff. Not bad for a beginner!
Summary
In this chapter you learned about pickers and how to use the date picker to do date and time selection. You explored a custom picker, using the delegate and data source to put custom data in the picker and capture user input. You saw how you can easily extend this for multiple components and how to capture data back from it.
In the next chapter, you’ll look at what is perhaps the most common component used in iOS applications—the table view.