
Depending on the size of your iPhoto Library (or libraries; I talk about multiple iPhoto libraries in Chapter 3), you might have a difficult time finding that one photo you're looking for. You can organize your photos in lots of ways so that the iPhoto main window doesn't look so cluttered. (See Chapters 4 and 5.) When you're searching, somewhere within all that organization is the one photo you're looking for. The question is how to find it easily and efficiently.
The good news is that this chapter shows you a number of ways to find what you're looking for — including one I tell you about that isn't really documented.

The chapter concludes with helping you ensure that you'll always have something to search for. I know you've probably heard that backing up is vital — I'm restating the obvious. But believe me, the exasperation you might feel at having this repeated to you is nothing compared with the feeling of despair and helplessness you'll experience when you search for a photo you cherish only to find out that it has disappeared and is irretrievable.
In this chapter, I first show you some search methods. Then, I deal with backup techniques to keep your precious photos safe.
Whether your iPhoto Library is very large, it's always a good idea to have the capability of searching quickly for the photo or photos you need to find. iPhoto's capabilities allow you to search using text, keywords, dates, and ratings, in addition to some more complex search methods. (See the section "Constructing Complex Keyword Searches" later in this chapter.)
Tip
For any search, if you have knowledge that the photo you're looking for is in a particular Event (or any other type of grouping, such as Faces, Places, Albums, or folders), you can narrow the search by concentrating on just that Event.
Tip
Before performing your search, it's also helpful to choose View from the iPhoto menu and select the options to have iPhoto display titles, keywords, and rating for each photo. This allows you to get more information from the search, and it can help you more easily decide when you have what you want.
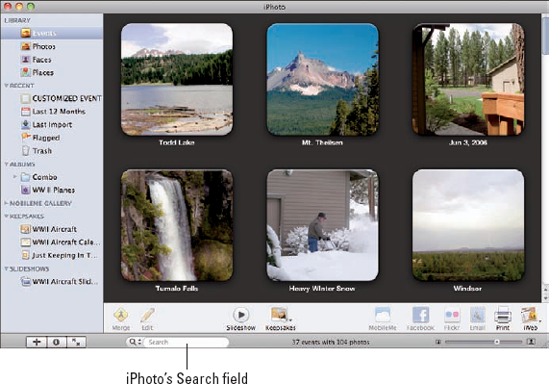
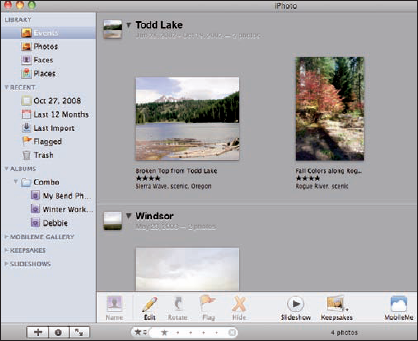
You use the Search field located beneath the iPhoto toolbar at the bottom of the iPhoto main window (see Figure 6-1) to search the Library for photos. To search for text assigned to a photo, you must select All from the Search field pop-up menu. iPhoto then searches the title, description, keywords, and rating of the photos in the Library for the text you key in. As you're typing text in the Search field, iPhoto works with whatever you've typed and finds as many photos that match.
To find a photo using text, follow these steps:
Select Photos from the Source list to set the scope of the search.
You can narrow the focus of the search by selecting another Source in the list, such as Events or Last 12 Months, if you're sure that what you're looking for is contained there.
Choose the All option from the Search field pop-up menu. Then, in the Search field, type the word or phrase that you're searching for.
For this example, I'm searching for the word winter.
iPhoto begins to display photos that match the term you're entering after just a few letters.
As shown in Figure 6-2, I've typed only win, and iPhoto is already starting to find and retrieve photos. At the bottom of the window, you see that eight photos qualify at this point. They have the letters win in their titles, descriptions, dates, keywords, and/or ratings.
To guarantee that you get only results that perfectly match your search, finishing typing the entire search term.
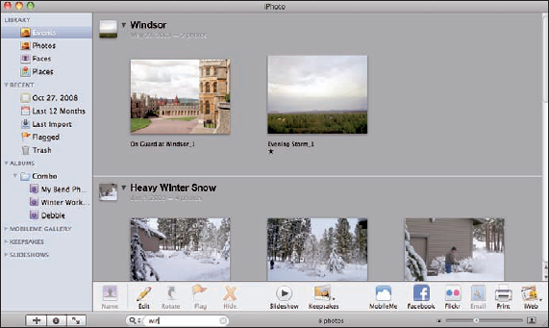
As you can see in Figure 6-3, I added another letter to the Search field (it now reads wint), and the search continues to narrow the results.
Continue typing the search term until the photo(s) that you're looking for is displayed in the results.
Tip
You might find the photo(s) that you're looking for after typing just a few letters, but typing all the letters in your search term provides exact results.
To cancel the search and begin again, simply click the Reset button (the X in the far-right side of the Search field).

What about searching for photos based on other types of photo properties? You continue to use the Search field and set its pop-up menu to those properties you want to search. Read on.
Say, for instance, you want to search for a photo based on a certain date. To do so, follow these steps.
In the Source list, choose the Source you want to search within, such as Events or Photos.
Set the pop-up menu in the Search field to Date.
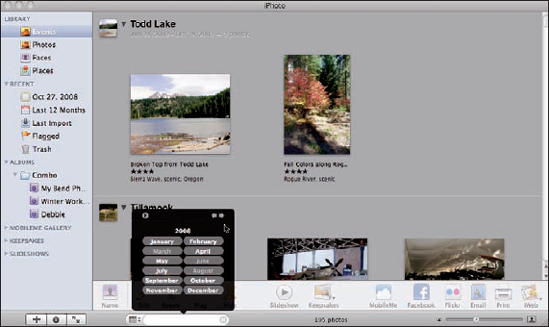
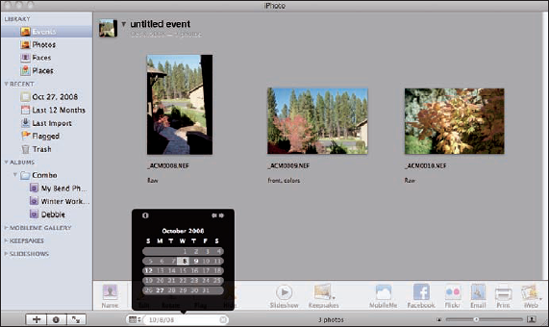
You'll see all the months for a particular year listed. If you don't, just click the small button in the top-left corner of the calendar, and the year appears. The months that are highlighted actually have photos in your Library with those dates, as shown in Figure 6-4.
Choose a month to search by clicking it.
Use the right arrow and the left arrow at the top-right side of the calendar to cycle through the months of the year. As you might have guessed, highlighted dates mean that you have photos for those dates. See Figure 6-5.
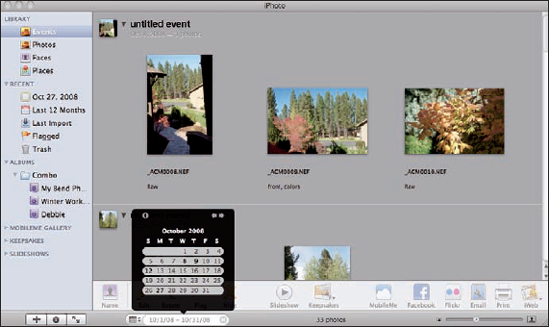
Click a day in the month, and the photos that match appear, as shown in Figure 6-6.
To select more than one consecutive date, press and hold the Shift key and then select the beginning and ending date.
All dates between the beginning and ending date are automatically be selected, and the search results are displayed.
To select nonconsecutive dates, press and hold the
key and then select dates.
Only the dates selected are highlighted, and the displayed results encompass only those dates.
To cancel the search and begin again, simply click the Reset button (the X in the far-right of the Search field).
You have to admit that even just searching by text or date can make retrieving your photos of interest a lot easier. But there's more. Read on for details on keyword searching.
Keywords are labels that you can add to your photos to provide additional information about the subject of the photo — and, more importantly, make searches for particular photos more efficient.
Note
Keywords are usually added to photos when you import them into iPhoto, but you can also add or edit them at any time. (See Chapter 3 for instructions.) Why edit them? Well, during import, you might add many keywords at one time, and it could be that you misspelled a few. (You won't get many search hits that way.) Or you might later discover that a keyword isn't specific enough, making the search less effective.
Okay, now I tell you how to use keywords to retrieve the photo or photos you want to find. To search based on keywords, follow these steps:
Select either Events or Photos from the Source list.
Set the pop-up menu in the Search field to select Keyword.
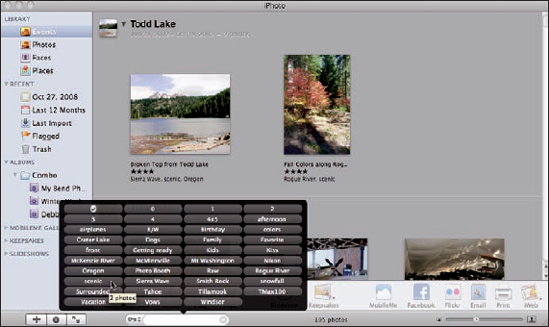
A list of all the keywords in your iPhoto Library appears.
Hover your mouse over each keyword, and the indicator tells you how many photos have that keyword, as shown in Figure 6-7.
Notice that because no keyword is selected at this point, the iPhoto main window shows all the Events and their content.
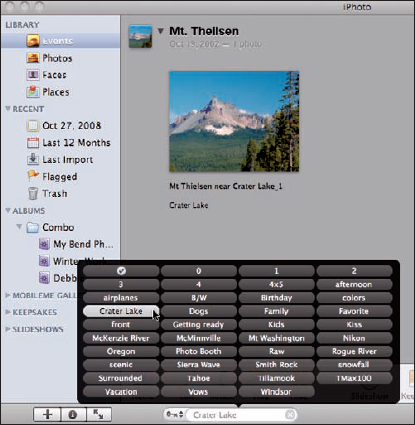
Select the keyword you wish to use for the search.
In this example, I clicked Crater Lake, and the photo with that keyword appeared, as shown in Figure 6-8.
To cancel the search and begin again, simply click the Reset button (an X on the right side of the Search field).
You can construct more complex keyword searches. See the "Constructing Complex Keyword Searches" section later in this chapter for more details.
iPhoto's Ratings scheme is based on 1–5 stars, and like most other properties for photos, you can set or change them at any time. The ratings are, of course, completely subjective, but they can help at editing time to cull those you think are worthy of further work. Setting the ratings is discussed in Chapter 3.
iPhoto gives you two ways to search based on ratings:
Choose elect All from the Search field pop-up menu. In the Search field, type the number of stars you're searching for.
Tip
You enter a star in the Search field by pressing Shift+8 on the keyboard.
Choose elect Rating from the Search field pop-up menu and click the number of stars you're searching for in the Search field.
Tip
It's important to realize that these two ways, although they seem very similar, provide different results, as I'm about to show you.
Here's how to perform a search based on ratings using the first method I just mentioned:
Make sure the pop-up menu for the Search field is set to All.
Press Shift+8 to begin entering the number of stars you want to search for.
iPhoto returns results for only those photos with exactly that rating.
Figure 6-9 shows a sample result for a one-star search.
This means that if you want to find an exact match to the rating entered, you should type it in. But what happens if you use the second method? iPhoto shows you all photos with the range of stars that you select. For example, you can choose to display all photos with at least three stars, which will show you all those photos with three, four or five stars.
To perform a search based on rating using the second method, follow these steps:
Set the Search field pop-up menu to Rating.
Using the mouse, click the first of the five indicators (they look like dots) in the Search field.
The indicator (dot) changes to a star. If you click the second indicator, the first two indicators change to stars, and so on.
iPhoto's results show all photos with at least one star, as shown in the example in Figure 6-10.
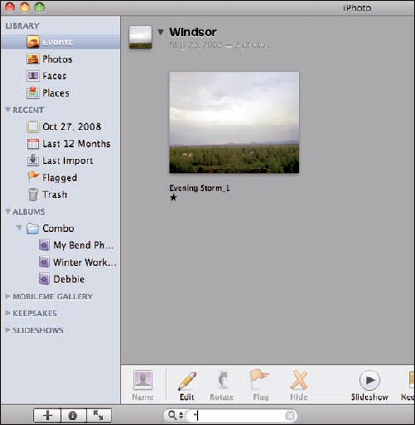
If you clicked the second indicator in Step 2, the results would show all photos with at least two stars. (Photos with only one star would not appear in the results.) That's quite a difference from the first method.
So, iPhoto gives you two methods for searching by Rating, one exclusive and one inclusive. Choose wisely when using these search methods.
There's a convenient new tool in the Places feature that allows searching based on the locations that you or the camera have set in your photos. It's quick and simple to use, and very handy. (See Chapter 3 for more information about using the Places feature.)
To search based on location, follow these steps:
Click Places in the Source list.
Click the right half of the View button on the toolbar to bring up the Location browser, as shown in Figure 6-11.
The Location browser lists all the locations that you or the camera have entered in your iPhoto Library.
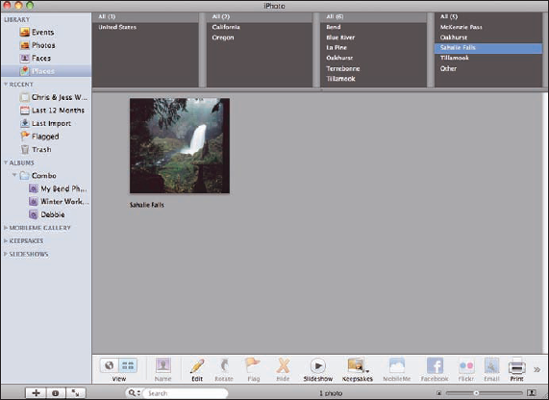
Click the location that you're searching for, and the results are displayed, as shown in Figure 6-12.

When the Location browser first appears, it shows all photos from all locations. Each column breaks the locations down further so that specific places and their associated photos are easier to find. In the example in Figure 6-12, the first column lists United States. The second column breaks down United States into California and Oregon: The country in column one is divided into that country's states in column two. You can see that column three breaks the states into cities, and column four breaks the cities into places within those cities.
One more tool (the complex Keyword search) can make your photographic life simpler and more efficient.
Earlier in this chapter, in the "Searching based on keywords" section, I mention a more complex keyword search. That section tells you how it's possible to use keywords to search for photos based on single and multiple keywords. But what if you need to be a little more exclusive than that? No problem. You can use three special keys to construct more complex keyword searches. The keys are
Shift key: Represents the logical operator OR
Option key: Represents the logical operator NOT
Control key: Represents the logical operator AND
This means that you can create a search that says something like, "Show me all the photos that have keywords scenic AND Oregon and NOT snowfall." In fact, I try that out in the steps that follow to show you what happens.
To perform a complex keyword search using the OR, NOT, and AND operators, follow these steps:
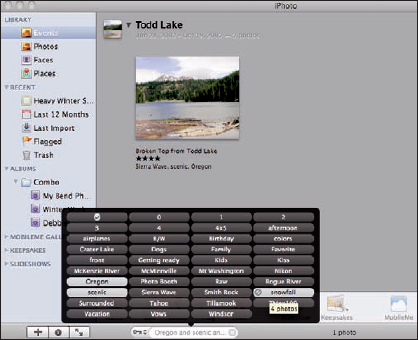
Choose Keyword from the Search field's pop-up menu, and then select a keyword.
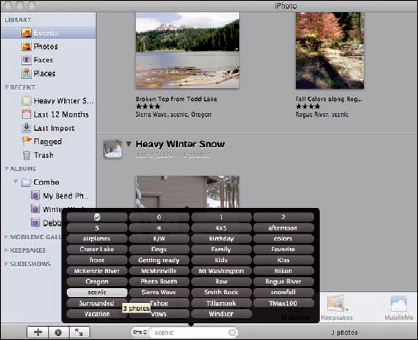
In this example, I selected scenic for the first keyword, and three photos match the search criteria so far, as shown in Figure 6-13.
Press and hold the Control key to add the AND operator, and then click the second keyword.
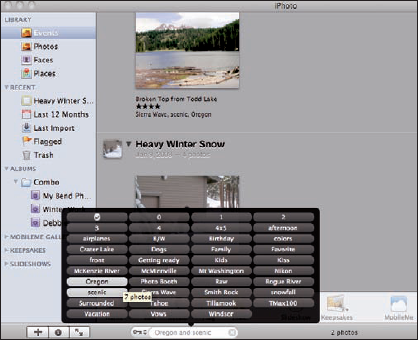
I selected Oregon for the second keyword. Because I held the Control key when selecting the second keyword, the AND operator is applied, and a search string of Oregon and scenic is created. The number of qualifying photos is now two, as shown in Figure 6-14.
Note
As you hover your mouse over a keyword, a white box appears telling you how many photos in the Library contain that keyword. When performing a complex keyword search, don't confuse this number with the number of photos in the Library that actually match the complex keyword search string. This number is listed as the Library totals. (Refer to the figure on the Cheat Sheet, located at the front of this book.)
Press and hold the Option key to add the NOT operator, and select the third keyword.
I selected snowfall for the third keyword. Because I held the Option key when selecting the third keyword, the NOT operator is applied, and the words and not snowfall are added to the end of the search string, thus cutting the number of qualifying photos to one, as shown in Figure 6-15.
Searching for particular photos in what may be a large iPhoto Library is a fairly common occurrence. iPhoto has great capabilities for finding exactly the photos you're looking for — if they exist. Ooh, maybe you haven't thought a lot about that situation, but I assure you that it's an all-too-common occurrence. You might have inadvertently deleted a photo, or maybe a software glitch corrupted part or all of the Library. If that's the case, it doesn't matter how extensive the search capabilities are in iPhoto; they just won't get you the results you want. So what can you do to prevent this? Back up your iPhoto Library regularly.
If you've been using iPhoto, you might have noticed that you haven't been using a Save command as you usually do with software packages. iPhoto does several things for you to make the environment more secure, including the following:
iPhoto automatically saves changes to anything you work on (a photo, Event, Album, and so on) as you work. This frees you to concentrate on your artistic endeavors rather than the administration of your Library. This is why there's no Save command in iPhoto.
iPhoto lets you revert to the original version of the photo. While you're working on a photo, you can choose Photos

iPhoto makes Library backup and switching easy. I discuss this in Chapter 3, but it's important enough to go over these details again. See the next section.
I can't emphasize enough the need to make Library backup something you routinely do. And it's a great opportunity to use iCal (or any other calendar software you use) to remind you to perform the backup. How often you do a backup is really an individual choice. Do it often enough to give you a warm and comfy feeling, whether that's once weekly, once monthly, or once every three months. The more valuable your photos, the more often you should back them up. And the more photos you upload between backup intervals, the more you have to lose.
The iPhoto Library is located on your computer in the Pictures folder, and it's aptly named iPhoto Library.
You can use any of these three main ways to back up your Library:
Copy the iPhoto Library to another disk.
Copy the iPhoto Library to a CD or DVD.
Use Apple's Time Machine software (if you're running Mac OS X version 10.5 or later) or another backup solution (like the Backup program that comes with MobileMe).
Copying onto another disk is fairly straightforward. Just follow these steps:
Go to your Pictures folder on your computer and select the iPhoto Library file.
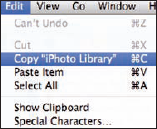
Choose Edit
Copy iPhoto Library, as shown in Figure 6-16.In the Finder, select the disk to which you want to copy, and then choose Edit
Paste Item.
This stores a copy of your iPhoto Library on the selected disk. Remember where this is. (You might want to put the copy into a new folder you create, called My iPhoto Backup or something similar.)
To copy your iPhoto Library onto a CD or DVD (depending on how large your Library is), do the following:
Go to your Pictures folder on your computer and select the iPhoto Library file.
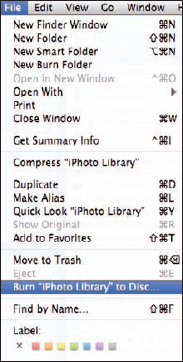
In the Finder, choose File
Burn iPhoto Library to Disc, as shown in Figure 6-17.When the Burn Disc dialog appears, insert an appropriate, blank disc.
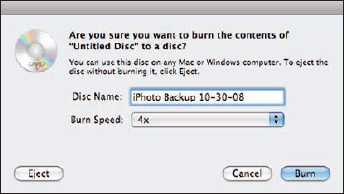
When the next dialog appears (see Figure 6-18), type a descriptive name for the CD or DVD in the Disc Name field, select an appropriate burn speed, and then click Burn.
Last, but certainly not least, you can do backups using Apple's Time Machine software, if you're running Mac OS X version 10.5 or later. You might already use it — in which case, there's nothing to do. Saving iPhoto and the Library is done at whatever interval you have set for Time Machine. Time Machine uses a separate hard disk to back up your entire hard disk — or some portion of it that you specify. It keeps
Hourly backups for the past 24 hours
Daily backups for the past month
Weekly backups until your backup disk is full
Tip
The operation of Time Machine is described under Mac Help on your Macintosh computer and on the Apple Web site. (Description of all Time Machine topics and uses are beyond the scope of this book — check one of the two mentioned locations. You can also check out Mac OS X Leopard All-in-One Desk Reference For Dummies, by Mark L. Chambers, Wiley.)
Accessing the backup information on Time Machine is easy. Follow these steps:
With iPhoto open, choose File
Browse Backups.When Time Machine opens, you can select dates in the past where a lost or corrupted photo exists and retrieve that information.