
Making an Album
Creating a Smart Album
Making changes in Smart Albums
Creating Smart Albums from Places and Faces
Arranging your albums
Adjusting photo order in an Album
Deleting photos from an Album
I'm sure many of us have turned pages in an old photo album (or at least have seen relatives doing so). You might wonder about the relevance for albums in the digital world in which we live. This chapter has the answer.
If you've read this book to this point, you already know about Events and how iPhoto organizes your imports into Event-specific groupings. The order inside an Event, though, is governed by the order of import into iPhoto. You can't really change that order after the fact. One of the benefits of an old, physical photo album was you could move your photos around until you had them in the order you wanted, and then paste them in place. In Events, you can't really do that — but with iPhoto's Albums feature, you can.
In addition to letting you manually change the order of photos, iPhoto's Albums let you put multiple, often related, Events or photos into one place. So, for instance, you might have several Events representing your child's birthdays over several years. With Albums, you can put them into one Album — say, called Johnny's Birthdays or Megan's Birthdays — and keep them all in one place, making them easy to find and view.
Take a look at how this all happens.
I want you to understand one very important point about Albums: No matter how many different Albums you put a photo into, the photo file is never stored in the iPhoto Library more than once. That means you're not wasting space when you place a photo in more than one Album. This also means that if you delete a photo from an Album, the photo is still in the iPhoto Library — and still in its original Event. Great stuff, huh?
Warning
The reverse is not true. If you delete photos or Events from your iPhoto Library, they will automatically be deleted from any Album(s) they are in.
Albums always appear in the same place in iPhoto, in the section called Albums, in the Source list. When you create an Album, you can either select the individual photos or Events to put in it, or create the Album first and then add photos and Events.
Tip
If you start by choosing an Event, the Album you create will have the name of the Event as its name with the word Album appended: for example, April's Birthday Album. Of course, you can change the name.
To create a standard Album without first selecting any photos or Events to place in it, follow these steps:
Click the Add (the + symbol) button (on the small toolbar in the bottom-left corner of the main iPhoto window).
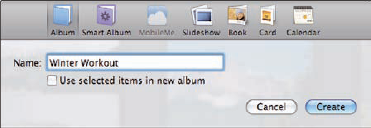
This brings up a dialog (shown in Figure 5-1). You can also choose File

Click the Album icon at the top of the dialog, type in the name you want to give the album (as shown in Figure 5-1), and then click the Create button.
Tip
The check box labeled Use Selected Items in New Album will be discussed shortly. For now, leave it unchecked.
The new Album is created and now appears under Albums in the Source list.
To add content to the new Album, select and drag it into the new Album in the Source list.
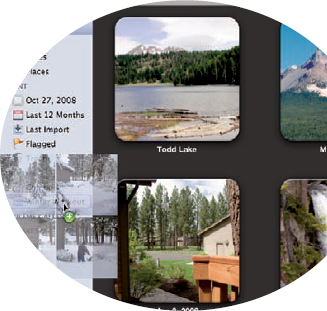
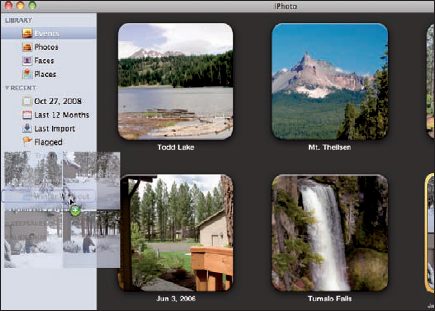
Figure 5-2 shows an Event selected and in the process of being dropped in the Album.
In addition to selecting an entire Event and dragging it onto the Album, you can add content to an Album by
Opening an Event, selecting just the photos, and dragging them onto the Album.
Clicking Photos in the Source List, choosing what photos you want from the entire Library, and dragging your selections onto the Album.
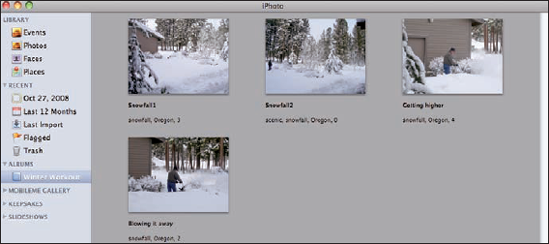
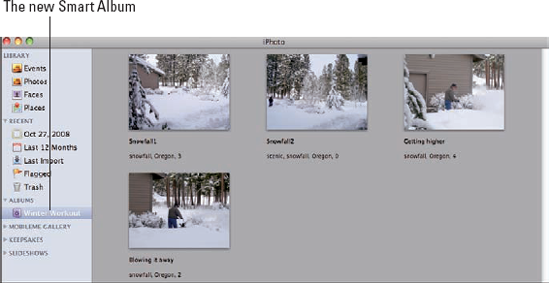
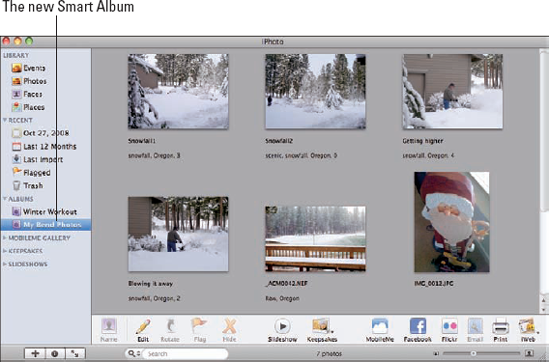
Figure 5-3 shows the resulting content of the Winter Workout album after dragging the one Event.
If you already selected the items you want to add into a new Album, follow these steps:
With the items you want to add to a new Album still selected, choose File
New Album from Selection. Or, click the Add button.The dialog shown in Figure 5-1 appears.
Type in the name you want to give the new Album, make sure that the Use Selected Items in New Album check box is selected, and then click Create.
The items you selected are added to the new Album, and the new Album's name appears in the Source list, under Albums.
Here are some other ways to get content into an Album:
Dragging from another Album: Dragging one or more photos from one Album into another will leave both Albums with the photos.
Dragging from a CD, DVD, or hard disk: Adding photos from a CD, DVD, or hard disk (drive) to an Album will also cause the photos to be automatically imported into the iPhoto Library, thus causing an Event (or Events) to be created as well. This happens because no photo can be in iPhoto unless it's in the Library and is an Event.
Dragging a folder of photos from the Finder into the Source list in iPhoto: This method actually creates a new Album instead of placing the content into an existing Album. The Album created will have the same name as the folder from the Finder. (This can be changed, of course.) Although all the photos will be in one Album, one or more Events will be created, depending on the Events Preferences settings for Autosplit into Events (see Chapter 2 for more details). If set for One Event Per Day, for instance, and the photos cover a span of two days, two Events will be created.
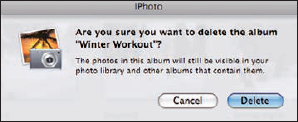
To delete an Album, select it in the Source list and do one of the following:
Drag the Album icon to the iPhoto Trash.
Right-click with your mouse (or Control-click) the Album icon and then choose Delete Album.
Choose Photos
Delete Album from the iPhoto menu.Performing any one of these actions will bring up the warning dialog shown in Figure 5-4.
Note
Deleting an Album or any photos in an Album does not delete anything from the iPhoto Library, as shown in Figure 5-4.
The problem with Albums is that you must decide on the content it contains and manually make any modifications to the content either by adding or removing photos. Wouldn't it be nice if you could decide, just once, what kind of photos you want to be in the album and forever after iPhoto would take care of things automatically? Well, your wish has been answered, and that answer is Smart Albums.
Smart Albums allow you to fill them with specific photos from your iPhoto Library, both now and in the future, based on such parameters as specific keywords, ratings, the specific type of camera, shutter speed, date captured, Faces, Places, and many more.
As you can imagine, the possibilities are nearly endless. And the best part is that this is all done automatically: Photos that qualify are added; those that don't qualify aren't. No dragging or selecting of individual photos is necessary.
Note
If you haven't already, create useful keywords for your photos so the Smart Album has something to work with. Adding and editing keywords is discussed in Chapter 3.
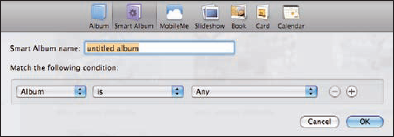
To create a Smart Album, follow these steps:
Click the Add (the + symbol) button to open the dialog shown in Figure 5-5. Then click the Smart Album icon at the top of the dialog.
Tip
You can also choose File
Type a name for the Smart Album.
I'm calling mine Winter Workout.
Begin to set up your photo-candidate expressions — filters — for the Smart Album by making a selection from the first pop-up menu.
Each expression contains an entry from each of the pop-up menus and tells iPhoto what photos qualify to be in this particular Smart Album, now and in the future. Be aware that even if you select a number of photos for a Smart Album but some of them don't fulfill the expression, they won't appear in the Smart Album.
I'm going to choose Keyword as the first part for this example. Some other choices are filename, title, date, place, description, camera model, and quite a few more.
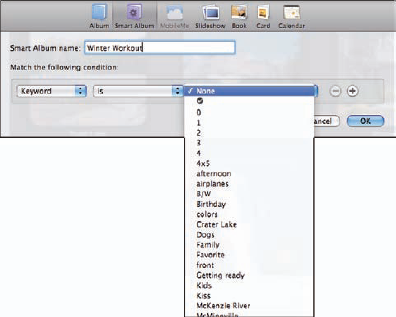
Select a verb from the second pop-up menu.
These choices will vary, depending on your choice from the first menu.
I'm going to select Is, for this example.
Tip
What the third pop-up menu contains is dependent upon the selections you make in the first two pop-up menus. Because I chose Keywords and Is, the third pop-up menu contains a listing of all the keywords that have been used in my iPhoto Library, as shown in Figure 5-6. Your list will be different.
Make a selection from the third pop-up menu.
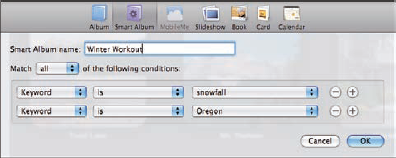
I'm selecting Snowfall. Suppose you want to have several expressions that must be satisfied before a photo can appear in the Smart Album? No problem.
Click the Add (the + symbol) button to the right of the expression you just completed to add another expression to the Smart Album.
Again, choose from the three pop-up menus to complete the expression. For this example, I made a second expression by choosing Keyword, Is, and Oregon. Figure 5-7 shows the two expressions for the Smart Album.
When you add a second expression, a new pop-menu appears above the expressions. This menu gives you the choice of whether All or Any of the expressions have to be true for the photo to qualify for inclusion. In Figure 5-7, it's set for All, which means that both expressions must be true.
Click OK when you're finished adding expressions and ready to create the Smart Album.
The Smart Album with the name you assigned will be created in the Source list and populated, automatically, with every photo in the iPhoto Library that satisfies the expressions you created, as shown in Figure 5-8.
Tip
The icon for a Smart Album has a gear on it to make it easier to distinguish.
This is very cool stuff, and it just keeps getting better. The Smart Album gets updated automatically and instantly whenever a photo that matches your Smart Album settings (in the example, it would be the keywords of Snowfall and Oregon) is added or removed from your iPhoto Library. If you find another photo that belongs in a Smart Album, make the necessary edits to meet the Smart Album's conditions, and it will be added to the Smart Album (in the example, it would require adding the keywords Snowfall and Oregon to the photo in the Library).
Tip
Because of this capability, I recommend adding keywords, Places, Faces, or any other descriptor to all your photos when you import them (see Chapter 3 for more details). Then later, when you want to get them into separate Albums, just make your Smart Album settings, and it's done.
There are several ways to edit the content of Smart Albums. When you edit a photo in your iPhoto Library, as soon as you exit Edit mode, iPhoto replaces the previous version of the photo in your Smart Album(s) with the new, edited version of the photo. You never have to worry about getting things out of sync. You can also change a Smart Album's expressions to edit the content it contains.
To edit the expressions of a Smart Album, follow these steps:
From the Source list, select the Smart Album you want to change and then choose File
Edit Smart Album.You can also right-click (Control-click) the Smart Album in the Source list and then choose Edit Smart Album.
The dialog (refer to Figure 5-7) opens, from which you can change, add, or remove expressions to change the content of the album.
To change an expression, use the pop-up menus and choose a different item from the list.
To add an expression, click the Add (the + symbol) button next to an expression and begin entering the information for a new expression.
To remove an expression, click the Remove (the – symbol) button next to the expression. It will be removed.
Click OK when you're finished — and watch the fun begin.
Depending on how you set your expressions in Step 2, the number of photos in the Smart Album will increase, decrease, or go to zero.
Among the newer capabilities in iPhoto are technologies called Places and Faces. (I discuss these in detail in Chapters 3 and 4.) With these capabilities, you can create Smart Albums that automatically contain only photos of particular people or locations. How great is that?
Note
In Chapter 3, I discuss that in order to see and use the Maps capability in Places, you must be connected to the Internet. You might want to read that chapter (if you haven't already) or at least keep that fact in mind.
To use Places (when you're connected to the Internet) to create a Smart Album, follow these steps:
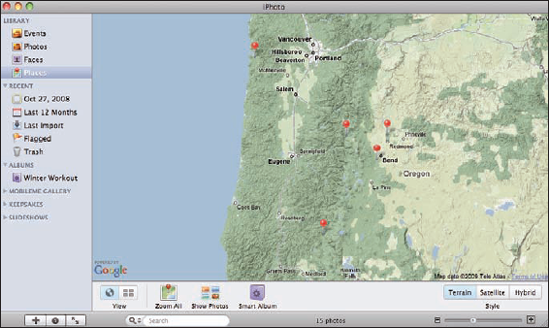
Select Places from the Source list.
Make sure the View button in the bottom-left corner of the Places pane has the left side of the button (World View) selected.
You see a map showing pins at locations for your photos that have GPS information, as shown in Figure 5-9.
Tip
Notice in Figure 5-9 the Zoom All button on the toolbar. This is used when you want to see all the pins for all the locations you have set. When you click this button, the map automatically zooms out and shows all your pin locations.
Click the Show Photos button to change the pane from displaying the map to display all the photos for the locations that were currently visible on the map. Very handy. To go back to Map view, click the large arrow icon named Map in the upper-left corner of the pane.
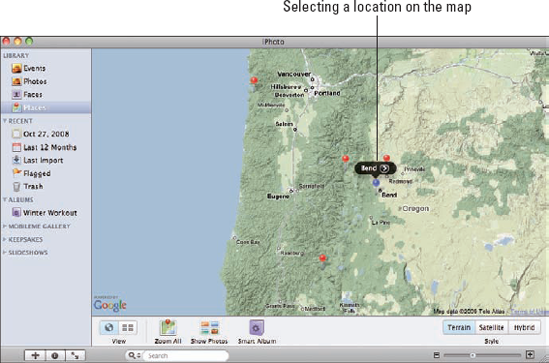
With the map displayed in the pane, select a specific location by clicking the appropriate red pin.
The pin turns blue, and the location attached to it will show up, as shown in Figure 5-10.
Tip
If you want to use a region or country instead of a specific Place pin to create a new Smart Album, use the zoom slider in the bottom-right corner to zoom in and out, and then drag the map around until only those locations you're interested in are showing on the map (as shown in Figure 5-11).
Click the Smart Album button at the bottom of the pane.
A new Smart Album appears in the Source list, and the pane displays the photos it contains.
Type a different name for the Smart Album.
In the example in Figure 5-12, I named the Smart Album with the name of the location where the photos were taken.


If you're not connected to the Internet, don't worry. Even though the map won't display in the Places pane, you can still create Smart Albums using the Places feature by following these steps:
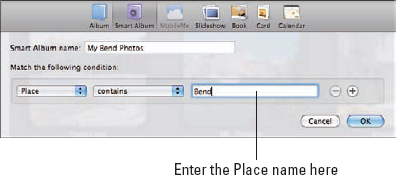
Click the Add (the + symbol) button.
In the dialog that opens, click the Smart Album icon at the top of the dialog, type a name for the Smart Album, and set the expression for the Smart Album (see Figure 5-13) as follows:
Choose Place from the first pop-up menu.
Choose Contains from the second pop-up menu.
Type the name of the place on which you want to base the Smart Album.
Click OK.
A new Smart Album appears in the Source list, as shown in Figure 5-14.
What a great way to organize photos from different locations — and it's easy, too! Like all Smart Albums, as photos get added to your Library with these locations, they're automatically added to the appropriate Smart Album.
So, how about Smart Albums for Faces? Yes, iPhoto has them, too. Again, there are three ways to use Faces to create Smart Ablums. Here's the first way:
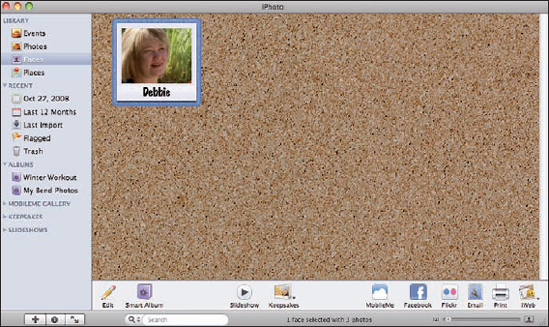
Select Faces in the Source list to open the Faces pane, as shown in Figure 5-15.
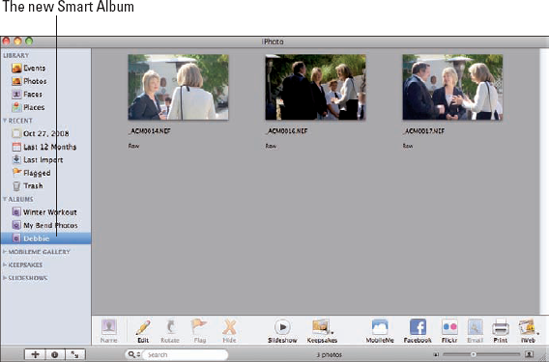
The easiest way to create a Smart Album is to drag the Faces tile (in the example, Debbie) to an empty space in the Source list (in this case, at the bottom of the Source list).
Magically, a Smart Album named Debbie appears under Albums, as shown in Figure 5-16.
Couldn't be easier.
The second way to use Faces to create a Smart Album is to select the Faces tile of the person from the Faces pane and then click the Smart Album button at the bottom on the toolbar. The results are identical — a new Smart Album based on the selected Face is created.
The last way to do this is the same way I show you how to create regular Smart Albums, earlier in this chapter:
Click the Add (the + symbol) button.
Click Smart Album icon on the top of the dialog and then type a name.
Choose Name from the first pop-up menu, Contains from the second menu, and then type the name of the person in Faces that you want to create the Smart Album for.
Tip
If you want to collect photos that have more than one person, make sure you set the Match pop-up menu to
Any: To collect photos that show any of the named people
All: To show only photos where all named people are present
To add more people, click the plus sign next to your first condition and repeat Step 3.
Click OK.
The Smart Album appears.
Using Faces and Places is not only fun, but makes keeping track of your favorite people a lot easier.
As your collection of photographs grows and you create more Albums and Smart Albums, your Source list might get very crowded.
If that's the case for you, consider grouping several albums together that have something in common. For this purpose, you can create folders in the Source list. To do this, follow these steps:
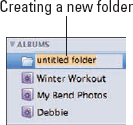
Choose File
New Folder, or right-click (Control-click) in an empty space in the Source list, and then choose New Folder.Folders are always created under the heading Albums in the Source list, as shown in Figure 5-17.
Name the folder as you wish and then press Return.
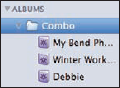
For this example, I'm naming it Combo.
Now just drag an Album(s), regular or Smart, into the folder.
The Albums appear indented under the folder, as shown in Figure 5-18.
Clicking the arrow beside the folder closes it and also saves viewing space in the Source list.
The ability to change the order of photos in Albums depends upon the type of Album you're dealing with. You can change the order in standard Albums in three ways:
Use the View menu in iPhoto and sort the photos by one of the following criteria:
Date
Title
Rating
Keywords
After you select the criteria, you can sort the photos in ascending or descending order.
You can also very quickly try different photo orderings by simply dragging photos within the Album and placing them where you want them to appear.
The order of photos in Smart Albums can be changed using the first two methods for standard Albums — by Date, Title, Rating, and Keywords; and by ascending or descending order.
However, in Smart Albums, you can't manually drag the photos into a different sort order. (No manual operations of that type are allowed in Smart Albums.) About the only thing you can do is to perhaps add a numeric keyword to each photo (for this to work, the numeric keyword must be the first Keyword for the photo), then view the photos based on Keyword and sort them in Ascending order to force the photos to be sorted in a numerical order you have contrived.
There are significant differences in how deleting photos works in standard Albums and Smart Albums.
To delete a photo or photos from a standard Album
Select the Album from the Source list.
Click appropriately to select the photos to be deleted.
Press the Delete key on the keyboard to remove the photos from (only) that Album, or drag the photo(s) to the Trash in the Source list.
The photo(s) will be removed from the Album but will not appear in the Trash in the Source list — you are removing them only from the Album and not from the Library. As usual, you can choose Edit
Note
Because standard Albums are populated manually by you, removing the instance of a photo from one Album does not remove it from any other standard Album or from the iPhoto Library.
Deleting a photo or photos from a Smart Album requires more effort and more care. Remember that Smart Albums content is created automatically based on conditions that you set. You can't just drag a photo to the Trash because the very next time that the conditions are checked in the iPhoto Library, that photo would qualify and would be placed back in the Smart Album you had just deleted it from. There are three ways to remove a photo from a Smart Album:
Change the criteria in a photo that's causing a match, such as the keyword, rating, description, or whatever is causing the photo to be in the Smart Album.
Change some part of the expressions for the Smart Album to exclude the photo or photos you want to remove from it.
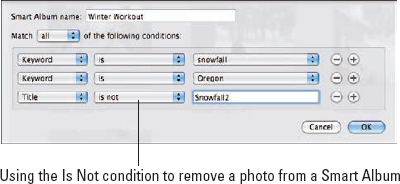
You could include a expression that uses Is Not to pinpoint the photo or photos to be excluded. An example of an edited set of conditions is shown in Figure 5-19. In the example, if any photo has the title Snowfall2, it will be excluded from the Smart Album.
Do what I call a "special delete" that removes the photo from the Library.
Warning
This special delete will remove the photo from the iPhoto Library and thus from every Album in which it appears. After the Trash is emptied, there is no Undo.
To do the special delete, follow these steps:
Click on the Smart Album in the Source List to see the contents. Select the photo or photos to be deleted.
Press and hold
+Opt+Delete.
The photo or photos will appear in the Trash in the Source list.
If you change your mind, choose Edit
Undo Move to Trash, and the photo will be restored to the Smart Album. Otherwise, empty the Trash to complete the operation.