
Manipulating the size and shape — rotate, crop, and straighten
Correcting the most common photo faults
Ansel Adams used to say that if he got 10–12 quality photographs a year, it was a good year. Only those shots were worth the time, effort, and materials he would expend to deliver a classic photograph. We're not likely to be in his league. So what's my point?
My point is we can mimic a professional approach to obtain the best photos we can. That means
Take lots of photos of a subject.
Be aware of how each photo looks and try to make each one better by altering location, exposure, composition, and so on.
Be critical when reviewing photos — reserve the best for advanced editing and the others for basic editing to make them the best they can be.
I cover advanced editing in detail in Chapters 9 and 10. But before you do anything advanced, you need to understand and practice basic editing, and that's what this chapter is all about.
Tip
The editing examples are shown within iPhoto's Edit mode. While Edit mode is a perfectly fine way to apply edits to a photo, I recommend you do any editing that has to be exact in Full Screen view — this makes it much easier. See Chapter 7 for more on Full Screen view.

Warning
When you use any of the tools described in this chapter (Crop, Rotate, Straighten, Enhance, Red-Eye, or Retouch) to edit a photo, the result of using that tool is applied to the photo in the iPhoto Library. This means that whatever editing you do to the photo affects that photo anywhere else it appears in your Library — every Album, Book, Calendar, Card, and so on. If that isn't your intent, select the photo you want to edit, choose Photos
Let's get started.
In the sections that follow, I discuss some aspects of composition that include altering the size and shape of a photo. The iPhoto tools for performing these alterations are the Rotate, Crop, and Straighten tools.
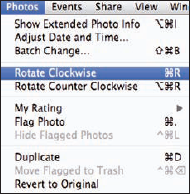
Depending on the orientation of your camera when you take a photo, you may need to rotate the photo to have it appear properly in iPhoto. The Rotate tool allows you to rotate photos in 90° increments. To use the Rotate tool, follow these steps:
Select the photo to be rotated and click the Edit button to open it in Edit mode.
You can also double-click the photo to open it for editing.
Click the Rotate button on the toolbar at the bottom of the Edit pane.
Each click of the Rotate button rotates the photo in that direction 90°.
You can choose to rotate in the opposite direction by pressing the Option key and then clicking the Rotate button. You'll see the arrow on the Rotate button change direction.
You can also set the direction of rotation by selecting Photos

When you're finished, click the Rotate button again to turn off the Rotate tool.
Click the Done button on the toolbar at the bottom of the Edit pane to exit Edit mode.
Cropping is an area in which your choices, intuition, and artistic skills can really make a difference. People are sometimes hesitant to cut anything out of a photo, but I assure you, doing so often makes a mediocre photo into one that's stunning.
Before you actually begin cropping, I recommend that you spend a few minutes just looking at the photograph in question. Ask yourself these questions:
What am I trying to say with this photo?
What's the main subject?
What distractions do I see in the photo?
Answering these questions helps you create a plan for making the photo the best it can be. It's amazing how many creative errors you may make when taking a photo, but you can often correct them afterwards in iPhoto when you recognize what you need to do.
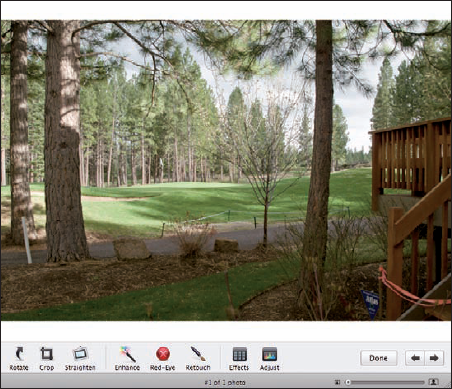
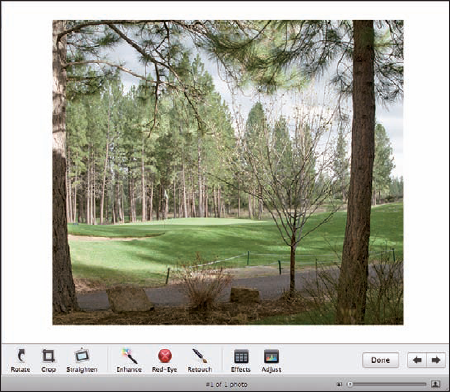
The photo I chose for this example (see Figure 8-2) isn't particularly memorable. In fact, I took it only to document an event. But it's bad enough, from a composition perspective, to provide a great way of showing the editing power of iPhoto.
In Figure 8-2, you see the photograph prior to any editing. Before I do anything, though, I answer my three questions. For sake of argument, let's say that what I'm trying to communicate in this photo is the beauty of this golf hole and fairway. The main subject is the flag on the green. The distractions are numerous, starting with the orange tape in the lower-right corner, the extensive foreground, the deck railing, and the tree and white stick on the far left. Wow, there's lots to do! Follow these steps to correct one of your photos with similar issues:
Select the photo to be edited and click the Edit button to open it in Edit mode.
You can also double-click the photo to open it for editing.
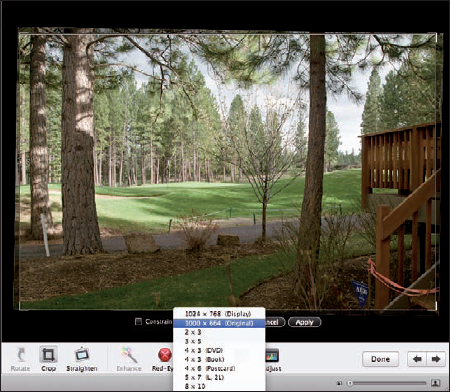
Click the Crop button on the toolbar at the bottom of the Edit pane.
The first thing to notice is the white rectangle indicating where the crop will occur. This is a moveable boundary that you can adjust either manually or by selecting a size from the Constrain pop-up menu, as shown in Figure 8-3. In this example, I do the crop manually.
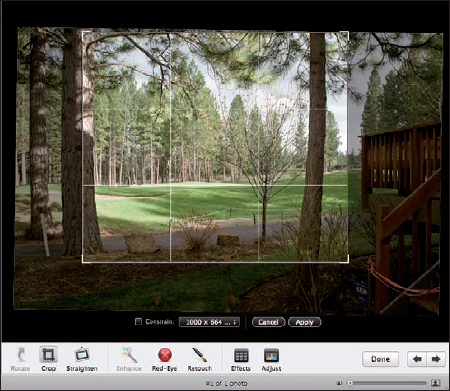
Move the mouse over one of the white lines you want to adjust until the cursor changes to a pair of lines with two arrows; then press and hold the mouse down while moving the line where you want it to go.
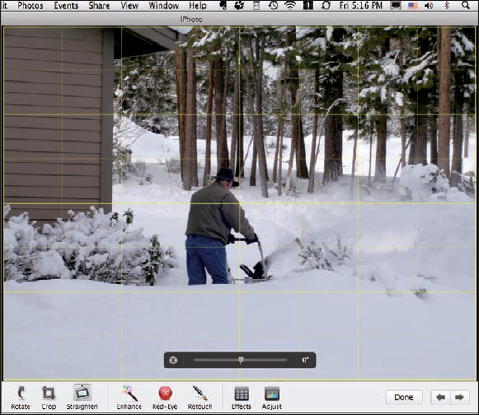
In Chapter 7, I mention the Rule of Thirds. Notice that when you begin to move the white line, a Rule of Thirds grid is superimposed on the photo (see Figure 8-4), helping you to crop and place objects accordingly.
Repeat Step 3 on each of the crop lines you want to move.
You can go back and move lines as often as you want until you're satisfied.
When you have the lines set, click the Apply button to set the crop.
Figure 8-5 shows the change I made. Not a great photo, but it's certainly a great improvement.
Tip
Press and release the Shift key to alternately look at the original photo and the cropped photo. Remember, you can also revert to the original photo and start again if you like by choosing Photos
When finished, click the Crop button again to turn off the Crop tool.
Click the Done button on the toolbar at the bottom of the Edit pane to exit Edit mode.
Cropping is a real art, and it can save a photo with correctable flaws. It's certainly better than driving 100 miles to retake the shot!
The Straighten tool has a similar effect as the Rotate tool except that it rotates the photo in much smaller increments, with a maximum rotation capacity of 10°. To use the Straighten tool follow these steps:
Select the photo to be straightened and click the Edit button to open it in Edit mode.
You can also double-click on the photo to open it for editing.
Click the Straighten button on the toolbar at the bottom of the Edit pane.
You'll notice a slider bar appear along with yellow grid lines to help determine the direction and extent of any necessary corrections, as shown in Figure 8-6.
Move the indicator on the slider to the left or right.
Moving the indicator to the left tilts the left side down; moving the indicator to the right tilts the right side down. To the right of the slider bar is the number of degrees of rotation that is being applied.
When you have the correction as you want it, click on the Straighten button again to turn off the Straighten tool.
Click the Done button on the toolbar at the bottom of the Edit pane to exit Edit mode.
Note
As was true with the Rotate tool, whatever straightening you do to the photo will affect that photo anywhere else it appears in your Library. Make a duplicate if you do not want this to happen.
The remainder of what I call the basic photo editing tools in iPhoto are Enhance, Red-Eye, and Retouch. With the power of today's computers and careful, patient editing, these tools may be all you need to bring out exactly the look you wanted when you captured your photos.
Perhaps the most consistent error that nonprofessional photographers make is in exposure, and the tendency is to err on the side of under-exposing, making photos too dark. This is because lighting is a tricky thing and not really controllable outdoors. Concentrating on the main subject of your photo may cause you to miss the very bright light reflecting off of something at the side. That bright spot can end up fooling the camera's light sensor, causing the photo to be under-exposed.
A problem with flash-lit portraits is red-eye, where the subject's pupils are dilated and the flash bounces off the rear of the eye and back out into the camera lens.
Requiring constant vigilance, dust on the lens can cause bothersome spots on the photo, which distract and detract from the beauty of the photo.
In the sections that follow, I show you what iPhoto can do to correct all these problems.
There are always times when, for one reason or another, you underestimate the amount of exposure needed for a particular photo. With digital cameras, the cure is pretty easy; just look at the camera's reviewing screen, spot the problem, adjust the exposure, and take another picture. But what if this was a one-time event. What if it's something that you can't reshoot, and you're stuck with whatever you captured?
Relax. All is not necessarily lost. In this case, the Enhance control in iPhoto can automatically vary brightness and contrast. Actually, it can do quite a bit. To use the Enhance tool, follow these steps:
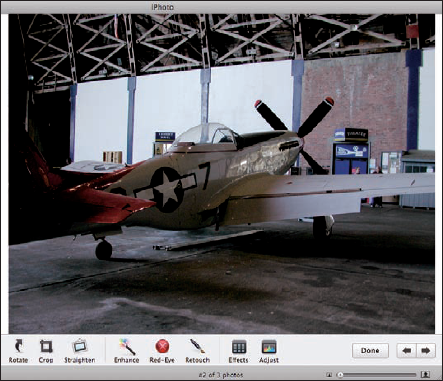
As is usually the case, select the photo to be enhanced and click the Edit button to open it in Edit mode. (See Figure 8-7.)
You can also double-click the photo to open it for editing. As you can see in the example photo, there isn't enough exposure to see detail.
Click the Enhance button on the toolbar at the bottom of the Edit pane.
Couldn't be simpler. The tool looks at the photo and decides on the best change it can make. There are no adjustments for you to do; just judge if this change is sufficient and has made the photo look the way you intended. If not, you can always choose Edit
Click the Done button on the toolbar at the bottom of the Edit pane to exit Edit mode.
If the use of the Enhance tool isn't enough, Chapter 10 covers much more advanced ways of correcting exposure.
I'm sure you've all seen horrible examples of people with devilish red eyes caused by taking flash pictures in a dark area. The pupils are naturally dilated, and that leads to what we call red-eye. Luckily, iPhoto can cause a significant reduction in red-eye with the use of the Red-Eye tool.
Tip
Note that the Red-Eye tool works only on human eyes. Because of differences in the construction of pet eyes, they may look green or yellow rather than red. If you have software than has a paintbrush-type tool you may be able to change the color to look normal for your pet. The iPhoto Red-Eye tool is for humans.
Some cameras and some flash units automatically compensate to virtually eliminate red-eye as the photo is taken.
Here are the steps to take if you're not so fortunate:
Select the photo you want to remove red-eye from and click the Edit button to open it in Edit mode.
You can also double-click on the photo to open it for editing.
Zoom in to the area around the eyes using the size adjust slider in the lower-right corner of the Edit window.
In order to make the Red-Eye tool work properly, you must zoom in to enlarge the eyes in the photo. For more on zooming, see Chapter 7.
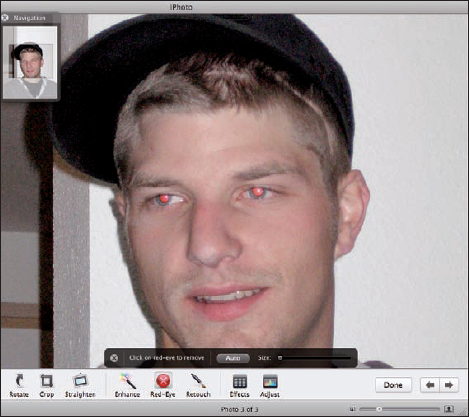
Click the Red-Eye button on the toolbar at the bottom of the Edit pane to open the Red-Eye tool, shown in Figure 8-9.
I recommend you click on the Auto button first and let iPhoto try its hand at correcting the red-eye. It usually does a miraculous job. No need to position the cursor — iPhoto finds the eyes. In fact, Figure 8-10 shows the corrected photo using only the Auto button.
If clicking the Auto button doesn't work, use the Size slider to adjust the cross-hair cursor to the size of the eyes you're trying to correct. A handy shortcut for sizing the cursor is to press the Left- and Right-Bracket keys (they're next to the "P" key) to decrease or increase the cursor size, respectively.
Position the suitably-sized pointer over one of the pupils to be corrected, click the mouse, and then do the same for the other eye.
Repeat Step 4 for any other subjects in the photo with red-eye.
As always, you can press the Shift key to see the original photo for comparison.
When you're finished, click the Close button (the "X") at the left of the Red-Eye control to turn it off.
Click the Done button on the toolbar at the bottom of the Edit pane to exit Edit mode.
This should make whoever was the subject of your photo happy again.

Dust is definitely the scourge of all photographers. It's also plentiful. Make it a habit to use a brush specifically made for camera lens to clean the lens you're using before shooting your pictures and always put the lens cap back on the lens when you're not shooting. This also helps keep your lens from getting scratched.
Be aware that no matter how careful you are, there will be spots in your photos, especially in blue skies. Or maybe your subjects may have some blemishes they'd like removed (without a visit to the dermatologist).
iPhoto can help. To use the Retouch tool, do the following:
Select the photo to be edited and click the Edit button to open it in Edit mode.
You can also double-click the photo to open it for editing.
Move the size adjust slider (in the bottom-right corner of the Edit pane) to the right to enlarge the area you wish to retouch.
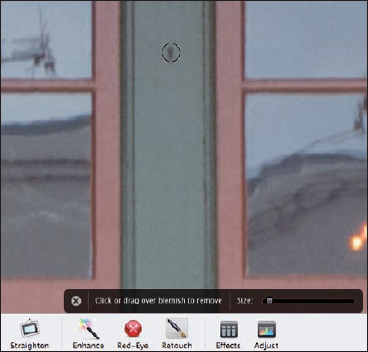
Click the Retouch button on the toolbar at the bottom of the Edit pane.
As shown in Figure 8-11, you can choose the size of the Retouch brush by moving the slider. If your guess is off and you need a different-sized brush, just come back to the slider and move it to make it larger or smaller. Figure 8-11 shows the mark to be removed within the cursor. Just like the Red-Eye tool, use the Left- and Right-Bracket keys to change the size of the cursor.
Position the mouse over the mark that you want to remove and click. If the blemish is large or irregularly shaped, you may find you need to click and drag the mouse to remove it.
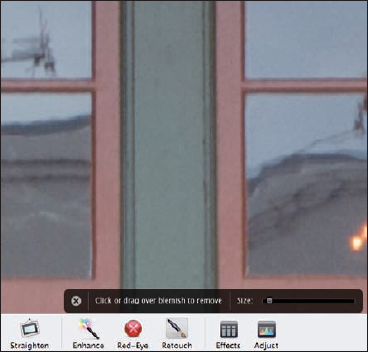
iPhoto samples what's around the area to be retouched and changes the photo accordingly. It does a remarkably good job. Press the Shift key to view the original and compare the difference. Figure 8-12 shows the result — the mark is gone!
When you're finished, click the Close button (the "X") at the left of the Retouch control to turn it off.
Click the Done button on the toolbar at the bottom of the Edit pane to exit Edit mode. If you make a mistake in clicking with the tool, you can choose Undo Retouch and try again.
Of course, you can always revert to the original photo if you're not pleased with the results. Choose Photos
That's it for basic editing. In the next chapter I start to show you the many advanced techniques in iPhoto to make you photo editing even more enjoyable.