Chapter 3. Touring the Touch
TRADITIONAL IPODS MAY HAVE THEIR CLICK WHEELS AND BUTTONS, but the iPod Touch brings a whole new level of control to your fingertips. In fact, your fingertips do control the way you use this very special ‘Pod. Instead of scrolling and clicking through menu after menu, this touchscreen-outfitted iPod gives you a set of icons on its Home screen. Tap one and you instantly go wherever you want to—whether that’s onto the Web, amongst your favorite tunes, or into your photo collection. And the Touch not only shows off pictures, it shoots them, too—along with videos.
The Touch comes preloaded with colorful little programs that let you send and receive email from all your accounts, keep tabs on the weather, track the stock market, and record your to-do lists. But you’re not limited to standard-issue software—thanks to the iTunes App Store, you can turn your Touch into a personalized pocket computer with its own games, productivity programs, eBooks, and more.
This chapter gives you a close-up look at where to find everything on your Touch and how to customize it to your preferences.
Turn the Touch On and Off
WHILE ITS NICE, BRIGHT interactive touchscreen gets most of the attention, the Touch does have a few physical controls—a quartet of buttons along its edges and front. Two of these buttons let you turn the Touch on. One is the narrow little Sleep/Wake button on the Touch’s top-right edge. The other is the Home button on the front of the Touch (described in detail on the next page).
The Sleep/Wake button serves a second purpose, too—it puts the Touch in Sleep mode. Give it a gentle press to put the Touch down for a nap in power-saving standby mode.
To wake up a sleeping Touch, press the Sleep/Wake button once more or press the Home button.
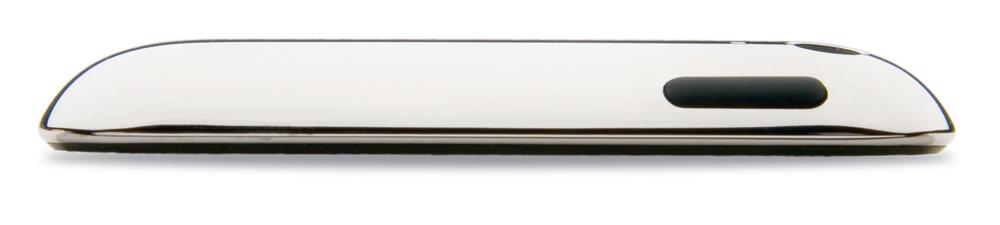
If you want to turn your Touch off completely, the Sleep/Wake button acts as an On/Off button, too—just press and hold it down for a few seconds. The screen fades to black, and the no-nonsense “slide to power off” red arrow appears. Drag the arrow to the right to power down your ‘Pod.
When it’s time to play again, press the Sleep/Wake button to turn the Touch back on.
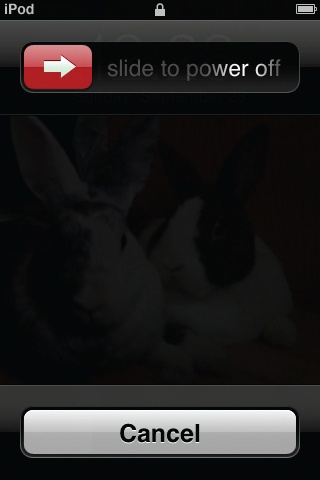
The Home Button and Home Screen
EVEN WITH ITS SIMPLE design, the Touch has one very prominent physical button, smack-dab on the player’s glass front: the Home button. You’ll press this one a lot, because it’s the portal to all the stuff stored on your Touch.
Most people associate the word Home with peace and stability, and this button lives up to that notion. No matter where you are in the Touch—16 levels up in a game, deep into the new U2 album, or out on the Internet, pressing the Home button always brings you back to the main Touch screen. You don’t even have to click your heels three times.
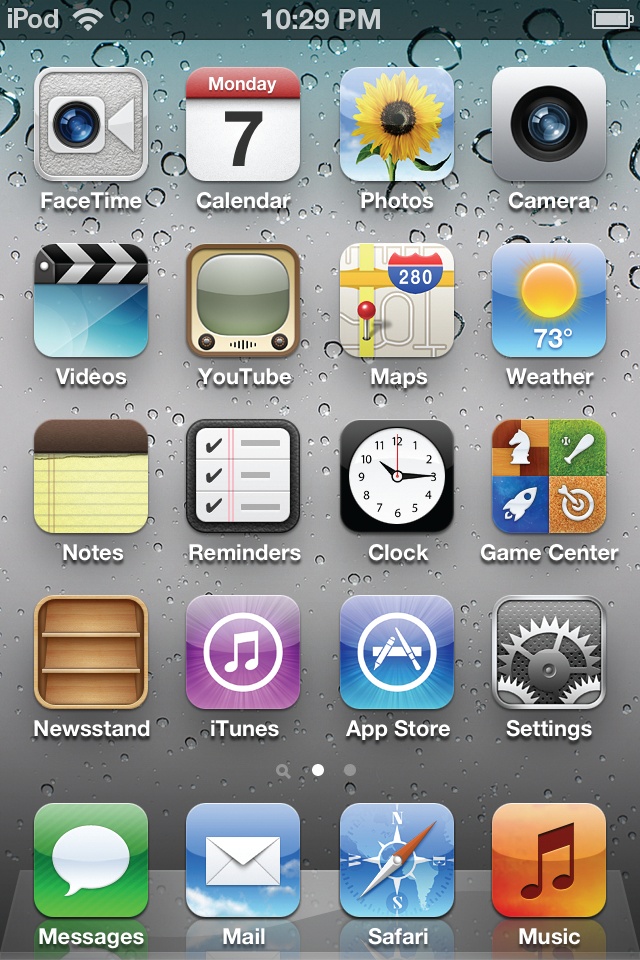
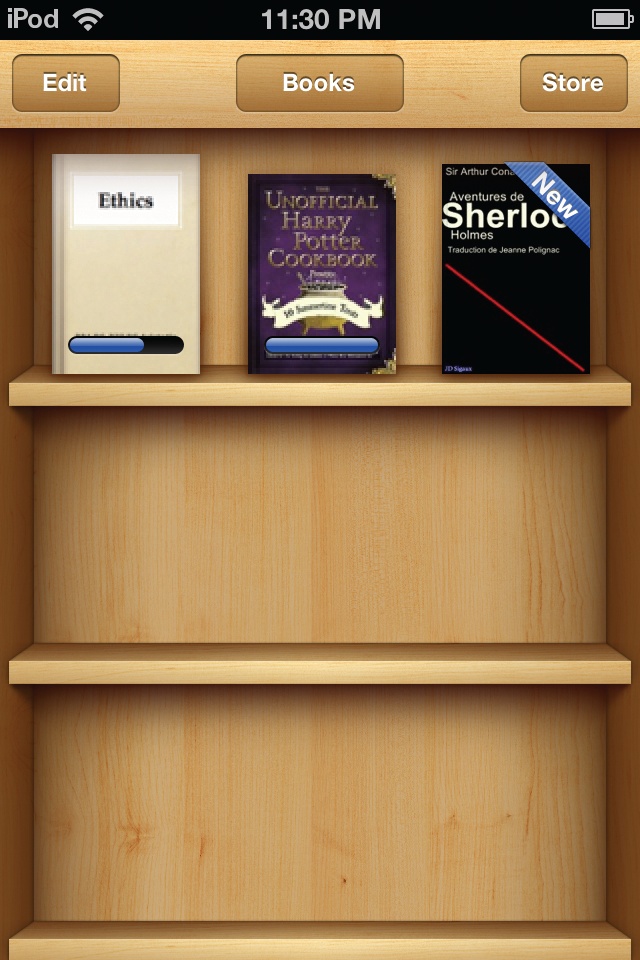
When you turn on your brand-new Touch, the Home screen will probably look something like this, with its included apps in their standard order. The Touch divides the icons into two groups: One is the four-by-four grid in the main part of the screen, and the other is the single row of four icons along the bottom. You can have up to 11 flickable pages of icons on the Touch’s Home “screen,” but no matter which page you flick to, the four icons anchored to the bottom row always stay onscreen.
Want to rearrange the icons—including that bottom row of four—so you can put your most-used apps up front? Press down on an icon until it wiggles, and then drag it to a new location. When you’re done rearranging, press the Home button to make the icons sit still again. Once you fill up the first Home screen with icons, swipe your finger to the left to go to the next screen of icons. Swipe your finger the other way to go back to that first screen. (If you find all this finger dragging, well, a drag, you can rearrange your icons more easily in iTunes; see Manage Apps in iTunes to learn how.)
The Home button can do other tricks, too, like letting you switch quickly from one app to another (Multitask on Your Touch) and forcing misbehaving apps to quit. If an app is stuck onscreen, hold down the Sleep/Wake button until the red “power off” slider appears (opposite page). Let go of Sleep/Wake and hold down the Home button until the app closes—and you’re back Home. And you can summon the Touch’s camera from the Lock Screen by pressing the Home button twice quickly to get a ![]() icon that takes you right into the Camera app.
icon that takes you right into the Camera app.
What’s in the Music Menu
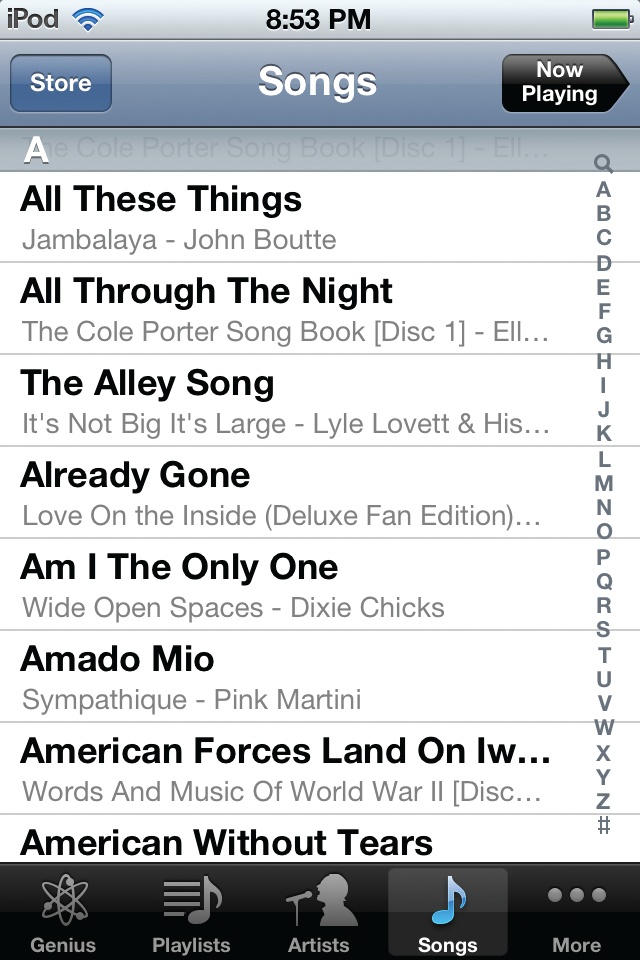
SINCE YOU HAVE AN iPod, you probably want to play some music, right? To do that, tap the Music icon; you’ll see your audio collection sorted into all kinds of helpful categories, like songs, artists, and albums. Click a category to reveal its list of songs, musicians, or albums. Flick your finger up and down the screen to scroll through a list. In any category that goes right to a song list, tap a song’s title to hear the tune. For other categories, like Artists or Albums, click a name or title in the list to see all the songs in that category, and then tap a song title to play it.
Icons on the bottom row of the Touch’s Music screen take you to the first four categories, which vary depending on whether you synced up Genius Mixes (Chapter 6) from iTunes. Here’s what the categories look like:
Genius. If you did sync Genius Mixes, tap this button to play them.
Playlists. If you didn’t go for a Genius Mix sync session (or haven’t gotten to it yet), Playlists shows up as the first icon. In case you haven’t heard of a playlist, it’s a collection of songs that you think sound good together A playlist for a gym routine could contain high-energy dance tracks, for example. (Chapter 6 shows you how to create a playlist.).
Artists. To sort your music by band or performer, tap Artists. Even if your collection has just one measly track from an obscure bar band, the band’s name will show up proudly next to Elvis Presley and The Beatles. Tap the band’s or artist’s name to see the available tracks, and tap a song to start playing it.
Songs. Tap here to see a complete list of the songs on your iPod, nicely arranged in alphabetical order. If you don’t feel like flicking forever to get down to “Zing! Went the Strings of My Heart,” tap the vertical index bar to jump to a specific letter—and all the songs that start with it.
Note
If you didn’t sync Genius Mixes to your iPod, the fourth category before the More button is Albums. There’s more on More—and Albums—on the next page.
The last icon in the row is aptly named More. Tap it to see more ways to sort your audio collection, including these categories:
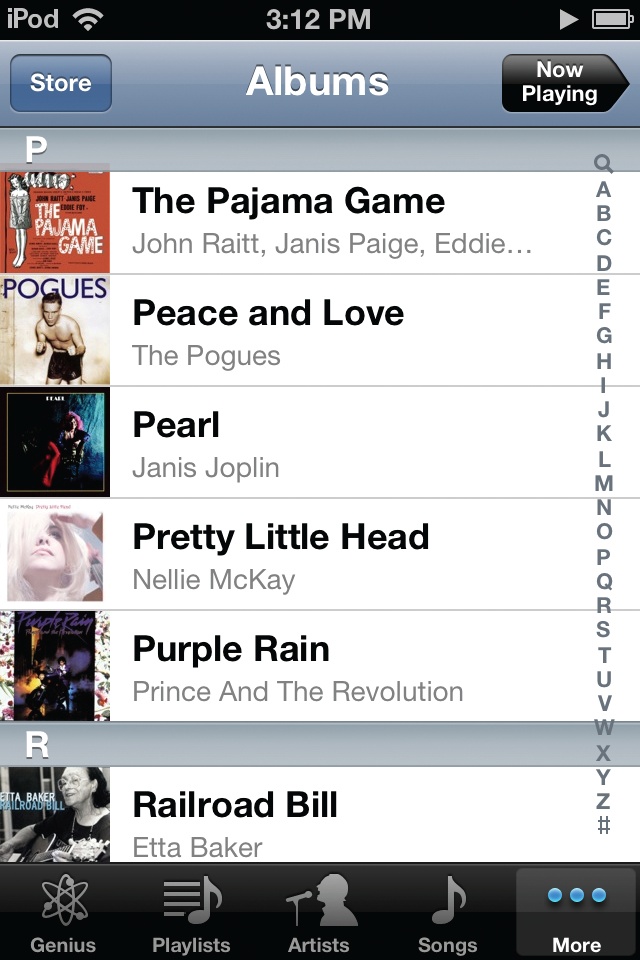
Albums. Far from its roots on discs of black vinyl, the notion of “album” still thrives on music players everywhere, whether you have the complete set of tracks or not. Tap here to see all your music grouped according to the name of the album it appears on.
Audiobooks. Tap here to see the narrated books you bought and downloaded from the iTunes Store or Audible.com (Chapter 7). Tracks you ripped from audiobook CDs don’t show up here automatically; you have to edit the file type first (to do that, see Edit Album Information).
Compilations. Soundtracks, tribute records, and any other album with tracks from multiple artists is usually considered a compilation. If iTunes doesn’t automatically tag these albums as compilations, you can do it yourself by heading to Edit Album Information.
Composers. All your music, listed by songwriter, resides here.
Genres. If you’re in a jazz, country, pop, or other music-specific mood, tap Genres to see all the music in a particular category.
iTunes U. College lectures, educational videos, and other academic pursuits from the iTunes U campus in the iTunes Store live here.
Podcasts. All those radio-like shows you can download free from the Web huddle together under this menu. Tap a show title to see a list of individual episodes. A blue dot means it’s a new, unheard episode, while a half-blue dot means you started listening and stopped somewhere along the way.
As you tap around your collection, your Touch is ready if you want to add to it right there: A Store button in the top-left corner of most screens awaits your impulses.
Tip
Don’t like Apple’s order of things and want to put your lists where you want them? Tap the More button and, on the next screen, tap the Edit button in the top-left corner. On the black Configure screen, drag the ghostly white list icons down into the bottom row in the order you prefer them. Once you get your favorite icons within easy reach, tap Done.
What’s in the Videos Menu
VIDEO COMES IN MANY forms these days: movies, TV shows, podcasts, and more. If you have moving images on your Touch, they’re in one of these categories:
Movies. Hollywood blockbusters from the iTunes Store, movies you made yourself, and trailers you snagged off the Web all live happily here.
TV Shows. Don’t have time for TV the traditional way (on the couch and with a beverage)? When you grab TV shows from the iTunes Store, you see them in this part of the Videos menu.
Music Videos. You find music videos you bought from the iTunes Store (or those that come with some albums) here.
Video Podcasts. Podcasts aren’t just audio-only these days; look here for full-blown video productions. (You see only one listing for each podcaster, along with the number of episodes you’ve got.)
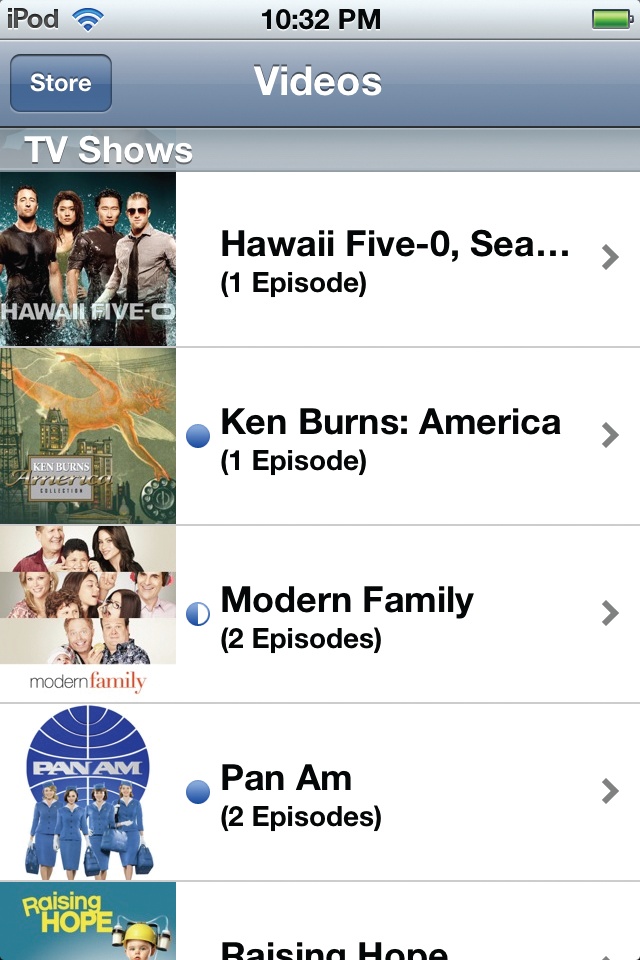
A thumbnail photo next to each video gives you a hint as to its content, and information like running time or number of episodes appears here as well.
Tap a title to play a video. If you have multiple episodes of a TV show or podcast, tap the show title and then tap the name of the episode you want to watch. Rotate the Touch to landscape view and enjoy the show. (Flip ahead to Chapter 8 if you want to know more about video right now.)
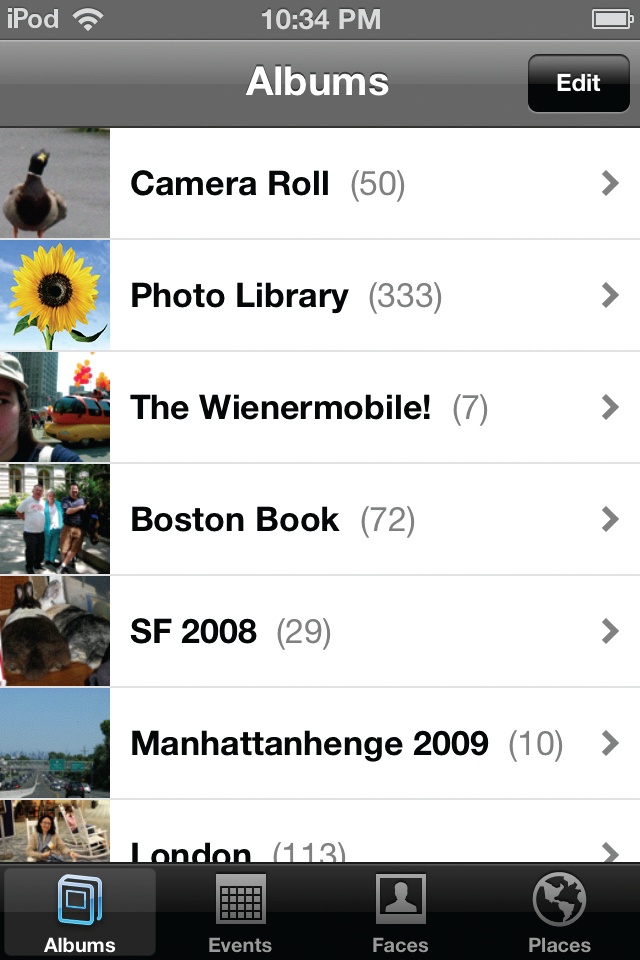
What’s in the Photos Menu
WHO NEEDS TO DRAG around a photo album or a laptop full of slideshows when you’ve got a Touch? And with the current Touch, you not only have a picture viewer, you get a whole digital camera and camcorder in the mix, too.
Odds are, though, you probably took most of your photos with a standard digital camera. As Chapter 9 explains, you can transfer copies of your favorite pictures and photo albums onto the Touch through iTunes. And when you do, they land here in the Photos app.
Give the Photos icon (the happy sunflower) a tap on the Home screen, and all those pictures await you in the iPod’s Photo library. Many photo-organizer programs, like Adobe Photoshop Elements and Apple’s iPhoto, let you sort pictures into albums, and you can see those same albums in the Photos app, if you opted to sync them over. The number in parentheses next to the album name reveals how many photos live there.
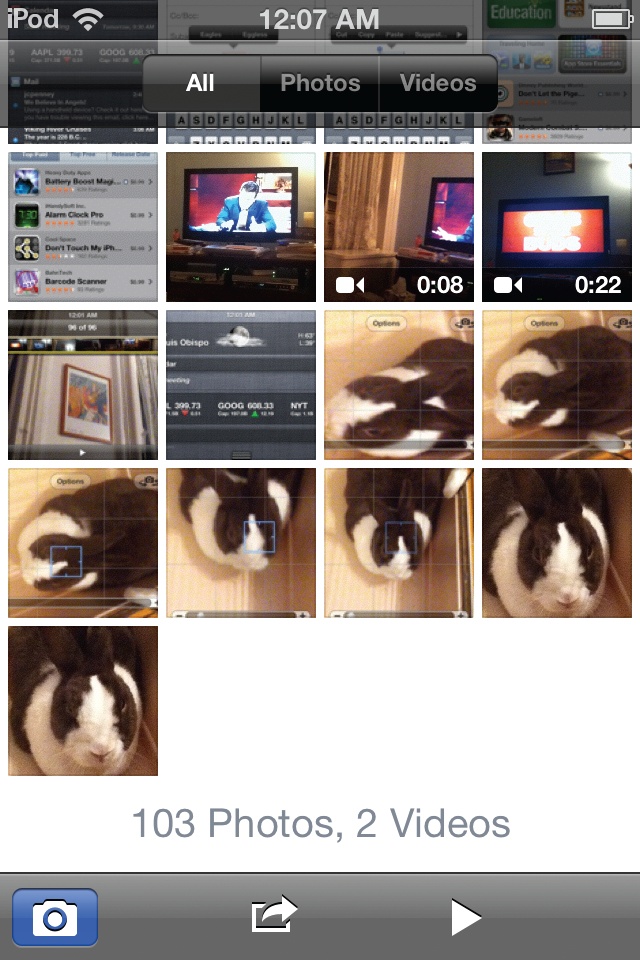
The Camera Roll album at the top of the screen collects all the photos you take and the videos you shoot with the Touch itself; you can import them back into your computer using your photo-organizer app. Other images that come right to the Touch—like screenshots you snap or photos you save from email messages—land here, too. Chapter 9 has all the photographic details.
What’s in the Settings Menu
THE TOUCH IS A powerful little media machine, and you fine-tune the way it works in the Settings menu. Here’s what you find by tapping the Settings icon on the Home screen:
Airplane Mode. When the flight attendant tells you to turn off all Internet devices, tap Airplane Mode to On—that turns off your WiFi, the airborne data streams the pilot is worried about.
WiFi. Turn the iPod’s WiFi antenna on or off here—or see what wireless network you’re currently connected to.
Notifications. Many apps can alert you to news and updates (like football scores) with “push” notifications that automatically pop up onscreen. Turn the alerts on or off here.
Sounds. The Touch can make all sorts of external noises, from ringtones for FaceTime calls to keyboard clicks. Set your sounds (and volumes) here.
Brightness. If you don’t like the Touch’s Auto-Brightness sensor adjusting your screen, override it and make your own adjustments here.
Wallpaper. Tap here to change the background image for your Touch’s Lock (at left in photo) and Home (right) screens. You can use Apple’s stock snaps or your own pictures.
General. Here you’ll find the Touch’s About menu (listing the iPod’s serial number, software version, and number of songs, videos, apps, and more), plus network info, Bluetooth settings, and the On/Off switch for the GPS-like Location Services feature. You control wireless settings, like those for iTunes Wi-Fi Sync and over-the-air software updates, from here as well. You can also restrict Spotlight searches to certain file types, set up a passcode for your Touch, and adjust the date and time. The Keyboard settings let you turn off (or on) the iPod’s spell-check and auto-correction features. In the International area, you can choose the iPod’s display language or switch to a foreign-language keyboard. The Accessibility options include VoiceOver settings, spoken-word alerts, and high-contrast screen text. You can also reset all the settings you’ve fiddled with—and even erase all the iPod’s content.
iCloud. Tap here to set preferences for syncing your personal data —contacts, calendars, mail, notes, reminders, bookmarks—as well as your Photo Stream (Share and Stream Photos With iCloud) and data backup to Apple’s free online storage locker.
Mail, Contacts, Calendars. Tap here to set up an email account right on the Touch. You can adjust all other mail-related preferences here, too (like how often the Touch looks for new messages), and delete unwanted accounts. Scroll farther down for the Contacts settings, where you can change the way the Touch sorts your contacts—first name first or last name first. In the Calendars area, you get time zone controls to make sure your events are set for your own location, and a toggle to turn event invitation alerts on or off. Chapter 10 has more on syncing contacts and calendars.
Twitter. If you use the popular microblogging service, log into your account here to tweet photos, links, and more right from the Touch.
FaceTime. Turn the FaceTime feature on here, and set up the email account you want to use with it so FaceTime callers can find you.
Safari. Specify the Safari web browser’s default search engine (Google, Yahoo, or Bing), and whether you want the Autofill feature to fill in website user names and passwords on your behalf. The security settings are here, too: Turn on warnings for potentially fraudulent websites, block annoying pop-up ads and cookies, or clear your browser cache—which erases all the accumulated page parts left behind from your web surfing. Chapter 11 has more on this fun stuff.
Messages. Set up your iMessage account to use Apple’s free text-messaging service for iOS 5 devices here. Use iMessage has more on iMessage.
Music. You can set the iPod to shuffle with a shake (or not), turn the Equalizer and Sound Check features off or on (Chapter 5), set limits for maximum volume, and choose to display lyrics and podcast titles here.
Video. Instruct the Touch to pick up playing a video where you left off, and turn closed captioning on or off. If you’re connecting your iPod to a television, the TV Out settings for pumping video to the big screen also reside here.
Photos. The settings for your Touch slideshows are here, including the time each slide stays onscreen, the animated transition between shots, and whether the Touch repeats the show or shuffles the slides.
Notes. Tap here to pick one of three fonts for your little yellow iPod notes.
Store. The name of the iTunes account you use to buy apps and music gets displayed here. Tap Sign Out to log out.
Individual application settings. Certain apps, like Facebook and iBooks, have their own settings screen. Tap the app name to see and adjust the settings. Facebook, for example, lets you reload screens with a shake of the Touch and set up push alerts.

Other Icons on the Touch Home Screen
THE MUSIC, VIDEOS, AND Photos icons on the Touch Home screen definitely get a workout, but several other icons await your gentle tap as well:
FaceTime. Tap here to start the cameras rolling with Apple’s mondo-cool video-chat program. New Touch owners can yap up a storm with other Touch-carrying folks, and with iPhone 4 peeps as well. Make FaceTime Calls has more.
Calendar. You can sync a copy of your schedule from your computer’s copy of Outlook, iCal, or Entourage. Chapter 10 tells you how.
Camera. Tap this icon to turn on the Touch’s built-in camera. With a few screen taps, you can snap digital pictures of something in front of you or use the Touch’s front-facing camera to capture a self-portrait. A little onscreen slider lets you switch from shooting still photos to capturing video. Flip ahead in this chapter for more on using the Touch’s camera.
YouTube. Wirelessly watch video from one of the world’s most popular (and time-consuming) websites. Chapter 8 has more on YouTube and other iPod video.
Maps. Get directions or even find yourself. You’ll read more on Maps later in this chapter.
Weather. Temperatures and forecasts for your favorite cities live here. Tap
 to flip the screen to add towns, and swipe a finger across the screen to whip through them. Tap
  to get Yahoo’s event info for that locale.
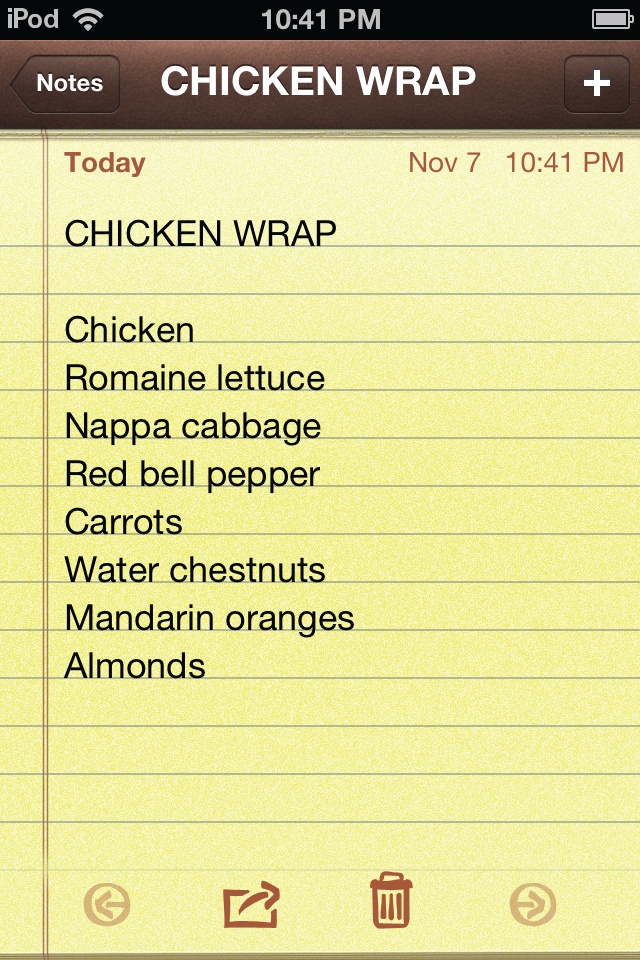
Notes. When you need to jot down information in a hurry—like a grocery list or an idea for the Great American Novel—tap here. The Touch keyboard slides up, ready for action. Tap
 to add a new note, and tap
  to delete an existing one. To call up a previously typed note, tap its name in the main Notes list. To email or print a note, tap
  .
.You can sync notes between your Touch and Microsoft Outlook 2003 and later or Mac OS x Mail 10.5 and later. Just connect the Touch to your computer, click its icon in the Source list, and click the Info tab in the main part of the iTunes window. Scroll down, turn on the checkbox next to the option for syncing notes, and then click Apply or Sync. If you have MobileMe, Google, Yahoo, or AOL mail accounts set to sync wirelessly, you can sync their Notes as well. Tap Settings→Mail, Contacts, Calendars; tap the name of your account; and then tap the Notes button to On. You can also sync notes through iCloud (Set Up an iCloud Account).
Reminders. A to-do list to keep you organized; see Use Reminders for more..
Clock. You can have one clock in your pocket—or keep time in several cities around the world at once. Chapter 10 has the details.
Game Center. Want to play a game? Turn to Play Around in Game Center.
Newsstand. This app keeps all your eMagazines in one place (Use Newsstand and iBooks).
iTunes. This happy purple icon leads to shopping fun in the iTunes Store—without wires. Chapter 7 tells you what to expect once you get there.
App Store. Tap here for games, eBooks, and more to tickle your Touch.
Stocks. Check your portfolio to see how the market is doing. To add your stocks to your palm-sized Big Board, tap the tiny
in the bottom-right corner. The screen spins around, giving you a place to type in ticker symbols. Flick the bottom panel to browse through three screens of information about a selected stock, including a quick-look chart of its 52-week performance, sales graphs, and recent headlines about the company. Turn the Touch sideways and tap to see the stock’s trading price rise and fall over a day, a week, a month, 3 months, 6 months, 1 year, or 2 years. Tap to get company info from Yahoo Finance.Mail. Tap here to check your email—or send messages. There’s more on the Mail app and setting up your accounts later in this chapter.
Safari. Take a web journey. Tap the Safari icon to fire up the browser; check out Chapter 11 for details on how to use it.
Contacts. Keep in touch on your Touch with the iPod’s address book. See Chapter 10 for instructions on syncing old contacts or making new ones.
Calculator. Tap the Calculator icon to get a big, bright math machine, ready to divide and conquer. Hold the Touch in landscape mode to get a scientific calculator for trigonometry and other math functions.
Voice Memos. Turn your Touch into an audio recorder. Chapter 10 explains how.

Map Your Way with WiFi
THE TOUCH’S RELIANCE ON a WiFi signal doesn’t make it a very good navigational device when you’re away from your home network or a coffee shop (unless you have a personal portable hot spot, like the Verizon MiFi). There are plenty of times, however, when getting directions and finding places on a map from the comfort of a WiFi connection comes in handy.
To plot your course, tap the Maps icon on the Home screen. Here are some of the things you can do with Maps and a network connection:
Find yourself. Tap the compass icon in the bottom-left corner (circled) to have the Touch pinpoint your current location within a few hundred yards. (While the Touch doesn’t have a GPS chip inside it, it does have software that calculates your position based on a big database of WiFi hot spots.) To find yourself, you need to make sure you have Location Services turned on. To do that, tap Settings→General→Location Services→On.
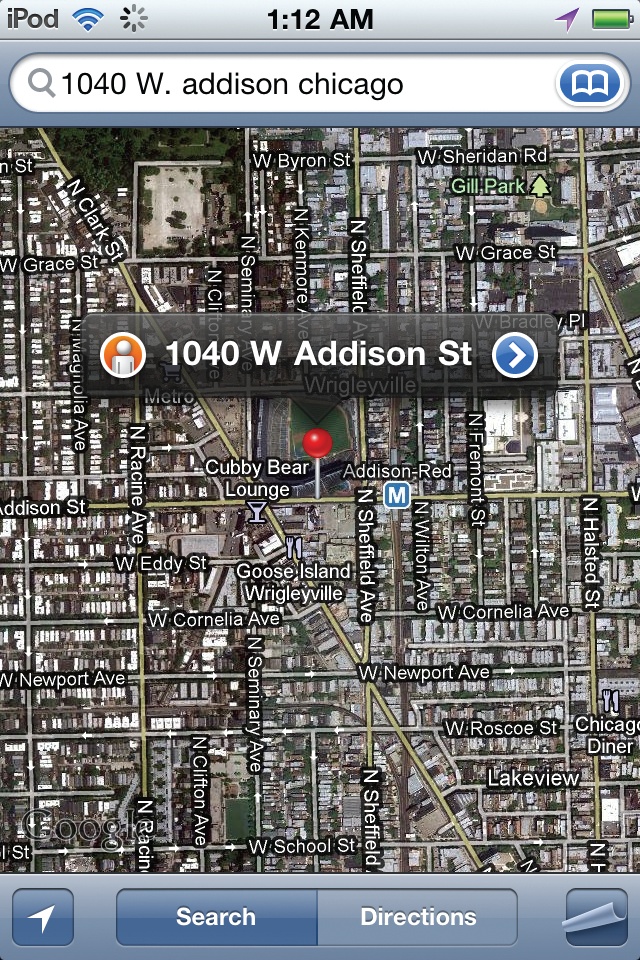
Find an address. In the Address box at the top of the screen, type in an address—or tap the
 icon to call up your Contacts list, where you can select the friend or business you want to map. Then tap the Search button to see a red pushpin drop onto that location.
If your location has an orange icon next to it (
 ), you can see what that address looks like in real life with Google Street View. Tap , and when the photo of the location appears, drag your finger around the screen to see the image from all directions and angles.
When you’re done, tap the mini map (the circle in the bottom-right corner, shown right) to go back to the regular map.
Options for map addresses. Tap the Directions button at the bottom of the screen. When you see your address marked on the map next to the push-pin, tap the
 icon to advance to a screen where you can get directions to or from that address. Your other options include adding the address to a contact file (great for filing away restaurants you want to visit again), or sharing it by email (the Touch’s Mail program pops up). You can also bookmark it for future reference. (Tap the
  button to call up a screen with tabs for Bookmarks, Recents [for recent locations], and Contacts.)
Find your way. Tap the Directions button at the bottom of the screen. A two-field box appears. If you don’t want to use your current location as the starting point, tap
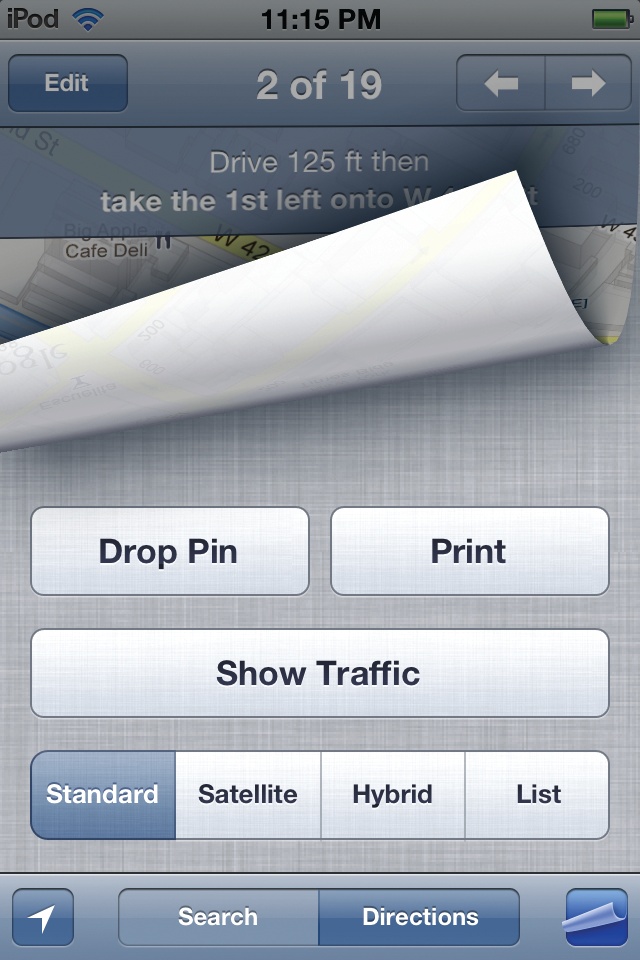
 in the Start box, and then type in a point of origin. In the End box, type in your destination. Press the Route button. The Maps app returns turn-by-turn directions for travel by car, mass transit (if applicable), or on foot. It also shows available alternate routes. Tap the icon for your means of the transportation, and then tap the Start button to get going. Tap
  or
or  to move through the directions. If you want to see a text list of the directions, tap the
  icon in the bottom-right corner (the map appears to curl up in cool iPod 3-D), and then tap the List button.
While on this screen, you can also choose the look of your map: a regular cartographic version, a satellite image, or a hybrid of both. Tap Show Traffic if you want to see current road congestion and maybe take that antacid before you leave the house. If you have an AirPrint-compatible printer, tap the Print button to take a copy of the map with you.


Play Around in Game Center
UNLESS YOU’RE PLAYING SOLITAIRE, games are usually more fun when you play with someone. Once you sign up for the Touch’s new Game Center, you can compete against thousands of other Game Center players around the world. You can add pals to a Friends list for quick competitions, do battle with strangers in multiplayer games, and join the race to the top of each game’s leaderboard.
Here’s how to get started with Game Center:
Tap the Game Center icon on the Touch’s Home screen and sign up for an account or type in your Apple ID (Set Up an iTunes Store Account); games you buy and download get billed to this account. Pick an online nickname—it may take a few tries to find an available one. You can also add a photo to your profile.
Configure your settings so you get invitations to games, and so Game Center members can find you based on your email address.
If you didn’t turn them on before, you can get push notifications from the Game Center for game invitations and updates.
Add some friends by tapping the
icon. Here, you can send a message to an email address or a Game Center nickname. After your buds accept your friend requests, you can send game challenges by tapping the Friends button and then tapping a name. (Tap the Requests button to see pending friend requests from other players.) And after you sign up a few friends, Game Center reccomends new ones for you.Once you have your account set up, it’s time to get a game. Tap the Games icon and then tap Find Game Center Games. Not every App Store game is hooked into Game Center, so it’s best to pick them from within the app. At the top of the Games screen. tap Game Recommendations to see suggestions from Game Center itself.
Play. Tap the Friends button to pick a buddy, tap the name of a game, and then tap Play. Your pal gets a game invite, and once she accepts your challenge, throw down and start whooping.
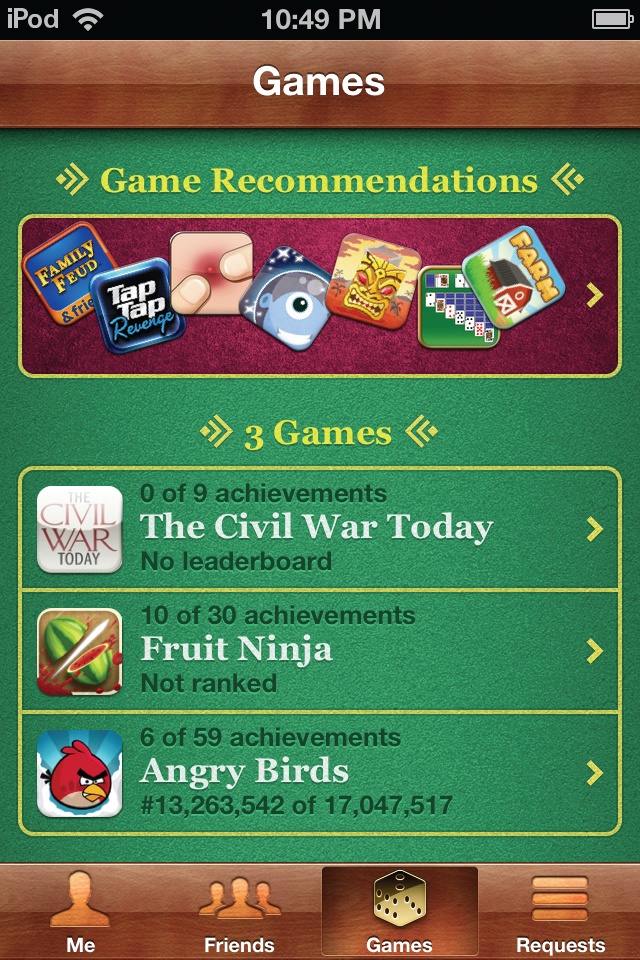
If your invitation goes ignored, tap the Auto-Match button to have Game Center pair you with an available player, or send a request to another friend. Even when you play solo, you can check player standings right after you finish a game (or later by tapping Games→[Name of Game]→Leaderboards).
Make FaceTime Calls
SINCE THE EARLY DAYS of science-fiction movies and TV shows, the video-phone has been a staple of fantasy communication. Cheap webcams and teleconferencing systems made the fantasy real, but they’re so last year (and so stationary). For modern convenience, the Touch makes and takes video calls thanks to FaceTime, its built-in mobile video-chat app.
To use FaceTime, you need an Apple ID (Chapter 7) and a WiFi connection. You also need folks to talk to, namely other new Touch owners and people running around with iPad 2s and iPhone 4/4S models who have time to chat.
Once you have all that, getting started with FaceTime is easy:
Tap the FaceTime icon on the Home screen and sign in with your Apple ID. Fill in your vitals, like your geographic region and email address, so other FaceTimers can find and call you.
Once you have your account set up, tap the Contacts icon on the Home screen, tap the name of the person you want to call, and then tap the FaceTime button at the bottom of the Contacts screen. Since iPhone 4/4S owners can use their phone numbers for FaceTime calls, a screen pops up asking what connection (phone digits or email address) you want to use for the call. Tap your choice. If you don’t have anybody in your Contacts file, visit Chapter 10, which explains how to import your computer’s address book or add entries on the Touch itself.
When your buddy picks up the call, hold your Touch up so they can see you and start chatting. You see them, too. If the little picture-in-picture window of your face is in the way, use your finger to drag it to a new part of the screen.
After you wave goodbye, tap the End button to hang up.
If you need to temporarily turn off the sound during a call (like when the baby starts screaming), tap the Mute icon (![]() ).
).
Want to show your friend what you’re seeing without physically flipping the Touch around? Tap the ![]() icon in the bottom-right corner to switch to the Touch’s rear camera. Tap the icon again to return the view to you.
icon in the bottom-right corner to switch to the Touch’s rear camera. Tap the icon again to return the view to you.

Use iMessage
THANKS TO THE IMESSAGE app in iOS 5, iPod Touch owners now have a way to send free, unlimited text messages, photos, and videos to people who are also running iMessage on their iPads, iPhones, and Touches. It works over a WiFi connection on the iPod Touch. Setting up iMessage takes just a few steps:
On the Home screen, tap open the iMessage app. The first time you start it up, it asks you to enter your Apple ID. (If you’ve blown off Apple’s previous 18 attempts to get you to sign up for an account, tap Create New Account and follow along onscreen.) The email address you use with your Apple ID is the one people need in order to send you iMessages.
To add more email addresses to your iMessage account, tap open the Settings icon on the iPod Touch’s Home screen and in the left column of icons, tap Messages. Tap the “Receive At” line and then type in the addresses. (The Settings screen also has a button to turn off iMessage if you don’t want to be pestered.)
Once you sign up, you can send messages to others who have registered with Apple. Tap open iMessage on the Home screen, tap the
 icon, and then enter the address of your recipient. Type your message in the text field at the bottom of the screen and then tap the Send button.
Tap
 if you also want to send a picture or video from your Camera Roll—or shoot a new pic for the occasion.
To see your previous iMessage conversations, tap the Messages button in the upper-left corner of the screen. A list of earlier chats appear onscreen. From here, you can tap open a conversation to review or restart it. To whack old chatter, tap the Edit button, select the conversations, tap the ![]() icon next to each one, and then tap the Delete button.
icon next to each one, and then tap the Delete button.
Unlike a cellphone text plan, which ties your message Inbox to your mobile number, iMessage works by email address. This means you can get your messages on several iOS 5 devices to keep your conversations going. And, unlike a cell-phone text plan, iMessage is free—making it an affordable way to keep up with your pals, as long as they’re all using iOS 5 gadgets, too.
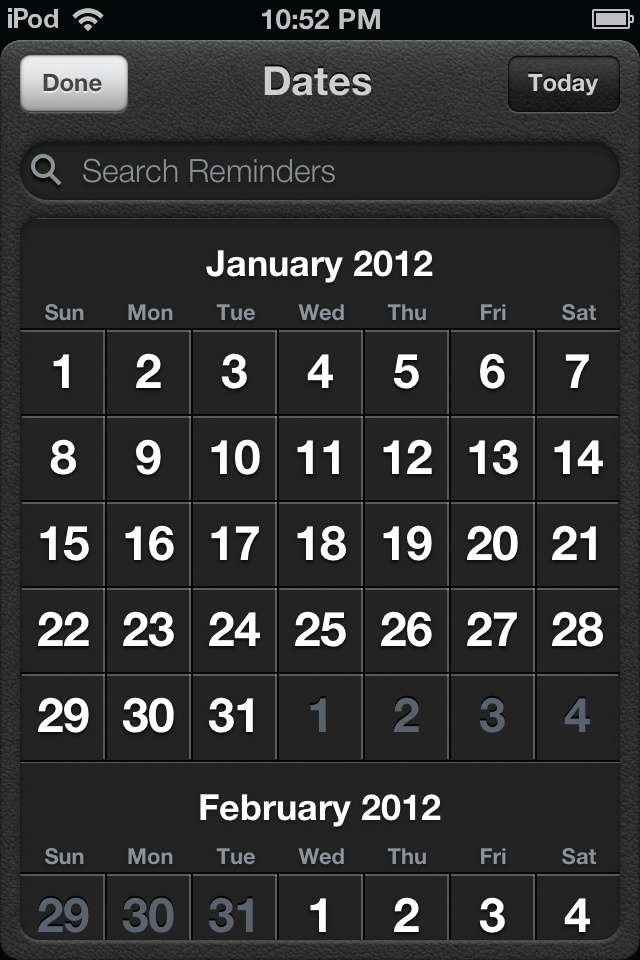
Use Reminders
FOR LONG-TIME USERS OF iOS, one vital app has been missing for years: a to-do list. Apple has finally checked this task off its own to-do list and introduced the new Reminders app. Reminders is wonderfully easy to use, and you can jot down your chores in a straightforward list or assign them to a future date. Here’s how add a task either way:
By List. Tap open the Reminders icon on the iPod’s home screen. Tap the List button, tap the
button in the upper-right corner, and then type in what you need to accomplish, like “Buy Pampers.”By Date. Tap the Date button at the top of the screen. If the task needs to be completed in the next few days, find the day in the date bar along the bottom of the screen and then tap the
button to enter your item. For a date far in the future, tap the calendar icon in the upper-left corner to reveal the next three months, as shown here, and then tap the day you need a reminder.
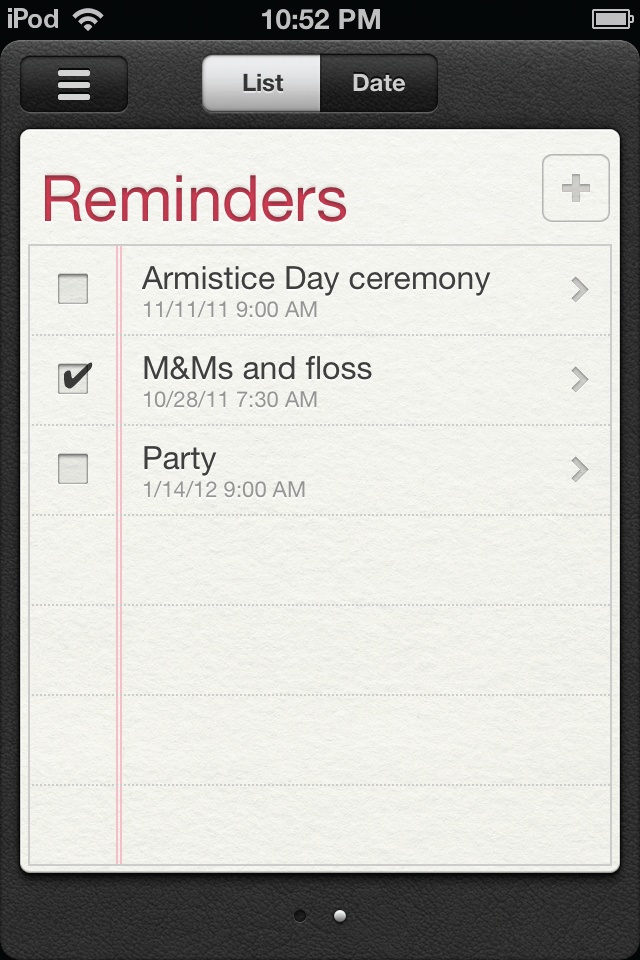
As you complete your chores in either List or Date view, tap the empty square next to the task to check it off. Here are a couple of other things you can do with the Reminders app:
In List view, swipe left to right to see a list of completed tasks and get that proud feeling of accomplishment.
Tap an entry to add to it or see more information about the task. On the Details screen, you can tap to add a reminder for your reminder (in the form of an onscreen notification; see Use Notifications), repeat the alert, add a note about the task, or even delete the whole thing.
Can’t remember exactly when you did something? Search your reminders by tapping the Search icon in the top-left corner on either the List or Date screens. In the search box, type in keywords to bring up results that may jog your memory.
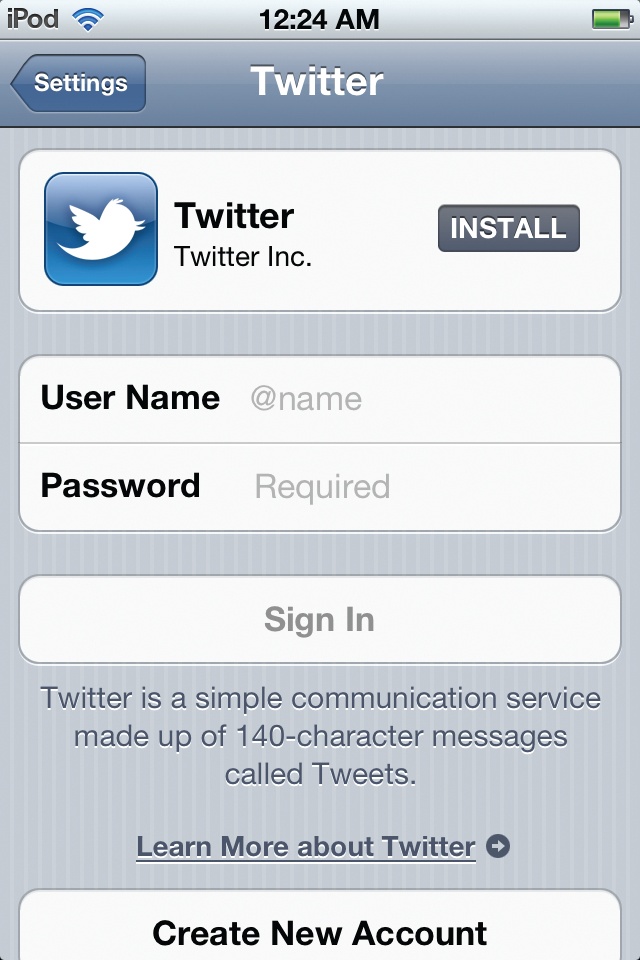
User Twitter
TWITTER, FOR THOSE WHO haven’t been paying attention the past few years, is a microblogging service; it lets you update friends about your activities or musings. Millions of people use it to report what they see or feel, check for public announcements, and share links to photos and web pages. You have 140 characters per message to express your thoughts. And it’s free.
If you already have a Twitter account—and use it—get ready to let out a joyous holler, because iOS 5 lets you tweet (post updates) directly from many iPod Touch apps, including Safari, Maps, YouTube, Camera, and Photos. Just tap the ![]() icon in those apps to see the Tweet menu option.
icon in those apps to see the Tweet menu option.
Technically, Twitter’s not a built-in app, but so many iPod programs offer a tweet option that it’s best covered in this part of the book. To get full use of the Twitter experience with your iPod apps and see reactions to the things you share, you can install the Twitter app right from the Settings screen:
Tap Home→Settings→Twitter.
Tap the Install button to snag the program from the App Store. (You need to have an App Store account and password to get the app, so check out Set Up an iTunes Store Account if you don’t.)
If you already have a Twitter account, you don’t need to install the app if you just want to tweet out links and photos from your Touch. Type in your Twitter user name and password on the settings screen and tap Sign In.
If you’re new to this Twitter thing but want to take the plunge right on your iPod, tap the Create New Account button and follow along.
So now that you have Twitter installed and your personal Twitter account set up, what do you do with it on your Touch? If you’re an experienced Twitter user, you’ve probably already put this book down and gone off to post a few tweets to your pals.
If you’re brand-new to Twitter, you should take a spin over to the Support area of Twitter’s site. The company has set up its own online guide for using the service, as well as using the search feature to find out what everyone else is tweeting about. The guide is at http://support.twitter.com/groups/31-twitter-basics.
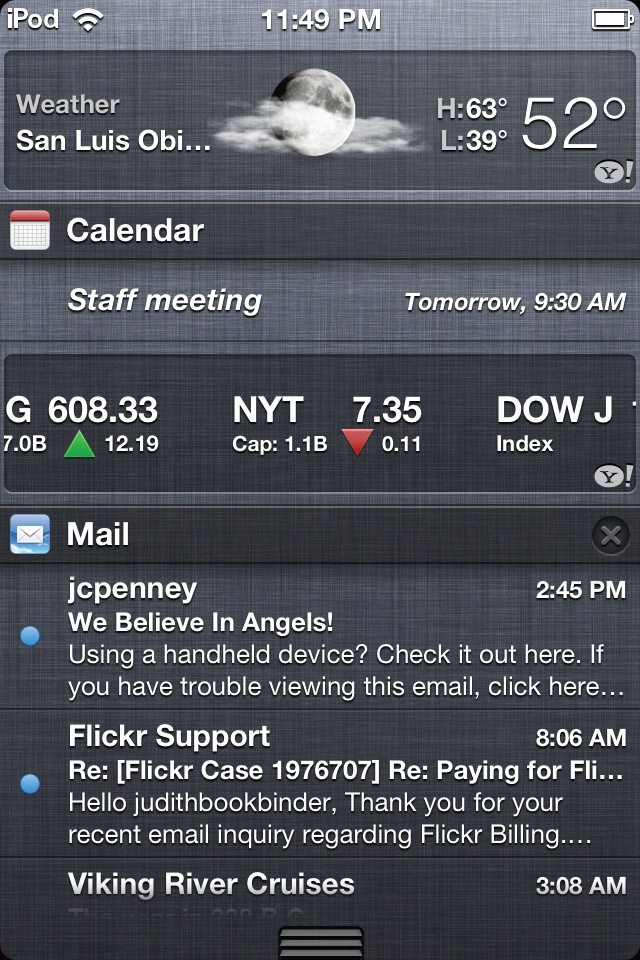
Use Notifications
THE IPOD’S NATIVE APPS can keep track of your life, from bugging you about meetings to reminding you to buy milk on the way home. Once you visit Settings→Notifications and turn on alerts for the apps you want to hear from, you’ll get little onscreen notifications no matter what you’re doing on the iPod.
But with all the various apps on board, wouldn’t it be great to have one place where you can review pressing matters, like calendar appointments, email messages, or pending to-do list items?
Thankfully, there is such a Dashboard of Your Life. It’s called the Notifications screen. To see it from anywhere or any app on your Touch, just place your finger at the very top edge of the screen and drag it downward, like you’re pulling down a miniature window shade. The Notifications screen appears.
You can get a quick hit of data and jump to any listed app or message by tapping it. Notifications also appear on the iPod’s Lock Screen so you don’t miss anything when you’re not using your Touch. To go right to a notice, put your finger on the app’s icon or message and slide it to the right. This both unlocks the Touch and opens the app that’s badgering you for attention.
By default, the Notifications screen shows you basic info-nuggets, like pending reminders, calendar appointments, stock prices, or any new email messages that have arrived. But like most things on the Touch, you can customize your Notifications screen by adding apps it, removing them, or resorting them.
To do all this, tap Settings→Notifications. You can sort the displayed apps manually or by time (meaning the newest updates appear highest up). To manually sort the apps, tap the Edit button in the top-right corner and use the grip strip (![]() ) to drag them into a new order. Tap an app’s name to turn its notifications on or off—or to further customize its display with one of two different onscreen styles (a small, top-of-the-screen “banner” or a larger, middle-of-the-screen “alert”).
) to drag them into a new order. Tap an app’s name to turn its notifications on or off—or to further customize its display with one of two different onscreen styles (a small, top-of-the-screen “banner” or a larger, middle-of-the-screen “alert”).
No matter when a notification popped onto your screen, you can always get a recap by dragging down the Notifications screen. To dismiss it, put your finger at the bottom of the iPod screen and flick upwards. Consider yourself notified.
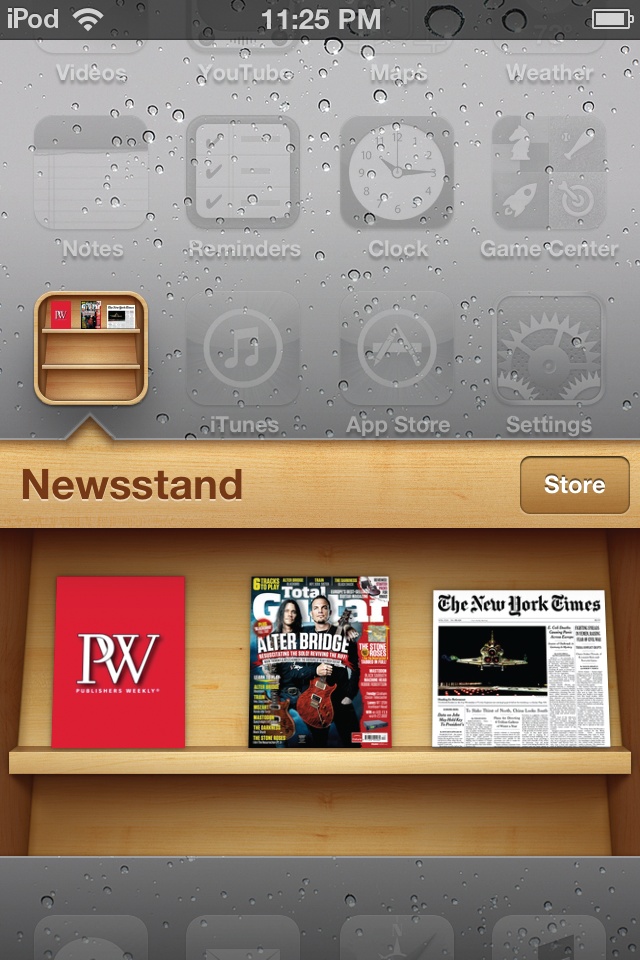
Use Newsstand and iBooks
Even though you may not use it—or haven’t had reason to yet—the Touch’s new built-in Newsstand app organizes all the digital newspapers and magazines you buy through the App Store. And Apple’s iBooks app, while not built-in, is easy to snag from the App Store so you can buy and download electronic books to read as well.
Yes, even though the Touch’s screen is much smaller than the iPad’s, the Touch is still a handy way to haul around dozens of magazines and hefty books in convenient electronic form—it’s like a bookstore that fits in your pocket, and the Touch is easier to hold and read on crowded trains, planes, and other tight spots.
First up, Newsstand. This app sits quietly on the iPod’s Home screen, waiting for you to download an electronic magazine or newspaper so it can display the material proudly on its virtual shelves.
“Hey,” you say, “That all sounds great, but how do I find and subscribe to digital magazines and newspapers in the first place?” Apple, in its quest to sell you more content, has made it extremely easy: Just launch the Newsstand app and tap the Store button in the top-right corner, as shown at the right.
The Newsstand whisks you to a special part of the App Store, one with electronic periodicals you can buy, subscribe to, and download to your Touch. The Store displays each ePublication as though it were an app, offering price, ratings, and other information. Tap a title to learn more, buy a single issue, or sign up for a subscription. The bill for your purchase goes to the credit card linked to your Apple ID (Set Up an iTunes Store Account).
If you need to cancel, renew, or adjust a subscription, log into your Store account with your Apple ID. You can do that right from the Touch by opening the iTunes Store app, flicking to the bottom of the screen, and tapping either your account name (if you’re signed in already) or Sign In. Tap View Apple ID, log in, and flick down to Subscriptions. Tap Manage and then tap the name of the ePublication you want to change.
If you sign up for a subscription, the Newsstand app automatically grabs each new issue and sends you a notification (if you have your settings configured to do so). The app also lists the number of new e-rags in a red circle on the Newsstand icon. Tap it open to see what awaits you on the faux-IKEA shelves.
On to iBooks. The first time you visit the App Store (Buy iPod Touch Apps), you’ll likely get a note from Apple asking if you’d like to download a free copy of its iBooks app so you can read eBooks. If this appeals to you, tap the Get iBooks button (you can always go back and download it later from the Apple Store).
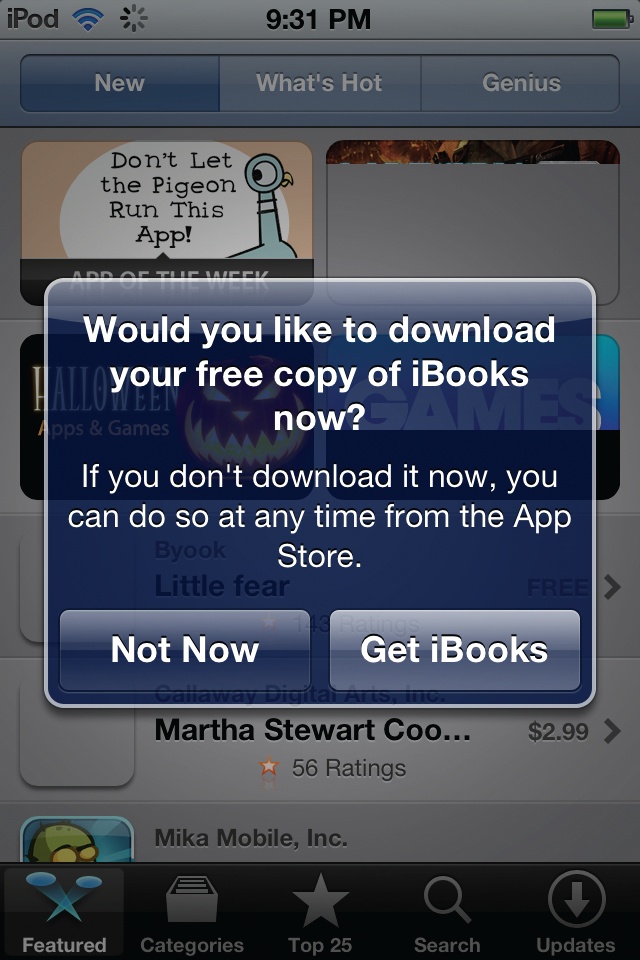
Once you install iBooks, you see it also has a Store button that beckons you to tap it. When you do, you’re swept right into the section of the App Store that sells electronic books. After you find something to read, tap the price to buy it—and to have it billed to your iTunes account. If you’re not sold yet, tap the Get Sample button to download a portion of it to evaluate. Tap the Library button to leave the Store and return to your personal book collection.
The books you download appear in the iBooks app. Tap a book cover to open the title and start reading. You can read your book in either portrait (vertical) or landscape (horizontal) mode.
By tapping the electronic page onscreen, you can summon the controls for navigating and customizing your reading experience. For instance:
Tap
 to go to the book’s table of contents or list of pages you’ve bookmarked.
Tap
 to make the type larger or smaller, pick a different typeface, or add a light-brown sepia tone to the page to make it easier to read.
Tap
 to search for text within the book—or on Google and Wikipedia.
Tap
 to bookmark your place. If you’re reading the book on different iOS devices, iBooks offers to sync your bookmarks between them.
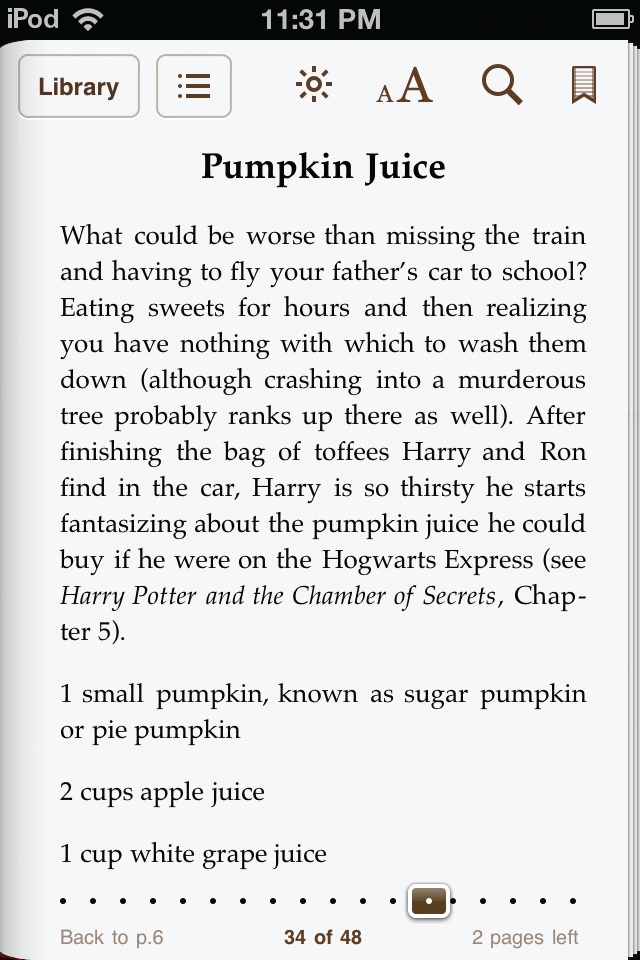
With your fingertip, use the brown slider at the bottom of the page to skip around in the book. When you’re done reading, tap the Library button in the top-left corner of a book’s page to close it and return to your Library. You can also open, read, and store PDF files in the iBooks app. The iPod as eBook and Text Reader shows you how.
Use the Touch Keyboard
THE TOUCH HAS FOUR buttons but no keys—and no physical keyboard. All your text input for web addresses, email messages, Game Center sign-ups, and more come from the Touch’s virtual keyboard. This keyboard magically appears onscreen whenever you tap an area that requires typed text.
Trained typists (or those with large fingers) may find the keyboard annoying at first, but most people feel it gets easier the more they use it. To enter a letter, tap the key you want. As your finger hits the screen, a bigger version of the letter balloons briefly into view so you can visually confirm your keystroke.
The keyboard works in portrait (vertical) mode, but it’s wider and easier to use in landscape (horizontal) view. It’s a regular old QWERTY keyboard, with a few special keys.
Shift (
 ). Need a capital letter? Tap this key first (it takes on an eerie white glow to show you it’s in action) and then type your letter, which should appear in uppercase. After all that excitement, the key returns to normal and your letters go back to lowercase.
Backspace/Delete (
 ). One of the most popular keys ever. Press this one to back up and erase previously typed letters. Tap once quickly to erase the first letter to the left. Hold it down to have it gobble letters a bit faster, like a reverse Pac-Man. Hold it down even longer, and it whacks entire words at a time for a speedier deletion experience.
 . The Touch keyboard has a finite amount of space, and not enough room for all the keys the average person needs. Tap this button when you need to type in numbers or punctuation, and the keyboard switches to a whole new set of keys. Tap the same key—which is now an
  key—to return to the letters keyboard. (Want to get to a special character more quickly? Press and hold the key until the keyboard changes, and then drag your finger over to the punctuation or number you need.)
Need even more characters? The Touch has a third keyboard tucked away. When you’re on the
keyboard, a  key appears. Tap it to get more obscure characters, like math symbols, brackets, and currency signs.
When you type letters into a note, an email message, a web form, or anyplace that’s not a URL, the Touch adds a return key to the keyboard so you can jump down from one line to the next. This key transforms itself to say “Join” when you type in a WiFi password, “Go” when you enter a web address, and “Search” when you enter keywords into the Safari search box.
To make up for its limited real estate, the Touch keyboard includes shortcuts that help you work faster:
Web addresses. When you type in Safari’s web address box, the keyboard adds a few characters to aid your URL entry, including an underscore, a slash, and a hyphen key. It also provides a .com button so you can finish off that address. For URLs that end with other suffixes, like .edu, .org, .us, or .net, press and hold the .com button to see them all, and then slide your finger over to the one you need. Tap the Go button to take off.
Accented or special characters. Need an accented letter, say an á instead of a regular a? Press and hold the a character to reveal a whole bunch of accented choices, and slide your finger onto the one you need. This trick works on most letters that take accent marks. You can also use it to get international currency symbols by holding down the $ key, or to get a § when you hold down &.
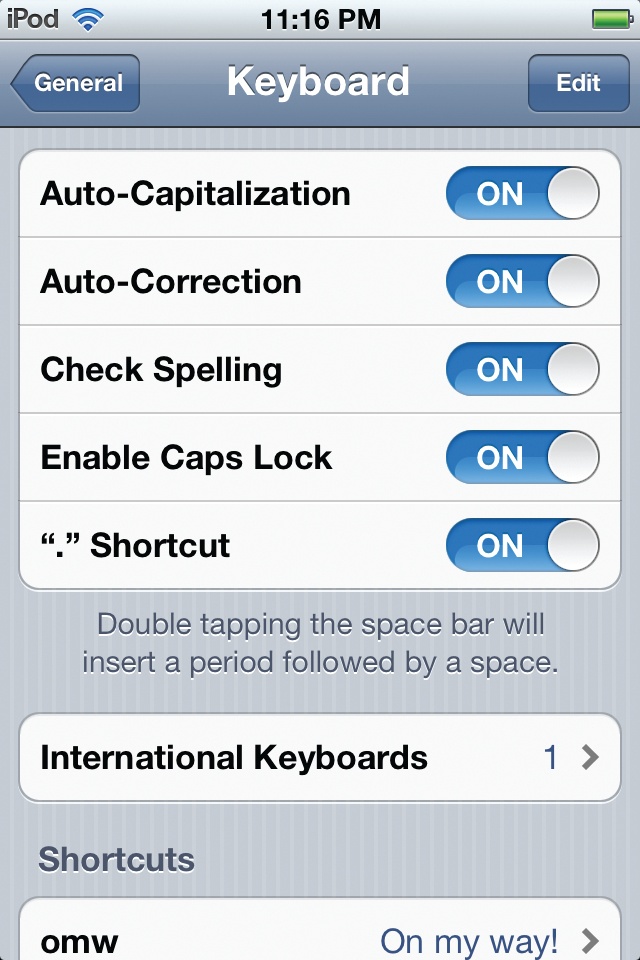
Keyboard settings shortcuts. Tap Settings→General→Keyboard to turn on (or off) all the iPod’s keyboard helper settings, like auto-capitalization (the next letter after a period gets capped), auto-correction (for catching typos), and the spell-checker that underlines suspect words in red. There’s also the Enable Caps Lock setting that kicks you into all-caps mode with a double-tap of the Shift (
) key and the “.” shortcut that inserts a period and a space when you double-tap the space bar.If you want to type in another language altogether, tap International Keyboards and select the language you want—the Touch offers around 50 keyboards, including those for Arabic, Cherokee, and Korean. Tap a language in the list to add its keyboard. When you’re ready to type with international flair, tap
 on the keyboard (it’s to the left of the space bar, as shown on the opposite page) and you can switch between languages and keyboard layouts.
You can also add text shortcuts for commonly used phrases. Just flick down to Shortcuts and tap Add New Shortcut.
Cut, Copy, Paste, and Replace by Touch
THE TOUCH HAS COME a long way as a device that can handle the conventions of modern word-processing. There’s no Ctrl or ⌘ key on its keyboard, though, so Apple incorporated tap-friendly commands for those convenient cut-copy-paste functions right into the Touch.
To cut or copy from text you can edit (like an outgoing email message or a note you created), double-tap a word to highlight it. A Cut | Copy | Paste box pops up. To select more words, drag the blue dots on either end of the selected word. Then tap Cut or Copy.
For pages you can’t edit (like incoming emails), hold your finger down until a magnifying glass and an insertion-point cursor appear. Drag it to the text you want to copy. When you lift your finger, a Select or Select All box appears. Select gives you the blue dots you can drag to highlight more text. Select All highlights all the text. Lift your finger, and you get a Copy button. A web page works differently: When you lift your finger, you get only a Copy button.
Tap the place where you want to paste the text—or jump to a different program and tap within it to get the Paste button.
Tap the Paste button to add the text to the new location.

Make a mistake and wish you could undo what you just did? Give the Touch a shake and then tap the Undo Edit button that appears onscreen.
Tip
If all this tiny typing is denting your productivity when you have to do some serious text input, consider getting a wireless Bluetooth keyboard for your Touch. True, you have to haul around a big chunk of gear—unless you’re at home in front of the TV. To use an external keyboard, turn on the iPod’s Bluetooth chip by choosing Settings→General→Bluetooth→On and then follow the instructions that came with the wireless keyboard for connecting it to the Touch.
In addition to the Cut, Copy, and Paste options in apps where you can edit text (like Notes or Mail), you can replace a misspelled word with one that’s spelled correctly—or look up its definition in the onboard dictionary by selecting it and tapping Define. If you have the Touch’s spell-check function turned on (flip back two pages), the Touch highlights typos (and unknown words) with a red underscore so they stand out as you proofread. (You do proof important messages, right?) These are the words you want to replace.
You can also replace one word with a closely related one (for those times when you typed close to, but not quite, the right word).
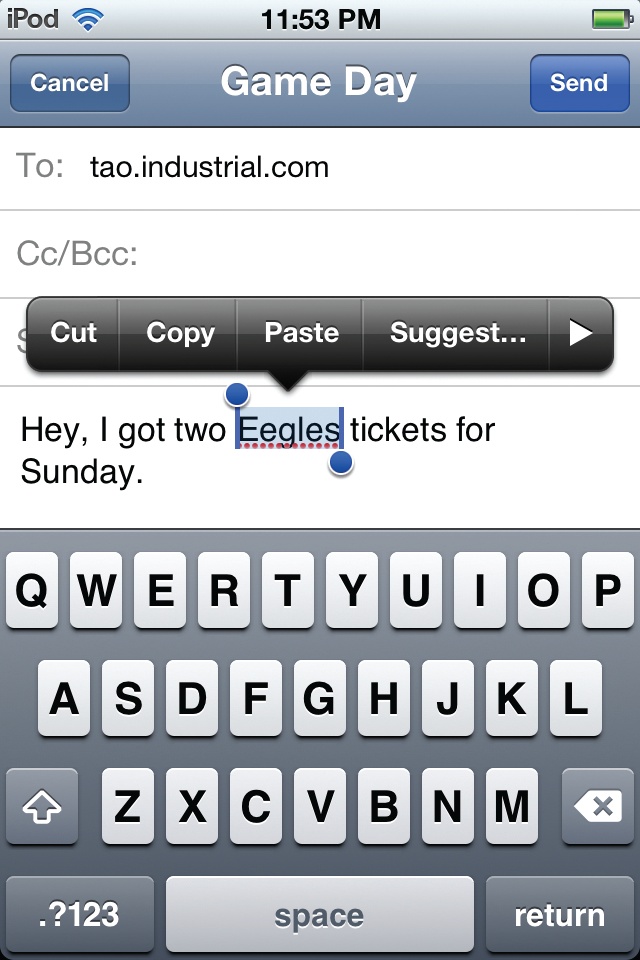
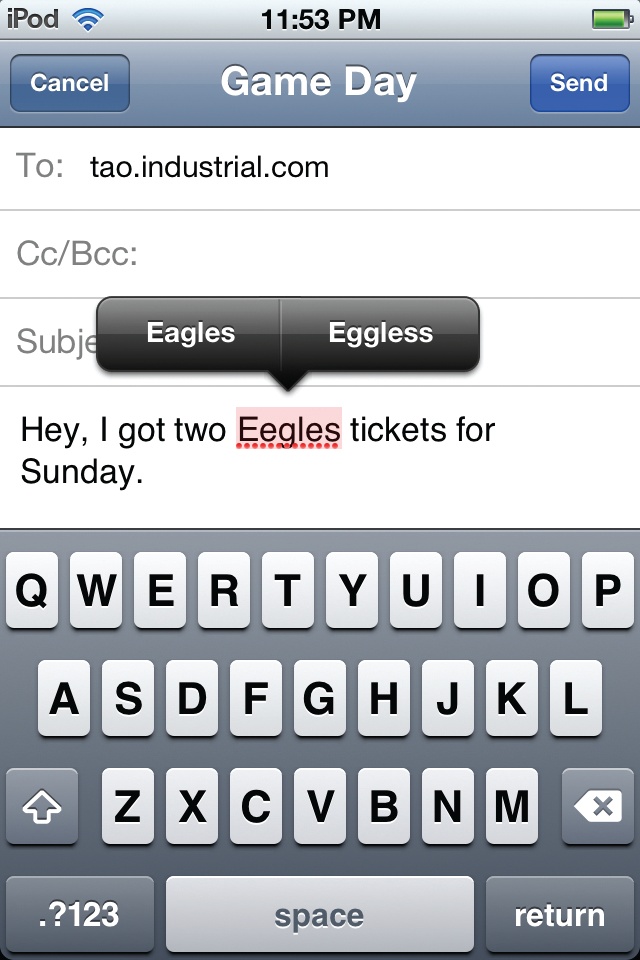
To get the Suggest option, double-tap (or Select) a word onscreen. When the Cut | Copy | Paste | Suggest… box appears (top right), tap Suggest. The Touch offers up a few alternate words. If you see the one you meant to type, tap it to replace the text. If it can’t find a similar word, you see a “No Replacements” message.
But enough about text—want to copy a photo or video into a message-in-progress or some other program? Hold your finger down on the screen until the Copy button pops up, as shown in the bottom-right photo. Tap the Copy button and then tap within the message body to get a Paste button. Tap it to insert your image or video.
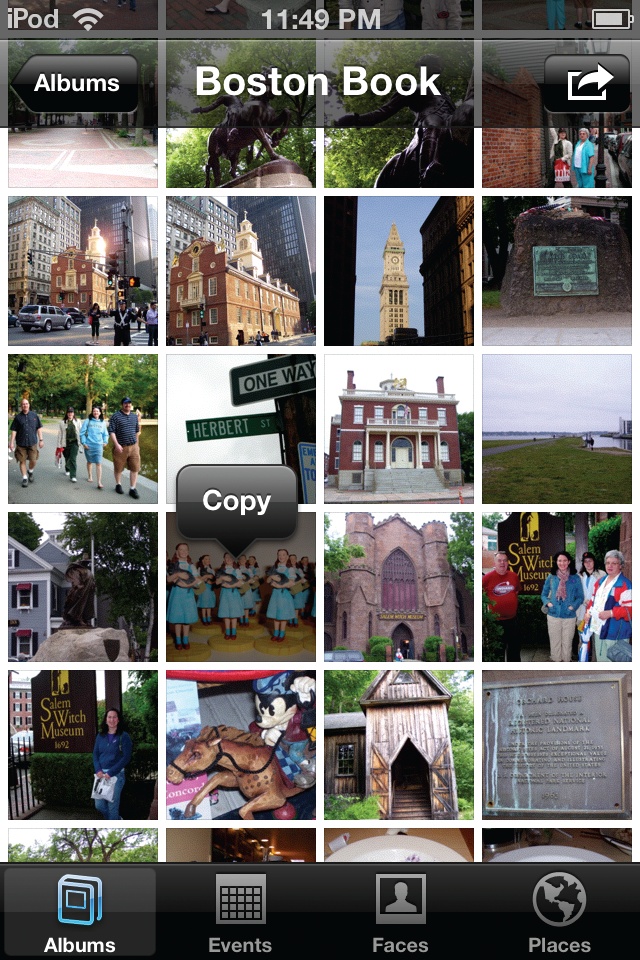
If you want to copy multiple items, like pictures out of a photo album, tap the ![]() icon in the top-right corner. Next, tap the photos you want to copy; blue checkmarks appear in the corners to confirm your selection. Tap the Copy button on the top-left of the toolbar, switch to the program where you want to deposit your pics (like a mail message under construction), and then press the glass until the Paste button appears.
icon in the top-right corner. Next, tap the photos you want to copy; blue checkmarks appear in the corners to confirm your selection. Tap the Copy button on the top-left of the toolbar, switch to the program where you want to deposit your pics (like a mail message under construction), and then press the glass until the Paste button appears.
Install (and Uninstall) New Apps
PROGRAMS FROM THE APP Store give your Touch all sorts of new powers. If you’re eager to try some out, here are two ways to trick out your Touch:
Buy apps in the iTunes Store. In iTunes’ Source list, click iTunes Store and then click the App Store link on the main Store page. After you shop, connect the Touch to your computer and sync ‘em up. Chapter 5 explains the fine art of syncing.
Buy apps on the Touch. When you’ve got a WiFi connection, tap the blue App Store icon on the Home screen and browse away. At the top of the Featured screen, you can see what’s new and hot—or what the iTunes Genius (Make a Genius Playlist in iTunes) thinks you might like. At the bottom of the screen, you find apps grouped by category and by the “Top 25 Apps.” A Search icon (
) awaits if you’re looking for something specific. When you find an app you want, tap the price icon; it turns into a Buy button. Hit that, type in your iTunes Store name and password (even if you’re downloading a free application), and the download begins. After the program finishes loading and installing, tap its icon to launch it.
It’s a fact of life: Sometimes apps don’t work out. They’re not what you thought they’d be, they’re buggy (it happens), or they take up too much precious Touch space. Here are two ways to uninstall an app:
Remove apps in iTunes. Connect the Touch to your computer, click its icon in iTunes, and then click the Applications tab. In the list, deselect the apps you want to remove and then click Sync to uninstall them.
Remove apps on the Touch. On the Home screen, press and hold the unwanted application’s icon until an
 appears in the wiggling icon’s corner. Tap the , confirm your intention to delete, and wave goodbye to that app. Press the Home button to return to business as usual.
Note
See a red, circled number on the App Store icon? You’ve got updates waiting for that number of apps; tap the icon to go into the App Store and see what they are. Tap the name of one of the programs, or tap the Price button (don’t worry, updates are free), and then tap Install. The App Store updates the program after you type in your password. For multiple-app updates, tap Update All in the top-right corner.
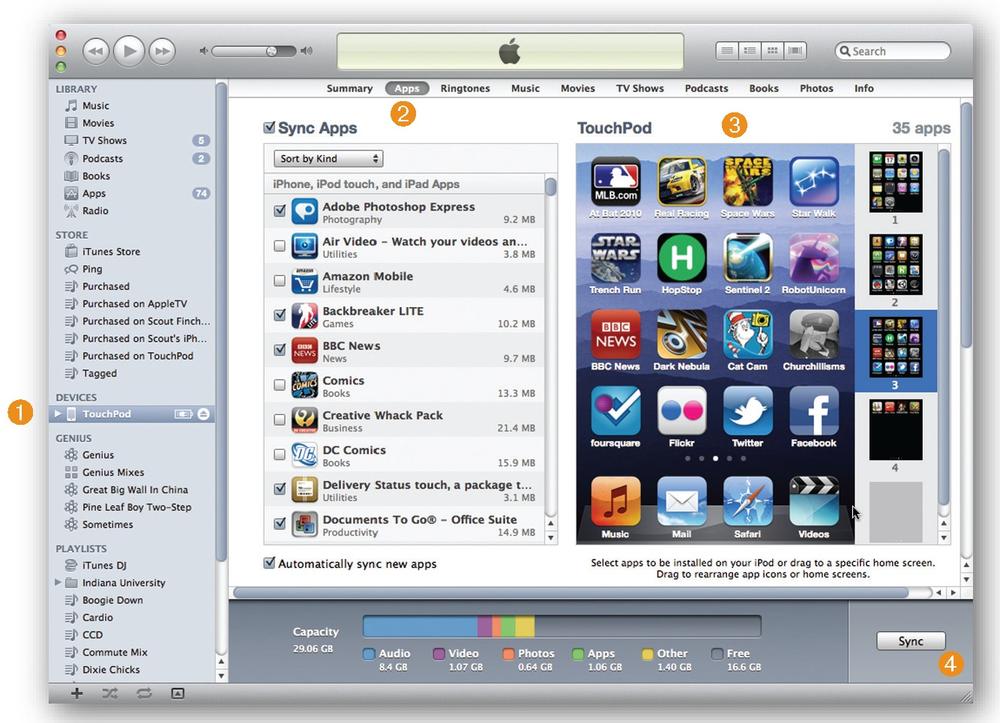
Manage Apps in iTunes
EARLIER IN THIS CHAPTER, you learned how to rearrange the icons on your Touch’s Home screen. And after reading the previous page, you may now have a ton of groovy new app icons all over your Touch—but not in the order you want them. Sure, you can drag wiggling icons all over the 11 pages of your Home screen, but that can get a little confusing and frustrating if you accidentally drop an icon on the wrong page.
Fortunately, iTunes lets you arrange all your Touch icons from the comfort of your big-screen computer:
Connect the iPod to your computer. Click its icon in the Source list.
Click the Apps tab. You now see all your applications—plus giant versions of each page of your Touch Home screen, all lined up vertically on the right side.
Select the icons you want to move. Once you click an icon on the large screen, drag it to the desired page thumbnail displayed along the right side of the screen to move it there. It’s much easier to group similar apps on a page this way—you can have, say, a page of games or a page of online newspapers. You can even change the four permanent icons in the gray bar at the bottom of the Touch screen.
Click Apply or Sync. Wait just a moment as iTunes rearranges the icons on your Touch, so they mirror how you have them in iTunes.
Snap and Edit Photos with the Camera
FOR YEARS, MANY TOUCH owners have pined for a hardware feature that iPhone owners could take for granted: a camera. In 2010, Apple granted that wish and then some—the Touch now has two cameras, one on the front and one on the back. Together, they provide the hardware you need for FaceTime video calls, shooting quick video clips, and snapping off still photos.
This section deals with the Touch as a still camera; flip ahead two pages to shoot and edit video. As digital cameras go, the Touch’s camera isn’t exactly a multi-megapixel powerhouse—it’s relatively low-quality compared to your regular camera or even the iPhone 4S. (But at least the Touch now has a camera.)
To start using it, tap the Camera icon on the Touch’s Home screen. Make sure the little slider in the bottom-right corner is set to ![]() (still camera) and not
(still camera) and not ![]() (video camera). Then line up your shot and press the shutter button (
(video camera). Then line up your shot and press the shutter button (![]() ) in the middle of the bottom toolbar. The Touch makes a little shutter-click noise, just like an old-fashioned film camera.
) in the middle of the bottom toolbar. The Touch makes a little shutter-click noise, just like an old-fashioned film camera.
The Touch saves your newly snapped picture in Photos→Camera Roll. A thumb-nail of the last shot you snapped also appears in the bottom-left corner of the screen; tap it to jump right to the photo in the Camera Roll album.
The Touch camera, while not exactly overloaded with the features of a standalone point-and-shoot camera, does offer a few controls for better photos:
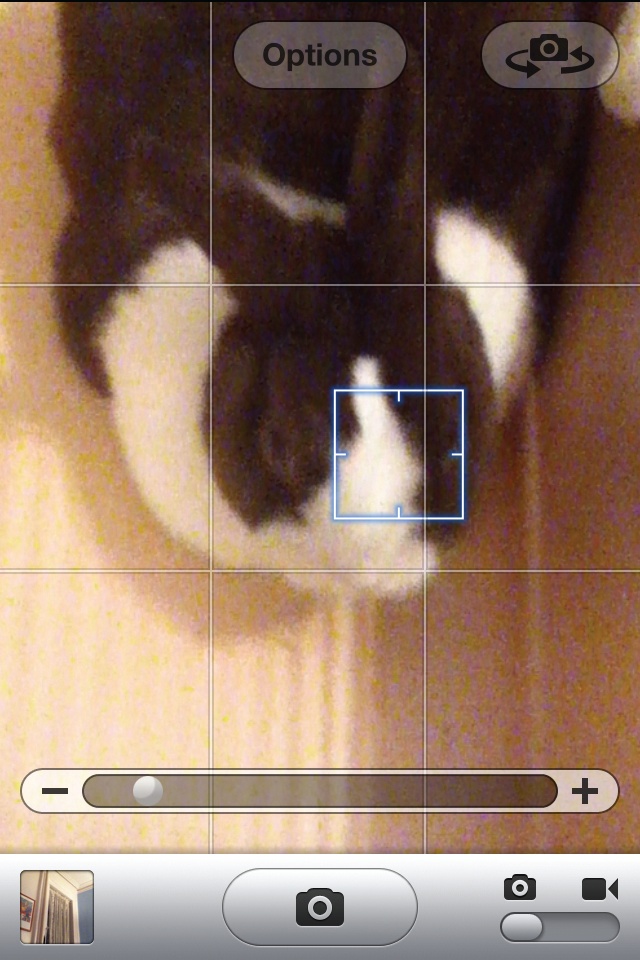
Exposure adjustment. Lighting is an important part of photography, and while the Touch doesn’t have a flash, it does let you adjust the exposure (the overall lightness or darkness) of an image. If you have a shot lined up, but one part of the frame is cast in shadows, tap a lighter area of the image. A blue-white square appears briefly onscreen and the Touch readjusts its overall exposure settings based on that area. Now snap the picture.
Zoom. Pinching the screen with your fingers to readjust the photo’s exposure brings up the zoom slider (shown above). If you want to narrow in on your subject and lose distracting background elements, drag the slider to the right until you have the framing you want. Drag the slider the other way to zoom back out.
Grid. Tap the Options button to overlay the screen with a nine-square grid to help you align and compose your shots.
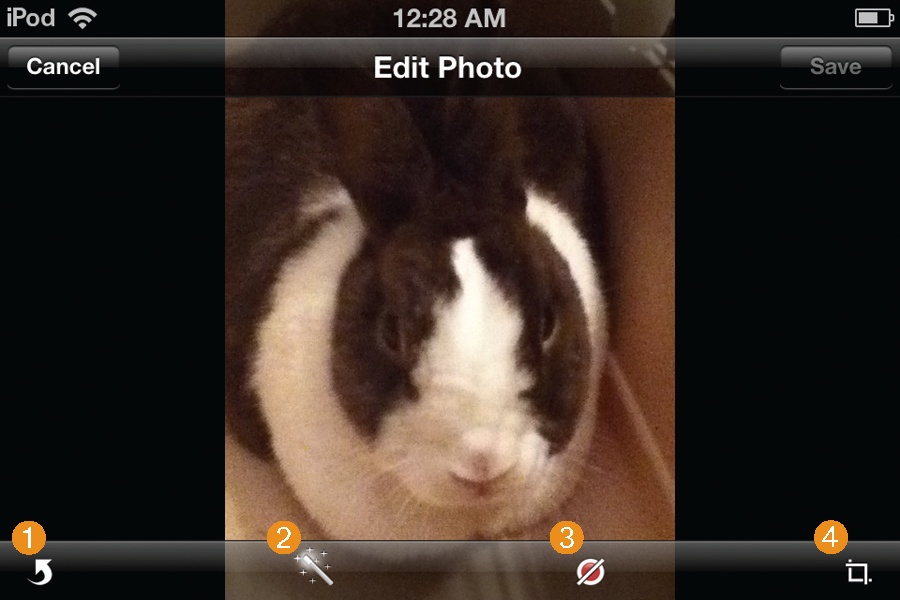
In iOS 5, you can do basic image-editing on your iPod. Just tap open a photo that needs fixing and tap the Edit button at the top of the screen. You can tap:
Rotate. Tap the Rotate button to spin a vertical shot into a horizontal one or flip it upside down.
Enhance. Tap here to have the iPod analyze the picture and improve its contrast, exposure, and saturation.
Red Eye. If your subject has glowing red demon eyes from your camera flash, tap the Red Eye button to give those devil peepers a neutral color.
Crop. Tap here to chop out the boring, distracting, or ex-boyfriend parts of a picture. In Crop mode, tap the Constrain button to conform to standard photo sizes, like 4 x 6, and then tap the yellow Crop button.
Hate that change you made to a pic? Tap the Cancel button to reverse it. Once you like an edited photo, tap the Save button to put a copy in your Camera Roll.
To change cameras and take a self-portrait with the front camera (circled below left), tap the Switch Cameras icon in the upper-right corner of the photo screen. As shown on these pages, you can take photos in either portrait (vertical) or landscape (horizontal) mode. The Touch’s rear camera (circled below right) sits in the corner on the back, so be careful when you shoot with it or you may get a stunning portrait of your own finger.

Shoot and Edit Videos on the Touch
CELLPHONES AND POCKET CAMCORDERS that can shoot video clips have boomed in popularity over the years—which could explain the noticeable increase in YouTube videos of cats riding Roomba vacuum cleaners. Thanks to its back camera that shoots high-definition video (at a resolution of 720p and at 30 frames per second), the Touch now joins the video party. Warn your pets.
Shooting a video on the Touch works a lot like shooting a still photo. And even though you can tap an area of the screen to adjust the exposure, there’s no zoom feature for video as there is for still photos.
Tap the Camera icon on the Touch’s Home screen to get started. When you want to shoot videos, make sure the slider on the gray toolbar is set to record video (![]() ) and not to snap still photos (
) and not to snap still photos (![]() ).
).
The tiny microphone next to the camera lens on the back of the Touch records audio to go along with your video.
You can hold the Touch vertically or horizontally to shoot video, but portrait-shot clips may get shrunk or letterboxed if you upload them to a video-sharing site that’s geared to display video in the more cinematic horizontal orientation. When you’re ready to start filming, tap the ![]() button. It flashes red to indicate that you’re recording.
button. It flashes red to indicate that you’re recording.
The time stamp in the upper-right corner of the screen shows the current length of your video-in-progress. When you’re ready to virtually yell “Cut!”, tap the ![]() button again to stop recording.
button again to stop recording.

Once you do, the Touch stores your clip in Photos→Camera Roll. To see what you shot without leaving the Camera app, tap the thumbnail preview at the end of the gray toolbar to call up the clip. Tap ![]() to play it back.
to play it back.
Editing Video on the Touch
Do you have a video where all the good action is in the middle? You know, the one where the first 5 minutes capture your voice trying to wheedle your toddler into dancing for Grandma—while the last 2 minutes show the inside of your shirt pocket because you forgot to turn off the camera? That stuff is easy to fix on the Touch.
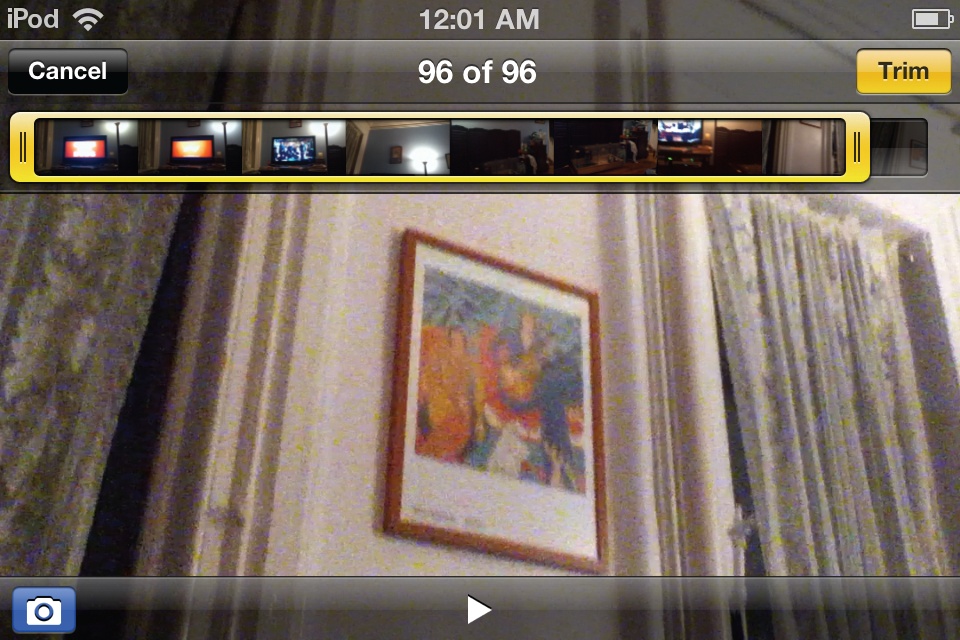
Here’s how to trim off the unnecessary parts on either end of a clip (you can’t edit within a clip):
Open the video you want to edit.
Tap the screen to call up the editing controls. The frame-viewer bar at the top of the screen displays scenes from the clip.
Press the outer edge of the frame-viewer so it turns yellow, and then drag either end of the yellow bar to isolate just the frames you want to keep. Tap the Trim button to cut away the detritus.
After you press the Trim button, the Touch offers you a choice of cutting the original clip (which makes this edit permanent) or saving the edited video as a whole new clip—while leaving the original version intact.
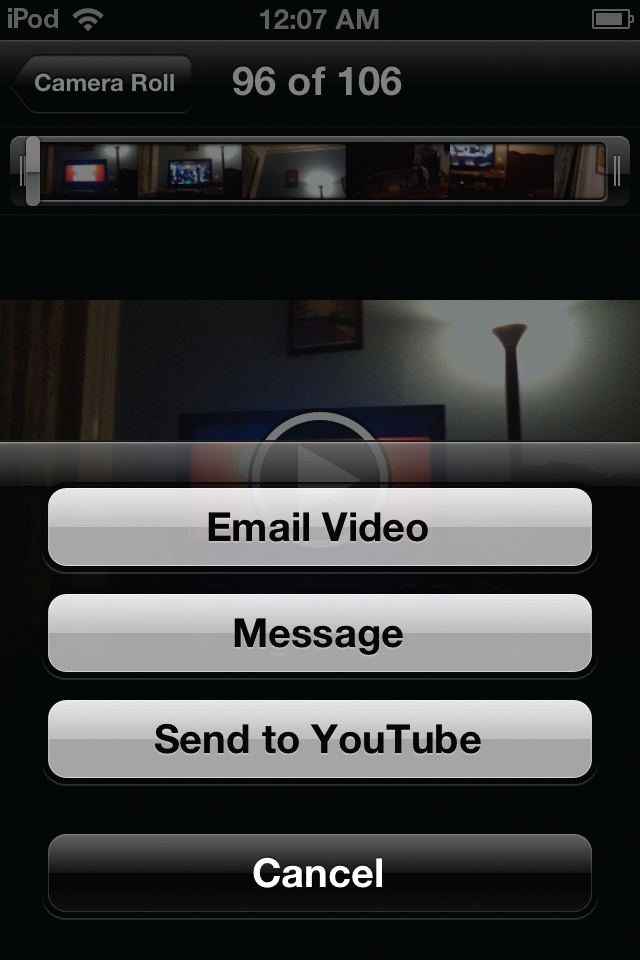
Share and Upload Photos and Videos
NOW THAT YOU’VE TAKEN all these great photos and videos on your Touch, don’t you want to share them with the world—or at least your friends and relatives? You can do that several ways:
Email. It’s easy to share selected photos and short videos directly with friends. Just tap Photos→Camera Roll to see your photos and videos (if you have the Camera app open onscreen, tap the thumbnail preview in the toolbar to jump to your collection). No matter how you get there, hit the
button, tap the thumbnails of the photos and videos you want to send, and then tap Share. A mail message appears with your files attached, ready for you to address and send. (You can also use the button to select files for deletion out of the Camera Roll.)Message. Tap the
icon on a selected photo or video to send it as an iMessage (Use iMessage) to friends with iOS 5 devices.Print. If you have an AirPrint printer (Print From Your iPod Touch), tap
for the Print option.Tweet. Got Twitter? Select a photo and tap
to see the Tweet command.Upload to YouTube. With a video clip open onscreen, tap the
button and select Send to YouTube. There’s an option to email it from here, too.Transfer to the computer. Connect your Touch to your Windows PC or Mac and use the Import command in your photo-organizer program (like Adobe Photoshop Elements, iPhoto, or Image Capture) to copy over photos and videos. Once you have the files on your computer, you can post them to your blog or a photo-sharing site.
Cover Flow in Motion
THE TOUCH CAMERA IS great, but if you like moving pictures—or pictures that really move—check out Cover Flow. Designed to show off your music collection to maximum effect, Cover Flow is basically a parade of album artwork that also lets you start playing music right away.
To use Cover Flow, tap the Music icon on the Home screen to get into your audio library. Instead of tapping through lists with the Touch in portrait mode, rotate it to landscape (horizontal) view. The text-based lists go away, replaced by full-color album covers. Flick your finger across the screen to see them whiz by.

An album cover doesn’t tell you what songs are on it, so stop flicking covers and tap one to see its track listing. You can also tap the ![]() button in the lower-right corner to spin the cover around and see the song list. To hear a song play, tap its title in the list. To pause the song, tap
button in the lower-right corner to spin the cover around and see the song list. To hear a song play, tap its title in the list. To pause the song, tap ![]() in the lower-left corner; press
in the lower-left corner; press ![]() to start it up again.
to start it up again.
To flip back to the album art, tap the track listing (![]() ) or the
) or the ![]() button again. When you’ve exhausted the sheer visual excitement of Cover Flow (or you have to do something else for a while), turn the iPod back to portrait mode (upright) to return to your lists and screen icons. Cover Flow may not do much for some people, but it sure is pretty to watch.
button again. When you’ve exhausted the sheer visual excitement of Cover Flow (or you have to do something else for a while), turn the iPod back to portrait mode (upright) to return to your lists and screen icons. Cover Flow may not do much for some people, but it sure is pretty to watch.
Tip
With all the audio and video files—not to mention email messages, contacts, calendar appointments, and other stuff—on your Touch, you may wish for a quick way to find a specific item. Wish no more. On the first Home screen, swipe your finger to the right to get a handy search box. Type in the name of the app or title you seek and tap the Search button to retrieve it.
Explore the Now Playing Screen
THE TOUCH SHOWS OFF photos and videos quite nicely, and it even makes your music look good. Cover Flow (see the previous page) is one example, but even if you’re just listening to an album, you get a big visual reminder of what you’re listening to. This is called the Now Playing screen.
In addition to lovely giant cover art, the Now Playing screen displays icons and information along its top edge to control your music. Here’s what everything means, starting from left to right:
Back arrow (
). Just like the Back button on a web browser, tap here to go back to the screen you were on before you landed here.Song information. The top-center of the Now Playing screen displays the name of the current song, the artist performing it, and the album it’s on.
Track listing (
 ). The information in the middle of the screen tells you the current song’s name. Tap this icon to see all the tracks you have from this album. (You can also double-tap the album cover, which spins around to reveal the list of tracks on the album.)
Tip
Have you ever wanted a computer like the ones on Star Trek, where you could just speak a music playback command out loud and have the machine respond and obey? You can do that easily on the latest Touch models (or even on a slightly older model with Apple’s headset/microphone combo) thanks to the Voice Control feature. To use it, hold down the Home button until the blue Voice Control screen appears and beeps. Then speak your commands clearly into the Touch.
Sample commands include “Play artist Beyoncé” or “Play album ‘Let It Be’.” Say “Shuffle” to shuffle or “Genius” to hear similar tracks. “Play” and “Pause” work as commands, and you can even ask, “What’s playing?” To turn off Voice Control, say “Stop” or “Cancel.” If English isn’t your native tongue, you can change the language that Voice Control responds to by choosing Settings→General→International→ Voice Control→[Language].
Sure, it’s not quite the Siri personal assistant that rides along with the iPhone 4S, but it can be fun to boss the Touch around when you want to listen to music.
When you tap the
button on the Now Playing screen to see an album’s song list in high-contrast white type on a black background, a blue triangle identifies the track currently playing. If you’re tired of that tune, tap a different song title to hear that one instead.Looking at your song titles on this screen gives you the opportunity to add your own personal star ratings. As the song plays, swipe the row of dots along the top part of the screen to convert them into stars. You can rate songs from 1 to 5 stars, and the ratings you add to your songs here get synced back to iTunes when you connect Touch to computer. Chapter 5 has more on star ratings.
When you tire of looking at track names and rating songs, you can return to the full-screen album art view by tapping the tiny album cover in the top-right corner.

Like Cover Flow, the Now Playing screen looks the coolest when you have big, bright, colorful album covers for your song files. If you purchased your music from the iTunes Store or another online music emporium, the album art came with it. If you ripped the tracks yourself and didn’t add any album artwork, you probably see a boring old gray music note. If you find this aesthetically unap-pealing, flip to Replace Album Covers Manually for art lessons.
Control Music on the Now Playing Screen
THE NOW PLAYING SCREEN is more than just a pretty face for your music. You can also manage current-song playback from this screen. Here’s what the various icons mean, starting with that strip along the bottom of the screen:
Play/Pause (
 /
/ ) button. The Now Playing screen usually means something is playing; you pause the song by tapping , and restart it by tapping .
Previous, Next (
 ,
,  ). To hear a currently playing song from the beginning again, tap . If you’re already at the beginning of a song, tap to go to the previous track. Conversely, if you want to skip a long fade-out and blow on through to the end of a song, tap the key. Tapping the same key at the end of a song takes you to the next track.
Miss the days of fast-forwarding or rewinding cassette tapes to hear the quality parts of a song? Press and hold
or to simulate the process on the Touch. The longer you keep the button pressed, the faster the song leaps by.Volume. Sure, your Touch has physical volume buttons on its outer edge, but sometimes you don’t feel like readjusting your grip on the player to scootch the volume up a notch for that cool saxophone solo in the middle of a song. With the volume slider at the bottom of the screen, you can boost or reduce the sound by dragging the big white dot with the tip of your finger. (If you do use the physical volume buttons while looking at the Now Playing screen, you see the onscreen slider move magically by itself.)
If you have an Apple TV or an AirPort Express that you’ve connected to your TV, home-entertainment sound system, stereo, or set of powered speakers (Stream Music and Video from iTunes), you also see the AirPlay icon ( ![]() ) on the playback control bar. Tap it and choose an output source from the list on the screen.
) on the playback control bar. Tap it and choose an output source from the list on the screen.
But wait, there’s more to the Now Playing screen! It’s just not real obvious until you tap the screen again to call up another layer of playback controls—the ones that like to stay out of the way unless you really want them. (Tap the screen again to hide them when you’re done.) Here they are:
Loop. Certain songs are so good that you want to play them over and over and over again. To make that happen, tap the Loop button (
 ) button twice until it looks like
  . If you want to put the album itself on repeat, tap the Loop button only once, so that it turns a nice shade of blue (
 ).
).Like. If you’re logged into Ping (Ping Your Way to New Music), tap the
 icon to tell your pals you like the song.
Scrubber bar. This slider at the top of the screen shows you the total length of the song, how much time has elapsed, and how much is left to go. Drag the white dot (formally known as the “playhead”) to a different time to skip to that part of the song. The “2 of 19” (or whatever) number above the scrubber bar tells you where this track falls in the album or playlist.
Genius playlist. Tap the
 icon to make a Genius playlist based on this song. Chapter 6 has the details.
Ping post. Tap the
 icon to share your thoughts about the track on Ping.
Shuffle. If you like to mix things up, the Touch can shuffle the tracks in the current album or playlist for you. Just tap the
 button. When it turns blue, the Touch plays the songs in random order. Tap
  again to turn off Shuffle and return to the standard playback order.
If you’re listening to an audio podcast, you might see three other icons:
30-second playback. Tap the
 icon to replay the last half-minute of audio in case you missed something.
Playback speed. Tap
 to hear the audio in double time, tap
  to hear it slowed to half-speed, and tap
  to hear it at its normal speed.

Set Up Mail Accounts
WHEN YOU’RE NEAR A WiFi hot spot, the Touch is a traveling email machine that lets you read, write, and send messages. And just as there are two ways to get apps on the Touch, there are two ways to set up your email accounts.
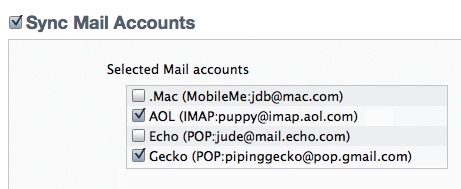
Sync mail settings with iTunes. You get email on your computer, right? If you’re using a dedicated program, like Microsoft Outlook or Apple Mail, you can copy those account settings over to the Touch. Connect the Touch to your computer, click its icon in iTunes, and then click the Info tab. Scroll down to Sync Mail Accounts and turn on the checkbox next to it. All the email accounts you have configured on your computer are listed underneath, so turn on the checkboxes next to the ones you want to tote around on the Touch. Click Sync or Apply to copy the settings—but not your computer-based messages—over to the Touch.
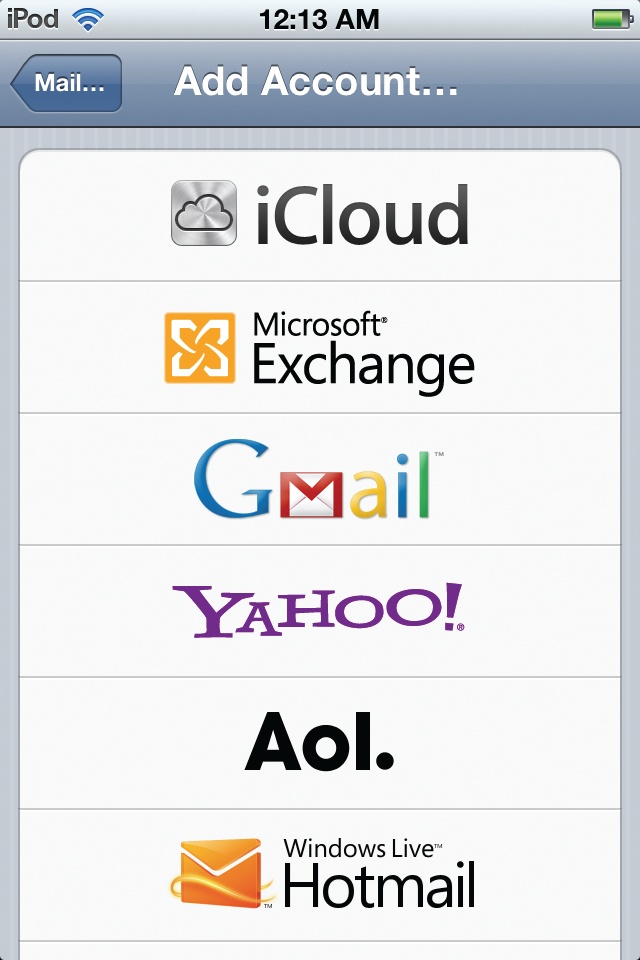
Set up mail accounts on the Touch. Tap the Mail icon. You can set up a free iCloud account (Set Up an iCloud Account) or, if you use Exchange, Gmail, Yahoo, or AOL, tap the appropriate icon. If you don’t use any of those, tap Other. On the next screen, type in your name, email address, password, and a brief description (“Gmail,” say). If you tapped Other, type in the account settings you got from your Internet provider when you signed up. Click Save, and the program fetches your mail. Need help sorting through email geekery, like the difference between IMAP and POP? Check out this book’s Missing CD page at http://missingmanuals.com/cds/ipodtmm10/.
Use Email on the Touch
MAIL ON THE TOUCH looks and works pretty much like any other email program. You can:
Check mail. Tap the Mail icon on the Home screen. If you have just a single account on your Touch, you see just one Inbox. If you’re juggling multiple mail accounts, the Inboxes area of the Mailboxes screen displays the name of each account, the number of new messages in each, and the overall number of new messages. You can get to the individual mailbox folders for each account (like Sent and Saved) by tapping their names in the Accounts list. Tap the
 button in the bottom-left corner to check for new messages.
Read mail. When you have an Inbox open on the screen, tap a message preview (pictured in the bottom screen at right) to open it. A blue dot means you haven’t read that message yet. If you open the message and want to remember to read it again later, tap Details on the From line and then tap the blue Mark Unread link that appears.
Write mail. To compose a new message, tap the
icon in the bottom-left corner of the mailbox screen or in an open message. An empty message form and the Touch’s keyboard appear, ready for you to write and send mail. To format text, select it, tap the icon on the menu, tap B/U, and then pick a style.Delete mail. Tap the
icon at the bottom of the screen to trash an open message. Delete a message without opening it by swiping your finger across its Inbox preview and tapping the red Delete button that appears. To trash bulk mail in bulk, tap the Edit button in the upper-right corner of the Inbox screen. Tap the preview of each message so a red checkmark appears, and then tap Delete to whack them all at once.
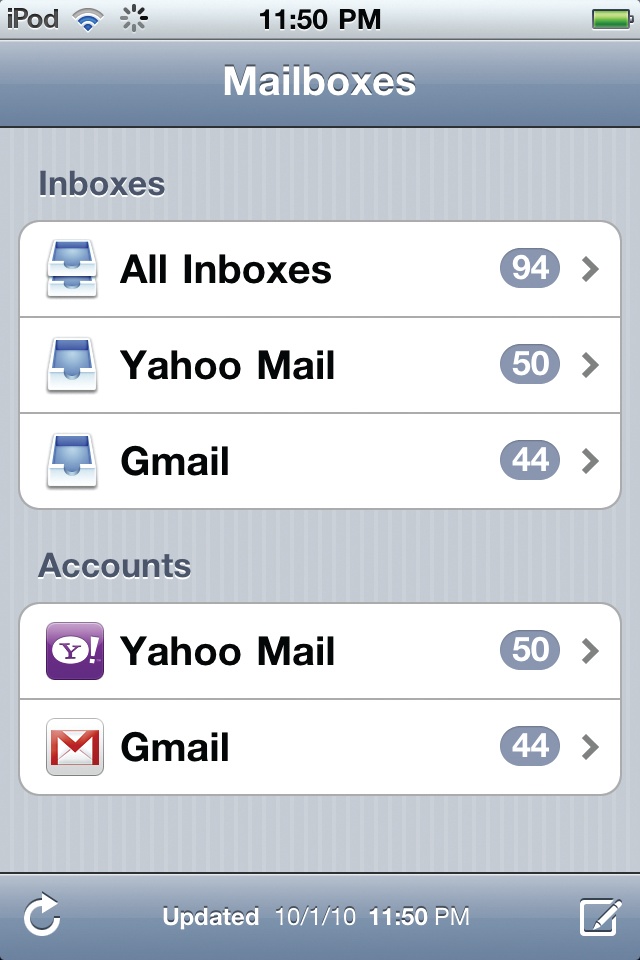
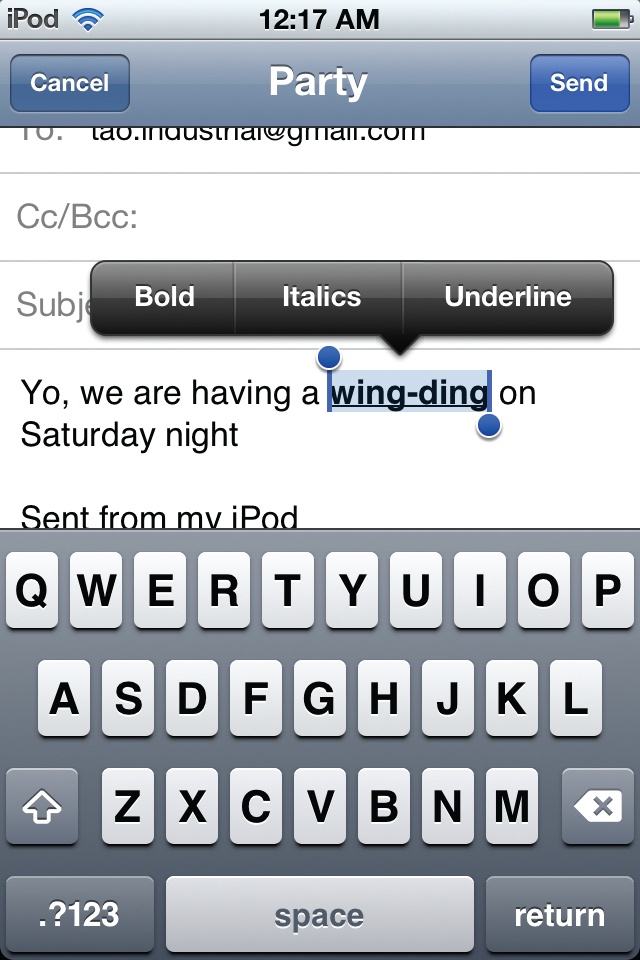
On the Edit screen, you can also move messages to another mail folder, tap the Mark button to flag messages (![]() ) for later, or mark them as unread.
) for later, or mark them as unread.
Organize Apps in Folders
AS MENTIONED EARLIER IN this chapter, you can have up to 11 Home-screen pages on your Touch and flick across them to find the apps you want. But some app-loving folk can quickly fill up all 11 screens with icons. Also, some people would prefer a tidier way to group their apps than dragging them around to different pages.
This is where Home screen folders can make everything better. You can have up to 12 apps in a single folder—which looks like an icon with little icons nestled inside it (right). Putting apps in folders saves screen space and keeps them corralled. By default, most new Touches come with one folder from the start: the Utilities folder, which contains the Contacts, Calculator, and Voice Memos apps.

To create a folder, press and hold an icon until it wiggles, and then drag that icon on top of one you want to put in the same folder. When you do, you automatically create a folder and see a bar with a generic name for it, like “Games.” You can keep this name or replace it with one of your own. Once you set up a folder, you can drag up to 10 more apps in to fill it up. Tap the screen to close the folder.
To launch an app inside a folder, tap the folder to open it, and then tap the app you want to use.
If you change your mind and want to pull an app out of a folder, open the folder and press and hold the app’s icon to start the Wiggle Dance. Now you can drag it out of the folder and back to its place on the Home screen proper.
To get rid of a folder altogether, press an icon to get them all wiggling. Drag all the apps out of the folder and back to the Home screen. When the last app is out, the folder disappears.
Multitask on Your Touch
PUTTING APPS IN FOLDERS helps you organize your Touch screen more precisely, but it doesn’t save you a lot of time when you’re in the middle of one thing and want to switch over to use another app real quickly—like if you’re reading email and want to nip out and turn on your Pandora radio app to hear some tunes as you shovel out your Inbox. Who wants to go all the way out to the Home screen for that?
Fortunately, the Touch has a shortcut. When you’re in an app, click the Home button twice. A row of four icons sprouts from the bottom of the screen, shoving the app you’re currently using up to the top of the screen (top-right).
These four icons represent the apps you’ve recently used. Tap one to quickly switch to it. Turn on Pandora, check your sports scores, do whatever it is you wanted to do. When you finish, double-click the Home button again. When the row of icons appears, tap the icon of the app you were previously using to return to it.
If the app you want isn’t in this initial row of four, flick the icons from right to left until you find the one you want.
To kill apps in the hidden row that you haven’t used in forever (because they may be hogging memory), press down on an icon until the ![]() symbol appears. Tap it to remove the app from the recently used list—but not from the Touch itself. Press the Home button when you’re done.
symbol appears. Tap it to remove the app from the recently used list—but not from the Touch itself. Press the Home button when you’re done.
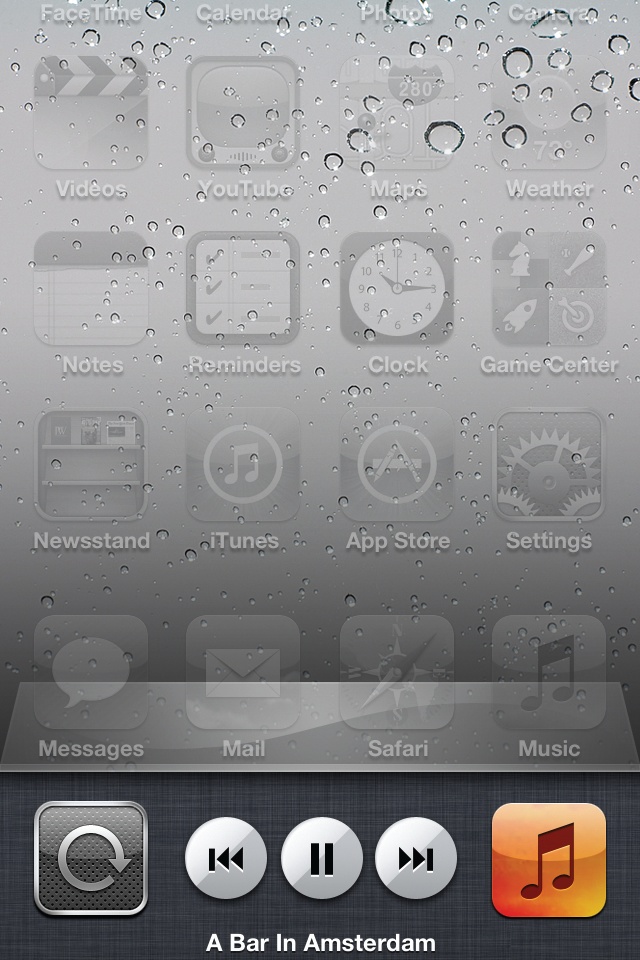
In addition to your most recent apps list, the Home button double-click offers another time-saver. Instead of flicking right to left to see the recent apps, flick left to right to see the Music playback controls (bottom right). These can save you the trouble of going all the way back to the Now Playing screen to skip a playlist track. And if you get agitated when the Touch reorients itself into landscape view when you try to read an eBook or write a message in bed, tap the first icon, the circular arrow in the left corner. This locks the Touch into portrait mode no matter which way you hold it—until you tap this icon again to unlock the screen.