Chapter 8. Tour the iPod Classic

You’ll learn to:
Set up your Classic
Navigate its menus, jacks, and switches
Load your Classic with music
Customize its settings
Turn the Classic into an external hard drive
INTRODUCED IN THE FALL of 2001, the original chunky white iPod changed the world of portable entertainment, melding form and function into an easy-to-use pocket media player. Eleven years later, the iPod has evolved into several different versions, but the essence of original model lives on today as the iPod Classic.
As with the original iPod, today’s Classic is still simple to operate—five buttons and a click wheel take you to all your songs, movies, games, audio books, and everything else parked on your ’Pod. Even though the player doesn’t have a mouse, its controls work just like those on a desktop computer: You highlight an item on-screen and click the Classic’s center button, which either takes you to another menu of options or triggers an action—like playing a song, calling up a calendar, or displaying the time in Paris.
This chapter gives you a tour of the Classic’s many features and shows you how to load up the player with music. When you’re ready to put the multi in multimedia, visit Chapter 14 to learn how to watch video and Chapter 15 to load up photos. While this iPod may lack Internet connectivity and the small size of other iPods, its storage space (a whopping 160 gigabytes) and versatility make it well-rounded and, well, Classic.
Set Up the iPod Classic
UNLIKE ITS DESCENDANT, THE iPod Touch, the iPod Classic needs to connect to your computer—and iTunes—as part of the setup process. So if you haven’t installed iTunes on your Windows PC or Mac, flip back to Install iTunes for instructions.
Once you have iTunes up and running, take a look inside the box your Classic came in. It should include these items:
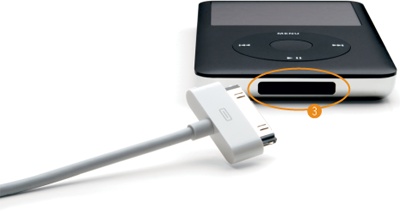
A USB cable to connect your Classic to your computer. Although other iPods use Apple’s new and smaller Lightning port, the Classic still gets its power and media files via the original 30-pin Dock Connector cable, shown below.
A little pamphlet of quick-start information that’s not nearly as fun or as colorful as this book.


What you want right now is the USB cable. Connect the small, narrow end to your computer’s USB port and the wide, flat end to the iPod Classic. (Thanks to the USB connection, the iPod’s battery begins to charge when you plug it into the computer.) If it’s not open already, iTunes leaps into action, popping up on your screen, ready to walk you through the Classic configuration process.
Use iTunes to Configure Your Classic
The iTunes Setup Assistant now takes over. It walks you through a few screens that format your new Classic for use with a Windows PC or a Mac, and then it loads music and other content onto your ’Pod.
If this isn’t your first iPod—maybe you had a Nano or a Shuffle and decided you needed a lot more room for your music collection and only a 160-gigabyte Classic would fit—you might already have music tracks and other files in your iTunes library. If that’s the case, iTunes can copy all those audio tracks over to your new Classic and you’re good to go.
But if this is your first visit to Apple Land and you’ve never used iTunes to load up an iProduct, you can have iTunes automatically copy over your media to your iPod; see Load Music onto the iPod Classic for details. Alternatively, you can pick and choose (or “manually manage”) what goes onto your iPod; see how on Manual management.
In addition to formatting the Classic, the Setup Assistant offers to register your new iPod with Apple. These screens take a few minutes to click through, but can pay off later, as your iPod’s serial number is linked to your name in Apple’s database—and that can speed up technical support at the Genius Bar or an Apple-autorized provider since there’s a record of your purchase.
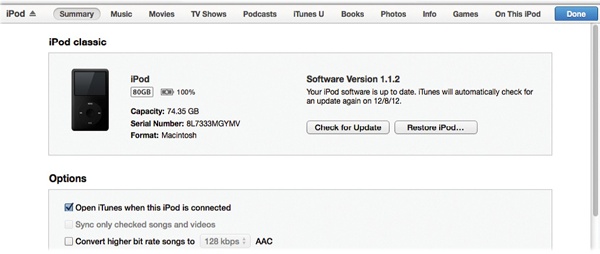
When you finish setting up and registering your new Classic, its icon appears at the top of the iTunes window, under “iPod.” Click the iPod’s icon to see details on your new media player—and, as you will soon see, to copy files to it.
iPod Classic Ports and Switches
ALTHOUGH THE BIG WHEEL on the front of the Classic gets all the attention, the top and bottom edges of the player handle all your connections for power and sound. Here’s what each port and switch does:
On the top edge of the iPod Classic, you have:
Hold. The Classic is the only iPod left with a physical Hold switch. Slide it to the On position (with the orange background visible) to lock down the Classic’s controls so your iPod doesn’t accidentally get bumped on or off when it rattles around in your pocket or bag.
Headphones. The small, round jack on the top of the Classic is where you plug in your white earbuds. And if you don’t like white earbuds or want to use a different style of headphones altogether, just plug them in here—as long as your new cans use the standard 3.5mm plug.
On the iPod Classic’s bottom edge, you have:
Dock Connector. This flat, thin jack is where you plug in one end of the iPod’s USB cable so you can connect to your computer to sync up your iTunes library, charge up your Classic battery, or connect external speakers and docks.

Control the iPod Classic
JUST AS WITH THE original Classic, you still drive today’s model with that great big ring of controls on the front of the player. Commonly called the click wheel, this where you control your Classic’s playback functions for music, video, games, and photo slideshows. To turn on the Classic, push any button on the wheel. From there, you control the player like so:
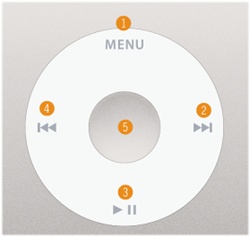
Menu. Tap this button to return to any screen you just viewed. For example, if you visited Music→Playlists→My Top Rated, you’d press Menu twice to return to the Music menu.
Next/Fast-Forward (
 ). Press here to jump to the next song in a playlist (Chapter 12), or hold the button down to zip through a song that’s playing.
Play/Pause (
 ). This button starts a song; push it again to pause the music.
Previous/Rewind (
 ). Press and release this button to play the song before the current track, or hold it down to “rewind” within a song.
Center button. Press here to choose a highlighted menu item. When you have a song title highlighted, pressing Select begins playback. If you press the Select button while a song plays, you cycle through the Classic’s options. You can scrub (fast-forward through a song’s audio) to a certain part of the song (Jump Around Within Songs and Videos); assign a star rating to the song by sliding your thumb over the wheel until you see one to five stars on-screen; choose song and album shuffle options; and turn on the iTunes Genius for automatic playlist-creation (Make a Genius Playlist on the iPod). If you pasted lyrics into your song files in iTunes (Add Lyrics to Your Song Files), you can press Select until you see the words on-screen.
If you get no response when you push a click-wheel button, check to make sure the Classic’s Hold switch (previous page) isn’t on and that the iPod’s battery hasn’t run down. (Charge Your iPod has more on charging up the battery.)
Navigate the iPod Classic’s Menus
LIKE ANY MODERN GADGET, the iPod uses a series of menus and submenus to control it. You can recognize the Classic’s top-level, or main, menu because it says “iPod” at the top of the screen. No matter how deeply you burrow into the player’s submenus, you can always get back to the main menu by repeatedly pressing the Menu button on the click wheel.

Think of Classic navigation like this: Press the center button to go deeper into menus and press the Menu button to back out, retracing your steps along the way. The contents of your iPod menu vary a bit depending on what you’re doing at the time and whether you changed any of the default settings, but here’s the basic lineup. The next page shows you how to mix and match menu items:
Music. The Music menu holds all the submenus that let you organize your collection—Cover Flow (Cover Flow in Motion), Playlists, Artists, Albums, Compilations, Songs, Genres, and Composers. Audiobooks and a Search feature live here, too. Select a submenu, say Albums, to see your music grouped by album.
Videos. The Classic stores your movies, TV shows, and music videos under the Videos menu, as it does any iTunes movies you rent or video playlists you create. The Video Settings menu, which lets you connect the Classic to a TV so you can see photos and movies on the big screen, is here, too.
Photos. Pictures and photo albums you sync from your computer (Set Up: Get Ready to Put Photos on Your iPod) are here, as well as the timing and music settings for slideshows.
Podcasts. Those free audio and video shows you download from the iTunes Store live under this menu.
Extras. You’ll find things that make the Classic more than a media player—clocks, calendars, games, and notes—under the Extras menu; they’re described beginning on The iPod as Address Book.
Settings. As with your desktop computer, you can tweak and fine-tune your iPod’s settings to your heart’s content. Adjust The iPod Classic Settings explains what each item in the Settings menu can do for you.
Shuffle Songs. Want to mix up the music? Scroll to the Shuffle Songs menu to have your Classic spin tunes in random order.
Now Playing. You only see the Now Playing option if you have a song currently playing. Scroll down and select it if you can’t remember the name of that song wafting into your ears.
Customize Your iPod’s Menus
The iPod Classic lets you customize both your main menu and your music menu so you see only the options you like. For example, you could add “Calendar” as a main menu item so you don’t have to dig through the Extras menu to get at it.
To do that, choose iPod→Settings→Main Menu. As you scroll down the list of menu items, press the center button to add (or delete) each one from the main menu. You might, for example, consider adding these commands:
Clock, for quick checks of the time.
Games, for quick killing of time.
Contacts, to look up phone numbers and call people to pass the time.
To see the fruits of your labor, press Menu twice to return to the main screen. Sure enough, in addition to the usual items, you see the formerly buried menus right out front, ready to go.
Now that you’ve got your Classic’s main menu squared away, you can customize your iPod’s music screen by choosing Settings→Music Menu.
Want to learn more iPod settings? Turn the page.
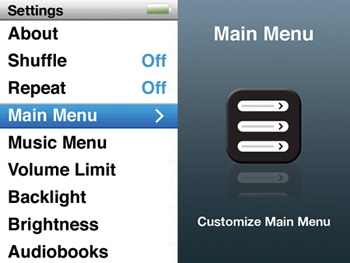
Adjust The iPod Classic Settings
THE SETTINGS MENU HAS more than a dozen options for tailoring your iPod’s look and sound.
About. Look here for your iPod’s serial number; the number of songs, videos, and photos on it; your model’s hard drive size; and how much disk space you have left. Click the center button to go through all three screens of info.
Shuffle. Turn this feature to On to shuffle songs or albums.
Repeat. Repeat One plays the current song over and over; Repeat All repeats the current album, playlist, or song library.
Main Menu. Customize which items appear in the Classic’s main menu here.
Music Menu. Customize which items appear in your music menu here.
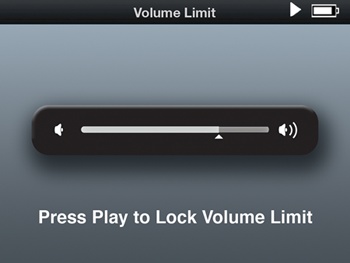
Volume Limit. Keep your (or your child’s) eardrums from melting down by setting a volume limit. The bar on the screen shows the iPod’s maximum volume. Slide the scroll wheel until the indicator on screen shows a new, less-loud maximum volume. Press the Play button to lock in the volume limit.
Backlight. Specify how long your screen’s backlight stays on each time you press a button or turn a dial—from 2 seconds to Always On.
Brightness. If your iPod movies seem a bit dim (and not just because of Hollywood’s standards), use this setting to brighten the screen.
Audiobooks. Having trouble catching all the words as you listen to an audiobook? Visit this setting, where you can speed up or slow down the narration.
EQ. Choose from more than 20 equalizer presets for acoustic, classical, hip-hop, and other types of music. Chapter 5 has more on equalization.
Sound Check. Turn on Sound Check to level out the song volume as you go from one tune to the next. Chapter 11 has more.
Clicker. Some people think the clicker noise the Classic makes during a long scroll sounds like ants tap-dancing. Others like the audio cue. Decide for yourself and turn the sound off or on here.
Date & Time. Adjust your iPod’s date, time, and time zone here. If you want your iPod to always display the time at the top of the screen, flip the “Time in Title” setting to On here.
Sort By. This setting lets you change the sort order of the contacts in your iPod’s address book (first name first or last name first).
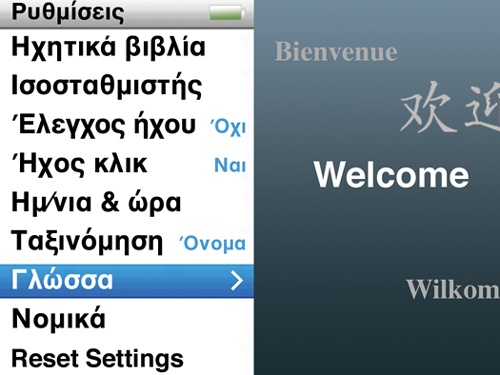
Language. The iPod can display its menus in most major European and Asian languages. Pick the one you want here. If your Classic gets set to a language you can’t read (accidentally or by the hand of a prank-minded associate), you can restore your native tongue to the menus a couple of ways.
For one, you can scroll all the way down to the end of the menu to the Reset All Settings option and select it. Although this pops you back to the iPod’s original pick-a-language screen, it also wipes out any other settings you custom-configured.
The second method saves your settings but requires some careful counting: Start by clicking the Menu button until you get back to the main iPod menu.
Next, scroll down to the sixth line on the main screen and select it. This calls up the Settings menu, even if you can’t read it. On the Settings menu, scroll all the way down, select the third line from the bottom (as shown above) and press the center button. That takes you to the big list of languages, with English right there on top. Select your language of choice, press the center button to set it, and return to business as usual.
Legal. The Legal screen contains a long scroll of copyright notices for Apple and its software partners. It’s not very interesting reading unless you’re studying intellectual-property law.
Reset All Settings. This command returns all your iPod’s customized sound and display settings to their factory defaults.
Load Music onto the iPod Classic
NOT EVERYONE WANTS TO haul around their entire iTunes library—and some people can’t even if they wanted to because they have too much stuff. Here are the various ways to load music onto the Classic from iTunes.
Automatic sync
If you want iTunes 11 to automatically load a copy of all the music and videos in your library, you can make it so. Just connect the Classic to iTunes, click the iPod icon that appears at the top of the iTunes window, and then click the Summary tab on the next screen. Once you turn off the checkbox next to “Manually manage music and videos” and click the Apply/Sync button, your Classic gets the works.
Selective sync
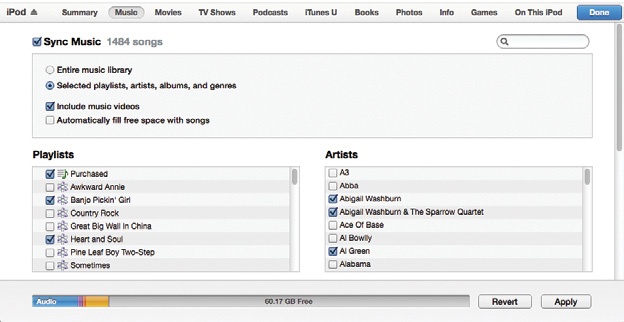
If you want more control over what goes on your iPod, click the iPod icon at the top of the iTunes window. Along the top of the next screen, you see a row of tabs marked Music, Movies, TV Shows, and so on. Now:
Click the Music tab and turn on the checkbox next to Sync Music.
Click the button next to “Selected playlists, artists, albums, and genres” and in the list that appears below, turn on the checkboxes next to everything you want to copy to the iPod. Turn on the checkbox next to “Automatically fill free space with songs” if you want to top off the iPod’s tank with extra music after iTunes copies over your selections.
Click Apply and then Sync to make it so.
Selectively syncing your iPod lets you automatically copy certain items (the ones you choose in step 2 above) each time you connect your player. But you can still manually drag new items from your iTunes library onto the iPod when you want (see next page).
Manual management
If you don’t have enough room on your Classic for your whole iTunes library, or if you plan to load music onto your iPod from more than one computer—say your work PC and home PC—you’ll want to manually manage your songs and other media. (If you’ve already chosen autosync, click the iPod’s Summary screen when it’s connected to iTunes and turn on the checkbox next to “Manually manage music and videos.”) iTunes now refrains from automatically dumping everything onto your iPod. “But,” you ask, “how do I get the music on there by myself?” Easy—you just drag it:
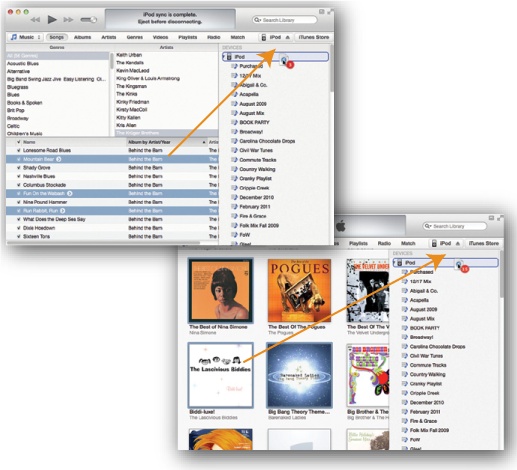
In iTunes, click the Music icon under the Library pop-up menu. Click the Songs button to see all the songs in your music library. You can also click Ctrl+B (⌘-B) to go into Column Browser view (Change the Look of the iTunes Window), where iTunes lists your music by genre, artist, and album.
Click the songs or albums you want to copy to your iPod. Grab multiple songs or albums by holding down the Ctrl (⌘) key while clicking.
Drag your selections to the right side of the screen, onto the iPod icon that appears. The number of songs you’re dragging appears inside a red circle.
You can manually load any items in your iTunes library—audiobooks, movies, whatever—onto your iPod this way.
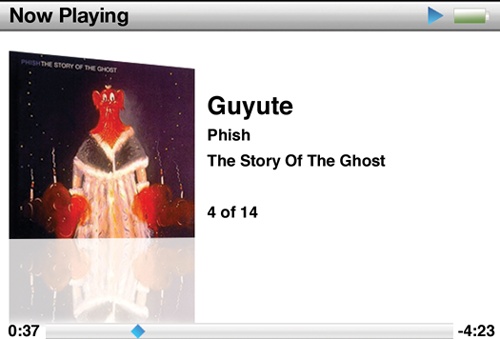
Jump Around Within Songs and Videos
SOMETIMES, YOU JUST HAVE to hear the good part of a song again or watch that scene in a movie once more because it was so cool the first time. If that’s the case, the iPod gives you the controls to make it happen.
This jump-to-the-best-part technique is called scrubbing, so if a fellow iPodder tells you to scrub over to 2:05 in a song to hear a great guitar solo, he’s not talking about cleaning the bathtub. It’s all about having a fast-forward/reverse control with a visual guide.
Here’s how to scrub on the iPod Classic:
When a song or video is playing on the screen, hold down the Rewind/Previous or the Fast Forward/Next buttons on either side of the click wheel to zip back and forth through a song or video clip.
To get to a specific time in a song or video, press the Classic’s center button and then use the click wheel to scroll over to the exact spot in the track’s on-screen timeline. For an audio file, a small diamond appears in the timeline when you press the center button so you can see where you are in a song.
For video files with DVD-style chapter markers (which look like small vertical lines along the timeline bar), press the Rewind/Previous or Fast Forward/Next button to retreat or advance chapter by chapter.
Tip
Scrubbing through a track makes fast work of finding a particular spot in a song, and the Classic has a couple other time-related goodies. For one, there’s the Sleep Timer feature to lull you to sleep. Choose Extras→Alarms→Sleep Timer and then pick the amount of time you want the Classic to play: 15, 30, 60, 90, or 120 minutes. (You can choose to turn the timer off here as well.) Once you pick a time, press Play and relax. And if you really like timers, go to Extras→Stopwatch→New Timer to track your laps or time your presentations.
Search for Songs on the iPod Classic
AS YOUR MUSIC COLLECTION grows, scrolling to find a song or album can leave you thumb-weary. Sometimes, you may not even remember if you have a certain song on the Classic, given its 160 gigabytes of storage. The Classic’s Search feature lets you drill down through your massive library to locate specific songs, albums, and so on with a few spins of the click wheel. It works like this:
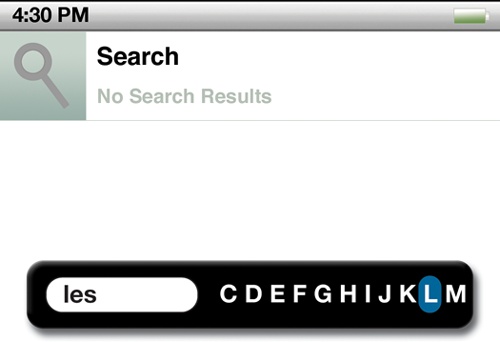
Choose iPod→Music→Search.
On the screen that appears, use the click wheel to highlight a letter from the alphabet. Press the center button to select the letter.
The iPod immediately presents a list of matching titles, winnowing the list further as you select more letters. Use the iPod’s Rewind/Previous key as a backspace button to wipe out letters you don’t want.
Once the title you want appears on-screen, click the Menu button (to jump up to the results list), and then scroll down to select your song.
Search Visually With Cover Flow
SEARCHING BY SONG NAME is one way to find the music you’re looking for, but you can visually search your Classic’s music collection, too. Press iPod→Music→Cover Flow to see all your music displayed as miniature album covers (or gray music notes if you haven’t added art; see Fetch Missing Album Covers).
To take a stroll through the music, slide your thumb along the iPod’s scroll wheel to see the covers sail by. When you see an album you want to play, press ![]() . To see the tracks on the album, press the center button to flip the cover around. Scroll to the desired song and press
. To see the tracks on the album, press the center button to flip the cover around. Scroll to the desired song and press ![]() to play it.
to play it.
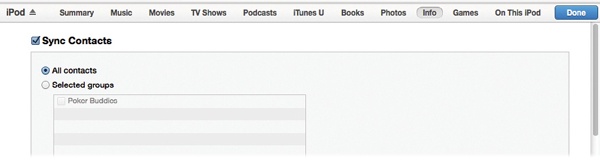
The iPod as Address Book
PUTTING A COPY OF your contacts file—also known as your computer’s address book—on your iPod is easy with the help of iTunes.
Windows users need to store their contacts in Outlook Express, Outlook 2003 or later, Windows Contacts, or the Windows Address Book (used by Outlook Express and some other email programs).
Mac folks need to have at least Mac OS X 10.5 (Leopard) and the Mac OS X Address Book (shown below), which Apple’s Mail program uses to stash names and numbers. You can also use Entourage 2004 or later and Outlook 2011, but you have to link before you sync: In the mail program, choose Preferences, and then click Sync Services. Turn on the checkboxes for sharing contacts and calendars with Address Book and iCal (Apple’s calendar program) to have the shared info synced up with Address Book and iCal.
To turn your iPod Classic into a little black book, follow these steps:
Connect your iPod to your computer and click its icon in the iTunes window. (If you use Outlook, launch that now, too.)
At the top of the iTunes window, click the Info tab.
Windows owners: Turn on the checkbox next to “Sync contacts from” and use the drop-down menu to choose the program that holds your contacts. Mac owners: Turn on the “Sync Address Book contacts” checkbox. If you want to sync contact groups, select them from the “Selected groups” box. You can also choose to import the photos in your contacts files.
Click Apply in the lower-right corner of the iTunes window.
iTunes updates your iPod with the contact information stored in your address book. To ditch a person, delete him or her from your computer’s address book, and the contact disappears from your iPod the next time you sync up.
To look up a pal on an iPod Classic, choose iPod→Extras→Contacts and scroll to the name of the person. Press the center button, and you’ll see his address card pop up on-screen.
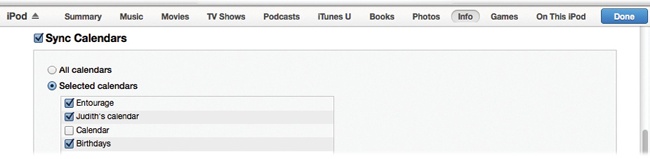
The iPod as Calendar
JUST AS ITUNES CAN pluck contacts out of your computer’s address book, so it can snag and sync a copy of your desktop’s daily or monthly schedule to your iPod Classic—if you use Outlook on your PC or iCal on your Mac. (You can also use Entourage 2004 or later by choosing, in Entourage, Preferences→Sync Services and turning on the option to have Entourage share events with iCal; Outlook 2011 for the Mac works the same way.)
To get your calendar connected, fire up iTunes and follow these steps:
Connect your iPod to the computer and click the iPod icon in the Devices list.
In the main part of the iTunes window, click the Info tab. Scroll down past Contacts to Calendars.
Turn on the checkbox next to “Sync Calendars.” If you have multiple calendars, select the ones you want to copy.
In the lower-right corner of the iTunes window, click Apply.
If iTunes doesn’t automatically start updating your iPod with your datebook, choose File→Sync iPod. If you haven’t changed any sync settings and you’re just updating contact info, iTunes’ Apply button turns into a Sync button, and you can click that instead of going up to Menuville.
To look up your busy schedule on a Classic, choose iPod→Extras→Calendars. Select the name of the calendar you want to examine and press the center button. You get a blue-and-gray grid with tiny red flags planted on the days you have something scheduled. Use the scroll wheel to navigate to a particular day, and then press the center button to see the details.
If you use the To Do list function in your calendar program, your action items appear in their own place on the Classic. Choose iPod→Extras→Calendars→To Do’s. You can also have your iPod remind you of upcoming events. To turn on Nag Alerts on the Classic, choose iPod→Extras→Calendars→Alarms. You have your choice of Off, Beep, or None (the last displays a silent message on-screen).
Set the iPod’s Clock
WHEN YOU CONNECT YOUR iPod to your computer, the player’s clock syncs up with the one on your Windows PC or Mac. If you don’t sync that often or you travel between time zones, you may need to reset the clock.
To adjust your current clock for things like daylight saving time, the current date, the time zone—or to opt for the military-style 24-hour clock display—choose iPod→Settings→Date & Time.
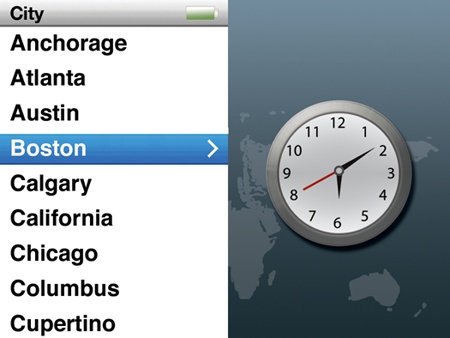
To change the city a clock represents, click it with the Classic’s center button and then select Edit. Pick the geographic area you want from the Region menu, and then choose a city on the next screen. The clock adjusts itself to the new time zone.
You aren’t stuck with just one clock on the Classic. Your iPod can also serve as a world timekeeper, showing the hour in places faraway. Here’s how to add multiple clocks:
You’ll see your local clock. Press the center button again to select Add. (Choose Edit if you have just one clock but want to change it.)
On the next screen, select a world region, like North America, Europe, Africa, or Asia. Some categories on the Region menu are less obvious: Select Atlantic if you live in Iceland or the Azores; choose Pacific if you live in Hawaii, Guam, or Pago Pago.
Once you select a region, a new screen displays a list of major cities and the current time in that part of the world. Scroll and select the city of your choice. Once you do, the iPod creates a clock named after the city, displays the local time, and adds the timepiece to the Clocks menu.
If you want to change a clock, select it and press the iPod’s center button to bring up the Edit and Delete options. Choose Edit, which takes you back through the whole “pick a region, pick a city” exercise.
If you decide you have too many clocks and don’t need that Bora Bora timepiece after all, select the unwanted clock from the list. Press the center button on the iPod, scroll down to Delete, and then press the center button again to erase time.
Use the iPod Classic as an Alarm Clock
IT MAY NOT HAVE the booming wake-up powers of a bedside alarm clock, but the iPod Classic’s alarm can give you a gentle nudge when you need it.
To set your alarm:
Choose Extras→Alarms→Create Alarm. Press the center button. The alarm gets set to On, and you land on a screen full of choices, described below.
Choose Date. As you turn the click wheel, you change the date for your wake-up call. Press the center button as you pick the month, day, minutes, and so on.
Choose Time. Repeat the wheel-turning and clicking to choose the hour, minute, and AM/PM setting for the alarm. When you get back to the Create Alarm menu, click Repeat if this is a standing alert, and then choose the alarm’s frequency: daily, weekly, and so on.
Choose Alert Sound. It’s time to decide whether you want “Beep” (a warbling R2-D2–like tone that comes out of the iPod’s built-in speaker) or music from a selected playlist. If you choose music, it plays through your headphones (assuming they haven’t fallen out) or to an external set of speakers if you have some (Chapter 16).
Choose Label. What’s alarming you—a class, a meeting, time to take a pill? Pick a name for your alarm here.

If you wake up early and want to turn off the alarm so it doesn’t bother anybody else, go to Extras→Alarms→[Name of Alarm]→Alarm and press the center button to toggle it off. You can also delete an alarm with the Delete option at the bottom of the menu.
Voice Memos: The iPod as Audio Recorder
THE IPOD CLASSIC DOESN’T just play sound, it can record it, too, thanks to its Voice Memos feature. You do need to invest in an external microphone for the player first, though—Apple’s optional Earphones with Remote and Mic (available for $29 at www.apple.com/ipodstore) or a compatible third-party microphone. In fact, you need a microphone connected to even see the Voice Memos menus on the Classic.
Once you have your microphone in place, you can start your recording session:
Choose iPod→Voice Memos.
To start recording, choose Voice Memos→Start Recording. You can pause your recording by pressing
on the Classic’s click wheel. Press again to pick up recording where you left off.When you’re finished recording, press the Menu button, and then choose Stop and Save. To play back a recording, choose iPod→Voice Memos→Recordings and select the recording.
To erase a recording from the Classic, press the center button to select it, and then choose Delete from the menu. The next time you sync your iPod, iTunes copies your recordings to its Voice Memos playlist. You can find audio files on Classics enabled for disk use (described below) in the iPod’s Recordings folder.
The iPod as Portable Hard Drive
AS IF BEING A portable entertainment system and organizer isn’t enough, your iPod Classic can also serve as a portable hard drive to shuttle documents, presentations, and other files from one computer to another.
To give your iPod these file-toting powers:
Plug your iPod into your computer.
When its icon shows up the iTunes window, select it, and then click the Summary tab on the next screen.
Turn on the checkbox next to “Enable disk use” in the Options area of the Summary screen.
In the lower-right corner of the iTunes window, click Apply. If you forget and try to move on to something else, iTunes reminds you that you modified an iPod setting and prompts you to OK the change.

Your iPod now shows up as an icon in the My Computer area of Windows or on the Mac desktop. You can drag files on and off the icon just as you would files for any other drive connected to your computer. You can also double-click the iPod icon to create folders for your files.
File Management on the iPod Hard Drive
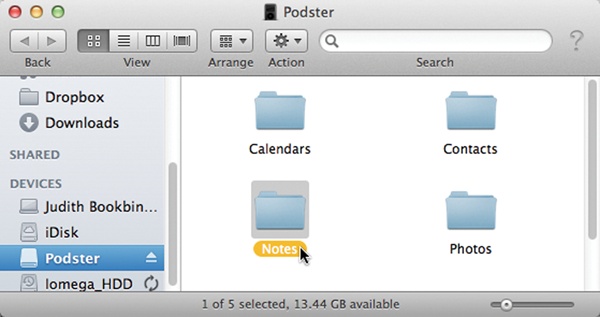
Like all hard drives, you’ll eventually want to clean up stuff you stashed on the iPod. Delete files by dragging them to the Recycle Bin or the Trash. Steer clear of the folders labeled Photos (and, on the Classic, the folders tagged Calendars, Contacts, and Notes); the iPod uses them to store the eponymous items. (Turn the page to see what else you can do with the Notes folder.)
Keep in mind that once you turn your iPod into an external hard drive, you have to treat it like one by formally ejecting it from iTunes before disconnecting your iPod. Do so by clicking the Eject icon next to the iPod’s name in the iTunes Devices list and you’ll avoid huffy alert boxes from your operating system about improper device removal.
Your iPod keeps music, movies, and other iTunes stuff in a special, invisible area of the player, so you can enjoy all that media even when you use your ’Pod as a file courier. (And syncing your music with a Windows PC or Mac doesn’t affect the computer files, either.) But remember that the more you fill up your iPod with data files, the less room you have for entertainment—and vice versa.
Read Text Files on the iPod Classic
IT’S A LITTLE-KNOWN FEATURE, but the iPod Classic and older click-wheel Nanos can display basic text files on-screen. You create these iPod notes as plain text files (those with a .txt extension), like those from Windows Notepad or TextEdit on a Mac. (You can’t read full-fledged word-processing documents from Microsoft Word or Apple’s Pages unless you save them as plain text files.)
To use the iPod’s Notes feature:
Connect your iPod to your computer as an external drive (flip back a page to find out how).
Once you save your files in the plain-text format, open your iPod by double-clicking its icon in the Computer window in Windows Vista/Windows 7/Windows 8 (the My Computer window for Windows XP) or on the Mac desktop.
Drag the files into the Notes folder on your iPod.
After you copy your files, eject the iPod from iTunes by clicking the Eject button next to its name in the Devices list, or use the Eject button in the corner of the iTunes window.
When you’re ready to start reading, choose Extras→Notes. You’ll see the names of your text files listed in the Notes menu. Scroll to the one you want, and then press the iPod’s center button to bring it up on-screen.
As you read, you can use the scroll wheel to page up and down through the file. Press the Menu button to close the file and return to the list of notes.

Using the iPod as a text reader is a handy way to bring your grocery list with you so you can rock while you shop. But to browse prose more challenging than “Buy Pampers,” swing by Project Gutenberg’s website at www.gutenberg.us. Here you can download thousands of public-domain literary works as plain text files and transfer them to your iPod’s Notes folder. (The iPod can display files up to only a measly 4 kilobytes in size; to read longer files, see the list of shareware programs on this book’s Missing CD page at www.missingmanuals.com/cds/ipodtmm11/.)
Play Games on an iPod Classic
THE IPOD CLASSIC IS a personal entertainment machine on many levels, and it comes with three games: Klondike, iQuiz, and Vortex. To find them, go to iPod→Extras→Games.
Klondike
The iPod has a Vegas-style Klondike solitaire game. To play, you get a row of seven card piles, on which you alternate black and red cards in descending numerical order. Use the click wheel to pass a virtual hand over each stack. Click the center button when you get to the card you want to move to the bottom of the screen. Then scroll the hand to the pile where you want to place the card and click the center button again to make the play. Click the facedown card (upper left) for three new cards to play.
iQuiz
Complete with colorful flashing graphics and a cheesy, ‘70s-style game show soundtrack, iQuiz picks your brain with contemporary multiple-choice questions in several trivia categories like music, movies, and TV. The game brings its own questions to the screen, but it also taps into your iPod to find out how much you know about your own library.

Vortex
Most computers and handheld devices wouldn’t be complete without some brick-bashing version of the old Pong-against-the-wall game. Vortex scales up the basic concept to 360 degrees of brick-smashing 3-D fun. Use the scroll wheel to move the bat around the edges of the circular Vortex and audibly smash through the rotating bricks.