
Chapter 9. Tour the iPod Shuffle
You’ll learn to:
Get your Shuffle up and running
Automatically fill it with music, audiobooks, and podcasts
Make the Shuffle announce song titles
Use the Shuffle as a flash drive
AS THE SMALLEST MEMBER of Clan iPod, the Shuffle is often overshadowed by the more full-featured members of the family. Sure, the Shuffle has no WiFi access, apps, or even a screen—but who needs any of that when you’re out on a 10-mile run at 6 a.m.?
The Shuffle’s simplicity is perhaps its greatest asset: It’s just there to play music, audiobooks, and audio podcasts and not distract you while you’re working out or sitting quietly. At 1.24 inches wide by 1.14 inches high and grazing the scales at 44 ounces, this featherweight iPod won’t distract you physically because it comes with a built-in clip that lets you attach it to your collar, t-shirt, or bag strap.
Although the Shuffle has no screen, that doesn’t prevent it from giving you feedback about the song or playlist currently coursing through your earbuds. Thanks to its optional VoiceOver feature, the Shuffle announces the title of your current selection at the touch of a button.
This tiny iPod runs on stable flash memory—the same kind used in pocket USB drives. With a couple of clicks, you can convert your Shuffle into file-toting flash drive, too. This chapter shows you how to get the most out of your Shuffle in, shall we say, a flash.
Control the iPod Shuffle
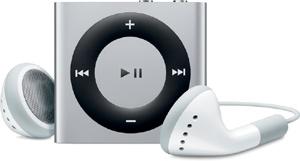
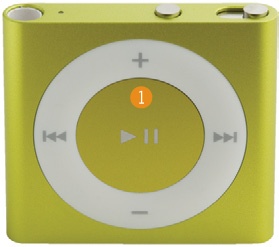
AS MUSIC PLAYERS GO, the iPod Shuffle is a breeze to operate. The ring on the front handles all your playback moves, with a button and switch on the top edge to provide the eponymous shuffle function and VoiceOver feedback.
Here’s what each part and port on the Shuffle can do for you:
The control ring rules the content on this iPod. Press a button to play and pause tracks (
 ), jump ahead to the next track (
 ), or back to the previous one (
 ). Adjust the Shuffle’s volume by pressing the top of the ring to make things louder (
 ) or the bottom (
 ) to lower the level.
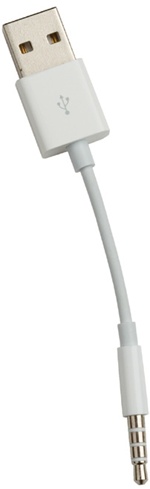
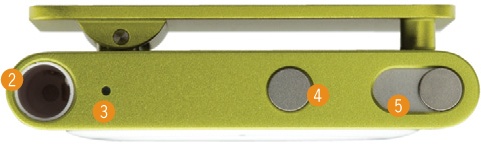
The earbuds/USB adapter jack sits on the left side of the top edge. You need to unplug one to use the other, so when the Shuffle’s battery gets low, disconnect the earbuds and plug in the skinny end of the USB adapter (shown right). Plug the flat end into your computer or a compatible AC adapter (The iPod-Computer Connection) and charge away.
The tiny status light shows green when the battery charge is good (
 ), amber when it’s dipping low (
 ), and red when you need to recharge soon (
 ). A flashing yellow light when you have the Shuffle connected to your computer means Do Not Remove until it finishes copying your songs and files.
The Shuffle’s VoiceOver button is in the middle. Push it to hear the Shuffle announce the name of the current song or playlist. (There’s more on VoiceOver on Use VoiceOver on the Shuffle.)
The Shuffle’s On/Off switch, here in the Off position, is on the right side. Slide it one notch to the middle to play tunes in order (
 ) or slide it over all the way over to shuffle them (
 ).
).
Set Up and Sync the Shuffle
AS WITH ANY IPOD (except for the Touch), you need to connect the Shuffle to your Windows PC or Mac and fill it up with music, podcasts, and other audio through Apple’s iTunes program. If you haven’t installed iTunes yet, see Install iTunes. If you don’t have any music either, see Chapter 10.
Once you have iTunes installed and some music ready to go, plug in the Shuffle’s USB adapter to the headphone jack and connect the bigger end to your computer’s USB port. If you have an iTunes library smaller than 1.88 gigabytes, you can sync all your content to the Shuffle by clicking its icon on the main iTunes screen and then clicking the Summary tab. Turn off the checkbox next to “Manually manage music” and then click the Apply/Sync button.
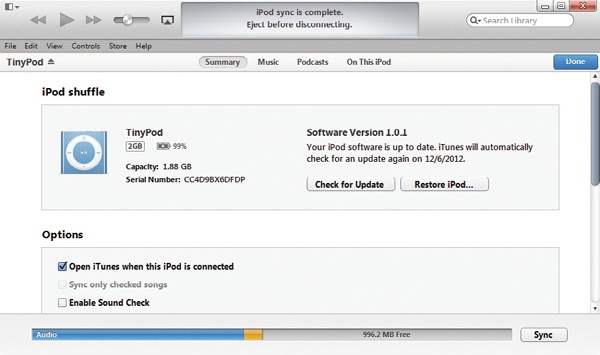
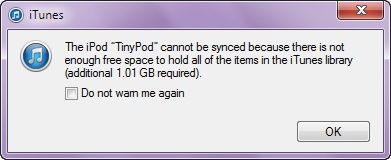
If you have an enormous music collection, though, all your songs may not fit, and you’ll get a message saying iTunes will copy as much music as it can. If you have high-quality audio tracks (Change Import Settings for Better Audio Quality), you can have iTunes automatically convert the Shuffle versions to smaller files so you can squeeze more of them on. With the iPod connected to iTunes, clicks its icon under “Devices,” and then click the Summary tab. Scroll down to Options, turn on the checkbox next to “Convert higher bit rate songs,” and select a lower bit rate from the pop-up menu, like 128 kbps. Click Apply and Sync. The trade-off here is audio fidelity—while your songs may not sound as rich, it’s a case of quantity over quality.
Autofill Your Shuffle with Songs
IF YOU LIKE ALL the music in your collection but don’t feel like manually managing it all the time, you can have iTunes randomly load your Shuffle using Autofill. Go to View→Show Sidebar (if it’s not already visible) and click the triangle next to the Shuffle icon to spin open its audio libraries. Click the Music icon there. The Autofill bar appears at the bottom of the iTunes window.

In the “Autofill From” pop-up menu, tell iTunes to snag songs from your entire library or just a particular playlist (see Chapter 12). Click the Settings button and in the box that pops up (shown below), have iTunes pick random tracks or select highly rated songs more often. (“Ratings?” you say? Check out Chapter 11.)
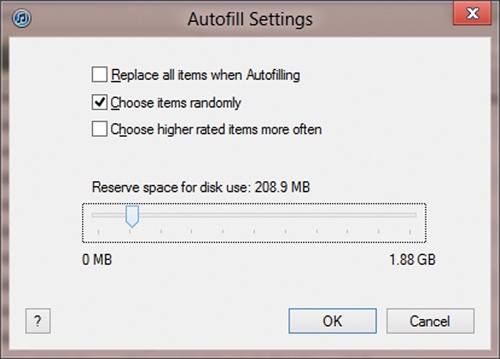
After you Autofill for the first time, when you return for another batch of songs, you can turn on the checkbox next to “Replace all items when Autofilling” to have iTunes wipe the first batch of songs off your iPod and substitute new tracks.
Once iTunes fills up your ’Pod, you see an “iPod sync is complete” message at the top of the screen. Click the Eject button next to your iPod’s icon, unplug the player from the computer, clip it onto your shirt, and head out with your little metal square full of music.
Manually Fill Your iPod Shuffle
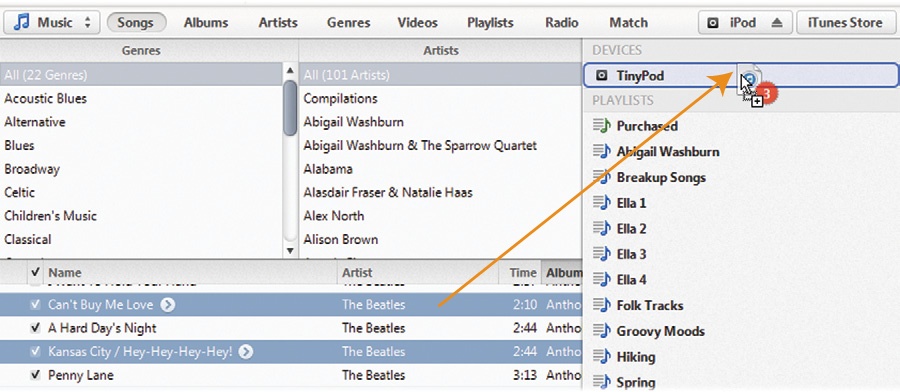
IF YOU WANT TO decide what goes onto your Shuffle, opt for manual updates instead of letting iTunes choose. As with any other iPod on manual control, you drag songs and playlists you want from your iTunes library and drop them onto the Shuffle icon that appears when you drag files to the right edge of the iTunes window..
To see what’s on your Shuffle, click the iPod’s icon in the iTunes window and then click On This iPod. Feel free to rearrange individual songs in the order you want to hear them—just drag them up or down. The info at the bottom of the iTunes window tells you how much space you have left on your Shuffle.
To delete songs from the On This iPod screen, select one or more tracks and then press the Delete key on your keyboard. This action deletes the song from your Shuffle only, not from your iTunes library; see Copy Your Music from iPod to iTunes.
You can also mix and match your song-loading methods. Start by dragging a few favorite playlists over to the Shuffle, and then click Autofill to finish the job. Just make sure you turn the “Replace all items when Autofilling” checkbox off, or iTunes will wipe out the tracks you already added.
Tip
The Shuffle may be tiny, but it can produce big sound—so big that it may cause hearing damage if you crank it up too high. Because of its easy interface and low price, children often use this iPod, and they may not realize the potential for injury.
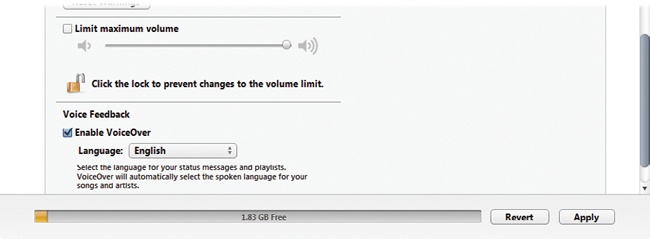
To help prevent this sort of thing, you can limit the Shuffle’s loudness. Connect the player to iTunes, click the Shuffle’s icon on the left side of the screen, and click the Summary tab at the top of the iTunes window. Scroll down to Options, and turn on the checkbox next to “Limit maximum volume.” Use the on-screen slider to lower the top volume the Shuffle can reach—and click the lock icon to set a password that prevents small hands from undoing the favor you just did their ears. Click Apply and then Sync.
Use VoiceOver on the Shuffle
THE SHUFFLE MAY NOT have a screen, but it has a voice—which announces the names of your songs when you push the VoiceOver button its top edge. To get the Shuffle yapping, though, you need to turn on the VoiceOver feature in iTunes. Connect the Shuffle to your computer with its USB cable, click its icon on the left side of the iTunes window, and then click the Summary tab at the top of the screen.
Scroll down to the options area, turn on the checkbox next to Enable VoiceOver, and choose the language you want the Shuffle to speak (it knows 29 of them) from the pop-up menu. Click Apply and Sync.
Sync Podcasts and Other Audio
The iPod Shuffle isn’t limited to playing music—it can also play audiobooks, recorded iTunes U lectures, and audio podcasts from the iTunes Store. Once you download these spoken-word files to iTunes, you can sync them over to your iPod. Plug in the Shuffle, click its icon on the left side of the iTunes window, and then click the tab describing the content you want to sync—Podcasts, iTunes U, or Books—to get to those settings. (If you don’t have any iTunes U content, you don’t see an iTunes U tab; ditto for Podcasts and Books.)
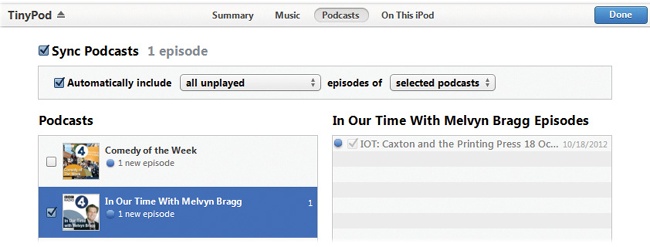
As shown at the bottom of the previous page, you can automatically refresh podcasts, which often have daily, monthly, or weekly episodes, each time you connect the Shuffle to your computer. Just click the Podcasts tab and use the pop-up menu at the top of the screen to control which episodes (new, recent, or unplayed) get copied automatically. In the lower part of the window, you can choose specific episodes to sync. Click Apply and Sync when you finish.
Use the Shuffle As a Flash Drive
AS IF BEING A miniature entertainment system and organizer isn’t enough, your Shuffle can also serve as a portable hard drive to shuttle documents, presentations, and other files from one computer to another.
To give your iPod these file-toting powers:
Plug your Shuffle into your computer.
When its icon shows up in the iTunes window, select it, and then click the Summary tab on the next screen.
Turn on the checkbox next to “Enable disk use” in the Options area of the Summary screen. To set a limit for non-music storage on the storage-shy Shuffle, spin its triangle open, click the Music icon, and then click the Autofill settings button (Autofill Your Shuffle with Songs). Drag the slider to the desired amount of space.
In the lower-right corner of the iTunes window, click Apply.
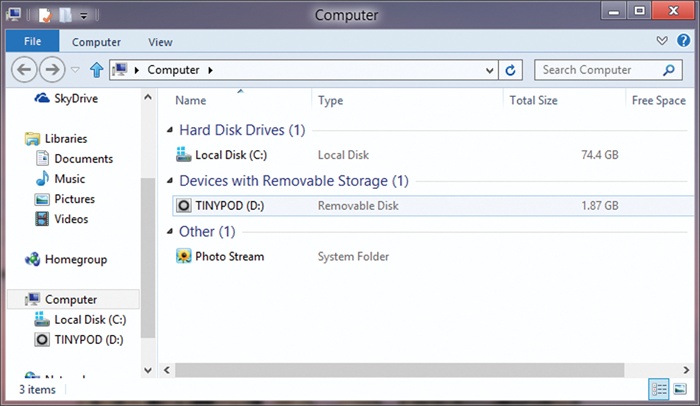
Your iPod now shows up as an icon in the Computer area of Windows or on the Mac desktop. You can drag files on and off the icon just as you would files for any other drive connected to your computer. You can also double-click the iPod icon to create folders for your files. Delete files by dragging them to the Recycle Bin or the Trash and electronically emptying the receptacle.
Keep in mind that once you turn your iPod Shuffle into an external flash drive, you have to treat it like one by formally ejecting the drive from iTunes before disconnecting your ’Pod. Do so by clicking the Eject icon next to the iPod’s name in the iTunes Devices list and you’ll avoid huffy alert boxes from your operating system about improper device removal.