
Lesson 2
Update, Upgrade, or Reinstall macOS
Every new Mac comes with the Mac operating system. To get the latest features and security updates, you will eventually need the latest macOS. If you have a qualifying Mac, you can upgrade at no cost.
Warning ![]()
Some exercises in this lesson involve significant changes to your Mac setup. Some of the steps are difficult or impossible to reverse. If you perform the exercises in this lesson, do so on a spare Mac or an external disk that doesn’t contain critical data.
Reference 2.1
macOS Installation Methods
Identifying the parts of a Mac operating system name will help you understand the difference between an upgrade and an update. A Mac operating system has a version name and a version number, such as macOS Big Sur 11.
When Apple releases an update to macOS Big Sur:
 The version name stays the same (Big Sur).
- The first part of the version number stays the same (11).
- Apple adds additional numbers after 11. For example, the first update for macOS 11.0 was 11.0.1. And the next update released was 11.1.
When Apple releases a major version upgrade of the Mac operating system, there is a new version name (for example, Big Sur instead of Catalina).
Although all previous versions of macOS have a version number that starts with “10.” (for example, macOS 10.0 through macOS 10.15), macOS Big Sur uses “11.” to start its version numbers.
This list summarizes the differences between updating, upgrading, reinstalling, and installing a Mac operating system:
- Update: Installs an incremental update of the Mac operating system but doesn’t upgrade it to the next major version (if one exists).
- Upgrade: Installs a next major standalone version of the Mac operating system.
- Reinstall: Installs the same major version of macOS on a volume that already has macOS. This overwrites existing system files but leaves apps, user home folders, and other files in place.
- Install: Installs macOS on a volume that doesn’t have macOS—for instance, a volume you erased.
Note ![]()
The terms disk, volume, and storage have similar meanings. Where possible, this guide uses terms that appear in apps on screen. Read Lesson 11, “Manage File Systems and Storage,” for more information.
Lesson 6, “Update macOS,” describes in more detail updating macOS and keeping macOS automatically updated.
Upgrading, reinstalling, or installing macOS Big Sur requires internet access.
Erase Your Startup Disk
If you want to get a fresh start with macOS and you don’t need the existing content on your Mac, erase the startup disk before you install macOS. The macOS installer (an app named Install macOS Big Sur) doesn’t erase disks, but you can use Disk Utility to erase a disk before you run the macOS installer:
- If you want to erase the system disk your Mac is currently running from, you can erase it if you start up from macOS Recovery, as covered in Lesson 5, “Use macOS Recovery.”
- If the destination is another disk, such as an external storage device, erase and install from your Mac, as covered in Lesson 11.
Reference 2.2
Prepare to Upgrade or Reinstall macOS
Follow these steps to prepare to start a macOS upgrade:
Verify installation requirements.
Back up important content.
Plug notebook computers into power.
Download macOS Big Sur.
Verify Installation Requirements
Verify that both your Mac and its operating system meet the requirements for an upgrade to macOS Big Sur. This includes verifying the hardware and the software.
To upgrade from OS X Mountain Lion 10.8, first upgrade to OS X El Capitan 10.11, then upgrade to macOS Big Sur.
Upgrading to macOS Big Sur has the following requirements:
- OS X Mavericks 10.9 or later
- 4 GB of memory
- 35.5 GB of available storage to upgrade from macOS Sierra 10.12, or 44.5 GB of available storage to upgrade from an earlier release
- Compatible internet service provider (for some features)
- Apple ID (for some features)
macOS Big Sur supports the following Mac models:
- MacBook introduced in 2015 or later
- MacBook Air introduced in 2013 or later
- MacBook Pro introduced in late 2013 or later
- Mac mini introduced in 2014 or later
- iMac introduced in 2014 or later
- iMac Pro
- Mac Pro introduced in 2013 or later
See Apple Support article HT211238, “macOS Big Sur is compatible with these computers” at https://support.apple.com/support.apple.com/HT211238 for more information about requirements for specific features. Some features of macOS Big Sur require specific Mac and iOS or iPadOS device models, such as the following features:
- Continuity Camera—Use your iPhone, iPad, or iPod touch to scan documents or take a picture of something nearby and it appears instantly on your Mac. Continuity Camera is supported in many apps, including Mail, Messages, the Finder, and more. See Apple Support article HT209037, “Use Continuity Camera on your Mac,” for more information.
- Handoff—With Handoff, you can start work on one device, then switch to another nearby device and pick up where you left off. Use Handoff with any Mac, iPhone, iPad, iPod touch, or Apple Watch that meets the Continuity system requirements. See Apple Support article HT204689, “System requirements for Continuity on Mac, iPhone, iPad, iPod touch, and Apple Watch,” for more information.
- Instant Hotspot—With Instant Hotspot, the Personal Hotspot on your iPhone or iPad (Wi-Fi + Cellular) can provide internet access to a Mac, iPhone, iPad, or iPod touch without requiring you to enter the password on those devices. Use Instant Hotspot with any Mac, iPhone, iPad, or iPod touch that meets the Continuity system requirements. See Apple Support article HT209459, “Use Instant Hotspot to connect to your Personal Hotspot without entering a password,” for more information.
- Universal Clipboard—With Universal Clipboard, you can copy content such as text, images, photos, and videos on one Apple device, then paste the content on another Apple device. Use Universal Clipboard with any Mac, iPhone, iPad, or iPod touch that meets the Continuity system requirements. See Apple Support article HT209460, “Use Universal Clipboard to copy and paste between your Apple devices,” for more information.
See Apple Support article SP833, “macOS Big Sur – Technical Specifications” at support.apple.com/kb/SP833 for more information.
Verify System Information
You need to know your Mac computer’s specifications when you install new software, upgrade installed software, perform maintenance, or troubleshoot a problem. In this section you learn how to find essential system information with About This Mac and System Information.
You can open the Apple menu and choose About This Mac to gather most of the information necessary to confirm that your Mac supports macOS Big Sur. About This Mac displays information such as the macOS software version, Mac model name, chip (for a Mac with Apple silicon) or processor type and speed (for an Intel-based Mac), total system memory, startup disk, graphics card information (for an Intel-based Mac), and Mac serial number.
Note ![]()
A Mac may not display a serial number if the necessary post-repair procedures were not successfully completed after a logic board replacement.
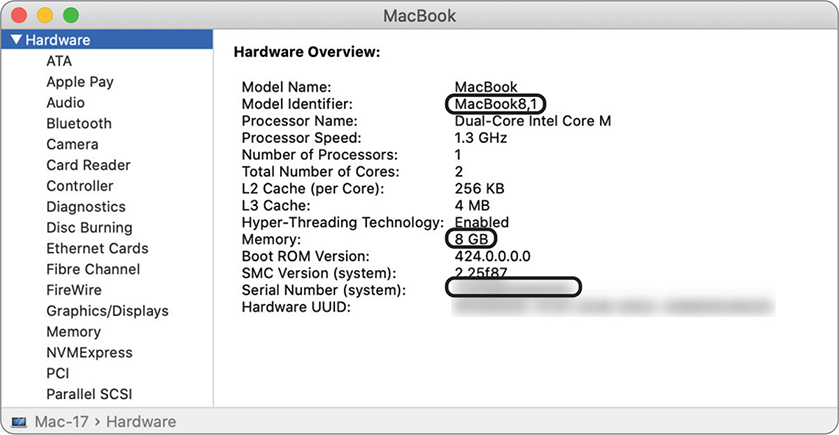
The Mac in the following figure has 16 GB of RAM and meets the memory requirements to run macOS Big Sur.
A few items are vital to identifying your macOS version and Mac model:
- The macOS version number represents the system software version currently installed.
- The macOS build number is more specific than the macOS version number alone. In the About this Mac window, click the macOS software version number to find the build number. Apple creates specific build versions of each macOS version as they refine it. A newly released model of Mac may require a specific build of macOS; the specific build may differ from the standard installation versions. For example, the first day the new MacBook Pro (13-inch, 2020, Two Thunderbolt 3 ports) was shipped, one model came with macOS 10.15.4 (19E2265), another model with different options came with macOS 10.15.4 (19E2269), but other Mac computers that were up to date were running macOS 10.15.4 (19E287). For more information, see Apple Support article HT201686, “Use the Mac operating system that came with your Mac, or a compatible newer version.”

- The Mac computer model name is derived from the product marketing name for the Mac, followed by a relative release date. For example, the previous screenshot was taken on a “MacBook Pro (15-inch, 2018).”
- The Mac serial number is located on the Mac case. The serial number is a unique number used to identify a Mac for maintenance and service.
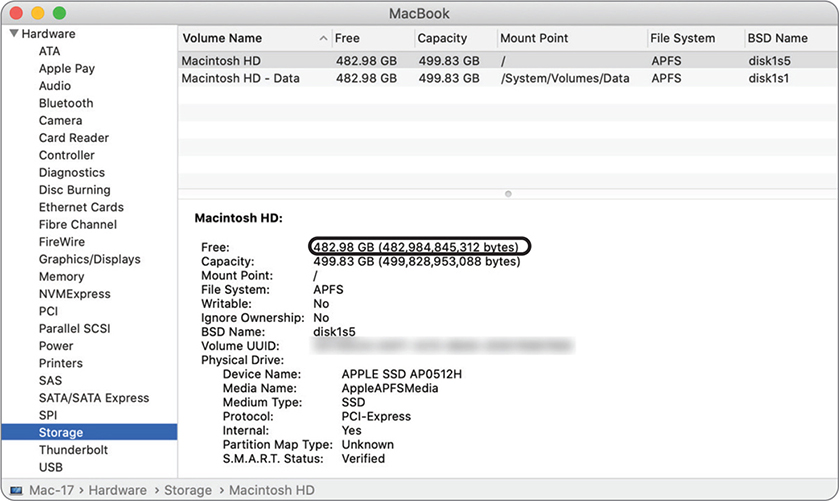
Click the Storage button to review how much disk space is available.
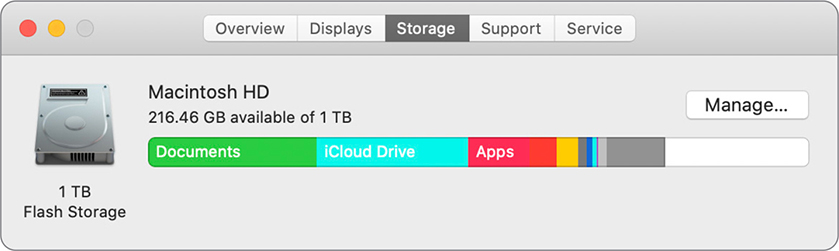
The Mac in this figure meets the available-storage requirements to upgrade to macOS Big Sur.
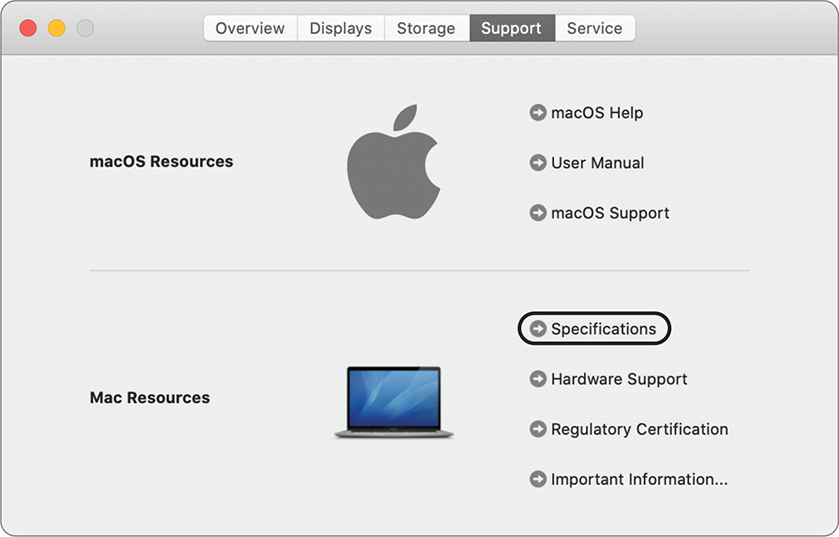
The Support and Service buttons link directly to specific areas of the Apple Support website. The contents of the links are generated dynamically to show the most up-to-date support information about macOS and your Mac. For example, the Specifications link opens a webpage with the full specifications for your Mac.
The information in the About This Mac window is a subset of what you can find with System Information. From the Overview window in the About This Mac window, click the System Report button to open System Information. Or you can press and hold the Option key and then choose Apple menu > System Information. Or you can use Spotlight; click the Spotlight icon (which looks like a magnifying glass) in the menu bar in the upper-right corner of your screen, enter System Information in the search field, then press Return.
If you have a version of the Mac operating system that shipped with the name OS X (instead of macOS), it includes System Profiler instead of System Information.

When you need to create a file to document the current state of a Mac, use System Information. Go to the menu bar, then choose File > Save. This creates a System Information–specific file (with the .spx filename extension) that you can open from other Mac computers.
Verify App Compatibility
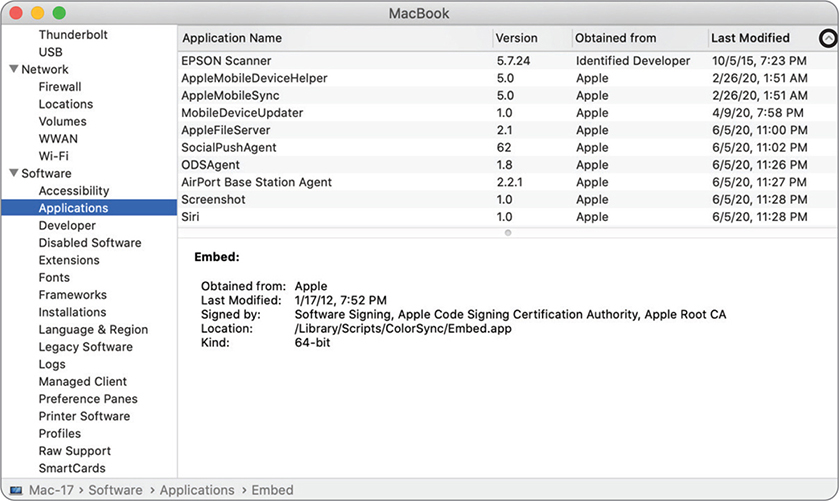
When you upgrade to macOS Big Sur, your third-party apps might need updates to function properly. You can use System Information to view installed apps. For older Mac computers with System Profiler instead of System Information, verify that View > Full Profile is selected to reveal the Applications section in the Contents list. Selecting Applications from the Contents list prompts macOS to scan common locations on the local volume for available apps.
You don’t have to worry about the apps that came with your Mac, such as Safari, Mail, and Photos. They are automatically upgraded when you install macOS Big Sur. You might have to visit third-party vendor websites to find out if your third-party apps require updates.
Back Up Important Files and Folders
It’s always crucial to keep backups of your important files and folders. Having a current backup is even more critical when you make significant changes to a Mac, such as installing a major version upgrade to the Mac operating system. If a new installation or upgrade is done improperly, it could result in complete data loss.
You can’t uninstall or revert an update or upgrade. If it turns out that an app you need is not compatible with macOS Big Sur, the only way to install an earlier version of macOS is to erase and restore from backup.
You can use Time Machine to create a backup before you start your installation. Using Time Machine is covered in Lesson 17, “Manage Time Machine.”
Document Network Settings
The macOS installer helps ensure that you don’t lose previous settings when you upgrade to macOS Big Sur. But some settings are so vital to your Mac that you should document them in case something goes wrong.
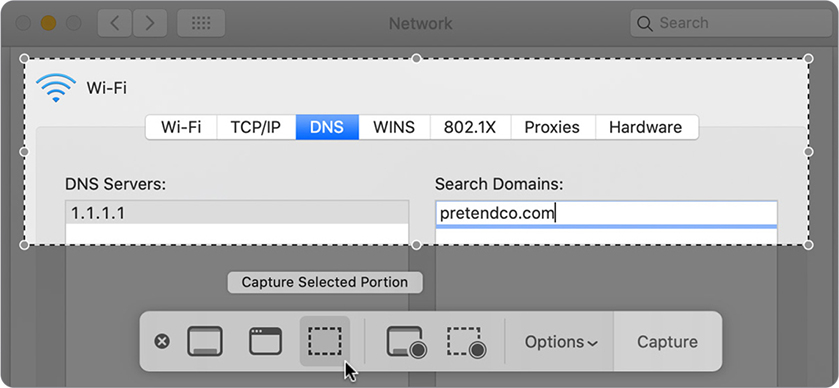
In particular, if you have any special network configuration, such as a static IPv4 address, or a specific Domain Name Service (DNS) server to use, document your network settings before you upgrade. Open System Preferences and click the Network icon to observe your current network settings. Avoid missing settings by navigating through the network interface and all the configurations.
You can quickly document your settings by using the Screenshot utility. Just press Shift-Command-5. Press the Space bar to change the pointer to a camera icon; then you can move your pointer to highlight different windows. Click to capture the highlighted window, or use the Screenshot menu to change what’s captured, to capture video, to change where you save the file, to set a timer, or to modify several other options. After you finish your screenshot or video capture, its preview appears in the corner of the screen. Drag the preview into a document, click the preview and mark it up, or just leave it and the Screenshot utility will automatically save it to your desktop with a filename of “Screen Shot” followed by the date and time of the capture. Be sure to print or copy your screenshots to another storage device before you install macOS Big Sur.
Note ![]()
When you use Screenshot to capture a window, you can exclude the window’s shadow. Just press and hold the Option key when you click. To copy a screenshot to the Clipboard, press and hold the Control key while you take the screenshot. You can then paste the screenshot somewhere else. Or you can use Universal Clipboard to paste it on another Apple device. See Apple Support article HT201361, “Take a screenshot on your Mac,” for more information.
Plug Mac Notebooks into Power
Plug your Mac into an AC power outlet during the upgrade to ensure that the upgrade completes successfully.
Download macOS Big Sur
If you’re using OS X El Capitan v10.11.5 or later, macOS Big Sur downloads in the background, making it easier to upgrade your Mac. When the download finishes, you receive a notification indicating that macOS Big Sur is ready to be installed. Click Install in the notification to get started.
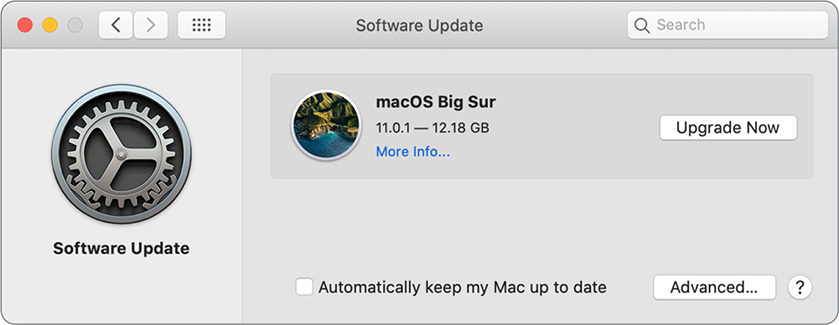
macOS Big Sur is free and available from Software Update preferences or the App Store.
If you’re using macOS Mojave 10.14 or later:
Open System Preferences.
Open Software Update preferences.
Click Upgrade Now.

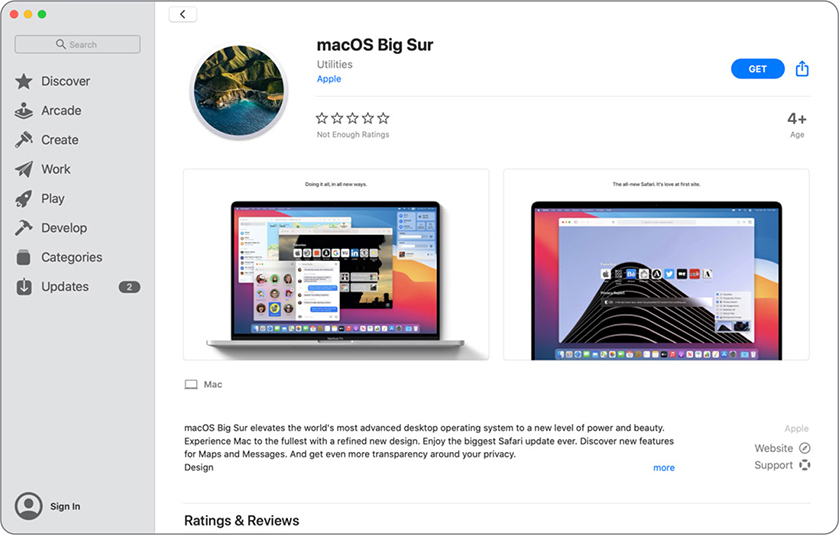
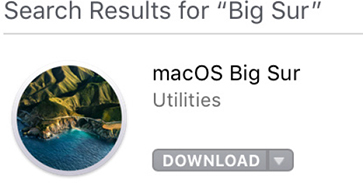
Or open the macOS Big Sur page in the App Store: “macOS Big Sur” at apps.apple.com/app/macos-big-sur/id1526878132. Then click the Get button.
Note ![]()
In the previous figure, App Store displays the number 2 next to Updates. This is because there are two apps that have updates available, but you can install these updates only after you upgrade to macOS Big Sur.
Reference 2.3
Upgrade or Install macOS
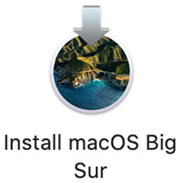
The App Store downloads Install macOS Big Sur and places it in your /Applications folder. After the download is complete, Install macOS Big Sur automatically opens.
Follow these steps to upgrade to macOS Big Sur:
Begin installation.
Allow installation to complete.
Begin Installation
Be sure you are connected to the internet when you upgrade or install macOS. The macOS installer downloads any available firmware updates specific to your Mac. These firmware updates don’t apply to external devices, such as those connected with USB, Thunderbolt, or target disk mode.
You can use these supported tools and methods to upgrade or install macOS:
- macOS installer.
- Bootable installer, then the macOS installer. Read Exercise 5.2, “Create a macOS Install Disk.”
- Start up from macOS Recovery and install macOS. Read Lesson 5 to learn more.
- Use the startosinstall command, inside the Install macOS Big Sur app, which is outside the scope of this guide. See Apple Support article HT208020, “How to install macOS at your organization,” for more information.
- Use the “Install OS update” command using your organization’s mobile device management (MDM) solution, which is outside the scope of this guide.
Use the Install macOS Big Sur app to install macOS on your startup disk. For details on using macOS Recovery to upgrade, reinstall, or install macOS Big Sur, read Lesson 5.
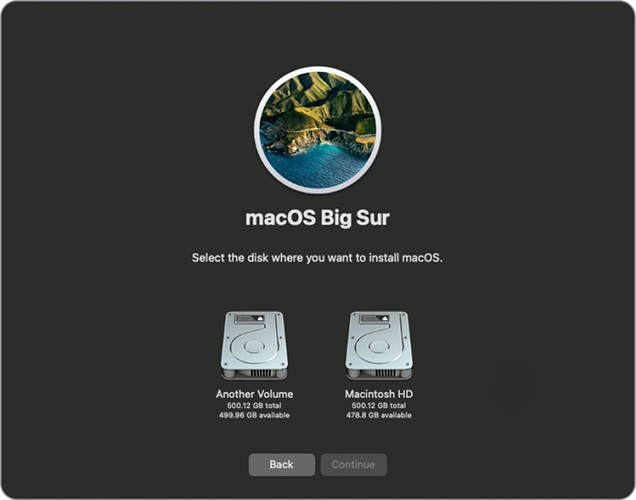
Select the Installation Destination
During macOS Big Sur installation, the only choice you make is the installation destination—you select the disk where macOS is installed. This can be an internal or external volume, as long as it’s properly formatted. The default selection is the current startup disk. The Show All Disks button appears if it is possible for you to select an alternate destination.

If necessary, provide administrator credentials to install a helper tool.
You may not be able to select certain disks or partitions when using the installer (read Reference 11.1, “File Systems,” for more information about partitions). This happens when the installer determines that your Mac can’t start from those disks or partitions. Possible reasons include the following:
- The disk is in target disk mode. Read Reference 11.5, “Troubleshoot File Systems,” for more information about target disk mode.
- The disk doesn’t have the proper partition scheme for your Mac. Mac computers use the GPT (GUID Partition Table) scheme. Use Disk Utility to repartition the disk.
- The partition isn’t formatted properly. macOS Big Sur requires a partition formatted as Apple File System (APFS). Use Disk Utility to erase an improperly formatted partition.
- The macOS installer doesn’t support installing to a volume that’s part of a RAID (Redundant Array of Independent Disks) set.
- The macOS installer doesn’t support installing to a disk containing Time Machine backups.
- The storage volume isn’t from Apple and isn’t compatible with macOS Big Sur.
You might need to click Restart to continue the macOS Big Sur installation.
Allow Installation to Complete
During normal installation, the Mac restarts at least once and possibly multiple times. If a power loss or storage device disconnection occurs, restart the installation.
The macOS installer is designed to never delete nonsystem data from the selected destination. The macOS installer ensures that user data and compatible third-party apps remain functional after an installation. The macOS installer upgrades your current Mac operating system or installs macOS to a volume (except a volume connected by target disk mode) that’s attached to your Mac.
If the Install macOS Big Sur app detects incompatible files and settings during an upgrade, it moves those files to a folder named Relocated Items in the /Users/Shared folder of your startup volume. See “If you see a Relocated Items folder on your Mac after upgrading macOS” in the macOS User Guide support.apple.com/guide/mac-help/mchl8ae423a3 for more information.
Apps that are not compatible with macOS Big Sur are left in place, but macOS displays a prohibitory symbol as part of the app icon. If you try to open incompatible software, macOS displays information about why the app cannot be opened.
Reference 2.4
Troubleshoot Installation Issues
The macOS installer can back out of an installation and restore the previous system if an installation goes wrong. Verify that your Mac meets the requirements for macOS Big Sur and complete the installation preparation steps as outlined in this lesson to avoid installation problems.
macOS Installer Troubleshooting
Beyond failing to prepare for an installation, the most common installation failures come from internet access and destination volume problems. For example:
- The installer has filtered or no access to the internet.
- The installer might be unable to verify the selected volume or partition. This indicates serious storage device problems. Refer to the troubleshooting steps in Lesson 11 to resolve this issue.
For more information, see Apple Support article HT204904, “How to reinstall macOS.”
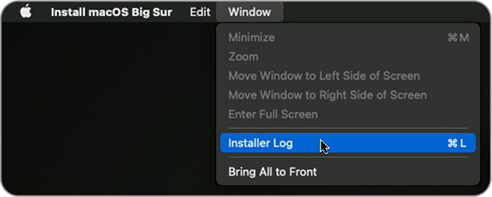
Installer Log
You can use the log file to troubleshoot macOS. The Installer log contains progress and error entries for nearly every installation step, including steps not shown in the standard interface.
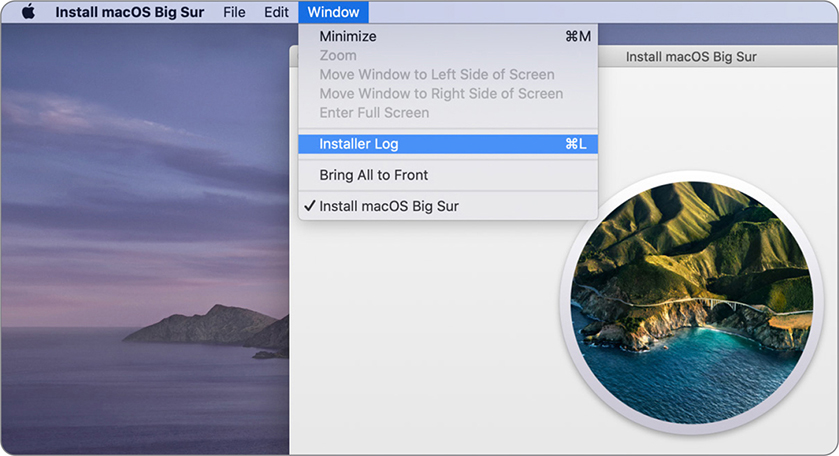
During the initial installation phases, choose Installer Log from the Window menu to access the log. The Installer log helps you pinpoint problems or verify installation.
After the preliminary installation phases, the installer enters the main installation phase and locks the Mac screen. You can only watch the installation progress bar. If the installation fails, the system restarts to the previous version of macOS.
After the Mac resumes normal operation, you can access the full Installer log with Console after you log in.
When you use macOS, error dialogs appear only if an issue is something you can resolve or that requires immediate attention. Otherwise, running processes and apps leave detailed information in log reports throughout macOS.
Console collects log messages and reports that are generated from your Mac and connected devices. Use Console to collect diagnostic information so that you can troubleshoot problems. You can open Console in at least two ways:
- Search with Spotlight.
- Navigate to /Applications/Utilities/ and double-click Console.
After Console opens, select Log Reports in the left column, then select install.log.
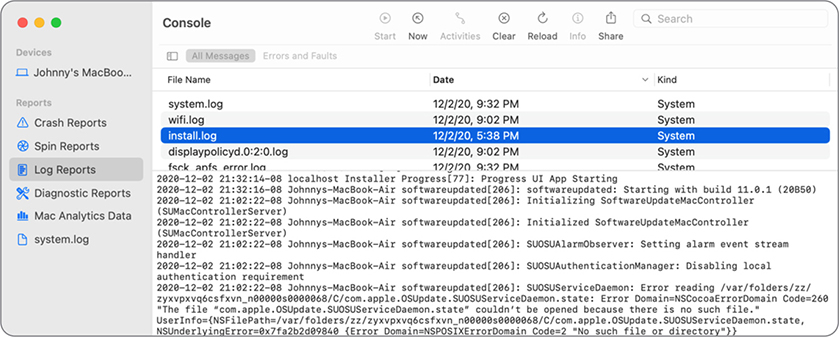
Even during a successful installation, there are warnings and errors. Many of the reported issues are benign, and you should concern yourself with them only if you are trying to isolate a problem that prevents a successful upgrade to macOS Big Sur.
Exercise 2.1
Prepare a Mac for Upgrade
Note ![]()
This exercise is for independent study only. You don’t perform this exercise in a classroom environment. Perform this exercise only if you are upgrading your Mac from an earlier version of macOS.
In this exercise, you verify that your Mac supports macOS Big Sur. You also check for old software and record important settings.
Note ![]()
This exercise can’t be used to prepare an independent-study Mac for the rest of the course. Independent learners must complete Exercise 2.3, “Erase a Mac and Install macOS Big Sur,” to continue to Exercise 3.1, “Configure a Mac for Exercises.”
Check Hardware and App Compatibility
Log in to your existing administrator account.
In the Finder, navigate to the /Applications/Utilities folder.
You can also use the Finder keyboard shortcut Shift-Command-U.
Open System Information.

If necessary, select the Hardware category in the sidebar.
Verify that there is at least 4 GB of memory.
Record the Model Identifier and Serial Number entries:
Model Identifier:
Serial Number:
Select the Storage category in the Hardware section of the sidebar. If there is no Storage entry, select the entry for the bus your Mac startup disk is attached to. For most models, this is the Serial-ATA bus.
Find your startup volume in the list on the right, then verify that it has at least 35.5 GB of available storage.
Note
If you are upgrading from OS X El Capitan 10.11 or earlier, you need at least 44.5 GB of available storage.
In the sidebar, under Software, select Applications, then wait for macOS to gather information on installed apps.
Click the heading for the Last Modified column on the right. If the arrow at the top of the column is pointing down, click again so that it points up.
The oldest apps are listed at the top. In general, older apps are more likely to be incompatible with newer versions of macOS. Research older apps to find out if they are compatible with macOS Big Sur or if updates are available. Often, a developer website has information about compatibility and updates. The most likely incompatible app could be an app that is not 64-bit.
Quit System Information.
Open Safari, then navigate to the Apple Tech Specs website (checkcoverage.apple.com).
Enter your Mac computer’s serial number (recorded in step 6) in the field, enter the code, then click Continue.
Your Mac computer’s model name, along with information about your warranty coverage and links to set up a repair, appears. Verify that the model name is on the list of supported models in Reference 2.2, “Prepare to Upgrade or Reinstall macOS.”
Do one of the following:
- If your Mac is running macOS High Sierra 10.13 or earlier, from the Apple menu choose App Store. If necessary, click the Updates icon in the toolbar and wait while your software is checked for updates.
- If you are running macOS Mojave 10.14 or later, open Software Update preferences and verify that no operating system updates are available.
If the No Updates Available message is displayed, proceed to the “Document Network Settings” section of this exercise.
Depending on your macOS version, if updates are available click the Update buttons for those you want to install. You may find a More option. Clicking More shows a more detailed list of system updates. Click the Update All button to install updates. Follow prompts and instructions to complete the updates.
After the updates have finished, repeat starting at step 15 to verify that all updates installed successfully and that no more updates are available.
Document Network Settings
From the Apple menu, choose System Preferences.
In System Preferences, click Network.

Select each of the network services (listed on the left of the preference pane), and record settings assigned to them. Click the Advanced button for each service to display the full settings. An easy way to do this is to take screenshots with the shortcut Shift-Command-5 to give you a record of the information to work from.
If your Mac has more than one location defined, repeat this process for each location.
Quit System Preferences.
Back Up Your Data
You should always have a current backup copy of the content on your Mac. Third-party backup solutions are available, and macOS includes a backup utility, which is described in Lesson 17, “Manage Time Machine.” Whichever solution you choose, after you complete a backup try restoring files to ensure that it works.
Exercise 2.2
Upgrade to macOS Big Sur
Note ![]()
This exercise is for independent study only. You don’t perform this exercise in a classroom environment. Perform this exercise only if you want to upgrade your Mac from an earlier version of macOS. This exercise can’t be used to prepare an independent study Mac for the rest of the course. Independent learners must complete Exercise 2.3, “Erase a Mac and Install macOS Big Sur,” to continue to Exercise 3.1, “Configure a Mac for Exercises.”
In this exercise, you download macOS Big Sur from the App Store and install it, as an upgrade, on your Mac.
If you are upgrading from macOS High Sierra 10.13 or earlier, use the steps in the “Use the App Store to Download the Installer” section. If you are upgrading from macOS Mojave 10.14, use the steps in the “Use Software Update to Download the Installer” section.
Use the App Store to Download the Installer
If necessary, log in to your existing administrator account on your Mac.
From the Apple menu, choose App Store.
In the search field of the App Store window, type Big Sur, then press Return.

Find macOS Big Sur in the search results, then click the view button under its name (it is labeled either “Download” or “Get”).
Wait for the Install macOS Big Sur app to download.
When the download is complete, the app opens automatically.
Skip the next section, “Use Software Update to Download the Installer,” and continue to the section “Upgrade Your Mac to macOS Big Sur.”
Note ![]()
As part of the installation process, the installer app is automatically deleted. If you want to upgrade several Mac computers or create a macOS Big Sur install disk, quit the installer and make a copy of it before you proceed. Find the process for creating an install disk in Exercise 5.2, “Create a macOS Install Disk.”
Use Software Update to Download the Installer
If necessary, log in to your existing administrator account on your Mac.
From the Apple menu, choose System Preferences, then open Software Update preferences.
macOS checks for available updates.

Software Update shows macOS Big Sur as an eligible update.
Other updates may be shown as well. For the purposes of this exercise, you will upgrade to macOS Big Sur.
Click Upgrade Now, then wait for macOS to finish downloading macOS Big Sur.
When the download is complete, the app opens automatically.
Upgrade Your Mac to macOS Big Sur
If necessary, open the Install macOS Big Sur app.
At the first screen, click Continue.

Read the license agreement, and if its terms are acceptable to you, click Agree.
In the confirmation dialog that appears, click Agree.
Select the installation destination. The default selection is the current startup volume. If you intend to upgrade a different volume, click the Show All Disks button to select a different destination.

Note
The Show All Disks button will appear only if more than one volume is available for installation of macOS Big Sur.
Click Install to start the installation. If you’re warned about not being connected to a power source, connect your power adapter before you continue.
Enter the password of your administrator account to authorize the installation.
To learn installation details, follow the instructions in Exercise 2.4, “Verify That macOS Is Installed Correctly,” after the installation starts.
The installation restarts several times and completes automatically.
Exercise 2.3
Erase a Mac and Install macOS Big Sur
Note ![]()
This exercise is for independent study only. You don’t perform this exercise in a classroom environment. Complete this exercise only if you must erase the contents of your Mac before you install macOS Big Sur, as covered in Reference 2.1, “macOS Installation Methods.” Perform this exercise to prepare your Mac to continue with Exercise 3.1, “Configure a Mac for Exercises.”
Warning ![]()
This exercise erases all of your Mac content. If you want to keep the content, back it up to an external storage device before you start.
Start Up from macOS Recovery or an External Installer
Before you proceed with this exercise, back up your data to an external storage device.
If your Mac is running, shut it down.
If you are using macOS Recovery to replace your current installation of macOS Big Sur:
Press the power button on your Mac to turn it on.
Immediately press and hold Command-R until the Apple icon appears in the middle of the screen.
After the Apple icon appears, release the keys and skip ahead to the next section, “Erase Your Storage Device.”
If you are using an external macOS Big Sur install volume, connect the storage device to your Mac.
Press the power button on your Mac to turn it on, then immediately press and hold the Option key until a row of icons appears on the screen.
Click the install disk icon (usually labeled “Install macOS Big Sur”).
Click the arrow that appears under the icon.
Your Mac starts up into the installer/recovery environment. Lesson 5 has more information about using these startup modes.
Erase Your Storage Device
If a language selection screen appears, select your preferred language, then click the right arrow to continue.
Open Disk Utility.
- If the macOS Utilities window appears, select Disk Utility, then click Continue.

- If an installer screen appears, from the menu bar choose Utilities > Disk Utility.
Disk Utility opens. Lesson 11, “Manage File Systems and Storage,” has more information about using Disk Utility.
From the sidebar, select the storage device or volume that you will erase to install macOS Big Sur.
Click the Erase button near the top of the Disk Utility window.
Enter a new name for your storage device. The rest of this guide assumes that it is named Macintosh HD.
From the Format menu, choose APFS if it is not already selected.
Many volumes may be formatted as Mac OS Extended (Journaled), which is still an option in some cases. If your volume is formatted as Mac OS Extended, the macOS Installer converts your volume to APFS automatically during installation.
If the dialog contains a Scheme menu, choose GUID Partition Map.

Click Erase.
When the process finishes, click Done.
From the menu bar, choose Disk Utility > Quit Disk Utility.
Install macOS Big Sur
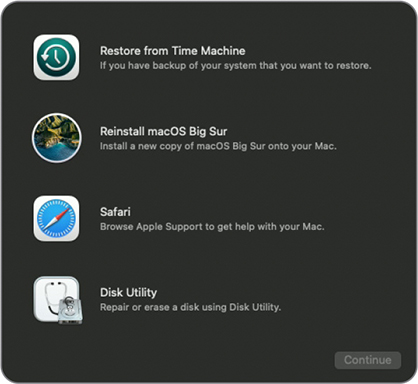
If the macOS Utilities window appears, select Install macOS or Reinstall macOS, and click Continue.
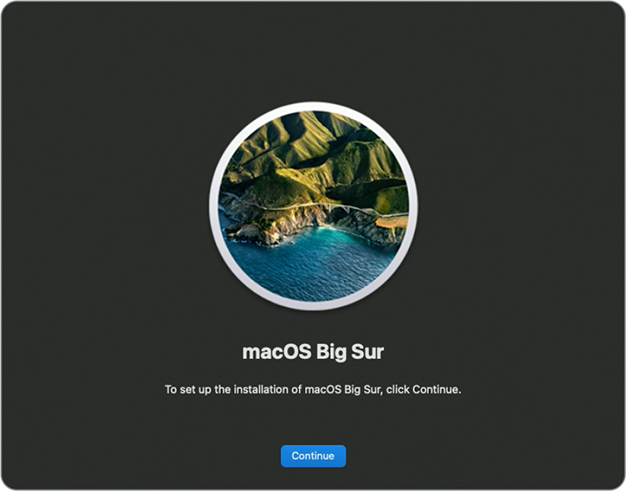
In the Install macOS Big Sur window, click Continue.
If you are asked to connect to the internet, use the Wi-Fi istatus menu at the right end of the menu bar to choose a Wi-Fi network, or connect using Ethernet.
If you are notified that your Mac computer’s eligibility will be verified with Apple, click Continue.
Read the license agreement, and if its terms are acceptable to you, click Agree.
In the confirmation dialog that appears, click Agree.
Select your volume, then click Continue.
To learn the details of the installation, follow the instructions in Exercise 2.4, “Verify That macOS Is Installed Correctly,” after the installation begins.
The installation restarts several times and completes automatically.
After restart, Setup Assistant opens, as covered in Lesson 3, “Set Up and Configure macOS.” Follow the instructions in Exercise 3.1, “Configure a Mac for Exercises,” to set up your Mac for the rest of the exercises.
Exercise 2.4
Verify That macOS Is Installed Correctly
Note ![]()
This exercise is for independent study only. You don’t perform this exercise in a classroom environment.
In this exercise, you use the Installer log to view the installation process.
View the Installer Log
During installation, you can bring up the Installer log by following these steps:
If the installer is running in full-screen mode, the menu bar is hidden. Move your mouse to the top of the screen and leave it there for a few seconds to reveal the menu bar.
From the menu bar, choose Window > Installer Log (or press Command-L).
Choose Show All Logs from the Detail Level menu to view the entire contents of the Installer log.

Use the Spotlight search field in the toolbar to view entries in the Installer log.
To save the Installer log, click the Save button in the toolbar.
The installer restarts the Mac partway through installation. When the Mac restarts for the second phase, the log window doesn’t automatically reopen. It isn’t available during this part of the installation.