
Lesson 14
Use Hidden Items, Shortcuts, and File Archives
macOS makes complex file-system structures simple. For example, the Finder displays just four folders at the root level of the system volume. Also, many items are shown in convenient locations but are stored elsewhere. And you can use the archiving technology built into macOS to combine multiple items into a compressed file.
In this lesson, you explore hiding, redirecting, and archiving items. You learn how to manage file-system aliases and links. You also open and create ZIP file format (.zip) archives and disk images.
Reference 14.1
Examine Hidden Items
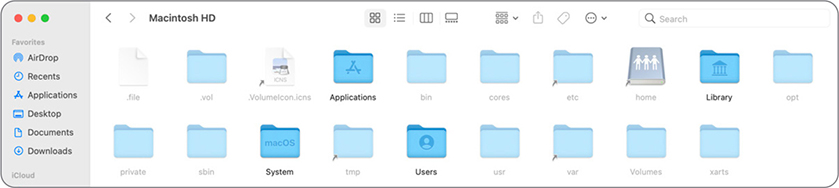
The root level of the system volume contains resources that macOS processes require and that you probably won’t ever need to examine. You can identify many of these resources because they have a period (.) at the beginning of the filename.
In macOS, you can hide files and folders in two ways. You can use the mv command in Terminal to add a period to the beginning of a filename or use the chflags command to enable an item’s hidden file flag. Changing an item’s file flag to hidden hides it only in the Finder. To prevent confusion, you can’t use macOS to hide items using the Finder or the default apps.
Reveal Hidden Folders in the Finder
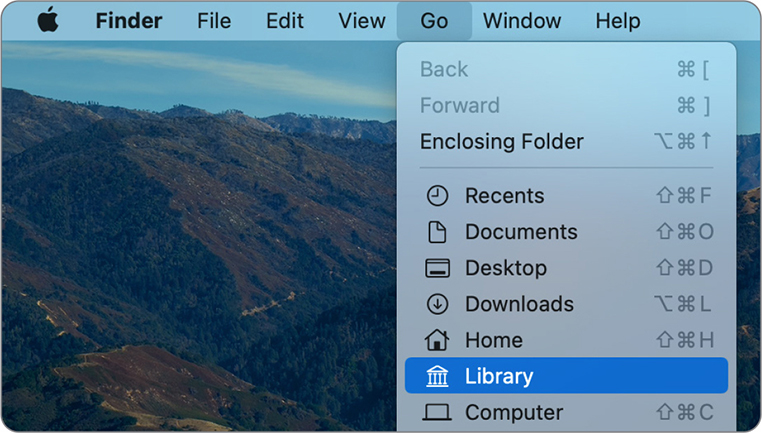
To reveal hidden items, go to the Library folder or open the Finder and select the Go menu.
The user Library folder includes important resources, but it’s hidden in the Finder. Press and hold the Option key, then click the Go menu to reveal the Library menu item.

If you frequently access a user Library folder, you can make it always visible.
Open Finder preferences (Command-Comma).
Click Sidebar at the top of the Finder Preferences window.
Select the checkbox for your home folder.

Close the Finder Preferences window.
Choose Go > Home.
In the Finder window toolbar, click the button to show items as icons, in columns, or in a gallery.


If the Finder window is narrow enough, the Finder displays a menu to change between showing items as icons, in a list, in columns, or in a gallery.

Choose View > Show View Options (Command-J).
In the View Options window, select the Show Library Folder checkbox.
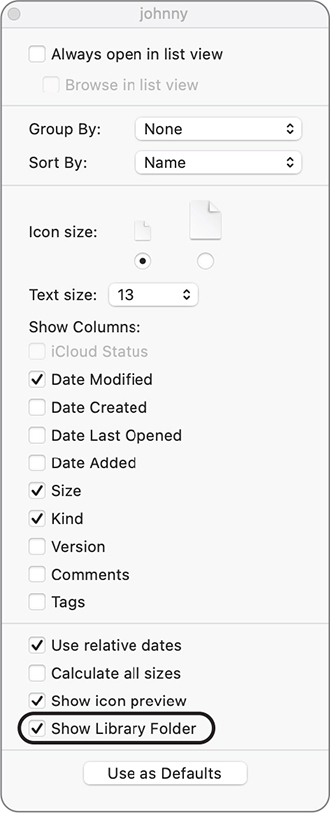
To reveal all hidden items in the Finder, press Shift-Command-Period. Hidden items remain visible in the Finder until you use the keyboard shortcut again to return the items to their default hidden state.
If you show a user Library folder in the Finder, it also appears in the Go menu and has a keyboard shortcut (Shift-Command-L).
Go to Folder
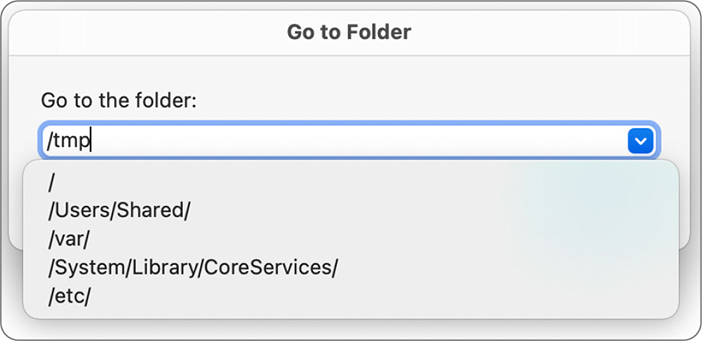
You can leave hidden items hidden in the Finder and still navigate to a particular hidden folder. To examine the contents of hidden folders in the Finder, choose Go > Go to Folder, or press Shift-Command-G. This opens a dialog that enables you to enter an absolute path to any folder on the Mac.
In the Go to Folder dialog, use Tab key completion to enter file-system pathnames. Enter the first few letters of a pathname, then press Tab, and macOS attempts to complete the name. If multiple possibilities exist for what you entered, choose from the displayed list.

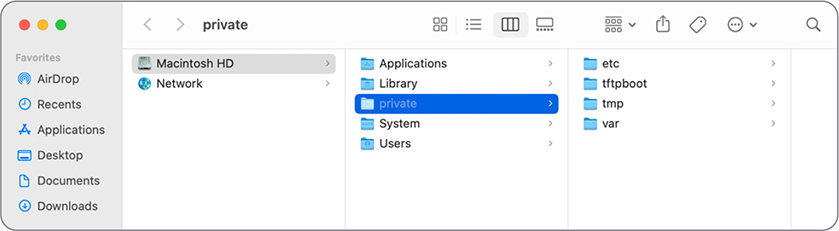
Click Go after you enter the pathname. The Finder reveals the folder in a window. For example, to navigate to /private, type /p and press Tab, then click Go or press Return.
You can also navigate to past destinations from the “Go to the folder” menu. Click the down-arrow button to the right of the text field to reveal past destinations.
The folder /private is one example of a hidden folder. It contains resources that macOS requires.
Reference 14.2
Examine Packages
Although packages and bundles are sometimes referred to interchangeably, they represent distinct concepts:
 A package is any folder that the Finder presents to the user as if it were a single file.
- A bundle is a folder with a standardized hierarchical structure thate holds executable code and the resources used by that code.
An item can be both a package and a bundle. It’s a package because when you double-click it, the Finder does not show you its contents. It’s a bundle because it’s a folder that holds executable code and resources. Examples of items that are both a package and a bundle include the following:
- Optional plug-ins in /Library/Internet Plug-Ins
- Screen savers in /System/Library/Screen Savers
- Most apps
Some items are packages but not bundles, because they don’t contain executable code. Examples of packages that are not bundles include the following:
- Photos Library—The Photos app keeps your pictures, videos, and other information in your Photos Library package, which is in your Pictures folder.
- Photo Booth Library—Photo Booth keeps its data in this package in your Pictures folder.
- Large Pages, Numbers, or Keynote documents.
If you’re working in Pages, Numbers, or Keynote and you have created a file that is larger than 500 MB, saving it as a package helps the app you’re using perform better. Go to Apple Support article HT202887, “Save documents as a package or a single file in Pages, Numbers, or Keynote,” for more information.
Frameworks are bundles but not packages. This includes:
- The frameworks in /System/Library/Frameworks and /Library/Frameworks.
Frameworks contain shared resources that multiple apps can use simultaneously. macOS loads frameworks into memory as needed and shares the one copy of the resource among all apps whenever possible.
Because packages are folders, you can copy them as regular folders to another volume even if it isn’t formatted as APFS or Mac OS Extended. The Finder recognizes the items as packages even when they are on a third-party volume.
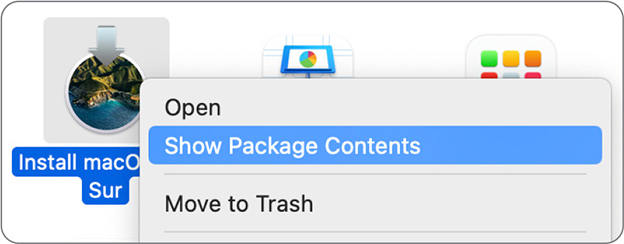
View Package Contents
To access a package’s contents in the Finder, Control-click the item you want to view and choose Show Package Contents from the shortcut menu. If you want to learn how to create or modify a bundle or package bundle, join the Apple Developer Program. You can find out more at developer.apple.com.
Installer Package Resources
An installer package contains a compressed archive of the software you want to install, as well as a few configuration files used by Installer. Other software bundles and packages contain resources for the app or software.
Software packages often include the following:
- Executable code for multiple platforms
- Document description files
- Media resources such as images and sounds
- User interface description files
- Text resources
- Resources localized for specific languages
- Private software libraries and frameworks
- Plug-ins or other software to expand capability
Reference 14.3
Use File-System Shortcuts
File-system shortcuts are files that refer to other files or folders. This enables you to have an item appear in multiple locations or with multiple names without having to create multiple copies of the item. Shortcuts in the Dock or in the Finder aren’t file-system shortcuts. The Dock and the Finder save references to original items as part of their configuration files. File-system shortcuts are files that you can find anywhere on a volume.
About File-System Shortcuts
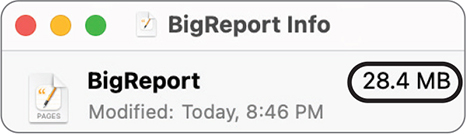
macOS uses four primary file-system shortcut types: aliases, symbolic links, hard links, and firm links. To help you compare these shortcut types, this section uses a 28.4 MB Pages document file named BigReport.pages for demonstration purposes. This file is referred to using each shortcut type. Throughout this section, the Info window in the Finder displays the differences for each shortcut type.
Aliases
You can create aliases using the Finder, but they aren’t recognized by Terminal. Command-line tools can’t follow alias references created in the Finder back to the original items.
Aliases are more resilient than other shortcut types. If the original item is replaced or moved, the alias is designed to never lose the original item.
The following screenshot shows the Finder Info window inspecting an alias pointing to BigReport.pages. The kind is reported as Alias and the file is much smaller than the 28.4 MB original. The Size field reports that the file is 940 bytes and uses 4 KB of disk space. The extra information in the alias is what allows macOS to keep track of the original item should it ever change location.

Symbolic Links
Symbolic links are pointers to the file-system path of the original item. In many cases, if you move the original item the symbolic link is broken. You can replace the original item with a file of the same name because the path remains the same.
You can create symbolic links only in Terminal, but the Finder follows symbolic links to an original item. An example of symbolic links is the way macOS stores some folders in the /private folder but also makes those folders available at the root of the file system using symbolic links. For example, /var is a symbolic link to /private/var.
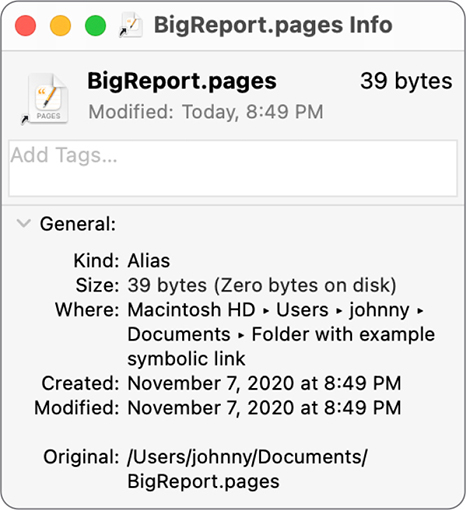
The following screenshot shows the Finder Info window inspecting a symbolic link pointing to BigReport.pages. The kind is also reported as Alias, but the file is only 39 bytes. This illustrates a symbolic link saving a path to the original item. There is no Select New Original button. This indicates that you can’t use the Finder to repair a symbolic link.
Hard Links
Hard links are references to an original item. A file has two parts: the bits on the physical storage device that make up the file content and a name that points to those bits. Every file has at least one hard link. If you create an additional hard link, you create another name that points to the same bits on the physical device.
If you remove an additional hard link, you don’t delete the original item. If you delete the original item, you don’t delete the data or additional hard links because the other hard links still point to the same bits on the device, which won’t be freed until there are no links left to them. With aliases and symbolic links, deleting the original item leaves the shortcut pointing at nothing.
You can create hard links only in Terminal, but the Finder can follow them. To save space, Time Machine uses hard links to refer to items that haven’t changed since the previous backup. macOS uses folder hard links for Time Machine. The man page for ln has more information about creating hard links and about creating symbolic links with the -s option.
Firm Links
Firm links help macOS display a single unified volume to the user and apps, even though macOS Big Sur separates the signed system volume (SSV) read-only APFS snapshot of the APFS System volume from the read-write APFS Data volume. Firm links allow forward and backward navigation between folders that straddle the SSV volume and the read-write APFS Data volume. These are transparent to the user. You cannot create or modify firm links. Go to Reference 11.1, “File Systems,” for more information.
Create Aliases
To create an alias in the Finder, select the item you want to create an alias for and use one of the following methods:
- Choose File > Make Alias.
- Press Command-L.
- In a Finder window, choose Make Alias from the Action menu (the icon looks like a circle containing three dots).
- In the Finder, Control-click an item and choose Make Alias from the shortcut menu.
- Drag the original item while pressing and holding the Option and Command keys to drop the alias in another location. This method doesn’t append the extension “.alias” to the filename of the new alias, but it updates the icon.
- Drag an app to the desktop. This gives you access to the app without the risk of accidentally removing it from its original installed location.
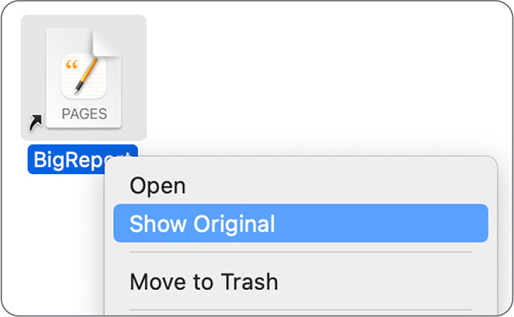
After you create an alias, you can rename it or move it. As long as the original item remains on the original volume—even if it’s replaced or its name changes—the Finder can locate the alias. An alias file has a small curved arrow at the lower-left corner of the icon. Locate an alias target from the Finder by Control-clicking the alias and choosing Show Original from the shortcut menu, or by pressing Command-R.
Repair Aliases
Double-click a broken alias to repair it in the Finder. The Finder tells you if it can’t locate the original for a broken alias. In the dialog, you can delete the broken alias, click Fix Alias to select a new original item, or click OK to dismiss the dialog.

You can also redirect an existing alias. Select the alias, open its Finder Info window, and in the General area, click the Select New Original button.

Both methods open a file browser dialog, where you can select a new original item for the alias.
Reference 14.4
Use File Archives
Unlike automated backup solutions, archiving is typically a manual process where you create compressed copies of data. Archive formats are efficient for storage and data transfer. In this section, you learn about ZIP archives and disk images.
File Archives
You can select files and folders to compress (or zip) into ZIP archives. This is an efficient way to archive small amounts of data. The ZIP archive format is widely compatible. Many operating systems include software to decompress ZIP archives back to their original state.
You can create disk images using Disk Utility. You can use disk images to archive an entire file system, including files, folders, and associated metadata, into a single file. You can compress, encrypt, or make read-only any disk image. You can also configure disk images with read/write permissions so that you can make changes.
Disk images you create with Disk Utility that use the .dmg filename extension can be accessed only by Mac computers. Other systems require third-party software to access Mac disk images.
Create ZIP Archives
By default, creating a ZIP archive in the Finder doesn’t delete the original items, and expanding a ZIP archive doesn’t delete the original archive.
To create a ZIP archive in the Finder, select the items you want to archive and compress in the Finder. Press and hold the Shift key to select contiguous lists of items, or press and hold the Command key to select noncontiguous items. With a single file selected in the Finder choose File > Compress Item, or Control-click the file and choose Compress Item from the shortcut menu, where Item is the name of the file. If multiple files are selected, the command is Compress.
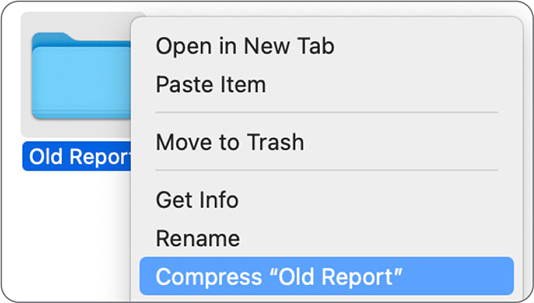
The Finder may show a progress dialog with the estimated time required to complete the compression. You can cancel the archive by clicking the small x button on the far right. When the process finishes, you are left with a ZIP archive named either Archive.zip or Item.zip, where Item is the name of the item you chose to archive and compress.
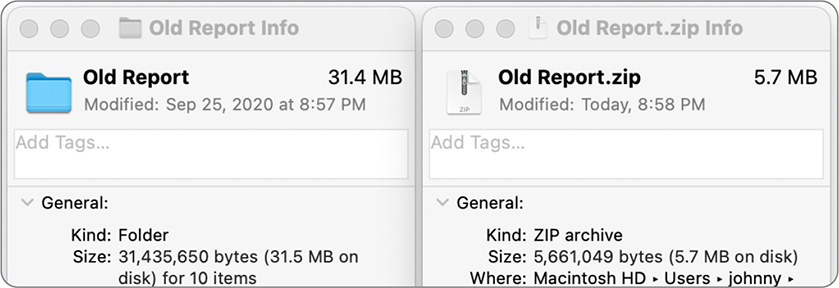
After the archiving is complete, compare the original item size with the archive size using the Info or Inspector window in the Finder. Many media formats come compressed, so your results may vary when you again compress these file types.
Expand ZIP Archives
Expand a ZIP archive in the Finder by double-clicking the archive file. The Finder cannot list or extract individual items from a ZIP archive.
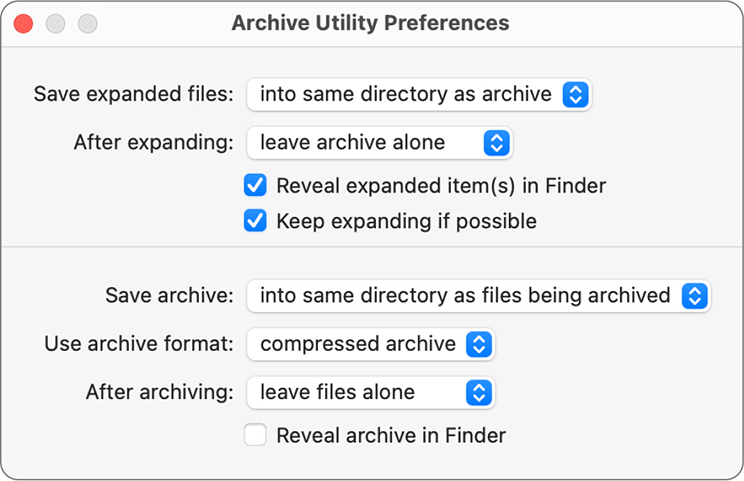
If you need more control over how ZIP archives are expanded, use Spotlight to open Archive Utility and choose Archive Utility > Preferences. These preferences enable you to adjust how ZIP archives are expanded and compressed. The preferences include options for handling original items after an archive transition.
Mount Disk Images
Safari mounts downloaded disk images, but you can manually mount disk images from the Finder too. To access the contents of a disk image, double-click the disk image file in the Finder. Doing so mounts the volume inside the disk image file as if you had just connected an external storage device.

Even if the disk image file is on a remote file server, you can mount it as if it were a local volume. You can treat the mounted disk image volume as you would other storage devices by navigating through its hierarchy and selecting files and folders. If the disk image is read/write, you can add to the contents of the disk image by dragging items to the volume.
Create Empty Disk Images
To create an empty disk image, which you can fill with content over time, log in as an administrator user, open Disk Utility, and choose File > New Image > Blank Image.

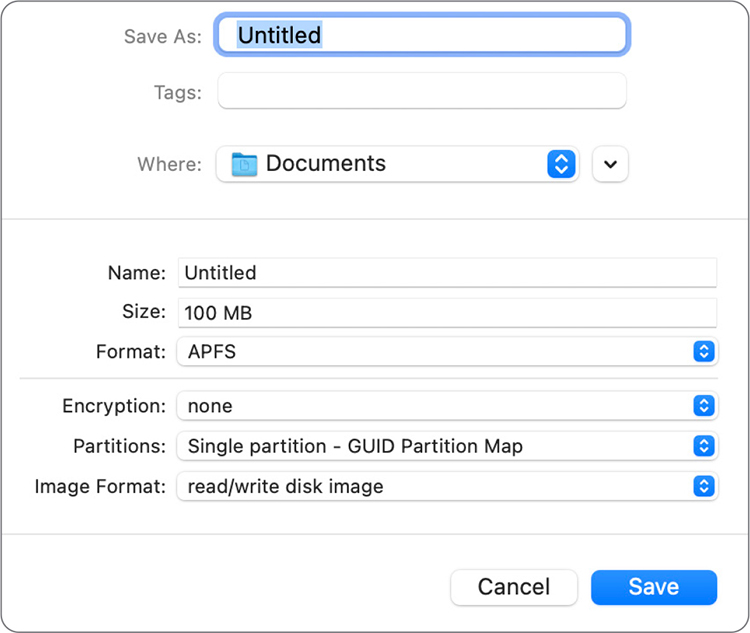
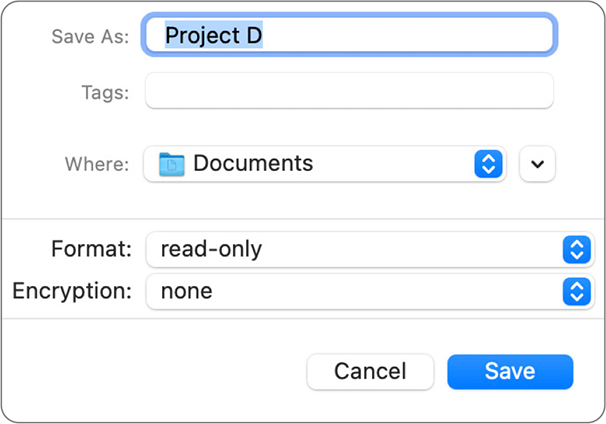
In the New Blank Image dialog, you can define the parameters for the new disk image. At the least, you need to select a name and destination for the disk image file. You should also enter a name for the volume inside the disk image. The disk image file and volume names don’t have to match, but they should be similar so that you can recognize their relationship.
Disk image size is limited by the storage destination capacity. You can select the “sparse disk image” image format to create an image file that’s only large enough to store items that are in the disk image volume. Empty space inside a disk image volume doesn’t count as storage space.
After you define your disk image options, click Save to create the disk image. After macOS creates the new blank disk image, macOS mounts it. If you chose to create a sparse disk image, you can open Info windows in the Finder for the disk image file and the disk image volume to verify that the volume size is much larger than the image size. As you copy files to the volume, the disk image file grows.
You can change the format of a disk image with Disk Utility by choosing Images > Convert. This opens a dialog where you can select the image you want to change and save a copy of the image with new options.
Create Disk Image Archives
To create a disk image that contains copies of items, open Disk Utility and choose File > New Image > Image from Folder. This opens a file browser window in which you can select the folder you want to copy into a new disk image.

To create a disk image from the contents of an entire volume or disk, select the source from the Disk Utility window disks list and choose File > New Image > Image from Source (where Source is the name of the selected volume or disk).

After you select the disk image source, a Save dialog appears. At the least, you must select a name and destination for the resulting disk image file. The name of the volume inside the disk image is set to the name of the selected source. You can compress the disk image contents to save storage space. Also, you can enable encryption for the disk image. If you do, you must set a password and provide a hint for the resulting secure disk image. Be sure to use Keychain Access to save the password to a keychain for easy, secure access.
After you define your disk image options, click Save to create the disk image. Depending on the amount of data to be copied and the image format you choose, it can take seconds to hours for the disk image to copy. Disk Utility opens a progress dialog that lets you cancel the copy.
You can find out more information about Disk Utility in the Disk Utility User Guide at support.apple.com/guide/disk-utility/.
Exercise 14.1
Navigate Hidden Items
macOS hides portions of the folder structure to simplify the user experience and to prevent accidental damage that may be caused by a user. In this exercise, you explore some of the hidden folders in macOS.
Examine Your User Library Folder
Log in as Johnny Appleseed.
In the Finder, open your home folder. You can do this by choosing Go > Home (or pressing Shift-Command-H).
No folder named Library appears.
In the Finder, open the Go menu. Don’t choose anything yet.
Press and hold the Option key.
As long as you hold down the Option key, a Library choice appears in the menu.
With the Option key held down, choose Library.
This opens the hidden Library folder in Johnny’s home folder.
Choose View > as Columns (or click the Items button in the Finder toolbar and choose Column View from the menu).
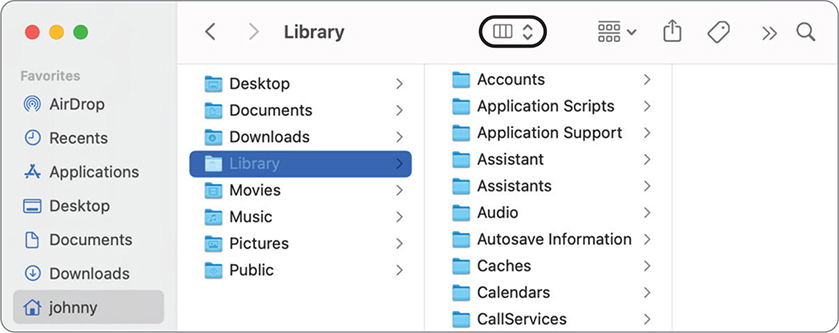
Johnny’s user Library folder is shown in Johnny’s home folder. It’s dimmed to indicate that it’s normally invisible.
Explore some subfolders in Johnny’s user Library folder. You can navigate into them normally.
Close the Finder window that shows Johnny’s user Library folder.
Press Shift-Command-H to open Johnny’s home folder in a new Finder window.
The Library folder isn’t shown.
Choose Go > Go to Folder (Shift-Command-G).
In the “Go to the folder” dialog, type ~/Li, then press Tab.
The field completes the path to ~/Library/.

This is an example of how you navigate to a folder by its path.
Click Go.
Johnny’s user Library folder appears in the Finder.
You could have reached this folder by entering the full path, /Users/johnny/Library, but the tilde (~) is an easier way to specify locations in your home folder.
Examine Hidden System Folders
Press Shift-Command-G to reopen the Go to Folder dialog.
This time, enter /L, then press Tab.
The field completes the path to /Library/. This path looks similar to the previous one, but because it doesn’t start with a tilde, it specifies a different folder. When a path starts with a slash (/), it starts at the top level of the startup volume (sometimes called the root of the file system).
Click Go.
This time, the Finder opens the Library folder at the top of the startup volume. The next lesson discusses the various Library folders.
This Library folder isn’t hidden, but you can use the same technique to reach any folder you know the path to, whether or not it is hidden.
Use the “Go to the folder” dialog to reach the /private/var/log/ folder. (You can type part of a name, then press Tab to complete it.)
The /private/var/log folder holds some of the system log files (there are more in /Library/Logs and ~/Library/Logs). Normally, you don’t need to access these files in the Finder, so they are hidden from view unless you specifically navigate to them.

Use the “Go to the folder” dialog to reach the /var/log/ folder.
This takes you to /private/var/log because /var is a symbolic link to /private/var.