
This is it. You’ve come to the most important part—administering your board. You’ve already seen some of the features described previously in this chapter as well as in Chapter 2, but it’s now time to take a more organized approach and make sure you understand what your administrative options are and how to use them.
This section will later describe some basic phpBB admin features that you’re likely to use more frequently than others. For more advanced and exotic options, make sure you read Chapter 6, which goes into details about security-related questions, smilies, usergroups, and other issues.
In order to test what’s being described further on, you need to log in as a user with administrative privileges. There can be multiple administrators to your board, but in any event, at least one administrative user account exists—the account created while installing phpBB. Well, log in with this account, use the Go to Administration Panel link, and let’s start exploring administrative options.
The Administration Panel has two main areas (referred to as frames in HTML terms):
- The left-hand navigation area, which contains links to all your administrative options. Its divided into groups of similar options like Forum Admin, User Admin, etc.
- The right-hand content area, where the appropriate content is loaded when you click a link from the navigation area.
Your Administration Panel front page looks as shown on the following screenshot:

The Administration Panel front page also has some general statistics about the forum usage, and a Who is Online section that works in a similar way to the one that visitors can access on the forum homepage (see the Visitor Experience section earlier in the chapter), except that this one has an IP address column as well. Clicking on an IP address redirects you to a third-party site that provides some IP-related tools that you may find useful.
The first three options of the navigation menu are pretty straightforward and you may want to give them a try just to get a more comfortable feeling browsing the Administration Panel. They are not actually administrative options but are simply links to the board’s front page and the Administration Panel. The phpBB logo in the top-left corner is also a link to the homepage of the board.
Now let’s take a closer look at the other groups of options on the navigation menu.
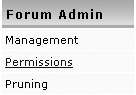
As the title says, this is a group of options for you to administer your forums, to create, edit, delete, or rearrange forums and their categories, as well as to set their options and rules of use (referred to as permissions).
Clicking the Management link in the Forum Admin options group brings up the Forum Administration interface. This interface allows you to create, edit, and delete forums and to organize them into categories.
The simplest way to create a new forum was already briefly discussed in the Moderator Experience section. Now let’s take a more detailed approach. The following screenshot shows how the interface looks after we’ve added the new forum in the previous section. If you haven’t done what was described in the Moderator Experience section, you’ll have the default phpBB look, which is same as shown below minus the New Forum row:

- Type Fun in the second text field of the Forum Administration interface.
- Click Create new category.
- Click the link in the Click Here to return to Forum Administration line once the category is created.
You’ve created a new blank category (blank because it doesn’t contain any forums yet). Here’s how the Forum Administration screen will look after you complete the earlier steps:

At this point, because the new category is still empty, visitors see no changes made to the board’s homepage.
Now let’s add some forums to the new category.
- Type Funny pics in the textbox after the Fun category youve just added in the Forum Administration interface.
- Click Create new forum. You are now presented with the following form:

- In the Description field, type Collection of links to funny images found on the web.
- Leave Category dropdown as is.
- Leave the Forum status dropdown as is.
- In the Auto-pruning section, leave the defaults.
- Click the Create new forum button.
- Click the link Click Here to return to Forum Administration. At this point we are repeating the exercise, but with a few modifications.
- To start creating another new forum, type Funny quotes, but this time do it in the first text field.
- In the Description field, type Here youll find links to funny quote web sites the admin finds amusing.
- Change the value in the Category dropdown from Test category 1 to Fun.
- Change the value in the Forum status dropdown from Unlocked to Locked.
- In the Auto-pruning section, select Enabled.
- In the Auto-pruning section, change the first text value from 7 to 30.
- In the Auto-pruning section, change the second text value from 1 to 7.
- Click the Create new forum button.
- Click the link in the Click Here to return to Forum Administration.
Here’s the result of what you’ve just done as shown in the Administration Panel:

And here’s what your users will see—the changed board on the home page:

Now let’s take a step back and see exactly what happened, using the same numbers as in the preceding Time For Action section:
- You gave a name to your new forum.
- You initiated the creation of the new forum.
- You gave a description to your forum.
- You used the phpBB-proposed value for a category.
- You used the phpBB-proposed value for the Locked/Unlocked forum status (in this case, Unlocked). What this means is that users can post in this forum. Locked, as you know, would mean that users cannot post in the forum, but administrators and moderators still can.
- You used the phpBB default value for the Auto-pruning option, which is to not use this option. If you enable the auto-pruning feature, phpBB will delete all topics that were inactive for a specified period of time. The Inactivity of a topic is counted from the time of the last posting to it.
- You finalized the creation of the new forum.
- You went back to the Forums Administration interface.
- You started the process of creating a new forum again and set the title.
- You specified the forum description.
- This time you didnt use the proposed value, but changed the forum category. This category was proposed by phpBB, because you typed the forum name under Test category 1 and not under Fun on step 9.
- You decided to have this forum locked so that users would not able to post, but you still could.
- You turned on the auto-pruning option.
- You set that phpBB should delete all topics older than 30 days, counted from the date of the last posting in this topic.
- You set phpBB to check topics for auto-deletion every seven days.
- You finalized the creation of the new forum.
- You went back to the Forums Administration interface.
After a forum is created, it can be managed further—edited, deleted, or positioned in relation to the other forums in the board.
You can edit an existing category or a forum by clicking the Edit link located next to the title of the category or forum. The edit forms look exactly the same as the forms for Create new forum and work the same way.
You can delete categories and forums by using the Delete links next to their titles. One specific point here: when you delete a forum or a category that has been around for some time and people have been posting in it, you might not want to delete all the postings. To simplify this, phpBB allows you to move the existing topics into another forum or a category before deleting the selected topic.
When you delete a category, you can pick a new category to move all forums to, as shown below (this interface shows Delete Forum and Forum name, but actually refers to deleting categories; you’ll spot the difference with the actual deleting-a-forum interface):
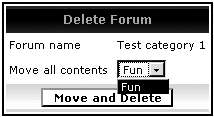
When you want to delete a forum, you are given the option of moving all the topics to another forum. Unlike with category deletion, when you delete a forum you can even choose to delete the topics and the postings as well. Think again before using this option though. Deleting your community’s postings may not be such a good idea.

You can change the order of displaying categories and forums on the board’s home page, by using the Move up and Move down links, next to each forum or a category.
- Click the Move down link next to the Test category 1 category.
- Click the Move up link next to the New Forum forum.

If you spot some weird things happening on you board, use the Resync option as a first attempt at recovery. If there are some data inconsistencies for whatever reasons, Resync will try to bring the data into a consistent state.
Resync can do no harm to the board data. So don’t worry, you can’t break anything. (Well, don’t take that last sentence as a challenge.) If ever in doubt about whether you should be using this option, just use it. On the other hand, if you find yourself using it too often, there might be other problems; isolate the symptoms and seek a cure on the phpBB community forums.
phpBB takes the security aspects of running a bulletin board really seriously. That’s why there is a powerful and options-rich system of permissions and user privileges. You’ll find some more detailed information about the permissions system in Chapter 6, which contains details on some advanced phpBB features. You’ll also find more information in the online phpBB user guide. So before you start playing around with the permissions, make sure you know what you’re doing. For now, we’ll just take a quick look into the permissions that are used most often, and leave the details for later.
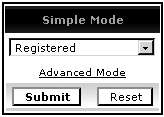
There are two modes of setting a forum’s permissions: simple and advanced. Using the simple mode, you can pick permission patterns (a set of advanced permissions grouped together to be easier to use) from a list of preset values. Example options for simple mode are "Public" forum, "Registered" forum, and "Hidden" forum.
These simple options are carefully analyzed and selected by the phpBB team, so using them instead of the advanced options is probably the safest thing to do until you are comfortable managing forum and user permissions. Let this be your rule of thumb: use the simple mode unless you have a good reason not to and you know what you’re doing.
The two simple mode options used the most frequently are "Registered" and "Public". To get a rough idea, in a "Public" forum, a visitor doesn’t have to be a registered user in order to post. In a "Registered" forum, only registered users can post. In both cases, only moderators and administrators can use more advanced features like specifying topic-type (sticky and announcement) or editing and deleting other people’s posts.
By default, all the forums that phpBB creates are public. A good (and common) practice is to change a forum’s permissions to "Registered" after you create it.
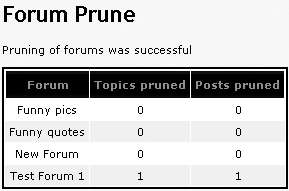
Pruning is a feature that allows you to clean up old inactive topics to free up database space. You already saw how the auto-pruning feature works. The only way pruning is different from auto-pruning is that it’s initiated by you, and not done automatically.
Think twice before you use this feature—deleting topics is irreversible! Are you sure you don’t need these topics anymore? Remember that your community members have spent quite some time writing all these postings. Do you want to throw their postings away? Consider buying more database space if you’re short, before deleting people’s topics. If you’re still positive you want to prune postings, here’s how.
- Select Pruning from the Forum Admin options from the left navigation menu.

- Pick All forums if you want to clean them all. You also have the option of pruning individual forums.
- Type 30 as the number of days.
- Click Do Prune.
Now let’s move to the General Admin group of options, which allow you to do the basic system administration tasks.
You can access the general configuration options by clicking the Configuration link from the General Admin options on the left navigation menu. (Don’t worry about skipping Backup Database; a description of this option follows in a bit.)

This brings the "General Configuration" form that contains the very root board settings, such as domain name, enabling private messages, and so on. You already know about these settings from Chapter 2.
It’s a good idea to make backup copies of your data, just in case something happens. Your hosting provider is likely to make such backup copies; you can also make backups using phpMyAdmin or using MySQL command-line utilities. If you’re using a different database system, you may have other options. If you have access to phpMyAdmin, use it. If your hosting provider is making copies, find out about their frequency and the level of effort required to restore the database. It’s your responsibility not to allow data to be lost, and it should be taken seriously.
Scared ya, huh? Good. Now for the good news: if you’re worried you don’t have access to tools to back up your data, rest assured, phpBB provides you with a database backup utility. Sometimes it can be your only option, so let’s look into it.
- Click Backup Database from the navigation menu.
- In the Backup Options form that you see, click Start Backup, leaving all values at default. You get a Please wait message.
- A file dialog window asks you what to do with the
phpbb_db_backup.sqlfile that was requested for download. Save this file into a selected folder on your computer.
You’ve just created a backup file containing the SQL instructions for your database and saved it on your computer. It’s a good idea to store these backup files carefully, keeping them organized by using appropriate filenames and directories. For example, filenames can contain the date the backup was created. Every once in a while, burn those files on a CD; you never know when your PC will crash and cause you to lose your data backups.
You restored your board database from a backup copy saved on your computer, containing all configuration, forums, topics, users: to put it simply—all the data your board needs in order to run.
Depending on the size of the database, the time taken to execute backup and restore operations may vary. For very large databases, these operations may even fail because of some server restrictions imposed by your hosting provider. If you’re experiencing problems, be sure to read Chapter 6 for more information on database backup and restore options, and feel free to seek advice on phpBB.com or phpBBHacks.com forums.
You can use phpBB to send an email to all your users, or to just one usergroup. This feature is really easy to use: you just select the Mass Email link from the menu on the left, select the recipients, type in the subject and the message body, and click the E-mail button. This hopefully will fire an email to all users. "Hopefully", because there is a chance that this feature will not work for you. Because of all these people that send unsolicited mail (read spam), Internet providers and hosting companies are taking measures against everything that looks like a mass mail. So if you have a lot of users in your database or your host has strict mail-usage rules, you may not be able to mass-mail your users.
You can try using the SMTP server of your ISP if the attempt to send without any configuration changes fails. The mail settings are located under the Configuration link in the General Admin section.
The way phpBB mailer works is it adds all recipients to the BCC. Imagine you’re sending a normal email in your favorite email environment. Now imagine you add all users in the BCC (Blind Carbon Copy) field. The result: the email is sent to all recipients, and they cannot see who else is on the BCC list.
You know smilies, those cute little icons (also known as emoticons) that you can use to lighten up your postings and show some emotion, as well as to give the reader a cue as to how to react to your text. Well, good news: phpBB comes with a package of smilies by default and is also flexible enough to allow you to add, edit, and delete the smilies that your members can use in their postings.
Clicking Smilies in the General Admin option group brings the Smiles Editing Utility.

It’s pretty easy to edit or delete smilies. Just use the corresponding link located next to each smilie. You can also add new icons and even add batches of new icons, packaged in special files (.pak). There’s more information on this in Chapter 6.
phpBB allows you to censor words that your members use in their postings. Censoring means replacing a bad word with another (not as bad) one. It actually doesn’t need to be a word per se; it can be a part of a word or a phrase.
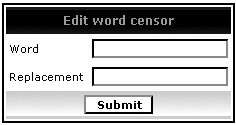
You introduced a new word replacement filter for posting texts. You can now go to the board’s front end and test how this feature works.
Some additional information:
- The words you choose to censor will be censored not only in posting texts but also in post/topic subjects, PM, usernames, polls answers, and poll questions.
- The words are replaced only when displaying. In the database, phpBB stores the original texts. So if you decide to remove a word censor, the original text will start showing up.
- You can use the * wildcard to match a partial word. In the previous example, if you go with matching and replacing The Dude su*, this will also match all alternative phrases like The Dude sukz, The Dude sux, etc., and all of them will be replaced.
Managing users is an activity that you might do quite often. Sometimes users have problems with their profiles, forget passwords, no longer have access to old email accounts, and so on. This is when you step in to help your users.
This section, as the title says, is an introduction and contains only the features you are likely to use more or less frequently. More advanced and less used features will be discussed in Chapter 6.
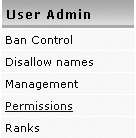
To edit a user profile, click on the Management link of the User Admin options.

You are already familiar with the screen for selecting a user based on the username. If you’re not sure about a username spelling, use the Find a username feature.

After you type (or find) a username, clicking the Look up user button brings up the user profile. The form for editing the profile is the same as the one the users see on the board front end with one addition: the Special admin-only fields section:

The options are quite self-explanatory:
- You can deactivate the user, so the user can no longer log in.
- You can disallow the use of private messaging or avatars for this user. Disallowing PM means that the user cannot send a PM, but can receive PMs from other users.
- You can assign a rank (ranks and avatars are discussed further).
- You can delete this user.
To delete a user, follow the steps described in the previous section, check the Delete this user? checkbox at the bottom of the edit form, and click Submit. Deleting a user is permanent; and cannot be reverted. However, deleting a user doesn’t mean deleting all the postings made by the user. When a user is deleted, all the postings by this user become "guest" postings. At this point, the username is recycled and becomes available for a new registration.
The interface for setting user permissions can be accessed using the Permissions link in the User Admin navigation group:
Again you are presented with the familiar Select a User form. After choosing the user to edit, you see the User Permissions Control screen:

Here, you have the option of making this user an administrator, which will automatically give the user access to the Administration Panel and will make the user a moderator of all the forums. In short, this means that the user will have exactly the same privileges as you.
The other option is to selectively make the user a moderator on per-forum basis. You’ve already done this; remember how you made The Dude a moderator at the beginning of the Moderator Experience section?
Here the Simple Permissions column is empty. The same is true for the detailed permissions of you click on Advanced mode. This is because these options are applicable and can be set for private forums only, and there’s no private forum among those listed. Private forums and detailed permissions are described further in the book.
Yes, it’s not a pleasant task, throwing out users. But what can you do? C’est la vie, it happens. There are all kinds of people out there, and sometimes hidden behind the anonymity of the Web, some folks start doing things that they wouldn’t normally do. Like using bad grammar. Or forgetting to post on Thursdays. Just joking, of course.
Anyway, the idea is that it’s up to you to define unwanted behavior for your specific community, but when it comes to the worst, you’d better know what your options are.
To access the ban control interface, use the Ban Control link under User Admin from the navigation menu on the left-hand side.

The interface for banning users may seem a bit confusing at first, but it’s actually good for providing an at-a-glance overview of what sort of bans are currently defined. The form consists of three groups of two form fields each. These three groups represent the three ways to ban a user, and the two fields are for adding and removing bans respectively. The form itself contains some help on the available options.
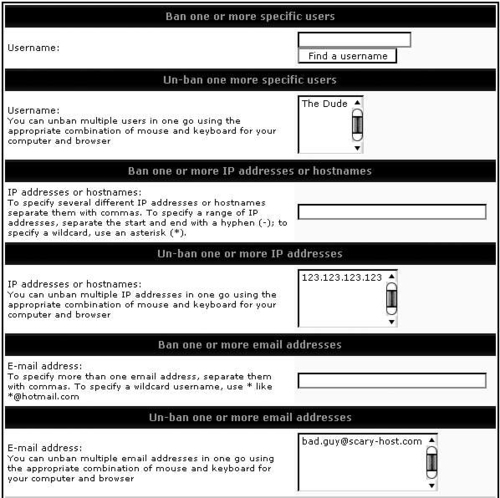
When you ban a user using any of the three methods and the user tries to access the forum, he or she will see a message as follows:

While you can ban users after the damage is done, disallowing certain usernames is a preventative act. When a username (or a part of it) is disallowed, it cannot be used for registrations. So this feature is used before a username is taken, to prevent it from being taken. The form for disallowing usernames contains an interface for both adding and removing rules. The form is accessible through the Disallow names link on the left.

The following example shows how everything starting with Mod (as in Moderator) or Admin is disallowed to prevent imposters from using usernames suggesting that they are not just regular users, but have special community powers.
