Chapter 8
Create Exciting Visual Aids
David Peoples, in his book Presentations Plus, says that people gain 75 percent of what they know visually, 13 percent through hearing, and 12 percent through smell, touch, and taste. Research shows that about 85 percent of the information stored in the brain is received visually. Information that is seen has a much greater chance of being remembered than information that is heard. Since many people are visually oriented, it is critical that presentations include visual aids such as flip charts, overhead transparencies, slide shows, computer-generated graphics, props, or handouts.
Visual aids, however, are never a replacement for the presenter. You are still the number 1 visual in your presentation. Your connection to the audience, your energy, your charisma are more important than any piece of multimedia equipment! Always keep that in perspective. In fact, only two people from the Memorable Speaker Survey mentioned visual aids when describing their favorite presenter.
Visual aids benefit the audience. They can:
![]() Aid in retention
Aid in retention
![]() Clarify a point
Clarify a point
![]() Focus attention
Focus attention
![]() Create interest
Create interest
Visual aids also benefit the presenter. They can:
![]() Increase the look of professionalism
Increase the look of professionalism
![]() Help to organize thoughts
Help to organize thoughts
![]() Give the presenter a reason to move around
Give the presenter a reason to move around
In this chapter, you’ll learn to:
72. Create Simple Visuals
73. Avoid the Tiny-Cluttered-Numbers Syndrome
74. Keep Your Visuals Visible
75. Add Spontaneous Flair With Flip Charts
76. Supercharge Your Overhead Transparencies
77. Control Your Overhead Show
78. Electrify Your Presentation: Videos, Slides, Computer-Generated Shows
79. Reinforce Details With Handy Handouts
80. Test! Test! And Test Again!
81. Glow, Even When the Lights Go Out
![]()
“Don’t even think about using tables and charts that are too complicated or too small to read.”
—Field Department Manager
72. Create Simple Visuals
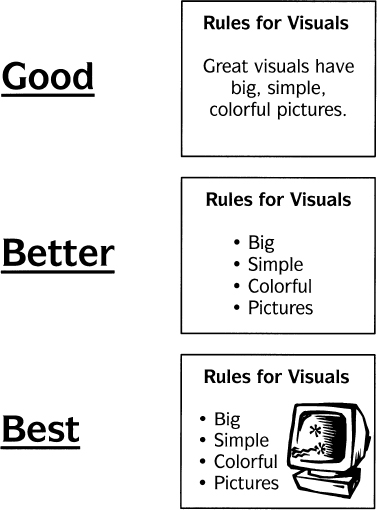
If it looks good on a T-shirt, it will look good as a visual aid. In other words, keep it simple! There are four basic rules to remember: Use big, bold letters, keep the design simple, use two or three colors, and add pictures and graphs when possible.
Be sure that your graphic is clear, interesting, simple, and visible. Figure 8-1 illustrates these rules and their application.
73. Avoid the Tiny-Cluttered-Numbers Syndrome
If someone asked me to identify the number-1 problem with visual aids, it would definitely be the tiny-cluttered-numbers syndrome. The numbers are usually typed, then photocopied onto a transparency. You’ve seen transparencies like this before. They look like the one shown in Figure 8-2.
Figure 8-1. Good, better, best rules for visuals.
Audiences dislike the confusion of cluttered visuals. They can’t read the details. Instead, the visual should contain a clear, basic idea, like that in Figure 8-3.
“A picture is worth a thousand words, but a picture of a thousand words ain’t worth much”—Unknown (but very wise).
74. Keep Your Visuals Visible
Sounds simple, doesn’t it? Yet 50 percent of all visual aids cannot be seen for the reasons shown in Figure 8-4.
Figure 8-2. Transparency suffering from tiny-cluttered-numbers syndrome.

Figure 8-3. Clear, uncluttered transparency.
75. Add Spontaneous Flair With Flip Charts
Visual Aid: Flip chart
Size of Audience: 1 to 40
Preparation: Whether or not you prepare the flip charts before your presentation is a matter of personal choice. Some presenters prefer having everything written and drawn ahead of time; others prefer to write spontaneously as they speak. Audiences show no preference. If you have trouble staying on track and organizing your presentation, it will be to your advantage to prepare the charts ahead of time.
Figure 8-4. Common reasons that visual aids cannot be seen.

1. Practice turning the pages. It takes some coordination.
2. Paper with lines will help you to write straighter.
3. Use “Mr. Sketch” water-based markers.
4. Black, blue, purple, and red have the best visibility.
5. Pencil in notes on the chart to jog your memory.
6. Do not write on the bottom 20 percent of the chart—it’s hard to see.
7. Staple two pieces of flip-chart paper together at the bottom of the page to eliminate the see-through effect.
8. Use no more than six lines on a page.
9. Flip charts are great for use in brainstorming activities, writing key words, or drawing simple diagrams. You do not need to be a great artist in order to get your point across.
10. For larger audiences, you can put the flip chart on a platform or riser for greater visibility.
Sue’s Opinion: I love flip charts. They are tops in user friendliness. I use them whenever possible. Even if you use other types of A-V equipment, put a flip chart in the room and use it occasionally. It will add personalized flair and interest to your talk.
76. Supercharge Your Overhead Transparencies
Visual Aid: Overhead projector and transparencies
Size of Audience: 1 to 200
Preparation: With fancy computer graphics packages, your transparencies can look dazzling. With materials that can be photocopied or run through a computer printer, they are quick and easy to develop. Prepare all of your work horizontally. To ensure that your transparencies are straight when you place them on the projector, use masking tape as a guide right on the projector, 3-M flip frames (sleeves that encase the transparency), cardboard mounts, or “Insta-Frame,” a rectangular device that is seated on the projector. Number each transparency—just in case you drop them on the floor!
Insider’s Tips:
1. Turn the projector off when not in use. You can also use a piece of cardboard to cover the light. Some projectors come with a device that shields the light. Another idea is to put a dark piece of paper on the projector instead of a transparency until you are ready to begin again.
2. Cheat! You can write notes around the transparency frames.
3. Use big, simple lettering and pictures. (Typed letters will not show up.)
4. Use blank transparencies and special wipe-off pens for a spontaneous effect. These pens can also add some spontaneity to prewritten transparencies.
6. Use a pencil, pen, or swizzle stick to point directly to the transparency to explain an idea. If you point to the screen, usually your back will be facing the audience.
7. Teachers’ supply stores are great places for inspiration for inexpensive graphics.
8. Be sure to arrive early. Test the machine. Focus it. Have your first transparency on the screen and ready to go.
Sue’s Opinion: An overhead projector competes with you. The bright light and the sound of some machines can grab the audience’s attention. It is not an audience-friendly piece of equipment. In fact, when the machine is turned off, a feeling of relaxation usually occurs. I suggest that you use the overhead projector for a maximum of twenty minutes at a time. Turn the machine off and do something else for about ten minutes before you use the overhead projector again.
77. Control Your Overhead Show
Have the first transparency on the projector, focused and ready to go, before you start your presentation. See Figure 8-5.
Figure 8-5. Make sure the first transparency is ready to go and focused.

The best setup for your projector is a six-foot table and screen positioned across the corner of the room (diagonally), as shown in Figure 8-6. If you are right-handed, the table should be on your right as you face the audience. This will give you plenty of room for your materials. A little projector cart isn’t big enough.
Use a triangular flow to move transparencies onto and off the projector. Use a three-point arrangement (see Figure 8-7): Point 1 is the unused transparencies in a pile, point 2 is the overhead projector with the transparency in use, and point 3 is the used transparencies in a pile. Move your transparencies in the same direction all the time, to successive points of the triangle.
78. Electrify Your Presentation: Videos, Slides, Computer-Generated Shows
Visual Aids: Slides, videos, computer-generated shows, films
Figure 8-6. Best setup for projector and screen.

Preparation: Lots! The computer world blesses us with new options daily. As technological features are added, preparation time increases. Razzle-dazzle can create frazzle-frazzle if the presenter is not well prepared and completely familiar with the equipment. Hiring an audiovisuals expert for the design and production of these visuals and for the operation of equipment during the presentation is always an option. Either really know your stuff or hire someone who does.
Insider’s Tips:
1. Remember that you, not the technology, are the number-1 connection to the audience.
2. Always start and end the presentation with full lighting.
Figure 8-7. Three-point arrangement for moving transparencies onto and off the projector.

3. For the first and last three minutes, it should be just you and the audience—no electronic media.
4. If the room must be dark, use a lectern light or spotlight shining on your face.
5. Stick with your style. Even though the audience’s attention is often focused on the visual, you still need to smile, move, and sound enthusiastic.
6. Let the visuals flow smoothly and swiftly. Don’t get caught up in whistles, bells, dissolves, and on-screen explosions.
Sue’s Opinion: I have seen many computer-generated presentation shows, but I have seen only two that were done efficiently and effectively. Most often, the presenters hit snags in the cueing of visuals and spend too much time with the fancy graphics instead of the message. Many of these presentations appear cumbersome, and lack any sense of rhythm. Always remember that you are the show. Visual aids should complement you, not the other way around.
79. Reinforce Details With Handy Handouts
Visual Aid: Handouts (including workbooks, manuals, flyers, pamphlets, ball caps, pens, pins, and laminated pocket cards).
Preparation: Handouts allow great opportunities for variety and creativity. Be sure that your handouts mirror your own image. For example, you wouldn’t use a ten-page stapled booklet for a $1,000 seminar. Length, cost, and detail are really your choice.
Insider’s Tips:
1. Every presentation should have some type of handout to reinforce the message. Have some fun. Think beyond written pages, stapled at the left!
2. Keep written handouts simple. What do you want the audience to remember one month down the road?
3. Put “extras” in the handout that you don’t have time to cover during the presentation: bibliography, extra details, extra examples, sources for more information.
4. Fill-in-the-blank pages can be used for audience interaction.
5. If the audience has no need to refer to the written handout during your presentation, tell them that they will be getting it at the end of the session. That way you won’t be competing with the handout for the audience’s attention.
6. Use your handout as a marketing tool. Put your name and address on it.
7. Themes and key phrases can be put on key chains, pens, ball caps, and other such items. They help your audience remember the message.
Sue’s Opinion: A handout is a must for every session. The audience needs something to take with them. The best handouts are simple, short, and usable. My favorites are: a one-page summary of main points, a three-ring binder with the title on the spine, a pen holder for my desk, a magnetic refrigerator calendar, a ball cap.
80. Test! Test! And Test Again!
Become a fanatical tester. Test all of your audiovisual equipment prior to your presentation (even if it’s the same overhead projector you’ve used for the past fifteen years). Arrive early and try everything: turn it on, adjust it, focus it, and give it a trial run. Be aware of these potential pitfalls:
![]() Flip chart: Check for stability (some are very wobbly); test the markers for dryness.
Flip chart: Check for stability (some are very wobbly); test the markers for dryness.
![]() Overhead projector: Check focus and visibility by the entire audience (stand in the back of the room and take a look at what they will be seeing). Turn the projector on and off. Be sure there is a spare bulb, and know how to change it.
Overhead projector: Check focus and visibility by the entire audience (stand in the back of the room and take a look at what they will be seeing). Turn the projector on and off. Be sure there is a spare bulb, and know how to change it.
![]() Slide projector: Test-drive at least ten slides. Check the focus and visibility.
Slide projector: Test-drive at least ten slides. Check the focus and visibility.
![]() VCR: Play a few minutes of videotape; know where the controls are, become familiar with the buttons on the remote, adjust the volume, stop, rewind, pause. Check the tracking; cue the tape for the precise starting point. Some machines create a loud, annoying hiss until the tape has run for a few seconds. If this is the case, keep the volume down at first and increase it after the tape has played for a short time. When you are finished, turn off the TV first, then the VCR.
VCR: Play a few minutes of videotape; know where the controls are, become familiar with the buttons on the remote, adjust the volume, stop, rewind, pause. Check the tracking; cue the tape for the precise starting point. Some machines create a loud, annoying hiss until the tape has run for a few seconds. If this is the case, keep the volume down at first and increase it after the tape has played for a short time. When you are finished, turn off the TV first, then the VCR.
![]() Computer graphics: Check the visibility. Run through about three minutes worth of graphics and any special effects and features you’ll be using.
Computer graphics: Check the visibility. Run through about three minutes worth of graphics and any special effects and features you’ll be using.
![]() Microphone: All mikes are different. Some need to be spoken into directly; others will pick up sound from all directions. Request the type of mike you prefer: lavaliere, hand-held, wireless, or attached to the lectern. Speak into the mike and do a sound check with someone standing in the back of the room.
Microphone: All mikes are different. Some need to be spoken into directly; others will pick up sound from all directions. Request the type of mike you prefer: lavaliere, hand-held, wireless, or attached to the lectern. Speak into the mike and do a sound check with someone standing in the back of the room.
![]() Room setup: Be sure that your directions for the setup of the room are clear and in writing. Give your contact person a drawing of exactly what you want. Always arrive early enough to change the setup if needed.
Room setup: Be sure that your directions for the setup of the room are clear and in writing. Give your contact person a drawing of exactly what you want. Always arrive early enough to change the setup if needed.
![]() Writing devices: Bring your own markers and transparency pens—90 percent of the time, the ones provided are dry.
Writing devices: Bring your own markers and transparency pens—90 percent of the time, the ones provided are dry.
![]() Light switches: Find out where they are, and know how to use them.
Light switches: Find out where they are, and know how to use them.
Sue’s Opinion: Never become overconfident when it comes time for an equipment check. In the audience’s eyes, you are responsible (even if the A-V department set up the equipment). Always arrive early and test everything.
81. Glow, Even When the Lights Go Out
What will you do when the equipment fails?
One day the lights went out on popular socio-psychologist Jennifer James. She was speaking to about 500 dentists when the entire room went dark, except for small emergency bulbs around the room. There was no electricity in the entire hotel. The overhead projector and microphone were no longer functional. Jennifer couldn’t even see a page of notes! What did she do? She walked into the center of the room, cranked up her voice projection, adopted a theater-in-the-round delivery, and proceeded. She knew her material and her organization well enough to ad lib through the main points. She was very conversational and made the best of an awkward situation. The audience was truly impressed.
Here are some tips for “presentation insurance”:
![]() Always have a back-up plan. You need to proceed regardless of any equipment malfunction. Apologize once and move on. Know your material. Add some audience involvement. Think of carrying on a conversation with the audience.
Always have a back-up plan. You need to proceed regardless of any equipment malfunction. Apologize once and move on. Know your material. Add some audience involvement. Think of carrying on a conversation with the audience.
![]() When traveling by air, keep your visuals and notes with you. Do not check them with your luggage.
When traveling by air, keep your visuals and notes with you. Do not check them with your luggage.
Sue’s Opinion: Equipment problems will happen. The audience will forgive you. They will understand. What’s most important is how you deal with the problem. Are you calm and professional, or are you shriveling with fear and embarrassment? If you are prepared for possible problems, there should be no difference in the end result of your presentation. All you need to know is: What will you do when the equipment fails?