
Day 20. AnyConnect Remote Access VPN
CCNA Security 210-260 IINS Exam Topics
![]() 3.2.c Implement basic AnyConnect SSL VPN using ASDM
3.2.c Implement basic AnyConnect SSL VPN using ASDM
![]() 3.2.d Verify AnyConnect connection
3.2.d Verify AnyConnect connection
Key Topics
Today we will focus on configuring and verifying client-based remote-access SSL VPNs using Cisco AnyConnect Secure Mobility Client and the Cisco Adaptive Security Appliance (ASA).
AnyConnect SSL VPN Concepts
A client-based SSL VPN is often called “full-tunnel” because it provides authenticated users with LAN-like, full network access to corporate resources, However, the remote devices require a client application, such as the Cisco AnyConnect Secure Mobility Client, to be preinstalled on the end-user device, or the application can be downloaded as needed by initially establishing a clientless SSL VPN.
Also, this type of solution uses bidirectional authentication: The client authenticates the ASA with a certificate-based authentication method, and the ASA authenticates the user against a local or remote user database, which is based on a username and password.
After authentication, the ASA applies a set of authorization and accounting rules to the user session. When the ASA has established an acceptable VPN environment with the remote user, the remote user can forward raw IP traffic into the SSL/TLS tunnel destined to the enterprise network, as shown in Figure 20-1.
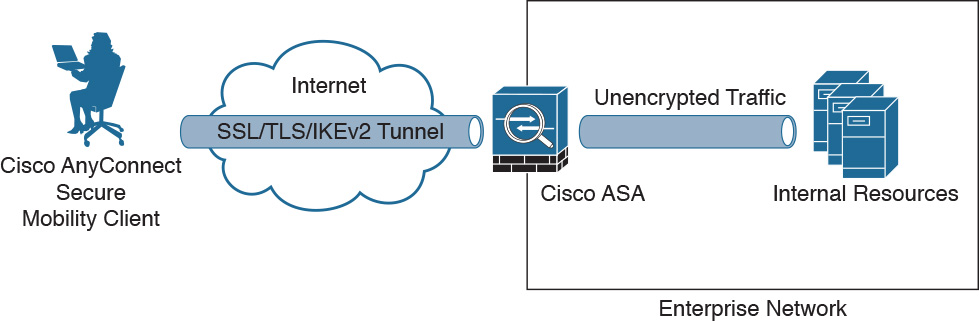
The Cisco AnyConnect Secure Mobility Client creates a virtual network interface to provide this functionality. This virtual adapter requires an IP address, and the most basic method to assign an IP address to the adapter is to create a local pool of IP addresses on the ASA.
The user can use Cisco AnyConnect in the following modes:
![]() Standalone mode: Enables the user to establish a Cisco AnyConnect connection without using a web browser. In standalone mode, a user opens Cisco AnyConnect just like any other application and enters the username and password credentials into the fields of the Cisco AnyConnect GUI.
Standalone mode: Enables the user to establish a Cisco AnyConnect connection without using a web browser. In standalone mode, a user opens Cisco AnyConnect just like any other application and enters the username and password credentials into the fields of the Cisco AnyConnect GUI.
![]() WebLaunch mode: Enables the user to enter the URL of the Cisco ASA security appliance in the Address or Location field of a browser, using the HTTPS protocol. The user then enters the username and password information in a login window, chooses the group, and clicks Submit. The portal window then appears, allowing the user to launch the client by clicking Start AnyConnect on the main pane. It is also possible to configure the ASA to deploy the AnyConnect package to the user’s device.
WebLaunch mode: Enables the user to enter the URL of the Cisco ASA security appliance in the Address or Location field of a browser, using the HTTPS protocol. The user then enters the username and password information in a login window, chooses the group, and clicks Submit. The portal window then appears, allowing the user to launch the client by clicking Start AnyConnect on the main pane. It is also possible to configure the ASA to deploy the AnyConnect package to the user’s device.
SSL VPN Server Authentication
As with a clientless SSL VPN, the ASA requires a server identity certificate, which the appliance sends to remote SSL VPN clients to enable them to authenticate the ASA. By default, the security appliance will create a self-signed X.509 certificate on each reboot, resulting in many client warnings when attempting SSL VPN access, as the certificate cannot be verified by any means. This can be avoided by either creating a permanently self-signed certificate or enrolling the ASA with an external certificate authority (CA) within a public key infrastructure (PKI).
SSL VPN Client Authentication
When Cisco AnyConnect SSL VPN users connect to a ASA, the users can choose their connection profile by choosing the desired profile from a drop-down list or connecting to the group URL. If no specific connection profile is chosen, the ASA security appliance will assign the users to the DefaultWEBVPNGroup connection profile. By default, this profile is configured to use user authentication, using the local user database on the Cisco ASA security appliance.
SSL VPN Client IP Address Assignment
When clients connect to a full-tunnel SSL VPN, the VPN gateway assigns an IP address to the virtual network interface (adapter) of the client PC. The PC uses this IP address as the source IP address to access resources beyond the VPN gateway. These IP addresses can be from the private IP address space, but they must be routed to the gateway (ASA) in the internal network.
The ASA can assign IP addresses in an SSL VPN full-tunnel solution in several different ways:
![]() Use an IP address pool that is configured on the ASA, and assign the pool to a default or custom connection profile.
Use an IP address pool that is configured on the ASA, and assign the pool to a default or custom connection profile.
![]() Use an IP address pool that is configured on the ASA, and assign the pool to a default or custom group policy. This is a good method to use if you want to differentiate between multiple groups of users on the ASA.
Use an IP address pool that is configured on the ASA, and assign the pool to a default or custom group policy. This is a good method to use if you want to differentiate between multiple groups of users on the ASA.
![]() Configure the IP addresses as part of the user account in the local user database, enabling per-user IP addresses. This is a good method to use if you want to assign specific per-user policies on the ASA.
Configure the IP addresses as part of the user account in the local user database, enabling per-user IP addresses. This is a good method to use if you want to assign specific per-user policies on the ASA.
AnyConnect SSL VPN Configuration and Verification
There are three major phases to configuring SSL VPN full-tunnel mode using Cisco ASDM so that remote clients will connect using Cisco AnyConnect:
Phase 1. Configure the ASA for Cisco AnyConnect.
Phase 2. Configure the Cisco AnyConnect VPN Client.
Phase 3. Verify AnyConnect configuration and connection.
For this AnyConnect SSL VPN scenario, we will use the same topology as on Day 21 when we deployed a clientless SSL VPN. We will add one extra element to this topology: an address pool for the VPN AnyConnect client. The ASA will provide IP addresses to connecting clients using the address pool 192.168.1.50 to 192.168.1.100.
In our scenario, we will first initiate a clientless session. From the clientless portal, we will click the AnyConnect option to proceed with the Cisco AnyConnect VPN Client download and installation. We will then start an SSL VPN full-tunnel session using the newly installed AnyConnect client. As on Day 21, we will perform all configuration tasks using the ASDM.
Phase 1: Configure Cisco ASA for Cisco AnyConnect
We will be performing eight tasks to configure the ASA for AnyConnect support using the AnyConnect VPN Wizard, which you access by choosing Wizards > VPN Wizards > AnyConnect VPN Wizard, as shown in Figure 20-2.

Task 1: Connection Profile Identification
After you click Next on the Introduction page of the wizard, the first task is to configure the connection profile identification, used to identify the ASA to the remote-access users, as shown in Figure 20-3.

There are two items to configure here. In the Connection Profile Name field, enter a name that remote-access users will access for VPN connections. Connection profiles appear as tunnel-group in the CLI. This connection profile name will be displayed in a drop-down list on the initial clientless session. In our example, we are configuring AnyConnect SSL VPN access for our HR users (Connection Profile Name = HR_users). In the VPN Access Interface drop-down menu, choose an interface that remote-access users will access for VPN connections. This is typically the outside interface.
Task 2: VPN Protocols and Device Certificate
After clicking Next, the next task is to specify the VPN protocol allowed for this connection profile, as shown in Figure 20-4.
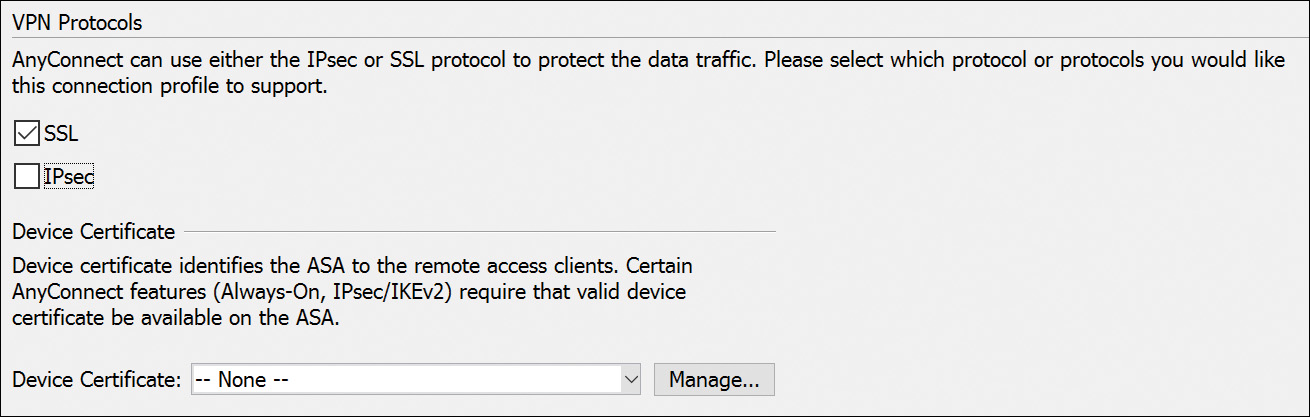
The Cisco AnyConnect VPN Client defaults to SSL. You must choose an identity certificate from the Device Certificate drop-down list. This certificate identifies the ASA to remote-access clients. Click the Manage button to open the Manage Identity Certificates dialog box, which allows you to create new certificates and manipulate existing certificates. If the Device Certificate field is left at the default, None, a self-signed certificate will be used and users will get a warning message when connecting (as discussed on Day 21).
Task 3: Client Image
ASA can automatically upload the latest Cisco AnyConnect VPN Client package to the client device when it accesses the enterprise network. After clicking Next, you will be prompted to add an AnyConnect image file, as shown in Figure 20-5. When you click Add, you will be prompted to either browse the ASA’s flash memory to select a previously uploaded image or upload a new client image to the ASA.
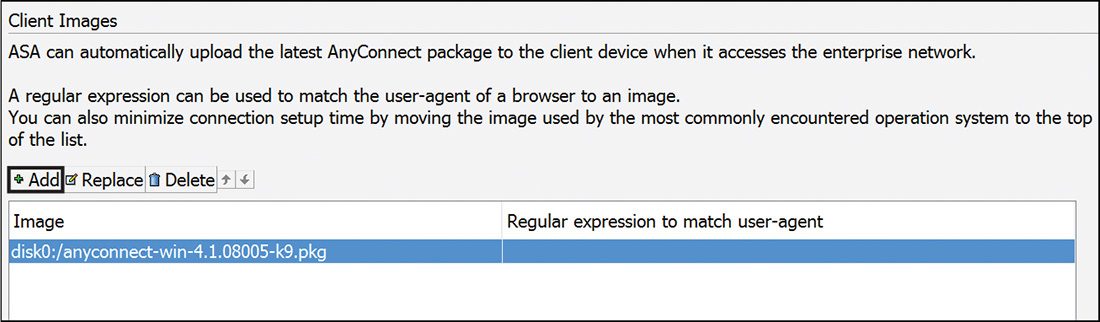
After confirming the client image file or files, click Next.
Task 4: Authentication Methods
User authentication may be managed either by external authentication servers (such as RADIUS) or locally using the ASA local user database. As shown in Figure 20-6, the keyword LOCAL (in uppercase on the ASA) is the keyword from an AAA perspective on the ASA that represents the local database (in the running configuration). In this example, we have already configured one user, Bob, and are adding a second user, Alice. This will allow them both access to the corporate network via the AnyConnect SSL VPN. Click Next to continue the wizard.

Task 5: Client Address Assignment
SSL VPN clients receive new IP addresses when they connect to the ASA. Clientless connections do not require new IP addresses. Address pools define a range of addresses that remote clients can receive. Click New to create a new IPv4 or IPv6 address pool, as shown in Figure 20-7. You must then specify a pool name, a starting address, an ending address, and a subnet mask. Click Next after applying the newly configured address pool. In our example, we are configuring a pool of 51 IPv4 addresses, from 10.2.2.100 to 10.2.2.150.

Task 6: Network Name Resolution Servers
The next step, shown in Figure 20-8, lets you specify which DNS entries should be handed out to your clients, and a domain name that will primarily play a part in name resolution. Click Next to continue after configuring the appropriate DNS information.

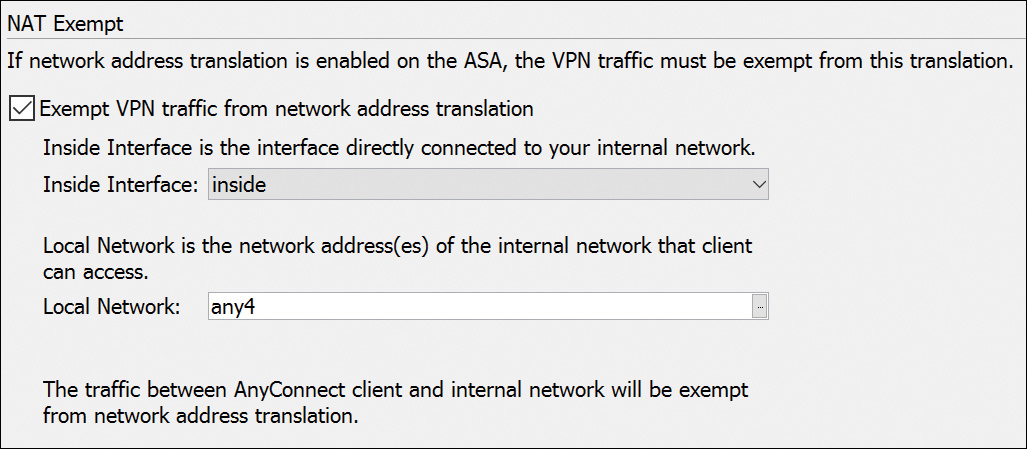
Task 7: Network Address Translation Exemption
If NAT is configured on the ASA, then the SSL client address pools must be exempt from the NAT process because NAT occurs before encryption functions. In other words, when SSL VPN clients are accessing corporate resources, the replies going back through the ASA must not trigger the NAT process. Figure 20-9 shows that when the Exempt VPN Traffic from Network Address Translation option is checked, two further options must be configured. First, choose the interface connected to the internal network that needs to be exempted from NAT. Second, type the host or subnet IP addresses that are to bypass NAT in the Local Network field. You can also click the ... button and select the addresses from the Browse Local Network dialog box. In our example, the any4 keyword represents all IPv4 local addresses.
Task 8: AnyConnect Client Deployment and Summary
After clicking Next, you are presented with the final two wizard pages, which are purely informational.
First, the AnyConnect Client Deployment window explains how you can install the Cisco AnyConnect VPN Client program to a client device using either of two methods. The first method is web launch, which installs automatically when accessing the ASA using a web browser. The second method is predeployment, which manually installs the Cisco AnyConnect VPN Client package.
Second, the Summary window provides a brief overview of your selections from the previous wizard pages, as shown in Figure 20-10.

Click Finish to complete the AnyConnect VPN Connection Setup Wizard. If the option was enabled, you will be shown the actual CLI configuration produced by the wizard. You can save this text file before deploying the configuration to the ASA.
Phase 2: Configure the Cisco AnyConnect VPN Client
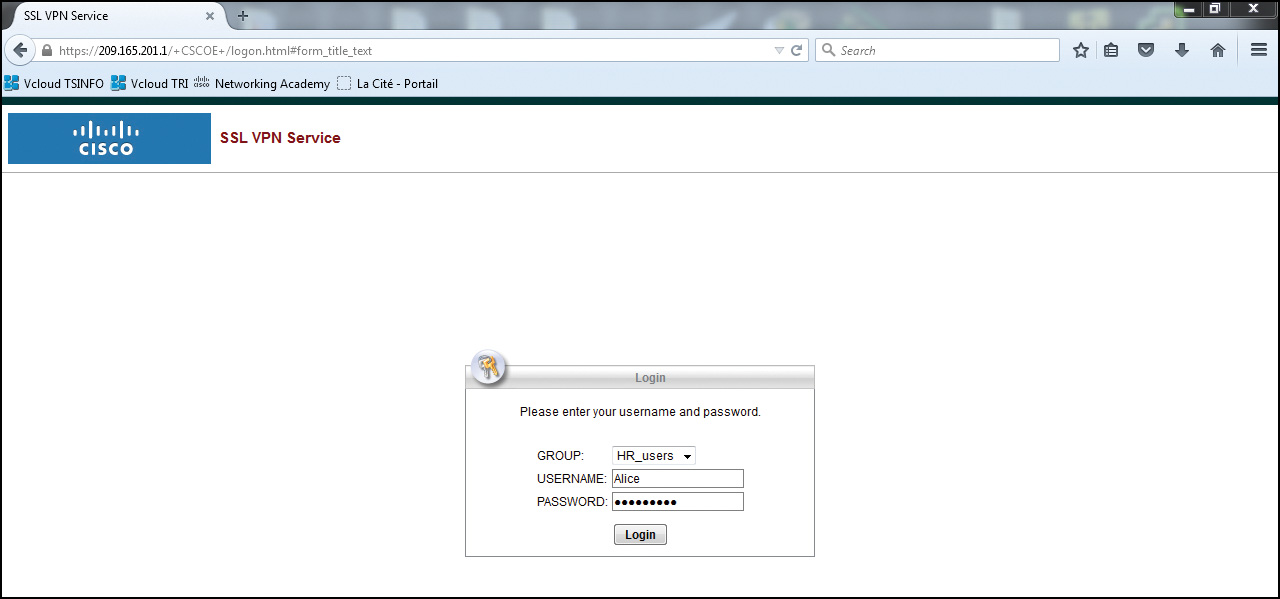
In our example, we will first connect to the ASA using a clientless SSL VPN, as shown in Figure 20-11.
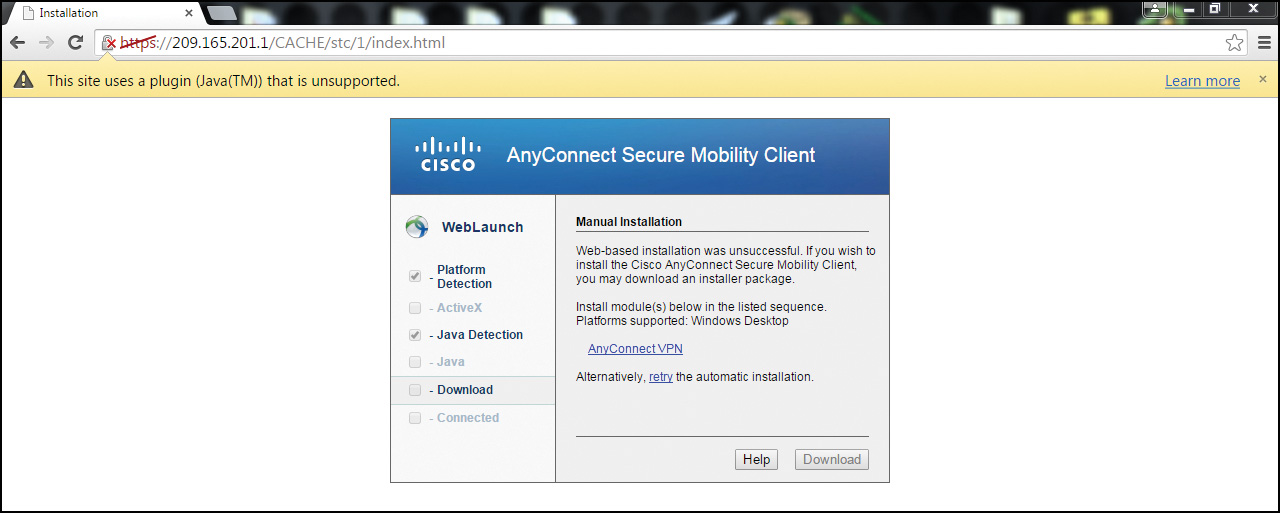
Once authenticated, the process to upgrade our connection to full client begins with a series of compliance checks for the target system, as shown in Figure 20-12. The following items are checked on the host system:
![]() Platform Detection: The ASA first queries the client system in an attempt to identify the type of client connecting to the security appliance. Based on the platform that is identified, the proper software package may be auto-downloaded.
Platform Detection: The ASA first queries the client system in an attempt to identify the type of client connecting to the security appliance. Based on the platform that is identified, the proper software package may be auto-downloaded.
![]() ActiveX: Detects whether ActiveX is available and authorized on the host system for client download.
ActiveX: Detects whether ActiveX is available and authorized on the host system for client download.
![]() Java Detection: Detects whether a supported version of Java is available on the host system for client download.
Java Detection: Detects whether a supported version of Java is available on the host system for client download.

If all the preceding checks succeed, Cisco AnyConnect will be downloaded and installed automatically on your remote system.
Once the client completes the auto-download of the Cisco AnyConnect SSL VPN Client, the web session automatically launches the Cisco AnyConnect SSL VPN Client and attempts to log the user into the network using the same credentials that are supplied when logging into the web portal.
If the ActiveX or Java checks are not successful, the ASA will nevertheless offer you the chance to download manually the Cisco AnyConnect VPN Client located in its flash memory, as shown in Figure 20-13.
After a manual download and install, launch the AnyConnect client, as shown in Figure 20-14. This will initiate a full client SSL VPN with the ASA. In this example, the ASA public IP address is 209.165.201.1. A Security Alert window will appear if the ASA is using a self-signed certificate.

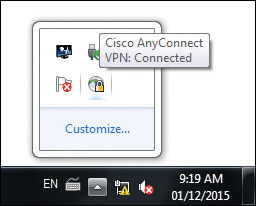
Once authenticated, an icon with a sphere and a lock will appear in the system tray, identifying that the client has successfully connected to the SSL VPN network, as shown in Figure 20-15.
Phase 3: Verify AnyConnect Configuration and Connection
The VPN configuration can be altered, customized, and verified on the AnyConnect Connections Profile page.
To open the Network Client Access window displayed in Figure 20-16, choose Configuration > Remote Access VPN > Network (Client) Access > AnyConnect Connection Profiles.

Note that SSL and Data Transport Layer Security (DTLS) is allowed on the outside interface. DTLS is the TLS protocol using UDP for transport instead of TCP. UDP has less overhead than TCP. Also, when encapsulating TCP traffic in tunnels, reliability is provided by the tunneled TCP protocol. If the tunneling protocol also provides reliability, double retransmissions of lost packets may result. Therefore, DTLS is the preferred protocol for SSL VPNs, but the ASA and the client will revert to standard TLS if DTLS is filtered anywhere along the remote-access VPN path.
Scrolling down to the bottom of the page displays the Connection Profiles on the ASA.
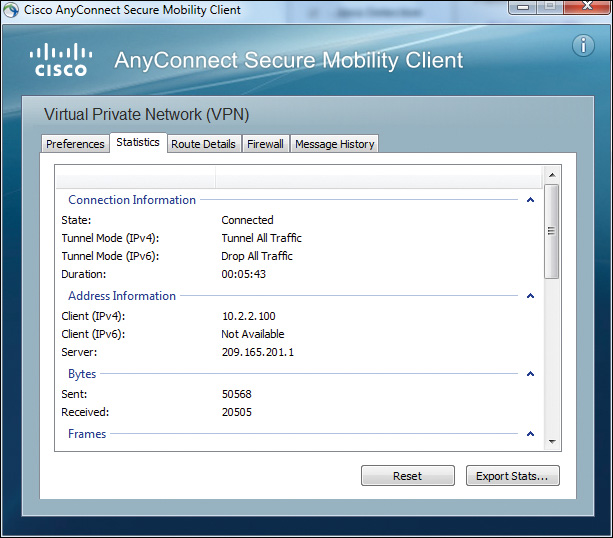
To view VPN client information, open the Windows system tray and point to the Cisco AnyConnect Client icon, as previously shown in Figure 20-15. Right-click the icon and choose Open AnyConnect to open the Cisco AnyConnect Client window displayed in Figure 20-17. Clicking through the tabs brings up further information such as preferences, statistics, route details, firewall configuration, and message history.
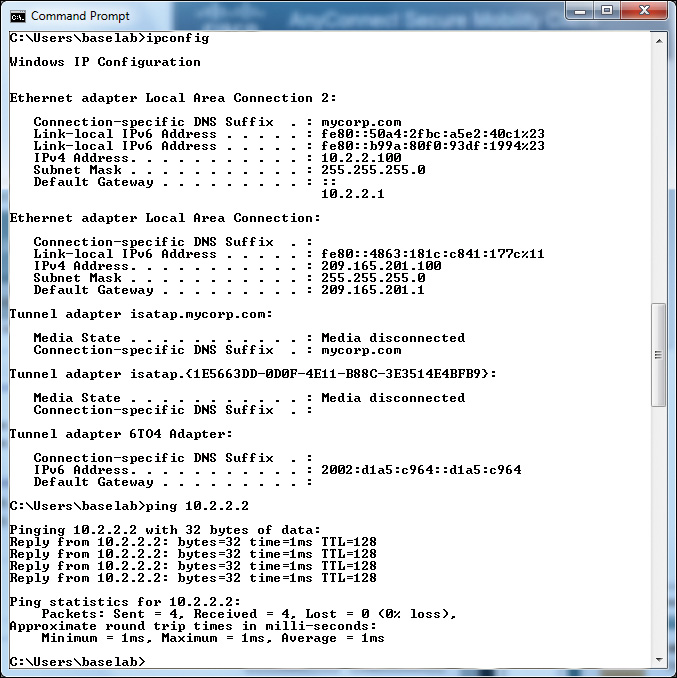
To verify the IP address allocation, open a CMD window and type ipconfig, as shown in Figure 20-18. Notice that the host has two IP addresses: one for the VPN connection (Ethernet LAN Connection) and one for the actual network on which the VPN connection is located (Ethernet LAN Connection 2). A ping to a host on the private network confirms that the remote host has access to internal resources.
In Cisco ASDM, you can monitor established VPN sessions by navigating to Monitoring > VPN > VPN Statistics > Sessions. From the Sessions window, shown in Figure 20-19, you can view session statistics for the ASA. In our example, Alice is successfully connected to the internal corporate network using an AnyConnect SSL VPN. Clicking Details to the right of the bottom pane provides additional details for each VPN session.

In terms of troubleshooting, if the client is having difficulty establishing an initial connection with the corporate network, use the debug webvpn svc command on the ASA and analyze the output. The error messages that appear will usually point out the issue. If the client is successfully connecting but is unable to send traffic over the SSL VPN tunnel, verify the traffic statistics on the client and the ASA. Common traffic issues most often can be related to routing, ACL filtering, or NAT.
 Video: Configuring and Verifying AnyConnect SSL VPN
Refer to the Digital Study Guide to view this video.
 Activity: Order the Steps when Configuring AnyConnect SSL VPN
Refer to the Digital Study Guide to complete this activity.
Study Resources
For today’s exam topics, refer to the following resources for more study.

![]() Check Your Understanding
Check Your Understanding
Refer to the Digital Study Guide to take a ten-question quiz covering the content of this day.