![]()
Introduction to Delta 3D Printers
The most fascinating three-dimensional (3D) printer design to watch print is the delta printer. The delta design is quite different from most 3D printers and is best known for its vertical orientation and relatively small footprint (although larger units can be quite tall). This book will help you learn what you need to buy or build your own delta printer, as well as how to get the most out of your delta printer.
A delta 3D printer, hence delta printer, is a type of parallel robot that uses geometric algorithms to position each of three vertical axes simultaneously to move the nozzle to any position in a cylindrical build area. Thus, when the printer is printing, all three axes move in a mesmerizing ballet of mathematical magic.1 If all this sounds too fantastic, don’t worry; I will present the mechanics of the delta printer in detail throughout this book.
Before we jump into how the hardware mechanisms work, let’s take a short tour on what 3D printing is all about. A firm understanding of the concepts of 3D printing is essential to getting the most out of your 3D printer investment. Even if you are already a 3D printing enthusiast (and especially if you have never used a delta printer), you may want to read the following sections because I present the material with delta printers in mind.
Getting Started
The world of 3D printing is growing in popularity as more people find creative ways to use 3D printers. People buy 3D printers for creating solutions for the home, gifts, artistic expression, and of course, for rapid prototyping of components for manufacture. I have even seen 3D printers used in architectural firms to replace the somewhat tedious art of 3D modeling2—from scale models of buildings to elaborate terrain maps.
The major contributor for this expansion is that 3D printers are getting easier to find and afford. While far from the point of finding a 3D printer in your local small retailer or as a bonus for buying a new mattress, you don’t have to look very far to find a 3D printer manufacturer or reseller. Even printing supplies are getting easier to find.
In fact, some of the larger retailers such as Home Depot are starting to stock 3D printers and supplies. For some time now, MakerBot Industries has sold their products on the Microsoft online store, as well as at their own retail stores. Similarly, other 3D printer suppliers have opened retail stores.
Naturally, nearly all 3D printing retailers have an online store where you can order anything from parts to build or maintain your own, to printing supplies such as filament and other consumables. So the problem that you are most likely to encounter is not finding a 3D printer, but rather it is choosing the printer that is best for you.
Indeed, the challenges today are less about where to buy and more about whether to buy or build your own from a kit (or from scratch), and if so, which kit to buy, which prebuilt printer to buy, what filament to use, and perhaps more importantly, what printing technology you want to use.
Unless you have spent some time working with 3D printers and have mastered how to use them, the myriad of choices may seem daunting and confusing. I have encountered a lot of people who, despite researching their chosen printer, have many questions about how the printer works, what filament to use, and even how to make the printer do what they want it to.
Too often I have discovered people selling their 3D printer because they cannot get decent print quality, or it doesn’t print well, or they don’t have the time or skills to complete the build, or they have had trouble getting the printer calibrated. Fortunately, most of these issues can be solved with a bit of knowledge and some known best practices.
This section will help you avoid these pitfalls by introducing you to the fundamentals of 3D printing with a specific emphasis on delta printers. You will learn that there are several forms of 3D printing and be provided with an overview of the software you can use with your printer. You will also learn about the consumables used in 3D printing, including the types of filament available. To round out the discussion on getting started, I present a short overview on buying a delta printer, including whether to build or buy, and what to consider when buying a used printer.
![]() Note Henceforth I will use “3D printer” and “printer” interchangeably since I will be talking only about 3D printers.
Note Henceforth I will use “3D printer” and “printer” interchangeably since I will be talking only about 3D printers.
What Is 3D Printing?
Mastering the mysteries of 3D printing should be the goal of every 3D printing enthusiast. But where do you find the information and how do you get started? This section presents the basics of 3D printing, beginning with the process of 3D printing and followed by a discussion on how the printer assembles or prints an object, and finally, it takes a look at the consumables involved in 3D printing. I will expand on many of these topics in later chapters.
The 3D Printing Process
The 3D printing process, also called a workflow, involves taking a three-dimensional model and making it ready for print. This is a multistep process starting with a special form of the model and software to break the model into instructions the printer can use to make the object. The following provides an overview of the process, classifying each of the steps by software type. I discuss each in greater detail in Chapter 3.
An object is formed using computer-aided design (CAD) software. The object is exported in a file format that contains the Standard Tessellation Language (STL) for defining a 3D object with triangulated surfaces and vertices (called an .stl file).
The resulting .stl file is split or sliced into layers, and a machine-level instruction file is created (called a .gcode file) using computer-aided manufacturing (CAM) software. The file contains instructions for controlling the axes, direction of travel, temperature of the hot end, and more. In addition, each layer is constructed as a map of traces (paths for the extruded filament) for filling in the object outline and interior.
The printer uses its own software (firmware) to read the machine-level file and print the object one layer at a time. This software also supports operations for setting up and tuning the printer.
Now that you understand how a 3D printer puts the filament together to form an object, let’s take a look at how the object is printed by the printer.
How an Object Is Printed
It is important to understand the process by which objects are built. Knowing how the printer creates an object will help you understand the hardware better, as well as help you tune and maintain your printer. That is, it will help you understand topics such as infill, shells (outer layers), and even how parts need to be oriented for strength.
The process is called additive manufacturing 3 and is used by most 3D printers available to the consumer. Conversely, computer numeric control (CNC) machines start with a block of material and cutaway parts to form the object. This is called subtractive manufacturing .4
Both forms of manufacturing use a Cartesian coordinate system (X, Y, and Z axes) to position the hardware to execute the build. Thus, the mechanical movements for 3D printing are very similar to the mechanisms used in CNC machines. In both cases, there are three axes of movement controlled by a computer, each capable of very high-precision movement.
Additive manufacturing has several forms or types that refer to the material used and the process used to take the material and form the object. However, they all use the same basic steps (called a process or workflow, as described earlier) to create the object.
The most common form of 3D printing for hobbyists and enthusiasts is called fused filament fabrication (FFF). Since the majority of 3D printers available today for consumer purchase are FFF, I will only discuss FFF in depth in this book. To simplify our discussion, henceforth I consider 3D printing to be synonymous with the FFF process. In fact, all printers discussed in this book are FFF-based.
When a 3D printer creates an object, the material used to print an object comes in filament form 5 on a large spool to make it easier for the printer to draw material. The filament is then loaded into an extruder that has two parts: one to pull the filament off the spool and push it into a heating element, and another to heat the filament to its melting point.
The part that pulls the filament and feeds it to the heating element is called the cold end, whereas the heating element is called the hot end. Sometimes manufacturers refer to both parts as the extruder, but others distinguish the extruder from the hot end (but they sometimes don’t call it a cold end). Delta printers typically separate the parts with the first part fixed to the frame and the second on the axis mechanism (called the effector). Just one of the many nuances to 3D printing I hope to explain!
![]() Tip Never buy filament that isn’t on a spool or a similar orderly delivery mechanism. Improperly wound filament can introduce a maddening number of extrusion failures.
Tip Never buy filament that isn’t on a spool or a similar orderly delivery mechanism. Improperly wound filament can introduce a maddening number of extrusion failures.
This is where 3D printers can differ. That is, they vary slightly in the mechanism used and the materials used to form the object. Table 1-1 lists some of the forms available, describes how the material is used to build the object, and tells what materials can be used.
Table 1-1. Types of Additive Manufacturing
Type | Build Process | Materials |
|---|---|---|
Filament | Objects built layer by layer, where material in filament form is extruded from a heated nozzle. | Various plastics, wood, nylon, and so forth. |
Wire | An electron beam is used to melt the wire as it is unspooled to form an object, layer by layer. | Most metal alloys. |
Granular | Various processes are used to take material in a raw, granular form using a laser, light, or electricity to fuse the granules and build the object. | Some metal alloys and thermoplastics. |
Powder | A reactive liquid is sprayed on a power base to form solid layers. Some variations use a multistep process to fuse and then bind materials. | Plaster and similar granular materials. Emerging solutions can use metal. |
Another form uses light or laser to cure powder to form solid layers. Printers of this type typically use SLA/DLP projectors for the light source. | Resin. | |
Laminate | Material is laid over the object and fused with a heated roller. A laser is then used to cut out the shape. | Paper, metal foil, plastic film. |
If this sounds like nothing more than a fancy hot glue gun, you’re right! The process is very similar, but unlike the hot glue gun that relies on human power to pump glue sticks (however inaccurately) into the heating element, 3D printers use a computer-controlled electric motor called a stepper motor to precisely control how much and how fast the filament is fed to the hot end. Most extruders use a direct drive mechanism where the drive pulley is driven by the stepper motor. This allows for faster retraction to avoid stringing (thin wisps of filament trailing the hot end).
Figure 1-1 shows a drawing of how the extrusion process works, including a pictorial representation of the components discussed in this section.

Figure 1-1. FFF extrusion with nomenclature
The drawing shows a mock-up of the extruder and a spool of filament. As you can see, the filament is pulled into the extruder (cold end) and then pushed into the nozzle (hot end) via a special PTFE tube (also called a Bowden tube). Once heated, the filament is extruded onto a build plate (a very flat surface used as the base for the object). Typically, the outer edges of an object are printed first, and then the interior edges are printed, and finally, the interior of the layer is printed as either a solid layer (for outermost layers) or as a fill-in matrix for inner layers.
Notice that the filament from the spool is much larger than the heated extrusion. This is because most nozzles (the small part where the filament exits the heater block) have a very small opening ranging from 0.2 millimeters (mm) to 0.5mm or larger. Notice in the drawing that I’ve exaggerated how the layer is built from multiple lines of heated filament. Although grossly simplified, this is effectively how a 3D printer takes filament and builds a layer of the object.
WHERE DID FUSED FILAMENT FABRICATION ORIGINATE?
FFF is also known as fused deposition modeling (FDM). FDM was developed by S. Scott Crump in the late 1980s, and further developed and commercialized by Stratasys Ltd. in the 1990s. Indeed, FDM is a trademark of Stratasys Ltd. (the owners of MakerBot Industries). Since the majority of 3D printers use this process (the process is not trademarked, only the term FDM), FFF is used to avoid confusion with the Stratasys trademark.
3D Printing Consumables
The ongoing costs of consumables for 3D printing depend on how much printing you do, what types of filament you use, and even what color filament you want. That is, if you want to print an object in a variety of colors, you will have to buy a number of spools of filament. For example, the object shown in Figure 1-2 uses six colors, which means you will have to buy six spools of filament.
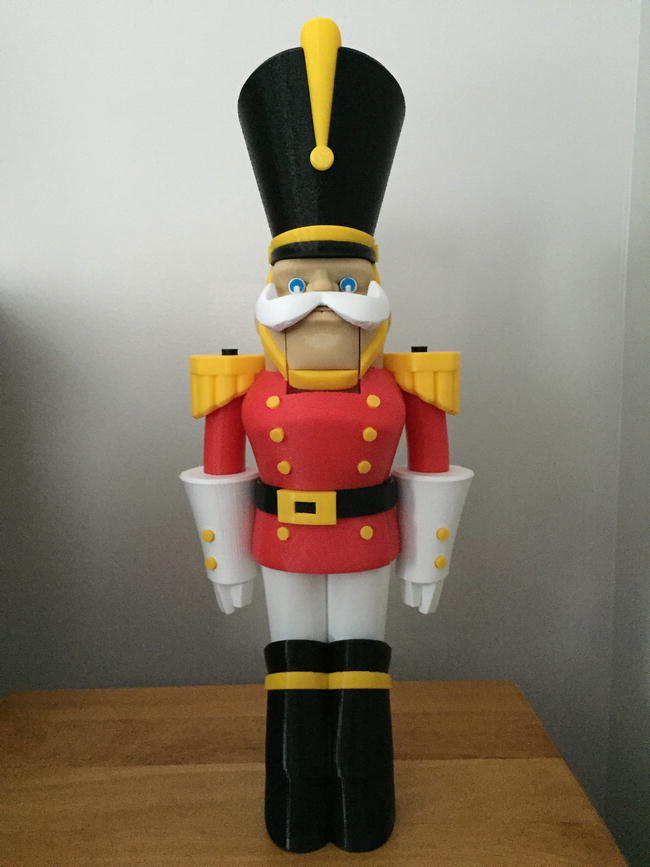
Figure 1-2. Complex 3D print
This object is an excellent example of what you can achieve with your 3D printer. The nutcracker stands nearly 15 inches tall and is assembled from a number of pieces that snap and click together. Printing time will vary, but you can expect it to take 20 or more hours to print all the parts.
I don’t recommend starting with this as your first print, but once your printer is calibrated and printing well, you will be ready to print objects like this fantastic novelty. You can find this object in the Thingiverse online repository (thingiverse.com/thing:579567).
WHAT’S THINGIVERSE?
Thingiverse is one of the most popular object repositories you can use to find and publish objects for 3D printing. Indeed, Thingiverse is a repository for more than just 3D printing. You will find objects and files for laser cutting, as well as CNC machining—although the majority of entries are for 3D printing.
On Thingiverse, you can search for objects by name, and order the results by popularity or newest creations. You can also create an account and publish your own objects. If you’re looking for something to print, check out Thingiverse. Chances are you will find a lot of things you will want to print. To get started, navigate to Thingiverse.com and search for “Mini Kossel”. You’ll find hundreds of things, including the full list of plastic parts to print your own Mini Kossel plastic kit.
There are two basic consumables in 3D printing aside from things like lubrication and maintenance parts, which you will learn more about in an upcoming chapter. The most obvious is the raw material—filament. However, you will also need to have supplies to treat your print surface so that objects will adhere to it without lifting. Lifting is a term used when part of the object pulls away from the print surface (also called curling). If the lift is bad enough, it can render the part useless.
Let’s look at filament first, and then discuss print surface treatments in detail. Proper preparation of the print surface is one of the keys to achieving high-quality prints.
Filament
There are many forms of filament and more being created every year. Filament comes in a variety of sizes (usually 1.75mm or 3.0mm)6 and dozens of different colors. You can get filament that has a slight sheen or even a flat (think matte) finish, filament that glows in the dark, and even filament that has small bits of metal flake to make it appear to sparkle in the light. Indeed, you can build up quite a palette of colors to express your creativity. Filament is normally wound on a plastic, wooden, or corkboard spool.
![]() Note The diameter of the filament required is governed by the size of the extruder. Printers come with either a 1.75mm or 3.0mm hot end. Check your documentation before ordering new filament.
Note The diameter of the filament required is governed by the size of the extruder. Printers come with either a 1.75mm or 3.0mm hot end. Check your documentation before ordering new filament.
The most common types of filament are plastics called polylactic acid (PLA) and acrylonitrile butadiene styrene (ABS). Each type of filament has certain heating properties and requirements for build platforms. Table 1-2 lists the more common filaments available, along with their abbreviations and brief descriptions. The melting point (in this case, the temperature that the filament becomes soft enough to extrude) is listed in degrees Celsius.
Table 1-2. Filament Types

![]() Note Actual melting points for your printer and filament may vary slightly.
Note Actual melting points for your printer and filament may vary slightly.
No matter what type of printer you buy or build, the choice of filament will be dictated by the printer hardware. Specifically, the following components determine which filament the printer will support:
- Size of extruder and hot end
- Hot end heating characteristics, such as the maximum heat range
- Heated print bed support
The size of the extruder feed mechanism and the size of the hot end will determine whether you can use 1.75mm or 3.0mm filament. The material used to make the extruder body and the heating characteristics of the hot end will also factor into which filament you can use. Lastly, whether the printer has a heated print bed will also determine which filament you can use.
A heated print bed helps the filament adhere to the print bed. Filaments that require a heated print bed (those that perform best with a heated print bed) are ABS, HIPS, nylon, and PC. PLA and other filaments with a lower melting point typically don’t require a heated print bed. However, it can be shown to help prevent lifting with PLA.
If you are planning to build a printer or want to be able to print with a number of filament types, you should look for a printer that has a hot end that can heat efficiently to 265 degrees Celsius (or higher), and has a heated print bed option.
Another, less frequently cited criteria is the sort of gases that the filament exudes when heated. Some filament produces a noticeable odor when heated. Some have an odor that is neither harmful nor noxious (to some), whereas others have an odor that can cause irritation for those with sensitivity or are allergic to certain chemicals.
Some filament, like ABS, can be extruded in an open environment and are not susceptible to air movement that can cause the object to cool too quickly (none can withstand the effects of the air currents from a house fan, for example). Cooling ABS too quickly can cause print failures. Other filament, like PLA, retains heat and requires a small fan to cool. Figure 1-3 shows one example of how a fan is used when printing PLA. The photo shows a fan nozzle mounted on a Mini Kossel. A squirrel cage fan is mounted above the hot end and connected via a flexible hose.

Figure 1-3. Using a fan when printing with PLA
Most printers and kits on the market today are designed to print in PLA or ABS. Since ABS has a higher melting point than PLA, a printer that has a small fan to cool the filament can print ABS and PLA.
The choice of whether to print with ABS or PLA can sometimes be emotionally charged. Those enthusiasts who have perfected their printing of either choice can be quite insistent that theirs is the best choice. Rather than supply yet more rhetoric, I will present arguments for and against each. With this information, you can make your own choice. That is, provided you haven’t locked in on a printer that prints only one type of filament (not that there is anything wrong with that).
ABS is a very good choice if you plan to create objects that are going to be in close proximity to heat sources like a hot end. ABS is also somewhat flexible and can withstand bending that would break PLA objects. It is also easily modified—you can cut it with a hobby knife and glue it together with either ABS glue or acetone. In fact, ABS dissolves in acetone and can be smoothed with acetone vapor. You can make your own ABS glue by dissolving a small amount of ABS in acetone. As the acetone evaporates, it leaves hardened ABS that forms a strong bond. Lastly, ABS flexes well—forming strong bond layers.
However, ABS exudes a very noticeable odor that can cause some people irritation. It is always a good idea to use a fume extractor when printing with ABS. In fact, some people build special enclosures or fume hoods to vent the gases to the outside. While more flexible than PLA, ABS is not as rigid and can wear more quickly than PLA. For example, gears are best made from PLA, since gears made from ABS can wear out quickly. If your printer came with ABS gears, check them often for wear, and replace them when tolerance becomes too great (the gears have excessive play).
Lastly, ABS requires a heated print bed and Kapton tape or similar for the best bond. This fact alone makes ABS harder to print objects with no warping. Furthermore, Kapton tape can be a bit of a challenge to get to stick to a glass plate without air bubbles or wrinkles. There are many techniques that can help, and that alone should be enough to conclude that ABS is more difficult to use.
PLA is a very good choice for those who plan to use their printers in their home or office. The odor it exudes smells a lot like pancake syrup when overheated, so unless you abhor that type of breakfast food, it is not an unpleasant experience. PLA is harder and more rigid, making it a good choice for components that must be strong and do not permit too much flexing. It is recommended to use a fan when printing PLA. A fan forces air over the filament as it is extruded. This helps the filament cool more quickly, forming a stronger bond and reducing lift. PLA is also more forgiving when it comes to adhering to the print bed. PLA adheres well to common blue painter’s tape, which is much easier to apply than Kapton tape. The ease of printing makes PLA a good choice for beginners.
However, since PLA does not flex well, it isn’t a good choice for clamps and similar objects that must flex. Also, since PLA has a lower melting point than ABS, PLA is not a good choice for extruder bodies and similar parts for printers that print ABS.
So, which is best? That depends. If you are starting out, you might want to stick to PLA until you’ve mastered some of the calibration techniques for achieving high-quality prints. On the other hand, if you want to build things that you can customize or use adaptive prototyping,7 you may want to choose ABS. Again, it is your choice, and now that you know the major ins and outs of each, you can make an educated choice.
You may be wondering if it is possible to switch from one type of filament to another. The answer is simply, “Yes, you can.” The only issue is making sure that the old filament is completely removed from the nozzle before loading and using the new filament. The same is true for changing colors of filament.
I like to run at least 200mm of filament through the hot end to ensure that all traces of the old filament are removed. When you are changing from one filament type to another, be sure to use the higher temperature of the two to ensure that you do not have any residue of higher-temperature filament in your hot end. You can adjust the temperature setting once you have cleared the nozzle.
An alternative technique is to use what is called the cold-pull method to clear the nozzle of old filament. It is also a great way to clear a blocked nozzle. You start preheating the nozzle and pull up on the filament (unlatching any Bowden tubes or extruders first) while the nozzle heats. I and others have found that using Nylon 618 from Taulman to cold pull works better than using ABS or PLA.8
Once the nozzle reaches about 80% of the recommended temperature, you should be able to pull the filament clear of the nozzle. This will remove most of the old filament, allowing you to clear the nozzle with less new filament. I recommend this technique when switching from one filament type to another, such as switching between ABS and PLA. Be sure to allow the hot end to cool before inserting new filament.
Print Surface Treatments
There are several types of print surfaces. The filament type dictates which of these you can use. For example, the best surface for PLA is blue painter’s tape, and the best surface for ABS is Kapton tape. These are surface treatments that work best for PLA and ABS filament and are considered the standard for each. However, I will discuss one alternative for ABS that is used to combat lifting.9
Some enthusiasts have discovered alternative print surface treatments, such as a glue-like coating, hair spray, different materials for the print surface, and even some different forms of tape. Some of these may work for you, but I would suggest starting with blue painter’s tape and Kapton tape. I suspect some of the alternative treatments are remedies for symptoms like too much airflow (too cool), poor cooling (too hot), and similar issues. That said, some have had success using Elmer’s disappearing purple glue (http://elmers.com/product/detail/e523) for ABS printing.
Under normal conditions, you should not have to use these alternative treatments (but you’re welcome to experiment). Don’t make the mistake of thinking blue painter’s tape, Kapton tape, or ABS juice is inadequate or the source of your problems. Many printing enthusiasts use these surface treatments successfully every day. Fix what is broken first before applying any unorthodox techniques.
There are some additional considerations if you have a printer that permits you to choose the print surface itself. For example, aluminum is better for using blue painter’s tape, and glass is a good choice for Kapton tape. However, glass works well for both. The following sections present various surface treatments. I include notes about the surface so that you can consider which is best for your needs.
![]() Tip I like to have a different print surface for each surface treatment. For example, I have one for blue painter’s tape, another for Kapton tape, and a third for Kapton tape plus ABS juice (see the following sections).
Tip I like to have a different print surface for each surface treatment. For example, I have one for blue painter’s tape, another for Kapton tape, and a third for Kapton tape plus ABS juice (see the following sections).
To get the most out of your surface treatment, you should ensure that the surface is clean and free from any dirt, smudges, and oils from your hands, and that it is dry. If your print surface is glass or aluminum, clean the surface with acetone followed by 90% or better isopropanol (also available as rubbing alcohol in most pharmacies), which cleans the surface well—without leaving any residue like soap and other cleaners. You may also use window cleaner, but make sure that it is safe to use on your print surface first. If you use a water-based solution, make sure that it is completely dry before printing.
If you are replacing the surface treatment, make sure that you remove all the old treatment first. Using several layers of surface treatment—more specifically blue painter’s or Kapton tape—is not recommended. Although it saves you time and money from having to remove the Kapton tape first, you may discover they don’t stick well to one another, which can result with the part lifting the top layer of tape, despite adhering well to the top layer. The same is true for multiple layers of the same type of tape. Use only one layer of tape at a time.
If you visit your local hardware or home improvement store, or even a specialty paint store, you will find a number of tape products that are specifically designed to mask out areas for painting (also called masking tape). The best tapes for painting are those that prevent paint from bleeding along the edge, which helps painters create precise lines when painting with multiple colors or around trim, electrical components, and just about anything they don’t want painted.
There are several types of painting masking tape. Some are nothing more than common masking tape (tan or brown in color), others are blue, while others are a combination of tape and plastic sheeting.10 While some are certainly better than others, they all have one attribute that is a must for painters: they can be removed easily without peeling away the paint or wallpaper to which they were adhered. The type of tape used in this book is called blue painter’s tape. It is called that because, well, it’s blue and it is used for painting.
GOT THE BLUES?
There are some new vendors making painter’s tape, and some of these are not—gasp!—blue! Indeed, I have found green and yellow painter’s tape—called FrogTape. The green is equivalent to typical blue painter’s tape. The yellow is a low-adhesion version for sensitive surfaces. Some people have reported mixed results with the green tape. I have found it works OK with a heated print bed, but it is not as good as blue painter’s tape without a heated print bed because parts do not stick to it as well. However, the yellow is not as good for 3D printing because it can become loose and pull off with the part.
Blue painter’s tape is a very good surface material for print beds. It works well for PLA and can work fine for ABS if a heated printed bed is used (but not as good as Kapton tape for ABS). The tape comes in a variety of widths and can be applied to glass or aluminum easily, and can be removed and replaced quickly without special applicators or tools.
![]() Note Objects printed on blue painter’s tape have a matte finish for the bottom and show the stippling of the tape. If you want a gloss finish, you can sand the bottom and apply an even layer of acetone to change the finish. It won’t look the same as the other sides, but it will be closer. This is one thing to consider when designing prints using multiple parts. To avoid the telltale tape side, you can try to orient the parts so that the “tape” sides mate together. The nutcracker in Figure 1-2 was designed specifically to avoid showing the tape side of the parts.
Note Objects printed on blue painter’s tape have a matte finish for the bottom and show the stippling of the tape. If you want a gloss finish, you can sand the bottom and apply an even layer of acetone to change the finish. It won’t look the same as the other sides, but it will be closer. This is one thing to consider when designing prints using multiple parts. To avoid the telltale tape side, you can try to orient the parts so that the “tape” sides mate together. The nutcracker in Figure 1-2 was designed specifically to avoid showing the tape side of the parts.
Parts can be removed easily once they have cooled, and the tape can be reused a number of times. Due to its lower cost, removing parts is not a stressful affair, even if you tear the tape. If you use several narrow strips vs. a single, wide piece, you can just cut away one strip or a part of a strip and replace that portion.
![]() Tip Objects can be removed from blue painter’s tape more easily once they have cooled. If you try to use tools such as a scraper or razor, you will likely cut or tear the tape. It is best to wait until the part is cool. This is another good reason to have multiple build surfaces—you can allow one part to cool while printing another.
Tip Objects can be removed from blue painter’s tape more easily once they have cooled. If you try to use tools such as a scraper or razor, you will likely cut or tear the tape. It is best to wait until the part is cool. This is another good reason to have multiple build surfaces—you can allow one part to cool while printing another.
But not all blue painter’s tapes are created equal. I recommend avoiding the really inexpensive, little-known manufacturers. Some of these may be just fine, but if they do not adhere well to the print surface, it can make a lifting problem worse. Similarly, if they adhere too well, they may not be easily removed from the print surface, making it harder to replace the tape.
Another consideration is whether the tape has the manufacturer’s logo imprinted on the tape surface. You should avoid using these tapes if you plan to print with light-colored filament. This is because the logo can transfer to the filament. For example, I used a major manufacturer’s “best” blue painter’s tape for printing white PLA. When I removed my objects from the printer, I discovered the logo was prominently displayed on each of my objects. If you use dark colored filament, you may not notice, but I would still avoid tape that has logos imprinted on the surface.
You will have to do your own cost analysis based on the cost of the tape in your area, but generally, you should look for a balance of cost, width, and adhesive qualities. For example, I use two-inch-wide tape that features a non-bleed edge and does not have any logos. It costs a bit more, but makes for a good bond to glass and has a much better durability than cheaper brands.
HOW WIDE IS WIDE ENOUGH?
In general, it is best to get the widest tape you can find. However, be sure to do some comparative shopping. For example, I once found some four-inch-wide blue painter’s tape, but it was priced nearly four times the cost of the two-inch tape and was only 75% as long as the two-inch rolls. In this case, wider is not cheaper. Also, really wide tape can be harder to apply if your print bed surface is not removable, especially if there are frames or electronics that prevent you from accessing the print surface easily. Thus, I use two-inch-wide tape and make several passes to cover the entire surface. This, for me, is the most economical choice.
Applying blue painter’s tape to your print surface is really easy. You simply cut a length of tape a bit longer than your print surface and apply the tape to the surface one row at a time until the surface is completely covered. Don’t worry about overhang—you can cut that away with scissors or a hobby knife after the surface is covered. I like to leave a bit of an overhang so that I can more easily remove the tape. But don’t leave so much as to affect movement of the printer axes. That is, blue painter’s tape overhang can curl on heated print beds. If you leave so much that it curls and strikes the hot end, it could stick and peel away the tape—or even obstruct the nozzle, causing extrusion failures.
![]() Tip Always shut down your printer and allow the print surface to cool to room temperature before removing or applying tape. If you apply tape when the surface is hot, it may not stick well, or bubble, wrinkle, or separate when cool.
Tip Always shut down your printer and allow the print surface to cool to room temperature before removing or applying tape. If you apply tape when the surface is hot, it may not stick well, or bubble, wrinkle, or separate when cool.
Since most delta printers have circular print surfaces, applying tape in narrow strips should start in the center and work outward. This allows you to avoid a case where there is a much narrower slice of tape on one side.
The hardest part of applying the tape is getting the seams even and as close as possible. Fortunately, the tape can be removed easily, so if you need to adjust it, you can. I like to start by holding the length of tape just beyond the print surface or at least near the edge.
Position one side of the tape so that there is no gap, and then slowly lower the other side, keeping the tape straight and tight against the edge of the previous strip. Again, this is easier to describe than do, but once you’ve practiced it a couple of times, you’ll get the hang of it.
Once I have the tape applied, I trim the edges and use a flat edge to press down across the seams. For example, you can use a putty knife that can flex to slide over the seams to press them flat. This allows you to firmly adhere the tape to the print surface, even if there is a small bit of overlap. Plus, the knife can be used to remove parts once cooled.
Figure 1-4 through Figure 1-8 present the process for applying blue painter’s tape. I used a glass print surface for a Mini Kossel. The procedure is the same for glass, acrylic, and similar materials. Similarly, if you have used Cartesian printers or delta printers with a square print surface, the procedure is exactly the same.
Take care with cutting away overhang if your print surface is soft (like Plexiglas). In that case, you may not want to use a hobby knife to trim the edges. That is, if you slip and cut the blue tape, you may also mar the print surface.
Also, if your print surface is attached to a heated print bed or a Kapton heater (as shown in the figures), take extra care to avoid getting the solution on the wiring or electronics. If you do get some solution on the wiring, allow it to dry completely before reinstalling or powering on your printer. Also, be careful when trimming the excess tape so that you do not accidentally cut the insulation on the wires or damage the thermistor.
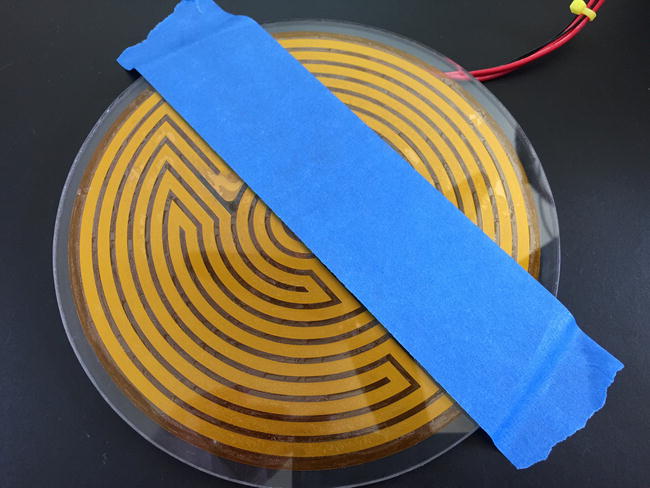
Figure 1-4. Applying the tape in rows
Notice in Figure 1-5 that I pulled the tape taught and aligned the outer edges. This helps avoid creating wrinkles and ensures that the seam is even across the surface. Notice that I also left a little overhang.
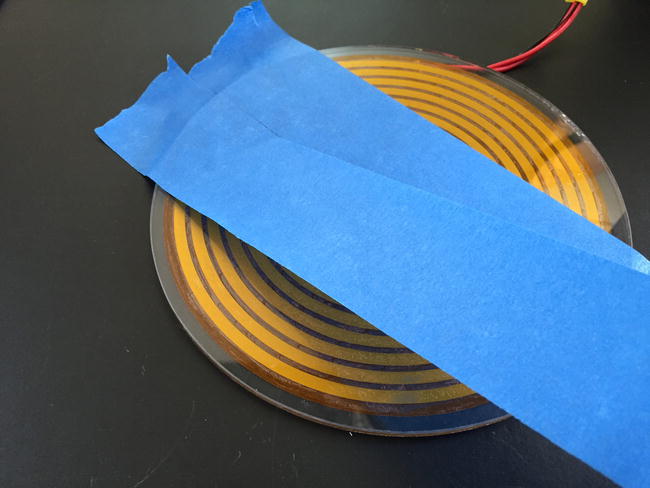
Figure 1-5. Align one side first
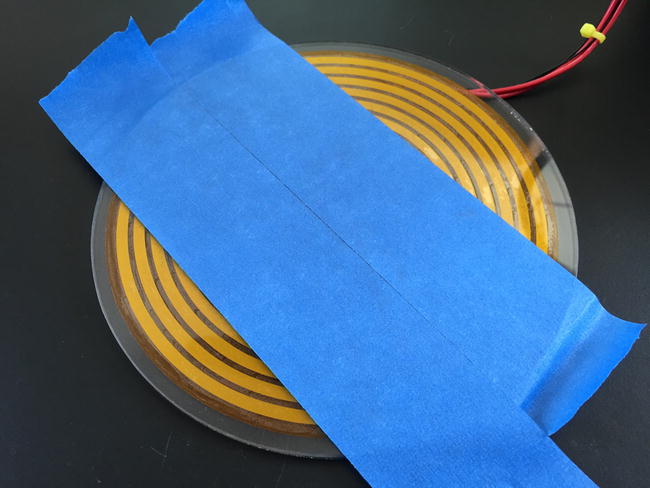
Figure 1-6. Align the other side
In Figure 1-7, I apply the finishing touches of trimming the excess and smoothing the seams. If your tape overlaps, you may see the effect on the bottom of your prints.

Figure 1-7. Cut away the excess tape
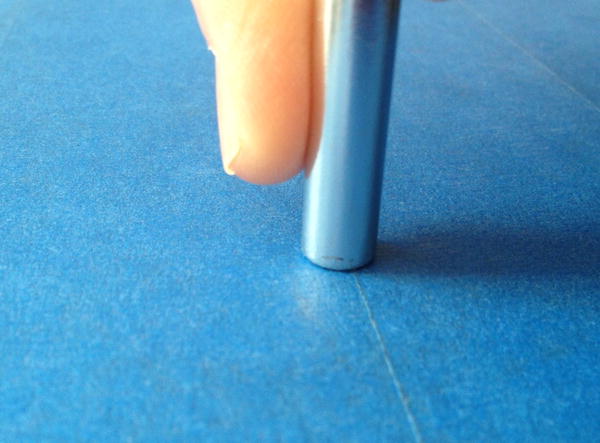
Figure 1-8. Smooth over the gaps
![]() Caution Try to avoid overlapping the tape. The thickness of the tape may be enough to cause the nozzle to strike the tape on the first layer, which can lead to problems such as lifting, or at the very least a crease on the underside of your object. Similarly, avoid gaps between the strips of tape. Gaps will cause creases on the bottom of your prints, but can also lead to lifting if the filament does not stick to the build surface.
Caution Try to avoid overlapping the tape. The thickness of the tape may be enough to cause the nozzle to strike the tape on the first layer, which can lead to problems such as lifting, or at the very least a crease on the underside of your object. Similarly, avoid gaps between the strips of tape. Gaps will cause creases on the bottom of your prints, but can also lead to lifting if the filament does not stick to the build surface.
Printing with blue painter’s tape requires no special settings on your printer. So long as the Z-height11 is set correctly (the width of a standard weight sheet of paper), filament should stick to the tape easily. Blue painter’s tape is great for printing with PLA and can also be used for printing ABS if there is a heated bed (but this may be harder to control lifting). Using blue painter’s tape with PLA and a heated bed works equally well; however, it is known to reduce the effectiveness of the adhesive, so you may have to change the tape more often when using with a heated print bed.
![]() Tip Using blue painter’s tape with ABS requires a very precise Z-height setting. I have found I need to set the Z-height lower when using ABS on blue painter’s tape than Kapton tape. ABS doesn’t stick as well to blue painter’s tape as it does to Kapton tape.12
Tip Using blue painter’s tape with ABS requires a very precise Z-height setting. I have found I need to set the Z-height lower when using ABS on blue painter’s tape than Kapton tape. ABS doesn’t stick as well to blue painter’s tape as it does to Kapton tape.12
You should change the tape when you see distortions on the surface. After several prints (perhaps as few as five, but more likely several dozen), you may also start to notice a change in the color of the tape. Some discoloration is fine, so long as the tape is still attached to the print bed. You are most concerned about any damage from removing parts or distortion of the tape surface, which can happen over many prints.
This is especially so if your slicing software positions the objects in the center by default. In this case, the center of the tape will wear out sooner. On the other hand, even if there is no distortion, if your prints start losing first-layer adhesion—or worse, you start experiencing lifting at the edges and corners, you should replace the tape and double-check your Z-height.
If you used two-inch-wide tape like I do, you may be able to replace only a strip or two of the tape. That is, if you’ve only printed in the center and the size of the objects printed do not extend past the center two strips, just replace those. You do not need to completely strip the surface every time. This is also another good reason to choose tape that isn’t as wide as your print surface—you can replace only those areas that are worn.
Have you ever seen the inside of a modern laptop, tablet, or smartphone?13 Did you notice some transparent yellow tape in there? Most likely you were seeing Kapton tape. Kapton is a brand-name tape made by DuPont. Kapton tape is a polyimide film with an adhesive on one side. It is highly heat resistant across a range of temperatures, from –269°C to +400°C (degrees Celsius). In the 3D printing world (and likely others), the name Kapton has become synonymous with the product (like Xerox). Indeed, you may find several vendors who sell polyimide film, but do not call it Kapton tape (for obvious trademark/product restrictions).
Kapton tape is best used for printing ABS. It may also work for other higher-temperature filaments. Kapton tape is more difficult to apply because the adhesive is designed to stick really well. In fact, the adhesive is stronger than the film itself. Thus, if you apply Kapton tape to a dry aluminum or glass print surface, you may not be able to remove it without tearing the film. Figure 1-9 shows a typical roll of Kapton tape.
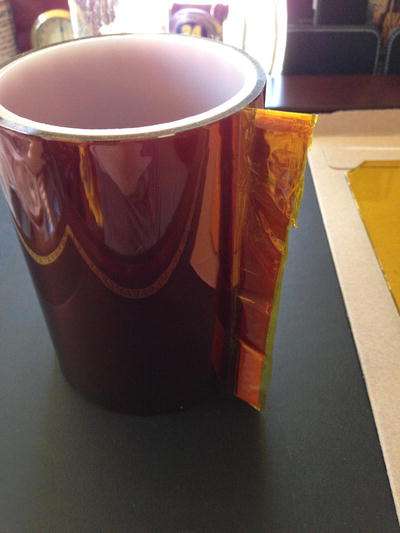
Figure 1-9. Kapton tape roll
![]() Note Objects printed on Kapton tape will have a smooth finish on the bottom. Some don’t like this because it is different from the other sides of the object.
Note Objects printed on Kapton tape will have a smooth finish on the bottom. Some don’t like this because it is different from the other sides of the object.
Removing parts from Kapton tape can be a bit of a challenge. For the best results, you should wait until the parts cool completely before attempting to remove them. They remove more easily when cool. There are a number of techniques for removing parts from Kapton tape, including using a sharp knife, or a craft blade, or a putty knife to pry the parts off. Any of these will work, but you risk damaging the Kapton tape. Given that Kapton tape is relatively expensive and harder to apply, you may want to use these tools as a last resort.
The technique I use for small objects is an adjustable wrench tightened around the object perpendicular to the print bed. I apply slight force to the wrench to twist the object—just enough to flex it—and the object usually pops off, or that side pops loose enough for me to use a dull plastic blade to pop the object off the print surface.
![]() Caution Do not attempt the following without wearing thick gloves and eye protection. If you get this wrong, you can break your glass print bed!
Caution Do not attempt the following without wearing thick gloves and eye protection. If you get this wrong, you can break your glass print bed!
Another technique that works for objects that are really stuck to Kapton tape on normal glass is to remove the glass print surface and place it on a towel on a workbench or a desk. Move the print surface so that half is on the desk and half is not. Press down very softly, gradually increasing pressure until you hear a pop. Do not use quick, energetic pressure—this can break your glass print bed! Repeat this for each edge or until enough of the part is free for you to pry it off.
Like blue painter’s tape, you will find Kapton tape in a variety of widths. However, unlike blue painter’s tape, I prefer the wider widths because it is harder to get pieces to align well enough to avoid gaps or overlap. Once again, you have to do some comparative shopping, as the wider widths can be a bit more expensive than the narrower widths. I use 200mm-width rolls and make two passes (two strips) when applying the tape. This leaves only a single seam down the center of the print surface for my larger printers and can easily cover the print surface of smaller delta printers, such as the Mini Kossel or Mini Rostock.
Applying Kapton tape requires some practice and a fair amount of patience. I have found a technique that works well for most print surfaces. It works best for glass and aluminum. I would not recommend using it on porous print surfaces or in situations where you cannot remove the print surface (some delta printer kits have a fixed aluminum build plate). The technique I use is as follows. Figure 1-10 through Figure 1-14 show the process in action.
- Remove the print surface and place it on a flat, water-resistant surface. I like to put a couple of paper towels down first to absorb extra liquid.
- Use a mixture of 1 drop of baby shampoo to 4 ounces of distilled water.
- Spray a liberal amount of the water on the print surface. Use a spritzing sprayer to distribute the water as evenly as you can.
- Cut a long strip of Kapton tape that is at least 2 inches longer than needed.
- Spray a small amount of the water on your fingers and carefully grip the tape on each end.
- Hold the tape over the print surface and allow it to droop, forming a “U” shape.
- Slowly and evenly (without pulling), lower your hands so that the tape spreads out evenly.
- If the tape isn’t applying evenly, remove it and try again. The water solution will make the tape much easier to remove. Spray more water if the tape is sticking to the glass.
- Using a rubber or similar soft-edge squeegee, start in the center of the tape and press lightly and outward to one edge to squeeze out the water. Repeat for the other direction. If there are large bubbles or wrinkles, carefully lift the tape back to the point where the anomaly begins and reapply by pulling (but not stretching) to remove the crease.
- Continue to squeeze out all the water that you can. It is OK if you cannot get all the bubbles out. Small bubbles (say, about 4mm–5mm in diameter) are fine and will disappear as the water dries.
- Repeat the process for the next strip, carefully aligning the tape next to the applied strip. You will find the water makes it easier to remove and even move the tape so that it joins the first strip.
- Use the squeegee to remove as much water as possible. Go over the seams again with the squeegee to remove water trapped near the edge.
- Use a hobby knife to cut off all the excess Kapton tape.
- Dry the print surface with paper towels, place the print surface in sunlight, and allow it to dry. Any small bubbles will disappear in a few hours or, at most, overnight.
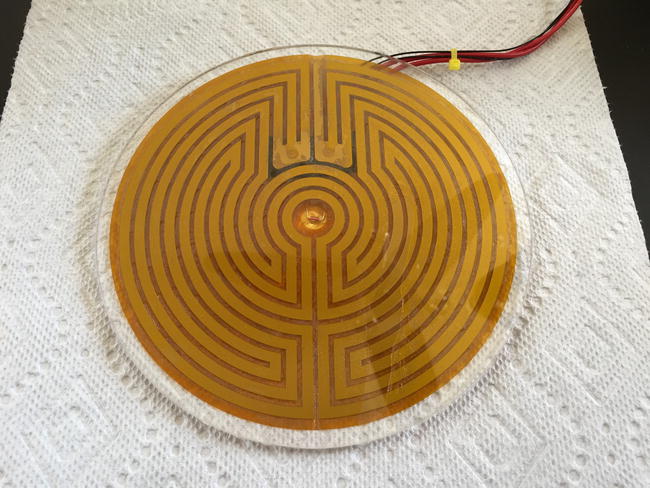
Figure 1-10. Getting ready
![]() Tip It is fine to spray a lot of water on the surface. The water keeps the tape from sticking to the glass.
Tip It is fine to spray a lot of water on the surface. The water keeps the tape from sticking to the glass.
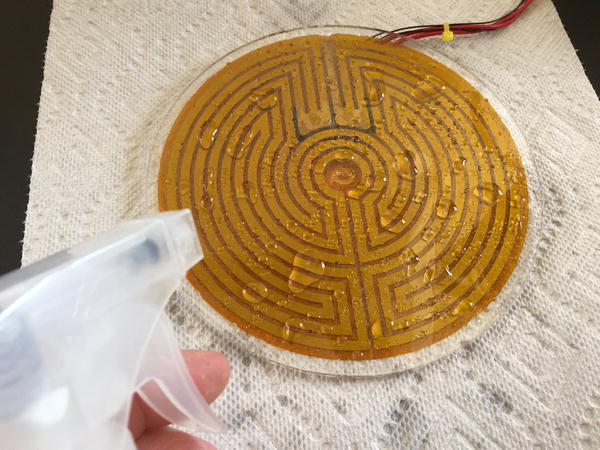
Figure 1-11. Applying the water mixture
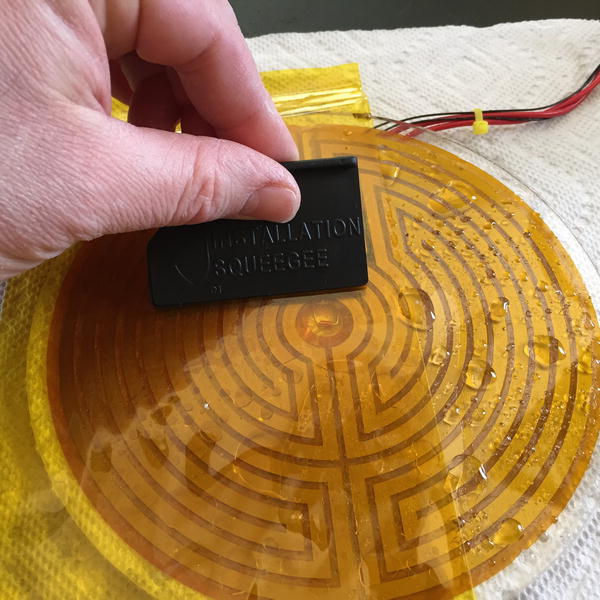
Figure 1-12. Apply one strip at a time
![]() Tip Starting in the center, use smooth, even strokes to press the water out to the edges.
Tip Starting in the center, use smooth, even strokes to press the water out to the edges.
Repeat the process until the entire surface is covered. Try to get the strips as close together as possible. Overlap should be avoided. If you do leave a small gap, make sure that it is no more than a few tenths of a millimeter at most. Any more than that and you will get a ridge on any objects that cross the gap.

Figure 1-13. Go over the seam(s)

Figure 1-14. All done!
Printing with Kapton tape requires a very precise Z-height—more so than blue painter’s tape. You should check your Z-height for the first few prints on newly applied Kapton tape (if not at least once per day of use).
Although ABS sticks very well to Kapton tape, it is not a cure for lifting. Some people have switched from blue painter’s tape to Kapton tape in order to solve lifting problems, only to discover it made it worse. This is most likely because the print surface wasn’t the problem. For example, if ABS is subjected to cooling air currents, the higher layers can shrink faster than the lower layers (which are heated by the print bed), forcing the lower layers to bend and curl—hence, lifting.14
![]() Note Delamination of layers can occur not only from cooling too fast, but also when printing on a layer that has cooled. In this case, the temperature of the two layers is too low for a sufficient bond.
Note Delamination of layers can occur not only from cooling too fast, but also when printing on a layer that has cooled. In this case, the temperature of the two layers is too low for a sufficient bond.
To get the most out of printing ABS on Kapton tape, you should use a heated print bed set to a range of 90°C to 110°C. The proper temperature may take some experimentation to get right and can vary based on the filament used. I have some lighter-color filament that requires lower heat on the print bed. The best thing to do is start at 100°C and watch how well the first layer adheres. If there is some lifting on smaller-diameter parts or the edges, increase the heated print bed by 5 degrees and run another print. This isn’t a terribly scientific process. I tend to use 100°C to 110°C when I print with ABS on Kapton tape, using the lower range for large objects and the higher for smaller objects or objects with thin protrusions. You can set these values in your slicer program.
Replacing Kapton tape is required less frequently than blue painter’s tape. It is more likely you will damage the tape when removing objects before the adhesion properties degrade. Even then, you can revive Kapton tape by using a small amount of acetone and a lint-free cloth to remove any ABS from the surface. I have had Kapton print surfaces last for more than 40 hours of printing. In fact, I have yet to wear out the tape without first damaging it.
ABS Juice
If you are printing with ABS and want to improve your first-layer adhesion, or you don’t want to use Kapton tape (or you ran out), there is a surface treatment called ABS juice.15 You can apply it to glass or on top of Kapton tape.
Simply dissolve about 10mm–20mm of thin ABS scrap from discarded skirts, brims, rafts, and so forth (filament can take a long time to dissolve) per 10ml of acetone in a glass jar with a lid. To apply, spread the solution evenly on a glass surface, allow it to dry (it only takes a few minutes), set your Z-height, and start printing. This technique will significantly reduce lifting problems with ABS on Kapton tape and is a great alternative to building a full enclosure to reduce drafts.
The proper mixture of ABS juice should be watery and free of clumps (the ABS is fully dissolved). Application can be made with a cotton tip, a cloth, or a paintbrush. You should apply the juice in a thin layer. It is OK if there are streaks of juice because this will not affect adhesion, and some users have actually reported that it helps adhesion. I’ve found it helps with the removal of parts. The proper application should make the glass opaque and it should have a slight tinge of the color of filament used. For example, you should see a very faint blue glaze when using blue filament juice. Figure 1-15 shows a print surface treated with ABS juice.
![]() Tip For better flow, you can apply the ABS juice to a heated surface of around 50°C.
Tip For better flow, you can apply the ABS juice to a heated surface of around 50°C.
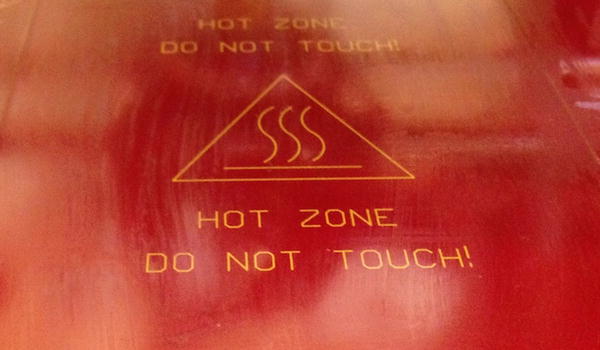
Figure 1-15. ABS juice applie d
When you mix your juice, you should use the same color filament that you use to print. This is because each time you remove an object from the print surface, the layer of juice normally comes off because it is stuck (bonded) to the first layer of your print. Thus, if you want to print a blue object, you should use blue juice. This is one reason some do not like to use juice—you have to remix it whenever you change filament. This is a drawback, but if you are like me, you tend to keep the same color of filament in the printer for several prints, so it isn’t that much of a burden. Figure 1-16 shows what happens when you remove parts from a juice-treated print surface.

Figure 1-16. Parts removed from juice-treated surface
![]() Tip An alternative to the acetone-based solution is methyl methacrylate-acrylonitrile butadiene styrene (MABS), which is a hybrid of ABS and acrylic. It produces a milky-white ABS juice that dries clear, allowing it to be used for any color of ABS. However, MABS may not be as easily obtained as acetone.
Tip An alternative to the acetone-based solution is methyl methacrylate-acrylonitrile butadiene styrene (MABS), which is a hybrid of ABS and acrylic. It produces a milky-white ABS juice that dries clear, allowing it to be used for any color of ABS. However, MABS may not be as easily obtained as acetone.
Notice that the juice has pulled completely away with the parts. The really great thing about ABS juice—aside from the fact that it helps to reduce (or in my case, completely eliminate) lifting—is that you can simply reapply more juice over the print surface where you removed the parts, and keep on using the surface. There is no need to completely remove and resurface!
If you ever wanted to remove the juice from a glass print surface, a simple razor tool can be used to scrape off the juice. If you have painted windows in your home, you already know what to do! You can also use a rag and acetone to wipe away the juice. This works best when the juice is thin. If you decide to use a thicker layer, it may require more elbow action to remove the juice with acetone alone (but it can be done).
When mixing and storing the juice, be sure to use a jar that has a seal that can withstand acetone vapor. I use jars with a spring-loaded lid and a rubber gasket. Acetone vapor will damage and in some cases destroy synthetic gaskets. Another option is to use an empty nail polish bottle. It can withstand the acetone and even has a small brush inside.
Clearly, if you want to store juice, make sure your container can withstand the corrosive effects of acetone. On the other hand, if you only plan to use a little juice, you can either allow the acetone to evaporate (leaving a layer of ABS in the bottom that can be reused) or rinse out the jar with more acetone when you are done.
If you use a paintbrush to apply the juice, make sure to use one made from animal hair. If it dissolves or the bristles stick together,16 it isn’t made with hair! I use a paintbrush that is cut straight across the edge (in other words, not round or angled) and is a half-inch wide. When I apply the juice, I make sure to use long, even strokes in the same direction. This helps form a smooth layer with just enough ridges to make removing the parts easy.
![]() Caution When using a paintbrush that has lacquer or a similar coating on the handle, be sure to avoid getting any juice on the brush handle. The acetone can make the surface tacky. It can also dissolve paint. The best brushes to use are those made with bare wood handles and animal hair bristles.
Caution When using a paintbrush that has lacquer or a similar coating on the handle, be sure to avoid getting any juice on the brush handle. The acetone can make the surface tacky. It can also dissolve paint. The best brushes to use are those made with bare wood handles and animal hair bristles.
The problem with using a paintbrush—beyond the construction of the brush—is cleaning it between uses. I use two jars for acetone. One contains my ABS juice mixture and another is pure acetone. I use the second jar to clean my brush after every use. I simply swish it around a few times, and then dry the bristles with a paper towel and allow it to dry. This method will work well if your juice is thin. If you make it too thick, it may be difficult to clean the brush properly.
Some people prefer to use cotton swabs or cotton tips rather than paintbrushes. Whatever works best for you is fine. The point is to get the juice on the glass as evenly as you can. Again, streaks are OK provided they are not wider than a millimeter or so.
There is one other thing I’d like to mention about ABS juice. Recall that you apply it directly to a glass surface. You can use it on other surfaces, but it isn’t nearly as good, and in some cases it can make the surface unusable. For example, I would not apply juice directly to a heated bed (some printers have no glass covering over the heater) because it can damage the circuit board. I would also not use it on an aluminum surface, but some people have reported success with this.
Applying the ABS juice over Kapton tape may sound wasteful or perhaps eccentric, but it is neither. It is a matter of convenience. Not only does it mean that I can remove the juice completely by removing the Kapton tape, it also means that I can use the juice sparingly by using thinner layers. Not only that, but if I accidentally tear the Kapton tape, I can fill in that tear (if it is small) with a bit more juice. So in a way, it means I can repair torn Kapton with ABS juice.
I have also experimented with applying the juice only near the edges of the object. What I do is let the printer lay down the outer border of the object. The outer border is set up in the slicer and is used to clear the nozzle of filament before starting the print. It is a great way to demarcate where the objects are on the print surface. Once the printer is stopped, I move the axes away and apply juice (about 10mm wide) around the inner perimeter. This saves a little juice while reducing lift.
Whether you use ABS juice directly on Kapton tape (as is recommended) or apply it on top of glass, you will find it a better alternative than using walls or similar barriers to reduce lifting. I will talk more about how to control lifting in a later chapter.
![]() Caution Remember, acetone is corrosive and can be harmful if ingested or inhaled. Use care when handling acetone because it can cause skin irritation. Prolonged exposure can cause dry skin. Small amounts are not normally harmful. Perhaps worse, acetone is flammable. Never use it near a flame or devices that can spark. Always have a fire extinguisher nearby when working with flammable liquids.
Caution Remember, acetone is corrosive and can be harmful if ingested or inhaled. Use care when handling acetone because it can cause skin irritation. Prolonged exposure can cause dry skin. Small amounts are not normally harmful. Perhaps worse, acetone is flammable. Never use it near a flame or devices that can spark. Always have a fire extinguisher nearby when working with flammable liquids.
If you haven’t seen, used, or owned a 3D printer, you may not be aware that there are distinct differences between a delta printer and other Cartesian 3D printers. There are several designs of 3D printers other than Cartesian and delta, but I will compare Cartesian and delta prints since these form the vast majority of designs used today.
Aside from the vertical orientation of all the axes, the most noticeable difference between Cartesian and delta printers is that the Cartesian printer has a rectangular build volume and the delta has a cylindrical build volume. You may see some delta designs that use a rectangular build plate, but the build volume is still cylindrical. Most delta printers will have a circular or hexagonal build plate. The reason for the cylindrical build volume is the unique geometry of the vertical axes. Delta printers also typically have a taller build height than Cartesian printers—another byproduct of the vertical axes orientation.
Another difference is in the orientation of the home position [0,0,0] for the axes. A Cartesian printer typically orients the home position in the forward, left position with all three axes at their starting position. Conversely, a delta printer orients the [0,0,0] position in the center of the build area. Thus, Cartesian printer axes travel from 0 to max, whereas the delta printer axes (just the X and Y axes) travel from –max to +max. For a delta printer with a 300mm diameter build plate (assuming it can utilize the entire area), the X and Y axes travel from -150 to +150. The Z axis on delta printers move from 0 to max.
In most 3D printers, each axis moves on a single plane (a Cartesian printer); the axes are independent and do not affect the resolution (movement) of the other planes. A delta printer, however, uses very small movements for all three axes in order to move to a specific location on the X-, Y-, and Z-planes.
A Cartesian printer allows movement of a single axis without affecting the movement of the other axes. That is, you can move the X axis from one position to another without changing the Y or Z axis. A delta printer would have to change all three axes in order to reposition on the X axis alone (or the Y axis).
This is because each axis on a delta printer can only move in the vertical direction. The mechanism of each axis is formed from two parallel arms attached to a single plate, or effector. All three axes therefore are connected together. Thus, in order to effect movement, all three axes must move in harmony. They can be a wonder to behold as they reposition the effector.17
The simplest movement is the Z axis. In this case, all three axes are moved at the same time. To move the effector and therefore the hot end up in the Z axis, all three axes are moved the same distance away from the build plate. Similarly, to move the hot end down in the Z axis, all three axes move in the same distance toward the build plate.
To move the effector (hot end) to a specific X or Y location at a set Z position, the delta printer uses algorithms to resolve the movement of each axis. While not precisely accurate, but analogous, each axis can be thought of as forming a parallelogram using a pair of right triangles with the axis as the vertical side, an imaginary line from the axis to the effector, and the parallel arms the hypotenuse. In order to resolve the X and Y position, the triangles must change in shape; that is, the vertical and horizontal lines must change in length because the hypotenuse is fixed (the parallel arms). However, since the horizontal lines are all attached together, the only side that needs to change is the vertical side. Since the hypotenuse is fixed, changing the length of one side changes the other and moving the axis up or down does this.
This is also known as a limited degrees of freedom concept. That is, the geometry is designed to fix endpoints to the effector, thereby providing three degrees of freedom. The effector cannot move in any direction other than horizontal along the X and Y plane, and moving all three axes at the same time raises or lowers that plane.
While somewhat simplified, this is how delta printers resolve movement in the X, Y, and Z axis. You will see exactly how the mathematics for this works in a later chapter. Now let’s turn our attention to a discussion about getting a delta printer.
Getting a Delta Printer
Whether you are looking to buy your first delta printer or looking to move on to a newer model with more features, this section will guide you in the right direction. I will discuss the classes of printers and present advice on whether to buy or build a printer. I will also present some advice for those considering building their own delta printer and even those seeking to buy a used delta printer. Let’s get started with a discussion of the options for getting a 3D printer.
Categories of 3D Printers
Unlike conventional ink-on-paper printers, there are few delta printers that have become available in retail stores. That is, you won’t likely find a delta printer at your local big-box home electronics store (but you may soon). However, if you are in Orange County, California, you can visit the MatterHackers retail store in downtown Lake Forest (matterhackers.com/retail-store).
For those of us living elsewhere, where do you go to find a delta printer? Why, the Internet of course! A quick Google search for “delta printer” will result in many different forms of delta printers—from ones that resemble a mash-up of random parts to well-implemented professional models. But how do you know which one is right for you?
I will answer these questions by first discussing the options available. I have classified the various 3D printers and vendors into three categories. Although there are certainly other options available (like inventing your own 3D printer, as well as other types of 3D printers, like a UV-cured resin printer), the vast majority of the FFF printers fall into one of these categories. I describe each of these in more detail in the following sections.
- Professional grade: Mostly closed-source options with advanced features and paid support
- Consumer grade: Commercial offerings available as a kit or preassembled
- Hobbyist grade: Pure open source designs for DIY enthusiasts
The first category contains those vendors that offer 3D printers manufactured for commercial sale to consumers. That is, they offer printers of their own design with mass-produced parts (from minor parts to the entire unit) that arrive with a warranty and support options. Such vendors have elaborate, professional web sites where you can not only buy their products, but also purchase parts and even get help using the products.
While these qualities may (and often do) apply to other 3D printer categories, these printers are typically built with a higher level of quality and precision. Vendors typically do not offer a full parts catalog; rather, they typically offer only those parts that are considered wear-and-maintenance items. As you can expect, they are typically more expensive. What you get for the extra cost is directly reflected in the quality and ease of use of the product.
For example, a professional-grade 3D printer normally does not need much in the way of setup and configuration. You won’t eagerly unbox your new purchase and find a 300-page assembly manual. In fact, some printers arrive so well packed that it takes longer to get it out of the box than it does to get it to print!
That doesn’t mean commercial printers are ready-to-print out of the box. You can assume any printer you buy will require some amount of setup to use it the first time. This may include some minor assembly, but normally doesn’t require more than a few simple hand tools that are often included in the box. You can also expect to have to adjust the printer periodically.
An example of a professional-grade delta printer is the Orion Delta Desktop 3D Printer from SeeMeCNC,18 as shown in Figure 1-17.
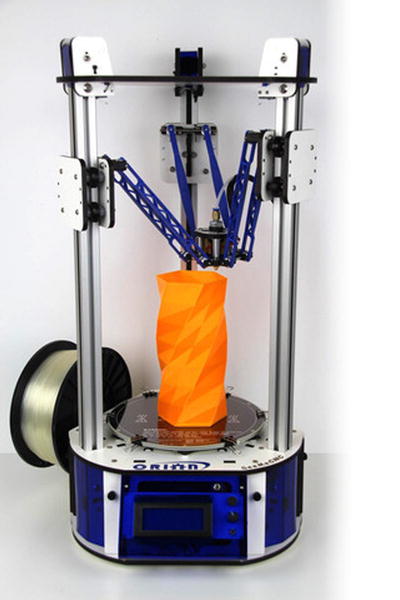
Figure 1-17. Orion Delta Desktop 3D Printer (courtesy of SeeMeCNC.com)
The Orion Delta Desktop 3D Printer arrives fully assembled, but requires attaching a few minor components—none of which are difficult or require any special skills. You also have to spend some time unwrapping and removing the printer from its packaging. This will likely take you longer than attaching the miscellaneous bits. A short instruction manual that details every step needed is provided. Within a short time, you will have your new printer unboxed and ready to print.
In general, you will find a commercial 3D printer to be a rewarding buying and owning experience. They do cost more, but the higher cost may be worth considering if you need to get started printing objects quickly.
![]() Note In my book Maintaining and Troubleshooting Your 3D Printer (Apress, 2014), I ranked the Orion printer in the consumer-grade category; but after using the product, and from reviews from long-term users, it is clear that this printer is more of a professional-grade printer. In fact, most high-end delta printers can be classified in either category because they share the same qualities.
Note In my book Maintaining and Troubleshooting Your 3D Printer (Apress, 2014), I ranked the Orion printer in the consumer-grade category; but after using the product, and from reviews from long-term users, it is clear that this printer is more of a professional-grade printer. In fact, most high-end delta printers can be classified in either category because they share the same qualities.
The next category contains those 3D printers that are available as partial kits (some parts preassembled), full kits (requires you to do all the assembly work), or fully assembled. They aren’t full, professional offerings since vendors typically don’t offer the same level of services and support (although some do). Even for those that do offer professional services, the level of assembly is the main feature of this class of printer.
Don’t be tempted to think that self-assembly means lower quality. This is generally not true; rather, the self-assembly aspect has more to do with shipping costs. Furthermore, some of the printers in this category are priced competitively with some of the printers in the professional-grade category. However, it is the kit format that permits vendors in this category to offer some of their 3D printers at lower prices, because it saves the cost of labor required for an assembly line. This is likely to be the case for small (and growing) companies. The kit form therefore offers you a price break in exchange for a few hours of your time.
If you purchase a 3D printer that comes as a kit, you can expect it to be fairly easy to assemble, requiring a small number of tools and a moderate level of skill. These printers aren’t quite as simple as assembling a tricycle, but can sometimes require the same level of patience required for assembling furniture from Scandinavia. The time it takes to assemble varies, but in general you can expect assembly to vary from a few hours to an afternoon or three. Of course, your own skills, patience, and time constraints will play a factor in how long it takes you to assemble the kit. I like to double the vendor’s estimate, and then add 50% more for those “oh, drat” moments.
So what do 3D printers in this category have in common besides the fact that they require some assembly? As you may surmise, it has to do with how the product is offered and the level of support available. Some vendors offer the same level of services as professional-grade vendors, but more often, vendors in this category have limited support on their web sites and either do not offer any paid support or do not offer any phone support. Although this may not be an issue for some, if you are concerned about getting help with your printer, you may want to examine a vendor’s web site carefully, and before buying one of their 3D printers, ask if they provide any level of support.
Another aspect of 3D printers in this category is the material used in construction. While most use commodity components (e.g., stepper motors, bolts, etc.), the material used for the major frame components can range from laser-cut wooden platforms, like the SeeMeCNC line of printers, to the metal components found in the OpenBeam USA Delta printers.
None of this should affect or prevent you from buying a consumer-grade 3D printer. If you have some mechanical and electronics skills, as well as the desire to tinker, and you don’t mind having to spend a little time putting the printer together yourself, you can save some money and have some fun at the same time!
An example of a consumer-grade delta printer is the Kossel Pro 3D Printer from OpenBeam, as shown in Figure 1-18.
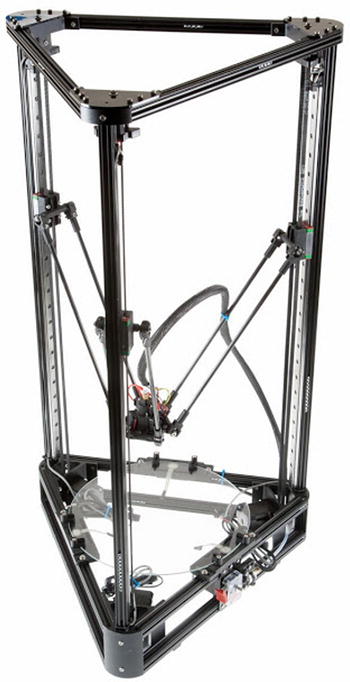
Figure 1-18. Kossel Pro 3D Printer (courtesy of openbeam.com)
The Kossel Pro 3D Printer uses high-quality bespoke components that are well designed and go together easily. Although assembly can take some time, the documentation provided is very good and most of the tedious assembly (like the hot end) has been completed. The quality of this printer is quite high and if not for the extended assembly and configuration time, the printer could be classified as professional grade.
In summary, consumer-grade 3D printers are a good option for those who want or can handle a 3D printer that requires some assembly, for those who don’t mind working on the printer, and for those who don’t need technical support (free or otherwise). These 3D printers are a mix of customized designs with some open source derivations. The quality of the printers ranges from a bit below (but still considered good) to comparable with professional-grade 3D printers. They are sometimes cheaper than professional-grade 3D printers and parts are more readily available. Some vendors offer warranties, but those that do have shorter warranty periods than professional-grade vendors. Lastly, consumer-grade 3D printers require more time and skill to operate and maintain.
The vendors in this category offer 3D printers that are implementations of one or more RepRap designs. They are open source and almost entirely DIY. That is, the printers require assembly from scratch. However, you can find complete kits, as well as some vendors who sell assembled units.
These kits are not designed for those who want to open the box and start printing. This is one of the tenets or perhaps rules of the RepRap world—you are expected to have the technical skills to put it together. Those with less skill can assemble some kits, but most kits require some mechanical skills, soldering, and a zeal for tinkering.
If you do not have these skills and you don’t want to learn them, or if you don’t have the time to devote to assembling your own 3D printer, you may want to consider a consumer-grade printer kit or an assembled 3D printer. You should also consider the fact that RepRap 3D printers require a fair bit of maintenance and tinkering to get working well. Thus, you may still need to repair and maintain it.19
Most of the vendors in this category do not offer much in the way of services, but most at least make their manuals and assembly guides available for download. Although a few offer phone support, most will answer your questions via e-mail within a day or so.
The main reason for this is that the vendors are striving to make RepRap printers more widely available. They’ve done all the hard work for you by sourcing the various parts and ensuring that the parts work together. Consequently, most vendors allow you to pick and choose options when ordering their kits.
For example, if you decide to use a different electronics board, you can usually specify that when you order the kit. Similarly, you can often find kits that have part of the components omitted, permitting you to buy only what you need. I find this very convenient because it allows me to upgrade a RepRap printer from one iteration to another, reusing the motors, electronics, and extruder. If you are thinking about getting another printer because your old one is a bit dated or it doesn’t have some of the latest features, look for vendors that offer partial kits so that you can save some money and get a new printer in the bargain.
![]() Tip If you are considering sourcing your own kit or want to learn more about other, Cartesian RepRap designs, you may want to read Maintaining and Troubleshooting Your 3D Printer (Apress, 2014). It contains a detailed discussion on sourcing components.
Tip If you are considering sourcing your own kit or want to learn more about other, Cartesian RepRap designs, you may want to read Maintaining and Troubleshooting Your 3D Printer (Apress, 2014). It contains a detailed discussion on sourcing components.
The Mini Kossel is an excellent choice for those who want to build a delta printer from scratch. The design is very well-thought-out and assembly is much shorter than a traditional Cartesian RepRap. Furthermore, the design allows for a host of customization and options that you can explore. For example, you can add a heated bed, an LCD panel, cooling fans, and more.
You can find Mini Kossel kits and parts from a variety of vendors from online auction sites to online retailers such as TriDPrinting (tridprinting.com/BOM/Kossel-Mini/), which sells individual parts, Blomker Industries (http://blomker.com), which sells complete kits, and Maker Geeks20 (makergeeks.com/mikofudiypae.html), which sells parts and complete kits for a variety of 3D printers.
The Mini Kossel is just one of several RepRap delta printer designs. I will discuss some of the other designs in a later chapter. However, I consider the Mini Kossel the most refined of the RepRap delta printers and therefore the best choice in this class of printer. Figure 1-19 shows an example of a RepRap delta printer. In this case, it is a heavily modified Mini Kossel.
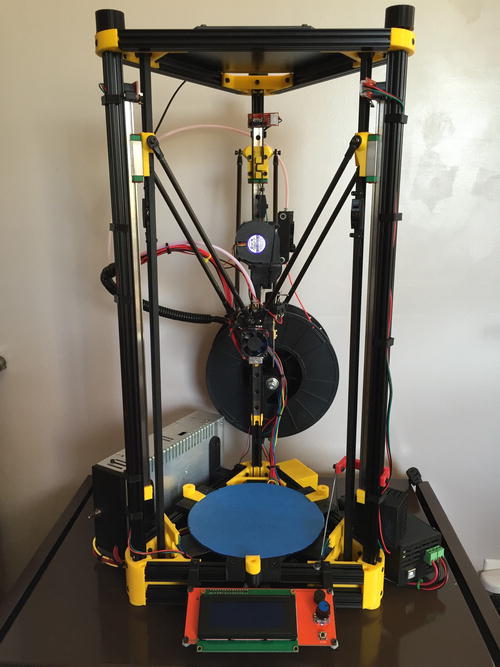
Figure 1-19. Mini Kossel RepRap Printer
In summary, RepRap printers are pure and simply DIY. The vendors that support RepRap 3D printers typically offer kits or parts only, and little or no online technical support. Most provide excellent documentation for their kits, but seldom include any help for assembly. Did I mention that they’re DIY?
A RepRap kit is a good choice for someone who wants to learn how the printers work or someone who wants to tinker. Due to the lower cost of the kits, a RepRap kit can be a good way for someone to enter the 3D printing world, but success or failure lies in the hands of the buyer. You can find a lot of help on the Internet, including the RepRap wiki (reprap.org) and the deltabot mailing list (groups.google.com/group/deltabot), but you should not expect to be able to pick up the phone and ask your vendor for help. Did I mention it’s DIY only?
Build or Buy?
The answer to the question of whether to build your own printer or buy a ready-to-go printer lies in your assessment of your skills and your desire to learn. If you are confident you can handle any electrical or mechanical task needed to build a 3D printer, and you have the time necessary to devote to the task and to learn new skills, then a 3D printer kit is an option you will want to consider. On the other hand, if you don’t have the skills or you don’t have the time to learn those skills, much less the time to build the printer, you may want to consider buying a printer that is ready-to-print.
Reasons for Building Your Own Delta Printer
There are two main reasons why you would want to opt to build your own printer. First, you enjoy working on a project that requires you to spend a lot of time during construction and configuration. Second, you want to save some money. Other reasons include wanting to build a 3D printer with specific unique features or you want to be able to upgrade the printer in the future.
If you want to embark on a build option, you should plan to spend anywhere from a single afternoon (for some assembly-required kits) to about 40 to 60 hours or more for a built-from-scratch delta printer. Although this estimate may seem very high (and some would say it is), realistically you should anticipate it taking more than a long weekend to complete—and that’s if you have all the parts and they all work! In addition, you should plan to spend some time configuring and calibrating your new printer. In my own experience, from someone who has built quite a few 3D printers, building a Mini Kossel from scratch is easier and faster than most Cartesian RepRap printers. It should be noted that the skillset is exactly the same for building a delta or a Cartesian 3D printer.
However, you should not try to rush through the build, but take your time to get things right. You will be glad you did. Once you have your printer whirring away, laying down plastic to make a whistle or another small gewgaw, you will be glad you took the time to get it right. So if you want a challenge and time isn’t an issue, building your own printer is a good option.
Currently, there are far more kits than there are completed or partially completed delta printers for sale. Thus, it is likely you will encounter more people who have built their own delta printer than those who have bought assembled printers. But that trend is changing with the efforts of vendors like SeeMeCNC and OpenBeam (but there are many others on kickstarter.com).
Reasons for Buying a Delta Printer
Ready-to-print delta printers encompass all the professional-grade class of 3D printers and any 3D printer in the consumer-grade class that comes mostly assembled or can be ordered assembled.
There are several reasons for choosing a professionally assembled delta printer. One reason is time. If you need to get started printing objects quickly and do not have time to learn how to build (and then configure and calibrate) your own delta printer, either from a kit or from scratch, you will want to choose a professional- or consumer-grade option.
Another reason you may want to buy a printer that is ready-to-go concerns quality. The print quality is generally better than what you may achieve if you built your own delta printer. This isn’t always the case, however, and it is more often applicable to professional-grade options. Regardless, if quality is a concern, you may want to buy a printer with a good reputation for high-quality prints.
Additionally, a ready-to-print option is easier to use and more reliable. That is, a ready-to-print option means all the hard work of configuration and calibration has been done for you. Although you may need to spend some time to get the printer set up properly once you’ve unboxed it, this is typically a small fraction of the time required to build your own delta printer, because you don’t have to invest the time required to get everything fit together and working. This goes far beyond the mundane mechanics of the assembly.
Perhaps the most important factor in buying a ready-to-go printer is technical support. If you do not have or do not want to learn the skills required to diagnose or fix problems with your delta printer, you should buy your printer from a vendor that offers a support option, or at the least a very good warranty and a support forum and help line.
Buying a Used 3D Printer
If your budget limits your buying power or you are looking for a bargain, a used printer may be a good choice. You can often get a slightly used delta printer for about 75% of the price of a new one. However, like all used purchases, you need to do your homework to ensure that you are getting a well-maintained and reliable printer.
The following lists several considerations and some advice on how to buy a used delta printer. If you follow this advice, you should be able to find a good printer to fit your budget.
- Online auction sites are an excellent place to look for a 3D printer. If you apply a little patience and avoid the temptation to join a bidding frenzy, you will find the printer you want at the price you are willing to pay.
- Set your expectations based on your budget. Remember, real bargains are hard to come by. If the price is too good to be true, chances are there is something wrong with it.
- Find the printer with the lowest usage. I’ve seen cases where used printers have no more than a few hours of use. Avoid printers with hundreds of hours of use, or are broken, or advertised as non-working or needs work.
- Beware of highly modified printers. Buying a well-tuned printer is a good idea, but don’t pay extra for all the add-ons and upgrades. It is possible those upgrades could be useless or even detrimental to your print quality. Some people will raise the price thinking the extras are worth more, but this is generally not the case.21
- If you are seeking a professional-grade printer, check to see if there is an extended warranty and that it can be transferred to you (most cannot).
- Ask if the seller is the original owner. If the printer has passed among several owners, you may want to pass on it as well. Similarly, if the seller professes he knows nothing about it, do not buy it for any price short of the absurd. Chances are that if you encounter a problem, the seller will politely refuse to help you (some state this up front in fact).
- Check for the original accessories. Look for printers that come with the original manuals and all accessories. Consumables may not be included, but the original tools and whatnot should.
- Be very careful if buying from a seller who doesn’t have the original shipping box. This shouldn’t be a deal breaker, but you should insist on shipping insurance and ask the seller to explain how they plan to prepare the printer for shipping. You should also ensure that they secure the axes for shipping.
- Ask to see hi-res photos of printed objects. Check the quality carefully. If you see any anomalies or quality issues, don’t buy the printer.
- Good communication is the key to a good sale. If the seller is willing to exchange e-mails and answer questions promptly, it is a good sign. Don’t buy from a seller who won’t return your e-mails, dodges questions, or takes a long time to respond.
- Lastly, ask the seller whether he will take the printer back for a full refund if there is something wrong with it. You may have to pay return shipping but the peace of mind of getting a refund is worth paying a bit more for the reassurance.
Summary
A delta 3D printer is a very different take on 3D printer designs. Delta printers solve a number of problems with Cartesian printers (but have a few of their own, as you will see in a later chapter), have a smaller footprint, and can achieve higher movement rates. As a plus, they’re really neat to watch when printing.
In this chapter, you discovered how 3D printing works, learned about the software or workflow for 3D printing, and looked at the consumables used in 3D printing. I also discussed the options for getting your own delta printer.
The next chapter examines how the delta hardware mechanisms work in greater detail. I will remove the veil that obscures the magic in the machine.
_________________________
1It’s at this point you may be wishing you paid more attention in trigonometry class.
2My early passion was architecture. I was quite good at making scale models, but not so much with tedious lettering skills.
3For more information, visit http://en.wikipedia.org/wiki/3D_printing.
4Also called machining; see http://en.wikipedia.org/wiki/Machining.
5Like fishing line, or as my wife says, “fishing twine.”
6These sizes can vary a bit. For example, 3.0mm filament is usually 2.9mm +/- 0.1mm for most suppliers.
7Which goes something like this: cut, drill, sand, glue, repeat.
8See http://bukobot.com/nozzle-cleaning.
9It is as close to a magic cure as you’re likely to get for ABS lifting.
10Never, ever attempt to use painter’s tape that is made of plastic of any variety. It will not survive application on a heated print bed and may make a mess of your prints because it may stick to your objects.
11The initial height of the nozzle above the print surface when Z = 0 (lowest position).
12This is one of those YMMV situations. It is harder to control lifting and adhesion problems, and for that reason alone I’d recommend waiting to use blue painter’s tape with ABS until you’ve had some experience controlling lifting and similar adhesion problems.
13Every Apple device I’ve seen has several pieces inside.
14It can also cause larger objects to develop cracks where layers separate during cooling.
15Not to be confused with ABS slurry, which is a thicker concoction used to glue parts together.
16Animal hair does not dissolve in acetone.
17Actually, I find all 3D printers mesmerizing. It’s just that the delta does it with a bit more class and a bit of whimsy thrown in for good measure.
18See openbeamusa.com.
19While your mileage may vary, all 3D printers need maintenance and repair to ensure proper operation.
20If you want a premium heated print bed, check out the aluminum Mini Kossel option.
21This is especially true for motorcycles and sports cars. Adding thousands of dollars of accessories will only net you about 10% of the cost of those accessories.