
Chapter 7: Core Capabilities of the Leading JavaScript Test Automation Frameworks
Earlier in the book in Chapter 4, Matching Personas and Use Cases to Testing Frameworks, we provided a table that broke down all the critical capabilities across the top four test automation frameworks – Selenium, Cypress, Playwright, and Puppeteer. In this chapter, we will connect these capabilities and provide per each capability the recommended test framework to go with it. When combining multiple capabilities with the recommended frameworks, frontend developers can use this chapter to make a data-driven decision.
The chapter is designed to offer the following:
- An overview of the core capabilities of the leading test automation frameworks
- A compelling events list that can suggest a re-assessment of the test automation framework currently in use
After reading this chapter, you should be able to better evaluate a web test automation framework while considering its core capabilities, as well as understand the differences between built-in capabilities and capabilities obtained through plugin installation.
Comparing the test automation framework capabilities
As illustrated by the core capabilities in Chapter 4, Matching Personas and Use Cases to Testing Frameworks, each aspect of a web application needs to be tested; however, there are strengths and weaknesses across the top four testing frameworks, which need to be known upfront.
In the following section, we will dive deeper into the core categories of a web application testing plan and provide some recommendations for a framework that can get the highest coverage of testing per category or use case. The order of the following use cases and categories is random and not based on any kind of priority.
Visual testing
A successfully built web application obviously needs to function properly and perform at high speed; however, the look and feel from a UI standpoint is also a key factor within testing, since the range of screen sizes, resolutions, and devices that the web app will run on is huge.
This is where visual testing comes into play. The visual testing of a responsible Progressive Web App (PWA) or standard web application can be either done within a core capability of a test framework that the developers are using or through a third-party library that is imported as part of the framework dependencies.
In many cases, having visual testing as a core capability of the framework that we use is a great advantage, since we do not need to continuously maintain and import updates to the dependent library. However, sometimes, there will be exceptions where the third-party solution (such as Happo) provides unique capabilities that are not built into the framework out of the box.
Let's look at visual testing across the different frameworks, starting with Cypress.
Cypress visual testing
For the Cypress framework, visual testing elements that are built into the framework are limited to taking a screenshot of the web application screens that are under test using the cy.screenshot() APIs (https://docs.cypress.io/api/commands/screenshot), as well as taking screenshots upon a validation failure using the cy.OnRunFailure() APIs. Also, as part of the Cypress APIs, a test developer can leverage the CSS assertion functions via have.css, but as the Cypress framework suggests, this might become hard to maintain, especially when a web application has many CSS styles.
The main Cypress screenshots commands are listed as follows and can be used within the JavaScript test code:
cy.screenshot()
cy.screenshot(fileName)
cy.screenshot(options)
cy.screenshot(fileName, options)
To extend visual testing on top of the aforementioned capabilities, Cypress relies on third-party plugins such as Applitools (https://applitools.com/tutorials/cypress.html), Percy (https://docs.percy.io/docs/cypress), Happo (https://github.com/happo/happo-cypress), and the snapshots plugin (https://github.com/meinaart/cypress-plugin-snapshots).
Keep in mind that all the aforementioned tools, including Applitools, Happo, and Percy, are commercial add-ons to Cypress that you'd need to obtain a license to use. To a limited level, some of these tools such as Happo can be used for free through the open source library.
There is also an existing integration between Cypress and Storybook that can be used for free for visual testing (https://github.com/storybookjs/storybook/tree/next/cypress).
Playwright visual testing
Playwright offers a nice out-of-the-box way of creating visual test assertions against a baseline of images that are captured upon the first test run (https://playwright.dev/docs/test-snapshots). From the second run and beyond, each screenshot or visual assertion is compared with the stored baseline, and any inconsistencies are reported to the tester for evaluation and decision making.
To make the aforementioned clearer, when running the following sample code for the first time, what Playwright will do is create a new visual baseline image called landing.png that will be compared and validated from the next run.
The concept of baselines in visual testing isn't new, and that's the main methodology behind many of the aforementioned commercial tools. Some would add AI as a method of analyzing these screenshots, such as Applitools, but that's an added benefit, of course:
// snapshot.spec.js
const { test, expect } = require('@playwright/test');
test('example test', async ({ page }) => {
await page.goto('https://www.packtpub.com');
expect(await
page.screenshot()).toMatchSnapshot('landing.png');
});
Playwright visual comparisons can compare images and also text on these screens. It uses a library called pixelmatch (https://github.com/mapbox/pixelmatch) to perform its visual analysis.
If you need to extend the aforementioned visual testing built-in capabilities and perform at a higher scale and more intelligent visual testing, you can use the available integration Playwright has with Applitools through this tutorial (https://applitools.com/tutorials/playwright.html) and/or with Percy (https://docs.percy.io/docs/playwright).
Puppeteer visual testing
Google's Puppeteer framework has built-in capabilities to take basic web page screenshots, which are not that useful from a complete visual testing perspective. There is a more solid integration between Puppeteer and Percy (https://docs.percy.io/docs/puppeteer) that developers can use to perform visual analysis comparisons with the baseline concept and higher scale and assertions.
To easily get started with Percy and Puppeteer, you will need to install the dependency, and since it is commercial, you'll need to obtain a license and a security token to use it:
npm install --save-dev @percy/cli @percy/puppeteer
For each JavaScript file that you have and want to use Percy for visual testing, you would need to add this dependency requirement:
const percySnapshot = require('@percy/puppeteer')
Once the preceding dependencies are set, you can start using the Percy APIs such as percySnapshot().
Selenium visual testing
Selenium is one of the oldest and most mature frameworks in the industry, which integrates with a variety of commercial visual testing tools and works nicely with the open source platform called Storybook (https://storybook.js.org/tutorials/design-systems-for-developers/react/en/test/) and Galen (http://galenframework.com/docs/reference-javascript-tests-guide/).
Unlike Playwright, which has some built-in APIs for visual testing, with Selenium, a developer would need to learn the methodologies of Galen, Storybook, and Applitools to integrate them into their source code. It is, of course, doable, and fully supported and maintained by both communities and vendors, so adding visual testing to Selenium is a matter of choice and budget if you choose to go with the commercial vendors (Applitools, Percy – https://docs.percy.io/docs/selenium-for-javascript).
Adding such code to a Selenium JavaScript test scenario would perform the visual validation and check the page layout. Galen with Selenium is very strong for responsive web application testing (responsive web design):
test("Home page", function() {
var driver = createDriver("http://galenframework.com",
"1024x768");
checkLayout(driver, "homePage.gspec", ["all", "desktop"]);
});
So far, we have seen that visual testing can be accomplished across all four test automation frameworks; however, Playwright is the only framework that has such capabilities built into its core APIs, while the others require third-party integrations with either open source frameworks such as Galen and Storybook, or commercial ones such as Percy and Applitools.
API testing
In the traditional testing pyramid, it's clear that lower-level automated testing is API testing. However, it is powerful, fast, very reliable, and stable. Most testing projects use API testing as part of their test plan scoping; however, when it comes to API testing within the four leading frameworks, not all of them offer this ability as a built-in capability.
Cypress API testing
Cypress offers built-in support for API testing. With the Cypress testing framework, developers and test engineers can create any kind of API testing across all different types of methods (GET, POST, DELETE, PATCH, and PUT).
Cypress performs most of its API tests via the cy.request() method, which serves as a GET command to the web server being tested.
In the following examples, we will be using a free website (http://jsonplaceholder.typicode.com/) that is available for API testing activities. On the website, there are several resources that can be used for testing purposes and training, such as 200 to-do list items, thousands of photos, 10 usernames, and many other options.
With the Cypress API testing abilities, you can perform various validations on the aforementioned sample website.
When a user installs Cypress locally, they can learn from a built-in code sample how to test different network requests.
In the following snippet, Cypress uses the request method to retrieve the first user ID from the user's website and then adds a new entry with the ID 'Cypress Test Runner':
it('cy.request() - pass result to the second request', () => {
// first, let's find out the userId of the first user
// we have
cy.request(
'https://jsonplaceholder.cypress.io/users?_limit=1')
.its('body') // yields the response object
.its('0') // yields the first element of the returned
// list
// the above two commands its('body').its('0')
// can be written as its('body.0')
// if you do not care about TypeScript checks
.then((user) => {
expect(user).property('id').to.be.a('number')
// make a new post on behalf of the user
cy.request('POST',
'https://jsonplaceholder.cypress.io/posts', {
userId: user.id,
title: 'Cypress Test Runner',
body: 'Fast, easy and reliable testing for
anything that runs in a browser.',
})
})
// note that the value here is the returned value of
// the 2nd request which is the new post object
.then((response) => {
// new entity created
expect(response).property('status').to.equal(201)
expect(response).property('body').to.contain({
title: 'Cypress Test Runner',
})
})
It is very clear from an API testing standpoint that Cypress can check the box of a supported capability. While it is not as thorough as dedicated solutions such as Postman, REST-Assured, and others, it does provide an easy user experience to add to the functional testing layer API tests and the creation of network request scenarios.
Playwright API testing
Similar to Cypress, the Playwright framework also provides a set of capabilities to create API test scenarios (https://playwright.dev/docs/test-api-testing). With Playwright's methods under appiRequestContext (get, post, fetch, put, delete, patch, dispose, head, and storageState), developers can perform a wide range of API test validations. apiResponse (body, status, headers, and so on) methods will return the responses returned by the apiRequestContext methods:

Figure 7.1 – An apiRequestContext syntax example (source – Playwright documentation https://playwright.dev/docs/api/class-apirequestcontext#api-request-context-get)
At the time of writing, Playwright supports API testing only using JavaScript and Python languages, with Java and .NET coming later in the roadmap.
Selenium API testing
This is a short section since Selenium cannot automate API testing as a built-in capability, only through integrations with third-party API testing frameworks such as REST-Assured (https://rest-assured.io/).
Puppeteer API testing
This is a short section since Google Puppeteer cannot automate API testing as a built-in capability.
Supported development languages
While this book is 100% focused on JavaScript test automation development, some of the four leading frameworks that we're covering can support other language bindings.
To give a brief comparison of the supported languages, here is a snippet from Chapter 4, Matching Personas and Use Cases to Testing Frameworks, that should make it clear and easy to understand the differences between the test frameworks:

Knowing the supported languages of each framework lets test and development managers know that for some frameworks, they can have more flexibility around test creation. If among the developers there are individuals that, for example, are stronger in Java or Python, Selenium and Playwright are strong options to consider. As shown in the preceding table, languages such as C#, Ruby, and Kotlin are only supported by Selenium.
Mobile device testing
It is a fact that websites are used more nowadays on mobile devices than on desktop machines. With that in mind, developers and test engineers must include mobile device testing as part of their test plan. This core capability can be a bit complicated across analyzed test automation frameworks, since testing on simulated viewports or emulators/simulators is only good to some extent. To ensure real-world user experience, performance, and quality on mobile devices, testing must be also done on real devices.
Cypress mobile device testing
Cypress can use the cy.viewport() APIs to mimic the width and height of a mobile phone screen's viewport for the website under test; however, this will only give you a basic look and feel for your web application across specified screen sizes. In addition, Cypress offers the use of userAgent as part of the simulation of a real mobile device property (https://docs.cypress.io/guides/references/configuration#Browser). A developer can either specify the use of a specific mobile platform userAgent string within the cypress.json file or embed it in the test code itself within the onBeforeLoad() method. The Mozilla Developer Network (MDN) web docs by Mozilla provide very useful documentation on how to use and specify userAgent (https://developer.mozilla.org/en-US/docs/Web/HTTP/Headers/User-Agent).
As an example, to test a Cypress web application scenario on a Google Pixel 6 device running on Android 12 on a Chrome 96 browser version, you can use the following declaration in your test code with the value: [userAgent] attribute, as specified in the following:
value: Mozilla/5.0 (Linux; Android 12; Pixel 6 Pro) AppleWebKit/537.36 (KHTML, like Gecko) Chrome/96.0.4664.92 Mobile Safari/537.36
userAgent
userAgent is a characteristic string that lets servers and network peers identify the properties of an application, type of operating system, vendor, and the OS version of the requesting platform. W3C defines it at a high level as "software that retrieves, renders and facilitates end user interaction with Web content, or whose user interface is implemented using Web technologies." (https://www.w3.org/WAI/UA/work/wiki/Definition_of_User_Agent).
With the preceding two methods in mind (userAgent and using a viewport), this is still considered a very limited set of capabilities from a mobile testing perspective.
Playwright mobile device testing
Similar to how Cypress offers testing different viewports as part of its extended mobile testing abilities, Playwright also offers the use of the playwright.devices() API (https://playwright.dev/docs/api/class-playwright#playwright-devices), which allows frontend developers and SDETs to specify device characteristics.
The preceding capability is used by adding to your test code the following specific lines (in the following, we are using iPhone 12 characteristics to test the Packt website):
const { webkit, devices } = require('playwright');
const iPhone = devices['iPhone 12'];
(async () => {
const browser = await webkit.launch();
const context = await browser.newContext( {
...iPhone
})
const page = await context.newPage();
await page.goto('http://packtpub.com');
await browser.close();
})();
As clarified in the previous Cypress section, Playwright does not offer any advanced mobile testing ability here.
Puppeteer mobile device testing
Google's Puppeteer framework also offers a simulation capability through the emulate() method. Basically, the previous code snippet is very close to the Puppeteer syntax with minor adjustments, as shown in the official Google documentation (https://pptr.dev/#?product=Puppeteer&version=v12.0.1&show=api-pageemulateoptions). As with Cypress, Puppeteer can also specify userAgent and viewports through the page.setUserAgent(userAgent) and page.setViewport(viewport) methods. If you're planning to juggle multiple devices, using the Puppeteer-supported device descriptors option can be very useful.
Selenium mobile device testing
Selenium is the most advanced testing framework when it comes to mobile and web application testing. The Appium framework (https://appium.io/) is derived from the Selenium WebDriver implementation, but it's fully aimed at testing mobile web, hybrid, and mobile-native applications across most language bindings, including JavaScript. If you wish to extend your web testing to mobile devices at scale, using Appium might be a good option, and it leverages the same core APIs with new and specific ones that are relevant to the mobile landscape.
Performance testing
The user experience and performance of a web application are equally important as functionality. Ensuring that the response time of any web application transaction is reasonable across mobile and web platforms, including when the load on the backend servers is growing, should be part of any web application testing plan. There are leading performance-testing frameworks on the market, such as JMeter (open source) with its supported load testing product BlazeMeter (https://www.blazemeter.com/) and NeoLoad from Tricentis. From the perspective of the four main JavaScript testing frameworks covered in this book, most can offer measurements of transaction timing or, through browser developer tools (such as the CDP), utilize the Lighthouse tool to perform some advanced measurements of such transactions. Keep in mind that none of these frameworks comes with built-in load testing capabilities.
Cypress performance testing
As we will see, in most of the test automation frameworks that we're evaluating in this book, Google Lighthouse can be utilized to measure the following top six key performance indicators:
- First Contentful Paint (FCP)
- Large Contentful Paint (LCP)
- Speed index
- Time To Interactive (TTI)
- Total blocking time
- Cumulative Layout Shift (CLS):
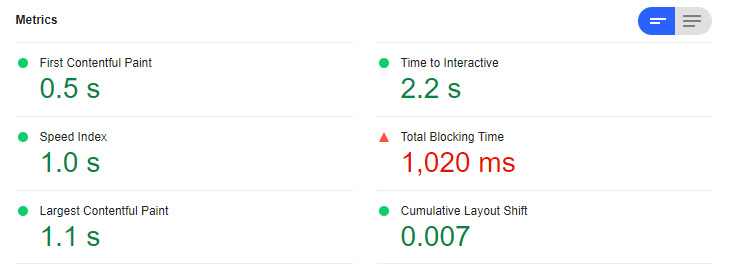
Figure 7.2 – The Google Lighthouse performance output on the Packt website
In addition to embedding Lighthouse in the Cypress test code, frontend developers can also measure specific web application transactions using the two following methods:
win.performance.mark("start-loading");
performance.mark("end-loading");
performance.measure("pageLoad", "start-loading",
"end-loading");
The preceding commands will measure a given page load time from the start of the load until the end-load command. This code can measure any given components that are being loaded on the page in between the start and endpoints.
Playwright and Puppeteer performance testing
Since both frameworks were developed by the same team, we can see that there are many similarities in the APIs offered by Playwright and Puppeteer. Specifically for performance testing, both Playwright and Puppeteer provide navigation timing (https://www.w3.org/TR/navigation-timing/) and resource timing APIs (https://www.w3.org/TR/resource-timing-1/) that frontend developers can embed in their test code to measure timestamps for a given web application load. A short simple code snippet that assesses basic performance metrics for a web application can be obtained from this GitHub repository (https://github.com/PacktPublishing/A-Frontend-Web-Developers-Guide-to-Testing/blob/master/perfTest.js). Download and execute it using the following:
node perfTest.js
When running the test, you should observe the following output in your console:
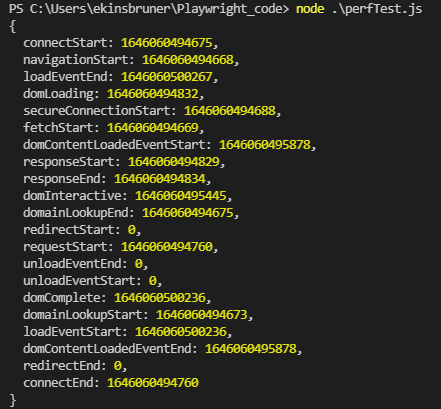
Figure 7.3 – Performance test execution output on the Packt website
The preceding output consists of the most common performance metrics such as domLoading and domInteractive. Note that the test was executed locally without applying any kind of load on the backend. To analyze the web application under high user volume, it is recommended to use a load testing tool that applies a significant load on the backend while running this test.
The preceding code snippet uses the performance timing APIs to measure the timestamp of the Packt page load time.
For the Puppeteer framework, there are also external libraries such as the Web Perf measurement library, which was developed by the community and can be used to perform web page KPI measurements using Chrome DevTools (https://github.com/addyosmani/puppeteer-webperf).
Obviously, since both frameworks are based on the CDP, they can use the developer tools from the Chromium and Edge browsers, as well as the Lighthouse tool to perform single-user performance testing on their web applications.
Selenium performance testing
Selenium is a very thorough test automation framework; however, even the Selenium documentation states that using Selenium for performance testing is not advised (https://www.selenium.dev/documentation/test_practices/discouraged/performance_testing/), since it's not optimized to measure user experience. Selenium is built on the WebDriver protocol, which may add a payload to the measurements of page load time and other testing transactions. Therefore, it is recommended to use a neutral tool for such testing activities. Selenium refers users to JMeter for performance testing, which can then be extended using BlazeMeter, as previously mentioned.
Accessibility testing
Each website these days must adhere to the strict accessibility requirements defined by WCAG and other bodies. Enabling people with various disabilities to consume data on websites and perform all available transactions is a mandatory requirement. Hence, designing a web application for accessibility and testing for it is a key requirement for each software iteration. For web accessibility testing, Deque has developed the widely adopted axe open source framework (https://www.deque.com/axe/), which most test automation frameworks today support through APIs and plugins.
Cypress accessibility testing
As mentioned, most frameworks utilize the axe framework for checking website accessibility issues.
To validate your website accessibility, install the axe plugin on top of your local Cypress installation folder by running the following command:
npm install --save-dev cypress-axe
npm install --save-dev cypress axe-core
After both libraries are installed, add the import line to the index.js file in your cypress/support folder:
import 'cypress-axe'
The axe library will provide you with the following useful methods:
- cy.injectAxe()
- cy.configureAxe()
- cy.checkA11Y()
Running your test code in JavaScript or TypeScript with the axe plugin will generate a detailed A11Y accessibility test report, which will be available on both the Cypress GUI dashboard as well as within the local test report. Frontend developers should then analyze and resolve all violations.
Puppeteer accessibility testing
Google Puppeteer can also leverage the axe framework to run accessibility tests on web applications.
A dedicated plugin can be installed above the local Puppeteer folder through this command:
npm install axe-puppeteer
This plugin will add the AxePuppeteer(page).analyze() method, which can be used to run a scan on a given page and report back the results. A dedicated document was created by the Deque team to help get started with the solution (https://www.deque.com/blog/axe-and-attest-integration-puppeteer/).
Playwright accessibility testing
As with Puppeteer, axe is the preferred and recommended plugin to use with Playwright to test for web application accessibility. To get started with the plugin and to add its supported APIs to your Playwright test code, run the following command:
npm i -D axe-playwright
A complete guide of how to use the plugin with Playwright was created by Deque and can be obtained here: https://www.deque.com/blog/new-axe-devtools-integration-playwright/. In contrast to Puppeteer, with Playwright, the method to use within the test code to analyze the accessibility of a specific page is AxeBuilder( {page} ).analyze().
Selenium accessibility testing
To use Selenium WebDriver with the axe plugin, visit the Deque GitHub repository (https://github.com/dequelabs/axe-webdriverjs).
As with the preceding framework, you will need to install the node library. To do so, run the following command:
npm i axe-webdriverjs
Once you have the library installed and added to your local Selenium environment, you can start using it to analyze your web application pages. Since axe is constantly updating its rules, frontend developers can specify and pass the axe-core source file as a parameter and use a specific rules version out of the many that axe provides.
Network control testing and mock services
Testing web applications is not just about the functionality of an app; it's also about all the services that build the app and that the app relies on. Some of the problems when testing web apps pre-production are that not all the services are ready to be used during the development stage, or that these services and test data are dynamically changing, and developers and testers have no control over the data.
Test automation frameworks can utilize mock services as well as use network control capabilities, such as changing the clock time, to assess web application output based on triggered events.
Cypress network control and mocking
Cypress has a great set of network controls and mocking capabilities that can solve problems around a lack of control over test or production data and thereby add more reliability to the testing cycles.
cy.intercept() and cy.clock() are two of the strong capabilities of Cypress for controlling and testing some services of a web application. An additional use case of cy.intercept() is stubbing. Using the method testers can stub a response and control the body, status, and headers and even delay them. It is a way of manipulating an application by cutting off parts of the application to send a controlled response and validate the application behavior.
The use of cy.clock() and cy.tick() help to override native global functions related to time and allow them to be controlled synchronously. You can set timeouts and much more and, thereby, perform time-based assertions on a dynamic page where elements appear or change when you want. Lastly, when using Cypress with mock data, testers can utilize the fixtures folder and place in it mock data files in a JSON format. Such test data can be any relevant data that your web app should be tested against, such as items in a cart prior to purchasing, notes, and a list of items. Using the test data under that folder is done by calling cy.fixture() with the path to the JSON test data file. To learn more about Cypress network control as well as get some code samples, refer to the Cypress documentation (https://docs.cypress.io/guides/guides/network-requests).
Playwright network control and mocking
Playwright has its own APIs that can be used to monitor and modify the network traffic for a web application under test. All the supported APIs are documented here (https://playwright.dev/docs/network) and include capabilities around authentication, and handling and modifying network requests. There is a great use case that combines Playwright's context.route() method and the CodeceptJS testing framework to perform mocking of network requests (https://codecept.io/playwright/#accessing-playwright-api).
You can learn more about network mocking APIs with Playwright here: https://playwright.dev/docs/test-configuration#network-mocking.
Puppeteer network control and mocking
Google Puppeteer, as mentioned previously in this book, is at the core of Playwright and comes with built-in network control capabilities, including mocking services. To perform network interception within your test code, you should utilize the page.setRequestInterception(true) APIs. The following insightful blog provides a great example of how, by using the preceding method, testers can block unnecessary elements such as images from loading to expedite page load time and test faster: https://www.checklyhq.com/learn/headless/request-interception/.
In addition to the preceding, the Puppeteer framework also has a way of emulating cellular network conditions (3G, 4G, and so on) by using the page.emulateNetworkConditions(networkConditions) method (https://pptr.dev/#?product=Puppeteer&version=v13.0.1&show=api-pageemulatenetworkconditionsnetworkconditions).
Lastly, there is a useful library called puppeteer-mock that can be used as a bridge between the Puppeteer framework and an open source mocking library (https://www.npmjs.com/package/puppeteer-mock). To install it on top of your local Puppeteer framework, run the following command:
npm install --save-dev puppeteer-mock
The preceding library has three main functions – activate(), deactivate(), and isActive().
Selenium network control and mocking
Selenium 4 brought advanced capabilities around network control and mocking APIs. The added support for CDP (https://chromedevtools.github.io/devtools-protocol/) opened the door for Selenium to use the DevTools package and perform network requests among other things. Prior to Selenium 4, this was quite difficult and, in many cases, required additional third-party plugins and libraries, or setting servers such as WireMock (http://wiremock.org/docs/getting-started/).
With Selenium 4 and the CDP DevTools, testers can use the devTool.send() API and other APIs to block CSS from loading, intercept network requests, ignore security certificates, and so on.
To learn more about the aforementioned CDP in Selenium 4, refer to the Selenium official documentation (https://www.selenium.dev/blog/2020/what-is-coming-in-selenium-4-new-tricks/).
Working with elements
At the core of test automation scenarios are element locators. Without properly identifying web application elements, the test automation code will not be able to run properly, since it can't find the elements on the web pages and perform actions on them. Obviously, all the four leading test automation frameworks work perfectly well with the elements within the website DOM tree. Some of the frameworks even make element identification and maintenance easier through object spies, page object model support, and even test automation recording.
Cypress working with elements
Unlike Selenium, Cypress queries the DOM and works only on CSS selectors (https://www.w3schools.com/cssref/css_selectors.asp), which include ID, class, and attribute. To use XPATH within the Cypress test code, you will need to install the cypress-xpath (https://www.npmjs.com/package/cypress-xpath) plugin. Cypress can also use .contains() to select an element that contains, for example, some text. Cypress can also find elements by their position in a list by using the .first(), .last(), or .eq() methods:
cy
.get('list')
.first(); // "select first item in the list "
cy
.get('list')
.last(); // "select last item in the list "
cy
.get('list')
.eq(2); // "select 2nd item in the list
"
There are various methods to locate elements in Cypress. You can use the DevTools utilities from the browsers themselves and inspect specific pages and elements, or you can use the Cypress GUI element selector and identify the target elements that you want to perform an automated action on. Another method that can be used is the SelectorsHub Google Chrome extension utility (https://chrome.google.com/webstore/detail/selectorshub-xpath-plugin/ndgimibanhlabgdgjcpbbndiehljcpfh):

Figure 7.4 – The Cypress CSS selector playground within the Cypress GUI used to identify web page elements
Playwright working with elements
Unlike Cypress, Playwright performs all of its actions on the .page() class (https://playwright.dev/docs/api/class-page). It has unique methods that are used to click on elements, enter text, navigate, and so on. The most common methods that are used to perform actions on elements within web applications are .page.fill("some text "), .page.press("button "), .page.dblclick("selector,options "), and assertThat(page.locator(".'selector')).hasText("some text "), which is used to find text in a given element on the website.
In addition to the page APIs that are quite efficient in performing actions on the elements, Playwright also supports and recommends the implementation of a Page Object Model (POM) as part of its best practices (https://playwright.dev/docs/pom). A POM is a great way to maintain elements across test code and simplify test code creation.
As with Cypress, Playwright also offers a built-in inspector tool (https://playwright.dev/docs/inspector) that can help with element identification, as well as test code debugging:
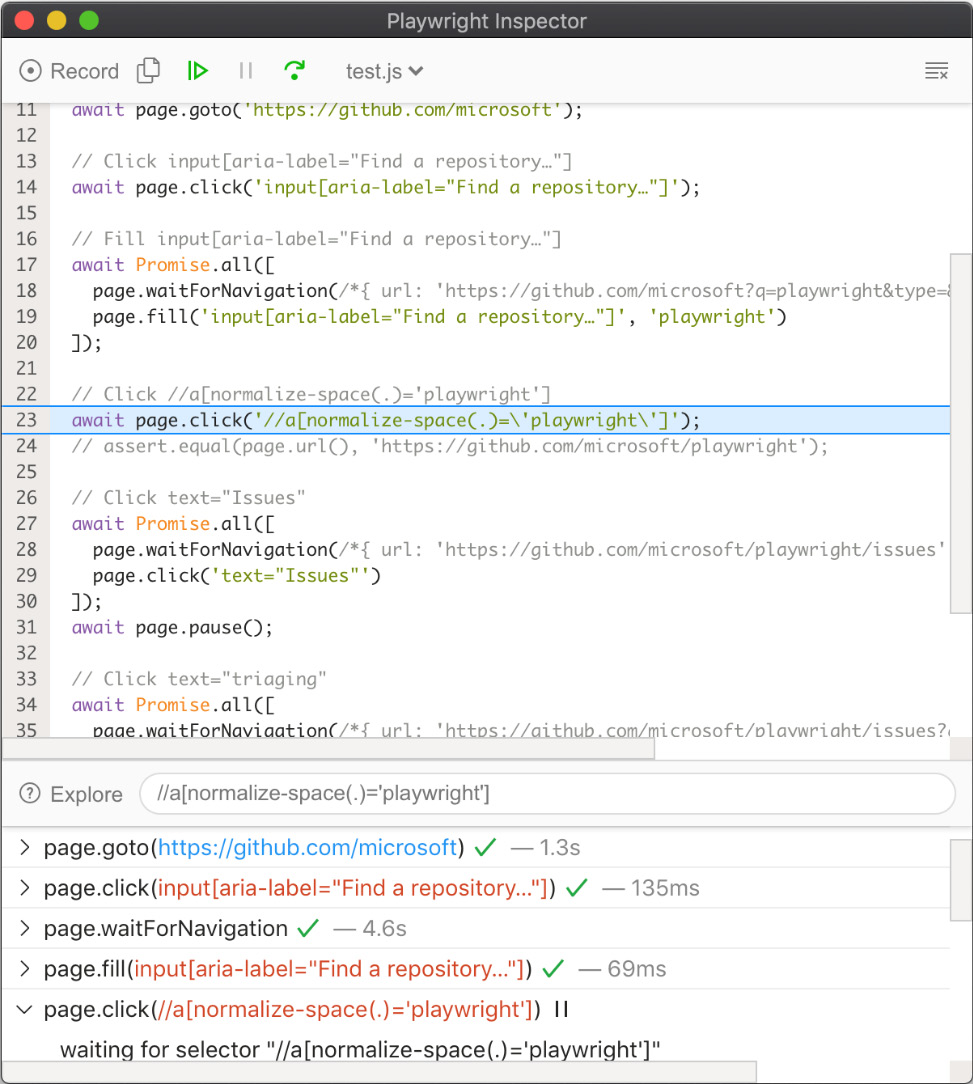
Figure 7.5 – The Playwright Inspector tool (source – https://playwright.dev/docs/inspector)
Puppeteer working with elements
Google's Puppeteer frameworks inevitably allow frontend developers and testers to use Chrome DevTools and a built-in browser inspector to identify elements on web applications.
Great documentation can be found at https://devdocs.io/puppeteer/ on how to work with Puppeteer across the different layers of a web application, including the page, the frames within the page, and the application context. Since Puppeteer drives the test through the DevTools protocol from the browser through the page, that's how you would design the test as well. The following code snippet shows how you would first launch Puppeteer and then create a new Incognito browser context before opening a new page on the Packt website:
(async () => {
const browser = await puppeteer.launch();
// Create a new incognito browser context.
const context =
await browser.createIncognitoBrowserContext();
// Create a new page in a pristine context.
const page = await context.newPage();
// Do stuff
await page.goto('https://www.packtpub.com');
})();
Puppeteer also uses the CSS selector syntax and specifically provides the querySelectorAll(selectors) APIs to search through the list of elements on the page (https://devdocs.io/dom/element/queryselectorall), as you can see in the following screenshot:

Figure 7.6 – Google's DevTools console used to perform an element query
Selenium working with elements
Earlier in the book in Chapter 3, Top Web Test Automation Frameworks, we covered the eight supported element locators by Selenium. The Selenium framework offers, like Playwright, the use of a POM, and through the Selenium IDE, it allows the recording of test scripts that can automatically identify the elements of a web application. Being the oldest framework on the market, Selenium already has very structured methods of working with elements through findElement(By. [supported locators]). As with the other testing frameworks, users can also leverage the browser DevTools inspector to identify elements and use them within their test code:

Figure 7.7 – Selenium-supported web element locators
It is the test engineer's responsibility to properly use the most robust and reliable element locator to ensure test stability over time. With the most recent release of Selenium 4, the community introduced the use of relative locators to better identify complex elements, based on their relationship with other elements on a page. Users can choose from the following relative locator-supported methods – preceding(), below(), toLeftof(), toRightof(), and near(). I strongly recommend reading Angie Jones's blog on relative locators in Selenium 4 (https://angiejones.tech/selenium-4-relative-locators/) to better understand the syntax and value of this feature.
CI/CD integration
Lastly, to meet the strict timelines within a software iteration, developers and testers run their test automation scenarios within Continuous Integration (CI). All the test automation frameworks support running tests in CI as well as in CI through cloud vendors such as Perfecto, SauceLabs, and BrowserStack.
As already identified in Chapter 4, Matching Personas and Use Cases to Testing Frameworks, these test frameworks somewhat differ from the CI servers that they best work with. It is up to developers to choose whether they prefer one framework over another, based on the following supported tools:

With the preceding CI tools overview, we conclude the full coverage of the different test automation framework capabilities.
In this section, we provided an overview of the most important capabilities across the leading test automation frameworks, including working with elements, performing visual testing, accessibility testing, network control, API testing, integrating into a CI/CD tool stack, performance testing, mobile testing, and more.
In the following section, we will provide the key compelling events that may cause a change to the existing test automation framework that is in use by your teams.
A re-evaluation of test automation frameworks due to compelling events
Comparing all the preceding capabilities is a great way to perform due diligence across the leading test automation frameworks on the market; however, such a comparison is a timely activity that must be done multiple times.
The market and the web application project life cycle often trigger a need to change the framework that's being used by frontend developers and SDETs. The following are a few examples of such compelling events:
- A new web application developed from scratch: Within a web project life cycle, the product management team or the business as a whole may decide that it's time for a full refresh of a website. With such a refresh, developers might pick a new development framework, as well as decide that the web application will be of the PWA type. A new project has a new UI, new requirements, new business flows, and so on. That's a valid trigger to re-assess the test automation framework that a team has been using and decide on a different one, based on the project requirements.
- Instability and flakiness within the testing pipeline: Even though a team has been using a solid test automation framework for an existing web application project, there are cases where the test automation percentage as well as the pass rate are too low, due to a mismatch of the framework to the testing scenarios, a skillset within the team, or simply the limitations of the framework. This is also a great moment to reassess and make changes to the tool stack. In many cases, bringing a secondary framework to complement the existing one can prove a great strategy to fix these instabilities and increase the test scenario coverage.
- Organizational-related changes: In this category, the change can involve offshoring the testing activities to a remote team that uses a different test framework and has different skillset levels, or within the development team there is a re-organization, and new leadership is brought in that has better experience with different tools. In such cases, a reassessment of the test frameworks might happen to better fit the technology with the current test developers' skills and needs.
- Market tool stack evolution: Lastly, as software development projects evolve, so do test automation frameworks. In this chapter, we gave some examples of the modifications made to the Selenium 4 framework, and such changes are constantly being made to other leading frameworks. Closing gaps in test frameworks by adding new features and the evolution of frameworks are great examples, providing an "excuse" to re-evaluate an existing test framework selection and either bring in a second one or replace the existing one with another.
Summary
In this chapter, we explored the different but important capabilities of a test automation framework and dived deeper into how each of the four leading test automation frameworks supports and works to address these capabilities. There is no clear-cut choice of framework, since a web application project is very complex and has different requirements and testing criteria.
This chapter gave some guidance in terms of each capability about whether a test framework can accomplish more, or if it's easier to use one compared to another. We have seen examples of capabilities that are built into the test frameworks as opposed to those that require an external plugin to be installed (such as XPath support).
As a frontend developer and/or SDET, you can use this chapter to create your own tailored consideration matrix that will fit your project. If your project requires more in-depth visual testing, performance testing, and network control, you can clearly see which of the four frameworks supports these requirements and to what extent, making your decision easier.
We also listed a few of the top compelling events that might cause a team to re-evaluate and change an existing framework for another.
This concludes this chapter! In the following chapter, we will focus on measuring test coverage across the four test automation frameworks and offer guidance on tools and practices to succeed in this objective.