
Chapter 13: Complementing Code-Based Testing with Low-Code Test Automation
While the open source community offers a wide range of coding test frameworks as highlighted in this book, there are also new and emerging intelligent testing solutions that can base their record-and-playback abilities with self-healing machine learning (ML)-driven features to provide an additional layer of test automation coverage. In this chapter, we will learn about the available options in the market, the relevant places and use cases to use such tools within a development pipeline, and caveats or pitfalls to be aware of.
Through our study of the four leading testing frameworks that we've covered in this book, Selenium, Playwright, Cypress, and Puppeteer, we've seen that each of these frameworks have some level of low-code/no-code capabilities. Within this chapter, we will highlight these specific capabilities but mostly provide an overview of the additional intelligent codeless test automation tools for web applications. We will look into Perfecto codeless web (https://www.perfecto.io/products/scriptless), Testim (https://www.testim.io/), Mabl (https://www.mabl.com/), and a few other tools that are new and emerging.
The chapter is designed to cover the following:
- Learning about the fundamental features of low-code testing tools for web applications
- Providing a technical overview of the leading codeless tools within the open source frameworks
- Providing an overview of commercial artificial intelligence (AI)-based codeless tools for web application testing
- Understanding when to use low-code over code-based solutions and what some of the trade-offs are
The goal of the chapter is to help frontend developers and testers consider additional tools that can support their overall test coverage objectives, as well as realizing in which cases such tools are more useful than the core open source tools.
Fundamental features of low-code/codeless testing tools
Over the past few years, we've seen tremendous growth and investment in codeless and low-code software testing tools. Some of these advancements occurred within the open source landscape community (for example, Selenium integrated development environment (IDE), Playwright CodeGen Inspector, and so on), while other advancements were seen within the rise of commercial intelligence tools.
Prior to exploring the available options, let's first understand what it takes from a features perspective for a codeless or low-code testing tool to compete in the cross-browser testing landscape.
As we have explored throughout this book, properly testing a modern web application across all relevant browser configurations and mobile viewports requires massive coverage and thorough planning. Functional testing, non-functional testing—such as performance, security, and accessibility—through visual and user interface (UI) testing, application programming interface (API) testing, mocking capabilities, scaling, and testing in parallel and within continuous integration (CI) are all critical pillars of a web application testing plan. Most of the open source test automation frameworks that we've covered in this book support in one way or the other the aforementioned capabilities, either as built-in features or through third-party integrations. For a codeless testing tool to equally be considered a competitor, such a tool needs to have most of these capabilities built in as well, and with high reliability and maintainability. Web applications change often and changing source code is relatively easy. Code is being managed within version control systems (VCSs), hence keeping up with changes and maintaining the code base is manageable. With codeless solutions where there are typically no code artifacts, it is critical to have an easier method to scale and version the test scenarios in between changes.
Have a look at the following diagram:

Figure 13.1 – Decision tree visualization
These are the high-level pillars and features that we would expect from a low-code/codeless web testing solution:
- Test methodologies coverage
- Functional testing
- API testing and mocking capabilities
- Visual testing
- Accessibility testing
- Performance testing
- Testing at scale/parallelization
- Grid executions
- Cloud integrations
- CI server integrations (GitHub Actions, Jenkins, and so on)
- Test development capabilities
- Advanced scenario support (inline frames (iFrames), multi-tabs, dynamic locators, varying authentication options, and so on)
- Working with elements across test scripts
- Support for Agile testing methods (for example, behavior-driven development, or BDD)
- Test scenario editing and maintenance
- Complementing code-based suites with codeless
- Test reporting and analysis
- Test result artifacts
- Trends and analysis
- Integration of test reports to code-based reporting dashboards
- Ease of use and ramp-up
- Time to get started with easy and more advanced test scenario development
- Solid documentation with recommended practices
- Ongoing and online support
- Cost of ownership
As highlighted in the preceding list, there are quite a lot of considerations that practitioners and managers need to deal with when selecting technology for testing their web applications. With code-based open source frameworks, it is a bit simpler to choose, since these frameworks are all JavaScript-based, backed by large communities, proven for several years, and clearly valuable from a test automation creation and execution perspective. When looking into the low-code/codeless marketplace, these tools are newer and less flexible to modify to the needs of an organization; they come with a cost, and they are often limited from a test coverage perspective.
Note
With the preceding information in mind, this raises the following question: So, why do we need codeless intelligent testing tools anyway?
In the next section, we will uncover the leading codeless testing tools for web applications and highlight their core features and added value on top of the open source frameworks. It is important to realize that these codeless tools are still new and emerging, and this needs to be considered as teams adopt such tools.
Codeless tool overview within the open source landscape
In this section, we will cover the leading codeless testing tools that are available and supported for free within the open source testing frameworks.
Open source codeless tool lineup
Selenium, Playwright, Cypress, and even Puppeteer provide a level of codeless testing abilities through recording and playing back the test scenarios.
Let's provide a brief overview of codeless open source tools, starting with Selenium.
Selenium IDE codeless tool overview
Selenium offers a browser plugin, Selenium IDE (https://github.com/SeleniumHQ/selenium-ide/releases), which is a basic record-and-playback solution to help new users of the Selenium project get started with the technology. The evolution of this IDE has led to it being a multi-browser extension (Chrome and Firefox) with a built-in element locator tool and a nice recorder with export-to-code abilities. It is not even close to the capabilities of a codeless AI-based testing tool but provides an entry-level option to Selenium.
Getting Selenium IDE for the Chrome browser can be done from here:
https://chrome.google.com/webstore/detail/selenium-ide/mooikfkahbdckldjjndioackbalphokd
Once you install the browser extension for Selenium IDE, you can immediately start recording a test scenario against your web application, as illustrated in the following screenshot:
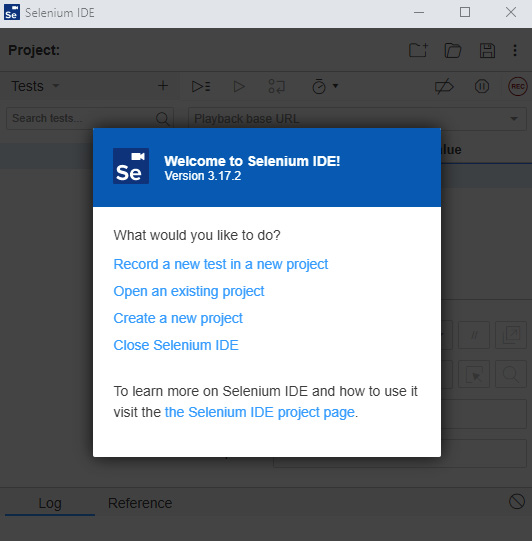
Figure 13.2 – Selenium IDE browser extension main UI
If you simply record a navigation scenario to the Packt Publishing home page, search for JavaScript books, and open a secondary tab, the generated test script will resemble the one shown in Figure 13.3.
As you can see, the IDE is built out of commands that are being performed on the web application, the target, which consists of the element locators, and the value that is being sent when relevant. All Selenium IDE projects are exported and saved under the *.side file format, which is basically the Selenium command-line runner (https://www.selenium.dev/selenium-ide/docs/en/introduction/command-line-runner). A saved Selenium IDE project that has been created can be executed through the command line with the saved *.side file as the target.
You will need to install the node library to run such saved projects by running this command:
npm install -g selenium-side-runner
npx selenium-side-runner [path to *.side test file]
Figure 13.3 shows a simple recorded scenario with the Selenium IDE browser plugin. It performs a navigation to the Packt homepage and records a few actions on the website.

Figure 13.3 – Selenium IDE-generated test scenario example
Under the Target menu item, users can change and use different locators such as ID, Name, CSS, XPATH, and any other exposed property of the object.
After generating the sample codeless Selenium script within the IDE, you can easily export it to any of the Selenium language bindings that are supported, as shown in the following screenshot, by hovering over the test name and clicking on the three vertical dots:

Figure 13.4 – Selenium IDE codeless test scenario export feature to language bindings
The generated code in JavaScript will look like this and will have the upper header line stating that this code was generated through Selenium IDE:
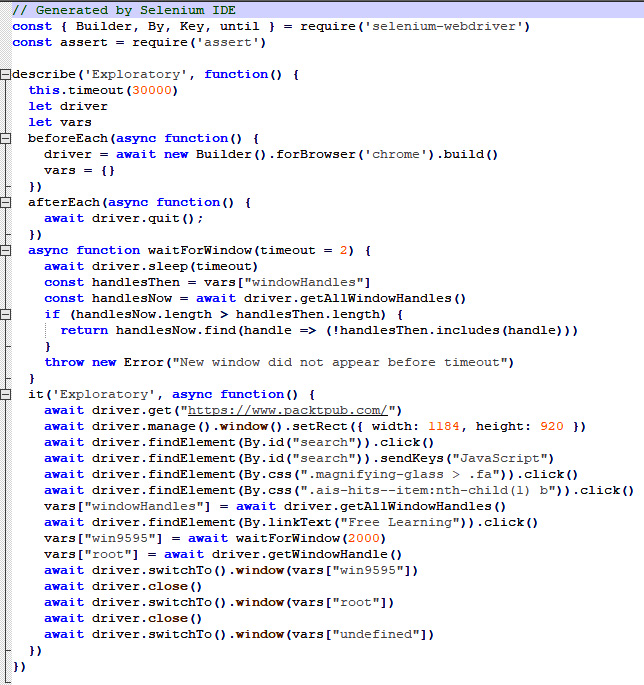
Figure 13.5 – Selenium IDE-generated code in a JavaScript language binding
As mentioned previously, Selenium IDE is a very basic tool to generate Selenium scripts, but it does provide a quick ramp-up to generate codeless tests that can be then exported into different languages.
Playwright CodeGen Inspector overview
As highlighted in Chapter 11, Working with the Playwright Framework, this framework also offers a nice entry-level codeless solution (https://playwright.dev/docs/codegen) that can record web applications through a GUI-based tool and export the generated script into code.
You can start the tool by running the following command from your command line or the Visual Studio Code (VS Code) IDE terminal window:
npx playwright codegen [website under test URL], e.g., packtpub.com
Upon running this command from your local Playwright installation folder path, you will get a browser window with the web page, and you can perform actions on the page while they are being recorded and converted in real time to JavaScript. You can see in the following screenshot that the recording already generates test code without any need to manually export the code, as you would need to do in Selenium IDE. This obviously enables better maintenance of the code, editing, and much more flexibility:
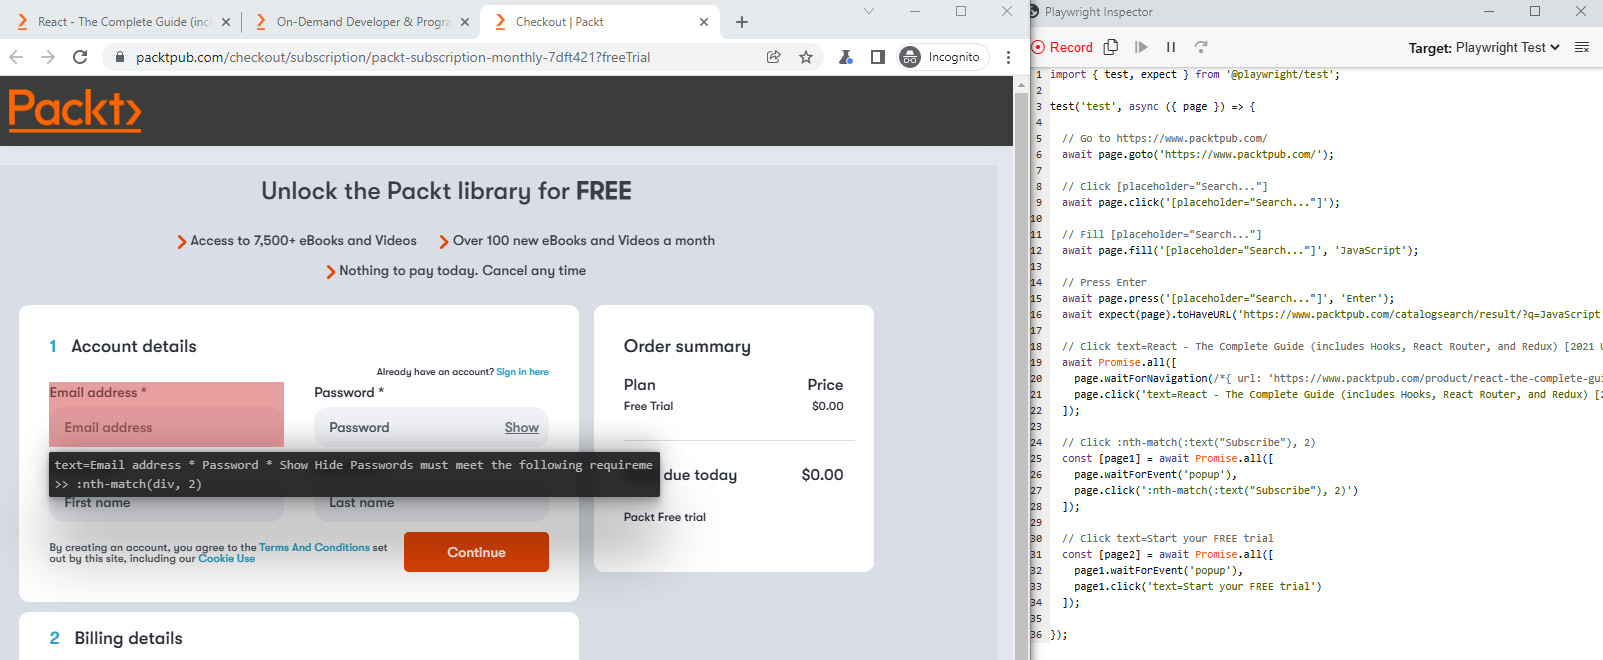
Figure 13.6 – Playwright CodeGen Inspector-generated test code example
The default test is generated in JavaScript Playwright test syntax; however, you can easily convert the code through the upper-right menu into the other language bindings supported by Playwright, as seen in the following screenshot, including JavaScript, Java, Python, and C#:

Figure 13.7 – Playwright-generated code: supported exporting language bindings
Compared to Selenium IDE, the Playwright CodeGen tool seems more modern and more frontend developer-friendly, as well as more capable. It can easily cope with complex websites, multiple tabs, and other challenging elements. It doesn't use self-healing or advanced AI capabilities, but it is a solid, codeless, free-to-use tool that comes with the Playwright open source installation.
Cypress Studio codeless tool overview
As we highlighted in Chapter 10, Working with the Cypress Framework, users of the Cypress framework can also benefit from the emerging Cypress Studio codeless tool (https://docs.cypress.io/guides/core-concepts/cypress-studio).
To get started with the Cypress Studio tool, you will need to enable its usage through the cypress.json file by adding the following lines of code:
{
"experimentalStudio": true
}
Once you enable this feature, when you run the Cypress framework in GUI mode, you will get the option to click on the Edit button near your existing test code in JavaScript on the left panel, and it will enable the Cypress Studio test-recording capabilities. Alternatively, you can start a new test using Cypress Studio by placing a test specification JavaScript file under your local Cypress integration folder, as specified in the following instructions: https://docs.cypress.io/guides/core-concepts/cypress-studio#Using-Cypress-Studio.
In the following screenshot, I took the getting started basic JavaScript test code and used Cypress Studio to add a step to the test. As you can see, as of the time of writing this book, there are several commands that are supported by the tool, such as .check(), .click(), .select(), .type(), and .uncheck():

Figure 13.8 – Cypress Studio (beta) in action on an existing JavaScript test specification file
Simply interfering with the existing test code and recording a few more actions generated the following code block in the existing JavaScript file:
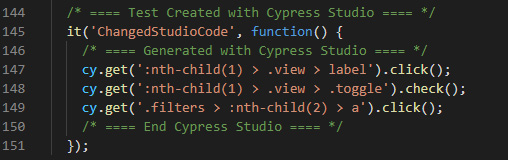
Figure 13.9 – Cypress Studio-generated JavaScript code block example
Such a tool can easily extend in a short amount of time the test coverage and the time it takes to write code in JavaScript. As this tool is still evolving as this book is being written, it will be interesting to see how it matures and which advanced features will be added to this tool. As with the Selenium and Playwright frameworks covered previously, this tool is free and comes within the Cypress open source framework, which is quite nice.
Now that we've covered the main open source codeless tools within the leading test frameworks, let's explore some of the leading commercial web testing tools that are available in the market at this time.
Leading commercial codeless testing tools for web applications
In the commercial landscape, there are a few leading tools that should be known to frontend web application developers, software development engineers in test (SDETs), and manual testers. While we will only focus on three tools in this section, there are a few others that are not in the scope of this chapter, including Katalon Studio and Tricentis Tosca.
This section will feature the following three commercial tools:
- Perfecto scriptless web (based on the acquired TestCraft solution)
- Testim codeless testing solution for the web
- Mabl codeless testing solution for the web
These three tools are quite different in their features and capabilities, as well as the vision that the companies behind these tools have.
Perfecto scriptless web overview
The Perfecto scriptless solution is an integration of a codeless web testing AI-driven solution that was acquired by Perfecto's owning company Perforce (https://www.perforce.com/press-releases/perforce-expands-portfolio-testcraft). After TestCraft was acquired, it was fully integrated into the Perfecto cloud-based continuous testing platform for web and mobile (https://www.perfecto.io/products/scriptless). With this tool, users can easily record any type of web application and generate keyword-driven test scenarios without writing a single line of code. At the backbone of the implementation, Perfecto scriptless utilizes the Selenium framework to perform actions on the web application under test; however, it also provides a wide range of testing capabilities, as listed here:
- Test creation and recording
- Test management and cloning
- Self-healing and element locator weighting
- Running tests within CI, schedulers, and in parallel
- A unique feature called Selenium-Based Extended Module (SBEM) for importing code into the codeless solution
- Fully integrated into the Perfecto platform with access to the code/codeless reporting and manual testing of web applications
You can see an example of a Perfecto scriptless test scenario in the following screenshot:

Figure 13.10 – Perfecto scriptless test scenario example
In the preceding screenshot, you can see the high-level and keyword-driven syntax of a test scenario that is available to view and edit after it has been recorded on the canvas. Developers can change sequence, add steps, modify the element locators used in the script, and much more. In addition, if there is a need to extend the test beyond what's supported in the codeless tool, developers can import JavaScript code into the tool via the SBEM, as seen in the following screenshot. Such an ability can add a command to the GUI recorder and expand the test flow:

Figure 13.11 – Perfecto scriptless SBEM extension capability example
Perfecto scriptless also encapsulates a self-healing mechanism that, through learning and continuous analysis of the web application DOM, can weight each of the elements on the page and use the highest-rated and most probable element during the test execution, as illustrated in the following screenshot:

Figure 13.12 – Perfecto scriptless advanced element locators weighting algorithm
In the preceding screenshot, the type attribute has the highest weight distribution, with 19.3%. Unless a user manually overrides the use of this element, this is the element that the tool will use in the script by default. From one test run to the next, the algorithm keeps learning and adjusting these weights to always use the ones that have the highest chances of being found and interacted with.
Test execution at scale, in parallel, and within CI is key for Agile testing and velocity. With Perfecto scriptless, users can use a built-in scheduler, connect to CI, and run the tests in the Perfecto cloud, as illustrated in the following screenshot:

Figure 13.13 – Perfecto scriptless CI/CD integration option and configuration window
Clearly, Perfecto scriptless provides rich and complete end-to-end (E2E) test framework abilities from the creation standpoint, through execution, maintenance, and integration to CI/CD.
Another capability of the Perfecto scriptless solution is to create and execute API tests on the web application under test. As we will learn later in this chapter, Mabl can also cover API testing.
It will be interesting to follow this product and see how it evolves, expands to mobile app testing as well, and enriches its AI abilities beyond element self-healing.
Testim codeless web tool overview
Testim has a great codeless solution for web application testing. Unlike Perfecto scriptless, which is fully cloud-based and embedded into the wider Perfecto platform, Testim (https://www.testim.io/) is a browser extension that allows practitioners to point to a web application under test and record the action on the app. The test scenarios are converted into keyword sets of sequential commands. After registering with a company account or your personal GitHub account, you will be redirected to download the Testim browser extension (https://chrome.google.com/webstore/detail/testim-editor/pebeiooilphfmbohdbhbomomkkoghoia). Once the extension is installed, you can start by recording a new test scenario on any web application.
With the acquisition by Tricentis (https://www.tricentis.com/news/tricentis-acquires-ai-based-saas-test-automation-platform-testim/), it will be interesting to see how this tool evolves and integrates into the overall portfolio Tricentis has.
You can see an example of a Testim-generated test flow here:

Figure 13.14 – Testim-generated test flow on the Packt Publishing home page
Each step in the exploratory test flow that was recorded and shown in the preceding screenshot is attached to a dedicated screenshot and element locator properties with options and conditions, such as when to mark the step as failed, options to run the step only when an element is visible, and more.
You can see an example for a specific recorded step here:
Figure 13.15 – Testim-generated screenshot for a specific recorded step with a highlight of the element under test
At the end of a test recording, if you like, you can click from the menu on export to code, and the tool will convert the high-level test scenario into source code using a tool called the Dev Kit. A nice feature of the Testim product is the ability to branch from a recorded test suite, as well as copying and pasting an existing test.
The tool also offers a nice structure for managing single test cases, test suites—which are groups of single test cases—test plans, labels to use per test case (for example, Nightly), and shared steps that can be used by other test scenarios. You can see an example of this in the following screenshot:

Figure 13.16 – Testim GUI options for managing test cases and test suites
An additional set of capabilities within Testim is the ability to use data-driven tests through spreadsheets, JavaScript Object Notation (JSON) files, or other test data configuration options to maximize test coverage, including happy path testing, negative scenarios, and boundary cases. You can see an example of this here:

Figure 13.17 – Testim Test Data capabilities: built-in example
Also, Testim provides the ability to perform network mocking, as we've seen in code-based testing frameworks such as Cypress, Playwright, and Puppeteer. To use the mock features, users need to record an HTTP Archive (HAR) format file and upload it to the system. You can see an overview of this here:

Figure 13.18 – Testim project settings options and mocking network capability
At the end of executions, whether they are triggered from the Testim GUI or from CI, users have a dedicated reporting portal within the tool to view all their test results and filter the test data based on their results. From this view, users can also change and create new test configurations such as browser version, operating system (OS), screen resolution, and step timeouts.
A newly created offer from Testim is their TestOps dashboard (https://www.testim.io/testops/). This dashboard offers granular governance across all test cases within the Agile team, an additional layer of test management at scale, and allows developers and testers to better analyze trends and failures.
Two additional and notable features of the product are outlined here:
- Testim Dev Kit
- Testim recorder for Playwright and Puppeteer frameworks
The Testim Dev Kit (https://help.testim.io/docs/index) provides a set of JavaScript APIs that allow frontend developers to create and edit test code.
To get started with this solution, you need to install a dedicated node library through this command:
npm install -g @testim/testim-cli
This library connects through your Testim credentials to the Testim tool.
The installation and initiation of the library creates a skeleton of a JavaScript test case that you can then edit and expand (https://help.testim.io/docs/getting-started). Once you finish coding, you can run it locally or within CI. Also, recorded tests from the Testim GUI can be exported to the Dev Kit framework and be used as a quick jumpstart to coding web test automation.
The Testim recorder for Playwright and Puppeteer is called Playground. After you have your Testim account created and the browser extension installed, simply go to https://www.testim.io/playground/, which consists of two tabs—Playwright and Puppeteer. You can record within the relevant tab an E2E scenario, and the code will be generated in the background and can be copied and pasted into your IDE of choice, such as VS Code, IntelliJ, and so on. From that point, you can continue editing the code from the IDE itself. This is a free offering from Testim.
The nice thing about Testim is that it provides a hybrid model of web application test automation that is both codeless-driven by AI to self-heal elements through the use of visual layers, automated waits, and support for smart locators (https://www.testim.io/test-stability/), as well as through code via its Dev Kit and Playground tools.
To learn more and even get Testim certifications, go to this resource and register:
https://www.testim.io/education/
Mabl codeless web testing tool overview
The third and last codeless tool that we will cover in this section is Mabl (https://www.mabl.com/). After registering for a free trial with Mabl, you will be asked to download the desktop application called Mabl trainer. This tool allows users to record and generate web application codeless test scenarios. There are two main views and interfaces for Mabl users: the trainer and the web platform. The trainer is where you record and generate tests, and the web view is where you run tests either locally or in the Google cloud. Tests can be executed either headed or headless.
The execution report also supports downloading autogenerated HAR files and testing logs. You can see an example of the Mabl application here:

Figure 13.19 – Mabl trainer desktop application main GUI
After filling in the initial details in the desktop application from Mabl, you can get started with recording your test flow. As you can see in the preceding screenshot, you can configure the web application URL and the screen resolution for desktop, and even mobile web is supported in the early stages.
When clicking on the Create test button on the app, a Chrome browser will launch and start recording all the user actions, as illustrated in the following screenshot:

Figure 13.20 – Mabl trainer side by side with the generated test script
After the recording is completed, the trainer application allows you to edit tests, as well as adding assertions. After saving the newly created test scenario, you can view it in the application GUI. Within the Mabl tool, users can also inspect their web application's single-user performance through the built-in speed index (https://help.mabl.com/docs/speed-index), as well as performing coverage analysis of their tests against the web application under test. As you can see in the following launch console, the Mabl execution engine uses Playwright to run the tests:

Figure 13.21 – Mabl test execution console in runtime
Here is the generated test scenario in a keyword-based syntax. The test can be added to a plan or executed within CI or a defined schedule:
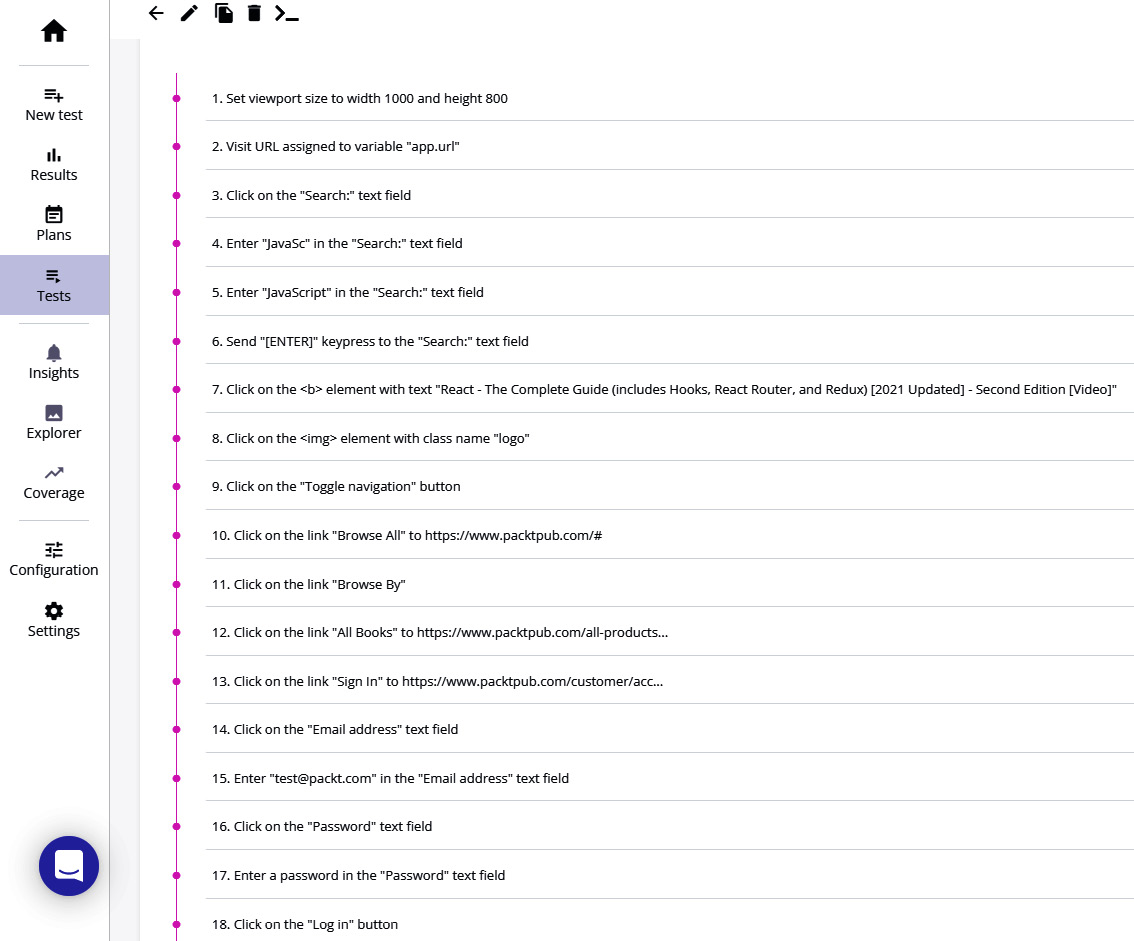
Figure 13.22 – Mabl-generated test flow example
Executing the tests from the Mabl application can be done, as mentioned previously, locally or through the Google cloud, as shown in the following screenshot. Users can add loops (https://help.mabl.com/docs/using-loops), conditions, mouse hovers, page refreshes, environment variables, and other abilities to their test scenarios:

Figure 13.23 – Mabl test execution GUI configuration window
In addition, and in parallel with functional E2E testing, Mabl also supports API test creation and execution. Users can define a set of API calls and use them within the test suite, as well as within the overall test coverage analysis that is provided by Mabl. This is illustrated in the following screenshot:

Figure 13.24 – Mabl API test creation window and supported capabilities
Mabl is indeed a rich product that supports functional, API, single-user performance, and visual testing (https://help.mabl.com/docs/visual-testing-and-monitoring). It has various integrations into many development-operations (DevOps) tool stacks including CI tools such as Jenkins, Azure Pipelines, GitLab, CircleCI, Slack, Jira, Microsoft Teams, and others.
Mabl, as with Testim and Perfecto scriptless, also uses its AI algorithm within the element locators and self-healing functionality (https://www.mabl.com/auto-healing-tests). However, as opposed to the other tools, with Mabl, users cannot export the recorded scripts into code, and that's a limitation.
With the upcoming support for mobile web testing, this solution can also be a solid complementary tool to the code-based testing frameworks that were covered in this book.
Now that we have covered the major commercial codeless tools in the market, let's provide a summary and conclude this chapter.
Summary
In this chapter, we focused 100% on codeless tools that are offered by the open source community, as well as commercial tools. We looked at the capabilities of such tools and what to look for in such tools from a feature set perspective and provided a quick getting started guide for each of the tools. We dived deeper into the three main commercial codeless and AI-based tools and explored their core capabilities. While these tools mark a transformation milestone in the marketplace, they are still new and emerging, and there are still major gaps in using them. As opposed to open source codeless tools, commercial tools are licensable and paid products, and the expectations are high. From my evaluation of all the commercial tools, it was clear that they provide great value and can complement code-based testing tools with exploratory and mid-level complex test creations. However, the level of stability in such tests as the scenario becomes more advanced and the ability to playback the tests are not always consistent. In addition, the scaling of test execution in most of the tools (excluding Perfecto scriptless) is not straightforward and requires additional cloud licenses and a separate paid package.
To place all three commercial tools in a comparison table, they look like this:


With the preceding summary table in mind, you can get an understanding of the weak spots and strengths, as well as commonalities between the three commercial tools.
The future of web application testing across desktop platforms and mobile is promising, and when combining open source code-based testing frameworks with codeless commercial tools, teams can really maximize the test coverage, stability, and maintainability of their test assets.
That concludes this chapter!
With this chapter, we conclude this book. The next chapter will provide a summary of the book and some predictions for the future, as well as expectations of this dynamic marketplace.