
![]()
XML is a very popular format—a very popular format—which makes it a bit surprising that it has often been more than a bit of a pain for developers to deal with.
The first version of the .NET base classes provided two ways of parsing XML. The simple way to deal with XML was to use the XML DOM, which allows the developer to easily find elements in a document, validate them against a schema, and do that sort of thing. It is fairly simple to use,1 but it is a fairly big stick; it takes a bit of time to load and parse XML and consumes quite a bit of memory.
The opposite end of the spectrum is represented by the XmlReader and XmlWriter classes. They are very fast at parsing XML, but they don’t provide a lot of help; the developer has to write complex code that ends up being difficult to understand and hard to change. But they are fast.
Creating XML had the same choices: the big DOM, the XmlWriter class, and the always-popular WriteLine() approach.2
Soon after, the XPathDocument class showed up, which provided a middle ground for parsing; it was faster than the DOM and much easier than the XmlReader class to use. But there was no improved way to create XML documents.
Linq to XML
Linq to XML is a bit of a misnomer. Under this umbrella are the following:
- A new syntax to create XML
- A nicer way to parse XML
- Smooth interfacing with other Linq abstractions
For a bit of context, here is some code that uses the DOM to create some XML:
static public string CreateXmlExample1DOM()
{
    XmlDocument xmlDocument = new XmlDocument();

    XmlNode xmlBooksNode = xmlDocument.CreateElement("books");
    xmlDocument.AppendChild(xmlBooksNode);

    XmlNode xmlBookNode = xmlDocument.CreateElement("book");
    xmlBooksNode.AppendChild(xmlBookNode);

    XmlNode xmlNameNode = xmlDocument.CreateElement("name");
    xmlNameNode.InnerText = "Fox in socks";
    xmlBookNode.AppendChild(xmlNameNode);

    XmlNode xmlPriceNode = xmlDocument.CreateElement("price");
    xmlPriceNode.InnerText = "35.99";
    xmlBookNode.AppendChild(xmlPriceNode);

    return xmlDocument.OuterXml;
}
Take a look at that code, and write down the XML that it generates.
My guess is that it took you a bit of time to do that, and a similar effort is required whenever that code is read. One of the major goals of Linq to XML is to make XML creation easier to write and understand. Here is the XML that it generated:3
<books>
  <book>
    <name> Fox in socks</name>
    <price> 35.99</price>
  </book>
</books>
You will generate the same XML using the XElement class. You’ll start with one of the inner elements.
XElement element = new XElement("name", "Fox in socks");
This allows both creating the element and setting the value to be performed in one statement, and it doesn’t require a separate document reference to create the new element. This makes it easy to create methods that return XElements.
Now, you can add the other elements.
XElement element =
    new XElement("books",
       new XElement("book",
            new XElement("name", "Fox in socks"),
            new XElement("price", "35.99")
       )
    );
return element.ToString();
Nicely, the constructor for XElement allows you to pass a list of child elements, so for the book element, it’s easy to pass the name and price children. This code is much shorter than the XDocument version; the arrangement and formatting of the code has the same structure as the XML that it is generating.
More typically, you need to be able to generate the list of books from some sort of data structure. This is easily done with a bit of Linq code to generate a sequence of book elements.
class Book
{
    public string Name { get; set; }
    public Decimal Price { get; set; }
}
var books = new List <Book> (){
    new Book(){ Name = "Fox in socks", Price = 35.99M },
    new Book(){ Name = "Rocks in box", Price = 12.99M },
    new Book(){ Name = "Lox in crocks", Price = 9.99M } };

XElement element =
    new XElement("books",
            books.Select(x => new XElement("book",
                                  new XElement("name", x.Name),
                                  new XElement("price", x.Price)
                        )
                )
    );
This generates the following XML:
<books>
<book>
    <name> Fox in socks</name>
    <price> 35.99</price>
</book>
 <book>
    <name> Rocks in box</name>
    <price> 12.99</price>
</book>
<book>
    <name> Lox in crocks</name>
    <price> 9.99</price>
</book>
</books>
You could save some space by creating attributes instead of elements.
XElement element =
    new XElement("books",
            books.Select(x = > new XElement("book",
                                  new XAttribute("name", x.Name),
                                  new XAttribute("price", x.Price)
                              )
                        )
                );
This code will yield the following XML:
<books>
<book name = "Fox in socks" price = "35.99" />
<book name = "Rocks in box" price = "12.99" />
<book name = "Lox in crocks" price = "9.99" />
</books>
Revisiting an earlier bit of code, look at the following:
XElement element = new XElement("name", "Fox in socks");
If you look at the constructors for XElement, you will find that there isn’t one that takes a string as the first parameter, but you do find a few that take an XName as the first element. A bit more exploration, and you find that XName declares the following conversion:
public static implicit operator XName(string localName);
This code is therefore the equivalent of this:
XElement element = new XElement((XName) "name", "Fox in socks");
The string "name" is automatically used to construct an XName, and in the process it sets the LocalName property of the XName class.
This construct gives you an element that has only a local name. If you need to create a name with a namespace, you can use the following:
XNamespace myNamespace = "http://www.example.com";
XElement element = new XElement(myNamespace + "books");
XNamespace defines both an implicit conversion and an addition operator:
public static implicit operator XNamespace(string namespaceName);
public static XName operator + (XNamespace namespaceName, string localName);
The conversion is used to create the namespace from a string, and the addition operator is used to create an XName from a namespace and a local name, resulting in the following XML:
<books xmlns = "http://www.example.com" />
A BRIEF DIGRESSION ABOUT DESIGN
Some of the design decisions made in this area are worth a bit of discussion.
The first is the choice to create XName instances directly from strings (through the overloaded conversion operator) instead of the conventional way of overloading the XElement constructors and methods to take either a string or an XName. It does make it easier to define the methods correctly and yields a bit of economy, but it’s harder to understand how everything works. It can be a bit confusing when IntelliSense shows you a method that takes an XName and you can’t figure out how to create one.4
The second decision was to be able to create XNamespace instances directly from strings. Namespaces are rarely created, and they aren’t done inline in the XML creation code, so there is little benefit of not doing this with a simple constructor.
The final decision is to create an XName from an XNamespace and a string, using the addition operator. This allows the developer to write the following:
var element = new XElement(myNamespace + "books");
which is a little shorter than the alternative but arguably not quite as clear.
var element = new XElement(myNamespace.GetName("books"));
In sum, I think the overall design is just a little bit too clever and would prefer that it was a bit more conventional even at a slight cost to readability. In writing this section, I discovered that it is legal to write the following, which is just wrong:
var element = new XElement((XNamespace)"http://www.example.com" + "books");
It is common to want to use namespace prefixes on nodes instead of full namespaces.
<bk:books xmlns:bk="http://examplelibrary.com" xmlns:pr="http://pricelibrary.com">
<bk:book>
<bk:name> Fox in Sox</bk:name>
<pr:price> 12.95</pr:price>
<bk:pages> 55</bk:pages>
</bk:book>
</bk:books>
You can do this by adding namespace attributes that define the prefixes at the appropriate point, and XElement will use the prefixes in the XML.
XNamespace booksNamespace = "http://examplelibrary.com";
XNamespace priceNamespace = "http://pricelibrary.com";
XElement element =
    new XElement(booksNamespace + "books",
       new XAttribute(XNamespace.Xmlns + "bk", booksNamespace.NamespaceName),
       new XAttribute(XNamespace.Xmlns + "pr", priceNamespace.NamespaceName),
       new XElement(booksNamespace + "book",
            new XElement(booksNamespace + "name", "Fox in Sox"),
            new XElement(priceNamespace + "price", "12.95"),
            new XElement(booksNamespace + "pages", "55")
       )
    );
You can easily add comments by adding an XComment instance. The following code adds a comment:
XElement element =
    new XElement("books",
       new XElement("book",
            new XComment("name is the short name"),
            new XElement("name", "Fox in socks"),
            new XElement("price", "35.99")
       )
    );
<books>
<book>
<!--name is the short name-->
<name> Fox in socks</name>
<price> 35.99</price>
</book>
</books>
The XText instance can be used to add text at other places in the XML tree. For example, the following creates a book node that contains both child elements and text:5
XElement element =
    new XElement("books",
       new XElement("book",
            new XText("book status"),
            new XElement("name", "Fox in socks"),
            new XElement("price", "35.99")
       )
    );
This generates the following:
<books>
<book> book status
<name> Fox in socks</name>
<price> 35.99</price>
</book>
</books>
The XElement class can be used for most operations, but in some cases the extra functionality of the XDocument class can be useful. It provides the following:
- A Declaration property, which allows setting the values that will be emitted for the <?xml ...> instruction at the top of the generated XML file6
- A place to put processing instructions that pass information to applications7
- A way to specify the document type
The following is an example of using XDocument:
XDocument document = new XDocument(
    new XProcessingInstruction(
       "xml-stylesheet",
       @"type = ""text/xsl"" href = ""style.xsl"""),
    new XElement("books"));
document.Declaration = new XDeclaration("1.0", "utf-8", "yes");
document.Save(@"%temp%	est.xml");
This will generate the following file:
<?xml version = "1.0" encoding = "utf-8" standalone = "yes"?>
<?xml-stylesheet type = "text/xsl" href = "style.xsl"?>
<books />
Parsing XML
The previous section wasn’t very “Linq-ish,” which isn’t surprising since the q in Linq stands for “query” and creating XML is not at all about querying. This parsing section will lean on Linq much more.
As with creating XML, XML can be loaded using the XDocument class or XElement class. If you want the extras of XDocument, use that class; otherwise, use XElement.
For both classes, there are two ways to load the XML.
- The XML can be loaded from a file, stream, XmlReader, or TextReader using the Load() method.
- A string of XML text can be parsed using the Parse() method.
The following is an example of the two different ways:
XElement element1 = XElement.Load(@"c:	est.xml");
XElement element2 = XElement.Parse(" < books> <book> <name> Fox in Sox</name> </book> </books> ");

Console.WriteLine(element1);
Console.WriteLine(element2);
The code to use XDocument would be identical, except access to the XML would be through the Root property of the XDocument.
It is important to understand the model and terminology that XElement uses for the XML tree. Consider the following XML:
<books>
<book>
<name> Fox in Sox</name>
<price> 12.95</price>
<editions>
<edition>
<number> 1</number>
<year> 1956</year>
<price> 1.49</price>
</edition>
<edition>
<number> 2</number>
<year> 1973</year>
<price> 5.59</price>
</edition>
</editions>
<pages> 55</pages>
</book>
<book>
<name> Fox in Crocs</name>
</book>
</books>
This XML is shown in tree form in Figure 29-1.
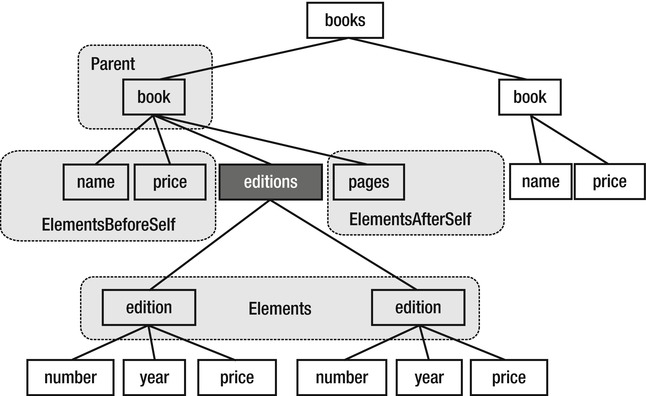
Figure 29-1 . Direct relations of the editions node
If you declare the following variable:
XElement editions;
and assign it to the editions element (marked in black) in the middle of the diagram, the related elements will be those in Table 29-1.
Table 29-1. Elements Related to the editions XElement via Direct Relationships
| Expression | Description |
|---|---|
| editions.Parent | The parent of the editions node (book) |
| editions.Elements() | The children of the editions node (edition, edition) |
| editions.ElementsBeforeSelf() | The siblings of the editions node that occur before the editions node (name, price) |
| editions.ElementsAfterSelf() | The siblings of the editions node that occur after the editions node (pages) |
The Parent and Elements() expressions reference only one level above and one level below the editions element. It is possible to go further, as illustrated in Figure 29-2.
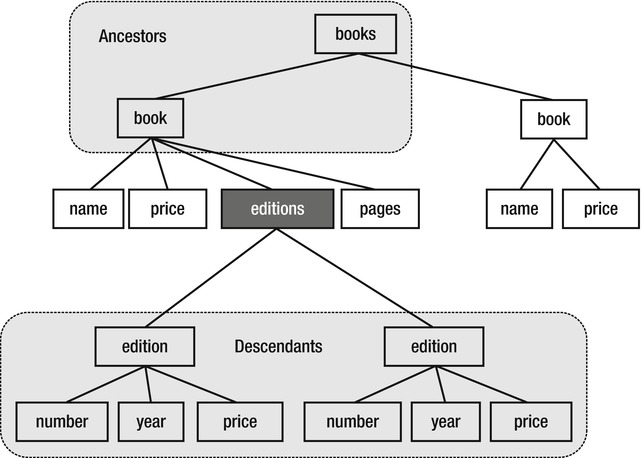
Figure 29-2 . Upper and lower relationships to the editions node
The upper and lower relationships are described in Table 29-2.
Table 29-2. Elements Related to the editions XElement via Upper and Lower Relationships
| Expression | Description |
|---|---|
| editions.Ancestors() | The ancestors of the editions node, in order from closest to farthest to the editions node (book, books) |
| editions.Descendants() | All descendants of the editions node, in document order (edition, number, year, price, edition, number, year, price) |
For all of these methods, there are overloads that accept an XName parameter that returns only elements that match that XName. There are also variants of Ancestors() and Descendants() named AncestorsAndSelf() and DescendantsAndSelf() that encompass the current element.
All of the previous expressions consider only the XElement instances in the tree. As you saw earlier in the chapter, there can be other nodes in the tree, such as XComment, XText, or XProcessingInstruction. To obtain the XElement instances and the other nodes, use the expressions described in Table 29-3.
Table 29-3. XElement and All Node Expressions
| XElement Only | XElement and Other Nodes |
|---|---|
| editions.Elements() | Editions.Nodes() |
| editions.ElementsBeforeSelf() | Editions.NodesAfterSelf() |
| editions.ElementsAfterSelf() | Editions.NodesBeforeSelf() |
| editions.Ancestors() | No node version8 |
| editions.AncestorsAndSelf() | No node version |
| editions.Descendants() | editions.DescendantNodes() |
| editions.DescendantsAndSelf() | editions.DescendantNodesAndSelf() |
The goal of the naming used in XElement was to make the distinction between XElement and other node types clear and to use a common naming pattern between those two operations.
Unfortunately, this resulted in one of the most used operations—accessing the children of a node—using the name Elements rather than the far more obvious name Children. The two names Elements and ElementsBeforeSelf/ElementsAfterSelf both use the term Element, despite the first referring to child elements and the second referring to sibling elements.
My preference would have been to use the natural names for the more often used element expressions (Children, SiblingsBeforeSelf, and SiblingsAfterSelf) and then accept less-natural names for the node expressions.
Using the books example from the previous section, you want to find the names of all the books. The first version of code you write is the following:
var books = booksElement.Elements("book");
foreach (var book in books)
{
    Console.WriteLine(book.Element("name").Value);
}
That generates the desired result, but it’s a bit clumsy; at the books level, you have to find all the book children, and then from the book level, you have to find all of the name children and then write them out. Perhaps Linq can help out.
var bookNames = booksElement.Elements("book")
                   .SelectMany(book => book.Elements("name"))
                   .Select(name => name.Value);
Hmm. That looks more complicated. What about the following?
var bookNames = booksElement
                   .Descendants("name")
                   .Select(name => name.Value);
This looks promising; rather than having to walk through the tree level by level, you can reach deep into the tree and extract the values in a single operation. And, in fact, this returns the two book names that you expect. Can you do something similar with price? How about this?
var bookPrices = booksElement
                     .Descendants("price")
                     .Select(name => name.Value);
This generates four price values, not the two you expect. Not only did it find the two price elements that are children of the book elements, it also found the two price elements that are children of the edition elements.
The problem with this approach is not cases such as this one, since it’s pretty obvious that you are not getting the values you expect. The problem is that future changes to the XML may use the same node names in a different context and can cause hard-to-find bugs.
![]() Tip Code that uses Descendants() to find nodes by name will break if the node name is reused elsewhere in the document. Use an alternate construct, such as the XPath approach in the next section.
Tip Code that uses Descendants() to find nodes by name will break if the node name is reused elsewhere in the document. Use an alternate construct, such as the XPath approach in the next section.
What is needed is a way to uniquely specify the path into the tree, which is commonly done using an XPath expression. At first glance, there is no support for XPath expressions in the XElement world, but it turns out that the support is defined using extension methods in System.Xml.XPath, and a simple using of that namespace will enable that support.9
In your first attempt at parsing, you wrote separate statements that walked down the tree to find the node you wanted. XPath allows you to specify the route through the tree through a single string statement.
var bookPrices = booksElement
                     .XPathSelectElements("book/price")
                     .Select(name => name.Value);
XElement also exposes an XPathEvaluate() method that can evaluate any general XPath expression, but since the expression can return several different types (bool, double, string, or IEnumerable <T>), the method return type is object, which makes it less than convenient to deal with. Consider the following XML that uses attributes to store values:
<book>
<price full = "15.99" wholesale = "7.99" />
</book>
Extracting the wholesale price requires the following:
var wholesale = ((IEnumerable <object>) book
       .XPathEvaluate("price/@wholesale"))
       .Cast <XAttribute> ()
       .Select(att => att.Value)
       .First();
That’s a lot of code, and given how common attributes are, it’s a bit surprising that there is no built-in helper to get them. You can add one, however.
public static class XPathHelper
{
    public static IEnumerable <string> XPathSelectAttributes(
       this XElement element,
       string xpathExpression)
    {
       return ((IEnumerable <object>) element.XPathEvaluate(xpathExpression))
            .Cast <XAttribute> ()
            .Select(att => att.Value);
    }
    public static string XPathSelectAttribute(
       this XElement element,
       string xpathExpression)
    {
       return XPathSelectAttributes(element, xpathExpression).First();
    }
}
With that defined, it is now very simple to pull out the value of an attribute.
string wholesale = book.XPathSelectAttribute("price/@wholesale");
It is fairly common to want to process XML documents that contain namespaces. Consider the following XML:
<books xmlns="http://examplelibrary.com">
<book>
<name> Fox in Sox</name>
<price xmlns="http://pricelibrary.com">12.95</price>
<pages> 55</pages>
</book>
<book>
<name > Fox in Crocs</name>
<price xmlns = "http://pricelibrary.com">9.95</price>
</book>
</books>
It is tempting to walk up to the books element and ask for all the book children.
XElement booksElement = GetExampleXmlWithNamespaces();
foreach (var book in booksElement.Elements("book"))
{
    Console.WriteLine("N: {0}", book);
}
That doesn’t work, because there are no elements named book in the default namespace. You will need to look in the proper namespaces.
XNamespace booksNamespace = "http://examplelibrary.com";
XNamespace priceNamespace = "http://pricelibrary.com";
foreach (var book in booksElement.Elements(booksNamespace + "book"))
{
    Console.WriteLine(book.Element(booksNamespace + "name").Value);
    Console.WriteLine(book.Element(priceNamespace + "price").Value);
}
In the previous example, you extracted the string value of the price node from the book node. It would be useful to be able to deal with that as a numeric value instead of a string. You could do it simply with the following code:
string temp = book.Element(priceNamespace + "price").Value;
Decimal price = Decimal.Parse(temp);
The temporary variable is a bit annoying, however. The XElement class defines explicit conversions to many different data types, so the previous code can be simplified to the following:
price = (Decimal) book.Element(priceNamespace + "price");
1 Assuming you are better at remembering how namespaces work than I am.
2 Purist may cringe, but there is a lot of code written this way.
3 All the XML examples in this chapter are formatted to be easy to read. The actual generated XML may differ in whitespace.
4 I have a rule for APIs I call “no surprises.” If you want to create an XName, you first look for an instance constructor (nope), and then you look for a static factory class (also nope). Then you have to go and read the remarks in MSDN to understand what is going on.
5 Try to avoid this unless you need to have it; it makes parsing much harder.
6 Because this is part of the stored XML and not strictly part of the XML document, it is generated only if you save the XDocument. It is not present in the return value of the ToString() method.
7 Processing instructions can also be added to XElements.
8 The tree is expressed only with XElement nodes, so the nodes higher in the tree must be of type XElement.
9 One of the reasons code is written using Descendants() instead of XPath is that the XPath support doesn’t show up without adding this using statement. Not that your author would ever do anything like that....