
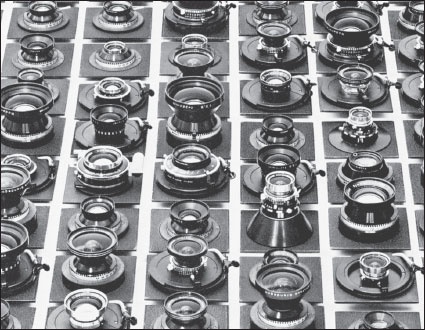
When you buy a film or digital SLR camera, it is packaged with a lens from the same manufacturer. You will probably, however, use your view camera with a lens made by a different company and a shutter from a third.
Selecting a lens, or a set of lenses, for your view camera requires more care and knowledge than for any smaller-format camera. Large-format lenses are among the most expensive objects in any photographer’s studio and the array of possible choices can be intimidating, but it is just this variety that makes the view camera an ideal professional tool.
If you are already a serious user of smaller cameras, it will seem strange to you that none of the manufacturers of large-format cameras also makes lenses. When you buy an SLR “system” camera, you naturally choose from lenses of the same brand. You are assured there will be no mismatch mechanically, optically, or electronically. There are no such guarantees with a large-format system.
It is possible, and in fact common, to use one lens for both a 4×5 and an 8×10 camera, or on a press camera one day and on a monorail the next. It is also possible for another lens to work properly for 4×5 and be almost useless for 8×10. Also, unfortunately, a lens that is suitable for one photographer working with 4×5 may not be satisfactory for another photographer using the same equipment.
Basically, you can mount any lens on your camera by having a hole of the correct diameter drilled in a relatively inexpensive lensboard and threading on a retaining ring. Having a lens mounted correctly, however, does not mean it is the correct lens. To determine the correct lens, you must know your own needs and have a general understanding of the characteristics of lenses.
Information about lenses can fill volumes, most of it incidental to their actual use. This chapter includes everything you will need to know about optics to make photographs with a view camera. When you have read and digested this information and are comfortable with the terminology, read Chapter 7. In it you will find a more in-depth treatment of the design and history of lenses. Many lenses made before you were born are perfectly useful today, and they are bargains as well. You will want to make an informed decision when buying a lens; since many of the lenses made since the turn of the century may be included in your possible choices, the more you know, the less you may have to spend.
The array of lenses you can use on a view camera is wider than for any other kind of camera, but you must know more about them than just how to mount one on the camera. ■
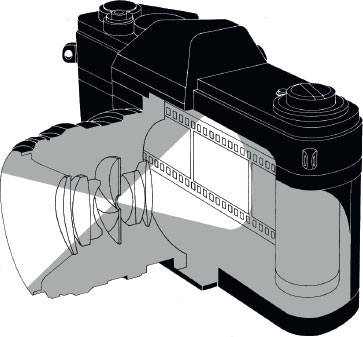
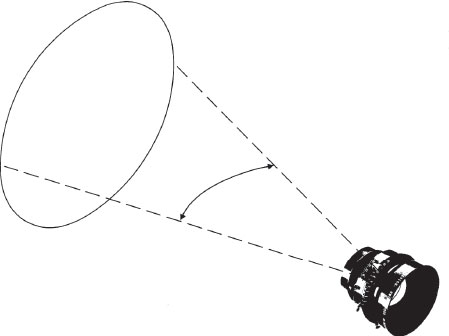
Before learning anything further about lenses, you will need to be familiar with the term coverage. All lenses project a cone of light. When this cone is intercepted by a flat surface, such as film, it forms a circle. To be useful, this circular image must be large enough to “cover” the film size you are using. A lens for a 35mm or full-frame digital camera must project a circle large enough to fit around the 24×36mm frame. The smallest circle that will cover 35mm film has a diameter the same as the frame diagonal, about 43mm. In order to photograph onto 35mm film, then, a lens must have a covering circle (or circle of coverage) with a diameter of at least 43mm and must be mounted so that its center, or optical axis, is lined up with the center of the film frame. This lens position is assured by the design of fixed-body cameras like the 35mm SLR. Your view camera, however, offers no such guarantee.
In Chapter 3 we found that one of the virtues of the view camera is that its movements allow the user to move the film away from the optical axis. With a lens like the one described above, having a covering circle just fitting around the frame, any camera movement would cause the image to miss part of the film’s edge. That is, the projected image would fail to “cover” the film. If you wish to take advantage of your view camera’s movements, you need a lens with a covering circle larger than the film. The more extreme the movements, the larger an image circle you need. The size of the circle of coverage is affected by aperture, lens design, image distance, and focal length, all discussed below.
Circle of Good Definition
The circle of coverage of a lens can be defined in two ways. The circle of illumination is the entire circular image with edges defined by a sharp cutoff of light caused mostly by vignetting (or shading by the opaque parts of the lens). The circle of good definition is the useful part of the projected field of a lens. It is concentric within the circle of illumination—smaller and less obviously defined. Although the circle of illumination can be considered a covering circle, most measurements equate the circle of good definition with the circle of coverage because only inside the circle of good definition does an image have sufficient resolution to be considered useful. Resolution is a measure of optical quality based on the ability of a lens to distinguish two small, close-together points from a single point (if you wear eyeglasses, chances are it is to increase the resolution of your eyes). For our purposes, we will use the term circle of coverage to mean the circle of good definition.
Because of its fixed position in relationship to the film, the lens of a 35mm camera need only just cover the rectangular frame. ■
The minimum covering circle for a lens for 35mm has a diameter of 43mm. ■
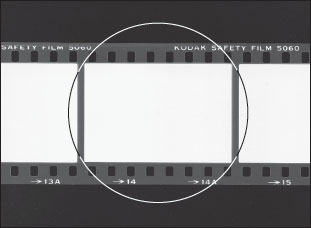
Your lens must project a circle with a diameter at least the size of the film’s diagonal to cover the film. For 4×5, that diagonal is 155mm. ■
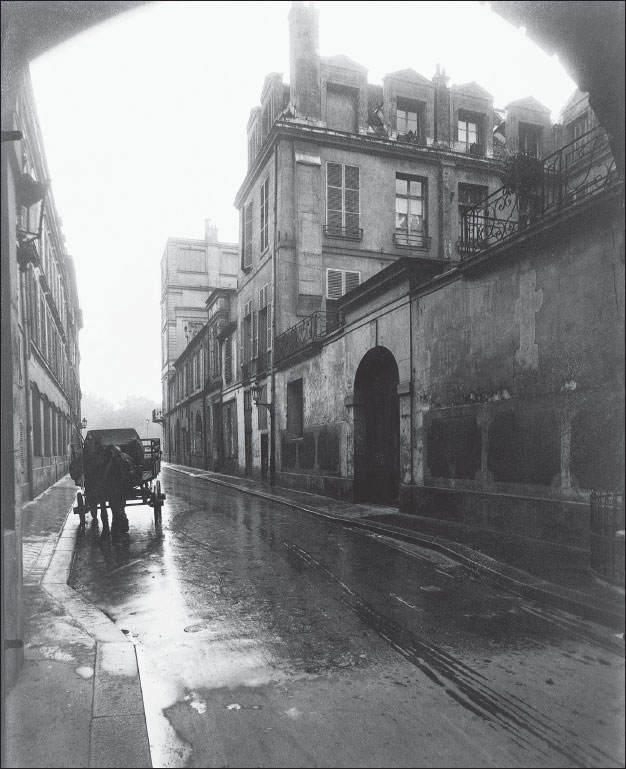
The lens used by Eugène Atget to make this Parisian street scene in 1924projected a circle a little too small to allow the slight lens rise he employed. Atget disguised part of the resulting vignette in an architectural detail. ■
Aperture and Coverage
Most lenses project their highest resolution in the center, with the image quality deteriorating as it moves toward the edges. Closing down the diaphragm (stopping down) generally increases resolution off-axis (away from the center) and enlarges the circle of good definition, both of which reach a maximum at a middle aperture, often f/22. Lens manufacturers measure and state in their literature the maximum coverage (or largest circle of good definition). Occasionally they will also list the minimum coverage, at full aperture.
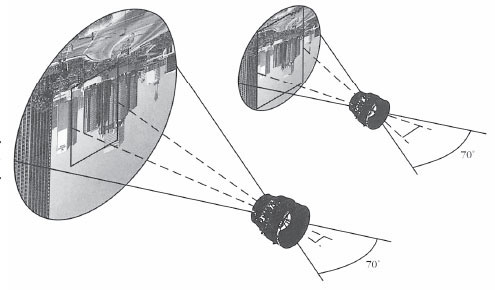
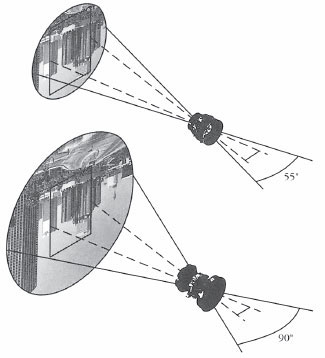
The working aperture is not the only factor affecting the size of the usable image circle (or covering circle). Some lenses are designed to have large covering circles while other lenses that may look similar are not. It is common to define the intrinsic coverage of a lens (a measure unaffected by the way the lens is used) by an angular measurement called a field angle. The field angle defines the shape of the cone of light projected from the rear of a lens that forms the covering circle at the film plane. Lens designers refer to the field angle as the full-field angle because they also use in their measurements the angle measured from the optical axis, called the half-field angle. You will probably see only the full-field angle quoted in any lens manufacturer’s literature.
Few lenses used for view cameras have a field angle less than 55°, and the most common have field angles of 70°. The widest field angles for off-the-shelf lenses are just over 100°. Using a normal focal-length lens with a 70° field angle will give you a covering circle adequate for all but the most extreme movements. Chapter 7 tells how field angle is related to lens design and what coverage to expect from most of the available lenses.
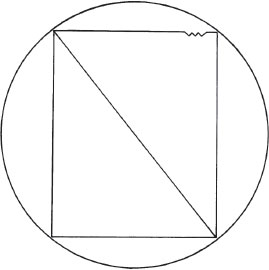
The circle of coverage that is useful for photographing is the inner circle, slightly smaller than the entire projected circle of illumination. The image in the outer fringes of the circle of illumination can never be brought into good focus. ■
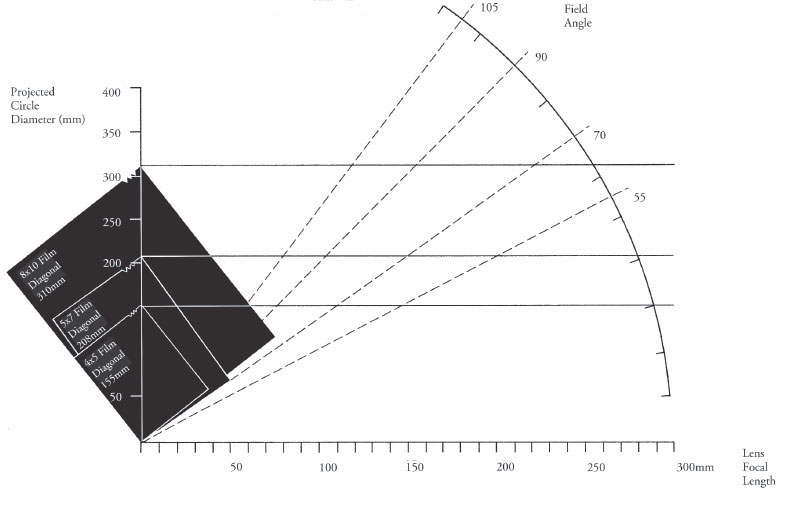
Below: Use this chart of coverage, field angle, and focal length to determine one of these values from the other two. ■
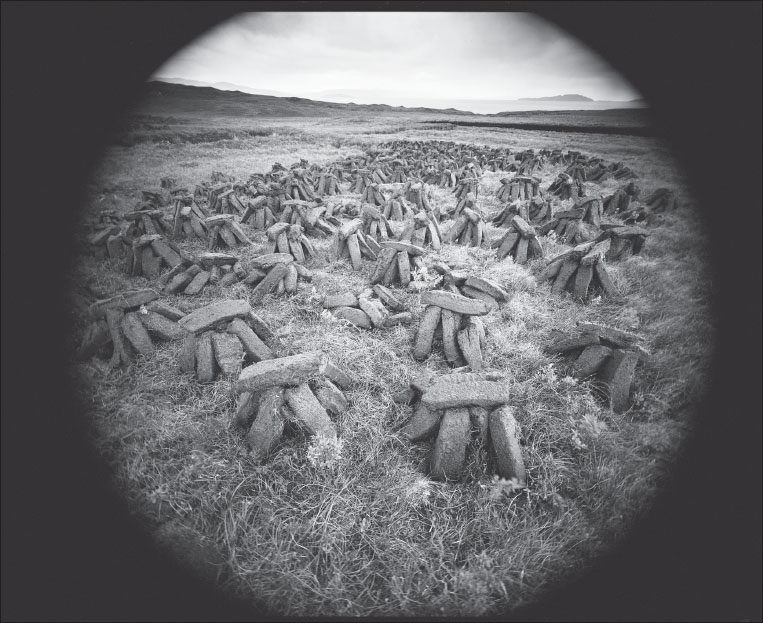
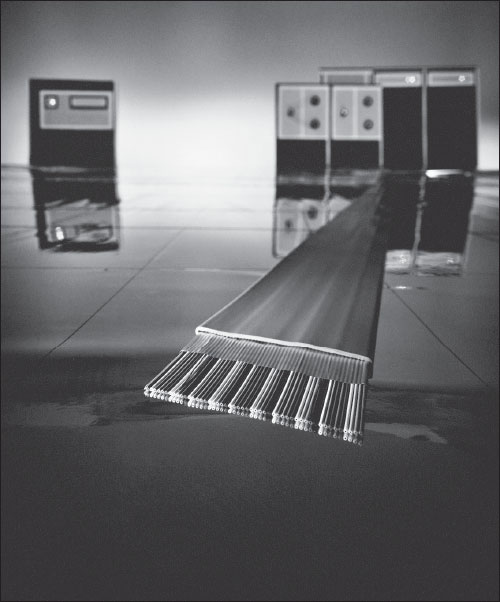
Peat, Isle of Skye, Scotland, 1972. Emmet Gowin mounted a lens for a smaller camera on his 8×10 to make a series of photographs using the entire projected image circle. He has written that the use “of such a lens contributed to a particular description of space and that the circle itself was already a powerful form. Accepting the entire circle… involved a recognition of the inherent nature of things.” ■
The cone of light made by the lens projecting its circle of coverage is measured by the field angle. ■
When a point in front of the camera is in focus, the distance from it to the lens is called the object distance; the distance from the lens to the film is the image distance. For any object distance, there is a corresponding image distance. Focusing the camera means you are selecting an object distance by changing the image distance—by moving the film closer to or farther from the lens. As the object distance increases the image distance decreases, and vice versa. The shortest possible image distance corresponds to an object at infinity; for any lens this minimum image distance is called its focal length. Strictly speaking, the image distance is measured from the rear nodal point of the lens to the film (the rear nodal point is the point in the lens from which all the light seems to emanate; see Chapter 7). We cannot locate exactly the rear nodal point without specialized optical equipment, but for our purposes we may use the rear of the lensboard as a close enough approximation of its position.
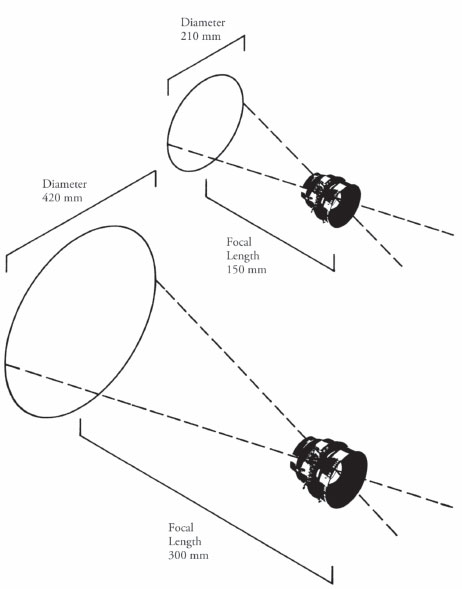
The focal length of your lens directly affects the size of the image circle. For lenses of the same design, regardless of focal length, the field angle is the same. Therefore, the shape of the projected cone of light is the same. The size of the covering circle, however, is not the same. The longer of two lenses having the same field angle and focused at the same distance will cover a larger area because the film plane slices the cone of light farther from the lens. For example, a 150mm Nikkor-W has exactly the same field angle as a 300mm Nikkor-W: 70° at f/22. Measured also at f/22, the diameter of the image circle for the 150mm lens is 210mm, while for the 300mm lens it is 420mm. In this example, twice the focal length, with the same field angle, gives a covering circle twice the diameter.
Along with object distance, focal length determines the size the image will be on the negative. A longer lens makes a larger image for the same reason it projects a larger covering circle. Slicing the projected cone of light with the film at a greater distance makes every part of the image larger (for example, imagine moving a slide projector farther from its screen). For any object distance, a longer lens has a proportionately longer image distance than a shorter lens.

When a point in front of the camera is in focus, the distance from it to the lens is the object distance and the distance from the lens to the film is the image distance. ■
Of two lenses with the same field angle, the one with a greater focal length will have greater coverage. Doubling the focal length produces a covering circle with twice the diameter. ■
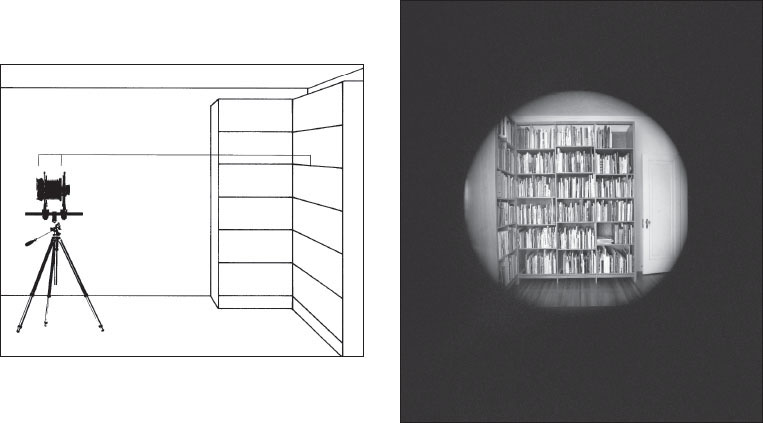
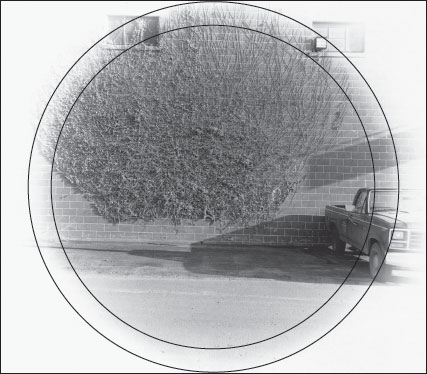
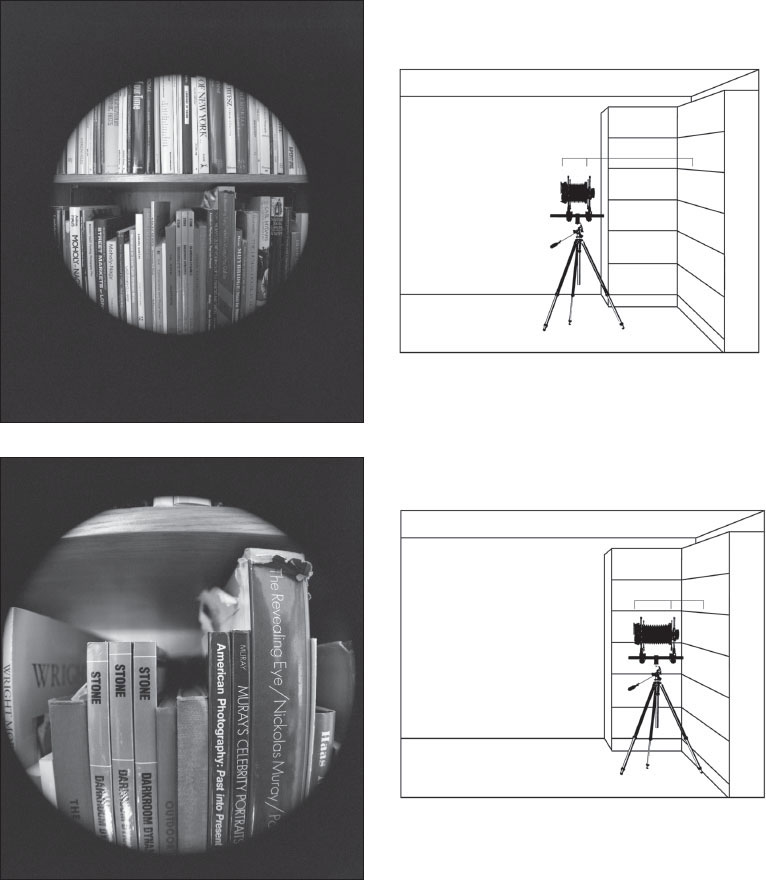
To make these three photographs, a lens from a 120 roll-film camera was mounted on an 8×10. The first photograph was taken from a distance of several meters and the size of the image circle is essentially that of infinity focus. The second photograph, from an object distance of less than a meter, shows slightly increased coverage from the increased image distance. The third, from an object distance about twice the 80mm focal length of the lens, required a much longer image distance. The greater the image distance, the farther the film is from the lens when it slices the projected cone of light and the larger the covering circle. ■
Image Distance and Coverage
Shortening the object distance also has the effect of enlarging the covering circle by increasing the image distance. For any lens, one focal length is its shortest usable image distance, corresponding to the greatest possible (infinity) object distance. As the object distance decreases from infinity, the image distance increases. In other words, as the object you are focusing on moves toward the camera, the distance between lens and film must increase for the object to remain in focus. An increase in image distance increases coverage in the same way that an increase in focal length does; a circle sliced from the projected cone of light gets larger as the distance of the slice from the lens increases. Focused at infinity, your lens has its least coverage.
Magnification ratio is the ratio of the size of the image to the size of the object. A magnification ratio of 1 occurs when image distance and object distance are equal—the image is the same size as the object. This is also sometimes called a 1:1 reproduction ratio. At 1:1, the image distance and object distance are equal and each is two times the focal length, using any lens. The covering circle then is twice its
normal diameter. This enlarged covering circle means that for reproduction ratios around 1:1, you can use a lens with half the field angle or half the focal length you would need to use for distance. For closer work—for magnification greater than one—you can use even shorter lenses. For example, a lens with insufficient coverage for landscape use on 4×5 could be a satisfactory close-up lens for 8×10.
Angle of view determines how much of your subject is included in a photograph. Like the field angle, the angle of view is also an angular measurement of a cone, but the cone in front of the lens. Angle of view is a result of both focal length and film size; if you use the same focal-length lens to photograph the same scene from the same place on two different-sized pieces of film, the smaller film will record a smaller piece of the image, and consequently a smaller piece of the world. The smaller film produces a smaller angle of view. If instead you use two different focal-length lenses to photograph from the same place on two pieces of film the same size, the longer lens will record a smaller piece of the world because the image projected on the film is larger. The longer lens produces a smaller angle of view.
The object distance was so short, less than 100mm, that photographer Steve Grohe could use a 65mm lens designedfor 4×5 to make this photograph on 8×10 (originally in color) and still have a covering circle larger than the film. ■
For any lens/film-size combination, the angle of view equals the smallest usable field angle for that focal-length lens—this field angle projects a circle with a diameter equal to the film diagonal. To just cover 4×5 film, for example, a 90mm lens needs a field angle of 81.5°, a 180mm lens needs a field angle of 46.6°. These angles tell you how much of the world each lens sees from any camera position. Notice that these two angles are not related by a factor of two, even though the focal lengths are. The diameter of the covering circle is proportional to the sine (a trigonometric ratio) of the field angle. The angle of view also gives you a clue to how much extra coverage (to accommodate movements) you have with the lens you are using, for example, a 90mm lens with a field angle of 100° or a 70° 180mm lens. The table on p. 77 shows the relationship between field angle or angle of view and covering circle or film size.
A 90mm lens on 4×5 film has the same angle of view as a 180mm lens on 8×10, the longer lens making an image twice as large on film having twice the dimensions. Having the same angle of view, these focal-length/film-size combinations make images that appear the same, and both lenses need the same field angle to cover their respective films.
Comparisons of angle of view are difficult to make between formats with different aspect ratios, or frame shapes. If you try to find the lens for a 35mm camera that has the equivalent angle of view of a 180mm lens on 4×5, you will get too many correct answers because the 4×5 frame is a different shape from that of the 35mm. The angles of view across the short dimensions of each rectangle will be equal if you use a 45mm lens on the small camera. The long dimensions will have the same angle of view if you use a 55mm lens, and the diagonals have the same angle of view with a 50mm lens.
With two lenses of the same design (therefore the same field angle), the longer focal length projects the same image into a larger circle. With a piece of film the same size behind each lens, the one behind the longer lens will have an image of a smaller piece of the world. A longer lens, therefore, has a smaller angle of view than a shorter one in any given format. ■
With two lenses of different designs but the same focal length, the one with a wider field angle projects more of the same size image. Using the same size film with each will result in exactly the same picture. For any given film size, all lenses of the same focal length (as long as they cover the film) have the same angle of view. ■
HOW LENSES INFLUENCE PERSPECTIVE
Perspective, as we have found, refers to the relative sizes of objects and depends upon vantage point. Because of the difficulty of exactly translating three dimensions to two, the perspective in a photograph will be exactly the same as the eye would see from the lens position only if the angle of view of the lens is exactly the same as the angle of view of the eye viewing the resulting photograph.
The angle of view of the eye viewing a photograph depends on the size of the print and its distance from the eye. So for a given print, the eye’s angle of view will match that of the taking lens at only one viewing distance. To reproduce the exact perspective of a scene, then, a contact print—exactly the size of the negative—must be viewed from a distance the same as the lens was from the film when the picture was taken: the image distance. Enlarging the negative will have the same effect on correct viewing distance as using a longer focal-length lens; viewing distance for exact perspective will increase in proportion to the degree of enlargement.
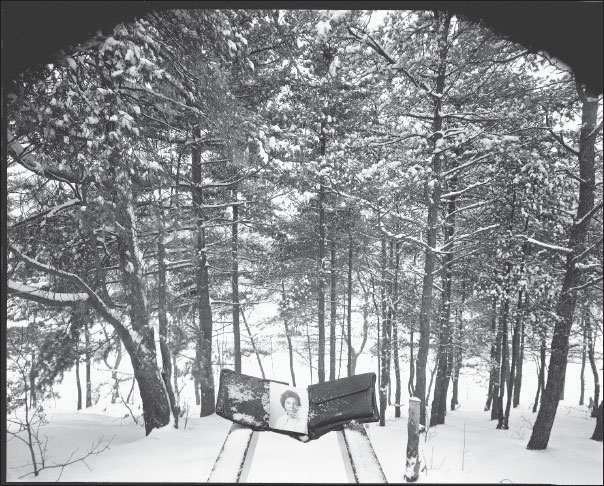
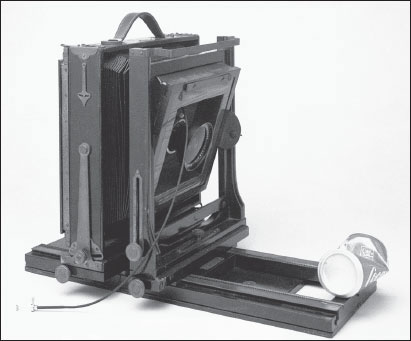
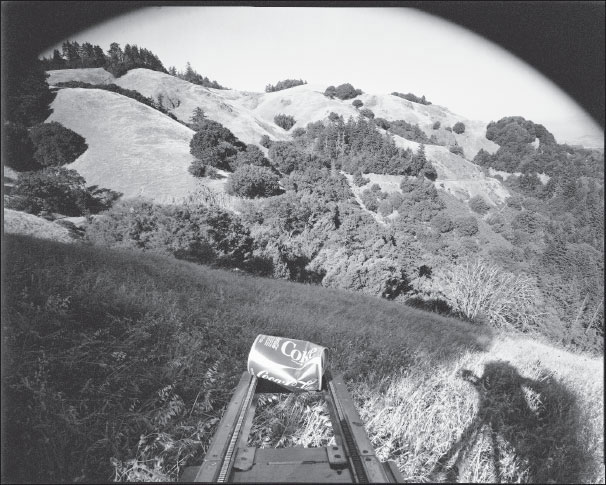
Bart Parker made these two photographs with the 8×10 camera shown below. In each case the object—the Coke can and the wallet with photograph—rests on the end of the camera’s base. To include these close foreground objects in the plane of focus required an extreme lens tilt, which is why dark, circular vignettes appear at the top of each photograph. The modern 120mm wide-field lens Parker used is considered a wide-angle lens even on the smaller 5×7 format and the projected covering circle was not large enough for this extreme angular displacement with the larger film. The smaller circle produced the vignetting intended by the artist to enhance the power of the photographs. ■
It may not seem necessary to think about reproducing perspective so exactly in your photographs, but you should be aware of the interrelationship of focal length, film size, degree of enlargement, and viewing distance and of their effects on the appearance of perspective in your photographs. Most viewers of a photograph will automatically (and unconsciously) adjust their viewing distance to the size of the print, moving farther away from a larger one and closer to a smaller one. Most viewers find a comfortable distance to be approximately the same as the diagonal of the print. From this viewing distance, the exact perspective will be assured by making the photograph with a lens having a focal length equal to the film’s diagonal. That is why this focal length is referred to as normal for its format. It is important to understand that any photograph will reproduce exact perspective from some viewing distance, but that distance may not be a comfortable one for the viewer. Photographs made with wide-angle (short focal-length) lenses are nearly always viewed from too far away for exact perspective, which is why it is often assumed (wrongly) that they distort it.
The Normal Lens
A normal lens for 4×5 film is 150mm (the film’s frame diagonal is actually 155mm), normal for 5×7 is 210mm (actually 208mm), and for 8×10 it is 300mm (actually 311mm). A normal design lens (see Chapter 7) with a field angle of about 70°, in the normal focal length for a given format, will offer enough extra coverage for moderate camera movements. Using a longer-than-normal focal length will make the image larger, the angle of view smaller, and the covering circle larger. For general use, many studio photographers use a 180mm (or longer) lens on 4×5 instead of a normal (150mm) because the increased coverage is useful for extreme movements and the slight change to perspective from the necessarily longer object distance is not noticeable. A lens of longer-than-normal focal length is referred to as a long-focus lens; telephoto (a name many photographers mistakenly apply to all long-focus lenses) refers to a specific lens design (see p. 116), rarely used on view cameras.
The Wide-Angle Lens
A wide-angle is a lens of shorter-than-normal focal length for the format in use. As the focal length decreases, the field angle must increase to cover a given format. Wide-field lenses are those with field angles greater than normal. So a wide-angle lens must also be wide-field. A 165mm wide-field lens makes a good choice for a wide-angle lens for 8×10. The term wide-angle refers to an angle of view, while wide-field refers to a field angle. Although a wide-angle lens must be wide-field, the reverse is not true. On a 4×5 camera, a 165mm Super-Angulon, wide-field because of its 100° coverage, is not a wide-angle. Its focal length makes it a little longer than normal for 4×5. At one time, a lens with a field angle of 70° was considered a wide-field lens. That is now considered good performance for a normal lens, and a wide-field covers at least 90°.
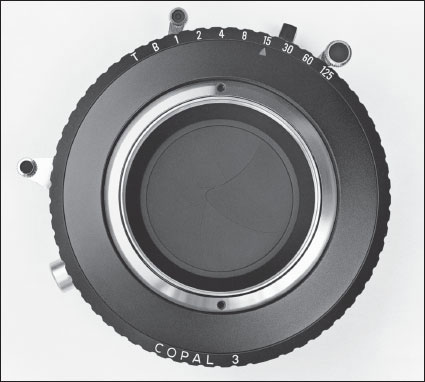
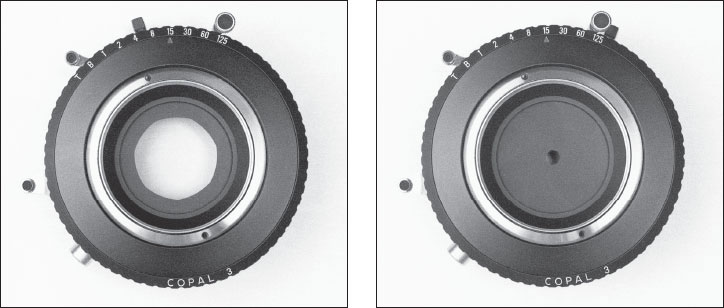
Most view camera lenses use a leaf shutter, which opens and closes by swinging a set of blades out of the light path and back. The leaves of this shutter are in their closed position. ■
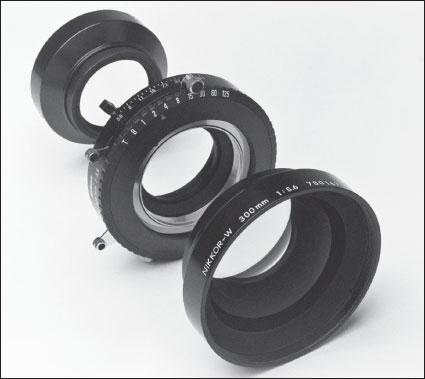
View camera lenses are shipped from the manufacturer already mounted in a between-the-lens shutter. The front and rear halves of the lens can be unscrewed and removed from the shutter mount. ■
Two major types of shutter are used in today’s cameras: the leaf shutter and the focal-plane (or curtain) shutter. Most small cameras have focal-plane shutters; the leaf shutter predominates in large-format photography.
The focal-plane shutter is now designed into every 35mm single-lens-reflex (SLR) camera and many medium-format (120 film) cameras. In a 35mm camera, two curtains just in front of the film plane (sometimes called the focal plane) move across the film; one opens, beginning the exposure, and the other closes, ending it. This same shutter was once found in large-format use. The single-lens-reflex Graflex (p. 109), for example, was outfitted with a long spring-tensioned opaque cloth curtain with several horizontal openings, or slits, of varying widths. Positioned directly in front of the film, the curtain was drawn across the focal plane vertically between rollers for each exposure, and the shutter speed was determined by a combination of slit width and spring tension. The Speed Graphic press camera (see p. 105) was also equipped with a focal-plane shutter. Because these shutters had a top speed of 1/1000 of a second, they were especially desirable in a camera designed to be used hand-held, as were the Graphic and Graflex. The focal-plane shutter disappeared from large-format use as smaller cameras took over all hand-held photography in the 1950s. The position and size of a focal-plane shutter prevents its practical use on most of today’s view cameras; its presence would impede the movements of the back.
The leaf shutter swings its closed blades, or leaves, outward on pivots until the entire light path of the lens is exposed. After a measured, timed exposure, it then swings them back to their original closed position. Because the blades are small and light, this action is much less likely to jar the camera during exposure than would the motion of a large focal-plane shutter. This sequence of blade movements, accelerating away from the center, stopping, and reversing direction to return, is not well suited to extremely fast shutter speeds; most leaf shutters are limited to a top speed of 1/500 of a second. Larger leaf shutters, such as those found on 8×10 camera lenses, have such large blades that 1/125 of a second is a common top speed. Fortunately, the use of high shutter speeds is extremely uncommon in large-format work.
Most view camera lenses are purchased already mounted in shutter, which means that the lens barrel is separated into two pieces and attached to the front and rear of a between-the-lens leaf shutter assembly, which is then mounted as one piece on the lensboard (p. 155). Each lens, then, must have its own shutter. As implied by its name, the be-tween-the-lens shutter is mounted in an air space between the lens elements (see p. 115). The blades, usually five of them in a good shutter, can be seen through the front of the lens when the shutter is closed.
Between-the-lens leaf shutters are most often of the preset, or set-and-release, type. Moving one lever winds, or tensions, the spring that provides energy for the movement of the blades. Another lever, usually operated by a cable release (see p. 140), triggers the opening and closing of the blades for exposure. An automatic, or press, shutter has one lever that both winds and releases in one motion. Automatic shutters are limited in their range of fast speeds because the effort required to tension a shutter spring for a high speed would introduce camera movement. These shutters are useful on copy stand cameras (see p. 108) and any time a large number of exposures must be made with few adjustments.
Retarding Mechanism
Your shutter has a mechanism that opens the blades to reveal the entire light path and closes them to halt the exposure. A good shutter will complete these movements as rapidly as possible. In between opening and closing, the blades must stay out of the way for a measured, adjustable, and exactly repeatable amount of time—the exposure. Ensuring this precise delay is the job of the retarding mechanism.
In the early days of photography, when the shutter was only a lens cap, the only available retarding mechanism was the photographer’s pocketwatch. Removing the lens cap began the exposure; covering the lens again ended it. The materials of early nineteenth-century photography in its infancy demanded exposures in sunlight measured in minutes, and it was not until more sensitive gelatin dry plates began to appear in the 1870s that this system finally succumbed to progress. Slightly less primitive shutter designs using gravity or rubberband power had already been introduced, and tensioned-blade designs reaching 1/100 of a second (a presage of today’s leaf shutters) were introduced in the 1880s.
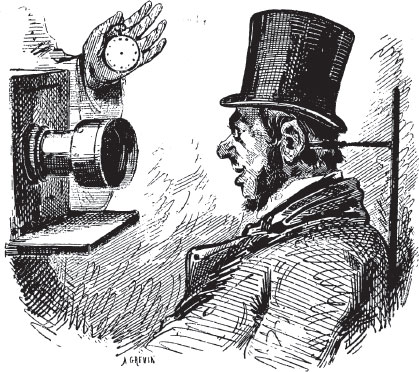
The earliest shutter was a lens cap and exposures were timed by pocketwatch. To assure a motionless portrait in those days, the sitter’s head was held in a clamp. ■
By the turn of the century, the most satisfactory retarding mechanism was a pneumatic delay, which used a piston to force air through a small hole at the end of a cylinder. Substituting a smaller hole resulted in a longer delay, hence a slower shutter speed. Pneumatic-delay shutters were subject to timing variation from changes in temperature and humidity and were easily immobilized by dust.
The introduction of the Ilex shutter in 1910 rapidly made all other designs obsolete. Its retarding mechanism, based upon the geared escapement of a mechanical watch, provided accurate timing unaffected by humidity and all but the most extreme temperatures. Today’s Copal shutter from Japan and the German Compur are direct descendants of the Ilex. Newer shutters with electronic delay mechanisms are available; their speed settings are extremely accurate and their timing invariant. These new shutters are still considerably more expensive than those with mechanical delays, however, and the difference in accuracy will be inconsequential to most working photographers. And they require batteries.
The pneumatic-delay shutter, popular for the last decade of the nineteenth century, relied upon air being squeezed out of a small hole in a cylinder to regulate exposures. ■
Shutter Speeds
Your shutter is marked with a series of shutter speeds and calibrated so that each speed corresponds to an exposure time, or the duration that the shutter is open. The markings indicate the denominator in a fraction of a second. For example, 30 marked on the shutter dial stands for 1/30 of a second exposure. Today’s shutters, by convention, all have a sequence of speeds like this:

This sequence was adopted in the 1950s to conform closely to the exact one-stop interval used for the aperture sequence. Many shutters from before that time, some of which are still in use, had a slightly more irregular scale:

Exposures longer than one second are accommodated by one of two additional settings, T and B. Some shutters provide only the B, which stands for bulb. This setting will hold the shutter open as long as the release lever is pressed or the cable release is held. The name refers to early shutters, which were operated by air pressure supplied by a rubber bulb. The shutter opened when the bulb was squeezed, stayed open while it was held, and closed when it was released. The T setting, for time, opens the shutter with one stroke of the release lever and closes it with another. Use this setting if your shutter has no press-focus lever to hold open the shutter for viewing.
The press-focus lever (or pre-view button) on your shutter allows you to open and close its blades manually without readjusting the speed selector. Because a view camera uses the same lens for viewing and focusing that it uses to make the exposure, you need to be able to open and close its shutter easily. Use the press-focus to hold open the shutter for viewing and focusing. Some shutters must be tensioned before the press-focus will operate. Automatic shutters are made without press-focus levers and must be set on T (or B, using a locking cable release) for viewing.
The design of your leaf shutter’s mechanism can produce an unexpected inaccuracy in your exposures as a result of variations in shutter efficiency. Shutter efficiency is a measure of the difference between the shutter speed you set, or the indicated shutter speed, and the actual time of exposure, the effective shutter speed. This difference is due to the time the shutter blades take to travel from a closed to a fully open position and from open back to closed. When you change from one shutter speed to another, you only alter the delay time during which the blades are held open. The blade travel time is additional, and with most shutters it is the same for all settings.
As the blades travel, opening like an iris diaphragm, the center of the light path opens before and closes after its outer edge. The shutter, therefore, fully reveals a very small aperture in a shorter time than it does a wide aperture. With the smallest apertures, the entire light path is open for almost the entire duration of the exposure. With wider apertures the blades must travel farther after their release to uncover the entire light path and they begin to cover it sooner on their return. At any setting, the shutter is therefore giving full exposure for less time at larger apertures than at smaller ones. As you increase the aperture, the effective shutter speed will lag farther behind the indicated shutter speed. This discrepancy means the shutter is less efficient for larger apertures.
If you select a slow shutter speed, the blade travel time is a very small part of the overall exposure and the difference in shutter efficiency between large and small apertures is insignificant. With the faster shutter speeds, however, the blades barely reach their fully open position before they begin to close and they are moving during most of the exposure. At faster speeds, then, the difference in shutter efficiency between large and small apertures noticeably increases.
Manufacturers normally calibrate their shutters to be accurate (100 percent efficient) at their widest aperture by adjusting the delay time between the half-open and half-closed positions to equal the indicated shutter speed. The efficiency difference, then, will give your film more exposure than you expect at the smaller apertures rather than less than you expect at larger apertures. The effects of changing shutter efficiency will probably be noticeable only at faster shutter speeds. In practice, small apertures are seldom combined with fast shutter speeds, but the compounded error can result in as much as a full stop of overexposure. In addition, since shutters are more prone to slow down than to speed up with age, mechanical error often compounds the problem by increasing the overexposure error.
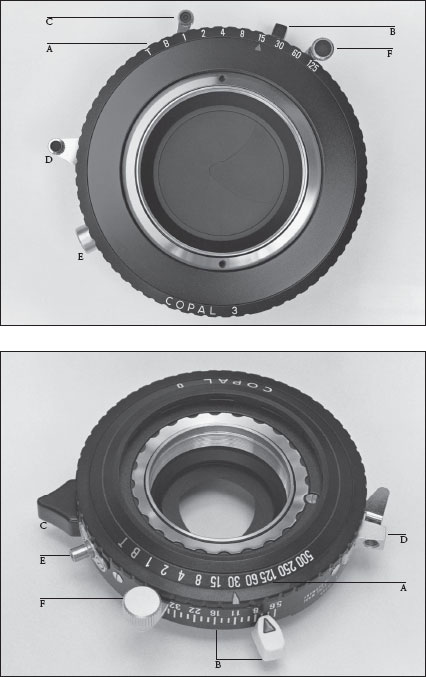
These are contemporary between-the-lens leaf shutters with (a) shutter-speed dial, (b) aperture dial and indicator, (c) press-focus lever, (d) cable release attachment point and release lever, (e) PC synchronization connector, and (f) wind lever. ■
Although unusual in current leaf shutters, many view camera shutters made in the last few decades (and still in use) included a self-timer. After the shutter’s release is pressed, a self-timer provides a delay of several seconds before the blades move to allow the photographer to get into the picture or just away from the camera. The self-timer was often incorporated into the wind mechanism; by moving a latch, the winding lever could be moved beyond its normal end position to wind the self-timer. An accessory self-timer with a cable-release tip and a selector for several delay times is available today. Remote-control releases operated by radio, infrared, Wi-Fi, or Bluetooth are also available.
When you use an electronic flash, commonly called a strobe, or the all-but-obsolete flashbulbs, the job of synchronization falls to the shutter. Because the flash is a short-duration light, an automatic mechanical or electronic switch must be used to trigger the illumination so it appears when the shutter is open, that is, to synchronize the flash with the shutter.
Before the popularity of strobe light for the professional photographer eliminated the common use of flashbulbs, synchronization made shutter design and use very complex. Flashbulbs were manufactured in several sizes and required different shutter delays for proper synchronization. Bulbs, once ignited, take as much as 1/30 of a second to reach maximum brightness, and another 1/30 of a second to die out. In order to efficiently use a shutter speed shorter than 1/15 of a second, a delay system similar to a shutter’s retarding mechanism was needed to open the shutter at a specific time after igniting the bulb. Properly adjusted, this synchronization would open the shutter at the time of maximum light output.
Early synchronizers for flashbulbs often were shutter accessories consisting of a separate delay piston attached to the shutter or lensboard, offering three delay settings for three classes of bulbs: F (.005 seconds), M (.014–.020 seconds), and S (.030 seconds). As electronic flash began to appear in the early 1940s, shutters were made with internal synchronization to accommodate it. Because electronic flash reaches its peak light output almost instantaneously, proper synchronization needs only to trigger the flash when the shutter is fully open. A simple electrical contact inside the shutter is all that is needed, thus making the shutter less expensive than one with synchronization for bulbs. Also, without the necessity of a timed delay, synchronization is more dependable. The designation “X” is used to indicate triggering at the instant the full-open position is reached. Shutters made today offer only X-synchronization.
Many shutters were made between the introduction of strobe light and the obsolescence of bulbs and have both internal M- and X-synchronization. These shutters have a small selector switch. If you have a shutter with such a switch and you use strobes, tape the switch in the X position to avoid a possible catastrophe. If you inadvertently use the M position, the light from your strobe will have disappeared by the time the shutter opens and your exposure will be considerably less than you expect. If you have a modern shutter with only X-synchronization, you can still use flashbulbs (if you can find them) by selecting a shutter speed of 1/30 or longer so the shutter remains open long enough to capture all the illumination.
Shortly after its introduction, electronic flash earned the nickname “speedlight” from its extremely short duration; flash times shorter than 1/2000 of a second were common. Strobes were used to stop action and could be synchronized with a leaf shutter at its top speed. As electronic flash for the studio evolved, power supplies were made safer and less expensive by using lower internal voltage. The use of lower operating voltage has created a side effect, however. It lengthens the duration of the flash and many studio flash units must now be used with X-synchronization at shutter speeds no faster than 1/125 of a second.

This remarkable series of photographs was made by Dr. Harold Edgerton of a mechanical shutter opening and closing at a shutter speed of 1/200 second. Thirty-nine pictures were taken in that time at a rate of 4200 per second using a high-speed strobe. These photographs show the problem of shutter efficiency—the shutter was completely open for less than one-fourth of the exposure time. ■
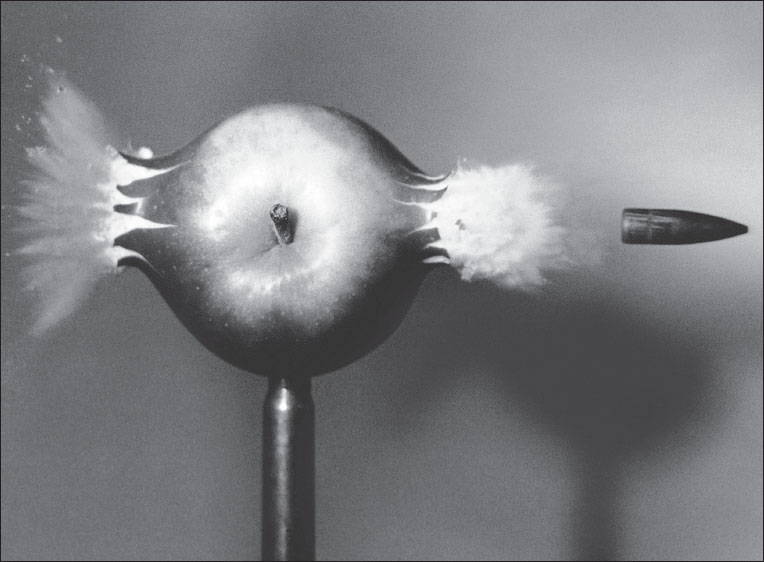
Stopping the flight of this bullet traveling at 900 meters per second required very accurate synchronization with a 1/300,000 second flash. Dr. Harold Edgerton made this photograph at the Massachusetts Institute of Technology in 1964. ■
Synch Connectors
Synchronization depends on an electronic signal transmitted from the shutter to the flash to trigger the light at the correct time. Although wireless triggering with infrared and radio-frequency transmitters and receivers is common in studios, your signal for synchronization may also be transmitted
from shutter to flash unit by a wire called a synch cable. This wire has a connector at each end—one to plug into a receptacle on the outside of the shutter body and one to join with the strobe. The connectors on your cable must mate properly with those on your shutters and flash. In universal use is the PC connector, and all currently manufactured between-the-lens shutters have a PC receptacle. An older shutter may have a standard, or two-pin plug, for which adapters are available. Most studio strobe power packs accept a standard AC lampcord plug and any household extension cord may be used as a synch extension. You will still need a short PC cord to connect the extension to your shutter.

Your between-the-lens shutter also houses a diaphragm, the mechanism that adjusts the light intensity admitted to the film. It is sometimes called an iris diaphragm because its function corresponds to the iris of the human eye. With blades similar to those of the shutter, the diaphragm creates a circular opening centered in the light path—the aperture. The aperture is measured by f/numbers, each a ratio of the diaphragm opening diameter to the lens focal length.
The diaphragm’s blades pivot and slide over one another to change the size of the aperture. These blades are visible through the rear element of the lens or, when the shutter is open, through the front. They should retract entirely out of view when set to the maximum aperture.
Since there is no distinct advantage to a perfectly circular diaphragm, most have as few as five blades to fit the narrow air space in modern design lenses. The aperture will appear to be a rounded polygon. The aperture settings, or f/stops, are usually indicated on the front and side of the shutter dial on the aperture ring. A pointer or mark on the dial may be moved to set and indicate your working
aperture. Sometimes the settings and pointer appear twice—180° apart—so they can be seen from above and below or from the right and left.
Some aperture rings are provided with detent (or click-stop) settings at whole-stop intervals, some have detents at ½ or ⅓ stop intervals, and others slide smoothly across their entire range. In all cases, however, the pointer or mark indicates the exact aperture, and settings in between whole stops provide for smaller increments of exposure. With the shutter speeds, on the other hand, selecting a position between two adjacent settings (for example, between 1/30 and 1/60) will cause the shutter to choose one or the other, but will not produce an intermediate shutter speed and may damage the shutter.
The position of the diaphragm along the optical axis is an important aspect of lens design because it controls focus shift. A lens with a focus shift changes the image distance with aperture, so if you focus once with the aperture at its maximum and then close down to a smaller working aperture, you must refocus after stopping down. Once refocused, the optical performance of a lens with focus shift is otherwise unaffected by it. Some view camera lenses, notably nineteenth-century designs, exhibit focus shift because the designer could not place the diaphragm in the optimum position, usually because there was already an element there. Today’s computer-designed lenses are mostly without focus shift problems.
The diaphragm is the multibladed mechanism that creates and adjusts the aperture. ■
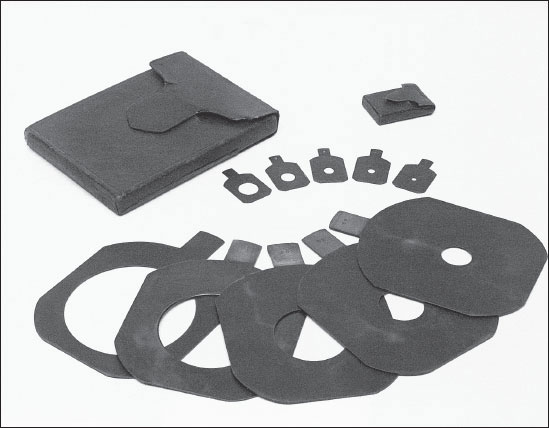
Before adjustable diaphragms became common, apertures were selected and changed with the use of Waterhouse Stops. Each stop was an individual flat paddle with the appropriately sized opening and was inserted into a slot in the lens barrel for use. ■
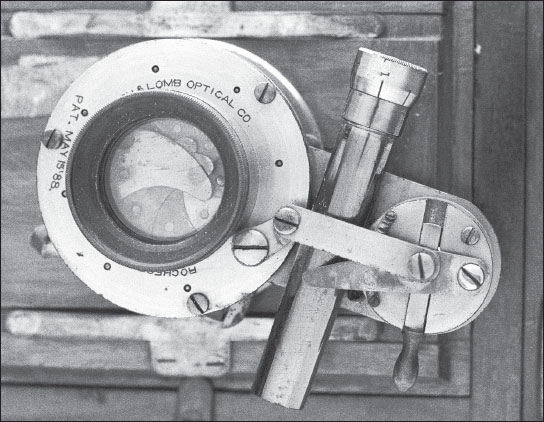
If you use several lenses with the same camera, it may be to your advantage to have one behind-the-lens shutter. This separate shutter is not a part of a lens as are the between-the-lens types; it mounts to the camera and can then be used with all your lenses. With it, you can use lenses mounted in barrel, that is, without a shutter. Like small-format lenses, barrel-mounted lenses have all the glass parts (elements) of the lens enclosed in a single tube rather than separated into two pieces to be mounted in the front and back of a shutter. As a result, you don’t buy a shutter with each lens and the lenses are less expensive.
A behind-the-lens shutter will give you exactly the same shutter speeds for each lens. If your work demands exact calibration of shutter speeds—necessary for the Zone System—the speed variation between shutters when each lens has its own can add enormously to already ponderous calculations. This is not to say that the accuracy of behind-the-lens shutter speeds is any better—they are subject to the inaccuracies of any mechanical shutter—but the inaccuracies are more predictable since you are always using the same shutter.
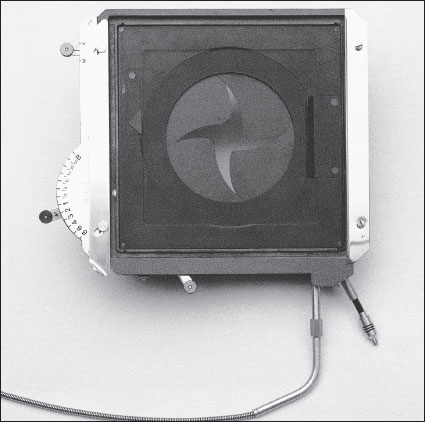
This sophisticated behind-the-lens shutter allows you to adjust the shutte speed and aperture and to open and close the lens without leaving your viewing position behind the camera. ■

The anachronistic Packard shutter is inexpensive, practical, and dependable and may save you money when you buy lenses. ■
The studio photographer who controls exposure with aperture and strobe brightness uses a shutter only to synchronize the flash and to open the lens to focus. Any shutter will suffice for these basic applications, but the Sinar behind-the-lens shutter allows you to adjust the aperture from behind the camera and couples with the spring back to close the shutter when the film holder is inserted. These features save time and streamline camera operation, particularly when a studio setup requires that lights, stands, reflectors, or shades be next to the lens. Such a setup often obstructs access to the shutter’s controls.
The behind-the-lens shutter does have some limitations. Its mounting position prevents its use with some wide-angle lenses. These lenses have such a limited back-focus distance that there is inadequate space to fit the shutter between the rear of the lens and the ground glass. Another disadvantage of the mounting position is that the light path through the shutter is wider than through a conventional between-the-lens position and necessitates larger shutter blades. The increased inertia of heavier blades lowers the possible top speed and aggravates the exposure errors resulting from variations in shutter efficiency. And even though barrel-mounted lenses are less expensive than those in shutters, don’t expect an overall savings—a good behind-the-lens shutter can cost as much as six of the between-the-lens shutters it replaces.
Although an anachronism, the venerable Packard shutter is still available. A throwback to the mid-nineteenth century, this bulb-only behind-the-lens shutter is still surprisingly useful. Simple and inexpensive, the Packard shutter allows you to use older barrel-mount lenses that are usually a fraction of the cost of new lenses. The Packard restricts you to the use of two shutter speeds: B for a second or longer, and approximately 1/25 of a second. Long exposures are very common with large-format photography and the Packard at a second or more is every bit as accurate as any other shutter. If you use strobes, a professional repair shop can adapt an X-synch connection to the 1/25 speed to give you a simple, inexpensive shutter suitable for most studio uses.