
In addition to your camera, lens, and shutter, you will need or may want to use a number of accessories. Most large-format cameras cannot be used without a tripod, hand-held light meter, and cable release, all of which are considered advanced options in the use of smaller cameras. As with lenses, these and other accessories are invariably manufactured by a different company from the one that made your camera, giving you the pleasure of a wide range of choices but also the responsibility of ensuring that each accessory is compatible with the rest of your equipment and suitable for your needs.
This chapter discusses camera stands, light meters, and other items not supplied with the view camera and includes further information about some accessories already discussed, such as film holders. The last section of the chapter describes those parts of your camera, such as the bellows, ground glass, and lensboard, for which options are available from your camera’s manufacturer. With all these options and accessories you can tailor the versatile view camera exactly to your specific personal or professional photographic needs.
Camera Stands
Few large-format cameras were designed to be handheld. The longer focal-length lenses necessary to cover large sheets of film require smaller apertures for adequate depth of field, and small apertures require shutter speeds too slow for the camera to be held steadily. The few large cameras designed for hand-held use were a poor compromise in an era that gave the photographer no satisfactory options. Back then, if you couldn’t get the picture with a large-format camera, you didn’t get the picture. Today, with high-quality digital cameras satisfying any need for speed and portability, your reasons for using large-format equipment probably do not include any practical reasons for hand-held work.
You will also find it impossible to learn to use the camera or control its movements if it is not held still for you. The first accessory for you to consider, then, is a camera stand to get the camera out of your hands.
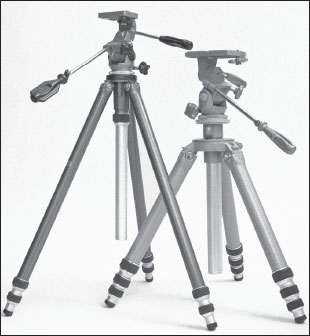
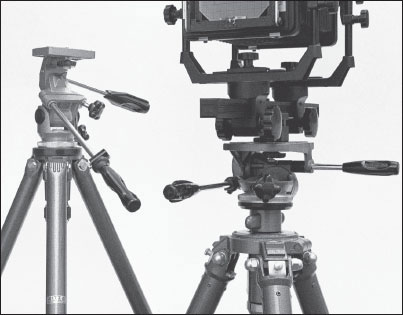
Tripods. The most common camera stand is a tripod, which consists of three legs joined at their tops with a platform to support the camera. Like the early cameras, the tripods that held them were made of wood. Surveyors still use wooden tripods to support their optical equipment because the wood construction makes them resistant to binding caused by dust and dirt. The few wooden tripods still made for cameras are particularly useful for work in the field around dirt or water.
The shorter tripod is more compact but requires more time to set up. Both will place a camera at about the same maximum height. ■
Most camera tripods currently available are aluminum or carbon fiber, with tubular legs and a cast platform. Such a tripod can be adjusted more precisely and easily and is much lighter than a similar wooden one. Each tubular leg is made of concentric segments that can be extended independently and locked in place. The number of leg segments is a compromise between portability and maximum height. Unless you need an extremely compact tripod for portability, or one taller than you, three-segment legs should be sufficient. Setting up and collapsing a tripod with four- or five-segment legs can be time consuming and tedious. Most tripods have an extendable center column to allow easy vertical adjustments and to increase the maximum height permitted by the legs alone. For heavy cameras, this center column should be geared and have a crank handle to raise and lower the camera. A reversible center column allows you to suspend the camera below the tripod for low-angle shots. Increasing the height of the camera with the center column rather than by extending the legs makes the camera less stable, so use the center column only for small adjustments in height.
Conventional wisdom dictates that your tripod should weigh at least as much as your camera so it can resist vibration from air movement and provide a solid base of support. The larger the diameter of the leg segments, the more the tripod has of both stability and weight. If you must use a lightweight tripod in the field, you can increase its resistance to wind by hanging a weight or heavy bag below the center column.
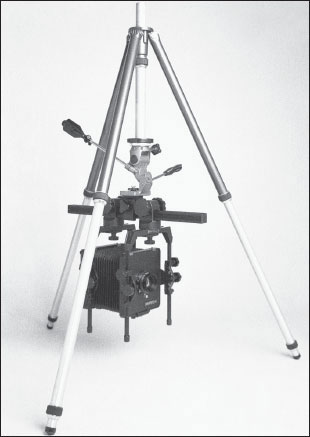
Monostands. During the first century of photography, the itinerant photographer carried a tripod for camera support while his indoor counterpart used a special table. This table, with its tilting top and wheeled legs, is the direct ancestor of today’s monostand.
Whenever portability ceases to be an issue, sturdiness is the most important attribute of a camera stand. Monostands are much heavier and consequently sturdier than tripods. A monostand is a heavy column resting on a wide, low base. A horizontal arm extends from the column to hold the camera. The arm is usually counterbalanced with weights or springs so you can move it easily up and down the column while it supports a heavy camera. Optional locking wheels on the base allow you to move the heavy monostand easily and lock its position for shooting. You may also select arms and columns of different lengths to suit your needs. An optional accessory tray on the arm or column provides a convenient resting place for film holders or a light meter. In the studio, you will probably prefer a monostand to a tripod. It adjusts more easily, occupies less floor space, and allows the camera to be positioned against or cantilevered over a tabletop surface.
Some tripods allow the center column to be reversedfor low-angle photographs. ■
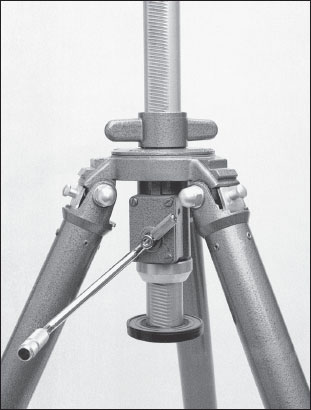
A large, heavy professional tripod should be equipped with a geared crank on the center column to make vertical adjustments with a heavy camera easier. ■
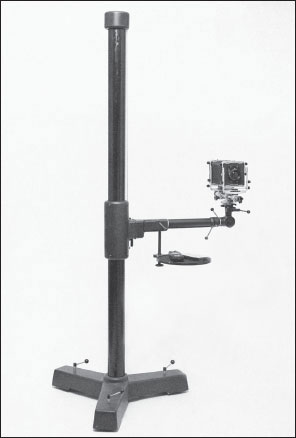
A monostand is the best camera support for a view camera that stays in the studio. ■
A double-tilt tripod head allows easy adjustment of the camera position around three axes. ■
A ball head is more compact and easier to transport than a double-tilt head, but not as convenient to use. ■
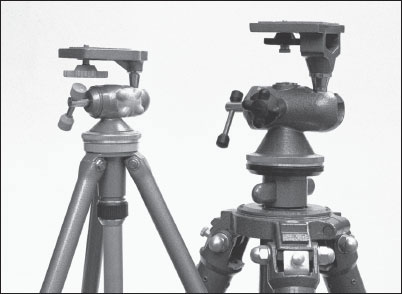
Tripod Heads. All monostands and tripods large enough to be used for view cameras are made by suppliers of professional photographic equipment. One indication of a professional tripod is that it is sold as a set of legs independent of a support platform and its adjustment mechanism—the tripod head. In addition to clamping the camera firmly to the tripod or monostand, the head allows you to adjust the position of the platform and camera. You will have a choice of several different heads to fit your choice of camera stand.
Three types of tripod heads are available: single-tilt, double-tilt, and ball. Single-tilt heads allow adjustment only around a horizontal axis (similar to a tilt of the entire camera) and are most often used for cinema and video. They are made to pan, or rotate smoothly during a shot, a quality unnecessary for most still-camera work. A double-tilt head, the most common for still photography, provides two levers to adjust the angle of the platform around two perpendicular horizontal axes, tilting front to back and side to side. A ball head works much like a human shoulder joint—it is a ball-and-socket. Only a few ball-heads are sturdy enough for constant use with a view camera, but their light weight and compact construction make them desirable for field work.
All three types of tripod head are available in different sizes, each based upon the weight of the largest camera it is expected to support. When you select a tripod head, be sure the platform is large enough for your camera, that its movements are smooth, and that it can securely lock your camera in place, even at an angle. A larger head will lock any camera more securely and its longer levers give you more control when adjusting it, but it will also weigh more and take up more room.
Your tripod head will have a threaded mounting bolt projecting through its platform. Make certain the threads match those of the corresponding hole in your camera’s baseplate. The bolts come in two standard sizes: ¼-20 (¼-inch diameter, 20 threads per inch) is the smaller of the two, and that thread size is used in the tripod mounting hole on most hand cameras; the larger ⅜-16 is called the European thread and is safer for use with larger, heavier cameras. The camera mounting platforms on larger tripods often come with two interchangeable bolts, one in each of the standard sizes. You can buy a threaded adapter to fit the smaller bolt into the larger hole, but it makes a weaker connection than using the correct size bolt.
Tripod Adapters. If you need to connect and disconnect your camera and its tripod frequently, you might consider using an accessory two-part bracket available for rapid mounting. One part of this quick-release adapter couples with the camera and nests into the other part, which is held to the tripod head. The two parts then clasp or bayonet together firmly and release with the press of a button or catch. A quick-release adapter does not make as strong and secure a connection between camera and tripod as the standard mount and can fail when used with heavy cameras in unusual camera positions.
Another accessory adapter, sometimes called a twin bracket or twin head, can be handy when you use a monorail camera for extreme close-ups or with long focal-length lenses. You will find that these situations greatly increase the distance between lens and film and cause balance problems for the camera and tripod. With a large heavy lens and a long bellows extension, you can put great strain on the monorail and tripod head. A long rail, particularly one made up of shorter sections, may be forced out of alignment inadvertently.
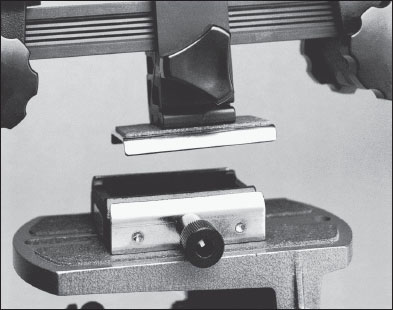
You should consider using a quick-release bracket if you need to disconnect and reconnect your camera and tripodfrequently. ■
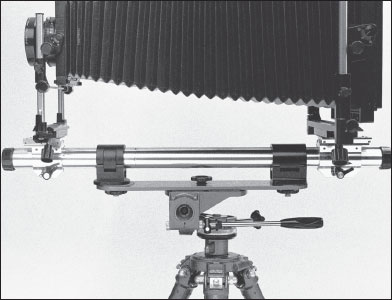
This twin-bracket adapter can help ease the strain that a long bellows extension and heavy camera place on the monorail. ■
To compensate for the bending force on the rail, use a tripod adapter such as the one shown here to hold two rail clamps (you can buy a second rail clamp as an accessory for most monorails). Twin-bracket adapters are often sold for the purpose of mounting two cameras side by side on one tripod, but one can be used to provide two points of support for the monorail instead of the usual single point. Use caution when positioning the camera, for the adapter will increase the distance between the tripod head’s platform and the camera. This additional distance will raise the center of gravity of your camera and make it more difficult for the tripod head to hold an inclined camera. The farther from level you position the rail, the more strain there will be on the head and the greater the likelihood you will tip the entire tripod. For extremely long extensions, or situations where a two-clamp adapter proves inadequate, you should use two tripods. Setting up a camera on two tripods is awkward, but will result in a setup unlikely to vibrate or fall.
For extreme bellows extensions, your rail should be supported by two tripods. ■
Cable Release
A cable release is a flexible plunger that triggers your camera’s shutter. Its tip threads into the proper fitting on your shutter and a release button that fits your fingers caps the plunger at the other end. An internal spring returns the plunger when you stop pressing on it. You must have a cable release for most view camera operations.
Start with one about 16 inches (40cm) long. You should be able to release the shutter with your hand far enough away from the camera that you don’t risk jarring it. If you cannot stand next to the camera, or for some reason need to operate the shutter from a distance, there are cable-release extensions as long as 10 meters, rubber bulb air-tube releases twice that length, timed releases, and even radio-controlled and infrared-triggered remote control releases. If your shutter has no T (for Time) setting to keep the shutter open for a longer exposure than its slowest setting, you may wish to use a locking cable release, one that can be set to remain in the extended position until you release it. Before buying any cable release, try it with your lens to make sure the tip at the shutter end extends far enough to trigger your shutter. It is not uncommon for a photographer to have a cable release for each lens and to leave them attached during storage.
Light Meters
When you are photographing with any camera, the correct exposure for a situation is most easily determined by measuring the light intensity with a light meter. Virtually all hand cameras are equipped with built-in meters and many amateur photographers are unaware that there is an option. With a view camera, you must use a separate light meter. Hand-held light meters are of two types: reflected light meters, which you point at the subject from camera position to read the light reflected from the subject, and incident meters, which you point at the camera from the subject position to read the light falling on (or incident upon) the subject. Both are equally useful in the hands of an experienced photographer. Some meters are designed to measure light both ways.

A good cable release is a necessary accessory to your view camera. For releasing the shutter from a distance, an air release is better. Air-tube extensions are available. ■
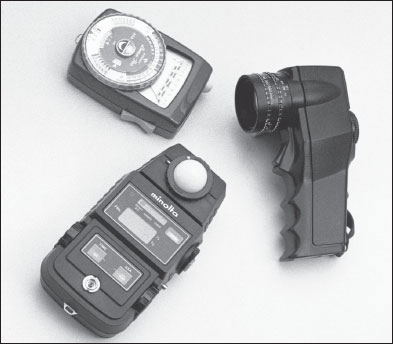
Light meters have become more accurate and easier to use with developments in electronics. The three major types are (clockwisefrom the top) incident/reflected, spot, and strobe. ■
Some reflected light meters are designed to read only a very narrow angle of the incoming light. These are called spot meters, many of which read a tiny circle at the end of an imaginary one-degree cone. Spot meters are most useful for black-and-white shooting in which tonal values of different parts of the same scene must be determined independently, such as with the Zone System. Another group of meters, mostly designed as incident-reading, can also measure a short burst of light. These are called flash meters (or strobe meters) and are a tremendous help in the studio for use with electronic flash.
Designed especially for 4×5 view cameras (and for larger cameras with reducing backs) are several other meters and meter attachments that read directly from the ground-glass image. Some will read flash as well as continuous light; all have the virtue of compensating directly for light loss due to bellows extension.
Darkcloth
Even with your lens at full aperture, the inverted image on the ground glass is too dim to be seen well without surrounding it in darkness. A darkcloth made from a simple one-yard (one-meter) square of black cloth can be used to cover the camera and your head simultaneously and is sufficient to allow easy viewing. An improvement on the simple black cloth is the addition of a light-colored facing on one side. A white or silver side used facing out will reflect sunlight instead of absorbing it and will make focusing much more comfortable outdoors on warm, sunny days. The second layer of cloth also makes the darkcloth more opaque for viewing and the light side can be used as a reflector for bouncing light into a scene. You can also use the darkcloth to wrap and protect your camera between uses.
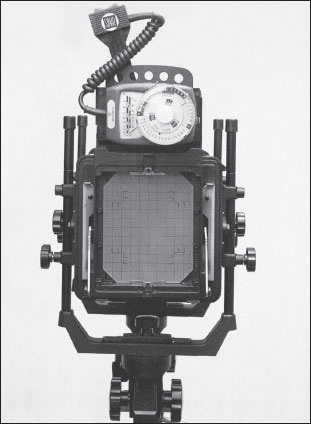
A probe connected to this light meter reads directly from the spot the film will be during exposure. ■

This accessory hood makes viewing easier by reinverting the image, magnifying it, and darkening the area around the ground glass. ■
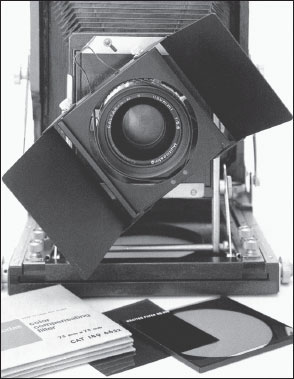
The gel filter holder on the lens incorporates adjustable black flaps to help shade the lens and reduce flare. ■
When it’s windy, keeping the cloth secure on the camera requires some ingenuity. Here are some possible solutions: fasten the darkcloth to the camera with added clips; use Velcro strips on camera and cloth; sew a circle of elastic into one end of the cloth; or tie the cloth around your neck like a cape and then secure the bottom around the ground glass with a clothespin.
Viewing Hoods
If the darkcloth seems like a burden, you might use one of a number of accessory viewing and focusing hoods that attach to the back of the camera. The simplest hoods merely replace the darkcloth with a rigid metal or plastic clip-on shade. Some, similar to a compendium, have a built-in eyepiece (sometimes a magnifying eyepiece) so that viewing admits no stray light to the back of the ground glass. More sophisticated (and expensive) are reflex viewers that invert the ground-glass image for right-side-up viewing of the normally upside-down image. Unfortunately, none of the accessory viewers wraps and protects your camera between uses as well as a darkcloth.
Filters and Holders
The professional view camera user is likely to need a variety of filters for contrast control, color correction, and lighting compensation. Rather than buy one screw-in glass filter of each color for each different-sized lens, most photographers use gel filters. These gels, actually thin sheets of dyed gelatin, are available in squares of several sizes for a fraction of the cost of glass filters.
If you use a filter infrequently, tape the filter over the front of your lens when you need it. Be careful not to get the tape in the light path. Outdoors where wind and the elements threaten the gel, tape it to the rear of the lens where it is protected inside the bellows. Gel filters are expected to succumb to use, becoming scratched and damaged with age and use. If you use filters more regularly, or need more than one at a time, you should have one of the several different kinds of filter holders available to hold them to the lens. Even though gels are less expensive than glass filters, you still will not want to replace them too often; they will last much longer if you use a filter holder instead of tape.
Some filter holders simply hold the filter in front of the lens; some include flaps to function as a lens shade. Other holders clip onto the lens and will fit lenses of several different diameters. The most secure connection is made by screwing a filter holder into the threaded front of the lens, but this requires an adapter for each lens diameter. A compendium bellows (p. 154) also includes a provision for holding filters.
Camera Cases
Unfortunately for the user, view cameras present an awkward problem when they have to be shipped or stored. Many cameras are irregularly shaped and the ground glass is fragile. Most monorail cameras cannot be set down in a stable position on a flat surface. If your camera stays in the studio, you may just want to leave it on a tripod draped with the darkcloth when not in use. If you work on location, a field or press camera is desirable because they fold into a compact, protected box.
A monorail camera must be at least partially disassembled to assume a compact shape, and some manufacturers provide attaché-like cases to carry the pieces conveniently. If you want to take the camera out of its case ready to go on the tripod, it must be suspended upside down by its rail in a specially made box. These cases are available from camera manufacturers and accessory companies or you may have one custom-made by a trunk or case maker. Fiberboard, aluminum, and plywood are commonly used for constructing camera cases; you will find increased protection comes with either higher price or greater weight. Wheels on a camera case will also help you.
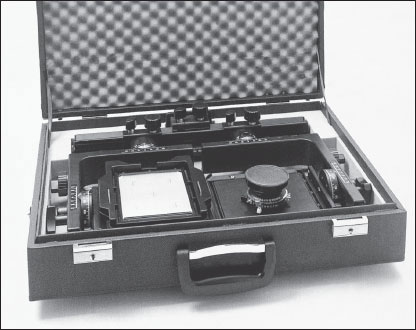
If you have the time to disassemble your camera before packing it, you can store or carry it in an attaché case like this one. ■
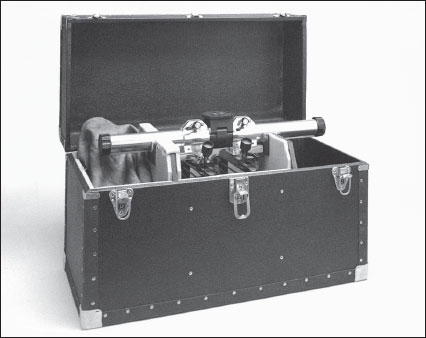
Protective but bulky, a camera case like this stores the camera ready to be mounted on the tripod. ■
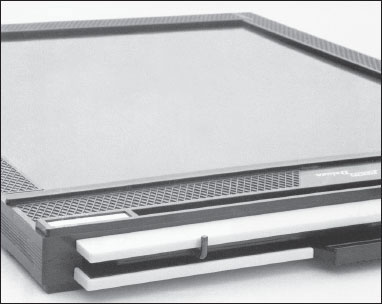
Double Sheet-Film Holder. The standard film for view cameras is sheet film and the standard holder is a sheet-film holder. The double sheet-film holder pictured here is ubiquitous, but as you will see in the next few sections, it is by no means your only option. Film holders are designed to prevent stray light from striking the film during use or storage. They are most often made of plastic; metal holders are available at three times the price but do not function any better.
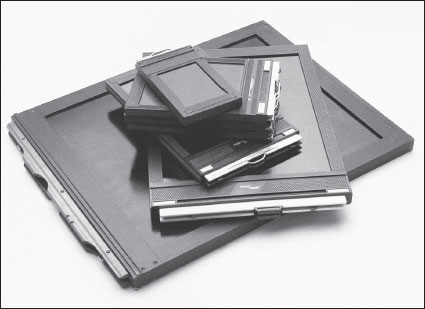
Other than their size, double sheet-film holders are basically identical from 2¼×3¼ (top) through 11×14. ■
Each of the double sheet-film holder’s two faces holds one sheet of film under a darkslide to protect the sheet until you are ready to expose it. Each film holder will hold no more than two sheets of film and must be unloaded and reloaded in the dark before reuse. When you are shooting in the studio, you can have ready as many holders as you care to own. In the field, excess film adds considerable unwanted weight and bulk.
The main function of this and any other film holder is to hold the film flat and in place, that is, in the same plane as the front surface of the ground glass. Plate holders, similar in appearance to film holders, are designed to hold an emulsion-coated glass plate at the film plane. Trying to use a plate holder for sheet film will result in poor focus because the thinner film will be held in the wrong position. Be careful when buying used holders not to confuse the two types.
Each face of your film holder has a flap at the bottom to fold down out of the way so you can slip in the film. At the top of each side of the holder is a slot lined with a light trap of black cloth. The dark-slide is inserted through this slot and seated in the bottom flap. The bottom flap and the light-trap slot can leak light if worn, as can the darkslide if cracked or chipped. Carefully inspect these areas on any holders you buy used and occasionally check all your holders as they age. See how to test and repair holders in Chapter 9.
On the top edge of each double film holder is a pair of small wire clips. These clips safeguard against the unintentional removal of a darkslide. After you load each holder, rotate the clips into a position that blocks the movement of the darkslides. Move the clip out of the way before withdrawing a darkslide for exposure and relock that side afterwards. You may wish to use the locks only for exposed film, since a forgotten lock may cause you to move the camera out of position inadvertently when you try to withdraw a locked darkslide before exposure.
The small wires at the top of each holder can be used to lock the darkslide against inadvertent withdrawal. ■
Grafmatic Film Holders. No longer manufactured, but readily available second-hand, a Grafmatic film holder can be loaded with six sheets of film, but is only slightly thicker than a double sheet-film holder. Each sheet of film is held in a septum—a thin metal separator—and is cycled to the back of the holder after exposure. After six sheets have been cycled, the holder locks to prevent double exposures. The Grafmatic is a boon to any itinerant photographer since it offers a tremendous saving in space and weight over double sheet-film holders.
Before purchasing a used Grafmatic, check for the label “45” Graphic, which will ensure compatibility with any contemporary spring back. Grafmatics were also made to fit an earlier clip-in (nonspring) back, and are marked “45” Graflex. These holders are unlikely to be useful unless you are using an older Graflex camera. Before you commit important film to exposure in a Grafmatic, practice working with an unloaded holder in the light until you understand its mechanism and idiosyncrasies.
Roll Film. Although your view camera was designed to use sheet film, it may be easily adapted to use convenient roll film with a roll-film adapter. The widest commonly available roll film is 120 size, and the adapters are made to fit 4×5 Graflok or other 4×5 spring backs, so using roll film means you will be reducing your large-format camera to medium-format. You will sacrifice the quality of the larger film for the convenience of roll film but still retain the other advantages of a view camera.
There are two basic styles of roll-film adapters for the use of 120 film in a 4×5 camera. One style threads the film from one end of the adapter to the other, around it and back, so that both the supply and takeup spools of the film are at one end of the adapter. This kind of adapter can be made thin enough to fit in the spring back like a sheet-film holder. The other style, with the spools at opposite ends of the holder, replaces the spring back in a Graflok (or universal) back. The former is harder to load, but may be used without removing the ground glass each time after focusing. These adapters are made to accommodate 120 and 220 film, which are the same width but different lengths, and to make negatives in 6×7, 6×9, and 6×12cm formats.
If you wish to use roll film in a camera larger than 4×5, your camera may have a reducing back available as an option. A reducing back is made to fit the back of some 5×7 or 8×10 cameras and provide a 4×5 spring back in the center of the larger frame. These backs are necessary if you wish to use 4×5 instant-picture film (see the following section) in a larger camera.
A very few highly specialized aerial cameras use roll film in widths of 70mm (the same as 120), 5 inch, and 9½ inch. A discussion of their use is beyond the scope of this book.
This roll-film adapter from Sinar fits a 4×5 spring back and can vary its format to make 4.5×6, 6×6, 6×7, 6×9, or 6×12cm negatives on 120 or 220 roll film. ■
Minor White took this photograph in 1973 on Type 52 Polaroid film. The finished print could be viewed in 20 seconds, allowing the results of one photograph to contribute to the next. ■
Photography came out of the dark ages in 1947, the year Dr. Edwin Land used an 8×10 view camera to demonstrate the first Polaroid self-developing film. It is difficult to comprehend, let alone summarize, the effect instant photography had on the medium. Within ten years, Polaroid had firmly established an amateur market, selling well over a million cameras. Fuji followed with instant-picture products in 1981. Soon nearly everyone, worldwide, had experienced amateur instant-picture products as the photographer, subject, or observer of a pictorial near-miracle. Using instant film, people no longer needed to wonder whether the picture would “come out.”
Less well known, yet responsible for dramatic changes in the lives of professional photographers everywhere, were Polaroid’s large-format products. Before Land’s introduction of a 4×5 holder and sheet film in 1958, a photographer’s test exposure
was always followed by a lengthy interruption for processing. In the studio, this limitation dampened enthusiasm for exploring lighting options, especially in the presence of a client. On location or in the field, photographers always felt the need to ensure results with redundant exposures made with several different apertures and several different filters. Polaroid’s 4×5 black-and-white print in 15 seconds (color in 60 seconds) gave them all the information they needed about lighting, exposure, focus, and composition—indeed, sometimes it was the final product itself (above).
The turn-of-the-21st-century digital revolution gave photographers the instant feedback that was key to instant film’s success, after which the production and availability of instant-picture materials became intermittent. Following is a summary of Polaroid’s products in the hope that you can find them.
The first system of products Polaroid developed specifically for professional and technical use was the sheet film and holder for 4×5 cameras. This film system used single-exposure lighttight packets, each containing a positive sheet, negative sheet, and development chemical (Polaroid called it a reagent) pod. These packets were sold in boxes of 20, and each packet could be removed from the box, loaded, and developed in the light.
The original #500 film holder was supplanted by the #545 in 1968 and the #545i in 1993. These holders were designed to be inserted into the spring back of any standard 4×5 camera. Each holder contains a pair of stainless steel rollers to break the chemical pod and spread the processing goo (an unofficial Polaroid term) evenly between positive and negative for development. The rollers are engaged by a lever on the outside of the holder.
To load a sheet of 4×5 Polaroid film, set the lever on the film holder to L, for Load. Notice that one end of the film sheet has a metal clip. Insert this end of the film into the open end of the holder and slide the film down until the clip clicks into place and will go no farther. One side of the film packet, imprinted with the phrase “This side toward lens,” should be visible through the open face of the holder when the film is properly loaded. Handle the film only by its edges and be particularly careful with the area of the packet surrounding the chemical pod. This area is slightly thicker than the rest of the sheet and is printed with a warning label.
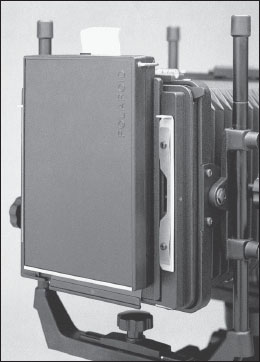
The Polaroid #545 film holder adapts their single-sheet films to a 4×5 spring back. ■
When your camera is set for an exposure, insert the Polaroid holder as you would a standard holder into the spring back of your camera, making sure the open side of the holder faces the lens. The #545i holder can also clip into the place of the spring back in a universal (or Graflok) back. After checking to make sure the shutter is closed and the holder is properly seated, pull the exposed end of the film packet straight out until it stops. You have withdrawn the lighttight envelope that contains the positive sheet and left the clip, negative, and chemical pod inside the holder. This is equivalent to withdrawing the darkslide from a sheet-film holder.
Place the holder on a steady flat suface and hold it in place firmly as you pull the packet through the rollers for processing. Leaving the holder in the camera for this operation risks jarring the camera out of position. ■
Make the exposure, then push the film envelope back into its original position and remove the holder from the camera. Swing the lever on the holder to P, for Process, and lay the holder on the edge of a flat surface as shown. Setting the lever to P engages the roller assembly at the top of the holder, pressing the rollers together. Secure the holder with one hand, grasp the end of the film packet with the other, and pull the packet straight out of the holder through the rollers. The pulling motion should be very steady and neither too slow nor too fast; it should take about half a second to slide the packet all the way through the rollers. Pulling the packet through the rollers breaks the pod of chemical reagent and spreads it between negative and positive as they are pressed together. As the negative develops, a process called diffusion transfers the image across the developer layer to the positive.
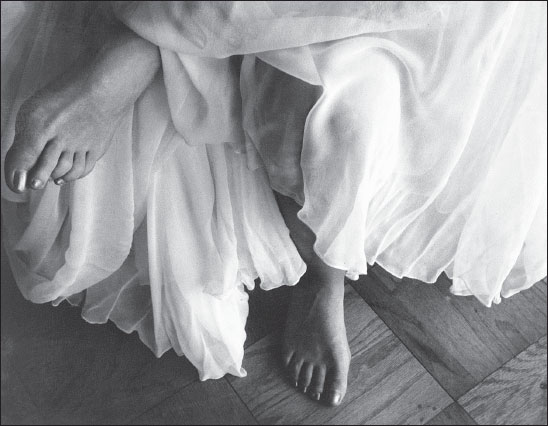
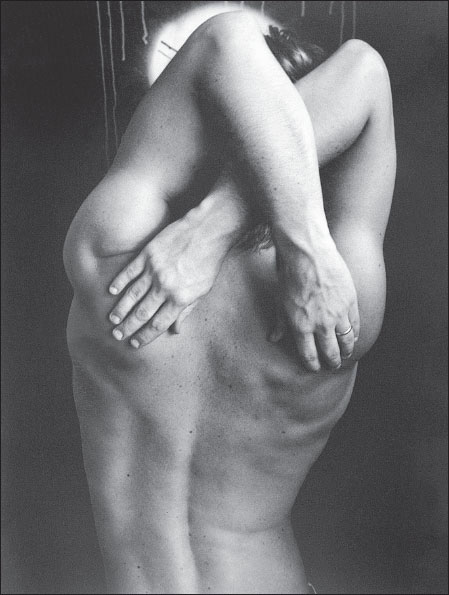
In Laura’s Feet, 1973, Rosamond Wolff Purcell took advantage of the ability of Type 52 film to render delicate light tones. ■
Begin timing the development just as the film leaves the rollers. Each type of film has its appropriate development time printed on each packet. A few seconds before the processing time elapses, peel apart the packet to reveal the negative/positive sandwich inside. Peel up a corner of the white positive sheet and separate it from the rest of the sandwich with a snap of your wrist at the moment the development time should end. Take care not to get any of the caustic developing reagent on your hands or clothing and wash it off immediately if you do.
Sheet Films. Polaroid made a wide range of sheet films to work with their 4×5 film holder. Their most popular self-developing films for proofing in the studio were print films in black and white and color that matched the ISO 100 film speed of the most popular conventional transparency films used by professionals. Useful for scientific and technical applications was a very fast (ISO 3000) black-and-white print film, and there was even a film (Type 55) that produced both a print and a usable large-format negative after a 20-second development.
Pack Films
The roll film used in Polaroid’s first amateur cameras required the negative and positive to remain in contact for development inside the camera. With the introduction of the pack film format in 1963, it was no longer necessary to wait for complete processing before making another exposure. Once a sheet of this pack film was exposed, the negative/positive sandwich could be pulled out of the camera through rollers, beginning the processing outside the camera. The packs, containing eight positive and eight negative sheets, were originally made to fit only Polaroid cameras containing built-in roller assemblies.
Polaroid introduced the Model #405 film pack adapter in 1974 to extend the usefulness of what by then was a full line of pack films. This adapter enabled photographers to use the series 100 (later, series 600) pack films in conventional 4×5 cameras. The finished prints from pack films were smaller than 4×5 (about 72×95mm, or 2⅞×3¾ inches), so with the purchase of each film holder Polaroid included an acetate template made to fit a 4×5 ground glass with position marks for the pack film format. The #405 holder incorporates a darkslide to allow removal of the holder from the camera for focusing and adjustment between exposures.
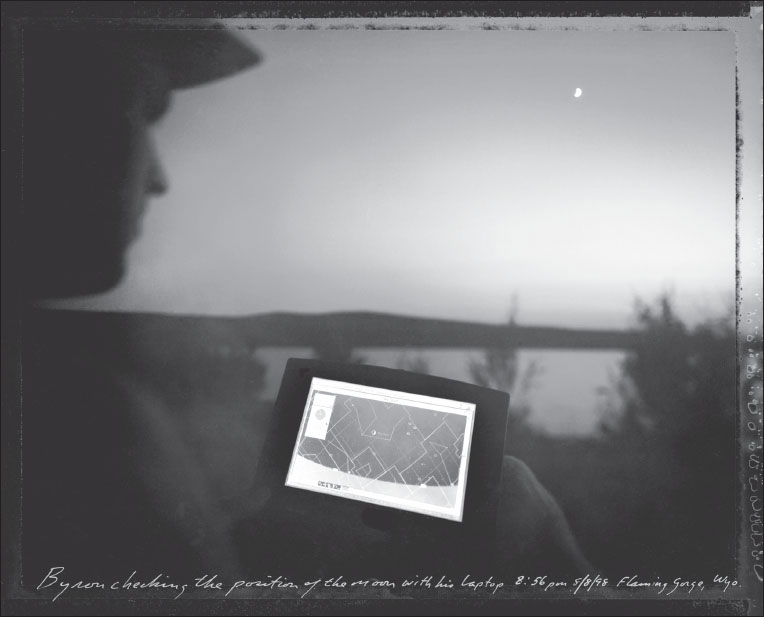
Mark Klett’s 1997 photograph Byron checking the position of the moon with his laptop, is an enlargement made from a Type 55 instant negative. Because of the very low light and the presence of a human subject, he needed to use as wide an aperture—giving him as short an exposure—as possible. Klett used both lens swing and tilt to align the plane of focus with the screen of the laptop, maximizing the visual effect of very limited depth of field. ■
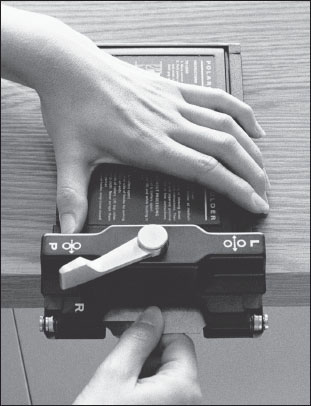
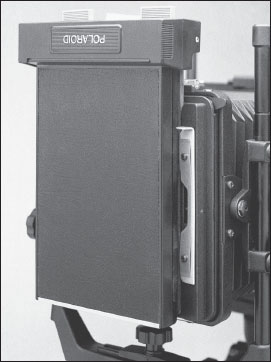
This Polaroid #405 Pack Film Adapter is held to the camera by the clips on the universal (Graflok) back. ■
Polaroid’s #550 Pack Film Adapter held packs that each make eight instant 4×5 prints. ■
Because the film packs were adapted to and not designed for the view camera, the holder is too thick to fit easily into all spring backs. And when it does fit, its thickness demands special care when inserting the holder to avoid jarring the camera. The holder was designed with side slots to allow it to clip into a universal back in place of the spring back.
Polaroid films produced in packs corresponded to their 4×5 films: there were black-and-white and color print films as well as a black-and-white positive/negative film.
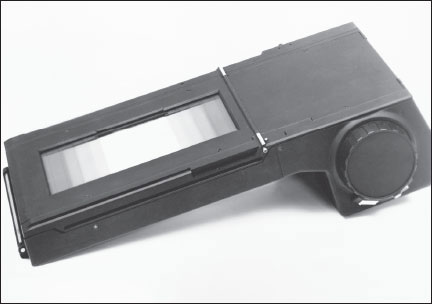
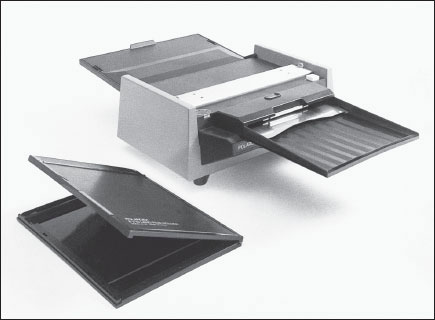
4×5 Pack Film. In 1981, Polaroid introduced a larger version of pack film specifically for the professional market. These convenient pack films in full 4×5 size required the Model 550 film holder to adapt them to a conventional 4×5 spring (or universal) back. Films available for use in the Model 550 included Type 552 black-and-white and Type 559 color print film. Like the Model 405 holder, the 550 loads rapidly with pre-packaged packs, has a built-in roller system that is removable for cleaning, and incorporates a darkslide. The product illustrations for this book were made on Type 552 (and 52) film and were reproduced directly from the 4×5 Polaroid prints. This process saved the author countless hours—in 1986, remember—of darkroom work. Fuji still makes some instant pack films.
The 8×10 System
Professional photographers who needed a finished product without delay could use Polaroid’s 8×10 system. Like the other professional products from Polaroid, the 8×10 system included both positive and negative sheets, development chemicals in a pod, a roller assembly to burst the pod for processing, and an adapter to fit the system to a conventional view camera. The resulting 8×10 prints could go home with the client, be placed on display immediately, or be used as the original for high-quality offset lithography. An 8×10 print is large enough to be a satisfactory final product for many of the needs of portrait or commercial photographers, and an instant 8×10 print was also useful for making proofs for critical 8×10 work with conventional films.
Although the positive and negative sheets were packaged separately, each film available for Polaroid’s 8×10 system was basically a larger version of one of their 4×5 products. The 8×10 system’s film holder (Model 81-06) accepts one sheet of negative material at a time for exposure in a conventional 8×10 camera. After exposure, you would slip the positive sheet with its attached chemical pod into the holder and insert the package into the electrically powered 81-12 Processor. Rollers large enough to distribute the developing reagent evenly across the eight-inch width were too heavy to be incorporated into the holder, and the separate motor-driven processor ensured that the film would pass through the rollers at a constant and correct speed. Its built-in timer started automatically and informed you when the selected processing time had elapsed.
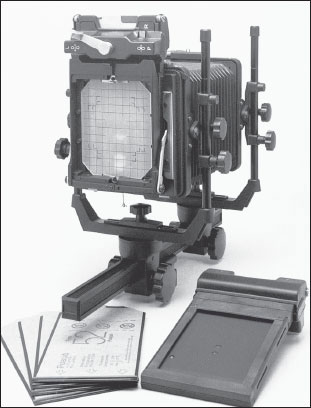
The 8×10 system from Polaroid used a separate motor-driven processor to ensure correct roller pressure and even development. The film holder shown here with the processor adapted the Polaroid negative to a standard 8×10 spring back. ■
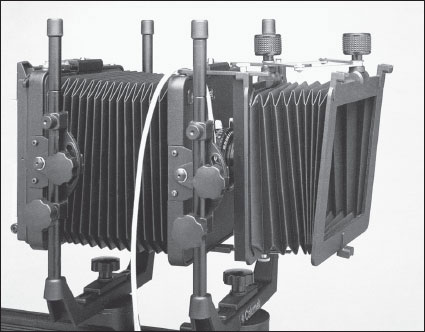
Bellows
The bellows on your camera is not an accessory but a necessary part of the camera. Your camera probably was supplied with an accordion-fold standard bellows as original equipment. The standard bellows for 4×5 cameras is square in cross section (it is also called a square bellows) and is the same size at the front and rear. Larger cameras most often have tapered standard bellows, still square in cross section but smaller at the camera’s front. A tapered bellows will collapse into a shorter package than a square bellows.
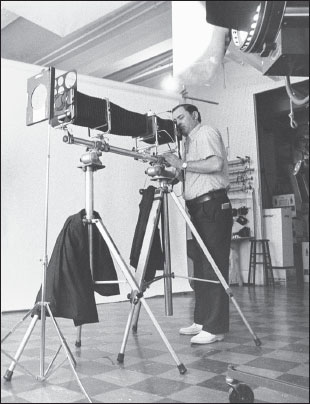
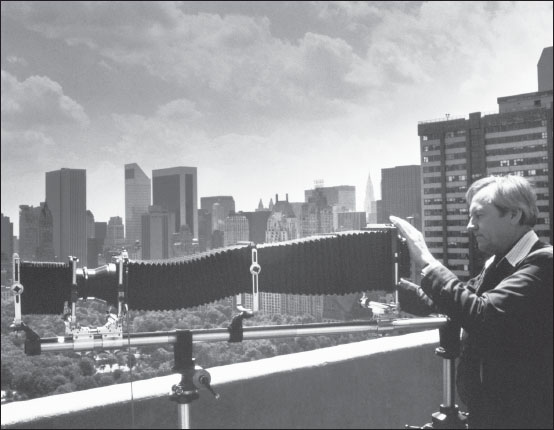
Originally a research lab curiosity, this immense view camera was built by Polaroid’s technicians to make instant 20×24-inch color prints. Now you can have a camera that size of your very own, made by several vendors. This photograph of the author using the camera was made by John Reuter, the manager of the New York studio in which one camera is based. ■
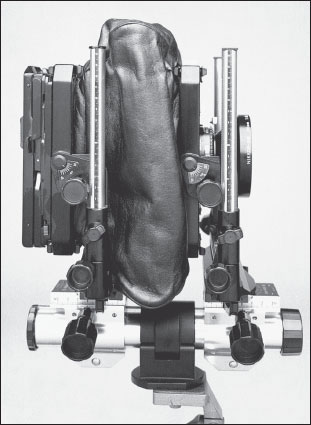
Bag Bellows. If your camera’s bellows is removable and sold as part of a modular camera system, you will have the option of buying and using a bag or wide-angle bellows. Bag bellows is an appropriate name for the amorphous mass of black material that replaces the traditional accordion folds of a square bellows. It is needed when you use short focal-length lenses because the short back-focus distance (image distance) of a wide-angle lens requires that the front and rear standards be quite close together—close enough that most accordion bellows would be compressed almost totally. A square bellows closed all the way becomes quite rigid and prevents use of the camera movements. In fact, very short focal-length lenses often cannot be brought close enough to the film plane to focus at infinity with the square bellows in place. The bag bellows, however, offers no restrictions on movements and will allow the front and rear standards to be as close together as the design of the camera permits. Use of the bag bellows is limited to short focal-length lenses because of its short maximum extension.
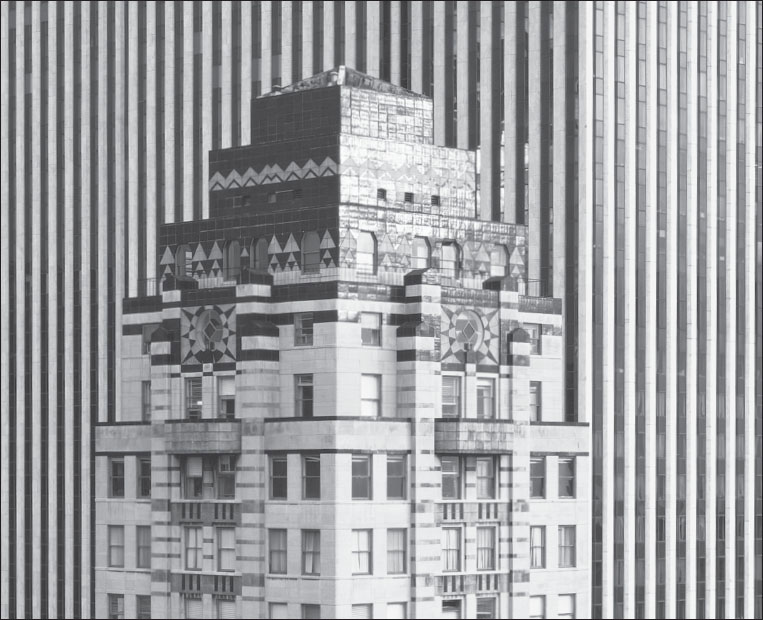
This photograph of the Fuller Building, with the General Motors Building in the background, was made by Reinhart Wolf for his 1980 book New York (original in color). ■
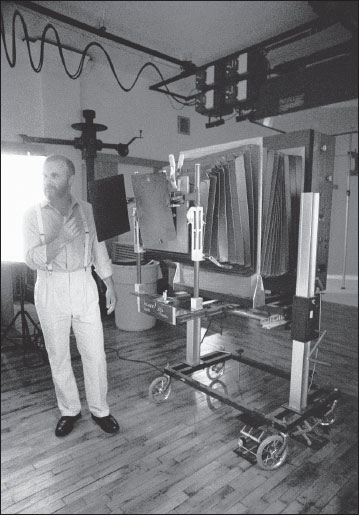
German photographer Reinhart Wolf is shown photographing the top of a skyscraper. His 1000mm lens required an extra standard and bellows on his 8×10 Sinar. The third bellows at the extreme left is a compendium lens shade. This photograph is by Geoff Juckes. ■
Extra Bellows. Very long lenses or extreme close-ups can require another bellows option available only for a modular monorail camera. When one bellows will not extend enough for a particular use, a second may be added by sliding another standard onto the rail into a position between the front and rear standards. Since the clips on both sides of the standards are the same, this center standard may be used to connect the rear of one bellows to the front of another.
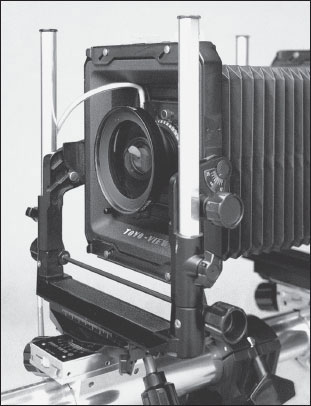
Using a wide-angle lens is much more convenient with a bag bellows and short monorail like on this Toyo. ■
Compendium Bellows. Another optional bellows, called a compendium bellows, fits over the lens to be used as a shade and works to accommodate the camera movements in a way that a fixed lens shade cannot. While you view through the ground glass, you may adjust the compendium’s extension to the correct length for a lens of any focal length and match any camera movements with the compendium’s own front swing and tilt. Keeping stray light from falling on the front of the lens during exposure will reduce image-degrading flare; the compendium should shade the lens by being extended as far as possible without vignetting (blocking part of the image). Vignetting can be seen in the corners and edges of the ground glass as shaded parts in the image itself. Once adjusted, the compendium can be moved on its hinges up out of the way of the lens so you can adjust the aperture and set and wind the shutter. The black accordion folds of its inner surface, like the interior of the camera’s bellows, act as a baffle to reduce unwanted light reflection. Many models of compendium bellows include a convenient drawer across the front of the bellows for holding a filter, but they require a larger, more expensive gel than those you can attach to the front of the lens.
The compendium bellows is a lens shade that is adjustable to accommodate camera movements. ■
Ground Glass
The ground glass supplied with your camera is relatively easy to replace. And since it is the most fragile part of your camera, it may not be long before you need to find out just how easy. You may also want to replace the screen with one of the optional styles to better suit your needs.
The most simple ground glass is a plain, unmarked rectangle cut in the correct dimensions to fit into the spring back’s frame on your camera’s back. Many plain ground-glass screens have cut corners that serve two purposes. First, if your camera does not incorporate lighttrap air vents in the standards, these cuts are necessary to allow air to flow in and out of the camera’s interior when the bellows is moved during setup or focusing. Second, you may look through these triangular openings to see the rear of the lens.
A magnifying loupe makes precise focusing easier. ■
By looking at the shape of the diaphragm visible from a corner of the back, you will be able to identify vignetting by the lens barrel, filter, lens shade, or a bend in the bellows. Vignetting is often the result of using camera movements too extreme for the coverage of the lens; some of the ground glass will be outside the image circle. When there is no interference, the open diaphragm set at the working aperture should appear oval and cal when viewed from a corner. Vignetting will cause this oval to be shaded, to be asymmetrical, or to have pointed ends. In an extreme case, the diaphragm may not be visible at all. If your ground glass does not have cut corners, you can do the job yourself if you are handy with a glass cutter. Unfortunately, cut corners also remove part of the image from view.
A less common ground-glass style has a clear, unground spot or circle with fine cross hairs in its center for aerial image focusing. You focus while looking at the cross hairs, and the lens image is projected through the glass and focused directly by your eye. When the cross hairs and aerial image (the one from the camera’s lens) are in focus simultaneously, the image distance (or focus) is correct. A low-power magnifier, or loupe, will aid in focusing with either screen. Some photographers, particularly in technical or scientific work, find aerial image focusing to be more precise than plain ground-glass focusing.
All lenses project less light to the edges than to the center and light at the edges of the frame is angled away from your eyes. An accessory fresnel lens, or screen, attached to the rear of your ground glass, or an optional ground glass incorporating such a screen, will more evenly illuminate the entire image area. The screen is actually a simple planoconvex lens sectioned into flat, concentric rings, and it directs the light leaving the ground glass into parallel rays. Without a fresnel (pronounced frĕnĕl’) screen, you may have difficulty seeing the corners of your ground-glass image.
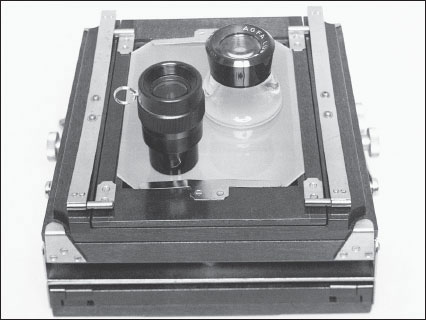
Another useful addition to the standard ground glass is a grid of horizontal and vertical lines etched or printed on its surface to aid in precise image alignment. A transparent plastic overlay with the same rulings can be taped in place to serve the same purpose, and can be removed when not needed. Other ruled lines are also useful to mark the borders of another film size or format, such as Polaroid 4×5 film, which produced an image that was slightly smaller than 4×5 and is not centered in the frame.
You may be able to find an accessory ground glass with the appropriate markings or you may have to add them to yours with a permanent marker. Temporary marks may be made directly on the ground glass with a china-marking crayon. Advertising photography often requires making a photograph to match an art director’s layout exactly. To make this job easier, a china-marking crayon or washable felt-tip pen can be used to sketch the layout with removable marks on a plastic overlay or upside down directly on the ground glass.
Loupes intended for viewing slides are satisfactory for view camera focusing. The compact loupe on the left, designed for view camera use, can be worn around your neck on a string. ■
This replacement 4×5 ground glass has an etched grid, cut corners, and framing marks for roll film. ■
This complicated montage was planned out methodically in advance. The art director sketched the placement of objects on the ground glass and photographer Steve Grohe made the final image with multiple exposures on a single sheet of film. ■

The final use of Grohe’s photograph, a magazine cover, shows how areas in the photograph were deliberately held open for type. The empty space at the lower left is for the mailing label. Most commercial photomontage is now done with a computer but the ground glass is very useful for visualizing the future assembly of elements. ■
Since it is much easier to replace the board in the camera than the lens in the board, you will need one lensboard for each lens you use frequently. Most lensboards are square and symmetrical and clip easily into the front standard of the camera for which they were made. Each board should have a center hole of the correct diameter drilled or punched for the shutter to be mounted in it. There are three standard shutter sizes:
#0 35mm #1 42mm #3 65.5mm
Many shutters use the head of a small screw as an alignment pin. The screw fits into a small hole in the lensboard just outside the edge of the center hole. This arrangement prevents the shutter from rotating in its mount.
Lensboards are made in a variety of mutually incompatible sizes and contours. Unlike the film back, no universal design for lensboards has ever been accepted. Only occasionally are the boards of one manufacturer interchangeable with another—for example, Sinar with Horseman, Linhof with Wista and Tachihara, and Graphic with Toyo. Many manufacturers make adapter boards which can be invaluable to anyone owning more than one camera. Usually they adapt a smaller board, such as a 4-inch-square Calumet to a larger opening for an 8-inch-square Toyo board. If you interchange lenses among several cameras, it is often wise to mount all your lenses on identical small boards, such as Toyo/Graphic or Calumet, and use an adapter to mount the small boards onto each camera.
Many times the design of a camera or the bulk of a bellows prevent the front and rear standards from being placed closely enough to focus a wide-angle lens. Special recessed lensboards accommodate very short focal-length lenses. A recessed lensboard holds the lens behind the normal position, preventing the bellows from compressing into inflexibility. Access to the shutter settings and cable-release mount can be restricted by a recessed board, sometimes necessitating special linkages and extensions.
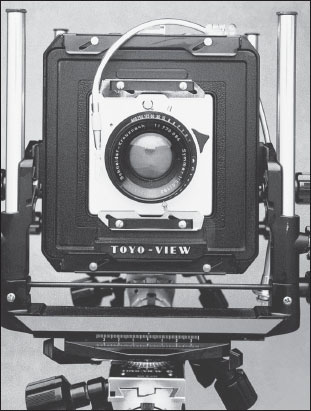
The smaller silver-colored lensboard is a Graphic board, which also fits an early Toyo Field. Here it is clipped in place in an adapter lensboard on a Toyo View. ■
A recessed lensboard can overcome some of a camera’s physical obstructions to the use of short-focal-length lenses. ■
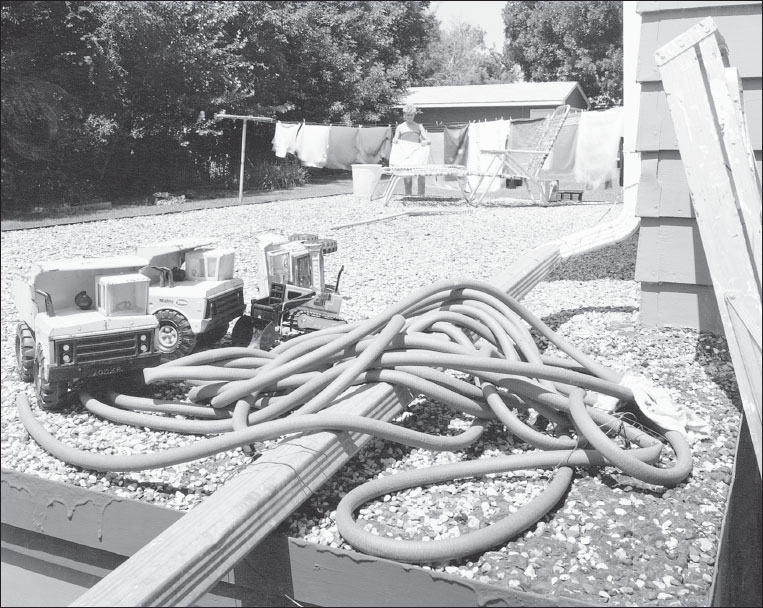
David Graham used a front tilt on his 8×10 camera to make the plane of focus cut through the toys and hose and the figure in the background (original in color). ■