
Chapter 2. How to Build and Use ACE in Your Programs
Traditional, closed-source libraries and toolkits are often packaged as shared libraries (DLLs), often without source code. Although ACE is available in installable packages for some popular platforms, its open-source nature means that you can not only see the source but also change it to suit your needs and rebuild it. Thus, it is very useful to know how to build it from sources.
You will also, of course, need to build your own applications. This chapter shows how to include ACE in your application's source code and build it.
2.1 A Note about ACE Versions
ACE kits are released periodically as either of two types:
- Release— two numbers, such as 5.3. These versions are stable and well tested. You should use release versions for product development unless you need to add a new feature to ACE in support of your project.
- Beta— three numbers, such as 5.3.4. These versions are development snapshots: the “bleeding edge.” They may contain bug fixes above the previous release, but they may also contain more bugs or new features whose effects and interactions have not yet been well tested.
The first beta kit following each release—for example, 5.3.1—is traditionally reserved for bug fixes to the release and usually doesn't contain any new features or API changes. This is sometimes referred to as a BFO (bug fix only) version. However, it doesn't go through all the same aggressive testing that a release does.
Riverace Corporation also releases “Fix Kits”: fixes made to a release version and labeled with the release version number followed by a letter that increases with each Fix Kit, such as 5.3c. Riverace maintains a separate stream of fixes for each ACE release and generates Fix Kits separately from the main ACE development stream. For this book's purposes, Fix Kits are treated the same as release versions. This book's descriptions and examples are based on ACE 5.3.
2.2 Guide to the ACE Distribution
The ACE distribution is arranged in a directory tree. This tree structure is the same whether you obtain ACE as part of a prebuilt kit or as sources only. The top-level directory in the ACE distribution is named ACE_wrappers, but it may be located in different places, depending on what type of kit you have.
• If you installed a prebuilt kit, ask your system administrator where the kit was installed to.
• If you have a source kit, it is probably a Gzip-compressed tar file. Copy the distribution file, which we'll assume is named ACE-5.3.tar.gz, to an empty directory. If on a UNIX system, use the following commands to unpack the kit:
$ gunzip ACE-5.3.tar.gz
$ tar xf ACE-5.3.tar
If on Windows, the WinZip utility is a good tool for unpacking the distribution. It works for either a Gzip'd tar file or a zip file.
In both cases, you'll have a directory named ACE_wrappers that contains the ACE sources and a lot of other useful files and information. Some useful and interesting files in ACE_wrappers are:
• VERSION—Identifies what version of ACE you have.
• PROBLEM-REPORT-FORM—Provides the information you'll need to report when asking for help or advice from Riverace or on the ACE user groups.
• ChangeLog—Provides a detailed list in reverse chronological order of all changes made to ACE. The ChangeLog file gets very long over time, so it's periodically moved to the ChangeLogs directory and a new ChangeLog started. For each new ACE version, Riverace writes release notes that summarize the more noteworthy changes and additions to ACE, but if you're curious about details, they're all in the ChangeLog.
• THANKS—Lists all the people who have contributed to ACE over the years. It is an impressive list, for sure. If you are so inspired to contribute new code or fixes to ACE, your name will be added too.
The following directories are located below ACE_wrappers:
• ace contains the source code for the ACE toolkit.
• bin contains a number of useful utilities, which we'll describe as their use comes up in this book.
• apps contains a number of ACE-based application programs, such as the JAWS web server and the Gateway message router. These programs are often useful in and of themselves; however, they also contain great examples of how to use ACE in various scenarios.
• docs contains information related to various aspects of ACE, such as its coding guidelines. (Should you wish to contribute code, it should follow these guidelines.)
• examples contains many examples of how to use ACE classes and frameworks. The examples are arranged by category to make it easier to find what you need.
• include/makeinclude contains all the ACE build system files.
• tests contains ACE's regression test suite. If you build ACE, it's a good idea to build and run the tests as well, using the run_test.pl Perl script. Even if you don't need to run the tests, these programs also contain many examples of ACE usage.
You should define an environment variable named ACE_ROOT to reference the full path to the top-level ACE_wrappers directory. You'll need this environment variable when building both ACE and your applications.
2.3 How to Build ACE
Why would you want to (re)build ACE?
• ACE has been ported to many platforms, but a prebuilt kit may not be available for yours.
• You've fixed a bug or obtained a source patch.
• You've changed a configuration setting.
Many open-source projects use the GNU Autotools to assist in configuring a build for a particular platform. ACE doesn't use GNU Autotools, because when ACE's build scheme was developed, GNU Autotools wasn't mature enough to handle ACE's requirements on the required platforms. Future versions of ACE will use the GNU Autotools, however.
ACE has its own build scheme that uses GNU Make (version 3.79 or newer is required) and two configuration files.
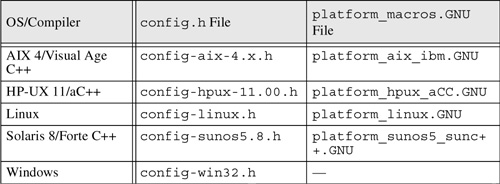
config.hcontains platform-specific settings used to select OS features and adapt ACE to the platform's compilation environment.platform_macros.GNUcontains commands and command options used to build ACE. This file allows selection of debugging capabilities, to build with threads or not, and so on. This file is not used with Microsoft Visual C++, as all command, feature, and option settings are contained in the Visual C++ project files.
Platform-specific versions of each of these files are included in the ACE source distribution.
The procedure for building ACE follows.
- If you don't already have it, obtain the ACE source kit. See Section 1.8 for information on where to find ACE kits.
- The kit comes in a few formats, most commonly a Gzip-compressed
tarfile. Use gunzip and tar—or WinZip on Windows—to unpack the kit into a new, empty directory. - (You can skip this step if using Microsoft Visual C++.) If you haven't already set the
ACE_ROOTenvironment variable, set it to the full pathname of the top-levelACE_wrappersdirectory: for example,ACE_ROOT=/home/mydir/ace/ACE_wrappers; export ACE_ROOT - Create the
config.hfile in$ACE_ROOT/ace/config.h. The file must include one of the platform-specific configuration files supplied by ACE. For example, the following is for building ACE on Windows:
#include "ace/config-win32.h"Table 2.1 lists the platform-specific configuration files for popular platforms. The full set of files is contained in
$ACE_ROOT/ace.Table 2.1. Configuration Files for Popular ACE Platforms
- (Skip this step if using Microsoft Visual C++.) Create the
platform_macros.GNUfile in$ACE_ROOT/include/makeinclude/platform_macros.GNU. The file must include one of the platform-specific files supplied by ACE. For example, the following could be used for building on Linux:
include $(ACE_ROOT)/include/makeinclude/platform_linux.GNUNote that this is a GNU Make directive, not a C++ preprocessor directive, so there's no leading
'#', and use of an environment variable is legal.Table 2.1 lists the platform-specific macros files for popular platforms. The full set of files is contained in
$ACE_ROOT/include/makeinclude. - Build ACE. The method depends on your compiler.
• Microsoft Visual C++ 6: Start Visual C++ and open the workspace file
$ACE_ROOT/ace/ace.dsw, select the desired configuration, and build.• Microsoft Visual C++ .NET: Start Visual C++ and open the solution file
$ACE_ROOT/ace/ace.sln, select the desired configuration, and build.• Borland C++Builder: Set your current directory to
$ACE_ROOTace, set the BCCHOME environment variable to the home directory where C++Builder is installed; use the C++Builder make command. For example:make -i -f Makefile.bor -DDEBUG=1 all• All others: Set your current directory to
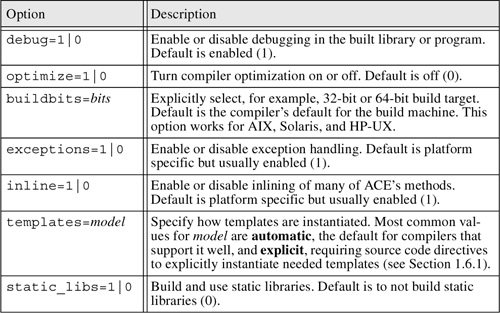
$ACE_ROOT/ace, and use the GNU make command:make [options]. Table 2.2 lists the options, which can also be placed in theplatform_macros.GNUfile before including the platform-specific file.
Table 2.2. GNU make Options
2.4 How to Include ACE in Your Applications
This book describes many things you can do with ACE and how to do them. Including ACE in your programs has two practical requirements.
- Include the necessary ACE header files in your sources. For example, to include the basic OS adaptation layer methods, add this to your source:
#include "ace/OS.h"You should always specify the
acedirectory with the file to avoid confusion with choosing a file from somewhere in the include path other than the ACE sources. To be sure that the ACE header files are located correctly, you must include$ACE_ROOTin the compiler's include search path, usually done by using the-Ior/Ioption.You should include the necessary ACE header files before including your own headers or system-provided headers. ACE's header files can set preprocessor macros that affect system headers and feature tests, so it is important to include ACE files first. This is especially important for Windows but is good practice to follow on all platforms.
- Link the ACE library with your application or library. For POSIX platforms, this involves adding
-lACEto the compiler link command. If your ACE version was installed from a prebuilt kit, the ACE library was probably installed to a location that the compiler/linker searches by default. If you built ACE yourself, the ACE library is in$ACE_ROOT/ace. You must include this location in the compiler/linker's library search path, usually by using the-Loption.
2.5 How to Build Your Applications
The scheme used to build ACE can also be used to build your applications. The advantage to using the supplied scheme is that you take advantage of the built-in knowledge about how to compile and link both libraries and executable programs properly in your environment. One important aspect of that knowledge is having the correct compile and link options to properly include ACE and the necessary vendor-supplied libraries in each step of your build. Even if you don't use the ACE build scheme, you should read about how the compile and link options are set for your platform to be sure that you do compatible things in your application's build scheme.
This is a small example of how easy it is to use the GNU Make-based system. Microsoft Visual C++ users will not need this information and can safely skip to Section 2.5.1.
If you have a program called hello_ace that has one source file named hello_ace.cpp, the Makefile to build it would be:
BIN = hello_ace
BUILD = $(VBIN)
SRC = $(addsuffix .cpp,$(BIN))
LIBS = -lMyOtherLib
LDFLAGS = -L$(PROJ_ROOT)/lib
#---------------------------------------------------
#Include macros and targets
#---------------------------------------------------
include $(ACE_ROOT)/include/makeinclude/wrapper_macros.GNU
include $(ACE_ROOT)/include/makeinclude/macros.GNU
include $(ACE_ROOT)/include/makeinclude/rules.common.GNU
include $(ACE_ROOT)/include/makeinclude/rules.nonested.GNU
include $(ACE_ROOT)/include/makeinclude/rules.bin.GNU
include $(ACE_ROOT)/include/makeinclude/rules.local.GNU
That Makefile would take care of compiling the source code and linking it with ACE and would work on each ACE platform that uses the GNU Make-based scheme. The LIBS = -lMyOtherLib line specifies that, when linking the program, -lMyOtherLib will be added to the link command; the specified LDFLAGS value will as well. This allows you to include libraries from another part of your project or from a third-party product. The ACE make scheme will automatically add the options to include the ACE library when the program is linked. Building an executable program from multiple source files would be similar:
BIN = hello_ace
FILES = Piece2 Piece3
SRC= $(addsuffix .cpp,$(FILES))
OBJ= $(addsuffix .o,$(FILES))
BUILD = $(VBIN)
#---------------------------------------------------------
# Include macros and targets
#---------------------------------------------------------
include$(ACE_ROOT)/include/makeinclude/wrapper_macros.GNU
include$(ACE_ROOT)/include/makeinclude/macros.GNU
include$(ACE_ROOT)/include/makeinclude/rules.common.GNU
include$(ACE_ROOT)/include/makeinclude/rules.nonested.GNU
include$(ACE_ROOT)/include/makeinclude/rules.bin.GNU
include$(ACE_ROOT)/include/makeinclude/rules.local.GNU
This Makefile would add Piece2.cpp and Piece3.cpp to the hello_ace program, first compiling the new files and then linking all the object files together to form the hello_ace program.
The following example shows how to build a shared library from a set of source files:
SHLIB = libSLD.$(SOEXT)
FILES = Source1 Source2 Source3
LSRC = $(addsuffix .cpp,$(FILES))
LIBS += $(ACELIB)
BUILD = $(VSHLIB)
#-----------------------------------------------------------
# Include macros and targets
#-----------------------------------------------------------
include $(ACE_ROOT)/include/makeinclude/wrapper_macros.GNU
include $(ACE_ROOT)/include/makeinclude/macros.GNU
include $(ACE_ROOT)/include/makeinclude/rules.common.GNU
include $(ACE_ROOT)/include/makeinclude/rules.nonested.GNU
include $(ACE_ROOT)/include/makeinclude/rules.lib.GNU
include $(ACE_ROOT)/include/makeinclude/rules.local.GNU
#----------------------------------------------------------
# Local targets
#----------------------------------------------------------
ifeq ($(shared_libs),1)
ifneq ($(SHLIB),)
CPPFLAGS += -DSLD_BUILD_DLL
endif
endif
This Makefile builds libSLD.so—the suffix will automatically be the correct one for shared libraries on the build platform—by compiling Source1.cpp, Source2.cpp, and Source3.cpp and then linking them by using the appropriate commands for the build platform.
The last section of the previous Makefile example conditionally adds a preprocessor macro named SLD_BUILD_DLL when building a shared library. This is related to the need to declare library functions as “exported” and is needed mostly on Windows. The next section discusses this further.
2.5.1 Import/Export Declarations and DLLs
Windows has specific rules for explicitly importing and exporting symbols in DLLs. Developers with a UNIX background may not have encountered these rules in the past, but they are important for managing symbol usage in DLLs on Windows. The rules follow.
• When building a DLL, each symbol that should be visible from outside the DLL must have the declaration __declspec (dllexport) to specify that the symbol or class members are to be exported from the DLL for use by other programs or DLLs.
• When declaring the use of a symbol that your code is importing from another DLL, your declaration of the symbol or class must include __declspec (dllimport).
Thus, depending on whether a particular symbol or class is being imported from a DLL or being built into a DLL for export to other users, the declaration of the symbol must be different. When symbol declarations reside in header files, as is most often the case, a scheme is needed to declare the symbol correctly in either case.
ACE makes it easy to conform to these rules by supplying a script that generates the necessary import/export declarations and a set of guidelines for using them successfully. To ease porting, the following procedure can be used on all platforms that ACE runs on.
- Select a concise mnemonic for each DLL to be built.
- Run the
$ACE_ROOT/bin/generate_export_file.plPerl script, specifying the DLL's mnemonic on the command line. The script will generate a platform-independent header file and write it to the standard output. Redirect the output to a file namedmnemonic_export.h. - Include the generated file in each DLL source file that declares a globally visible class or symbol.
- To use in a class declaration, insert the keyword
mnemonic_Exportbetween theclasskeyword and the class name. - When compiling the source code for the DLL, define the macro
mnemonic_BUILD_DLL(SLD_BUILD_DLLin the previous example).
Following this procedure results in the following behavior on Windows.
- Symbols decorated using the preceding guidelines will be declared using
__declspec (dllexport)when built in their DLL. - When referenced from components outside the DLL, the symbols will be declared
__declspec (dllimport).
If you choose a separate mnemonic for each DLL and use them consistently, it will be straightforward to build and use DLLs across all OS platforms.
2.5.2 Important Notes for Microsoft Visual C++ Users
As mentioned, the GNU Make scheme is not used with Microsoft Visual C++. All needed settings are recorded in Visual C++'s project files. Because there's no common “include” file that a project can reuse settings from, each project must define the correct settings for each build configuration: debug versus release, DLL versus LIB, MFC versus non-MFC. Settings important for proper ACE usage follow. These descriptions are valid for Visual C++ version 6, and are all accessible via the Project>Settings... menu.
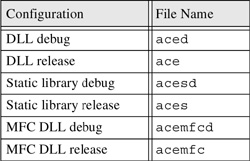
Table 2.3. ACE Library File Names for Visual C++
• C/C++ tab
• Code Generation category: Choose a multithreaded version of the runtime library.
• Preprocessor category: You should include $(ACE_ROOT) in the “Additional include directories” field. Some users choose to include $(ACE_ROOT) in the Tools>Options... menu on the Directories tab. This is acceptable if you always use one version of ACE for all projects. It is more flexible, however, to specify the ACE include path in each project.
• Link tab
• Input category: Include the proper ACE library file in the “Object/library modules” field. Unlike the POSIX platforms, the name of the ACE library is different for various build configurations. Table 2.3 lists the ACE library file names. Select the desired name and append .lib to it to get the file name to add to the “Object/library modules” field. When building a debug configuration of your project, you should choose one of the debug ACE files as well—similarly, choose a release ACE file for a release build of your project—or you may get errors at link time.
• Input category: Include the path to the ACE library link file in the “Additional library path” field. This will generally be $(ACE_ROOT)/ace. If you're linking with an ACE DLL, the export library file (.LIB) is in $(ACE_ROOT)/ace, and the matching DLL your program will access at runtime is in $(ACE_ROOT)/bin; it has the same base name but a .DLL suffix. Do not include $(ACE_ROOT)/bin in the “Additional library path” field. Instead, either include %ACE_ROOT%/bin in your PATH environment variable, or copy the needed DLL file to a location that is part of the PATH.
2.6 Summary
In this chapter, we learned about ACE kits and version types, how to build ACE, and why you might need to. We also learned how to build both an executable program and a shared library (DLL) that use ACE. Finally, we learned some details about building and using shared libraries on Windows platforms.
Next, we look at one of the most basic developer needs—a flexible way to log runtime information and trace program execution—and how to use the facilities ACE provides to meet those needs.