
6
Forms and Data Validation
In this chapter, we'll mostly deal with forms, data input, and validation techniques. As we already know, HTML forms are one of the most important and delicate aspects of any business application. Nowadays, forms are used to fulfill almost any task involving user-submitted data, such as registering or logging in to a website, issuing a payment, reserving a hotel room, ordering a product, performing and retrieving search results, and more.
If we were asked to define a form from a developer's perspective, we would come out with the statement that a form is a UI-based interface that allows authorized users to enter data that will be sent to a server for processing. The moment we accept this definition, two additional considerations should come to mind:
- Each form should provide a data entry experience good enough to efficiently guide our users through the expected workflow; otherwise, they won't be able to use it properly.
- Each form, as long as it brings potentially insecure data to the server, could have a major security impact in terms of data integrity, data security, and system security, unless the developer possesses the required know-how to adopt and implement the appropriate countermeasures.
These two considerations provide a good summary of what we'll do in this chapter: we'll do our best to guide our users into submitting data in the most appropriate way, and we'll also learn how to check these input values properly to prevent, avoid, and/or minimize a wide spectrum of integrity and security threats. It's also important to understand that these two considerations are frequently intertwined with each other; hence, we'll often deal with them at the same time.
In this chapter, we'll cover the following topics:
- Angular forms, where we'll deal with Template-Driven Forms as well as Reactive Forms, all while understanding the pros and cons of both approaches and looking at which is the most suitable to use in various common scenarios.
- Data validation, where we'll learn how to double-check our users' input data in the front-end and also from the back-end, as well as the various techniques to give visual feedback when they send incorrect or invalid values.
- Form builder, where we'll implement another Reactive Form using some factory methods instead of manually instantiating the various form model elements.
At the end of each task, we'll also take some time to verify the result of our work using our web browser.
Technical requirements
In this chapter, we're going to need all the technical requirements that we mentioned in the previous chapters, with no additional resources, libraries, or packages.
The code files for this chapter can be found at: https://github.com/PacktPublishing/ASP.NET-Core-5-and-Angular/tree/main/Chapter_06
Exploring Angular forms
If we take a look at our current .NET Core with Angular projects, we will see how none of them allow our users to interact with the data:
- For the
HealthCheckapp, this is expected since there's simply no data to deal with: this is a monitor app that doesn't store anything and requires no input from the user. - The
WorldCitiesapp, however, tells a whole different story: we do have a database that we use to return results to our users, who could – at least theoretically – be allowed to make changes.
It goes without saying that the WorldCities app would be our best candidate for implementing our forms. In the following sections, we'll do just that, starting with the Angular front-end and then moving to the .NET Core back-end.
Forms in Angular
Let's take a minute to briefly review our WorldCities app in the state we left it in at the end of Chapter 5, Fetching and Displaying Data. If we take a look at the CitiesComponent and CountriesComponent templates, we will see that we actually already have a data input element of some sort: we're clearly talking about <mat-form-field>, which is the selector of Angular Material's MatInputModule, which we added to the loop during Chapter 5, Fetching and Displaying Data, to let our users filter the cities and countries by their names.
Here's the relevant code snippet:
<mat-form-field [hidden]="!cities">
    <input matInput (keyup)="loadData($event.target.value)"
        placeholder="Filter by name (or part of it)...">
</mat-form-field>
This means that we are already accepting some kind of user action – consisting of a single input string – and reacting to it accordingly: such an action + reaction chain is the basis of an interaction between the user and the app, which is basically what the vast majority of forms are all about.
However, if we look at the generated HTML code, we can clearly see that we do not have any actual <form> element. We can test it by right-clicking that view's input element from our browser window and selecting Inspect element, as shown in the following screenshot:

Figure 6.1: Inspecting the HTML of the input element
As we can see, there is no main form, only a single input field that perfectly handles the task we've assigned to it. The absence of the form is not missed because we're not submitting anything using FORM DATA: we're performing our data fetching using the Angular HttpClient module, which technically does this using an asynchronous XMLHttpRequest (XHR) through JavaScript – in one word, AJAX.
Such an approach does not require a <form> container element and is capable of handling the data encoding and transmission tasks using the following supported methods:
application/x-www-form-urlencodedmultipart/form-datatext/plain
It only needs the actual input elements to get the required values from the user.
For further details regarding the encoding method supported by the HTML <form> element, take a look at the following specifications:
URL Living Standard, – URL-encoded Form Data: https://url.spec.whatwg.org/#concept-urlencoded
HTML Living Standard, section 4.10.21.7 – Multipart Form Data: https://html.spec.whatwg.org/multipage/form-control-infrastructure.html#multipart-form-data
HTML Living Standard, section 4.10.21.8 – Plain Text Form Data: https://html.spec.whatwg.org/multipage/form-control-infrastructure.html#plain-text-form-data
Although not required, a form element – or any HTML container for our input elements – might be very useful for a number of important tasks that don't fall into the data encoding and transmission subjects. Let's see what they are and why we may need them.
Reasons to use forms
Let's try to summarize the most blatant shortcomings of our current formless approach:
- We cannot keep track of the global form state since there's no way we can tell whether the input text is valid or not.
- We have no easy way to display an error message to the users to let them know what they have to do to make the form valid.
- We don't verify the input data in any way; we just collect and toss it to the server without thinking twice.
That's absolutely fine in our specific scenario since we're only dealing with a single text string and we don't care too much about its length, the input text, and so on. However, if we have to deal with multiple input elements and several value types, such limitations could seriously hinder our work – in terms of either data flow control, data validation, or user experience.
Sure, we could easily work around most of the aforementioned issues by implementing some custom methods within our form-based components; we could throw some errors such as isValid(), isNumber(), and so on here and there, and then hook them up to our template syntax and show/hide the validation messages with the help of structural directives such as *ngIf, *ngFor, and the like. However, it would definitely be a horrible way to address our problem; we didn't choose a feature-rich client-side framework such as Angular to work that way.
Luckily enough, we have no reason to do that since Angular provides us with a couple of alternative strategies to deal with these common form-related scenarios:
- Template-Driven Forms
- Model-Driven Forms, also known as Reactive Forms
Both of them are highly coupled with the framework and thus extremely viable; they both belong to the @angular/forms library and also share a common set of form control classes. However, they also have their own specific sets of features, along with their pros and cons, which could ultimately lead to us choosing one of them.
Let's try to quickly summarize these differences.
Template-Driven Forms
If you've come from AngularJS, there's a high chance that the Template-Driven approach will ring a bell or two. As the name implies, Template-Driven Forms host most of the logic in the template code; working with a Template-Driven Form means:
- Building the form in the
.htmltemplate file - Binding data to the various input fields using an
ngModelinstance - Using a dedicated
ngFormobject related to the whole form and containing all the inputs, with each being accessible through their name
These things need to be done in order to perform the required validity checks.
To understand this, here's what a Template-Driven Form looks like:
<form novalidate autocomplete="off" #form="ngForm"
    (ngSubmit)="onSubmit(form)">

    <input type="text" name="name" value="" required
        placeholder="Insert the city name..."
        [(ngModel)]="city.Name" #title="ngModel"
        />
    <span *ngIf="(name.touched || name.dirty) &&
     name.errors?.required">
        Name is a required field: please enter a valid city name.
    </span>
    <button type="submit" name="btnSubmit"
      [disabled]="form.invalid">
      Submit
    </button>
</form>
As we can see, we can access any element, including the form itself, with some convenient aliases – the attributes with the # sign – and check for their current states to create our own validation workflow. These states are provided by the framework and will change in real time, depending on various things: touched, for example, becomes True when the control has been visited at least once; dirty, which is the opposite of pristine, means that the control value has changed, and so on. We used both touched and dirty in the preceding example because we want our validation message to only be shown if the user moves their focus to the <input name="name"> and then goes away, leaving it blank by either deleting its value or not setting it.
These are Template-Driven Forms in a nutshell; now that we've had an overall look at them, let's try to summarize the pros and cons of this approach.
The pros
Here are the main advantages of Template-Driven Forms:
- Template-Driven Forms are very easy to write. We can recycle most of our HTML knowledge (assuming that we have any). On top of that, if we came from AngularJS, we already know how well we can make them work once we've mastered the technique.
- They are rather easy to read and understand, at least from an HTML point of view; we have a plain, understandable HTML structure containing all the input fields and validators, one after another. Each element will have a name, a two-way binding with the underlying
ngModel, and (possibly) Template-Driven logic built upon aliases that have been hooked to other elements that we can also see, or to the form itself.
The cons
- Template-Driven Forms require a lot of HTML code, which can be rather difficult to maintain and is generally more error-prone than pure TypeScript.
- For the same reason, these forms cannot be unit tested. We have no way to test their validators or to ensure that the logic we implemented will work, other than running an end-to-end test with our browser, which is hardly ideal for complex forms.
- Their readability will quickly drop as we add more and more validators and input tags. Keeping all their logic within the template might be fine for small forms, but it doesn't scale well when dealing with complex data items.
Ultimately, we can say that Template-Driven Forms might be the way to go when we need to build small forms with simple data validation rules, where we can benefit more from their simplicity. On top of that, they are quite similar to the typical HTML code we're already used to (assuming that we do have a plain HTML development background); we just need to learn how to decorate the standard <form> and <input> elements with aliases and throw in some validators handled by structural directives such as the ones we've already seen, and we'll be set in (almost) no time.
For additional information on Template-Driven Forms, we highly recommend that you read the official Angular documentation at: https://angular.io/guide/forms
That being said, the lack of unit testing, the HTML code bloat that they will eventually produce, and the scaling difficulties will eventually lead us toward an alternative approach for any non-trivial form.
Model-Driven/Reactive Forms
The Model-Driven approach was specifically added in Angular 2+ to address the known limitations of Template-Driven Forms. The forms that are implemented with this alternative method are known as Model-Driven Forms or Reactive Forms, which are the exact same thing.
The main difference here is that (almost) nothing happens in the template, which acts as a mere reference to a more complex TypeScript object that gets defined, instantiated, and configured programmatically within the component class: the form model.
To understand the overall concept, let's try to rewrite the previous form in a Model-Driven/Reactive way (the relevant parts are highlighted). The outcome of doing this is as follows:
<form [formGroup]="form" (ngSubmit)="onSubmit()">
    <input formControlName="name" required />
    <span *ngIf="(form.get('name').touched || form.get('name').dirty)
        && form.get('name').errors?.required">
        Name is a required field: please enter a valid city name.
    </span>
    <button type="submit" name="btnSubmit"
        [disabled]="form.invalid">
        Submit
    </button>
</form>
As we can see, the amount of required code is much lower.
Here's the underlying form model that we will define in the component class file (the relevant parts are highlighted in the following code):
import { FormGroup, FormControl } from '@angular/forms';
class ModelFormComponent implements OnInit {
  form: FormGroup;
  ngOnInit() {
    this.form = new FormGroup({
        title: new FormControl()
    });
  }
}
Let's try to understand what's happening here:
- The
formproperty is an instance ofFormGroupand represents the form itself. FormGroup, as the name suggests, is a container of form controls sharing the same purpose. As we can see, theformitself acts as aFormGroup, which means that we can nestFormGroupobjects inside otherFormGroupobjects (we didn't do that in our sample, though).- Each data input element in the form template – in the preceding code,
name– is represented by an instance ofFormControl. - Each
FormControlinstance encapsulates the related control's current state, such asvalid,invalid,touched, anddirty, including its actual value. - Each
FormGroupinstance encapsulates the state of each child control, meaning that it will only be valid if/when all its children are also valid.
Also, note that we have no way of accessing the FormControls directly like we were doing in Template-Driven Forms; we have to retrieve them using the .get() method of the main FormGroup, which is the form itself.
At first glance, the Model-Driven template doesn't seem too different from the Template-Driven one; we still have a <form> element, an <input> element hooked to a <span> validator, and a submit button; on top of that, checking the state of the input elements takes a bigger amount of source code since they have no aliases we can use. What's the real deal, then?
To help us visualize the difference, let's look at the following diagrams: here's a schema depicting how Template-Driven Forms work:

Figure 6.2: Template-Driven Forms schematic
By looking at the arrows, we can easily see that, in Template-Driven Forms, everything happens in the template; the HTML form elements are directly bound to the DataModel component represented by a property filled with an asynchronous HTML request to the Web Server, much like we did with our cities and country table. That DataModel will be updated as soon as the user changes something, that is, unless a validator prevents them from doing that. If we think about it, we can easily understand how there isn't a single part of the whole workflow that happens to be under our control; Angular handles everything by itself using the information in the data bindings defined within our template. This is what Template-Driven actually means: the template is calling the shots.
Now, let's take a look at the Model-Driven Forms (or Reactive Forms) approach:

Figure 6.3: Model-Driven/Reactive Forms schematic
As we can see, the arrows depicting the Model-Driven Forms workflow tell a whole different story. They show how the data flows between the DataModel component – which we get from the Web Server – and a UI-oriented form model that retains the states and the values of the HTML form (and its children input elements) that are presented to the user. This means that we'll be able to get in-between the data and the form control objects and perform a number of tasks firsthand: push and pull data, detect and react to user changes, implement our own validation logic, perform unit tests, and so on.
Instead of being superseded by a template that's not under our control, we can track and influence the workflow programmatically, since the form model that calls the shots is also a TypeScript class; that's what Model-Driven Forms are about. This also explains why they are also called Reactive Forms – an explicit reference to the Reactive programming style that favors explicit data handling and change management throughout the workflow.
For additional information on Model-Driven/Reactive Forms, we highly recommend reading the official Angular documentation at: https://angular.io/guide/reactive-forms
Enough with the theory; it's time to empower our components with some Reactive Forms.
Building our first Reactive Form
In this section, we'll create our first Reactive Form. More specifically, we're going to build a CityEditComponent that will give our users the chance to edit an existing city record.
To do that, we'll do the following:
- Add a reference to the
ReactiveFormsModuleto ourAppModuleclass. - Create the
CityEditComponentTypeScript and template files.
Let's get started.
ReactiveFormsModule
The first thing we have to do to start working with Reactive Forms is add a reference to the ReactiveFormsModule in the AppModule class.
From Solution Explorer, open the /ClientApp/src/app/app.module.ts file and add the following code (the updated source code is highlighted):
import { BrowserModule } from '@angular/platform-browser';
import { NgModule } from '@angular/core';
import { FormsModule } from '@angular/forms';
import { HttpClientModule, HTTP_INTERCEPTORS } from '@angular/common/http';
import { AppRoutingModule } from './app-routing.module';
import { AppComponent } from './app.component';
import { NavMenuComponent } from './nav-menu/nav-menu.component';
import { HomeComponent } from './home/home.component';
import { CitiesComponent } from './cities/cities.component';
import { CountriesComponent } from './countries/countries.component';
import { BrowserAnimationsModule } from '@angular/platform-browser/animations';
import { AngularMaterialModule } from './angular-material.module';
import { ReactiveFormsModule } from '@angular/forms';
@NgModule({
  declarations: [
    AppComponent,
    NavMenuComponent,
    HomeComponent,
    CitiesComponent,
    CountriesComponent
  ],
  imports: [
    BrowserModule.withServerTransition({ appId: 'ng-cli-universal' }),
    HttpClientModule,
    FormsModule,
    AppRoutingModule,
    BrowserAnimationsModule,
    AngularMaterialModule,
    ReactiveFormsModule
  ],
  providers: [],
  bootstrap: [AppComponent]
})
export class AppModule { }
Now that we've added a reference to the ReactiveFormsModule in our app's AppModule file, we can implement the Angular component that will host the actual form.
CityEditComponent
Since our CityEditComponent is meant to allow our users to modify a city, we'll need to let it know which city it has to fetch from (and send to) the server. The best way to do that is by using a GET parameter, such as the city id.
Therefore, we're going to implement a standard Master/Detail UI pattern, much like the following one:

Figure 6.4: A Master/Detail UI pattern
This editing pattern, other than being the most used in the world when dealing with a list of items, is a perfect fit for our scenario. Sounds like a plan: let's do it!
From the Solution Explorer of our WorldCities project, do the following:
- Navigate to the
/ClientApp/src/app/citiesfolder. - Right-click the folder's name and select Add | New Item three times to create the following files:
city-edit.component.tscity-edit.component.htmlcity-edit.component.css
We know what we're doing here due to what we learned about in Chapter 3, Front-End and Back-End Interactions: we're creating a new Angular component.
city-edit.component.ts
Once you're done, open the three new (and empty) files and fill them with the following, the source code for the /ClientApp/src/app/cities/city-edit.component.ts file:
import { Component, Inject, OnInit } from '@angular/core';
import { HttpClient } from '@angular/common/http';
import { ActivatedRoute, Router } from '@angular/router';
import { FormGroup, FormControl } from '@angular/forms';
import { City } from './City';
@Component({
  selector: 'app-city-edit',
  templateUrl: './city-edit.component.html',
  styleUrls: ['./city-edit.component.css']
})
export class CityEditComponent implements OnInit {
  // the view title
  title: string;
  // the form model
  form: FormGroup;
  // the city object to edit
  city: City;
  constructor(
    private activatedRoute: ActivatedRoute,
    private router: Router,
    private http: HttpClient,
    @Inject('BASE_URL') private baseUrl: string) {
  }
  ngOnInit() {
    this.form = new FormGroup({
      name: new FormControl(''),
      lat: new FormControl(''),
      lon: new FormControl('')
    });
    this.loadData();
  }
  loadData() {
    // retrieve the ID from the 'id' parameter
    var id = +this.activatedRoute.snapshot.paramMap.get('id');
    // fetch the city from the server
    var url = this.baseUrl + "api/Cities/" + id;
    this.http.get<City>(url).subscribe(result => {
      this.city = result;
      this.title = "Edit - " + this.city.name;
      // update the form with the city value
      this.form.patchValue(this.city);
    }, error => console.error(error));
  }
  onSubmit() {
    var city = this.city;
    city.name = this.form.get("name").value;
    city.lat = +this.form.get("lat").value;
    city.lon = +this.form.get("lon").value;
    var url = this.baseUrl + "api/Cities/" + this.city.id;
    this.http
      .put<City>(url, city)
        .subscribe(result => {
          console.log("City " + city.id + " has been updated.");
          // go back to cities view
          this.router.navigate(['/cities']);
        }, error => console.error(error));
    }
}
This is a fair amount of source code: luckily enough, there are a lot of comments that should help us understand the purpose of each relevant step.
Let's try to summarize what we did here:
- We added some
importreferences to the modules we're about to use within this class: among them, we can see a couple of new kids on the block:@angular/routerand@angular/form. The former is required to define some internal routing patterns, while the latter contains theFormGroupandFormControlclasses that we need in order to build our form. - Right below the class definition, we created a
FormGroupinstance within aformvariable: that's our form model. - The
formvariable instance contains threeFormControlobjects that will store the city values we want to allow our users to change:name,lat, andlon. We don't want to make them change theIdor theCountryId– at least, not for now. - Right below the
formvariable, we defined acityvariable that will host the actual city when we retrieve it from the database. - The city retrieval task is handled by the
loadData()method, which is rather similar to the one we implemented in thecities.component.tsfile: a standard data-fetching task handled by anHttpClientmodule that's injected (as usual) through theconstructor(). The most relevant difference here is that the method, right after the HTTP request/response cycle, proactively loads the retrieved city data within the form model (by using the form'spatchValue()method) instead of relying on the Angular data-binding feature: that's hardly a surprise since we're using the Model-Driven/Reactive approach and not the Template-Driven one. - The
onSubmit()method is where the update magic takes place:HttpClientplays a major role here as well by issuing a PUT request to the server sending thecityvariable properly. Once the Observable subscription has been processed, we use therouterinstance to redirect the user back to theCitiesComponent(the Master view).
Before moving further, it could be wise to spend a couple of words talking about the patchValue() method that we used in the preceding code.
The @angular/forms package gives us two ways to update a Reactive Form's model: the setValue() method, which sets a new value for each individual control, and the patchValue() method, which will replace any properties that have been defined in the object that have changed in the form model.
The main difference between them is that setValue() performs a strict check of the source object and will throw errors if it doesn't fully adhere to the model structure (including all nested FormControl elements), while patchValue() will silently fail on those errors.
Therefore, we can say that the former method might be a better choice for complex forms and/or whenever we need to catch nesting errors, while the latter is the way to go when things are simple enough – like in our current samples.
The @angular/router package deserves a special mention because it's the first time we have seen it in a component TypeScript file, and we've only used it twice before:
- In the
app.module.tsfile, to define our client-side routing rules - In the
nav.component.htmlfile, to implement the aforementioned routing rules and make them appear as navigation links within the web application's main menu
This time, we had to import it because we needed a way to retrieve the City id parameter from the URL. To do this, we used the ActivatedRoute interface, which allows us to retrieve information about the currently active route, as well as the GET parameter we were looking for.
city-edit.component.html
Here's the content for the /ClientApp/src/app/cities/city-edit.component.html template file:
<div class="city-edit">
    <h1>{{title}}</h1>
    <p *ngIf="!city"><em>Loading...</em></p>
    <div class="form" [formGroup]="form" (ngSubmit)="onSubmit()">
        <div class="form-group">
            <label for="name">City name:</label>
            <br />
            <input type="text" id="name"
                   formControlName="name" required
                   placeholder="City name..."
                   class="form-control" />
        </div>
        <div class="form-group">
            <label for="lat">City latitude:</label>
            <br />
            <input type="text" id="lat"
                   formControlName="lat" required
                   placeholder="Latitude..."
                   class="form-control" />
        </div>
        <div class="form-group">
            <label for="lon">City longitude:</label>
            <br />
            <input type="text" id="lon"
                   formControlName="lon" required
                   placeholder="Latitude..."
                   class="form-control" />
        </div>
        <div class="form-group commands">
            <button type="submit"
                    (click)="onSubmit()"
                    class="btn btn-success">
                Save
            </button>
            <button type="submit"
                    [routerLink]="['/cities']"
                    class="btn">
                Cancel
            </button>
        </div>
    </div>
</div>
Wait a minute: where's our <form> HTML element? Didn't we say that we were working with form-based approaches because they are way better than placing a bunch of separate <input> fields here and there?
As a matter of fact, we do have a form: we just used a <div> rather than the classic <form> element. As you may have guessed at this point, forms in Angular don't necessarily have to be created using the <form> HTML element, since we won't be using its distinctive features. For that very reason, we are free to define them using <div>, <p>, or any HTML block-level element that could reasonably contain <input> fields.
city-edit.component.css
Last but not least, here's our /ClientApp/src/app/cities/city-edit.component.css content:
/* empty */
Yeah, that's it: we don't need a specific style at the moment, so we'll just leave it empty for now: we'll pimp it later on.
Adding the navigation link
Now that our CityEditComponent is ready, we need to enforce our master/detail pattern by adding a navigation link that will allow our users to navigate from our city listing (master) to the city edit form (detail).
To do that, we need to perform two tasks:
- Create a new route within the
app.module.tsfile. - Implement the preceding route in the template code of
CitiesComponent.
Let's do this!
app.module.ts
Open the /ClientApp/src/app/app.module.ts file and add a reference for the new component:
import { BrowserModule } from '@angular/platform-browser';
import { NgModule } from '@angular/core';
import { FormsModule } from '@angular/forms';
import { HttpClientModule, HTTP_INTERCEPTORS } from '@angular/common/http';
import { AppRoutingModule } from './app-routing.module';
import { AppComponent } from './app.component';
import { NavMenuComponent } from './nav-menu/nav-menu.component';
import { HomeComponent } from './home/home.component';
import { CitiesComponent } from './cities/cities.component';
import { CityEditComponent } from './cities/city-edit.component';
import { CountriesComponent } from './countries/countries.component';
import { BrowserAnimationsModule } from '@angular/platform-browser/animations';
import { AngularMaterialModule } from './angular-material.module';
import { ReactiveFormsModule } from '@angular/forms';
@NgModule({
  declarations: [
    AppComponent,
    NavMenuComponent,
    HomeComponent,
    CitiesComponent,
    CityEditComponent,
    CountriesComponent
  ],
  imports: [
    BrowserModule.withServerTransition({ appId: 'ng-cli-universal' }),
    HttpClientModule,
    FormsModule,
    AppRoutingModule,
    BrowserAnimationsModule,
    AngularMaterialModule,
    ReactiveFormsModule
  ],
  providers: [],
  bootstrap: [AppComponent]
})
export class AppModule { }
That's it: now we can deal with the routing part.
app-routing.module.ts
Right after that, add a new route to the app-routing.module.ts file with the following source code (new lines are highlighted):
import { NgModule } from '@angular/core';
import { Routes, RouterModule } from '@angular/router';
import { HomeComponent } from './home/home.component';
import { CitiesComponent } from './cities/cities.component';
import { CityEditComponent } from './cities/city-edit.component';
import { CountriesComponent } from './countries/countries.component';
const routes: Routes = [
  { path: '', component: HomeComponent, pathMatch: 'full' },
  { path: 'cities', component: CitiesComponent },
  { path: 'city/:id', component: CityEditComponent },
  { path: 'countries', component: CountriesComponent },
];
@NgModule({
  imports: [RouterModule.forRoot(routes)],
  exports: [RouterModule]
})
export class AppRoutingModule { }
As we can see, we imported the CityEditComponent, added it to the @NgModule declarations list, and – last but not least – defined a new city/:id corresponding to the route. The syntax we used will route any URL composed by city and a parameter that will be registered with the id name.
cities.component.html
Now that we have the navigation route, we need to implement it within the Master view so that the Detail view can be reached.
Open the /ClientApp/src/app/cities/cities.component.html file and change the HTML template code for the city's Name column in the following way:
<!-- ...existing code... -->
<!-- Name Column -->
<ng-container matColumnDef="name">
  <th mat-header-cell *matHeaderCellDef mat-sort-header>Name</th>
  <td mat-cell *matCellDef="let city">
    <a [routerLink]="['/city', city.id]">{{city.name}}</a>
  </td>
</ng-container>
<!-- ...existing code... -->
Once you're done, test it out by hitting F5 and navigating to the Cities view. As shown in the following screenshot, the city names are now clickable links:

Figure 6.5: Cities table with clickable links
From there, filter the table for Paris and click on the first result to access the CityEditComponent, which we'll finally be able to see (as shown in the following screenshot):

Figure 6.6: The CityEditComponent
As we can see, everything is much as we would expect it to be. We have three textboxes, as well as a Save button and a Cancel button, both of which are ready to perform the task they have been assigned. The Save button will send the modified text to the server for the update and then redirect the user to the Master view, while the Cancel button will redirect the user without performing any changes.
That's definitely a good start! However, we're far from done: we still have to add validators, implement error handling, and write a couple of unit tests for the client side and the server side. Let's get started.
Adding a new city
Before going any further, let's spend a couple more minutes adding a very useful feature to our CityEditComponent: the chance to add a brand-new City. This is a rather classic requirement of a Detail view with editing capabilities, which can be handled with the same component – as long as we perform some small modifications to enable it to handle a new feature (adding a new city) as well as the existing one (editing an existing city) in a seamless way.
To do that, we'll have to perform the following steps:
- Extend the functionalities of CityEditComponent to make it able to add new cities, as well as edit existing ones.
- Add a new Add City button to our component's template file and bind it to a new client-side route.
- Implement the required functionalities to select a country for the newly added city, which will also be useful in edit mode (it will allow users to change the country for existing cities).
Let's get to work!
Extending the CityEditComponent
Open the /ClientApp/src/app/cities/city-edit.component.ts file and add the following code (the new/updated lines are highlighted):
import { Component, Inject, OnInit } from '@angular/core';
import { HttpClient } from '@angular/common/http';
import { ActivatedRoute, Router } from '@angular/router';
import { FormGroup, FormControl } from '@angular/forms';
import { City } from './City';
@Component({
  selector: 'app-city-edit',
  templateUrl: './city-edit.component.html',
  styleUrls: ['./city-edit.component.css']
})
export class CityEditComponent implements OnInit {
  // the view title
  title: string;
  // the form model
  form: FormGroup;
  // the city object to edit or create
  city: City;
  // the city object id, as fetched from the active route:
  // It's NULL when we're adding a new city,
  // and not NULL when we're editing an existing one.
  id?: number;
  constructor(
    private activatedRoute: ActivatedRoute,
    private router: Router,
    private http: HttpClient,
    @Inject('BASE_URL') private baseUrl: string) {
    }
  ngOnInit() {
    this.form = new FormGroup({
      name: new FormControl(''),
      lat: new FormControl(''),
      lon: new FormControl('')
    });
    this.loadData();
  }
  loadData() {
    // retrieve the ID from the 'id'
    this.id = +this.activatedRoute.snapshot.paramMap.get('id');
    if (this.id) {
      // EDIT MODE
      // fetch the city from the server
      var url = this.baseUrl + "api/Cities/" + this.id;
      this.http.get<City>(url).subscribe(result => {
        this.city = result;
        this.title = "Edit - " + this.city.name;
        // update the form with the city value
        this.form.patchValue(this.city);
      }, error => console.error(error));
    }
    else {
      // ADD NEW MODE
      this.title = "Create a new City";
    }
  }
  onSubmit() {
    var city = (this.id) ? this.city : <City>{};
    city.name = this.form.get("name").value;
    city.lat = +this.form.get("lat").value;
    city.lon = +this.form.get("lon").value;
    if (this.id) {
      // EDIT mode
      var url = this.baseUrl + "api/Cities/" + this.city.id;
      this.http
        .put<City>(url, city)
        .subscribe(result => {
          console.log("City " + city.id + " has been updated.");
          // go back to cities view
          this.router.navigate(['/cities']);
        }, error => console.error(error));
    }
    else {
      // ADD NEW mode
      var url = this.baseUrl + "api/Cities";
      this.http
        .post<City>(url, city)
        .subscribe(result => {
          console.log("City " + result.id + " has been created.");
          // go back to cities view
          this.router.navigate(['/cities']);
        }, error => console.error(error));
    }
  }
}
Thanks to these modifications, our code will now be able to distinguish between the two different user actions (adding a new city or editing an existing one) and properly deal with both of them.
The HTML template file may also perform a minor update to notify the user of the new feature.
Open the /ClientApp/src/app/cities/cities-edit.component.html file and modify it in the following way (the new/updated lines are highlighted).
Add the following highlighted code near the beginning of the file:
<!-- ... existing code ... -->
<p *ngIf="this.id && !city"><em>Loading...</em></p>
<!-- ... existing code ... -->
With such an improvement, we'll ensure that the "Loading..." message won't appear when we're adding a new city since the city variable will be empty.
Also, add the following highlighted code toward the end of the file:
<!-- ... existing code ... -->
<div class="form-group commands">
    <button *ngIf="id" type="submit"
            (click)="onSubmit()"
            class="btn btn-success">
        Save
    </button>
    <button *ngIf="!id" type="submit"
            (click)="onSubmit()"
            class="btn btn-success">
        Create
    </button>
    <button type="submit"
            [routerLink]="['/cities']"
            class="btn">
        Cancel
    </button>
</div>
<!-- ... existing code ... -->
This minor yet useful addition will let us know if the form is working as expected: whenever we add a new city, we will see a more appropriate Create button instead of the Save one, which will still be visible in edit mode.
Now, we need to do two things:
- Find a nice way to let our users know that they can add new cities as well as modify the existing ones.
- Make them able to access this new feature.
A simple Add a new City button will fix both these issues at once: let's add it to our CitiesComponent.
Adding the "Add a new City" button
Open the /ClientApp/src/app/cities/cities.component.html file and add the following code:
<!-- ... existing code ... -->
<h1>Cities</h1>
<p>Here's a list of cities: feel free to play with it.</p>
<p *ngIf="!cities"><em>Loading...</em></p>
<div class="commands text-right" *ngIf="cities">
  <button type="submit"
          [routerLink]="['/city']"
          class="btn btn-success">
      Add a new City
  </button>
</div>
<!-- ... existing code ... -->
Here we go. There's nothing new here; we've added the usual route-based button within a container and a *ngIf structural directive to make it appear after the Cities array becomes available.
Adding a new route
Now, we need to define the new route that we referenced for the Add a new City button.
To do that, open the /ClientApp/src/app/app-routing.module.ts file and update the code, as follows:
// ...existing code...
RouterModule.forRoot([
  { path: '', component: HomeComponent, pathMatch: 'full' },
  { path: 'cities', component: CitiesComponent },
  { path: 'city/:id', component: CityEditComponent },
  { path: 'city', component: CityEditComponent },
  { path: 'countries', component: CountriesComponent },
]),
// ...existing code...
As we can see, the (new) route to add a new city and the (existing) route to edit an existing city are very similar since they both redirect the user to the same component; the only difference is that the latter doesn't have the id parameter, which is the technique we used to make our component aware of which task it has been called for. If the id is present, the user is editing an existing city; otherwise, they're adding a new one.
We are doing well... but we're not quite there yet. If we were to test what we've done so far by hitting F5 and trying to add a new city, our HttpClient module would be greeted by an HTTP 500 - Internal Server Error from the server, similar to the one shown in the following screenshot:

Figure 6.7: HTTP 500 error after trying to add a new city
Here's the full error text (with the relevant parts highlighted):
---> Microsoft.Data.SqlClient.SqlException (0x80131904): The INSERT statement conflicted with the FOREIGN KEY constraint "FK_Cities_Countries_CountryId". The conflict occurred in database "WorldCities", table "dbo.Countries", column 'Id'.
 The statement has been terminated.
It definitely seems like we forgot the CountryId property of the City entity: we did that on purpose when we had to define the Angular city interface because we didn't need it at that time. We didn't suffer from its absence when we implemented the city edit mode because that property was silently fetched from the server and then stored within our Angular local variable, which we were sending back to the server while the HTTP PUT request was performing the update. However, now that we do want to create a new city from scratch, such a missing property will eventually take its toll.
To fix this, we need to add the countryId property to the /ClientApp/src/app/cities/city.ts file in the following way (the new lines are highlighted):
export interface City {
    id: number;
    name: string;
    lat: number;
    lon: number;
    countryId: number;
}
However, this won't be enough: we also need to give our users the chance to assign a specific Country to the new city; otherwise, the countryId property will never see an actual value – unless we define it programmatically with a fixed value, which would be a rather ugly workaround (to say the least).
Let's fix this in a decent way by adding a list of countries to CityEditComponent so that the user will be able to select one before hitting the Create button. Such a new feature will be very useful – even when the component runs in edit mode – since it will allow our users to change the country for existing cities.
HTML select
The easiest way to allow our users to pick a country from a list of countries would be to use a <select> element and populate it by fetching our data from the .NET back-end via the CountriesController's GetCountries() method. Let's do that now.
Open the /ClientApp/src/app/cities/city-edit.component.ts file and add the following code (the new lines are highlighted):
import { Component, Inject, OnInit } from '@angular/core';
import { HttpClient, HttpParams } from '@angular/common/http';
import { ActivatedRoute, Router } from '@angular/router';
import { FormGroup, FormControl } from '@angular/forms';
import { City } from './City';
import { Country } from './../countries/Country';
@Component({
  selector: 'app-city-edit',
  templateUrl: './city-edit.component.html',
  styleUrls: ['./city-edit.component.css']
})
export class CityEditComponent implements OnInit {
  // the view title
  title: string;
  // the form model
  form: FormGroup;
  // the city object to edit or create
  city: City;
  // the city object id, as fetched from the active route:
  // It's NULL when we're adding a new city,
  // and not NULL when we're editing an existing one.
  id?: number;
  // the countries array for the select
  countries: Country[];
  constructor(
    private activatedRoute: ActivatedRoute,
    private router: Router,
    private http: HttpClient,
    @Inject('BASE_URL') private baseUrl: string) {
  }
  ngOnInit() {
    this.form = new FormGroup({
      name: new FormControl(''),
      lat: new FormControl(''),
      lon: new FormControl(''),
      countryId: new FormControl('')
    });
    this.loadData();
  }
  loadData() {
    // load countries
    this.loadCountries();
    // retrieve the ID from the 'id'
    this.id = +this.activatedRoute.snapshot.paramMap.get('id');
    if (this.id) {
      // EDIT MODE
      // fetch the city from the server
      var url = this.baseUrl + "api/Cities/" + this.id;
      this.http.get<City>(url).subscribe(result => {
        this.city = result;
        this.title = "Edit - " + this.city.name;
        // update the form with the city value
        this.form.patchValue(this.city);
      }, error => console.error(error));
    }
    else {
      // ADD NEW MODE
      this.title = "Create a new City";
    }
  }
  loadCountries() {
    // fetch all the countries from the server
    var url = this.baseUrl + "api/Countries";
    var params = new HttpParams()
      .set("pageIndex", "0")
      .set("pageSize", "9999")
      .set("sortColumn", "name");
    this.http.get<any>(url, { params }).subscribe(result => {
      this.countries = result.data;
    }, error => console.error(error));
  }
  onSubmit() {
    var city = (this.id) ? this.city : <City>{};
    city.name = this.form.get("name").value;
    city.lat = +this.form.get("lat").value;
    city.lon = +this.form.get("lon").value;
    city.countryId = +this.form.get("countryId").value;
    if (this.id) {
      // EDIT mode
      var url = this.baseUrl + "api/Cities/" + this.city.id;
      this.http
        .put<City>(url, city)
        .subscribe(result => {
          console.log("City " + city.id + " has been updated.");
          // go back to cities view
          this.router.navigate(['/cities']);
        }, error => console.error(error));
    }
    else {
      // ADD NEW mode
      var url = this.baseUrl + "api/Cities";
      this.http
        .post<City>(url, city)
        .subscribe(result => {
          console.log("City " + result.id + " has been created.");
          // go back to cities view
          this.router.navigate(['/cities']);
        }, error => console.error(error));
    }
  }
}
- We added the
HttpParamsmodule to theimportlist of@angular/common/http. - We added a reference to our
Countryinterface since we need to handle countries as well. - We added a
countriesvariable to store our countries. - We added a
countryIdform control (with a required validator, since it's a required value) to our form. - We added a
loadCountries()method to fetch the countries from the server. - We added a call to the
loadCountries()method from theloadData()method so that we'll asynchronously fetch the countries while we do the rest of theloadData()stuff (such as loading the city and/or setting up the form). - We updated the city's
countryIdso that it matches the one that's selected in the form in theonSubmit()method; this means that it will be sent to the server for the insert or update task.
It's worth noting how, in the loadCountries() method, we had to set up some GET parameters for the /api/Countries URL to comply with the strict default values that we set in Chapter 5, Fetching and Displaying Data: we don't need paging here since we need to fetch the entire countries list to populate our select list. More specifically, we set a pageSize of 9999 to ensure that we get all our countries, as well as an appropriate sortColumn to have them ordered by their name.
Now, we can use our brand-new countries variable on our HTML template.
Open the /ClientApp/src/app/cities/city-edit.component.html file and add the following code (the new lines are highlighted):
<!-- ...existing code... -->
<div class="form-group">
    <label for="lon">City longitude:</label>
    <br />
    <input type="text" id="lon"
            formControlName="lon" required
            placeholder="Latitude..."
            class="form-control" />
</div>
<div class="form-group" *ngIf="countries">
    <label for="countryId">Country:</label>
    <br />
    <select id="countryId" class="form-control"
      formControlName="countryId">
      <option value="">--- Select a country ---</option>
      <option *ngFor="let country of countries" [value]="country.id">
        {{country.name}}
      </option>
    </select>
</div>
<!-- ...existing code... -->
If we press F5 to test our code and navigate to the Add a new City or Edit City view, we'll see the following output:

Figure 6.8: The CityEditComponent with a Country dropdown list
Now, by clicking the --- Select a country --- dropdown list, our users will be able to pick a country from the ones that are available. That's not bad, right?
However, we can do even better: we can improve the user experience of our view by replacing our standard HTML select with a more powerful component from the Angular Material package library: MatSelectModule.
Angular Material select (MatSelectModule)
Since we've never used MatSelectModule before, we need to add it to the /ClientApp/src/app/angular-material.module.ts file, just like we did for MatPaginatorModule, MatSortModule, and MatInputModule back in Chapter 5, Fetching and Displaying Data.
Here's how to do that (the new lines are highlighted):
import { NgModule } from '@angular/core';
import { MatTableModule } from '@angular/material/table';
import { MatPaginatorModule } from '@angular/material/paginator';
import { MatSortModule } from '@angular/material/sort';
import { MatInputModule } from '@angular/material/input';
import { MatSelectModule } from '@angular/material/select';
@NgModule({
  imports: [
    MatTableModule,
    MatPaginatorModule,
    MatSortModule,
    MatInputModule,
    MatSelectModule
  ],
  exports: [
    MatTableModule,
    MatPaginatorModule,
    MatSortModule,
    MatInputModule,
    MatSelectModule
  ]
})
export class AngularMaterialModule { }
Right after that, we can replace the <select> HTML element we added to the /ClientApp/src/app/cities/city-edit.component.html file a short while ago in the following way (the updated lines are highlighted):
<!-- ...existing code... -->
<div class="form-group">
    <label for="countryId">Country:</label>
    <br />
    <mat-form-field *ngIf="countries">
      <mat-label>Select a Country...</mat-label>
      <mat-select id="countryId" formControlName="countryId">
        <mat-option *ngFor="let country of countries"
          [value]="country.id">
          {{country.name}}
        </mat-option>
      </mat-select>
    </mat-form-field>
</div>
<!-- ...existing code... -->
And that's it! We can see the updated result by hitting F5 (see the following screenshot for the output):
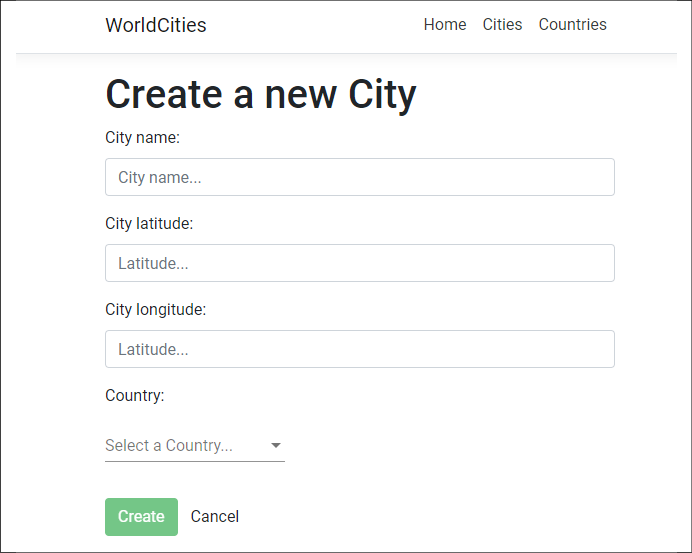
Figure 6.9: The CityEditComponent using MatSelectModule for the Country dropdown
The MatSelectModule is definitely prettier than the stock <select> HTML element, all while retaining the same features: we don't even need to change the underlying component class file since it uses the same binding interface.
Now, we can add our brand-new city to our database. Let's do this using the following data:
- Name:
New Tokyo - Latitude:
35.685 - Longitude:
139.7514 - Country:
Japan
Fill in our Create a new City form with these values and click the Create button. If everything went well, we should be brought back to the Cities view, where we'll be able to find our New Tokyo city using the filter (see the following screenshot):

Figure 6.10: Cities list after filtering for New Tokyo
Here we go: we successfully added our first city!
Now that our Reactive Form is working properly and we have decent know-how about how it works, we're ready to spend some time tweaking it by adding something that could be very useful in a production scenario: some error-handling capabilities. We'll obtain these by adding some data validators.
Understanding data validation
Adding data validation to a form is hardly an option: it's a required feature to check the user input in terms of accuracy and completeness to improve the overall data quality by validating the data we want – or need – to collect. It's also very useful in terms of user experience because the error-handling capabilities it comes with will make our users able to understand why the form doesn't work and what they can do to fix the issues preventing them from submitting their data.
To understand such a concept, let's take our current CityEditComponent Reactive Form: it works fine if our users fill out all the required fields; however, there's no way for them to understand what the required values actually are, or what happens if they forget to fill all of them out... except for a console error message, which is what our source code currently does whenever our PUT and POST requests end up with a back-end error of any sort.
In this section, we'll learn how we can validate user input from the front-end UI and display useful validation messages using our current Reactive Form. While we're there, we'll also take the chance to create an Edit Country/Add new Country form and learn something new in the process.
Template-driven validation
For the sake of simplicity, we've chosen to not mess around with Template-Driven Forms and bring our focus to Model-Driven/Reactive Forms instead. However, it might be wise to spend a couple of minutes understanding how we can add validation to a Template-Driven Form as well.
The good news about this is that we can use the same standard validation attributes that we would normally use to validate a native HTML form: the Angular framework uses directives to match them with validator functions internally and in a fully transparent way. More specifically, every time the value of a form control changes, Angular will run these functions and generate either a list of validation errors, thus resulting in an invalid status, or null, meaning that the form is valid.
The form's state – as well as each form control's state – can be checked/inspected by exporting ngModel to a local template variable. Here's an example that can help clarify this:
<input id="name" name="name" class="form-control" required minlength="4"
    [(ngModel)]="city.name" #name="ngModel">
<div *ngIf="name.invalid && (name.dirty || name.touched)" class="alert alert-danger">
    <div *ngIf="name.errors?.required">Name is required.</div>
    <div *ngIf="name.errors?.minlength">Name must be at least 4
      characters long.</div>
</div>
The data validation directives are highlighted in bold. As we can see, the preceding form will raise an error – and show a <div> element with an alert style to the user – whenever the city's name is not present or its character count is smaller than 4, since this is the minimum allowed length for the name input.
It's worth noting that we're checking two properties that might sound rather odd: name.dirty and name.touched. Here's a brief explanation of what they mean and why it's wise to check for their status:
- The
dirtyproperty starts as beingfalseand becomestruewhenever the user changes its starting values. - The
touchedproperty starts as beingfalseand becomestruewhenever the user blurs the form control element, that is, clicks (or taps, or "tabs") away from it after having it in focus.
Now that we know how these properties work, we should be able to understand why we are checking them: we want our data validator error to only be seen if/when the user goes away from the control, leaving it with an invalid value – or no value at all.
That's it for Template-Driven validation, at least for the purposes of this book. Those who need additional information should check out the following guide at: https://angular.io/guide/forms#template-driven-forms
The Safe Navigation Operator
Before moving on, it could be useful to spend a couple of minutes explaining the meaning of the ? question mark that we've been using whenever we need to check for the presence of form errors, such as in the following example, which has been taken from the preceding code:
name.errors?.required
This question mark is TypeScript's Safe Navigation Operator, also known as the Elvis Operator, and is very useful for protecting against null and undefined values in property paths. When the Safe Navigation Operator is present, TypeScript stops evaluating the expression when it hits the first null value. In the preceding code, if name.errors is null, the whole expression would return false without checking the required property, thus avoiding the following null-reference exception:
TypeError: Cannot read property 'required' of null.
As a matter of fact, the Safe Navigation Operator makes us able to navigate an object path – even when we are not aware of whether such a path exists or not – by returning either the value of the object path (if it exists) or null. Such behavior is perfect if we wish to check for the conditional presence of errors in Angular forms, where a null return value has the same meaning as false (that is, no errors). For this very reason, we're going to use it a lot from now on.
It's worth noting that the Safe Navigation Operator has been part of the Angular HTML template language since Angular 2 and was only recently added to TypeScript. This much-needed addition occurred in November 2019, with the release of TypeScript v3.7:
https://www.typescriptlang.org/docs/handbook/release-notes/typescript-3-7.html
For more information about the Safe Navigation Operator, check out the following URL: https://angular.io/guide/template-expression-operators#safe-navigation-operator
Model-driven validation
When dealing with Reactive Forms, the whole validation approach is rather different. In a nutshell, we could say that most of this job has to be done within the component class: instead of adding validators using HTML attributes in the template, we'll have to add validator functions directly to the form control model in the component class so that Angular will be able to call them whenever the value of the control changes.
Since we'll mostly be dealing with functions, we'll also get the option to make them sync or async, thus getting the chance to add synchronous and/or asynchronous validators:
- Sync validators immediately return either a set of validation errors or
null. They can be set up using the second argument when we instantiate theFormControlthey need to check (the first one being the default value). - Async validators return a Promise or Observable that's been configured to emit a set of validation errors or
null. They can be set up using the third argument when we instantiate theFormControlthey need to check.
It's important to know that async validators will only be executed/checked after the sync validators, and only if all of them successfully pass. Such an architectural choice has been made for performance reasons.
In the upcoming sections, we'll create both of them and add them to our form.
Our first validators
Enough with the theory: let's add our first set of validators in our CityEditComponent form.
Open the /ClientApp/src/app/cities/city-edit.component.ts file and add the following code:
import { Component, Inject, OnInit } from '@angular/core';
import { HttpClient, HttpParams } from '@angular/common/http';
import { ActivatedRoute, Router } from '@angular/router';
import { FormGroup, FormControl, Validators } from '@angular/forms';
import { City } from './City';
import { Country } from './../countries/Country';
@Component({
  selector: 'app-city-edit',
  templateUrl: './city-edit.component.html',
  styleUrls: ['./city-edit.component.css']
})
export class CityEditComponent implements OnInit {
  // the view title
  title: string;
  // the form model
  form: FormGroup;
  // the city object to edit or create
  city: City;
  // the city object id, as fetched from the active route:
  // It's NULL when we're adding a new city,
  // and not NULL when we're editing an existing one.
  id?: number;
  // the countries array for the select
  countries: Country[];
  constructor(
    private activatedRoute: ActivatedRoute,
    private router: Router,
    private http: HttpClient,
    @Inject('BASE_URL') private baseUrl: string) {
  }
  ngOnInit() {
    this.form = new FormGroup({
      name: new FormControl('', Validators.required),
      lat: new FormControl('', Validators.required),
      lon: new FormControl('', Validators.required),
      countryId: new FormControl('', Validators.required)
    });
    this.loadData();
  }
// ...existing code...
As we can see, we added the following:
- An
importreference to theValidatorsclass from the@angular/formspackage. - A
Validators.requiredto each of ourFormControlelements. As the name suggests, such a validator expects a non-null value for these fields; otherwise, it will return aninvalidstatus.
Validators.required is a built-in sync validator among those available from the Validators class. Other built-in validators provided by this class include min, max, requiredTrue, email, minLength, maxLength, pattern, nullValidator, compose, and composeAsync.
For more information regarding Angular's built-in validators, take a look at the following URL: https://angular.io/api/forms/Validators
Once you're done, open the /ClientApp/src/app/cities/city-edit.component.html file and add the following code:
<div class="city-edit">
    <h1>{{title}}</h1>
    <p *ngIf="this.id && !city"><em>Loading...</em></p>
    <div class="form" [formGroup]="form" (ngSubmit)="onSubmit()">

        <div class="form-group">
            <label for="name">City name:</label>
            <br />
            <input type="text" id="name"
                formControlName="name" required
                placeholder="City name..."
                class="form-control"
                />
            <div *ngIf="form.get('name').invalid &&
                 (form.get('name').dirty || form.get('name').touched)"
                 class="invalid-feedback">
                <div *ngIf="form.get('name').errors?.required">
                  Name is required.
                </div>
            </div>
        </div>
        <div class="form-group">
            <label for="lat">City latitude:</label>
            <br />
            <input type="text" id="lat"
                   formControlName="lat" required
                   placeholder="Latitude..."
                   class="form-control" />
            <div *ngIf="form.get('lat').invalid &&
                 (form.get('lat').dirty || form.get('lat').touched)"
                 class="invalid-feedback">
                <div *ngIf="form.get('lat').errors?.required">
                  Latitude is required.
                </div>
            </div>
        </div>
        <div class="form-group">
            <label for="lon">City longitude:</label>
            <br />
            <input type="text" id="lon"
                   formControlName="lon" required
                   placeholder="Latitude..."
                   class="form-control" />
            <div *ngIf="form.get('lon').invalid &&
                 (form.get('lon').dirty || form.get('lon').touched)"
                 class="invalid-feedback">
                <div *ngIf="form.get('lon').errors?.required">
                  Longitude is required.
                </div>
            </div>
        </div>

        <div class="form-group">
            <label for="countryId">Country:</label>
            <br />
            <mat-form-field *ngIf="countries">
              <mat-label>Select a Country...</mat-label>
              <mat-select id="countryId" formControlName="countryId">
                <mat-option *ngFor="let country of countries"
                  [value]="country.id">
                  {{country.name}}
                </mat-option>
              </mat-select>
            </mat-form-field>
            <div *ngIf="form.get('countryId').invalid &&
                 (form.get('countryId').dirty ||
                   form.get('countryId').touched)"
                 class="invalid-feedback">
                <div *ngIf="form.get('countryId').errors?.required">
                  Please select a Country.
                </div>
            </div>
        </div>
        <div class="form-group commands">
            <button *ngIf="id" type="submit"
                    (click)="onSubmit()"
                    [disabled]="form.invalid"
                    class="btn btn-success">
                Save
            </button>
            <button *ngIf="!id" type="submit"
                    (click)="onSubmit()"
                    [disabled]="form.invalid"
                    class="btn btn-success">
                Create
            </button>
            <button type="button"
                    [routerLink]="['/cities']"
                    class="btn">
                Cancel
            </button>
        </div>
    </div>
</div>
Here, we added four <div> elements (one for each input) to check the input value and conditionally return an error. As we can see, these validators are all working in the same way:
- The first
<div>(the parent) checks if theFormControlis valid or not. It only appears if it's invalid and either dirty or touched, so that it won't be shown until the user has had the chance to set it. - The second
<div>(the child) checks for the required validator.
We used this approach because we could have multiple validators for each FormControl. Therefore, it can be useful to have a separate child element for each of them and a single parent element that encompasses them all (invalid is set to true whenever any of the configured validators doesn't pass).
While we were there, we added a [disabled] property bound to the Create and Save buttons to conditionally disable them whenever the form has an invalid state. This is a great way to prevent the user from submitting wrong or invalid values.
Right after that, open the /ClientApp/src/app/cities/city-edit.component.css file and add the following code:
input.ng-valid {
  border-left: 5px solid green;
}
input.ng-invalid.ng-dirty,
input.ng-invalid.ng-touched {
  border-left: 5px solid red;
}
input.ng-valid ~ .valid-feedback,
input.ng-invalid ~ .invalid-feedback {
  display: block;
}
These simple yet powerful styles leverage existing Angular and Bootstrap CSS classes so that they decorate our input fields whenever they have a valid or invalid status.
Let's quickly check everything we've done so far: hit F5, navigate to the Cities view, click on the Add a new City button, and play with the form while trying to trigger the validators.
Here's what happens when we cycle through the various input values without typing anything:

Figure 6.11: Testing the CityEditComponent form validators
Not bad, right? The input errors couldn't be more visible, and the Create button will stay disabled until they are all fixed, thus preventing accidental submits. All of these colored warnings should help our users understand what they're doing wrong and fix these issues.
Before ending our data validation journey, there's still one topic we need to cover: server-side validation, which can often be the only reasonable way to prevent some complex errors.
Server-side validation
Server-side validation is the process of checking for errors (and handling them accordingly) on the server side, that is, after the data has been sent to the back-end. This is a whole different approach to client-side validation, where the data is checked by the front-end, that is, before the data is sent to the server.
Handling errors on the client side has a lot of advantages in terms of speed and performance because the user immediately knows whether the input data is valid or not without having to query the server. However, server-side validation is a required feature of any decent web application because it prevents a lot of potentially harmful scenarios, such as the following:
- Implementation errors of the client-side validation process, which can fail to block badly-formatted data
- Client-side hacks performed by experienced users, browser extensions, or plugins that might want to allow the user to send unsupported input values to the back-end
- Request forgery, that is, false HTTP requests containing incorrect or malicious data
All of these techniques are based upon circumventing the client-side validators, which is always possible because we have no way to prevent our users (or hackers) from skipping, altering, or eliminating them; conversely, server-side validators cannot be avoided because they will be performed by the same back-end that will process the input data.
Therefore, in a nutshell, we could reasonably say that client-side validation is an optional and convenient feature, while server-side validation is a requirement for any decent web application that cares about the quality of the input data.
To avoid confusion, it is important to understand that server-side validation, although being implemented on the back-end, also requires a front-end implementation, such as calling the back-end and then showing the validation results to the user. The main difference between client-side validation and server-side validation is that the former only exists on the client-side and never calls the back-end, while the latter relies upon a front-end and back-end coordinated effort, thus being more complex to implement and test.
Moreover, there are some scenarios where server-side validation is the only possible way to check for certain conditions or requirements that cannot be verified by client-side validation alone. To explain this concept, let's look at a quick example.
Launch our WorldCities app in debug mode by hitting F5, go to our Cities view, and type paris into the filter textbox.
You should see the following output:

Figure 6.12: Cities list after filtering for "paris"
The preceding screenshot tells us the following things:
- There are at least five cities called
Parisall over the world (!) - Multiple cities can have the same identical name
That's not surprising: when we created our database using Entity Framework with code-first, we didn't make the name field unique since we knew that there was a high chance of homonymous cities. Luckily enough, this isn't an issue since we can still distinguish between them by looking at the lat, lon, and country values.
For example, if we check the first three on Google Maps, we will see that the first one is in France, the second is in Texas (US), and the third is in Tennessee (US). Same name, different cities.
Now, what about adding a validator that could check if the city we are trying to add has the same name, lat, and lon values as a city already present in our database? Such a feature would block our users from inserting the same identical city multiple times, thus avoiding real duplicates, without blocking the homonyms that have different coordinates.
Unfortunately, there's no way to do that on the client-side only. To fulfill this task, we would need to create an Angular custom validator that could asynchronously check these values against the server and then return an OK (valid) or KO (invalid) result: in other words, a server-side validation task.
Let's try to do that now.
DupeCityValidator
In this section, we'll create a custom validator that will perform an asynchronous call to our .NET Core back-end to ensure that the city we're trying to add doesn't have the same name, lat, lon, and country as an existing one.
city-edit.component.ts
The first thing we have to do is create the validator itself and bind it to our Reactive Form. To do that, open the /ClientApp/src/app/cities/city-edit.component.ts file and change its contents accordingly (the new/updated lines are highlighted):
import { Component, Inject } from '@angular/core';
import { HttpClient, HttpParams } from '@angular/common/http';
import { ActivatedRoute, Router } from '@angular/router';
import { FormGroup, FormControl, Validators, AbstractControl, AsyncValidatorFn } from '@angular/forms';
import { Observable } from 'rxjs';
import { map } from 'rxjs/operators';
import { City } from './City';
import { Country } from './../countries/Country';
// ...existing code...
  ngOnInit() {
    this.form = new FormGroup({
      name: new FormControl('', Validators.required),
      lat: new FormControl('', Validators.required),
      lon: new FormControl('', Validators.required),
      countryId: new FormControl('', Validators.required)
    }, null, this.isDupeCity());
    this.loadData();
  }
// ...existing code...
  isDupeCity(): AsyncValidatorFn {
    return (control: AbstractControl): Observable<{ [key: string]: any } | null> => {
      var city = <City>{};
      city.id = (this.id) ? this.id : 0;
      city.name = this.form.get("name").value;
      city.lat = +this.form.get("lat").value;
      city.lon = +this.form.get("lon").value;
      city.countryId = +this.form.get("countryId").value;
      var url = this.baseUrl + "api/Cities/IsDupeCity";
      return this.http.post<boolean>(url, city).pipe(map(result => {
          return (result ? { isDupeCity: true } : null);
      }));
    }
  }
}
As we can see, we've made some important changes in the preceding code:
- We added some
importreferences (AbstractControl,AsyncValidatorFn,Observable, andmap) that we used to implement our new async custom validator. If you don't get what we need them for, don't worry: we'll be talking about this topic later on. - We created a new
isDupeCity()method, which contains the whole implementation of our async custom validator. - We configured the new validator to be used by the main
FormGroup(the one related to the whole form).
As for our custom validator, it seems way more complex than it actually is. Let's try to summarize what it does:
- The first thing worth mentioning is that the function is defined as an
AsyncValidatorFnthat returns anObservable: this means that we're not returning a value but a subscriber function instance that will eventually return a value – which will be either a key/value object ornull. Such a value will only be emitted when the Observable is executed. - The inner function creates a temporary
cityobject, fills it with the real-time form data, calls anIsDupeCityback-end URL that we don't know yet (but we will soon enough), and eventually returns eithertrueornull, depending on the result. It's worth noting that we're not subscribing to theHttpClientthis time, as we often did in the past: we're manipulating it using thepipeandmapReactJS (RxJS) operators, which we'll be talking about in a short while.
For more information regarding custom async validators, read the following guide: https://angular.io/guide/form-validation#implementing-a-custom-async-validator
Since our custom validator relies on an HTTP request being sent to our .NET Core back-end, we need to implement that method as well.
CitiesController
Open the /Controllers/CitiesController.cs file and add the following method at the bottom of the file:
// ...existing code...
private bool CityExists(int id)
{
    return _context.Cities.Any(e => e.Id == id);
}
[HttpPost]
[Route("IsDupeCity")]
public bool IsDupeCity(City city)
{
    return _context.Cities.Any(
        e => e.Name == city.Name
        && e.Lat == city.Lat
        && e.Lon == city.Lon
        && e.CountryId == city.CountryId
        && e.Id != city.Id
    );
}
// ...existing code...
The .NET method is very straightforward: it checks the data model for a City that has the same Name, Lat, Lon, and CountryId as the one provided by the front-end (as well as a different Id) and returns true or false as the result. The Id check has been added to conditionally disable the dupe check when the user is editing an existing city.
If that's the case, using the same Name, Lat, Lon, and CountryId would be allowed since we're basically overwriting the same city and not creating a new one. When the user adds a new city, that Id value will always be set to zero, preventing the dupe check from being disabled.
city-edit.component.html
Now that the back-end code is ready, we need to create a suitable error message from the UI. Open the /ClientApp/src/app/cities/city-edit.component.html file and update its content in the following way (the new lines are highlighted):
<div class="city-edit">
    <h1>{{title}}</h1>
    <p *ngIf="this.id && !city"><em>Loading...</em></p>
    <div class="form" [formGroup]="form" (ngSubmit)="onSubmit()">
        <div *ngIf="form.invalid && form.errors &&
             form.errors?.isDupeCity"
             class="alert alert-danger">
              <strong>ERROR</strong>:
              A city with the same <i>name</i>, <i>lat</i>,
              <i>lon</i> and <i>country</i> already exists.
        </div>
<!-- ...existing code... -->
As shown in the preceding code, the alert <div> we added will only be shown if all of the following three conditions are met:
- The form is invalid
- There are errors that are strictly related to the form itself
- The
isDupeCityerror is returningtrue
It's very important to check all of them, otherwise we risk showing such an alert even when it doesn't have to be shown.
Testing it out
Now that the component HTML template has been set up, we can test the result of our hard work. Press F5, navigate to the Cities view, click the Add a new City button, and insert the following values:
- Name:
New Tokyo - Latitude:
35.685 - Longitude:
139.7514 - Country:
Japan
If you did everything properly, you should be greeted by the following error message:

Figure 6.13: Testing the duplicate city validator
That's great! Our custom async validator is working fine and triggers both the front-end and the back-end validation logic.
Observables and RxJS operators
The async logic that's used to perform the call makes extensive use of the Observable/RxJS pattern: this time, though, instead of relying on the subscribe() method we've already used a number of times, we opted for a pipe + map approach. These are two very important RxJS operators that allow us to perform our data manipulation tasks while retaining the Observable status of the returned value, while subscriptions will execute the Observable and return actual data instead.
This concept might be quite difficult to understand. Let's try to put it in other words:
- We should use the
subscribe()method when we want to execute the Observable and get its actual result; for example, a JSON structured response. Such a method returns a Subscription that can be canceled but can't be subscribed to anymore. - We should use the
map()operator when we want to transform/manipulate the data events of the Observable without executing it so that it can be passed to other async actors that will also manipulate (and eventually execute) it. Such a method returns an Observable that can be subscribed to.
As for the pipe(), it's just an RxJS operator that composes/chains other operators (such as map, filter, and so on).
The most important difference between Observable methods and RxJS operators is that the latter always return Observables, while the former return a different (and mostly final) object type. Does this ring a bell?
If we think about what we learned back in Chapter 5, Fetching and Displaying Data, when dealing with .NET Entity Framework, it should definitely sound familiar. Remember when we were playing around with the IQueryable<T> interface? The various Where, OrderBy, and CountAsync IQueryable methods that we used when we built our ApiResult class are quite similar to what we can do in Angular by chaining multiple map functions with the pipe operator. Conversely, the subscribe() method strictly resembles the various ToListAsync()/ToArrayAsync() methods that we used in .NET to execute the IQueryable and retrieve its result in a usable object.
Performance issues
Before moving on, let's try to answer the following question: when will this validator be checked? In other words, can we reasonably expect performance issues, considering the fact it performs a server-side API call upon each check?
If we recall what we said earlier, the asynchronous validators will only be checked when all the synchronous validators return true. Since isDupeCity is async, it won't be called until all the Validators.required that we previously set up in all the FormControl elements return true. That's a piece of great news indeed, since there would be no sense in checking for an existing city with name, lat, lon, and/or countryId being null or empty.
Based on what we have just said, we can reasonably expect the isDupeCity validator to be called once or twice for each form submission, which is perfectly fine in terms of performance impact. Everything is fine, then. Let's move on.
Introducing the FormBuilder
Now that our CityEditComponent has been set up, we might be tempted to reuse the same techniques to create a CountryEditComponent and get the job done, just like we did in Chapter 5, Fetching and Displaying Data, with our CitiesComponent and CountryComponent files. However, we won't be doing this. Instead, we'll take the chance to introduce a new tool to our shed that can be very useful when dealing with multiple forms: the FormBuilder service.
In the following chapters, we'll do the following:
- Create our
CountryEditComponentwith all the required TypeScript, HTML, and CSS files. - Learn how to use the
FormBuilderservice to generate form controls in a better way. - Add a new set of
Validators(including a brand-newisDupeCountrycustom validator) to the new form implementation. - Test our new
FormBuilder-based implementation to check that everything works.
By the end of this section, we'll have a fully-functional CountryEditComponent that will work in the same way that CityEditComponent does, except it will be based on a slightly different approach.
Creating the CountryEditComponent
Let's start by laying down the files we need. From the Solution Explorer of our WorldCities project, do the following:
- Navigate to the
/ClientApp/src/app/countriesfolder. - Right-click the folder's name and select Add | New Item three times to create the following files:
country-edit.component.tscountry-edit.component.htmlcountry-edit.component.css
Once you're done, fill them with the following content.
country-edit.component.ts
Open the /ClientApp/src/app/countries/country-edit.component.ts file and fill it with the following code. Watch out for the highlighted parts, which are rather different from the previous CityEditComponent; other minor differences, such as country instead of city, are not highlighted, since they're more than expected:
import { Component, Inject, OnInit } from '@angular/core';
import { HttpClient, HttpParams } from '@angular/common/http';
import { ActivatedRoute, Router } from '@angular/router';
import { FormGroup, FormBuilder, Validators, AbstractControl, AsyncValidatorFn } from '@angular/forms';
import { map } from 'rxjs/operators';
import { Observable } from 'rxjs';
import { Country } from './../countries/Country';
@Component({
    selector: 'app-country-edit',
    templateUrl: './country-edit.component.html',
    styleUrls: ['./country-edit.component.css']
})
export class CountryEditComponent implements OnInit {
  // the view title
  title: string;
  // the form model
  form: FormGroup;
  // the city object to edit or create
  country: Country;
  // the city object id, as fetched from the active route:
  // It's NULL when we're adding a new country,
  // and not NULL when we're editing an existing one.
  id?: number;
  constructor(
    private fb: FormBuilder,
    private activatedRoute: ActivatedRoute,
    private router: Router,
    private http: HttpClient,
    @Inject('BASE_URL') private baseUrl: string) {
      this.loadData();
  }
  ngOnInit() {
    this.form = this.fb.group({
      name: ['',
        Validators.required,
        this.isDupeField("name")
      ],
      iso2: ['',
        [
          Validators.required,
          Validators.pattern(/^[a-zA-Z]{2}$/)
        ],
        this.isDupeField("iso2")
      ],
      iso3: ['',
        [
          Validators.required,
          Validators.pattern(/^[a-zA-Z]{3}$/)
        ],
        this.isDupeField("iso3")
      ]
    });
    this.loadData();
  }
  loadData() {
    // retrieve the ID from the 'id'
    this.id = +this.activatedRoute.snapshot.paramMap.get('id');
    if (this.id) {
      // EDIT MODE
      // fetch the country from the server
      var url = this.baseUrl + "api/Countries/" + this.id;
      this.http.get<Country>(url).subscribe(result => {
          this.country = result;
          this.title = "Edit - " + this.country.name;
          // update the form with the country value
          this.form.patchValue(this.country);
      }, error => console.error(error));
    }
    else {
      // ADD NEW MODE
      this.title = "Create a new Country";
    }
  }
  onSubmit() {
    var country = (this.id) ? this.country : <Country>{};
    country.name = this.form.get("name").value;
    country.iso2 = this.form.get("iso2").value;
    country.iso3 = this.form.get("iso3").value;
    if (this.id) {
      // EDIT mode
      var url = this.baseUrl + "api/Countries/" + this.country.id;
      this.http
        .put<Country>(url, country)
        .subscribe(result => {
          console.log("Country " + country.id + " has been updated.");
          // go back to cities view
          this.router.navigate(['/countries']);
        }, error => console.error(error));
    }
    else {
      // ADD NEW mode
      var url = this.baseUrl + "api/Countries";
      this.http
        .post<Country>(url, country)
        .subscribe(result => {
          console.log("Country " + result.id + " has been created.");
          // go back to cities view
          this.router.navigate(['/countries']);
        }, error => console.error(error));
    }
  }
  isDupeField(fieldName: string): AsyncValidatorFn {
    return (control: AbstractControl): Observable<{ [key: string]: any
     } | null> => {
      var params = new HttpParams()
        .set("countryId", (this.id) ? this.id.toString() : "0")
        .set("fieldName", fieldName)
        .set("fieldValue", control.value);
      var url = this.baseUrl + "api/Countries/IsDupeField";
      return this.http.post<boolean>(url, null, { params })
        .pipe(map(result => {
          return (result ? { isDupeField: true } : null);
      }));
    }
  }
}
As we can see, the component's source code is quite similar to CityEditComponent, except for some limited yet important differences that we're going to summarize here:
- The
FormBuilderservice has been added to the@angular/formsimport list, replacing theFormControlreference that we don't need anymore. As a matter of fact, we're still creating form controls, but we'll do that via theFormBuilderinstead of manually instantiating them, which means we don't need to explicitly reference them. - The
formvariable is now instantiated using a different approach that strongly relies upon the newFormBuilderservice. - The various
FormControlelements that get instantiated within theformfeature are some validators that we have never seen before.
The FormBuilder service gives us three factory methods so that we can create our form structure: control(), group(), and array(). Each generates an instance of the corresponding FormControl, FormGroup, and FormArray class. In our example, we're creating a single containing group with three controls, each with its own set of validators.
As for the validators, we can see two new entries:
Validators.pattern: A built-in validator that requires the control's value to match a given regular expression (regex) pattern. Since ourISO2andISO3country fields are defined using a strict format, we're going to use them to ensure that the user will input correct values.isDupeField: This is a custom async validator that we implemented here for the first time. It's similar to theisDupeCityvalidator we created for ourCityEditComponentbut with some key differences that we're going to summarize in the next section.
Those who don't know much about regular expressions (or regex for short) and want to use the Validators.pattern to its full extent should definitely visit the following website, which contains a good number of resources regarding regex and a great online builder and tester with full JavaScript and PHP/PCRE regex support: https://regexr.com/
The isDupeField validator
As we can see by looking at the preceding component's source code, the isDupeField custom validator is not assigned to the main FormGroup like isDupeCity is; instead, it's set three times: one for each FormControl it needs to check. The reason for this is simple: compared to isDupeCity, which was meant to check for duplicate cities using a four-field dupe key, isDupeField needs to individually check each field it's assigned to. We need to do that because we don't want more than one country having the same name, or the same iso2, or the same iso3.
This also explains why we need to specify a fieldname and a corresponding fieldValue instead of passing a Country interface: the isDupeField server-side API will have to perform a different check for each fieldName we're going to pass, instead of relying on a single general-purpose check like the isDupeCity API does.
As for the countryId parameter, it's required to prevent the dupe-check from raising a validation error when editing an existing country. In the isDupeCity validator, it was passed as a property of the city class. Now, we need to explicitly add it to the POST parameters.
The IsDupeField server-side API
Now, we need to implement our custom validator's back-end API.
Open the /Controllers/CountriesController.cs file and add the following method at the bottom of the file:
// ...existing code...
private bool CountryExists(int id)
{
    return _context.Countries.Any(e => e.Id == id);
}
[HttpPost]
[Route("IsDupeField")]
public bool IsDupeField(
    int countryId,
    string fieldName,
    string fieldValue)
{
    switch (fieldName)
    {
        case "name":
            return _context.Countries.Any(
                c => c.Name == fieldValue && c.Id != countryId);
        case "iso2":
            return _context.Countries.Any(
                c => c.ISO2 == fieldValue && c.Id != countryId);
        case "iso3":
            return _context.Countries.Any(
                c => c.ISO3 == fieldValue && c.Id != countryId);
        default:
            return false;
    }
}
Although the code resembles the IsDupeCity server-side API, we're switching the fieldName parameter and performing a different dupe-check depending on its value; such logic is implemented with a standard switch/case conditional block with strongly-typed LINQ lambda expressions for each field we can reasonably expect. Again, we're also checking that the countryId is different so that our users can edit an existing country.
If the fieldName that's received from the client differs from the three supported values, our API will respond with false.
An alternative approach using Linq.Dynamic
Before moving on, we may want to ask ourselves why we've implemented the IsDupeField API using strongly-typed LAMBDA expressions inside a switch...case block, instead of relying on the System.Linq.Dynamic.Core library.
As a matter of fact, we did that for the sake of simplicity, since the dynamic approach would require us having to write additional code to protect our method from SQL injection attacks. However, since we already implemented such a task in the IsValidProperty() method of our ApiResult class, maybe we can use it and shrink the preceding code down: after all, we've made it public and static so that we can use it anywhere.
Here's an alternative implementation using the aforementioned tools (the old code is commented, while the new code is highlighted):
using System.Linq.Dynamic.Core;
// ...existing code...
[HttpPost]
[Route("IsDupeField")]
public bool IsDupeField(
    int countryId,
    string fieldName,
    string fieldValue)
{
    // Default approach (using strongly-typed LAMBA expressions)
    //switch (fieldName)
    //{
    // case "name":
    // return _context.Countries.Any(c => c.Name == fieldValue);
    // case "iso2":
    // return _context.Countries.Any(c => c.ISO2 == fieldValue);
    // case "iso3":
    // return _context.Countries.Any(c => c.ISO3 == fieldValue);
    // default:
    // return false;
    //}
    // Alternative approach (using System.Linq.Dynamic.Core)
    return (ApiResult<Country>.IsValidProperty(fieldName, true))
        ? _context.Countries.Any(
            string.Format("{0} == @0 && Id != @1", fieldName),
            fieldValue,
            countryId)
        : false;
}
Not bad, right?
The alternative dynamic approach definitely looks more DRY and versatile than the default one, all while retaining the same security level against SQL injection attacks. The only downside may be due to the additional overhead brought by the System.Linq.Dynamics.Core library, which will likely have some minor performance impact. Although this shouldn't be an issue in most scenarios, whenever we want our APIs to respond to HTTP requests as quickly as possible, we should arguably favor the default approach.
country-edit.component.html
It's time to implement the template of our CountryEditComponent.
Open the /ClientApp/src/app/countries/country-edit.component.html file and fill it with the following code. Once again, pay attention to the highlighted parts, which are rather different from the template of CityEditComponent; other minor differences, such as country instead of city, are not highlighted since they're more than expected:
<div class="country-edit">
    <h1>{{title}}</h1>
    <p *ngIf="this.id && !country"><em>Loading...</em></p>
    <div class="form" [formGroup]="form" (ngSubmit)="onSubmit()">

        <div class="form-group">
            <label for="name">Country name:</label>
            <br />
            <input type="text" id="name"
                formControlName="name" required
                placeholder="Country name..."
                class="form-control"
                />
            <div *ngIf="form.get('name').invalid &&
                 (form.get('name').dirty || form.get('name').touched)"
                 class="invalid-feedback">
                <div *ngIf="form.get('name').errors?.required">
                  Name is required.
                </div>
                <div *ngIf="form.get('name').errors?.isDupeField">
                  Name already exists: please choose another.
                </div>
            </div>
        </div>
        <div class="form-group">
            <label for="iso2">ISO 3166-1 ALPHA-2 Country Code (2
              letters)</label>
            <br />
            <input type="text" id="iso2"
                   formControlName="iso2" required
                   placeholder="2 letters country code..."
                   class="form-control" />
            <div *ngIf="form.get('iso2').invalid &&
                 (form.get('iso2').dirty || form.get('iso2').touched)"
                 class="invalid-feedback">
                <div *ngIf="form.get('iso2').errors?.required">
                  ISO 3166-1 ALPHA-2 country code is required.
                </div>
                <div *ngIf="form.get('iso2').errors?.pattern">
                  ISO 3166-1 ALPHA-2 country code requires 2 letters.
                </div>
                <div *ngIf="form.get('iso2').errors?.isDupeField">
                  This ISO 3166-1 ALPHA-2 country code already exists:
                   please choose another.
                </div>
            </div>
        </div>
              <div class="form-group">
            <label for="iso3">ISO 3166-1 ALPHA-3 Country Code (3
              letters)</label>
            <br />
            <input type="text" id="iso3"
                   formControlName="iso3" required
                   placeholder="3 letters country code..."
                   class="form-control" />
            <div *ngIf="form.get('iso3').invalid &&
                 (form.get('iso3').dirty || form.get('iso3').touched)"
                 class="invalid-feedback">
                <div *ngIf="form.get('iso3').errors?.required">
                  ISO 3166-1 ALPHA-3 country code is required.
                </div>
                <div *ngIf="form.get('iso3').errors?.pattern">
                  ISO 3166-1 ALPHA-3 country code requires 3 letters.
                </div>
                <div *ngIf="form.get('iso3').errors?.isDupeField">
                  This ISO 3166-1 ALPHA-3 country code already exists:
                   please choose another.
                </div>
            </div>
        </div>

        <div class="form-group commands">
            <button *ngIf="id" type="submit"
                    (click)="onSubmit()"
                    [disabled]="form.invalid"
                    class="btn btn-success">
                Save
            </button>
            <button *ngIf="!id" type="submit"
                    (click)="onSubmit()"
                    [disabled]="form.invalid"
                    class="btn btn-success">
                Create
            </button>
            <button type="button"
                    [routerLink]="['/countries']"
                    class="btn">
                Cancel
            </button>
        </div>
    </div>
</div>
As we can see, the most relevant differences are all related to the HTML code that's required to show the new pattern and isDupeField validators. Now, we have as many as three different validators for our fields, which is pretty awesome: our users won't be given a chance to input wrong values!
country-edit.component.css
Last but not least, let's apply the UI styling.
Open the /ClientApp/src/app/countries/country-edit.component.css file and fill it with the following code:
input.ng-valid {
  border-left: 5px solid green;
}
input.ng-invalid.ng-dirty,
input.ng-invalid.ng-touched {
  border-left: 5px solid red;
}
input.ng-valid ~ .valid-feedback,
input.ng-invalid ~ .invalid-feedback {
  display: block;
}
No surprises here; the preceding stylesheet code is identical to the one we used for CityEditComponent.
Our component is finally done! Now, we need to reference it in the AppModule file and implement the navigation routes in the CountriesComponent.
AppModule
Open the /ClientApp/src/app/app.module.ts file and add the following code (the new lines are highlighted):
import { BrowserModule } from '@angular/platform-browser';
import { NgModule } from '@angular/core';
import { FormsModule } from '@angular/forms';
import { HttpClientModule, HTTP_INTERCEPTORS } from '@angular/common/http';
import { AppRoutingModule } from './app-routing.module';
import { AppComponent } from './app.component';
import { NavMenuComponent } from './nav-menu/nav-menu.component';
import { HomeComponent } from './home/home.component';
import { CitiesComponent } from './cities/cities.component';
import { CityEditComponent } from './cities/city-edit.component';
import { CountriesComponent } from './countries/countries.component';
import { CountryEditComponent } from './countries/country-edit.component';
import { BrowserAnimationsModule } from '@angular/platform-browser/animations';
import { AngularMaterialModule } from './angular-material.module';
import { ReactiveFormsModule } from '@angular/forms';
@NgModule({
  declarations: [
    AppComponent,
    NavMenuComponent,
    HomeComponent,
    CitiesComponent,
    CityEditComponent,
    CountriesComponent,
    CountryEditComponent
  ],
  imports: [
    BrowserModule.withServerTransition({ appId: 'ng-cli-universal' }),
    HttpClientModule,
    FormsModule,
    AppRoutingModule,
    BrowserAnimationsModule,
    AngularMaterialModule,
    ReactiveFormsModule
  ],
  providers: [],
  bootstrap: [AppComponent]
})
export class AppModule { }
Once done, we can add the required routes for CountryEditComponent.
AppRoutingModule
By now, we should know what to do. Open the app-routing.module.ts file and add the following routing rules (new lines are highlighted):
import { NgModule } from '@angular/core';
import { Routes, RouterModule } from '@angular/router';
import { HomeComponent } from './home/home.component';
import { CitiesComponent } from './cities/cities.component';
import { CityEditComponent } from './cities/city-edit.component';
import { CountriesComponent } from './countries/countries.component';
import { CountryEditComponent } from './countries/country-edit.component';
const routes: Routes = [
  { path: '', component: HomeComponent, pathMatch: 'full' },
  { path: 'cities', component: CitiesComponent },
  { path: 'city/:id', component: CityEditComponent },
  { path: 'city', component: CityEditComponent },
  { path: 'countries', component: CountriesComponent },
  { path: 'country/:id', component: CountryEditComponent },
  { path: 'country', component: CountryEditComponent }
];
@NgModule({
  imports: [RouterModule.forRoot(routes)],
  exports: [RouterModule]
})
export class AppRoutingModule { }
Now that we've laid down the two routes so that we can edit and add countries, we just need to implement them in the CountriesComponent template file.
countries.component.html
Open the /ClientApp/src/app/countries/countries.component.html file and add the following code (the new lines are highlighted):
<h1>Countries</h1>
<p>Here's a list of countries: feel free to play with it.</p>
<p *ngIf="!countries"><em>Loading...</em></p>
<div class="commands text-right" *ngIf="countries">
  <button type="submit"
          [routerLink]="['/country']"
          class="btn btn-success">
      Add a new Country
  </button>
</div>
<mat-form-field [hidden]="!countries">
  <input matInput (keyup)="loadData($event.target.value)"
      placeholder="Filter by name (or part of it)...">
</mat-form-field>
<table mat-table [dataSource]="countries"
  class="table-striped mat-elevation-z8"
  [hidden]="!countries"
  matSort (matSortChange)="loadData()"
  matSortActive="{{defaultSortColumn}}"
  matSortDirection="{{defaultSortOrder}}">
  <!-- Id Column -->
  <ng-container matColumnDef="id">
    <th mat-header-cell *matHeaderCellDef mat-sort-header>ID</th>
    <td mat-cell *matCellDef="let country"> {{country.id}} </td>
  </ng-container>
  <!-- Name Column -->
  <ng-container matColumnDef="name">
    <th mat-header-cell *matHeaderCellDef mat-sort-header>Name</th>
    <td mat-cell *matCellDef="let country">
      <a [routerLink]="['/country', country.id]">{{country.name}}</a>
    </td>
  </ng-container>
<!-- ...existing code... -->
... And that's it! Now, we're ready to test everything out.
Testing the CountryEditComponent
Now, it's time to press F5 and admire the result of our hard work.
Once the app has been launched in debug mode, navigate to the Countries view to see the Add a new Country button and the edit links on the various country names, as shown in the following screenshot:

Figure 6.14: Countries list with the Add a new Country button and edit links
Now, let's search for Denmark using our filter and click on the name to enter the CountryEditComponent in edit mode. If everything works fine, the name, iso2, and iso3 fields should all be green, meaning that our isDupeField custom validator(s) are not raising errors:

Figure 6.15: CountryEditComponent for Denmark
Now, let's try to change the Country name to Japan and the ISO 3166-1 ALPHA-2 Country Code to IT and see what happens:

Figure 6.16: Duplicate error messages when trying to edit Denmark
This is a great result: this means that our custom validators are doing their job, positively raising some dupe errors since these values have been reserved for other existing countries (Japan and Italy, respectively).
Now, let's hit the Cancel button and go back to the Countries view. From there, click the Add a new Country button and try to insert a country with the following values:
- Country name:
New Japan - ISO 3166-1 ALPHA-2 Country Code:
JP - ISO 3166-1 ALPHA-3 Country Code:
NJ2
If everything is working fine, we should raise two more validation errors, as shown in the following screenshot:

Figure 6.17: Duplicate errors while trying to add a new Country
The former error is raised by our isDupeField custom validator and is due to the fact that the ALPHA-2 country code already belongs to an existing country (Japan); the latter one is raised by the built-in Validators.pattern, which we configured with a regular expression, /^[a-zA-Z]{3}$/, that doesn't allow digits.
Let's fix these errors by typing in the following values:
- Country name:
New Japan - ISO 3166-1 ALPHA-2 Country Code:
NJ - ISO 3166-1 ALPHA-3 Country Code:
NJP
Once you're done, click Create to create the new country. If everything is working as expected, the view should redirect us to the main Countries view.
From there, we can type New Japan into our text filter to ensure that our brand-new country is actually there:

Figure 6.18: Countries list after filtering for New Japan
... Here it is! This means that we're finally done with CountryEditComponent and ready to move on to new, exciting tasks.
Improving the filter behavior
The real-time filter that we've implemented in our Cities and Countries listing views works well and should be very helpful for our users: however, every time the filter text changes (that is, upon each keystroke), Angular fires an HTTP request to the back-end to retrieve the updated list of results. Such behavior is intrinsically resource-intensive and can easily become a huge performance issue, especially if we're dealing with large tables and/or non-indexed columns.
Are there ways to improve this approach without compromising the results obtained in terms of user experience? As a matter of fact, the answer is yes, as long as we're willing to implement a couple of widely used techniques specifically meant to improve the performance of code that gets executed repeatedly within a short period of time.
Throttling and debouncing
If we think about it, our everyday life is full of situations where we are forced to do something while our attention is captured by something else: social networks like Twitter and instant messaging apps such as WhatsApp are a perfect example of that, since they literally flood us with notifications regardless of what we're doing.
What do we usually do in these cases? Let's consider the following alternatives:
- Respond to all notifications in real time, which would be great for the requesting party but would compromise what we're doing.
- Take no immediate action and check our messages only once every, let's say, five minutes.
- Take no immediate action and check our messages only when no new notifications have come in for the last five minutes.
The first approach is what our app is currently doing; the second is called throttling, while the third is called debouncing. Let's try to better understand what these terms actually mean.
Definitions
In software development, throttling is used to define a behavior that enforces a maximum number of times a function can be called over time. To put it in other words, it's a way to say, "let's execute this function at most once every N milliseconds". No matter how many times the user fires the event, that function will be executed only once in a given time interval.
The term debouncing is used to define a technique that prevents a function from being called until a certain amount of time has passed without it being called: in other words, it's a way to say, "let's execute this function only if N milliseconds have passed without it being called". The concept has some similarities with the throttling technique, with an important difference: no matter how many times the user fires the event, the attached function will be executed only after the specified time once the user stops firing the event.
In a nutshell, we can say that the main difference between throttling and debouncing is that throttling executes the function at a regular interval, while debouncing executes the function only after a cooling period.
Why would we want to throttle or debounce our code?
Let's cut it short: in information technology, throttling and debouncing are mostly useful for two main reasons: optimization and performance. They are widely used in JavaScript because they can be very helpful to efficiently handle some resource-intensive DOM-related tasks, such as scrolling and resizing HTML components, as well as retrieving data from the server.
In our given scenario, we can think of them as two ways to optimize event handling, thus lifting some work from our server (controller and database): more specifically, we want to find a way to reduce the HTTP requests that Angular currently makes to our server upon each keystroke.
Shall we do that using throttling or debouncing?
If we think about how the filter function works in terms of user experience, we can easily determine the correct answer. Since we're talking about a textbox that can be used to filter the listing results to those that contain one or more characters typed by the user, we can reasonably conclude that we could defer the HTTP request until the user stops typing, as long as we process it right after it does. Such behavior won't hinder the user experience granted by the current filter while preventing a good number of unnecessary HTTP calls.
In other words, we need to debounce our calls to the back-end: let's see how we can do that.
Debouncing calls to the back-end
An easy approach to debouncing with Angular is given by RxJS, the Reactive Extensions for JavaScript library that allows us to use Observables, which we introduced in Chapter 3, Front-End and Back-End Interactions.
Since we're using an Observable to perform the HTTP call, we're halfway done: we just need to make use of the handy debounceTime RxJS operator, which will emit a value from the source Observable only after a particular time span has passed without another source emission. While we are there, we can also take the chance to add the distinctUntilChanged operator as well, which emits a value only if it's different from the last one inserted by the user: this will prevent any HTTP call identical to the previous one, which could happen – for example – if the user writes a sentence, then adds a letter and immediately deletes it.
Updating the CitiesComponent
To implement such logic, open the /ClientApp/src/app/cities/cities.component.ts file and perform the following changes:
// [...]
import { MatSort } from '@angular/material/sort';
import { Subject } from 'rxjs';
import { debounceTime, distinctUntilChanged } from 'rxjs/operators';
import { City } from './city';
// [...]
  @ViewChild(MatPaginator) paginator: MatPaginator;
  @ViewChild(MatSort) sort: MatSort;
  filterTextChanged: Subject<string> = new Subject<string>();
// [...]
  ngOnInit() {
    this.loadData(null);
  }
  // debounce filter text changes
  onFilterTextChanged(filterText: string) {
    if (this.filterTextChanged.observers.length === 0) {
      this.filterTextChanged
        .pipe(debounceTime(1000), distinctUntilChanged())
        .subscribe(query => {
          this.loadData(query);
        });
    }
    this.filterTextChanged.next(filterText);
  }
  loadData(query: string = null) {
    var pageEvent = new PageEvent();
    pageEvent.pageIndex = this.defaultPageIndex;
    pageEvent.pageSize = this.defaultPageSize;
    if (query) {
      this.filterQuery = query;
    }
    this.getData(pageEvent);
  }
// [...]
As we can see, we haven't touched the loadData method at all, so that we won't mess up anything that we've done up to now; we added a new onFilterTextChanged method instead, which will be called by the filter's input and will transparently handle the debouncing task.
If we take a closer look at the onFilterTextChanged method, we can see that it works with a new filterTextChanged variable that we've also added to our component class: this variable hosts a Subject, a special type of Observable that allows values to be multi-casted to many Observers.
In a nutshell, here's what this new method does every time it gets called by the filter's input method:
- Checks the
filterTextChangedSubject to see if there are Observers listening; if there are no Observers yet, pipes thedebounceTimeanddistinctUntilChangedoperators and adds a new subscription for theloadDatamethod. - Feeds a new value to the Subject, which will be multi-casted to the Observers registered to listen to it.
For space reasons, we won't say any more about Subjects here, but the topic can be further studied by taking a look at the following page from the RxJS official guide: https://rxjs-dev.firebaseapp.com/guide/subject#
Although we've already explained what these operators do, let's quickly recap their role again:
debounceTimewill emit the value after 1,000 milliseconds of no source input coming from the user.distinctUntilChangedwill emit the value only if it's different than the last inserted one.
Now that we've implemented the debouncing logic in the Angular class, we just need to update the component's template file to make the filter's input call the new onFilterTextChanged method instead of loadData.
Open the /ClientApp/src/app/cities/cities.component.html file and apply the following changes:
<mat-form-field [hidden]="!cities">
    <input matInput
        (keyup)="onFilterTextChanged($event.target.value)"
        placeholder="Filter by name (or part of it)...">
</mat-form-field>
That's it.
Updating the CountriesComponent
Before going further, let's update the CountriesComponent in the exact same way. This can be done by opening the following files:
/ClientApp/src/app/countries/countries.component.ts/ClientApp/src/app/countries/countries.component.html
and applying the same changes that we did on the CitiesComponent files.
For space reasons, we won't demonstrate how to perform these changes here; however, the updated CountriesComponent source code can be found in the GitHub repository.
Delaying these HTTP requests in these two components will shut out most unnecessary HTTP requests coming from our Angular app, thus preventing our database from being called over and over rapidly.
What about throttling?
As a matter of fact, our WorldCities Angular app doesn't have tasks or features that could benefit from throttling. However, it's worth noting that such a technique can be implemented using the same approach that we've used for debouncing, replacing the debounceTime RxJS operator with throttleTime.
For additional info regarding these RxJS operators, refer to the following pages from the RxJS official guide:
Summary
This chapter was entirely dedicated to Angular forms. We started by clarifying what a form actually is and enumerated the features it needs to have in order to fulfill its duties, grouping them into two main requirements: providing a good user experience and properly handling the submitted data.
Then, we turned our focus to the Angular framework and to the two form design models it offers: the Template-Driven approach, mostly inherited from AngularJS, and the Model-Driven or Reactive alternative. We took some valuable time to analyze the pros and cons provided by both of them, and then we performed a detailed comparison of the underlying logic and workflow. At the end of the day, we chose to embrace the Reactive way of doing things, as it gives the developer more control and enforces a more consistent separation of duties between the Data Model and the Form Model.
Right after that, we went from theory to practice by creating a CityEditComponent and used it to implement a fully-featured Reactive Form; we also added the client-side and server-side data validation logic by making good use of the Angular template syntax in conjunction with the classes and directives granted by Angular's ReactiveFormsModule. Once done, we did the same with CountryEditComponent, where we took the chance to try and use a FormBuilder instead of the FormGroup/FormControl instances we used previously.
Once done, we performed a surface test with our browser to check all the built-in and custom validators, ensuring that they worked properly on the front-end as well as on their back-end APIs.
Last but not least, we spent some valuable time analyzing some performance issues of our filter feature and found a way to mitigate them by implementing a debouncing technique: this allowed us to learn how to use some very useful features from the RxJS library: Subject, debounceTime, and distinctUntilChanged.
In the next chapter, we're going to refine what we've done so far by refactoring some rough aspects of our Angular components in a better way. By doing so, we'll learn how to post-process the data, add decent error handling, implement some retry logic to deal with connection issues, debug our form using the Visual Studio client-side debugger, and – most importantly – perform some unit tests.
Suggested topics
Template-Driven Forms, Model-Driven Forms, Reactive Forms, JSON, RFC 7578, RFC 1341, URL Living Standard, HTML Living Standard, data validation, Angular validators, custom validators, asynchronous validators, regular expressions (regex), Angular pipes, FormBuilder, RxJS, Observables, Safe Navigation Operator (Elvis Operator), RxJS operators, Subject, debounceTime, throttleTime.
References
- The application/www-form-urlencoded format draft-hoehrmann-urlencoded-01: https://tools.ietf.org/html/draft-hoehrmann-urlencoded-01
- RFC 7578 - Returning Values from Forms: multipart/form-data: https://tools.ietf.org/html/rfc7578
- RFC 1341, section 7.2 - The Multipart Content-Type: https://www.w3.org/Protocols/rfc1341/7_2_Multipart.html
- URL Living Standard - URL-encoded Form Data: https://url.spec.whatwg.org/#concept-urlencoded
- HTML Living Standard, section 4.10.21.7 - Multipart form data: https://html.spec.whatwg.org/multipage/form-control-infrastructure.html#multipart-form-data
- HTML Living Standard, section 4.10.21.8 - Plain Text Form Data: https://html.spec.whatwg.org/multipage/form-control-infrastructure.html#plain-text-form-data
- Angular: Template-driven forms: https://angular.io/guide/forms#template-driven-forms
- Angular: Reactive forms: https://angular.io/guide/reactive-forms
- Angular: Form validation: https://angular.io/guide/form-validation
- Angular: Validators: https://angular.io/api/forms/Validators
- Angular: Custom Async Validators: https://angular.io/guide/form-validation#implementing-a-custom-async-validator
- RegExr: Learn, Build, and Test RegEx: https://regexr.com/
- TypeScript 3.7 Release Notes: https://www.typescriptlang.org/docs/handbook/release-notes/typescript-3-7.html
- Angular Template expression operators: https://angular.io/guide/template-expression-operators#safe-navigation-operator
- RxJS Subject: https://rxjs-dev.firebaseapp.com/guide/subject#
- RxJS debounceTime operator: https://rxjs-dev.firebaseapp.com/api/operators/debounceTime
- RxJS throttleTime operator: https://rxjs-dev.firebaseapp.com/api/operators/throttleTime