
10
Authentication and Authorization
Generally speaking, the term authentication refers to any process of verification that someone, be it a human being or an automated system, is who (or what) they claim to be. This is also true within the context of the World Wide Web (WWW), where that same word is mostly used to denote any technique used by a website or service to collect a set of login information from a user agent, typically a web browser, and authenticate them using a membership and/or identity service.
Authentication should never be confused with authorization, as this is a different process and is in charge of a very different task. To give a quick definition, we can say that the purpose of authorization is to confirm that the requesting user is allowed to have access to the action they want to perform. In other words, while authentication is about who they are, authorization is about what they're allowed to do.
To better understand the difference between these two apparently similar concepts, we can think of two real-world scenarios:
- A free, yet registered, account trying to gain access to a paid or premium-only service or feature. This is a common example of authenticated, yet not authorized access; we know who they are, yet they're not allowed to go there.
- An anonymous user trying to gain access to a publicly available page or file; this is an example of non-authenticated, yet authorized, access; we don't know who they are, yet they can access public resources just like everyone else.
Authentication and authorization will be the main topics of this chapter, which we'll try to address from both theoretical and practical points of view. More precisely, we're going to do the following:
- Discuss some typical scenarios where authentication and authorization could either be required or not.
- Introduce ASP.NET Core Identity, a modern membership system that allows developers to add login functionality to their applications, as well as
IdentityServer, middleware designed to add OpenID Connect and OAuth 2.0 endpoints to any ASP.NET Core application. - Implement ASP.NET Core Identity and IdentityServer to add login and registration functionalities to our existing
WorldCitiesapp. - Explore the Angular authorization API provided by the .NET Core and Angular Visual Studio project template, which implements the oidc-client npm package to interact with the URI endpoints provided by the ASP.NET Core Identity system, as well as some key Angular features, such as route guards and HTTP interceptors, to handle the whole authorization flow.
- Integrate the aforementioned back-end and front-end APIs into our
WorldCitiesproject in order to give our users a satisfying authentication and authentication experience. - Implement an email sending service, so that our app will be able to properly authenticate registered users using a typical email confirmation flow.
Let's do our best!
Technical requirements
In this chapter, we're going to need all the technical requirements listed in the previous chapters, with the following additional packages:
Microsoft.AspNetCore.Identity.EntityFrameworkCoreMicrosoft.AspNetCore.ApiAuthorization.IdentityServerMicrosoft.AspNetCore.Identity.UISendGridMailKit
As always, it's advisable to avoid installing them straight away; we're going to bring them in during the chapter to better contextualize their purposes within our project.
The code files for this chapter can be found at: https://github.com/PacktPublishing/ASP.NET-5-and-Angular/tree/master/Chapter_10/
To auth, or not to auth
As a matter of fact, implementing authentication and/or authorization logic isn't mandatory for most web-based applications or services; there are a number of websites that still don't do that, mostly because they serve content that can be accessed by anyone at any time. This used to be pretty common among most corporate, marketing, and informative websites until some years ago; that was before their owners learned how important it is to build a network of registered users and how much these "loyal" contacts are worth nowadays.
We don't need to be experienced developers to acknowledge how much the WWW has changed in the last few years; each and every website, regardless of its purpose, has an increasing and more or less legitimate interest in tracking its users nowadays, giving them the chance to customize their navigation experience, interact with their social networks, collect email addresses, and so on. None of the preceding can be done without an authentication mechanism of some sort.
There are billions of websites and services that require authentication to work properly, as most of their content and/or intents depend upon the actions of registered users: forums, blogs, shopping carts, subscription-based services, and even collaborative tools such as wikis.
Long story short, the answer is yes, as long as we want to have users performing Create, Read, Update, and Delete (CRUD) operations within our client app, there is no doubt that we should implement some kind of authentication and authorization procedure. If we're aiming for a production-ready Single-Page Application (SPA) featuring some user interactions of any kind, we definitely want to know who our users are in terms of names and email addresses. It is the only way to determine who will be able to view, add, update, or delete our records, not to mention perform administrative-level tasks, keep track of our users, and so on.
Authentication
Since the origin of the WWW, the vast majority of authentication techniques rely upon HTTP/HTTPS implementation standards, and all of them work more or less in the following way:
- A non-authenticated user agent asks for content that cannot be accessed without some kind of permission.
- The web application returns an authentication request, usually in the form of an HTML page containing an empty web form to complete.
- The user agent fills in the web form with their credentials, usually a username and a password, and then sends it back with a
POSTcommand, which is most likely issued by a click on a Submit button. - The web application receives the
POSTdata and calls the aforementioned server-side implementation, which will try to authenticate the user with the given input and return an appropriate result. - If the result is successful, the web application will authenticate the user and store the relevant data somewhere, depending on the chosen authentication method: sessions/cookies, tokens, signatures, and so on (we'll talk about these later on). Conversely, the result will be presented to the user as a readable outcome inside an error page, possibly asking them to try again, contact an administrator, or something else.
This is still the most common approach nowadays. Almost all websites we can think of are using it, albeit with a number of big or small differences regarding security layers, state management, JSON Web Tokens (JWTs) or other RESTful tokens, basic or digest access, single sign-on properties, and more.
Third-party authentication
Being forced to have a potentially different username and password for each website visit can be frustrating, as well as requiring users to develop custom password storage techniques that might lead to security risks. In order to overcome this issue, a large number of IT developers started to look around for an alternative way to authenticate users that could replace the standard authentication technique based on usernames and passwords with an authentication protocol based on trusted third-party providers.
The rise and fall of OpenID
Among the first successful attempts to implement a third-party authentication mechanism was the first release of OpenID, an open and decentralized authentication protocol promoted by the non-profit OpenID Foundation. Available since 2005, it was quickly and enthusiastically adopted by some big players such as Google and Stack Overflow, who originally based their authentication providers on it.
Here's how it works in a few words:
- Whenever our application receives an OpenID authentication request, it opens a transparent connection interface through the requesting user and a trusted third-party authentication provider (for example, the Google identity provider); the interface can be a popup, an AJAX-populated modal window, or an API call, depending on the implementation.
- The user sends their username and password to the aforementioned third-party provider, who performs the authentication accordingly and communicates the result to our application by redirecting the user to where they came from, along with a security token that can be used to retrieve the authentication result.
- Our application consumes the token to check the authentication result, authenticating the user in the event of success or sending an error response in the event of failure.
Despite the great enthusiasm between 2005 and 2009, with a good number of relevant companies publicly declaring their support for OpenID and even joining the foundation—including PayPal and Facebook—the original protocol didn't live up to its great expectations: legal controversies, security issues, and, most importantly, the massive popularity surge of the social networks with their improper—yet working—OAuth-based social logins in the 2009–2012 period basically killed it.
Those who don't know what OAuth is, have some patience; we'll get there soon enough.
OpenID Connect
In a desperate attempt to keep their flag flying after the takeover of the OAuth/OAuth 2 social logins, the OpenID Foundation released the third generation of the OpenID technology in February 2014; this was called OpenID Connect (OIDC).
Despite the name, the new installment has little to nothing to do with its ancestor; it's merely an authentication layer built upon the OAuth 2 authorization protocol. In other words, it's little more than a standardized interface to help developers use OAuth 2 as an authentication framework in a less improper way, which is kind of funny, considering that OAuth 2 played a major role in taking out OpenID 2.0 in the first place.
The choice of giving up on OpenID in favor of OIDC was highly criticized in 2014; however, after all these years, we can definitely say that OIDC can still provide a useful, standardized way to obtain user identities. It allows developers to request and receive information about authenticated users and sessions using a convenient, RESTful-based JSON interface; it features an extensible specification that also supports some promising optional features such as encryption of identity data, auto-discovery of OpenID providers, and even session management. In short, it's still useful enough to be used instead of relying on pure OAuth 2.
For additional information about OpenID, we strongly suggest reading the following specifications from the OpenID Foundation official website:
OpenID Connect:http://openid.net/specs/openid-connect-core-1_0.html
OpenID 2.0 to OIDC migration guide:http://openid.net/specs/openid-connect-migration-1_0.html
Authorization
In most standard implementations, including those featured by ASP.NET, the authorization phase kicks in right after authentication, and it's mostly based on permissions or roles; any authenticated user might have their own set of permissions and/or belong to one or more roles and thus be granted access to a specific set of resources. These role-based checks are usually set by the developer in a declarative fashion within the application source code and/or configuration files.
Authorization, as we said, shouldn't be confused with authentication, despite the fact that it can be easily exploited to perform an implicit authentication as well, especially when it's delegated to a third-party actor.
Third-party authorization
The best-known third-party authorization protocol nowadays is the 2.0 release of OAuth, also known as OAuth 2, which supersedes the former release (OAuth 1, or simply OAuth) originally developed by Blaine Cook and Chris Messina in 2006.
We have already talked a lot about it for good reason: OAuth 2 has quickly become the industry-standard protocol for authorization and is currently used by a gigantic number of community-based websites and social networks, including Google, Facebook, and Twitter. It basically works like this:
- Whenever an existing user requests a set of permissions to our application via OAuth, we open a transparent connection interface between them and a third-party authorization provider that is trusted by our application (for example, Facebook)
- The provider acknowledges the user and, if they have the proper rights, responds by entrusting them with a temporary, specific access key
- The user presents the access key to our application and will be granted access
We can clearly see how easy it is to exploit this authorization logic for authentication purposes as well; after all, if Facebook says I can do something, shouldn't it also imply that I am who I claim to be? Isn't that enough?
The short answer is no. It might be the case for Facebook because their OAuth 2 implementation implies that subscribers receiving the authorization must have authenticated themselves to Facebook first; however, this assurance is not written anywhere. Considering how many websites are using it for authentication purposes, we can assume that Facebook won't likely change their actual behavior, yet we have no guarantees of this.
Theoretically speaking, these websites can split their authorization system from their authentication protocol at any time, thus leading our application's authentication logic to an unrecoverable state of inconsistency. More generally, we can say that presuming something from something else is almost always a bad practice, unless that assumption lies upon very solid, well-documented, and (most importantly) highly guaranteed grounds.
Proprietary versus third-party
Theoretically speaking, it's possible to entirely delegate the authentication and/or authorization tasks to existing external, third-party providers such as those we mentioned before; there are a lot of web and mobile applications that proudly follow this route nowadays. There are a number of undeniable advantages to using such an approach, including the following:
- No user-specific database tables/data models, just some provider-based identifiers to use here and there as reference keys.
- Immediate registration, since there's no need to fill in a registration form and wait for a confirmation email—no username, no password. This will be appreciated by most users and will probably increase our conversion rates as well.
- Few or no privacy issues, as there's no personal or sensitive data on the application server.
- No need to handle usernames and passwords and implement automatic recovery processes.
- Fewer security-related issues such as form-based hacking attempts or brute-force login attempts.
Of course, there are also some downsides:
- There won't be an actual user base, so it will be difficult to get an overview of active users, get their email address, analyze statistics, and so on.
- The login phase might be resource-intensive, since it will always require an external, back-and-forth secure connection with a third-party server.
- All users will need to have (or open) an account with the chosen third-party provider(s) in order to log in.
- All users will need to trust our application because the third-party provider will ask them to authorize it to access their data.
- We will have to register our application with the provider in order to be able to perform a number of required or optional tasks, such as receiving our public and secret keys, authorizing one or more URI initiators, and choosing the information we want to collect.
Taking all these pros and cons into account, we can say that relying on third-party providers might be a great time-saving choice for small-scale apps, including ours; however, building our own account management system seems to be the only way to overcome the aforementioned governance and control-based flaws undeniably brought by that approach.
In this book, we'll explore both of these routes, in an attempt to get the most—if not the best—of both worlds. In this chapter, we'll create an internal membership provider that will handle authentication and provide its very own set of authorization rules; in the following chapter, we'll further leverage that same implementation to demonstrate how we can give our users the chance to log in using a sample third-party auth provider (Facebook) and use its SDK and API to fetch the data that we need to create our corresponding internal users, thanks to the built-in features provided by the ASP.NET Core Identity package.
Proprietary auth with .NET Core
The authentication patterns made available by ASP.NET Core are basically the same as those supported by the previous versions of ASP.NET:
- No authentication, if we don't feel like implementing anything or if we want to use (or develop) a self-made auth interface without relying upon the ASP.NET Core Identity system
- Individual user accounts, when we set up an internal database to store user data using the standard ASP.NET Core Identity interface
- Azure Active Directory (AD), which implies using a token-based set of API calls handled by the Azure AD Authentication Library (ADAL)
- Windows authentication, which is only viable for local-scope applications within Windows domains or AD trees
However, the implementation patterns introduced by the ASP.NET Core team over the past few years are constantly evolving in order to match the latest security practices available.
All the aforementioned approaches—excluding the first one—are handled by the ASP.NET Core Identity system, a membership system that allows us to add authentication and authorization functionalities to our application.
For additional info about the ASP.NET Core Identity APIs, check out the following URL:
https://docs.microsoft.com/en-us/aspnet/core/security/authentication/identity
Starting with .NET Core 3.0, ASP.NET Core Identity has been integrated with a new API authorization mechanism to handle authentication in SPAs; this new feature is based on IdentityServer, a piece of open-source OIDC and OAuth 2.0 middleware that has been part of the .NET Foundation since .NET Core 3.0.
Further information about IdentityServer can be retrieved from the official documentation website, which is available at the following URLs:
https://identityserver.io/ http://docs.identityserver.io/en/latest/
With ASP.NET Core Identity, we can easily implement a login mechanism that will allow our users to create an account and log in with a username and a password. On top of that, we can also give them the chance to use an external login provider—as long as it's supported by the framework; as of the time of writing, the list of available providers includes Facebook, Google, Microsoft account, Twitter, and more.
In this section, we're going to do the following:
- Introduce the ASP.NET Core Identity model, the framework provided by ASP.NET Core to manage and store user accounts
- Set up an ASP.NET Core Identity implementation by installing the required NuGet packages to our existing
WorldCitiesapp - Extend ApplicationDbContext using the Individual User Accounts authentication type
- Configure the Identity service in our application's
Startupclass - Update the existing SeedController by adding a method to create our default users with the .NET Identity API providers
Right after that, we'll also say a couple of words about the ASP.NET Core Task Asynchronous Programming (TAP) model.
The ASP.NET Core Identity model
ASP.NET Core provides a unified framework to manage and store user accounts that can be easily used in any .NET Core application (even non-web ones); this framework is called ASP.NET Core Identity and provides a set of APIs that allows developers to handle the following tasks:
- Design, set up, and implement user registration and login functionalities
- Manage users, passwords, profile data, roles, claims, tokens, email confirmation, and so on
- Support external (third-party) login providers such as Facebook, Google, Microsoft account, Twitter, and more
The ASP.NET Core Identity source code is open-source and available on GitHub at: https://github.com/aspnet/AspNetCore/tree/master/src/Identity
It goes without saying that ASP.NET Core Identity requires a persistent data source to store (and retrieve) the identity data (usernames, passwords, and profile data), such as a SQL Server database; for that very reason, it features built-in integration mechanisms with Entity Framework Core.
This means that, in order to implement our very own identity system, we'll basically extend what we did in Chapter 4, Data Model with Entity Framework Core; more specifically, we'll update our existing ApplicationDbContext to support the additional entity classes required to handle users, roles, and so on.
Entity types
The ASP.NET Core Identity platform strongly relies upon the following entity types, each one of them representing a specific set of records:
User: The users of our applicationRole: The roles that we can assign to each userUserClaim: The claims that a user possessesUserToken: The authentication token that a user might use to perform auth-based tasks (such as logging in)UserLogin: The login account associated with each userRoleClaim: The claims that are granted to all users within a given roleUserRole: The lookup table to store the relationship between users and their assigned roles
These entity types are related to each other in the following ways:
- Each
Usercan have manyUserClaim,UserLogin, andUserTokenentities (one-to-many) - Each
Rolecan have many associatedRoleClaimentities (one-to-many) - Each
Usercan have many associatedRoleentities, and eachRolecan be associated with manyUserentities (many-to-many)
The many-to-many relationship requires a join table in the database, which is represented by the UserRole entity.
Luckily enough, we won't have to manually implement all these entities from scratch, because ASP.NET Core Identity provides some default Common Language Runtime (CLR) types for each one of them:
IdentityUserIdentityRoleIdentityUserClaimIdentityUserTokenIdentityUserLoginIdentityRoleClaimIdentityUserRole
These types can be used as base classes for our own implementation, whenever we need to explicitly define an identity-related entity model; moreover, most of them don't have to be implemented in most common authentication scenarios, since their functionalities can be handled at a higher level thanks to the ASP.NET Core Identity sets of APIs, which can be accessed from the following classes:
RoleManager<TRole>: Provides the APIs for managing rolesSignInManager<TUser>: Provides the APIs for signing users in and out (login and logout)UserManager<TUser>: Provides the APIs for managing users
Once the ASP.NET Core Identity service has been properly configured and set up, these providers can be injected into our .NET controllers using Dependency Injection (DI), just like we did with ApplicationDbContext; in the following section, we'll see how we can do that.
Setting up ASP.NET Core Identity
In Chapter 1, Getting Ready, and Chapter 3, Front-End and Back-End Interactions, when we created our HealthCheck and WorldCities .NET Core projects, we always made the choice to go with an empty project featuring no authentication. That was because we didn't want Visual Studio to install ASP.NET Core Identity within our application's startup files right from the start. However, now that we're using it, we need to manually perform the required setup steps.
Adding the NuGet packages
Enough with the theory, let's put the plan into action.
From Solution Explorer, right-click on the WorldCities tree node, then select Manage NuGet Packages. Look for the following two packages and install them:
Microsoft.AspNetCore.Identity.EntityFrameworkCoreMicrosoft.AspNetCore.ApiAuthorization.IdentityServer
Alternatively, open Package Manager Console and install them with the following commands:
> Install-Package Microsoft.AspNetCore.Identity.EntityFrameworkCore
> Install-Package Microsoft.AspNetCore.ApiAuthorization.IdentityServer
At the time of writing, the latest version for both of them is 5.0.0; as always, we are free to install a newer version, as long as we know how to adapt our code accordingly to fix potential compatibility issues.
Creating ApplicationUser
Now that we have installed the required identity libraries, we need to create a new ApplicationUser entity class with all the features required by the ASP.NET Core Identity service to use it for auth purposes. Luckily enough, the package comes with a built-in IdentityUser base class that can be used to extend our own implementation, thus granting it all that we need.
From Solution Explorer, navigate to the /Data/Models/ folder, then create a new ApplicationUser.cs class and fill its content with the following code:
using Microsoft.AspNetCore.Identity;
using System;
using System.Collections.Generic;
using System.Linq;
using System.Threading.Tasks;
namespace WorldCities.Data.Models
{
    public class ApplicationUser : IdentityUser
    {
    }
}
As we can see, we don't need to implement anything there, at least not for the time being; we'll just extend the IdentityUser base class, which already contains everything we need for now.
Extending ApplicationDbContext
In order to support the .NET Core authentication mechanism, our existing ApplicationDbContext needs to be extended from a different database abstraction base class that supports ASP.NET Core Identity and IdentityServer.
Open the /Data/ApplicationDbContext.cs file and update its contents accordingly (updated lines are highlighted):
using IdentityServer4.EntityFramework.Options;
using Microsoft.AspNetCore.ApiAuthorization.IdentityServer;
using Microsoft.EntityFrameworkCore;
using Microsoft.Extensions.Options;
using WorldCities.Data.Models;
namespace WorldCities.Data
{
    public class ApplicationDbContext
        : ApiAuthorizationDbContext<ApplicationUser>
    {
        public ApplicationDbContext(
            DbContextOptions options,
            IOptions<OperationalStoreOptions> operationalStoreOptions)
            : base(options, operationalStoreOptions)
        {
        }
        public DbSet<City> Cities { get; set; }
        public DbSet<Country> Countries { get; set; }
    }
}
As we can see from the preceding code, we replaced the current DbContext base class with the new ApiAuthorizationDbContext base class; the new class strongly relies on the IdentityServer middleware, which also required a change in the constructor signature to accept some options that are required for properly configuring the operational context.
For additional information about the .NET authentication and authorization system for SPAs, the ASP.NET Core Identity API, and the .NET Core IdentityServer, check out the following URL:
https://docs.microsoft.com/en-us/aspnet/core/security/authentication/identity-api-authorization
Adjusting our unit tests
As soon as we save the new ApplicationDbContext file, our existing CitiesController_Tests.cs class in the WorldCities.Tests project will likely throw a compiler error, as shown in the following screenshot:

Figure 10.1: Compiler error after changing ApplicationDbContext.cs
The reason for that is well explained in the Error List panel: the constructor signature of ApplicationDbContext changed, requiring an additional parameter that we don't pass here.
It's worth noting that this issue doesn't affect our main application's controllers since ApplicationDbContext is injected through DI there.
To quickly fix that, update the CitiesController_Tests.cs existing source code in the following way (new and updated lines are highlighted):
using IdentityServer4.EntityFramework.Options;
// ...existing code...
var storeOptions = Options.Create(new OperationalStoreOptions());
using (var context = new ApplicationDbContext(options, storeOptions))
// ...existing code...
Now the error should disappear (and the test should still pass).
Configuring the ASP.NET Core Identity middleware
Now that we're done with all the prerequisites, we can open the Startup.cs file and add the following highlighted lines in the ConfigureServices method to set up the middleware required by the ASP.NET Core Identity system:
// ...existing code...
// This method gets called by the runtime. Use this method to add
// services to the container.
public void ConfigureServices(IServiceCollection services)
{
    services.AddControllersWithViews()
      .AddJsonOptions(options => {
        // set this option to TRUE to indent the JSON output
        options.JsonSerializerOptions.WriteIndented = true;
        // set this option to NULL to use PascalCase instead of
        // CamelCase (default)
        // options.JsonSerializerOptions.PropertyNamingPolicy = null;
     });
    // In production, the Angular files will be served from
    // this directory
    services.AddSpaStaticFiles(configuration =>
    {
        configuration.RootPath = "ClientApp/dist";
    });
    // Add ApplicationDbContext.
    services.AddDbContext<ApplicationDbContext>(options =>
        options.UseSqlServer(
            Configuration.GetConnectionString("DefaultConnection")
            )
    );
    // Add ASP.NET Core Identity support
    services.AddDefaultIdentity<ApplicationUser>(options =>
        {
            options.SignIn.RequireConfirmedAccount = true;
            options.Password.RequireDigit = true;
            options.Password.RequireLowercase = true;
            options.Password.RequireUppercase = true;
            options.Password.RequireNonAlphanumeric = true;
            options.Password.RequiredLength = 8;
        })
        .AddRoles<IdentityRole>()
        .AddEntityFrameworkStores<ApplicationDbContext>();
    services.AddIdentityServer()
        .AddApiAuthorization<ApplicationUser, ApplicationDbContext>();
    services.AddAuthentication()
        .AddIdentityServerJwt();
}
// ...existing code...
And then, in the Configure method, add the following highlighted lines:
// ...existing code...
app.UseRouting();
app.UseAuthentication();
app.UseIdentityServer();
app.UseAuthorization();
app.UseEndpoints(endpoints =>
// ...existing code...
The preceding code strictly resembles the default .NET Core Identity implementation for SPA projects. If we created a new ASP.NET Core web application using the Visual Studio wizard, by selecting the Individual User Accounts authentication method (see the following screenshot), we would end up with the same code, with some minor differences:

Figure 10.2: Creating a new ASP.NET Core web app using the Visual Studio wizard
In the opposite way to the default implementation, in our code, we took the chance to override some of the default password policy settings to demonstrate how we can configure the Identity service to better suit our needs.
Let's take another look at the preceding code, emphasizing the changes (highlighted lines):
options.SignIn.RequireConfirmedAccount = true;
options.Password.RequireLowercase = true;
options.Password.RequireUppercase = true;
options.Password.RequireDigit = true;
options.Password.RequireNonAlphanumeric = true;
options.Password.RequiredLength = 8;
As we can see, we didn't change the RequireConfirmedAccount default settings, which require a confirmed user account (verified through email) to sign in. What we did instead was explicitly set our password strength requirements so that all our users' passwords would need to have the following:
- At least one lowercase letter
- At least one uppercase letter
- At least one digit character
- At least one non-alphanumeric character
- A minimum length of eight characters
That will grant our app a decent level of authentication security, should we ever want to make it publicly accessible on the web. Needless to say, we can change these settings depending on our specific needs; a development sample could probably live with more relaxed settings, as long as we don't make it available to the public.
It's worth noting that the preceding code will require a reference to the new identity-related packages that we installed a moment ago:
// ...existing code...
using Microsoft.AspNetCore.Authentication;
using Microsoft.AspNetCore.Identity;
// ...existing code...
Furthermore, we'll also need to reference the namespace that we used for our data models, since we're now referencing the ApplicationUser class:
// ...existing code...
using WorldCities.Data.Models;
// ...existing code...
Now that we have properly configured our Setup class, we need to do the same with IdentityServer.
Configuring IdentityServer
In order to properly set up the IdentityServer middleware, we need to add the following lines to our existing appSettings.json configuration file (new lines are highlighted):
{
  "Logging": {
      "LogLevel": {
      "Default": "Information",
      "Microsoft": "Warning",
      "Microsoft.Hosting.Lifetime": "Information"
      }
    },
  "IdentityServer": {
    "Clients": {
      "WorldCities": {
        "Profile": "IdentityServerSPA"
      }
    }
  },
"AllowedHosts": "*"
}
As we can see, we added a single client for IdentityServer, which will be our Angular app. The "IdentityServerSPA" profile indicates the application type and it's used internally to generate the server defaults for that type—in our scenario, an SPA is hosted alongside IdentityServer as a single unit.
Here are the defaults that IdentityServer will load for our application type:
redirect_uridefaults to/authentication/login-callbackpost_logout_redirect_uridefaults to/authentication/logout-callback- The set of scopes includes
openID,Profile, and every scope defined for the APIs in the app - The set of allowed OIDC response types is
id_token tokenor each of them individually (id_token,token) - The allowed response mode is fragment
Other available profiles include the following:
- SPA: An SPA that is not hosted with
IdentityServer - IdentityServerJwt: An API that is hosted alongside
IdentityServer - API: An API that is not hosted with
IdentityServer
Before going further, we need to perform another IdentityServer-related update to our appSettings.Development.json file.
Updating the appSettings.Development.json file
As we know from Chapter 2, Looking Around, the appSettings.Development.json file is used to specify additional configuration key/value pairs (and/or override the existing ones) for the development environment. This is precisely what we need to do now since IdentityServer requires some development-specific settings that shouldn't be put in production.
Open the appSettings.Development.json file and add the following content (new lines are highlighted):
{
  "Logging": {
    "LogLevel": {
      "Default": "Debug",
      "System": "Information",
      "Microsoft": "Information"
    },
    "IdentityServer": {
      "Key": {
        "Type": "Development"
      }
    }
  }
}
The "Key" element that we added in the preceding code describes the key that will be used to sign tokens; for the time being, since we're still in development, that key type will work just fine. However, when we want to deploy our app to production, we'll need to provision and deploy a real key alongside our app. When we come to that, we'll have to add a "Key" element to our appSettings.json production file and configure it accordingly; we'll talk more about this in Chapter 12, Windows, Linux, and Azure Deployment.
Until then, it's better to avoid adding it in the production settings to prevent our web app from running in an insecure mode.
For additional information about IdentityServer and its configuration parameters, check out the following URL:
https://docs.microsoft.com/en-us/aspnet/core/security/authentication/identity-api-authorization
Now we're ready to create our users.
Revising SeedController
The best way to create a new user from scratch would be from SeedController, which implements the seeding mechanism that we set up in Chapter 4, Data Model with Entity Framework Core; however, in order to interact with the .NET Core Identity APIs required to do that, we need to inject them using DI, just like we already did with ApplicationDbContext.
Adding RoleManager and UserManager through DI
From Solution Explorer, open the /Controllers/SeedController.cs file of the WorldCities project and update its content accordingly with the following code (new/updated lines are highlighted):
using Microsoft.AspNetCore.Identity;
// ...existing code...
public class SeedController : ControllerBase
{
    private readonly ApplicationDbContext _context;
    private readonly RoleManager<IdentityRole> _roleManager;
    private readonly UserManager<ApplicationUser> _userManager;
    private readonly IWebHostEnvironment _env;
    public SeedController(
        ApplicationDbContext context,
        RoleManager<IdentityRole> roleManager,
        UserManager<ApplicationUser> userManager,
        IWebHostEnvironment env)
    {
        _context = context;
        _roleManager = roleManager;
        _userManager = userManager;
        _env = env;
    }
// ...existing code...
As we can see, we added the RoleManager<TRole> and UserManager<TUser> providers that we talked about early on; we did that using DI, just like we did with ApplicationDbContext and IWebHostEnvironment back in Chapter 4, Data Model with Entity Framework Core. We'll see how we can use these new providers to create our users and roles soon enough.
Now, let's define the following method at the end of the /Controllers/SeedController.cs file, right below the existing Import() method:
// ...existing code...
[HttpGet]
public async Task<ActionResult> CreateDefaultUsers()
{
    throw new NotImplementedException();
}
// ...existing code...
In a typical ApiController, adding another action method with the [HttpGet] attribute would create an ambiguous route that will conflict with the original method accepting HTTP GET requests (the Import() method): this code will not run when you hit the endpoint. However, since our SeedController has been configured to take the action names into account thanks to the [Route("api/[controller]/[action]")] routing rule that we placed above the class constructor back in Chapter 4, Data Model with Entity Framework Core, we're entitled to add this method without creating a conflict.
In the opposite way to what we usually do, we're not going to implement this method straight away; we'll take this chance to embrace the Test-Driven Development (TDD) approach, which means that we'll start with creating a (failing) unit test.
Defining the CreateDefaultUser() unit test
From Solution Explorer, create a new /SeedController_Tests.cs file in the WorldCities.Tests project; once done, fill its content with the following code:
using IdentityServer4.EntityFramework.Options;
using Microsoft.AspNetCore.Hosting;
using Microsoft.AspNetCore.Identity;
using Microsoft.AspNetCore.Identity.EntityFrameworkCore;
using Microsoft.EntityFrameworkCore;
using Microsoft.Extensions.Logging;
using Microsoft.Extensions.Options;
using Moq;
using System;
using WorldCities.Controllers;
using WorldCities.Data;
using WorldCities.Data.Models;
using Xunit;
namespace WorldCities.Tests
{
    public class SeedController_Tests
    {
        /// <summary>
        /// Test the CreateDefaultUsers() method
        /// </summary>
        [Fact]
        public async void CreateDefaultUsers()
        {
            #region Arrange
            // create the option instances required by the
            // ApplicationDbContext
            var options = new
             DbContextOptionsBuilder<ApplicationDbContext>()
                .UseInMemoryDatabase(databaseName: "WorldCities")
                .Options;
            var storeOptions = Options.Create(new
             OperationalStoreOptions());
            // create a IWebHost environment mock instance
            var mockEnv = new Mock<IWebHostEnvironment>().Object;
            // define the variables for the users we want to test
            ApplicationUser user_Admin = null;
            ApplicationUser user_User = null;
            ApplicationUser user_NotExisting = null;
            #endregion
            #region Act
            // create a ApplicationDbContext instance using the
            // in-memory DB
            using (var context = new ApplicationDbContext(options,
             storeOptions))
            {
                // create a RoleManager instance
                var roleStore = new RoleStore<IdentityRole>(context);
                var roleManager = new RoleManager<IdentityRole>(
                    roleStore,
                    new IRoleValidator< IdentityRole >[0],
                    new UpperInvariantLookupNormalizer(),
                    new Mock<IdentityErrorDescriber>().Object,
                    new Mock<ILogger<RoleManager<IdentityRole>>>(
                    ).Object);
                // create a UserManager instance
                var userStore = new
                 UserStore<ApplicationUser>(context);
                var userManager = new UserManager<ApplicationUser>(
                    userStore,                    new Mock<IOptions<IdentityOptions>>().Object,
                    new Mock<IPasswordHasher< ApplicationUser>>().Object,
                    new IUserValidator< ApplicationUser>[0],
                    new IPasswordValidator<ApplicationUser>[0],
                    new UpperInvariantLookupNormalizer(),
                    new Mock<IdentityErrorDescriber>().Object,
                    new Mock<IServiceProvider>().Object,
                    new Mock<ILogger<UserManager<ApplicationUser>>>(
                    ).Object);
                // create a SeedController instance
                var controller = new SeedController(
                    context,
                    roleManager,
                    userManager,
                    mockEnv
                    );
                // execute the SeedController's CreateDefaultUsers()
                // method to create the default users (and roles)
                await controller.CreateDefaultUsers();
                // retrieve the users
                user_Admin = await userManager.FindByEmailAsync(
                 "[email protected]");
                user_User = await userManager.FindByEmailAsync(
                 "[email protected]");
                user_NotExisting = await userManager.FindByEmailAsync(
                 "[email protected]");
            }
            #endregion
            #region Assert
            Assert.NotNull(user_Admin);
            Assert.NotNull(user_User);
            Assert.Null(user_NotExisting);
            #endregion
        }
    }
}
As we can see, we are creating real instances (not mocks) of the RoleManager and UserManager providers, since we'll need them to actually perform some read/write operations to the in-memory database that we have defined in the options of ApplicationDbContext; this basically means that these providers will perform their job for real, but everything will be done on the in-memory database instead of the SQL Server data source. That's an ideal scenario for our tests.
At the same time, we still made good use of the Moq package library to create a number of mocks to emulate a number of parameters required to instantiate RoleManager and UserManager. Luckily enough, most of them are internal objects that won't be needed to perform our current tests; for those that are required, we had to create a real instance.
For example, for both providers, we were forced to create a real instance of UpperInvariantLookupNormalizer—which implements the ILookupNormalizer interface—because it's being used internally by RoleManager (to look up existing roles) as well as UserManager (to look up existing usernames); if we had mocked it instead, we would've hit some nasty runtime errors while trying to make these tests pass.
While we are here, it could be useful to move the RoleManager and UserManager generation logic to a separate helper class, so that we'll be able to use it in other tests without having to repeat it every time.
From Solution Explorer, create a new IdentityHelper.cs file in the WorldCities.Tests project. Once done, fill its content with the following code:
using Microsoft.AspNetCore.Identity;
using Microsoft.Extensions.Logging;
using Microsoft.Extensions.Options;
using Moq;
using System;
using System.Collections.Generic;
using System.Text;
namespace WorldCities.Tests
{
    public static class IdentityHelper
    {
        public static RoleManager<TIdentityRole>
         GetRoleManager<TIdentityRole>(
            IRoleStore<TIdentityRole> roleStore) where TIdentityRole :
             IdentityRole
        {
            return new RoleManager<TIdentityRole>(
                    roleStore,
                    new IRoleValidator<TIdentityRole>[0],
                    new UpperInvariantLookupNormalizer(),
                    new Mock<IdentityErrorDescriber>().Object,
                    new Mock<ILogger<RoleManager<TIdentityRole>>>(
                    ).Object);
        }
        public static UserManager<TIDentityUser>
         GetUserManager<TIDentityUser>(
            IUserStore<TIDentityUser> userStore) where TIDentityUser :
             IdentityUser
        {
            return new UserManager<TIDentityUser>(
                    userStore,
                    new Mock<IOptions<IdentityOptions>>().Object,
                    new Mock<IPasswordHasher<TIDentityUser>>().Object,
                    new IUserValidator<TIDentityUser>[0],
                    new IPasswordValidator<TIDentityUser>[0],
                    new UpperInvariantLookupNormalizer(),
                    new Mock<IdentityErrorDescriber>().Object,
                    new Mock<IServiceProvider>().Object,
                    new Mock<ILogger<UserManager<TIDentityUser>>>(
                    ).Object);
        }
    }
}
As we can see, we created two methods—GetRoleManager and GetUserManager—which we can use to create these providers for other tests.
Now we can call these two methods from SeedController by updating its code in the following way (updated lines are highlighted):
// ...existing code...
// create a RoleManager instance
var roleManager = IdentityHelper.GetRoleManager(
    new RoleStore<IdentityRole>(context));
// create a UserManager instance
var userManager = IdentityHelper.GetUserManager(
    new UserStore<ApplicationUser>(context));
// ...existing code...
With this, our unit test is ready; we just need to execute it to see it fail.
To do that, right-click the WorldCities.Test node from Solution Explorer and select Run Tests.
Alternatively, just switch to the Test Explorer window and use the topmost buttons to run the tests from there.
If we did everything correctly, we should be able to see our CreateDefaultUsers() test failing, just like in the following screenshot:

Figure 10.3: Failure of our CreateDefaultUsers() test
That's it; all we have to do now is to implement the CreateDefaultUsers() method of SeedController to make the preceding test pass.
Implementing the CreateDefaultUsers() method
Add the following method at the end of the /Controllers/SeedController.cs file, right below the existing Import() method:
// ...existing code...
[HttpGet]
public async Task<ActionResult> CreateDefaultUsers()
{
    // setup the default role names
    string role_RegisteredUser = "RegisteredUser";
    string role_Administrator = "Administrator";
    // create the default roles (if they don't exist yet)
    if (await _roleManager.FindByNameAsync(role_RegisteredUser) ==
     null)
        await _roleManager.CreateAsync(new
         IdentityRole(role_RegisteredUser));
    if (await _roleManager.FindByNameAsync(role_Administrator) ==
     null)
        await _roleManager.CreateAsync(new
         IdentityRole(role_Administrator));
    // create a list to track the newly added users
    var addedUserList = new List<ApplicationUser>();
    // check if the admin user already exists
    var email_Admin = "[email protected]";
    if (await _userManager.FindByNameAsync(email_Admin) == null)
    {
        // create a new admin ApplicationUser account
        var user_Admin = new ApplicationUser()
        {
            SecurityStamp = Guid.NewGuid().ToString(),
            UserName = email_Admin,
            Email = email_Admin,
        };
        // insert the admin user into the DB
        await _userManager.CreateAsync(user_Admin, "MySecr3t$");
        // assign the "RegisteredUser" and "Administrator" roles
        await _userManager.AddToRoleAsync(user_Admin,
         role_RegisteredUser);
        await _userManager.AddToRoleAsync(user_Admin,
         role_Administrator);
        // confirm the e-mail and remove lockout
        user_Admin.EmailConfirmed = true;
        user_Admin.LockoutEnabled = false;
        // add the admin user to the added users list
        addedUserList.Add(user_Admin);
    }
    // check if the standard user already exists
    var email_User = "[email protected]";
    if (await _userManager.FindByNameAsync(email_User) == null)
    {
        // create a new standard ApplicationUser account
        var user_User = new ApplicationUser()
        {
            SecurityStamp = Guid.NewGuid().ToString(),
            UserName = email_User,
            Email = email_User
        };
        // insert the standard user into the DB
        await _userManager.CreateAsync(user_User, "MySecr3t$");
        // assign the "RegisteredUser" role
        await _userManager.AddToRoleAsync(user_User,
         role_RegisteredUser);
        // confirm the e-mail and remove lockout
        user_User.EmailConfirmed = true;
        user_User.LockoutEnabled = false;
        // add the standard user to the added users list
        addedUserList.Add(user_User);
    }
    // if we added at least one user, persist the changes into the DB
    if (addedUserList.Count > 0)
        await _context.SaveChangesAsync();
    return new JsonResult(new
    {
        Count = addedUserList.Count,
        Users = addedUserList
    });
}
// ...existing code...
The code is quite self-explanatory, and it has a lot of comments explaining the various steps; however, here's a convenient summary of what we just did:
- We started by defining some default role names (
RegisteredUsersfor the standard registered users,Administratorfor the administrative-level ones). - We created a logic to check whether these roles already exist. If they don't exist, we create them. As expected, both tasks have been performed using
RoleManager. - We defined a user list local variable to track the newly added users, so that we can output it to the user in the JSON object we'll return at the end of the action method.
- We created a logic to check whether a user with the
[email protected]username already exists; if it doesn't, we create it and assign it both theRegisteredUserandAdministratorroles, since it will be a standard user and also the administrative account of our app. - We created a logic to check whether a user with the
[email protected]username already exists; if it doesn't, we create it and assign it theRegisteredUserrole. - At the end of the action method, we configured the JSON object that we'll return to the caller; this object contains a count of the added users and a list containing them, which will be serialized into a JSON object that will show their entity values.
The Administrator and RegisteredUser roles we just implemented here will be the core of our authorization mechanism; all of our users will be assigned to at least one of them. Note how we assigned both of them to the Admin user to make them able to do everything a standard user can do, plus more: all the other users only have the latter role, so they'll be unable to perform any administrative-level tasks—as long as they're not provided with the Administrator role.
Before moving on, it's worth noting that we're using the user's email address for both the Email and UserName fields. We did that on purpose, because those two fields in the ASP.NET Core Identity system are used interchangeably by default; whenever we add a user using the default APIs, the Email provided is saved in the UserName field as well, even if they are two separate fields in the AspNetUsers database table. Although this behavior can be changed, we're going to stick to the default settings so that we'll be able to use the default settings without changing them throughout the whole ASP.NET Identity system.
Rerunning the unit test
Now that we have implemented the test, we can rerun the CreateDefaultUsers() test and see whether it passes. As usual, we can do that by right-clicking the WorldCities.Test root node from Solution Explorer and selecting Run Tests, or from within the Test Explorer panel.
If we did everything correctly, we should see something like this:

Figure 10.4: CreateDefaultUsers() test passed
That's it; now we're finally done updating our project's classes.
A word on async tasks, awaits, and deadlocks
As we can see by looking at the preceding CreateDefaultUsers() method, all the ASP.NET Core Identity system API's relevant methods are asynchronous, meaning that they return an async task rather than a given return value. For that very reason, since we need to execute these various tasks one after another, we had to prepend all of them with the await keyword.
Here's an example of await usage taken from the preceding code:
await _userManager.AddToRoleAsync(user_Admin, role_RegisteredUser);
The await keyword, as the name implies, awaits the completion of the async task before going forward. It's worth noting that such an expression does not block the thread on which it is executing; instead, it causes the compiler to sign up the rest of the async method as a continuation of the awaited task, thus returning the thread control to the caller. Eventually, when the task completes, it invokes its continuation, thus resuming the execution of the async method where it left off.
That's the reason why the await keyword can only be used within async methods; as a matter of fact, the preceding logic requires the caller to be async as well, otherwise, it wouldn't work.
Alternatively, we could have used the Wait() method, in the following way:
_userManager.AddToRoleAsync(user_Admin, role_RegisteredUser).Wait();
However, we didn't do that—for good reason. In the opposite way to the await keyword, which tells the compiler to asynchronously wait for the async task to complete, the parameterless Wait() method will block the calling thread until the async task has completed execution; therefore, the calling thread will unconditionally wait until the task completes.
To better explain how such techniques impact our .NET Core application, we should spend a little time better understanding the concept of async tasks, as they are a pivotal part of the ASP.NET Core TAP model.
One of the first things we should learn when working with sync methods invoking async tasks in ASP.NET is that when the top-level method awaits a task, its current execution context gets blocked until the task completes. This won't be a problem unless that context allows only one thread to run at a time, which is precisely the case of AspNetSynchronizationContext. If we combine these two things, we can easily see that blocking an async method (that is, a method returning an async task) will expose our application to a high risk of deadlock.
A deadlock, from a software development perspective, is a dreadful situation that occurs whenever a process or thread enters a waiting state indefinitely, usually because the resource it's waiting for is held by another waiting process. In any legacy ASP.NET web application, we would face a deadlock every time we're blocking a task, simply because that task, in order to complete, will require the same execution context as the invoking method, which is kept blocked by that method until the task completes!
Luckily enough, we're not using legacy ASP.NET here; we're using ASP.NET Core, where the legacy ASP.NET pattern based upon the SynchronizationContext has been replaced by a contextless approach layered upon a versatile, deadlock-resilient thread pool.
This basically means that blocking the calling thread using the Wait() method isn't that problematic anymore; therefore, if we switched our await keywords with it, our method would still run and complete just fine. However, by doing so, we would basically use synchronous code to perform asynchronous operations, which is generally considered a bad practice; moreover, we would lose all the benefits brought by asynchronous programming, such as performance and scalability.
For all those reasons, the await approach is definitely the way to go there.
For additional information regarding threads, async task awaits, and asynchronous programming in ASP.NET, we highly recommend checking out the outstanding articles written by Stephen Cleary on the topic, which will greatly help in understanding some of the most tricky and complex scenarios that we could face when developing with these technologies. Some of them were written a while ago, yet they never really age:
https://blog.stephencleary.com/2012/02/async-and-await.html
https://blogs.msdn.microsoft.com/pfxteam/2012/04/12/asyncawait-faq/
http://blog.stephencleary.com/2012/07/dont-block-on-async-code.html
https://msdn.microsoft.com/en-us/magazine/jj991977.aspx
https://blog.stephencleary.com/2017/03/aspnetcore-synchronization-context.html
Also, we strongly suggest checking out this excellent article about asynchronous programming with async and await at:
https://docs.microsoft.com/en-us/dotnet/csharp/programming-guide/concepts/async/index
Updating the database
It's time to create a new migration and reflect the code changes to the database by taking advantage of the Code-First approach we chose in Chapter 4, Data Model with Entity Framework Core.
Here's a list of what we're going to do in this section:
- Add the identity migration using the
dotnet-efcommand, just like we did in Chapter 4, Data Model with Entity Framework Core. - Apply the migration to the database, updating it without altering the existing data or performing a drop and recreate.
- Seed the data using the
CreateDefaultUsers()method ofSeedControllerthat we implemented earlier on.
Adding identity migration
The first thing we need to do is to add a new migration to our data model to reflect the changes that we have implemented by extending the ApplicationDbContext class.
To do that, open a command line or PowerShell prompt and go to our WorldCities project's root folder, then write the following:
dotnet ef migrations add "Identity" -o "Data/Migrations"
A new migration should then be added to the project, as shown in the following screenshot:

Figure 10.5: Adding a new migration
The new migration files will be autogenerated in the DataMigrations folder.
Those who experience issues while creating migrations can try to clear the DataMigrations folder before running the preceding dotnet-ef command.
For additional information regarding Entity Framework Core migrations, and how to troubleshoot them, check out the following guide:
https://docs.microsoft.com/en-us/ef/core/managing-schemas/migrations/
Applying the migration
The next thing to do is to apply the new migration to our database. We can choose between two options:
- Updating the existing data model schema while keeping all its data as it is
- Dropping and recreating the database from scratch
As a matter of fact, the whole purpose of the EF Core migration feature is to provide a way to incrementally update the database schema while preserving existing data in the database; for that very reason, we're going to follow the former path.
Before applying migrations, it's always advisable to perform a full database backup; this advice is particularly important when dealing with production environments. For small databases such as the one currently used by our WorldCities web app, it would take a few seconds.
For additional information about how to perform a full backup of a SQL Server database, read the following guide:
Updating the existing data model
To apply the migration to the existing database schema without losing the existing data, run the following command from our WorldCities project's root folder:
dotnet ef database update
The dotnet ef tool will then apply the necessary updates to our SQL database schema and output the relevant information—as well as the actual SQL queries—in the console buffer, as shown in the following screenshot:

Figure 10.6: Applying the migration to the existing database schema
Once the task has been completed, we should connect to our database using the SQL Server Management Studio tool that we installed back in Chapter 4, Data Model with Entity Framework Core—and check for the presence of the new identity-related tables.
If everything went well, we should be able to see the new identity tables together with our existing Cities and Countries tables:

Figure 10.7: Viewing the new identity tables in Object Explorer
As we can easily guess, these tables are still empty; to populate them, we'll have to run the CreateDefaultUsers() method of SeedController, which is something that we're going to do in a short while.
Dropping and recreating the data model from scratch
For completeness, let's spend a little time looking at how to recreate our data model and database schema (DB schema) from scratch. Needless to say, if we opt for that route, we will lose all our existing data. However, we could always reload everything using the Import() method of SeedController, hence it wouldn't be a great loss; as a matter of fact, we would only lose what we did during our CRUD-based tests in Chapter 4, Data Model with Entity Framework Core.
Although performing a database drop and recreate is not the suggested approach—especially considering that we've adopted the migration pattern precisely to avoid such a scenario—it can be a decent workaround whenever we lose control of our migrations, provided that we entirely back up the data before doing that and, most importantly, know how to restore everything afterward.
Although it might seem a horrible way to fix things, that's definitely not the case; we're still in the development phase, hence we can definitely allow a full database refresh.
Should we choose to take this route, here are the dotnet-ef console commands to use:
> dotnet ef database drop
> dotnet ef database update
The drop command should ask for a Y/N confirmation before proceeding; when it does, hit the Y key and let it happen. When the drop and update tasks are both done, we can run our project in debug mode and pay a visit to the Import() method of SeedController; once done, we should have an updated database with ASP.NET Core Identity support.
Seeding the data
Regardless of the option we chose to update the database, we now have to repopulate it.
Hit F5 to run the project in debug mode, then manually input the following URL in the browser's address bar: https://localhost:44334/api/Seed/CreateDefaultUsers
And let the CreateDefaultUsers() method of SeedController work its magic.
Once done, we should be able to see the following JSON response:

Figure 10.8: The CreateDefaultUsers() JSON response
This output already tells us that our first two users have been created and stored in our data model. However, we can also confirm that by connecting to our database using the SQL Server Management Studio tool and taking a look at the dbo.AspNetUsers table (see the following screenshot):

Figure 10.9: Querying dbo.AspNetUsers
As we can see, we used the following T-SQL queries to check for the existing users and roles:
SELECT *
  FROM [WorldCities].[dbo].[AspNetUsers];
SELECT *
  FROM [WorldCities].[dbo].[AspNetRoles];
Bingo! Our ASP.NET Core Identity system implementation is up, running, and fully integrated with our data model; now we just need to implement it within our controllers and hook it up with our Angular client app.
Authentication methods
Now that we have updated our database to support the ASP.NET Core Identity authentication workflow and patterns, we should spend some valuable time choosing which authentication method to adopt; more precisely, since we've already implemented the .NET Core IdentityServer, to properly understand whether the default authentication method that it provides for SPAs—JWTs—is safe enough to use or whether we should change it to a more secure mechanism.
As we most certainly know, the HTTP protocol is stateless, meaning that whatever we do during a request/response cycle will be lost before the subsequent request, including the authentication result. The only way we have to overcome this is to store that result somewhere, along with all its relevant data, such as user ID, login date/time, and last request time.
Sessions
Since a few years ago, the most common and traditional method to do this was to store that data on the server using either a memory-based, disk-based, or external session manager. Each session can be retrieved using a unique ID that the client receives with the authentication response, usually inside a session cookie, which will be transmitted to the server on each subsequent request.
Here's a brief diagram showing the Session-Based Authentication Flow:

Figure 10.10: Session-based authentication flow
This is still a very common technique used by most web applications. There's nothing wrong with adopting this approach, as long as we are okay with its widely acknowledged downsides, such as the following:
- Memory issues: Whenever there are many authenticated users, the web server will consume more and more memory. Even if we use a file-based or external session provider, there will nonetheless be an intensive I/O, TCP, or socket overhead.
- Scalability issues: Replicating a session provider in a scalable architecture (IIS web farm, load-balanced cluster, and the like) might not be an easy task and will often lead to bottlenecks or wasted resources.
- Cross-domain issues: Session cookies behave just like standard cookies, so they cannot be easily shared between different origins/domains. These kinds of problems can often be solved with some workarounds, yet they will often lead to insecure scenarios to make things work.
- Security issues: There is a wide range of detailed literature on security-related issues involving sessions and session cookies: for instance, Cross-Site Request Forgery (CSRF) attacks, and a number of other threats that won't be covered here for the sake of simplicity. Most of them can be mitigated by some countermeasures, yet they can be difficult to handle for junior or novice developers.
As these issues have arisen over the years, there's no doubt that most analysts and developers have put a lot of effort into figuring out different approaches, as well as mitigating them.
Regarding the mitigation part, a pivotal improvement was achieved in 2016 with the SameSite cookies draft, which suggested an HTTP security policy that was then improved by the Cookies HTTP State Management Mechanism (April 2019) and the Incrementally Better Cookies (May 2019) drafts:
https://tools.ietf.org/html/draft-west-first-party-cookies-07
https://tools.ietf.org/html/draft-west-cookie-incrementalism-00
https://tools.ietf.org/html/draft-west-first-party-cookies-07
Now that most browsers have adopted the SameSite cookie specification, cookie-based authentication is a lot safer than before.
Tokens
Token-based authentication has been increasingly adopted by Single-Page Applications (SPAs) and mobile apps in the last few years for a number of undeniably good reasons that we'll try to briefly summarize here.
The most important difference between session-based authentication and token-based authentication is that the latter is stateless, meaning that we won't be storing any user-specific information on the server memory, database, session provider, or other data containers of any sort.
This single aspect solves most of the downsides that we pointed out earlier for session-based authentication. We won't have sessions, so there won't be an increasing overhead; we won't need a session provider, so scaling will be much easier. Also, for browsers supporting LocalStorage, we won't even be using cookies, so we won't get blocked by cross-origin restrictive policies and, hopefully, we'll get around most security issues.
Here's a typical Token-Based Authentication Flow:

Figure 10.11: Token-based authentication flow
In terms of client-server interaction, these steps don't seem much different from the session-based authentication flow diagram; apparently, the only difference is that we'll be issuing and checking tokens instead of creating and retrieving sessions. The real deal is happening (or not happening) at the server side. We can immediately see that the token-based auth flow does not rely on a stateful session-state server, service, or manager. This will easily translate into a considerable boost in terms of performance and scalability.
Signatures
This is a method used by most modern API-based cloud-computing and storage services, including Amazon Web Services (AWS). In contrast to session-based and token-based approaches, which rely on a transport layer that can theoretically be accessed by or exposed to a third-party attacker, signature-based authentication performs a hash of the whole request using a previously shared private key. This ensures that no intruder or man-in-the-middle can ever act as the requesting user, as they won't be able to sign the request.
Two-factor
This is the standard authentication method used by most banking and financial accounts, being arguably the most secure one.
The implementation may vary, but it always relies on the following base workflow:
- The user performs a standard login with a username and password.
- The server identifies the user and prompts them with an additional, user-specific request that can only be satisfied by something obtained or obtainable through a different channel: an OTP password sent by SMS, a unique authentication card with a number of answer codes, a dynamic PIN generated by a proprietary device or a mobile app, and so on.
- If the user gives the correct answer, they are authenticated using a standard session-based or token-based method.
Two-Factor Authentication (2FA) has been supported by ASP.NET Core since its 1.0 release, which implemented it using SMS verification (SMS 2FA); however, starting with ASP.NET Core 2, the SMS 2FA approach was deprecated in favor of a Time-Based One-Time Password (TOTP) algorithm, which became the industry-recommended approach to implement 2FA in web applications.
For additional information about SMS 2FA, check out the following URL:
https://docs.microsoft.com/en-us/aspnet/core/security/authentication/2fa
For additional information about TOTP 2FA, take a look at the following URL:
https://docs.microsoft.com/en-us/aspnet/core/security/authentication/identity-enable-qrcodes
Conclusions
After reviewing all these authentication methods, we can definitely say that the token-based authentication approach provided by IdentityServer seems to be a great choice for our specific scenario.
Our current implementation is based on JSON Web Tokens (JWTs), a JSON-based open standard explicitly designed for native web applications, available in multiple languages, such as .NET, Python, Java, PHP, Ruby, JavaScript/Node.js, and Perl. We've chosen it because it's becoming a de facto standard for token authentication, as it's natively supported by most technologies.
Implementing authentication in Angular
In order to handle JWT-based token authentication, we need to set up our ASP.NET back-end and our Angular front-end to handle all the required tasks.
In the previous sections, we spent a good amount of time configuring the .NET Core Identity services as well as IdentityServer, meaning that we're halfway done; as a matter of fact, we're almost done with the server-side tasks. At the same time, we did nothing at the front-end level: the two users that we created in the previous section—[email protected] and [email protected]—have no way to log in, and there isn't a registration form for creating new users.
Now, here's some (very) good news: the Visual Studio Angular template that we used to set up our apps comes with built-in support for the auth API that we've just added to our back-end, and the best part of it is that it actually works very well!
However, we've also got some bad news: since we chose not to add any authentication method to our projects when we created them, all the Angular modules, components, services, interceptors, and tests that would have handled this task have been excluded from our Angular app. As a consequence of that initial choice, when we started to explore our pre-made Angular app back in Chapter 2, Looking Around, we only had the counter and fetch-data components to play with.
As a matter of fact, we've chosen to exclude the authorization components for a reason: since we used that template as a sample application to learn more about the Angular structure, we didn't want to complicate our life early on by bringing in all the authentication and authorization stuff.
Luckily, all those missing classes can be easily retrieved and implemented in our current WorldCities project... which is precisely what we're going to do in this section.
More specifically, here's a list of our upcoming tasks:
- Creating a brand-new .NET Core and Angular project, which we'll use as a code repository to copy the auth-related Angular classes from; the new project name will be
AuthSample - Exploring the Angular authorization APIs to understand how they work
- Testing the login and registration forms provided by the aforementioned APIs from the
AuthSampleproject
By the end of the section, we should be able to register new users, as well as log in with existing users, using the front-end authorization APIs shipped with the AuthSample app.
Creating the AuthSample project
The first thing we're going to do is create a new .NET Core and Angular web application project. As a matter of fact, it's the third time we're doing this: we created the HealthCheck project in Chapter 1, Getting Ready, and then the WorldCities project in Chapter 3, Front-End and Back-End Interactions; therefore, we already know most of what we have to do.
The name of our third project will be AuthSample; however, the required tasks to create it will be slightly different from (and definitely easier than) the last time we did this:
- Create a new project with the
dotnet new angular -o AuthSample -au Individualcommand. - Edit the
/ClientApp/package.jsonfile to update the existing npm package versions to the same version we're currently using in the existingHealthCheckandWorldCitiesAngular apps (see Chapter 2, Looking Around, for details on how to do this). - Remove the
@nguniversal/module-map-ngfactory-loaderandModuleMapLoaderModulereferences from the/ClientApp/package.jsonand/ClientApp/src/app/app.server.module.tsfiles.
Remember to execute the npm update and npm install commands to ensure that the npm packages will be updated.
That's it. As we can see, this time we added the -au switch (a shortcut for --auth), which will include all the auth-related classes that we purposely missed when creating the HealthCheck and WorldCities projects. Moreover, we didn't have to delete or update anything other than the npm package versions: the built-in Angular components, as well as the back-end classes and libraries, are more than enough to explore the auth-related code we've been missing until now.
Troubleshooting the AuthSample project
After updating the npm packages, the first thing we should do is launch the project in debug mode and ensure that the home page is properly working (see the following screenshot):

Figure 10.12: AuthSample home page
If we run into package conflicts, JavaScript errors, or other npm-related issues, we can try to execute the following npm commands from the /ClientApp/ folder to update them all and verify the package cache:
> npm install
> npm cache verify
This is shown in the following screenshot:

Figure 10.13: Updating npm packages and verifying package cache
Although Visual Studio should automatically update the npm packages as soon as we update the package.json file on disk, sometimes the auto-update process fails to work properly; when this happens, manual execution of the preceding npm commands from the command line is a convenient way to fix these kinds of issues.
If we experience some back-end runtime errors, it could be wise to briefly review the .NET code against what we did in the previous chapters—and also in this chapter—to fix any issue related to the template's source code, third-party references, NuGet package versions, and so on. As always, the GitHub repository provided by this book will greatly help us to troubleshoot our own code; be sure to check it out!
Exploring the Angular authorization APIs
In this section, we're going to take an extensive look at the authorization APIs provided by the .NET Core and Angular Visual Studio project template: a set of functionalities that rely upon the oidc-client library to allow an Angular app to interact with the URI endpoints provided by the ASP.NET Core Identity system.
The oidc-client library is an open-source solution that provides OIDC and OAuth 2 protocol support for client-side, browser-based JavaScript client applications, including user session support and access token management. Its npm package reference is already present in the package.json file of our WorldCities app, therefore we won't have to manually add it.
For additional info about the oidc-client library, check out the following URL:https://github.com/IdentityModel/oidc-client-js
As we'll be able to see, these APIs make use of some important Angular features—such as route guards and HTTP interceptors—to handle the authorization flow through the HTTP request/response cycle.
Let's start with a quick overview of the Angular app shipped with our new AuthSample project. If we observe the various files and folders within the /ClientApp/ directory, we can immediately see that we're dealing with the same sample app that we already explored back in Chapter 2, Looking Around, before trimming it down to better suit our needs.
However, there's an additional folder that wasn't there at the time: we're talking about the /ClientApp/src/app/api-authorization/ folder, which basically contains everything we missed back then—the Angular front-end implementation of the .NET Core Identity APIs and IdentityServer hook points.
Inside that folder there are a number of interesting files and subfolders, as shown in the following screenshot:

Figure 10.14: Exploring the api-authorization folder
Thanks to the knowledge we gained about the Angular architecture, we can easily understand the main role of each one of them:
- The first three subfolders—
/login/,/login-menu/, and/logout/—contain three components, each one with their TypeScript class, HTML template, CSS file, and test suite. - The
api-authorization.constants.tsfile contains a bunch of common interfaces and constants that are referenced and used by the other classes. - The
api-authorization.module.tsfile is anNgModule, that is, a container for the authorization API's common feature set, just like theAngularMaterialModulethat we created in ourWorldCitiesapp back in Chapter 5, Fetching and Displaying Data. If we open it, we can see that it contains some auth-specific routing rules. - The
authorize.guard.tsfile introduces the concept of route guards, which is something that we've yet to learn; we'll talk more about this in a short while. - The
authorize.interceptor.tsfile implements an HTTP interceptor class—another mechanism that we don't know yet; again, we'll talk more about this soon enough. - The
authorize.service.tsfile contains the data service that will handle all the HTTP requests and responses; we know their role and how they work from Chapter 7, Code Tweaks and Data Services, where we implementedCityServiceandCountryServicefor ourWorldCitiesapp.
We've yet to mention the various .spec.ts files; as we learned in Chapter 9, ASP.NET Core and Angular Unit Testing, we know that they are the corresponding test units for the class files they share their names with.
Route Guards
As we learned in Chapter 2, Looking Around, the Angular router is the service that allows our users to navigate through the various views of our app; each view updates the front-end and (possibly) calls the back-end to retrieve content.
If we think about it, we can see how the Angular router is the front-end counterpart of the ASP.NET Core routing interface, which is responsible for mapping request URIs to back-end endpoints and dispatching incoming requests to those endpoints. Since both of these modules share the same behavior, they also have similar requirements that we have to take care of when we implement an authentication and authorization mechanism in our app.
Throughout the previous chapters, we've defined a lot of routes on the back-end as well as on the front-end to grant our users access to the various ASP.NET Core action methods and Angular views that we've implemented. If we think about it, we can see how all of these routes share a common feature: anyone can access them. To put it in other words, any user is free to go anywhere within our web app: they can edit cities and countries, they can interact with our SeedController to execute its database-seeding tasks, and so on.
It goes without saying that such behavior, although being acceptable in development, is highly undesirable in any production scenario; when the app goes live, we would definitely want to protect some of these routes by restricting them to authorized users only—in other words, to guard them.
Route guards are a mechanism to properly enforce such a requirement; they can be added to our route configuration to return values that can control the router's behavior in the following way:
- If a route guard returns
true, the navigation process continues - If it returns
false, the navigation process stops - If it returns a
UrlTree, the navigation process is canceled and replaced by a new navigation to the givenUrlTree
Available guards
The following route guards are currently available in Angular:
CanActivate: Mediates navigation to a given routeCanActivateChild: Mediates navigation to a given child routeCanDeactivate: Mediates navigation away from the current routeResolve: Performs some arbitrary operations (such as custom data retrieval tasks) before activating the routeCanLoad: Mediates navigation to a given asynchronous module
Each one of them is available through a superclass that acts as a common interface: whenever we want to create our own guard, we'll just have to extend the corresponding superclass and implement the relevant method(s).
Any route can be configured with multiple guards: CanDeactivate and CanActivateChild guards will be checked first, from the deepest child route to the top; right after that, the router will check CanActivate guards from the top down to the deepest child route. Once done, CanLoad routes will be checked for asynchronous modules. If any of these guards returns false, the navigation will be stopped and all pending guards will be canceled.
Let's now take a look at the /ClientApp/src/api-authorization/authorize.guard.ts file to see which route guards have been implemented by the front-end authorization API shipped with the AuthSample Angular app (relevant lines are highlighted):
import { Injectable } from '@angular/core';
import { CanActivate, ActivatedRouteSnapshot, RouterStateSnapshot,
 Router } from '@angular/router';
import { Observable } from 'rxjs';
import { AuthorizeService } from './authorize.service';
import { tap } from 'rxjs/operators';
import { ApplicationPaths, QueryParameterNames } from
 './api-authorization.constants';
@Injectable({
  providedIn: 'root'
})
export class AuthorizeGuard implements CanActivate {
  constructor(private authorize: AuthorizeService, private router:
   Router) {
  }
  canActivate(
    _next: ActivatedRouteSnapshot,
    state: RouterStateSnapshot): Observable<boolean> |
     Promise<boolean> | boolean {
      return this.authorize.isAuthenticated()
        .pipe(tap(isAuthenticated =>
         this.handleAuthorization(isAuthenticated, state)));
  }
  private handleAuthorization(isAuthenticated: boolean, state:
   RouterStateSnapshot) {
    if (!isAuthenticated) {
      this.router.navigate(ApplicationPaths.LoginPathComponents, {
        queryParams: {
          [QueryParameterNames.ReturnUrl]: state.url
        }
      });
    }
  }
}
As we can see, we're dealing with a guard that extends the CanActivate interface. As we can reasonably expect from an authorization API, that guard is checking the isAuthenticated() method of AuthorizeService (which is injected in the constructor through DI) and conditionally allows or blocks the navigation based on it; no wonder its name is AuthorizeGuard.
Once they have been created, guards can be bound to the various routes from within the route configuration itself, which provides a property for each guard type; if we take a look inside the /ClientApp/src/app/app.module.ts file of the AuthSample app, where the main routes are configured, we can easily identify the guarded route:
// ...
RouterModule.forRoot([
  { path: '', component: HomeComponent, pathMatch: 'full' },
  { path: 'counter', component: CounterComponent },
  { path: 'fetch-data', component: FetchDataComponent, canActivate:
    [AuthorizeGuard] },
])
// ...
This means that the fetch-data view, which brings the user to the FetchDataComponent, can only be activated by authenticated users; let's quickly give it a try to see if it works as expected.
Press F5 to run the AuthSample app in debug mode, then try to navigate to the fetch data view by clicking the corresponding link to the top-right menu. Since we're not an authenticated user, we should be redirected to the Log in view, as shown in the following screenshot:

Figure 10.15: The Log in view
It seems that the route guard is working: if we now manually edit the /ClientApp/src/app/app.module.ts file, remove the canActivate property from the fetch-data route, and try again, we'll see that we'll be able to access that view without issues:

Figure 10.16: Trying to fetch the weather forecast data
... or maybe not.
As we can see from the Console log, even if the front-end allowed us to pass, the HTTP request issued to the back-end seems to have hit a 401 Unauthorized Error. What happened? The answer is really simple: by manually removing the route guard, we were able to hack our way through the Angular front-end routing system, but the .NET Core back-end routing also features similar protection against unauthorized access that can't be avoided from the client side.
This protection can easily be seen by opening the /Controllers/WeatherForecastController.cs file and looking at the existing class attributes (relevant line highlighted):
// ...
[Authorize]
[ApiController]
[Route("[controller]")]
public class WeatherForecastController : ControllerBase
// ...
In ASP.NET Core controllers, route authorization is controlled through the AuthorizeAttribute attribute. More specifically, the controller or action method that the [Authorize] attribute is applied to requires the authorization level specified by its parameters; if no parameters are given, applying the AuthorizeAttribute attribute to a controller or action will limit the access to authenticated users only.
Now we know why we are unable to fetch that data from the back-end; if we remove (or comment out) that attribute, we will finally be able to, as shown in the following screenshot:

Figure 10.17: Successfully fetching the weather forecast data
Before proceeding, let's put the front-end route guard and the back-end AuthorizeAttribute back in their place; we need them to be there to properly test our navigation after performing an actual login and obtaining the authorization to access those resources.
However, before doing that, we have to finish our exploration journey; in the next section, we'll introduce another important Angular concept that we haven't talked about yet.
For further information about route guards and their role in the Angular routing workflow, check out the following URLs:
https://angular.io/guide/router#preventing-unauthorized-access
https://docs.microsoft.com/en-us/aspnet/core/fundamentals/routing
HttpInterceptor
The Angular HttpInterceptor interface provides a standardized mechanism to intercept and/or transform outgoing HTTP requests or incoming HTTP responses; interceptors are quite similar to the ASP.NET middleware that we introduced in Chapter 2, Looking Around, and then played with in Chapter 3, Front-End and Back-End Interactions, except that they work at the front-end level.
Interceptors are a major feature of Angular since they can be used for a number of different tasks: they can inspect and/or log our app's HTTP traffic, modify the requests, cache the responses, and so on; they are a convenient way to centralize all these tasks so that we don't have to implement them explicitly on our data services and/or within the various HttpClient-based method calls. Moreover, they can also be chained, meaning that we can have multiple interceptors working together in a forward-and-backward chain of request/response handlers.
The AuthorizeInterceptor class shipped with the Angular authentication APIs we are exploring features a lot of inline comments that greatly help us to understand how it actually works.
To take a look at its source code, open the /ClientApp/src/api-authorization/authorize.interceptor.ts file (relevant lines are highlighted):
import { Injectable } from '@angular/core';
import { HttpInterceptor, HttpRequest, HttpHandler, HttpEvent }
 from '@angular/common/http';
import { Observable } from 'rxjs';
import { AuthorizeService } from './authorize.service';
import { mergeMap } from 'rxjs/operators';
@Injectable({
  providedIn: 'root'
})
export class AuthorizeInterceptor implements HttpInterceptor {
  constructor(private authorize: AuthorizeService) { }
  intercept(req: HttpRequest<any>, next: HttpHandler):
   Observable<HttpEvent<any>> {
    return this.authorize.getAccessToken()
      .pipe(mergeMap(token => this.processRequestWithToken(token, req,
       next)));
  }
  // Checks if there is an access_token available in the authorize
  // service and adds it to the request in case it's targeted at
  // the same origin as the single page application.
  private processRequestWithToken(token: string, req:
   HttpRequest<any>,
   next: HttpHandler) {
    if (!!token && this.isSameOriginUrl(req)) {
      req = req.clone({
        setHeaders: {
          Authorization: `Bearer ${token}`
        }
      });
    }
    return next.handle(req);
  }
  private isSameOriginUrl(req: any) {
    // It's an absolute url with the same origin.
    if (req.url.startsWith(`${window.location.origin}/`)) {
      return true;
    }
    // It's a protocol relative url with the same origin.
    // For example: //www.example.com/api/Products
    if (req.url.startsWith(`//${window.location.host}/`)) {
      return true;
    }
    // It's a relative url like /api/Products
    if (/^/[^/].*/.test(req.url)) {
      return true;
    }
    // It's an absolute or protocol relative url that
    // doesn't have the same origin.
    return false;
  }
}
As we can see, AuthorizeInterceptor implements the HttpInterceptor interface by defining an intercept method. That method's job is to intercept all the outgoing HTTP requests and conditionally add the JWT Bearer token to their HTTP headers; this condition is determined by the isSameOriginUrl() internal method, which will return true only if the request is addressed to an URL with the same origin as the Angular app.
Just like any other Angular class, the AuthorizeInterceptor needs to be properly configured within an NgModule in order to work; since it needs to inspect any HTTP request—including those not part of the authorization API—it has been configured in the AppModule, the root-level NgModule, of the AuthSample app.
To see the actual implementation, open the /ClientApp/src/app/app.module.ts file and look at the providers section:
// ...
providers: [
  { provide: HTTP_INTERCEPTORS, useClass: AuthorizeInterceptor,
    multi: true }
],
// ...
The multi: true property that we can see in the preceding code is a required setting, because HTTP_INTERCEPTORS is a multi-provider token that is expecting to inject an array of multiple values, rather than a single one.
For additional information about HTTP interceptors, take a look at the following URLs:
The authorization components
Let's now take a look at the various Angular components included in the /api-authorization/ folder.
LoginMenuComponent
The role of LoginMenuComponent, located in the /ClientApp/src/api-authorization/login-menu/ folder, is to be included within NavMenuComponent (which we already know well) to add the Login and Logout actions to the existing navigation options.
We can check it out by opening the /ClientApp/src/app/nav-menu/nav-menu.component.html file and checking for the presence of the following line:
<app-login-menu></app-login-menu>
This is the root element of LoginMenuComponent; therefore, LoginMenuComponent is implemented as a child component of NavMenuComponent. However, if we look at its TypeScript file source code, we can see that it has some unique features strictly related to its tasks (relevant lines are highlighted):
import { Component, OnInit } from '@angular/core';
import { AuthorizeService } from '../authorize.service';
import { Observable } from 'rxjs';
import { map, tap } from 'rxjs/operators';
@Component({
  selector: 'app-login-menu',
  templateUrl: './login-menu.component.html',
  styleUrls: ['./login-menu.component.css']
})
export class LoginMenuComponent implements OnInit {
  public isAuthenticated: Observable<boolean>;
  public userName: Observable<string>;
  constructor(private authorizeService: AuthorizeService) { }
  ngOnInit() {
    this.isAuthenticated = this.authorizeService.isAuthenticated();
    this.userName = this.authorizeService.getUser().pipe(map(u => u &&
     u.name));
  }
}
As we can see, the component uses authorizeService (injected in the constructor through DI) to retrieve the following information about the visiting user:
- Whether that user is authenticated or not
- That user's username
The two values are stored in the isAuthenticated and userName local variables, which are then used by the template file to determine the component's behavior.
To better understand that, let's take a look at the /ClientApp/src/api-authentication/login-menu/login-menu.component.html template file (relevant lines highlighted):
<ul class="navbar-nav" *ngIf="isAuthenticated | async">
    <li class="nav-item">
        <a class="nav-link text-dark"
         [routerLink]='["/authentication/profile"]'
         title="Manage">Hello {{ userName | async }}</a>
    </li>
    <li class="nav-item">
        <a class="nav-link text-dark"
         [routerLink]='["/authentication/logout"]'
         [state]='{ local: true }' title="Logout">Logout</a>
    </li>
</ul>
<ul class="navbar-nav" *ngIf="!(isAuthenticated | async)">
  <li class="nav-item">
        <a class="nav-link text-dark"
         [routerLink]='["/authentication/register"]'>Register</a>
    </li>
    <li class="nav-item">
        <a class="nav-link text-dark"
         [routerLink]='["/authentication/login"]'>Login</a>
    </li>
</ul>
We can immediately see how the presentation layer is determined by two ngIf structural directives in the following way:
- If the user is authenticated, it will show the
Hello <username>welcome message and theLogoutlink - If the user is not authenticated, it will show the
RegisterandLoginlinks
That's a widely used approach to implement a login/logout menu; as we can see, all the links are pointing to the Razor pages provided by ASP.NET Core Identity UI that will transparently handle each task.
LoginComponent
LoginComponent performs various tasks required to properly handle the user's login process; consequently, any Angular component and/or ASP.NET Core controller that wants to restrict its access to authenticated users should perform an HTTP redirect to this component's route. As we can see by looking at the source code of the component's defining method, if the incoming request provides a returnUrl query parameter, the component will redirect the user back to it after performing the login:
//...
private async login(returnUrl: string): Promise<void> {
  const state: INavigationState = { returnUrl };
  const result = await this.authorizeService.signIn(state);
  this.message.next(undefined);
  switch (result.status) {
    case AuthenticationResultStatus.Redirect:
      break;
    case AuthenticationResultStatus.Success:
      await this.navigateToReturnUrl(returnUrl);
      break;
    case AuthenticationResultStatus.Fail:
      await this.router.navigate(
       ApplicationPaths.LoginFailedPathComponents, {
        queryParams: { [QueryParameterNames.Message]: result.message }
      });
      break;
    default:
      throw new Error(`Invalid status result ${(result as
       any).status}.`);
  }
}
// ...
The LoginComponent TypeScript source code is rather long, but it's very understandable as long as we keep in mind its main job: passing the user's authentication information to the ASP.NET Core IdentityServer using the default endpoint URIs and returning the results back to the client; it basically acts like a front-end to the back-end authentication proxy.
If we take a look at its template file, this role will become even more evident:
<p>{{ message | async }}</p>
That's it. As a matter of fact, this component has a very tiny template, simply because it will mostly redirect the user to some back-end pages that loosely mimic the visual style of our Angular components (!).
To quickly confirm that, hit F5 to run the AuthSample project in debug mode and visit the Log in view, then look carefully at the UI elements highlighted in the following screenshot:
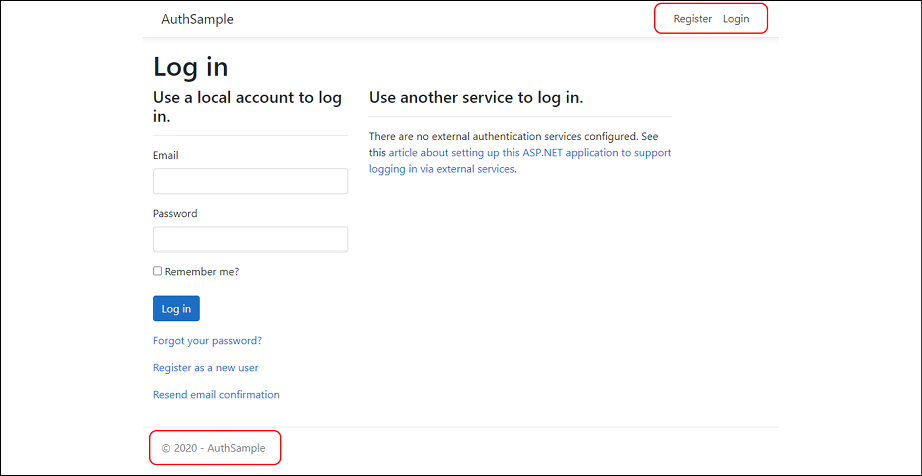
Figure 10.18: Inspecting UI elements on the Log in view
The two elements that we highlighted using the red squares don't match with the rest of our Angular app's GUI: the top-right menu is missing the Counter and Fetch data options, and the footer doesn't even exist; both of them have been generated from the back-end, just like the rest of the Log in view's HTML content.
As a matter of fact, the authentication API implementation shipped with the ASP.NET Core and Angular template is designed to work in the following way: both the login and registration forms are handled by the back-end, with LoginComponent playing a hybrid role—half a request handler, half a UI proxy.
It's worth noting that these built-in Login and Registration pages provided by the ASP.NET Core back-end can be fully customized in their UI and/or behavior to make them compatible with the Angular app's look and feel: see the Installing the ASP.NET Core Identity UI package and Customizing the default Identity UI sections within this chapter for further details on how to do this.
This technique might seem a hack—and it actually is, at least to a certain extent, but it's a very smart one, since it transparently (well, not so much) works around a lot of the security, performance, and compatibility issues of most login mechanisms featuring a pure front-end implementation, while saving developers a lot of time.
In one of my previous books (ASP.NET Core 2 and Angular 5), I chose to purposely avoid the ASP.NET Core IdentityServer and manually implement the registration and login workflows from the front-end: however, the .NET Core mixed approach has greatly improved in the last 2 years and now offers a great alternative to the standard, Angular-based implementation, thanks to a solid and highly configurable interface.
Those who prefer to use the former method can take a look at the GitHub repository of the ASP.NET Core 2 and Angular 5 book, (Chapter_08 onward), which is still mostly compatible with the latest Angular versions:
https://github.com/PacktPublishing/ASP.NET-Core-2-and-Angular-5/
If we don't like the redirect to back-end approach, the built-in authorization API features an alternative implementation that replaces the full-page HTTP redirects with popups.
To activate it, open the /ClientApp/src/api-authorization/authorize.service.ts file and change the popUpDisabled internal variable value from true to false, as shown in the following code:
// ...
export class AuthorizeService {
  // By default pop ups are disabled because they don't work properly
  // on Edge. If you want to enable pop up authentication simply set
  // this flag to false.
  private popUpDisabled = false;
  private userManager: UserManager;
  private userSubject: BehaviorSubject<IUser | null> = new
   BehaviorSubject(null);
// ...
If we prefer to implement the auth feature through popups, we can change the preceding Boolean value to false and then test the outcome by launching our AuthSample project in debug mode.
Here's what the pop-up login page will look like:

Figure 10.19: Pop-up login page
However, as the inline comments say, popups don't work properly on Microsoft Edge (and even the other browsers don't like them); for this reason, the back-end-generated pages are arguably a better choice—especially if we can customize them, as we'll see later on.
LogoutComponent
LogoutComponent is the counterpart of LoginComponent, as it handles the task of disconnecting our users and bringing them back to the home page.
There's not much to say there, because it works in a similar way to its sibling, redirecting the user to the ASP.NET Core Identity system endpoint URIs and then bringing the user's client back to the Angular app using the returnUrl parameter. The main difference is that there are no back-end pages this time, since the logout workflow doesn't require a user interface.
Testing registration and login
Now we're ready to test the registration and login workflow of the AuthSample Angular app; let's start with the registration phase, since we don't have any registered users here yet.
Hit F5 to run the project in debug mode, then navigate to the Register view: insert a valid email and a password that matches the required password strength settings, and hit the Register button.
As soon as we do that, we should see the following message:
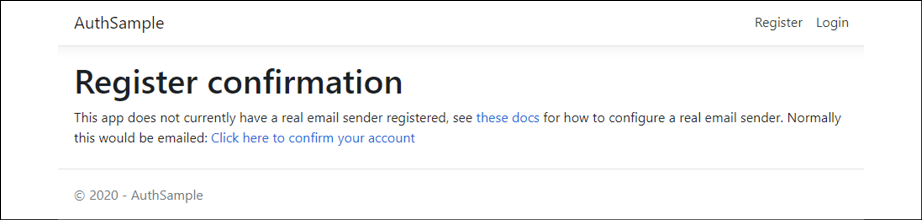
Figure 10.20: Register confirmation message
Click the confirmation link to create the account, then wait for a full-page reload.
Actually, all these redirects and reloads performed by this implementation definitely break the SPA pattern that we talked about in Chapter 1, Getting Ready.
However, when we compared the pros and cons of the Native Web Application, SPA, and Progressive Web Application approaches, we told ourselves that we would have definitely adopted some strategic HTTP round trips and/or other redirect techniques whenever we could use a microservice to lift off some workload from our app; that's precisely what we are doing right now.
When we're taken back to the Log in view, we can finally enter the credentials chosen a moment ago and perform the login.
Once done, we should be welcomed by the following screen:

Figure 10.21: Welcome screen after login
Here we go; we can see that we've logged in because the UI behavior of LoginMenuComponent has changed, meaning that its isAuthenticated internal variable now evaluates to true.
With this, we're done with our AuthSample app: now that we've understood how the front-end authorization API shipped with the .NET Core and Angular Visual Studio template actually works, we're going to bring it to our WorldCities app.
Implementing the auth API in the WorldCities app
In this section, we're going to implement the authorization API provided with the AuthSample app to our WorldCities app. Here's what we're going to do in detail:
- Import the front-end authorization APIs from the
AuthSampleapp to theWorldCitiesapp and integrate them into our existing Angular code - Adjust the existing back-end source code to properly implement the authentication features
- Test the login and registration forms from the
WorldCitiesproject
By the end of the section, we should be able to log in with our existing users, as well as create new users, from the WorldCities app.
Importing the front-end authorization APIs
The first thing we need to do in order to import the front-end authorization APIs to our WorldCities Angular app is to copy the whole /ClientApp/src/api-authorization/ folder from the AuthSample app. There are no drawbacks to doing this, so we can just do it with the Visual Studio Solution Explorer using the copy and paste GUI commands (or Ctrl + C/Ctrl + V, if you prefer to use keyboard shortcuts).
Once done, we need to integrate the new front-end capabilities with the existing code.
api-authorization.constants
The first file we have to modify is the /ClientApp/src/api-authorization/api-authorization.constants.ts file, which contains a literal reference to the app name on the first line of its contents:
export const ApplicationName = 'AuthSample';
// ...
Change 'AuthSample' to 'WorldCities', leaving the rest of the file as it is.
AppModule
Right after that, we need to update the /ClientApp/src/app/app.module.ts file, where we need to add the required references to the authorization API's classes:
// ...
import { HttpClientModule, HTTP_INTERCEPTORS } from '@angular/common/http';
// ...
import { ApiAuthorizationModule } from 'src/api-authorization/api-authorization.module';
import { AuthorizeInterceptor } from 'src/api-authorization/authorize.interceptor';
// ...
  imports: [
    BrowserModule.withServerTransition({ appId: 'ng-cli-universal' }),
    HttpClientModule,
    FormsModule,
    ApiAuthorizationModule,
    AppRoutingModule,
    BrowserAnimationsModule,
    AngularMaterialModule,
    ReactiveFormsModule
    ],
  providers: [
    {
      provide: HTTP_INTERCEPTORS,
      useClass: AuthorizeInterceptor,
      multi: true
    }
  ],
  bootstrap: [AppComponent]
})
export class AppModule { }
That's it.
AppRoutingModule
Now we need to protect our edit components using AuthorizeGuard, so that they will become accessible only to registered users. To do that, open the /ClientApp/src/app/app-routing.module.ts file and add the guard in the following way (new lines are highlighted):
import { NgModule } from '@angular/core';
import { Routes, RouterModule } from '@angular/router';
import { HomeComponent } from './home/home.component';
import { CitiesComponent } from './cities/cities.component';
import { CityEditComponent } from './cities/city-edit.component';
import { CountriesComponent } from './countries/countries.component';
import { CountryEditComponent } from './countries/country-edit.component';
import { AuthorizeGuard } from 'src/api-authorization/authorize.guard';
const routes: Routes = [
  {
    path: '',
    component: HomeComponent,
    pathMatch: 'full'
  },
  {
    path: 'cities',
    component: CitiesComponent
  },
  {
    path: 'city/:id',
    component: CityEditComponent,
    canActivate: [AuthorizeGuard]
  },
  {
    path: 'city',
    component: CityEditComponent,
    canActivate: [AuthorizeGuard]
  },
  {
    path: 'countries',
    component: CountriesComponent
  },
  {
    path: 'country/:id',
    component: CountryEditComponent,
    canActivate: [AuthorizeGuard]
  },
  {
    path: 'country',
    component: CountryEditComponent,
    canActivate: [AuthorizeGuard]
  }
];
@NgModule({
  imports: [RouterModule.forRoot(routes, {
    initialNavigation: 'enabled'
})],
  exports: [RouterModule]
})
export class AppRoutingModule { }
As we can see, other than adding the reference to the guard file, we've added AuthorizeGuard to all the routes pointing to components that perform writing activities to our database; this way we'll ensure that only registered and authorized users will be able to do that.
NavMenuComponent
Now we need to integrate LoginMenuComponent into our existing NavMenuComponent, just like in the AuthSample app.
Open the /ClientApp/src/app/nav-menu/nav-menu.component.html template file and add a reference to the menu within its content accordingly:
<header>
  <nav class="navbar navbar-expand-sm navbar-toggleable-sm
    navbar-light bg-white border-bottom box-shadow mb-3"
  >
    <div class="container">
      <a class="navbar-brand" [routerLink]="['/']">WorldCities</a>
      <button
        class="navbar-toggler"
        type="button"
        data-toggle="collapse"
        data-target=".navbar-collapse"
        aria-label="Toggle navigation"
        [attr.aria-expanded]="isExpanded"
        (click)="toggle()"
      >
        <span class="navbar-toggler-icon"></span>
      </button>
      <div
        class="navbar-collapse collapse d-sm-inline-flex
         flex-sm-row-reverse"
        [ngClass]="{ show: isExpanded }"
      >
        <app-login-menu></app-login-menu>
        <ul class="navbar-nav flex-grow">
          <li
            class="nav-item"
            [routerLinkActive]="['link-active']"
            [routerLinkActiveOptions]="{ exact: true }"
          >
            <a class="nav-link text-dark"
            [routerLink]="['/']">Home</a>
<!-- ...existing code... --->
Now we can switch to the back-end code.
Adjusting the back-end code
Let's start by importing OidcConfigurationController. The AuthSample project comes with a dedicated ASP.NET Core API controller to provide the URI endpoint that will serve the OIDC configuration parameters that the client needs to use.
Copy the AuthSample project's /Controllers/OidcConfigurationController.cs file to the WorldCities project's /Controllers/ folder, then open the copied file and change its namespace accordingly:
// ...
namespace AuthSample.Controllers
// ...
Change AuthSample.Controllers to WorldCities.Controllers and go ahead.
Installing the ASP.NET Core Identity UI package
Remember when we talked about the login and registration pages generated from the back-end a short while ago? These are provided by the Microsoft.AspNetCore.Identity.UI package, which contains the default Razor Pages built-in UI for the .NET Core Identity framework. Since it's not installed by default, we need to manually add it to our WorldCities project using NuGet.
From Solution Explorer, right-click on the WorldCities tree node, then select Manage NuGet Packages, look for the following package, and install it:
Microsoft.AspNetCore.Identity.UI
Alternatively, open Package Manager Console and install it with the following command:
> Install-Package Microsoft.AspNetCore.Identity.UI
At the time of writing, this package's latest available version is 5.0.0; as always, we are free to install a newer version, as long as we know how to adapt our code accordingly to fix potential compatibility issues.
Customizing the default Identity UI
The AuthSample project that we generated early on allows us to customize the top-level menu HTML snippet, which can be found within the /Pages/Shared/_LoginPartial.cshtml partial view: this can be useful to keep that menu "in sync" with the overall look and feel of our Angular app.
When copying that file, don't forget to change '@using AuthSample.Models;' to '@using WorldCities.Data.Models;' near the top.
If changing the top-level menu isn't enough, we can extend such a technique to any other login and registration view and/or partial view provided by the Microsoft.AspNetCore.Identity.UI package using the identity scaffolder tool, which can be used to selectively add the files contained in the Identity Razor Class Library (RCL) to our project; once generated, those files will be available within a dedicated /Areas/Identity/ folder, where we'll be able to change their appearance and/or behavior to better suit our needs.
Generated (and modified) code will automatically take precedence over the default code in the Identity RCL.
To gain full control of the UI and not use the default RCL, see the following guides:
- https://docs.microsoft.com/en-us/aspnet/core/security/authentication/scaffold-identity
- https://docs.microsoft.com/en-us/aspnet/core/security/authentication/scaffold-identity#full
- https://docs.microsoft.com/en-us/aspnet/core/razor-pages/ui-class
We'll use the scaffolding tool later in this chapter; for now, for the sake of simplicity, we'll just use the built-in login and registration pages.
Mapping Razor Pages to EndpointMiddleware
Now that we're (internally) using some Razor Pages, we need to map them to the back-end routing system; otherwise, our ASP.NET Core app won't forward the HTTP requests to them.
To do that, open the WorldCities project's Startup.cs file and add the following highlighted line in the EndpointMiddleware configuration block:
// ...
app.UseEndpoints(endpoints =>
{
    endpoints.MapControllerRoute(
        name: "default",
        pattern: "{controller}/{action=Index}/{id?}");
    endpoints.MapRazorPages();
});
// ...
That's it; now we're finally ready to log in.
Securing the back-end action methods
Before testing our authentication and authorization implementation, we should spend two more minutes to protect our back-end routes just like we did with the front-end ones. As we already know, we can do that using AuthorizeAttribute, which can restrict access to controllers and/or action methods to the registered users only.
To effectively shield our ASP.NET Core Web API against unauthorized access attempts, it can be wise to use it on the PUT, POST, and DELETE methods of all our controllers in the following way:
- Open the
/Controllers/CitiesController.csfile and add the[Authorize]attribute to thePutCity,PostCity, andDeleteCitymethods:using Microsoft.AspNetCore.Authorization; // ... [Authorize] [HttpPut("{id}")] public async Task<IActionResult> PutCity(int id, City city) // ... [Authorize] [HttpPost] public async Task<ActionResult<City>> PostCity(City city) [Authorize] [HttpDelete("{id}")] public async Task<ActionResult<City>> DeleteCity(int id) // ... - Open the
/Controllers/CountriesController.csfile and add the[Authorize]attribute to thePutCountry,PostCountry, andDeleteCountrymethods:using Microsoft.AspNetCore.Authorization; // ... [Authorize] [HttpPut("{id}")] public async Task<IActionResult> PutCountry(int id, Country country) // ... [Authorize] [HttpPost] public async Task<ActionResult<Country>> PostCountry(Country country) // ... [Authorize] [HttpDelete("{id}")] public async Task<ActionResult<Country>> DeleteCountry(int id) // ...
Don't forget to add a reference to the using Microsoft.AspNetCore.Authorization namespace at the top of both files.
Now all these action methods are protected against unauthorized access, as they will accept only requests coming from registered and logged-in users; those who don't have it will receive a 401 Unauthorized HTTP error response.
Testing login and registration
In this section, we're going to repeat the login and registration phases we already did for the AuthSample app a short while ago. However, this time, we'll do the login first, since we already have some existing users thanks to the CreateDefaultUsers() method of SeedController.
Launch the WorldCities app in debug mode by hitting F5. Once done, navigate to the login screen and insert the email and password of one of our existing users.
If we didn't change them at the time, the sample values that we used in SeedController should be the following: email: [email protected] and password: MySecr3t$.
If we did everything correctly, we should see a screen like the one shown in the following screenshot:

Figure 10.22: WorldCities home page
Right after that, we can perform the logout and try the registration workflow to register a new user, such as [email protected]; if our login path worked so well, there's no reason why this action shouldn't succeed as well:

Figure 10.23: WorldCities home page after login with a newly created user
We did it! Now our WorldCities app contains fully featured authorization and authentication APIs.
As a matter of fact, we're still missing some key features, such as the following:
- The email verification step right after the registration phase, which would require an email sending service of some sort
- The password change and password recovery features, also requiring the aforementioned email service
- Some third-party authentication providers such as Facebook, Twitter, and so on (that is, social login)
In the next section, we'll see how we can take care of the first two features by implementing a custom email sender based upon the ASP.NET Core built-in IEmailSender interface, which will be used to connect to a dedicated external service or an SMTP server.
For reasons of space, we won't be talking about how to enrich our existing authentication mechanism by adding a "social login" feature using third-party authentication providers. Those who are interested in doing so can take a look at this great guide with a lot of ready-to-use code samples to connect with external OAuth providers such as Facebook, Twitter, Google, and Microsoft:
https://docs.microsoft.com/en-us/aspnet/core/security/authentication/social/
Adding an email sending service
The IEmailSender interface is a set of ASP.NET Core built-in APIs that fully supports the ASP.NET Core Identity default UI infrastructure: such an interface can be implemented by creating a custom IEmailSender-derived class that can be used within any web application to asynchronously send email messages in a structured, transparent, and consistent way.
For additional info about the IEmailSender interface, check out the official documentation at the following URL:
https://docs.microsoft.com/en-us/dotnet/api/microsoft.aspnetcore.identity.ui.services.iemailsender
In this section, we'll explain how we can implement such an interface in order to allow any ASP.NET Core web application to send email messages.
More precisely, we'll see how to achieve this result using two alternative methods:
- A transactional email API provided by a third-party service such as SendGrid, Autopilot, and the like
- An external SMTP server of any sort, just like the one we use to send our personal email messages
Are we ready? Let's start!
Transactional email API using SendGrid
Let's see how we can implement the IEmailSender interface to send email services using one of the many third-party marketing automation platforms that offer transactional email services. If we look for them using a search engine, we can easily find a lot of alternatives, such as:
- SendGrid
- Autopilot
- Mailjet
- Sendinblue
- Mailgun
- Amazon SES
… and many more.
For obvious reasons of space, we'll just pick one of them, which also happens to have a good .NET Core API and, most importantly, a free plan: Twilio SendGrid.
For those who don't know what we're talking about, Twilio SendGrid (SendGrid from now on) is an all-in-one SaaS-based platform that offers transactional services such as email, SMS, chat (and more) through a versatile set of APIs that can be invoked and consumed from external websites or web services; its feature set makes it rather similar to the other alternatives, at least when it comes to email sending capabilities.
For additional info about the SendGrid full feature set, check out its Knowledge Center at the following URL:
Create a SendGrid account
The first thing we need to do is to create an account on SendGrid. Doing this is extremely easy; we just have to fill in the required fields, as shown in the following screenshot:

Figure 10.24: SendGrid account creation
Once done, we need to select one of the various pricing plans available: the best thing we can do, at least for the purpose of this book's samples, is to select the Free plan, which allows us to send up to 100 email messages per day; that's more than enough for testing out our implementation:

Figure 10.25: SendGrid plan selection
In order to complete the registration phase, we'll need to confirm our given email address: once done, we can proceed with the next step.
Get the Web API key
Right after completing the registration phase and performing the login, we'll be brought to SendGrid's main dashboard panel, which allows us to monitor our recent activities, as well as managing our campaigns, templates, settings, and more:

Figure 10.26: SendGrid main dashboard
Once there, select the Email API option from the left-side menu to access the Integration guide section, which is what we're going to use SendGrid for.
From the Integration guide section, we'll be prompted to choose between two available options:
- Web API, for direct app integration using the SendGrid official packages for the various supported languages (PHP, Ruby, Java, C#, and more).
- SMTP Relay, which can be used to retrieve the SendGrid SMTP data and implement it using a third-party email sender interface such as MailKit:

Figure 10.27: Choosing between Web API and SMTP Relay
Let's take the first choice for now, leaving the latter for the next section.
After selecting the Web API option, we'll access SendGrid's Web API setup guide: from there we can retrieve the Web API key, read all the required info, and even get a working code sample to get the stuff done:
Figure 10.28: Web API setup guide
Here's a list of what we need to do here:
- Create a new API key and store it within our Visual Studio
secrets.jsonfile (as seen in Chapter 4, Data Model with Entity Framework Core) - Install the SendGrid ASP.NET Core NuGet package
- Verify the integration using the sample code provided by the SendGrid page, modifying it to get the API key from the chosen environment variable, user secret, or plain text
- Create our own implementation code by adding the C# classes required by the
IEmailSenderinterface, using the sample code as reference
Creating the API key is quite a straightforward process that can be dealt with from the website's interface.
Install the SendGrid NuGet package
To install the SendGrid NuGet package, open the Visual Studio Package Manager Console and type the following command:
PM> Install-Package Sendgrid -version 9.21.2
The specified version is the latest at the time of writing; feel free to remove the -version switch if you want to use the package's latest version.
Verify the integration
Here's what the SendGrid guide's sample code looks like: the single line of code where we need to put the API key value has been marked:
// using SendGrid's C# Library
// https://github.com/sendgrid/sendgrid-csharp
using SendGrid;
using SendGrid.Helpers.Mail;
using System;
using System.Threading.Tasks;
namespace Example
{
    internal class Example
    {
        private static void Main()
        {
            Execute().Wait();
        }
        static async Task Execute()
        {
            var apiKey = Environment.GetEnvironmentVariable("NAME_OF_THE_ENVIRONMENT_VARIABLE_FOR_YOUR_SENDGRID_KEY");
            var client = new SendGridClient(apiKey);
            var from = new EmailAddress("[email protected]", "Example User");
            var subject = "Sending with SendGrid is Fun";
            var to = new EmailAddress("[email protected]", "Example User");
            var plainTextContent = "and easy to do anywhere, even with C#";
            var htmlContent = "<strong>and easy to do anywhere, even with C#</strong>";
            var msg = MailHelper.CreateSingleEmail(from, to, subject, plainTextContent, htmlContent);
            var response = await client.SendEmailAsync(msg);
        }
    }
}
The preceding sample code has been published for reference purposes only; it's strongly advised to use the version found in the official SendGrid Web API C# integration guide.
In order to test the SendGrid integration, we need to implement the preceding code (more precisely, the Execute method) within our web application's Program.cs file, and then launch it from the existing Main method.
If we want to try that, since we don't plan to store the API key within an environment variable, we just need to replace the first line of the Execute method in the following way:
var apiKey = "PUT-YOUR-API-KEY-HERE";
in order to use our newly generated API key.
If we don't want to alter our existing web app source code, we could skip this part and create a brand-new ASP.NET web application (or console application) project and test the SendGrid integration there instead... or we could just skip the test for now and just test our final implementation.
Here's the updated Program.cs file content (new lines are highlighted):
using Microsoft.AspNetCore.Hosting;
using Microsoft.Extensions.Hosting;
using SendGrid;
using SendGrid.Helpers.Mail;
using System.Threading.Tasks;
namespace WorldCities
{
    public class Program
    {
        public static void Main(string[] args)
        {
            // SendGrid implementation test
            Execute().Wait();
            CreateHostBuilder(args).Build().Run();
        }
        public static IHostBuilder CreateHostBuilder(string[] args) =>
            Host.CreateDefaultBuilder(args)
                .ConfigureWebHostDefaults(webBuilder =>
                {
                    webBuilder.UseStartup<Startup>();
                });
        /// <summary>
        /// SendGrid implementation test
        /// </summary>
        static async Task Execute()
        {
            var apiKey = "PUT-YOUR-API-KEY-HERE";
            var client = new SendGridClient(apiKey);
            var from = new EmailAddress("[email protected]", "Example User");
            var subject = "Sending with SendGrid is Fun";
            var to = new EmailAddress("[email protected]", "Example User");
            var plainTextContent = "and easy to do anywhere, even with C#";
            var htmlContent = "<strong>and easy to do anywhere, even with C#</strong>";
            var msg = MailHelper.CreateSingleEmail(from, to, subject, plainTextContent, htmlContent);
            var response = await client.SendEmailAsync(msg);
        }
    }
}
As we can see, we've just added the Execute method that we took from the SendGrid implementation sample and called it from the Main method of our Program class, right before running our web application.
You will find the preceding sample in the GitHub project for Chapter 10, with the Execute().Wait() call commented out for performance reasons; feel free to uncomment it to have the test running.
We can check the verification process from the SendGrid page; as soon as we successfully do that, we can proceed with our own implementation.
Implement the IEmailSender interface
The first thing to do is to add the SendGrid API key to our project. Although the SendGrid sample code suggests the use of an environment variable, we strongly advise you to not do that and implement the API key using the Visual Studio User Secrets approach that we've already seen in Chapter 4, Data Model with Entity Framework Core.
To do that, open the Visual Studio secrets.json file and store it in the following way (new lines are highlighted):
{
  "ConnectionStrings": {
    "DefaultConnection": "Server=localhost\SQLEXPRESS;Database=WorldCities;User Id=WorldCities;Password=MyVeryOwn$721;Integrated Security=False;MultipleActiveResultSets=True"
  },
  "ExternalProviders": {
    "SendGrid": {
      "ApiKey": "PUT-YOUR-API-KEY-HERE"
    }
  }
}
From now on, we'll be able to access our SendGrid API key in the following way:
Configuration["ExternalProviders:SendGrid:ApiKey"]
Now we can finally switch to the source code part.
In order to implement the IEmailSender interface, we need to create two classes:
- A custom class derived from the EmailSender base class: This is the class that will contain the main email sending logic.
- An options class that will contain the mail sender settings, which will be used as an initialization parameter of the main class.
Let's do this.
SendGridEmailSenderOptions
Let's start with the options class: from Solution Explorer, create a new /Services/ folder in the root project's node, then add a new SendGridEmailSenderOptions.cs class file and fill it with the following content:
namespace WorldCities.Services
{
    public class SendGridEmailSenderOptions
    {
        public string ApiKey { get; set; }
        public string Sender_Email { get; set; }
        public string Sender_Name { get; set; }
    }
}
As we can see, this class will be used to store the API key that we created a short while ago and a couple of other settings.
SendGridEmailSender
Right after that, right-click on the /Services/ folder again and add a new SendGridEmailSender.cs class file, filling it with the following content:
using Microsoft.AspNetCore.Identity.UI.Services;
using Microsoft.Extensions.Options;
using SendGrid;
using SendGrid.Helpers.Mail;
using System.Threading.Tasks;
namespace WorldCities.Services
{
    public class SendGridEmailSender : IEmailSender
    {
        public SendGridEmailSender(
            IOptions<SendGridEmailSenderOptions> options
            )
        {
            this.Options = options.Value;
        }
        public SendGridEmailSenderOptions Options { get; set; }
        public async Task SendEmailAsync(
            string email,
            string subject,
            string message)
        {
            await Execute(Options.ApiKey, subject, message, email);
        }
        private async Task<Response> Execute(
            string apiKey,
            string subject,
            string message,
            string email)
        {
            var client = new SendGridClient(apiKey);
            var msg = new SendGridMessage()
            {
                From = new EmailAddress(Options.Sender_Email, Options.Sender_Name),
                Subject = subject,
                PlainTextContent = message,
                HtmlContent = message
            };
            msg.AddTo(new EmailAddress(email));
            // Disable tracking settings
            msg.SetClickTracking(false, false);
            msg.SetOpenTracking(false);
            msg.SetGoogleAnalytics(false);
            msg.SetSubscriptionTracking(false);
            return await client.SendEmailAsync(msg);
        }
    }
}
As we can see, we've altered the sample code provided by the SendGrid website to create a custom class that extends the IEmailSender interface. The action takes place within the interface's Execute method, where the email message is built, then configured using the SendGridEmailSenderOptions object that we've added early on, and eventually sent using the SendEmailAsync method provided by the SendGrid client.
For additional info regarding the options that we used to disable tracking settings in the preceding code, check out the following URL:
Startup class
Now that we do have our classes, we just need to configure them in a dedicated transient service that we can define in our application's Startup class.
Open the Startup.cs file and add the following code at the end of the existing ConfigureServices method:
// IEmailSender implementation using SendGrid
services.AddTransient<IEmailSender, SendGridEmailSender>();
services.Configure<SendGridEmailSenderOptions>(options =>
{
    options.ApiKey = Configuration["ExternalProviders:SendGrid:ApiKey"];
    options.Sender_Email = "[email protected]";
    options.Sender_Name = "WorldCities";
});
For the preceding code to work without compiler errors, we'll also need to add our new services namespace at the beginning of the file:
using WorldCities.Services;
As we can see by looking at the preceding code, we are still using the [email protected] testing email address taken from the SendGrid sample code. It goes without saying that, before being able to actually send email messages, we'll have to replace it with a real email address.
Create a new sender
This can be done with SendGrid's Create new sender feature (in the Marketing > Sender section), which allows us to add one or more new sender addresses and use them within the API. Once added, each sender must be verified, as explained in the notes that we can read in the SendGrid's Add a Sender modal window:

Figure 10.29: SendGrid's Add a Sender modal window
As we can see, SendGrid currently supports two verification methods:
- Registering the email address domain under the authenticated domains section
- Answering a verification email that will be sent to the email address registered as the sender
Both methods would be viable enough for most scenarios. In our case, for the sake of simplicity, we suggest validating a single email address, adding it to the startup ConfigureServices method (thus replacing [email protected] in the preceding code), and go ahead.
Since we have to do that, we can take the chance to move the Sender_Email and Sender_Name property values to the secrets.json file instead:
"SendGrid": {
  "ApiKey": "PUT-YOUR-API-KEY-HERE",
  "Sender_Email": "[email protected]",
  "Sender_Name": "WorldCities "
},
And modify the Startup.cs code accordingly:
// IEmailSender implementation using SendGrid
services.AddTransient<IEmailSender, SendGridEmailSender>();
services.Configure<SendGridEmailSenderOptions>(options =>
{
    options.ApiKey = Configuration["ExternalProviders:SendGrid:ApiKey"];
    options.Sender_Email = Configuration["ExternalProviders:SendGrid:Sender_Email"];
    options.Sender_Name = Configuration["ExternalProviders:SendGrid:Sender_Name"];
});
This concludes our SendGrid implementation. Let's now see how we can use what we just did to send all the identity-related email messages, thus replacing the existing "no-send" behavior.
Scaffold the Identity pages
The best way to test our new IEmailSender implementation is to use the identity scaffolding tool that we've briefly introduced a while ago. This will allow us to view, modify, and debug all the account-related pages (login, registration, email confirmation, and so on).
From Solution Explorer, right-click the web application's root node and select Add > New Scaffolded Item. From the modal window that appears, select the Identity group and the Identity element within it, as shown in the following screenshot:

Figure 10.30: Add New Scaffolded Item modal window
Click on the Add button to access the next page of this mini-wizard; from there, we'll be asked to specify an existing layout page, select which files to override, and select our existing data context class.
Since we don't have an existing layout page or existing identity pages, we can leave the layout page textbox empty and select the Override all files checkbox. As for Data context class, select our ApplicationDbContext to ensure that the identity framework will perform its data accesses within that context:

Figure 10.31: Add Identity window
After clicking the Add button, the scaffolding process will start; the whole code generation task will likely take some seconds:

Figure 10.32: Scaffolding in progress
Eventually, a new /Areas/ folder will be added to our project, containing all the Razor pages included in the Identity Razor Class Library (RCL):

Figure 10.33: Examining the new Areas folder
These new Razor pages will allow us to edit the built-in HTML content that we saw a while ago when we first tested the login and registration views.
Disable link-based account verification
With the default templates, as we saw earlier on, when users submit their registration page by specifying the email address and password, they are redirected to the RegisterConfirmation page, where they can select a link to have the account confirmed. Such "automatic" account verification behavior is meant for testing purposes only and should definitely be disabled in a production app, possibly replacing it with an email-based verification process; this is precisely what we're going to do now.
From Solution Explorer, open the following page:
/Areas/Identity/Pages/Account/RegisterConfirmation.cshtml.cs
Locate the OnGetAsync method and set the DisplayConfirmAccountLink property to false in the following way (the single updated line is highlighted):
public async Task<IActionResult> OnGetAsync(string email, string returnUrl = null)
{
    if (email == null)
    {
        return RedirectToPage("/Index");
    }
    var user = await _userManager.FindByEmailAsync(email);
    if (user == null)
    {
        return NotFound($"Unable to load user with email '{email}'.");
    }
    Email = email;
    // Once you add a real email sender, you should remove this code that lets you confirm the account
    DisplayConfirmAccountLink = false;
    if (DisplayConfirmAccountLink)
    {
        var userId = await _userManager.GetUserIdAsync(user);
        var code = await _userManager.GenerateEmailConfirmationTokenAsync(user);
        code = WebEncoders.Base64UrlEncode(Encoding.UTF8.GetBytes(code));
        EmailConfirmationUrl = Url.Page(
            "/Account/ConfirmEmail",
            pageHandler: null,
            values: new { area = "Identity", userId = userId, code = code, returnUrl = returnUrl },
            protocol: Request.Scheme);
    }
    return Page();
}
The preceding change will disable the link-based account verification process, thus leaving the email-based alternative the only possible way to confirm the user registration.
Test the email-based account verification
Now we just need to test the new email-based behavior. To do that, open the following file:
/Areas/Identity/Pages/Account/Register.cshtml.cs
And place a breakpoint to the await _emailSender.SendEmailAsync call (it should be around line 92 or so), just like shown in the following screenshot:
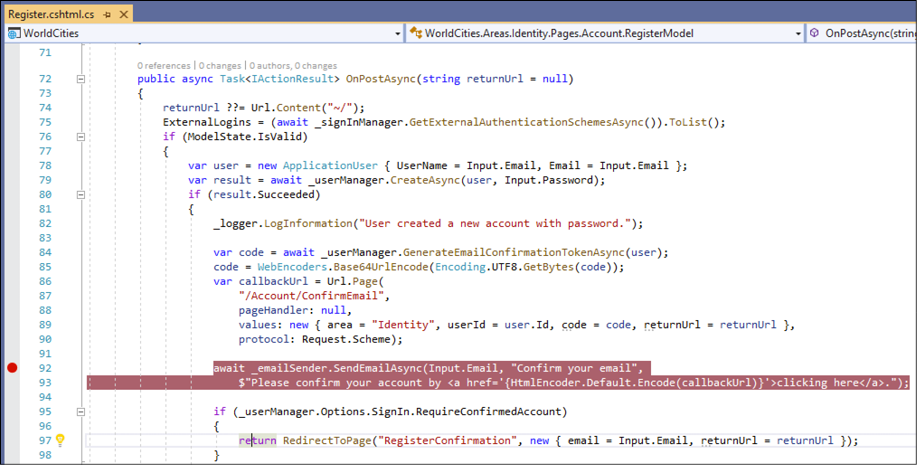
Figure 10.34: Adding a breakpoint to the await _emailSender.SendEmailAsync call
Once done, hit F5 to run the app in debug mode. Click the Register menu item, fill out another registration form, and hit the Register button to send it, just like we already did in our previous test.
If we did everything correctly, the breakpoint should trigger:

Figure 10.35: Triggering the breakpoint
This is one of the (many) parts of the auto-generated code that makes use of the IEmailSender interface to send the identity-related email messages.
Now, since we've implemented our very own SendGridEmailSender interface and configured it in the startup ConfigureServices method, we should reasonably expect that it will be used to fulfill such a task.
Let's see if that's the case. Open the /Services/SendGridEmailSender.cs file and place another breakpoint in the first line of the Execute method, then resume the app's execution by hitting Continue to release the previous breakpoint. The new breakpoint should trigger as well, demonstrating that our IEmailSender implementation successfully kicked in:

Figure 10.36: Triggering the second breakpoint
If we resume the app execution, and the SendGrid integration is working as expected, we should receive an email message containing the link to verify our email address, meaning that our web application now handles the verification task in a proper way.
The new behavior should be also confirmed by the Register confirmation view's revised look, which now shouldn't show the registration link anymore (as shown in the following screenshot):

Figure 10.37: Register confirmation revised view
Our SendGrid-based IEmailSender implementation is done. It goes without saying that such an approach is not limited to the identity-related pages. From now on, we'll be able to send email messages from any of our controllers, as long as we provide it with an IEmailSender interface using Dependency Injection:
public class MyController : Controller
{
    private readonly IEmailSender _emailSender;
    public MyController(
        IEmailSender emailSender)
    {
        _emailSender = emailSender;
    }
}
And then call the SendEmailAsync method in the following way:
await _emailSender.SendEmailAsync("[email protected]", "subject", "text");
In the next section, we'll see how to pull off a different approach that will allow us to use any SMTP server, including SendGrid's SMTP Relay method, which we talked about earlier on.
External SMTP server using MailKit
In this section, we'll see how to implement the IEmailSender interface to seamlessly send email messages through the SMTP server of our choice. To do that, we'll make use of MailKit, an open-source, cross-platform .NET mail-client library based on MimeKit that allows us to connect to the SMTP server and send email messages.
Are we ready? Let's start!
Install the MailKit NuGet package
The first thing we need to do is to install the MailKit NuGet package, which can be done from the Package Manager Console in the following way:
PM> Install-Package MailKit -version 2.10.1
The specified version is the latest at the time of writing; feel free to remove the -version switch if you want to use the package's latest version.
Set up the SMTP settings
The best place to store our SMTP server's settings is—again—our secrets.json file. Open it and add the following highlighted keys to the existing JSON:
[...]
"ExternalProviders": {
  "SendGrid": {
    "ApiKey": "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",
    "Sender_Email": "WorldCities",
    "Sender_Name": "[email protected]"
  },
  "MailKit": {
    "SMTP": {
      "Address": "my-smtp.server.com",
      "Port": "465",
      "Account": "my-smtp-username",
      "Password": "my-smtp-password",
      "Sender_Email": "[email protected]",
      "Sender_Name": "WorldCities"
    }
  }
}
[...]
Be sure to replace the SMTP sample settings in the preceding code (address, port, and so on) with valid ones. If we don't have an SMTP server available, we can use the one provided by SendGrid when choosing the SMTP Relay method, which we talked about earlier on.
Implement the IEmailSender interface
Right after doing this, we need to create the two classes required to implement the IEmailSender interface: the option class and the custom class, just like we did a short while ago when dealing with the SendGrid implementation.
Let's quickly get done with that, since we already know what to do.
MailKitEmailSenderOptions
Again, let's start with the options class: from Solution Explorer, create a new /Services/ folder in the root project's node, then add a new MailKitEmailSenderOptions.cs class file and fill it with the following content:
using MailKit.Security;
namespace WorldCities.Services
{
    public class MailKitEmailSenderOptions
    {
        public MailKitEmailSenderOptions()
        {
            Host_SecureSocketOptions = SecureSocketOptions.Auto;
        }
        public string Host_Address { get; set; }
        public int Host_Port { get; set; }
        public string Host_Username { get; set; }
        public string Host_Password { get; set; }
        public SecureSocketOptions Host_SecureSocketOptions { get; set; }
        public string Sender_EMail { get; set; }
        public string Sender_Name { get; set; }
    }
}
As we can see, this time there is no ApiKey property, simply because MailKit does not have a public API to deal with; however, in its place we had to add a bunch of additional properties related to the external SMTP server that we are going to use to send our e-mail messages.
MailKitEmailSender
MailKit's IEmailSender implementation will be quite similar to SendGrid's one, with some relevant differences in the main Execute method.
Right-click on the /Services/ folder again and add a new MailKitEmailSender.cs class file, filling it with the following content:
using MailKit.Net.Smtp;
using Microsoft.AspNetCore.Identity.UI.Services;
using Microsoft.Extensions.Options;
using MimeKit;
using MimeKit.Text;
using System.Threading.Tasks;
namespace WorldCities.Services
{
    public class MailKitEmailSender : IEmailSender
    {
        public MailKitEmailSender(
            IOptions<MailKitEmailSenderOptions> options
            )
        {
            this.Options = options.Value;
        }
        public MailKitEmailSenderOptions Options { get; set; }
        public Task SendEmailAsync(
            string email,
            string subject,
            string message)
        {
            return Execute(email, subject, message);
        }
        public Task Execute(
            string email,
            string subject,
            string message)
        {
            // create message
            var msg = new MimeMessage();
            msg.Sender = MailboxAddress.Parse(Options.Sender_EMail);
            if (!string.IsNullOrEmpty(Options.Sender_Name))
                msg.Sender.Name = Options.Sender_Name;
            msg.From.Add(msg.Sender);
            msg.To.Add(MailboxAddress.Parse(email));
            msg.Subject = subject;
            msg.Body = new TextPart(TextFormat.Html) { Text = message };
            // send email
            using (var smtp = new SmtpClient())
            {
                smtp.Connect(
                    Options.Host_Address,
                    Options.Host_Port,
                    Options.Host_SecureSocketOptions);
                smtp.Authenticate(
                    Options.Host_Username,
                    Options.Host_Password);
                smtp.Send(msg);
                smtp.Disconnect(true);
            }
            return Task.FromResult(true);
        }
    }
}
Again, the Execute method is where the email message is built and configured using the MailKitEmailSenderOptions object, and then sent using the method provided by the client provided by the third-party package – an instance of the MailKit.Net.Smtp.SmtpClient class.
Startup class
Now we just have to implement the MailKit service within our Startup.cs class, which can be done by adding the following lines at the end of the ConfigureService method:
// IEmailSender implementation using MailKit
services.AddTransient<IEmailSender, MailKitEmailSender>();
services.Configure<MailKitEmailSenderOptions>(options =>
{
    options.Host_Address = Configuration["ExternalProviders:MailKit:SMTP:Address"];
    options.Host_Port = Convert.ToInt32(Configuration["ExternalProviders:MailKit:SMTP:Port"]);
    options.Host_Username = Configuration["ExternalProviders:MailKit:SMTP:Account"];
    options.Host_Password = Configuration["ExternalProviders:MailKit:SMTP:Password"];
    options.Sender_EMail = Configuration["ExternalProviders:MailKit:SMTP:Sender_Email"];
    options.Sender_Name = Configuration["ExternalProviders:MailKit:SMTP:Sender_Name"];
});
Important: Be sure to comment out the SendGrid service if you have added it before.
That's it: the MailKit implementation will work just like the SendGrid one, with the only difference being that it will internally relay the e-mail messages using the SMTP server instead of the transactional API service.
Summary
At the start of this chapter, we introduced the concepts of authentication and authorization, acknowledging the fact that most applications, including ours, do require a mechanism to properly handle authenticated and non-authenticated clients as well as authorized and unauthorized requests.
We took some time to properly understand the similarities and differences between authentication and authorization as well as the pros and cons of handling these tasks using our own internal provider or delegating them to third-party providers such as Google, Facebook, and Twitter. We also found out that, luckily enough, the ASP.NET Core Identity services, together with the IdentityServer API support, provide a convenient set of features that allow us to achieve the best of both worlds.
To be able to use it, we added the required packages to our project and did what was needed to properly configure them, such as performing some updates in our Startup and ApplicationDbContext classes and creating a new ApplicationUser entity; right after implementing all the required changes, we added a new Entity Framework Core migration to update our database accordingly.
We briefly enumerated the various web-based authentication methods available nowadays: sessions, tokens, signatures, and two-factor strategies of various sorts. After careful consideration, we chose to stick with the token-based approach using JWT that IdentityServer provides by default for the SPA clients, it being a solid and well-known standard for any front-end framework.
Since the default ASP.NET Core and Angular project template provided by Visual Studio features a built-in ASP.NET Core Identity system and IdentityServer support for Angular, we created a brand-new project—which we called AuthSample—to test it out. We spent some time reviewing its main features, such as route guards, HTTP interceptors, HTTP round trips to the back-end, and so on; while doing that, we took the time to implement the required front-end and back-end authorization rules to protect some of our application views, routes, and APIs from unauthorized access. Eventually, we imported those APIs into our WorldCities Angular app, changing our existing front-end and back-end code accordingly.
In the last part of the chapter, we took care of an important missing feature of our sample identity-based implementation: the email sending capabilities of our app. We saw how we can implement a custom email sender based upon the ASP.NET Core built-in IEmailSender interface using two different approaches: a third-party, API-driven transactional email service and an external SMTP server.
We're ready to switch to the next topic, progressive web apps, which will keep us busy throughout the next chapter.
Suggested topics
Authentication, authorization, HTTP protocol, Secure Socket Layer, session state management, indirection, single sign-on, Azure AD Authentication Library (ADAL), ASP.NET Core Identity, IdentityServer, OpenID, Open ID Connect (OIDC), OAuth, OAuth 2, Two-Factor Authentication (2FA), SMS 2FA, Time-Based One-Time Password Algorithm (TOTP), TOTP 2FA, IdentityUser, stateless, Cross-Site Scripting (XSS), Cross-Site Request Forgery (CSRF), Angular HttpClient, Route Guard, Http Interceptor, LocalStorage, Web Storage API, server-side prerendering, Angular Universal, browser types, generic types, JWTs, Claims, AuthorizeAttribute, SendGrid, MailKit, IEmailSender.
References
- Introduction to Identity on ASP.NET Core: https://docs.microsoft.com/en-us/aspnet/core/security/authentication/identity
- Authentication and authorization for SPAs: https://docs.microsoft.com/en-us/aspnet/core/security/authentication/identity-api-authorization
- IdentityServer official documentation: http://docs.identityserver.io/en/latest/ RoleManager<TRole> Class: https://docs.microsoft.com/en-us/dotnet/api/microsoft.aspnetcore.identity.rolemanager-1
- Identity model customization in ASP.NET Core: https://docs.microsoft.com/en-US/aspnet/core/security/authentication/customize-identity-model
- Overview of ASP.NET Core Security: https://docs.microsoft.com/en-us/aspnet/core/security/
- Async and Await: https://blog.stephencleary.com/2012/02/async-and-await.html
- Async/Await FAQ: https://blogs.msdn.microsoft.com/pfxteam/2012/04/12/asyncawait-faq/
- Don't Block on Async Code: http://blog.stephencleary.com/2012/07/dont-block-on-async-code.html
- Async/Await – Best Practices in Asynchronous Programming: https://msdn.microsoft.com/en-us/magazine/jj991977.aspx
- ASP.NET Core SynchronizationContext: https://blog.stephencleary.com/2017/03/aspnetcore-synchronization-context.html
- Asynchronous programming with async and await: https://docs.microsoft.com/en-us/dotnet/csharp/programming-guide/concepts/async/index
- EF Core Migrations: https://docs.microsoft.com/en-us/ef/core/managing-schemas/migrations/
- SQL Server: Create a Full Database Backup: https://docs.microsoft.com/en-us/sql/relational-databases/backup-restore/create-a-full-database-backup-sql-server
- Two-factor authentication with SMS in ASP.NET Core: https://docs.microsoft.com/en-us/aspnet/core/security/authentication/2fa
- Enable QR code generation for TOTP authenticator apps in ASP.NET Core: https://docs.microsoft.com/en-us/aspnet/core/security/authentication/identity-enable-qrcodes
- Angular: Router Guards: https://angular.io/guide/router#preventing-unauthorized-access
- Routing in ASP.NET Core: https://docs.microsoft.com/en-us/aspnet/core/fundamentals/routing
- Introduction to authorization in ASP.NET Core: https://docs.microsoft.com/en-us/aspnet/core/security/authorization/introduction
- Simple authorization in ASP.NET Core: https://docs.microsoft.com/en-us/aspnet/core/security/authorization/simple
- Authorize with a specific scheme in ASP.NET Core: https://docs.microsoft.com/en-us/aspnet/core/security/authorization/limitingidentitybyscheme
- Scaffold Identity in ASP.NET Core projects: https://docs.microsoft.com/en-us/aspnet/core/security/authentication/scaffold-identity
- ASP.NET Core Identity: Create full identity UI source: https://docs.microsoft.com/en-us/aspnet/core/security/authentication/scaffold-identity#full
- Create reusable UI using the Razor class library project in ASP.NET Core: https://docs.microsoft.com/en-us/aspnet/core/razor-pages/ui-class
- Angular: HttpInterceptor: https://angular.io/api/common/http/HttpInterceptor
- Role-based authorization in ASP.NET Core: https://docs.microsoft.com/en-us/aspnet/core/security/authorization/roles
- Account confirmation and password recovery in ASP.NET Core: https://docs.microsoft.com/en-us/aspnet/core/security/authentication/accconfirm
- IEmailSender interface: https://docs.microsoft.com/en-us/dotnet/api/microsoft.aspnetcore.identity.ui.services.iemailsender
- SendGrid Tracking Settings: https://sendgrid.com/docs/ui/account-and-settings/tracking/
- MailKit: https://www.nuget.org/packages/MailKit