
5
Fetching and Displaying Data
In the previous chapter, we created a new WorldCities web application project and made a considerable effort to empower it with a DBMS-based data provider, built upon Entity Framework Core using the Code-First approach. Now that we have data persistence, we're ready to entrust our users with the ability to interact with our application; this means that we can implement some much-needed stuff, such as the following:
- Fetching data: Querying the data provider from the client side using HTTP requests and getting structured results back from the server side
- Displaying data: Populating typical client-side components such as tables, lists, and so on, ensuring a good user experience for the end user
In this chapter, we'll cover these two topics by adding a number of client-server interactions handled by standard HTTP request/response chains; it goes without saying that Angular will play a major role here, together with a couple of useful packages that will help us reach our goal.
Technical requirements
In this chapter, we're going to need all the technical requirements listed in the previous chapters, plus the following external libraries:
@angular/material(Angular npm package)System.Linq.Dynamic.Core(.NET Core NuGet package)
As always, it's advisable to avoid installing them straight away; we're going to bring them in during this chapter to better contextualize their purpose within our project.
The code files for this chapter can be found at: https://github.com/PacktPublishing/ASP.NET-Core-5-and-Angular/tree/main/Chapter_05
Fetching data
As we already know from Chapter 1, Getting Ready, reading data from the database is mostly a matter of having the Angular front-end send HTTP requests to the ASP.NET back-end and fetching the corresponding HTTP responses accordingly; these data transfers will be mostly implemented using JavaScript Object Notation (JSON), a lightweight data-interchange format that is natively supported by both frameworks.
In this section, we'll mostly talk about HTTP requests and responses, see how we can fetch data from the ASP.NET back-end, and lay out some raw UI examples using Angular components that will be further refined throughout the next sections.
Are we ready? Let's start!
Requests and responses
Let's start by taking a look at those HTTP requests and responses we'll be dealing with: hit F5 to launch our WorldCities project in debug mode and type the following URL in the browser's address bar: https://localhost:44334/api/Cities/
If we did everything correctly, we should see a list of cities, each one with a unique id. From that list we can easily pick the id of each city and add it to our URL to retrieve that specific city only: for example, we can choose to use 9793, which – in our specific scenario – corresponds to the city of New York.

Figure 5.1: Entry for New York
Important Note: The IDs of the various cities and countries referenced throughout the book might likely differ from those present in the reader's own database, depending on various factors: the world cities file version/progress, the starting auto-incrementing id of the [Cities] database table we used to store the data source, and so on. Don't mind that: all the code samples should still work, regardless of any ID difference.
JSON conventions and defaults
As we can see, the JSON is basically a serialization of our City entity, with some built-in conventions such as the following:
- camelCase instead of PascalCase: We have
nameinstead ofName,countryIdinstead ofCountryId, and so on, meaning that all our PascalCase .NET class names and properties will be automatically converted into camelCase when they are serialized to JSON. - No indentation and no line feed/carriage return (LF/CR): Everything is stacked within a single line of text.
These conventions are the default options set by ASP.NET when dealing with JSON outputs. Most of them can be changed by adding some customization options to the MVC middleware. However, we don't need to do that as they are perfectly supported by Angular, which is what we're going to use to deal with those strings; we'll just have to ensure that the Angular interfaces that we'll create to mirror the entity classes have their names and properties set to camelCase.
Anyone who wants to know why they chose camelCase instead of PascalCase as the default serialization option should check out the following GitHub thread: https://github.com/aspnet/Mvc/issues/4283
Anyway, for the sake of readability, let's add some indentation so that we'll be able to understand more of those outputs.
Open the Startup.cs file, locate the ConfigureServices method, and add the following code (new/updated lines highlighted):
public void ConfigureServices(IServiceCollection services)
{
    services.AddControllersWithViews()
        .AddJsonOptions(options => {
            // set this option to TRUE to indent the JSON output
            options.JsonSerializerOptions.WriteIndented = true;
            // set this option to NULL to use PascalCase instead of
            // camelCase (default)
            // options.JsonSerializerOptions.PropertyNamingPolicy =
            // null;
        });
    );
As we can see, we also added the required configuration option to force PascalCase instead of camelCase; however, for the sake of these sample projects, we do prefer to enforce the camelCase convention on JSON and Angular, so we have chosen to comment that line.
Those who want to uncomment it should be aware of the fact that they'll have to use camelCase for their Angular interfaces as well, changing our sample code accordingly.
Save the file, hit F5, and type the previous URL once more to see the following changes:

Figure 5.2: New JSON file with camelCase and indentation changes
Here we go: now, the JSON is fully readable, with Angular still being able to properly access it.
A (very) long list
Let's now move to our Angular app and create a sample component to show a list of Cities. We already created a component in Chapter 3, Front-End and Back-End Interactions, so we know what to do.
From Solution Explorer, do the following:
- Navigate to the
/ClientApp/src/app/folder. - Create a new
/cities/folder. - Within that folder, create the following new files:
city.tscities.component.tscities.component.htmlcities.component.css
Once done, fill them with the following content.
city.ts
Open the /ClientApp/src/app/cities/city.ts file and add the following:
export interface City {
    id: number;
    name: string;
    lat: number;
    lon: number;
}
This small file contains our city interface, which we'll be using in our CitiesComponent class file. Since we're eventually going to use it in other components as well, it's better to create it within a separate file and decorate it with the export statement so that we'll be able to use it there as well when the time comes.
cities.component.ts
Open the /ClientApp/src/app/cities/cities.component.ts file and add the following:
import { Component, Inject, OnInit } from '@angular/core';
import { HttpClient } from '@angular/common/http';
import { City } from './city';
@Component({
  selector: 'app-cities',
  templateUrl: './cities.component.html',
  styleUrls: ['./cities.component.css']
})
export class CitiesComponent implements OnInit {
  public cities: City[];
  constructor(
    private http: HttpClient,
    @Inject('BASE_URL') private baseUrl: string) {
  }
  ngOnInit() {
    this.http.get<City[]>(this.baseUrl + 'api/Cities')
      .subscribe(result => {
        this.cities = result;
      }, error => console.error(error));
  }
}
As we can see, we added an import reference to the City interface we created a short while ago. We also used the ngOnInit() life cycle hook method to perform the HTTP request that will retrieve the cities, just like we did in Chapter 3, Front-End and Back-End Interactions, for our previous HealthCheck app.
cities.component.html
Open the /ClientApp/src/app/cities/cities.component.html file and add the following:
<h1>Cities</h1>
<p>Here's a list of cities: feel free to play with it.</p>
<p *ngIf="!cities"><em>Loading...</em></p>
<table class='table table-striped' aria-labelledby="tableLabel" [hidden]="!cities">
  <thead>
    <tr>
      <th>ID</th>
      <th>Name</th>
      <th>Lat</th>
      <th>Lon</th>
    </tr>
  </thead>
  <tbody>
    <tr *ngFor="let city of cities">
      <td>{{ city.id }}</td>
      <td>{{ city.name }}</td>
      <td>{{ city.lat }}</td>
      <td>{{ city.lon }}</td>
    </tr>
  </tbody>
</table>
As we can see, the preceding HTML structure has nothing special: it's just a header, a paragraph, and a table with some standard loading logic to let the user know that we'll asynchronously load the data in a (hopefully) short while. However, there are at least two attributes that deserve a couple of words.
Bootstrap styling
If we take a look at the <table> HTML element, we can easily notice that we've applied a couple of CSS classes there: table and table-striped. These are two of the most used classes of the Bootstrap front-end framework when it comes to styling tables. In a nutshell, the former will apply some basic spacing and typography rules, while the latter will change the background color of the table's odd rows, thus reproducing a "striped" effect; both of them will greatly increase the table's readability.
To read more about UI components and layout styling using Bootstrap, check out the official documentation at the following URL: https://getbootstrap.com
Now we could ask ourselves the following question: how can we use Bootstrap to begin with, since we haven't added a reference or stylesheet link to it anywhere in our project?
As a matter of fact, we never did; we inherited it from the ASP.NET and Angular template we started with. If we take a look at the /ClientApp/angular.json file, we can easily find a reference to it (row #28 or so):
[...]
"styles": [
  "node_modules/bootstrap/dist/css/bootstrap.min.css",
  "src/styles.css"
],
[...]
The reference points to the Bootstrap npm package, which is referenced in the /ClientApp/package.json file: now we know why we're able to use those CSS classes.
The [hidden] attribute
Shortly after the table's class definition, we can see that the <table> element features a strange [hidden] attribute. Why is it there, and why is it between square brackets?
As a matter of fact, the hidden attribute is an HTML5-valid content attribute that can be legitimately set on any HTML element. The role it's supposed to play is very similar to the CSS display: none setting: it indicates to the browser that the element and all of its descendants should not be visible or perceivable to any user. In other words, it's just another way to hide content from the user.
For additional information regarding the hidden attribute, check out the following URL:
HTML Living Standard (last updated on November 26, 2019): https://html.spec.whatwg.org/multipage/interaction.html#the-hidden-attribute
As for the square brackets, that's just the Angular syntax used to define a property binding, that is, an HTML property or attribute within the component template (our .html file) that gets its value from a variable, property, or expression defined within the component class (our .ts file). It's worth noting that such a binding flows in one direction: from the component class (the source) to the HTML element within the component template (the target).
As a direct consequence of what we have just said, every time the source value evaluates to true, the HTML property (or attribute) between square brackets will be set to true as well (and vice versa); this is a great way to deal with a lot of HTML attributes that work with Boolean values because we can dynamically set them through the whole component's life cycle. That's precisely what we do with the <table> element in the preceding code block: its hidden attribute will evaluate to false until the cities component variable is filled by the actual cities fetched from the server, which will only happen when the HttpClient module finishes its request/response task. Not bad, right?
Wait a minute: isn't that the same behavior of the *ngIf structural directive that we already know from Chapter 3, Front-End and Back-End Interactions? Why are we using this [hidden] attribute instead?
This is a very good question that gives us the chance to clarify the difference between these two similar – yet not identical – approaches:
- The
*ngIfstructural directive adds or removes the element from the Document Object Model (DOM) based on its corresponding condition or expression; this means that the element will be initialized and/or disposed of (together with all its children, events, and so on) every time its status changes. - The
hiddenattribute, much like thedisplay: noneCSS setting, will only instruct the browser to show the element to or hide the element from the user; this means that the element will still be there, thus being fully available and reachable (for example, by JavaScript or other DOM-manipulating actions).
As we can see by looking at the preceding HTML code, we're using both of them: the *ngIf structural directive adds or removes the loading <p> element, while the [hidden] attribute binding shows or hides the main <table>. We have chosen to do this for a reason: the <p> element won't have children or events depending on it, while the <table> will soon become a complex object with a lot of features to initialize and preserve within the DOM.
cities.component.css
Here's the code for the /ClientApp/src/app/cities/cities.component.css file:
table {
  width: 100%;
}
That's it, at least for now: since we're using the bootstrap client framework, our component's CSS files will often be very small.
app.module.ts
Now that we've created the component, we need to add it to the app.module.ts file (new lines are highlighted):
import { BrowserModule } from '@angular/platform-browser';
import { NgModule } from '@angular/core';
import { FormsModule } from '@angular/forms';
import { HttpClientModule, HTTP_INTERCEPTORS } from '@angular/common/http';
import { AppRoutingModule } from './app-routing.module';
import { AppComponent } from './app.component';
import { NavMenuComponent } from './nav-menu/nav-menu.component';
import { HomeComponent } from './home/home.component';
import { CitiesComponent } from './cities/cities.component';
@NgModule({
  declarations: [
    AppComponent,
    NavMenuComponent,
    HomeComponent,
    CitiesComponent
  ],
[...]
Now that the component has its required reference here, we can deal with the routing part.
app-routing.module.ts
As we already know, this component can only be loaded – and can only be reached by Angular client-side routing – if we add it to the app-routing.module.ts file in the following way (new lines are highlighted):
import { NgModule } from '@angular/core';
import { Routes, RouterModule } from '@angular/router';
import { HomeComponent } from './home/home.component';
import { CitiesComponent } from './cities/cities.component';
const routes: Routes = [
  { path: '', component: HomeComponent, pathMatch: 'full' },
  { path: 'cities', component: CitiesComponent }
];
@NgModule({
  imports: [RouterModule.forRoot(routes)],
  exports: [RouterModule]
})
export class AppRoutingModule { }
Here we go.
nav-menu-component.html
Last but not least, we need to add a reference to the new component route within the app navigator component; otherwise, the user won't be able to see (and thus reach) it using the UI.
To do that, open the nav-menu-component.html file and add the following (highlighted) lines:
// ...existing code...
<ul class="navbar-nav flex-grow">
  <li
    class="nav-item"
    [routerLinkActive]="['link-active']"
    [routerLinkActiveOptions]="{ exact: true }"
  >
    <a class="nav-link text-dark" [routerLink]="['/']">Home</a>
  </li>
  <li class="nav-item" [routerLinkActive]="['link-active']">
    <a class="nav-link text-dark" [routerLink]="['/cities']"
      >Cities</a
    >
  </li>
</ul>
// ...existing code...
That's it. Now, we could hit F5 to launch our app, click on the Cities link that will appear in the top-right part of the screen, and experience the following outcome:

Figure 5.3: Cities table
As we can see by looking at the vertical scrollbar to the right, we would be overwhelmed by a huge HTML table consisting of 12,959 (or so) rows!
That's another huge performance stress for both ASP.NET and Angular – which should pass with flying colors on any average development machine since both frameworks can deal well with their respective tasks.
However, such a UI outcome is definitely a no-go in terms of user experience: we can't reasonably expect our end users to be happy if we force them to navigate through a 13k-row HTML table with a browser. They would go mad trying to find the city they're looking for!
To fix these major usability issues, we need to implement a few important features that are frequently used to deal with fat HTML tables: paging, sorting, and filtering.
Serving data with Angular Material
To implement a table with paging, sorting, and filtering features, we're going to use Angular Material, a UI component library that implements Material Design in Angular. As we most likely already know, Material Design is a UI design language that Google developed in 2014, which focuses on using grid-based layouts, responsive animations, transitions, padding, and depth effects such as lighting and shadows.
Material Design was introduced by the Google designer Matías Duarte on June 25, 2014, at the 2014 Google I/O conference. To make UI designers familiarize themselves with its core concepts, he explained that "unlike real paper, our digital material can expand and reform intelligently. Material has physical surfaces and edges. Seams and shadows provide meaning about what you can touch."
The main purpose of Material Design is to create a new UI language combining principles of good design with technical and scientific innovation in order to provide a consistent user experience across not only all Google platforms and applications but also any other web applications seeking to adopt such concepts. The language was revamped in 2018, providing more flexibility and advanced customization features based on themes.
As of 2020, Material Design is used on almost all Google web applications and tools – including Gmail, YouTube, Google Drive, Google Docs, Sheets, Slides, Google Maps, and all of the Google Play-branded applications, as well as most Android and Google OS UI elements. Such wide adoption also includes Angular, which has been provided with a dedicated npm package that can be added to any Angular-based project to implement Material Design in any Angular app; this package is called @angular/material and includes the native UI elements, the Component Dev Kit (CDK), a set of animations, and other useful stuff.
To install Angular Material, do the following:
- Open Command Prompt.
- Navigate to our project's
/ClientApp/folder. - Type the following command:
> ng add @angular/material
Doing this will trigger the Angular Material command-line setup wizard, which will install the following npm packages:
@angular/material@angular/cdk(prerequisite)Important: Be sure to install the same
@angular/materialversion specified in thepackage.jsonof the GitHub project released with this book –11.0.1at the time of writing. Those who want to change or update the Angular version should pay special attention to updating the@angular/materialpackage and/or manually fixing the potential breaking changes between the various versions.For additional information about Angular Material, check out the following URLs: https://material.angular.io/
During the installation process, the preceding command will ask us what pre-built theme we would like to install, as shown in the following screenshot:

Figure 5.4: Angular Material installation
For the purpose of this chapter, we're going to pick Indigo/Pink, but we're free to choose any other theme we like. If we want to look at them before making our choice, we can visit the preview URIs listed in the preceding screenshot.
The setup wizard will also ask us if we would like to set up a couple of optional features:
- Global Angular Material Typography Styles (answer YES here): this option will add the
mat-typographyCSS class to the<body>element of our Angular app'sindex.htmlfile, thus giving access to a lot of classes responsible for spacing, shadows, animations, and so on.For additional info about this feature, check out the following URL: https://material.angular.io/guide/typography
- Browser animation for Angular Material (answer YES here): this option will import the
BrowserAnimationsModuleinto our application, thus enabling Angular's animation system.
For additional info about the BrowserAnimationsModule and Angular's animation system, check out the following URLs:
https://angular.io/api/platform-browser/animations/BrowserAnimationsModule
Once done, the setup process will update the following files:
package.json/src/main.ts/src/app/app.module.tsangular.jsonsrc/index.htmlsrc/styles.css
Now, we can proceed with the revamp of our Cities table.
MatTableModule
The Angular component we're going to use is MatTableModule, which provides a Material Design styled HTML table that can be used to display rows of data. Let's see how we can implement it in our existing Angular app.
From Solution Explorer, navigate to the /ClientApp/src/app/ folder, create a new angular-material.module.ts file, and fill it with the following content:
import { NgModule } from '@angular/core';
import { MatTableModule } from '@angular/material/table';
@NgModule({
    imports: [
        MatTableModule
    ],
    exports: [
        MatTableModule
   ]
})
export class AngularMaterialModule { }
This is a brand new module that we're going to use for all the Angular Material modules we want to implement within our app; putting them here instead of using the app.module.ts file will keep that file smaller, which is great for project manageability.
Needless to say, for this module container to properly work, we need to add it within our existing app.module.ts file. Open it and add the following (highlighted) lines:
import { BrowserModule } from '@angular/platform-browser';
import { NgModule } from '@angular/core';
import { FormsModule } from '@angular/forms';
import { HttpClientModule, HTTP_INTERCEPTORS } from
 '@angular/common/http';
import { AppRoutingModule } from './app-routing.module';
import { AppComponent } from './app.component';
import { NavMenuComponent } from './nav-menu/nav-menu.component';
import { HomeComponent } from './home/home.component';
import { CitiesComponent } from './cities/cities.component';
import { BrowserAnimationsModule } from '@angular/platform-
 browser/animations';
import { AngularMaterialModule } from './angular-material.module';
@NgModule({
  declarations: [
    AppComponent,
    NavMenuComponent,
    HomeComponent,
    CitiesComponent
  ],
  imports: [
    BrowserModule.withServerTransition({ appId: 'ng-cli-universal' }),
    HttpClientModule,
    FormsModule,
    AppRoutingModule,
    BrowserAnimationsModule,
    AngularMaterialModule
  ],
  providers: [],
  bootstrap: [AppComponent]
})
export class AppModule { }
Here we go: now, everything we're going to put in the angular-material.module.ts file will also be referenced within our app.
Once we have done that, we can finally open our /ClientApp/src/app/cities/cities.component.ts file and add the following (highlighted) lines:
// ...existing code...
export class CitiesComponent implements OnInit {
  public displayedColumns: string[] = ['id', 'name', 'lat', 'lon'];
  public cities: City[];
  constructor(
    private http: HttpClient,
    @Inject('BASE_URL') private baseUrl: string) {
  }
}
// ...existing code...
Right after that, open the /ClientApp/src/app/cities/cities.component.html file and replace our previous table implementation with the new MatTableModule in the following way (updated code is highlighted):
<h1>Cities</h1>
<p>Here's a list of cities: feel free to play with it.</p>
<p *ngIf="!cities"><em>Loading...</em></p>
<table mat-table [dataSource]="cities"
  class="table-striped mat-elevation-z8"
  [hidden]="!cities">
  <!-- Id Column -->
  <ng-container matColumnDef="id">
    <th mat-header-cell *matHeaderCellDef>ID</th>
    <td mat-cell *matCellDef="let city">{{city.id}}</td>
  </ng-container>
  <!-- Name Column -->
  <ng-container matColumnDef="name">
    <th mat-header-cell *matHeaderCellDef>Name</th>
    <td mat-cell *matCellDef="let city">{{city.name}}</td>
  </ng-container>
  <!-- Lat Column -->
  <ng-container matColumnDef="lat">
    <th mat-header-cell *matHeaderCellDef>Latitude</th>
    <td mat-cell *matCellDef="let city">{{city.lat}}</td>
  </ng-container>
  <!-- Lon Column -->
  <ng-container matColumnDef="lon">
    <th mat-header-cell *matHeaderCellDef>Longitude</th>
    <td mat-cell *matCellDef="let city">{{city.lon}}</td>
  </ng-container>
  <tr mat-header-row *matHeaderRowDef="displayedColumns"></tr>
  <tr mat-row *matRowDef="let row; columns: displayedColumns;"></tr>
</table>
As we can see, MatTableModule kind of mimics the behavior of a standard HTML table, but with a template-based approach for each column; the template features a series of auxiliary structural directives (applied using the *<directiveName> syntax) that can be used to mark certain template sections and define their template section's actual role. As we can see, all these directives end with the Def postfix.
Here are the most relevant ones among those used in the preceding code:
- The
[hidden]attribute binding is not a surprise as it was already present in the previous table for the exact same purpose: keeping the table hidden until the cities have been loaded. - The
matColumnDefdirective identifies a given column with a unique key. - The
matHeaderCellDefdirective defines how to display the header for each column. - The
matCellDefdirective defines how to display the data cells for each column. - The
matHeaderRowDefdirective, which can be found near the end of the preceding code, identifies a configuration element for the table header row and the display order of the header columns. As we can see, we had this directive expression pointing to a component variable calleddisplayedColumns, which we defined in thecities.component.tsfile early on; this variable hosts an array containing all the column keys we want to show, which need to be identical to the names specified via the variousmatColumnDefdirectives.
Let's hit F5 and navigate to the Cities view to see what our brand new table looks like. This can be seen in the following screenshot:

Figure 5.5: New Cities table implemented using MatTableModule
OK, Material Design is indeed there, but the table has the same UI/UX problems as before! For one, it's still very long; let's fix that by implementing the paging feature.
Adding pagination with MatPaginatorModule
Now that we are using Angular Material, implementing pagination is a rather easy task. The first thing we need to do is import the MatPaginatorModule service into the angular-material.module.ts file we created a short while ago.
Client-side paging
Here's how we can do that (new lines are highlighted):
import { NgModule } from '@angular/core';
import { MatTableModule } from '@angular/material/table';
import { MatPaginatorModule } from '@angular/material/paginator';
@NgModule({
    imports: [
        MatTableModule,
        MatPaginatorModule
    ],
    exports: [
        MatTableModule,
        MatPaginatorModule
    ]
})
export class AngularMaterialModule { }
Right after that, we need to open the cities.component.ts file and import the MatPaginator, MatTableDataSource, and ViewChild services:
import { Component, Inject, OnInit, ViewChild } from '@angular/core';
import { HttpClient } from '@angular/common/http';
import { MatTableDataSource } from '@angular/material/table';
import { MatPaginator } from '@angular/material/paginator';
import { City } from './city';
@Component({
  selector: 'app-cities',
  templateUrl: './cities.component.html',
  styleUrls: ['./cities.component.css']
})
export class CitiesComponent implements OnInit {
  public displayedColumns: string[] = ['id', 'name', 'lat', 'lon'];
  public cities: MatTableDataSource<City>;
  @ViewChild(MatPaginator) paginator: MatPaginator;
  constructor(
    private http: HttpClient,
    @Inject('BASE_URL') private baseUrl: string) {
  }
  ngOnInit() {
    this.http.get<City[]>(this.baseUrl + 'api/Cities')
      .subscribe(result => {
        this.cities = new MatTableDataSource<City>(result);
        this.cities.paginator = this.paginator;
      }, error => console.error(error));
  }
}
Once done, open the cities.component.html file and add the following pagination directive (highlighted) right after the </table> closing tag:
// ...existing code...
  <tr mat-header-row *matHeaderRowDef="displayedColumns"></tr>
  <tr mat-row *matRowDef="let row; columns: displayedColumns;"></tr>
</table>
<!-- Pagination directive -->
<mat-paginator [hidden]="!cities"
    [pageSize]="10"
    [pageSizeOptions]="[10, 20, 50]"
    showFirstLastButtons></mat-paginator>
As we can see, we used the [hidden] attribute binding again to keep the paginator hidden until the cities were loaded. The other properties that we can see on the <mat-paginator> element configure some of the MatPaginatorModule UI options, such as the default page size and an array of all the page size options that we want to make available to the users.
Now, we can hit F5 and take a look at our efforts:

Figure 5.6: Cities table with pagination
Now, our table only shows the first 10 cities. It has also got a neat paginator at its bottom-right corner that can be used to navigate through the various pages using arrows. Our end user can even choose how many items per page to display using a neat drop-down list (10, 20, or 50 cities per page, as specified in the [pageSizeOptions] property). It definitely seems like we did it!
However, if we think about it, we can easily acknowledge that we're not quite there yet. Sure, now our users can browse the table nicely without having to scroll up and down for ages, but it doesn't take a genius to understand that all those rows are still there on the page: we never told the server to actually support a paginated request, so we still fetch all of the cities from our data provider (and through the ASP.NET API Controller) just like before: as a matter of fact, they're just not rendered by the front-end.
This basically means that we still have the same performance impact that we had before on the server side (huge SQL query result, massive JSON) and only a partial performance improvement on the client side: even if fewer HTML elements are now added to the DOM, there are still lots of HTML rows to show/hide on each paginator action, leading to a page change.
In order to mitigate the aforementioned issues, we need to move from client-side paging to server-side paging – which is precisely what we'll do in the next section.
Server-side paging
Implementing server-side paging is a bit more complex than its client-side counterpart. Here's what we need to do:
- Change our
CitiesControllerASP.NET class to make it support paged HTTP GET requests - Create a new
ApiResult.NET class that we can use to improve the JSON response of our ASP.NET Controllers - Change our
cities.controller.tsAngular component – and the currentMatPaginatorModuleconfiguration – to make it able to issue the new GET request and deal with the new JSON response
Let's do this!
CitiesController
The GetCities method of our CitiesController returns a JSON array of all the ~13,000 cities in our database by default; that's definitely a no-go in terms of server-side performance, so we need to change it. Ideally, we would like to only return a small number of Cities, which is something we can easily pull off by adding some (required) variables in the method signature, such as pageIndex and pageSize.
Here's how we could change that to enforce such behavior (updated lines highlighted):
// ...existing code...
[HttpGet]
public async Task<ActionResult<IEnumerable<City>>> GetCities(
    int pageIndex = 0,
    int pageSize = 10)
{
    return await _context.Cities
                .Skip(pageIndex * pageSize)
                .Take(pageSize)
                .ToListAsync();
}
// ...existing code...
That's it; we also specified some reasonable default values for those variables in order to avoid huge JSON responses by default.
Let's quickly test what we just did: hit F5 and type the following URL in the browser's address bar: https://localhost:44334/api/Cities/?pageIndex=0&pageSize=10
Here's what we should get:

Figure 5.7: A snippet of the JSON array of 10 cities
It definitely seems that our plan is working!
However, there is a major issue we have to deal with: if we just return a JSON array of 10 cities, there will be no way for our Angular app to actually know how many cities are present in our database. Without that information, there is little chance that the paginator would reasonably work the way it did when we implemented the client-side pagination early on.
Long story short, we need to find a way to tell our Angular app some additional information, such as the following:
- The total number of pages (and/or records) available
- The current page
- The number of records on each page
Truth be told, the only required information is the first one as the Angular client would then be able to keep track of the other two; however, since we need to implement that one, we might as well return them all, thus making our front-end life a lot easier.
In order to do that, the best thing we can do is create a dedicated response-type class – which we're going to use a lot from now on.
ApiResult
From Solution Explorer, right-click the Data folder and add a new ApiResult.cs C# class file. Then, fill it up with the following content:
using Microsoft.EntityFrameworkCore;
using System;
using System.Collections.Generic;
using System.Linq;
using System.Threading.Tasks;
namespace WorldCities.Data
{
    public class ApiResult<T>
    {
        /// <summary>
        /// Private constructor called by the CreateAsync method.
        /// </summary>
        private ApiResult(
            List<T> data,
            int count,
            int pageIndex,
            int pageSize)
        {
            Data = data;
            PageIndex = pageIndex;
            PageSize = pageSize;
            TotalCount = count;
            TotalPages = (int)Math.Ceiling(count / (double)pageSize);
        }
        #region Methods
        /// <summary>
        /// Pages a IQueryable source.
        /// </summary>
        /// <param name="source">An IQueryable source of generic
        /// type</param>
        /// <param name="pageIndex">Zero-based current page index
        /// (0 = first page)</param>
        /// <param name="pageSize">The actual size of each
        /// page</param>
        /// <returns>
        /// A object containing the paged result
        /// and all the relevant paging navigation info.
        /// </returns>
        public static async Task<ApiResult<T>> CreateAsync(
            IQueryable<T> source,
            int pageIndex,
            int pageSize)
        {
            var count = await source.CountAsync();
            source = source
                .Skip(pageIndex * pageSize)
                .Take(pageSize);
            var data = await source.ToListAsync();
            return new ApiResult<T>(
                data,
                count,
                pageIndex,
                pageSize);
        }
        #endregion
        #region Properties
        /// <summary>
        /// The data result.
        /// </summary>
        public List<T> Data { get; private set; }
        /// <summary>
        /// Zero-based index of current page.
        /// </summary>
        public int PageIndex { get; private set; }
        /// <summary>
        /// Number of items contained in each page.
        /// </summary>
        public int PageSize { get; private set; }
        /// <summary>
        /// Total items count
        /// </summary>
        public int TotalCount { get; private set; }
        /// <summary>
        /// Total pages count
        /// </summary>
        public int TotalPages { get; private set; }
        /// <summary>
        /// TRUE if the current page has a previous page,
        /// FALSE otherwise.
        /// </summary>
        public bool HasPreviousPage
        {
            get
            {
                return (PageIndex > 0);
            }
        }
        /// <summary>
        /// TRUE if the current page has a next page, FALSE otherwise.
        /// </summary>
        public bool HasNextPage
        {
            get
            {
                return ((PageIndex +1) < TotalPages);
            }
        }
        #endregion
    }
}
This ApiResult class contains some really interesting stuff. Let's try to summarize the most relevant things:
Data: A property of theList<T>type that will be used to contain the paged data (it will be translated to a JSON array)PageIndex: Returns the zero-based index of the current page (0 for the first page, 1 for the second, and so on)PageSize: Returns the total page size (TotalCount/PageSize)TotalCount: Returns the totalItemcount numberTotalPages: Returns the total number of pages taking into account the totalItemscount (TotalCount/PageSize)HasPreviousPage: ReturnsTrueif the current page has a previous page,FalseotherwiseHasNextPage: ReturnsTrueif the current page has a next page,Falseotherwise
Those properties are precisely what we were looking for; the underlying logic to calculate their values should be quite easy to understand by looking at the preceding code.
Other than that, the class basically revolves around the static method CreateAsync<T>(IQueryable<T> source, int pageIndex, int pageSize), which can be used to paginate an Entity Framework IQueryable object.
It's worth noting that the ApiResult class cannot be instantiated from the outside since its constructor has been marked as private; the only way to create it is by using the static CreateAsync factory method. There are good reasons to do that: since it is not possible to define an async constructor, we have resorted to using a static async method that returns a class instance; the constructor has been set to private to prevent developers from directly using it instead of the factory method, since it's the only reasonable way to instantiate this class.
Here's how we can make use of our brand new ApiResult class in the GetCities method of our CitiesController:
// ...existing code...
// GET: api/Cities
// GET: api/Cities/?pageIndex=0&pageSize=10
[HttpGet]
public async Task<ActionResult<ApiResult<City>>> GetCities(
        int pageIndex = 0,
        int pageSize = 10)
{
    return await ApiResult<City>.CreateAsync(
            _context.Cities,
            pageIndex,
            pageSize
            );
}
// ...existing code...
Here we go! Now, we should have our 10 cities and all the information we were looking for.
Let's hit F5 and navigate to the same URL as before to see what's changed: https://localhost:44334/api/Cities/?pageIndex=0&pageSize=10.
Here's the updated JSON response:

Figure 5.8: The updated JSON array containing extra page information
If we scroll down to the bottom of the page, we will see that our much-needed properties are all there.
The only downside of this implementation is that the URL we need to call to get such a result is rather ugly; before moving on to Angular, it could be useful to spend some time seeing if there's a way to make it sleeker.
Theoretically speaking, we could do better than what we did by implementing a dedicated route in the CitiesController.cs file in the following way (updated lines are highlighted, but do not perform such a change on your code – just have a look):
// ...existing code...
// GET: api/Cities
// GET: api/Cities/?pageIndex=0&pageSize=10
// GET: api/Cities/0/10
[HttpGet]
[Route("{pageIndex?}/{pageSize?}")]
public async Task<ActionResult<ApiResult<City>>> GetCities(
        int pageIndex = 0,
        int pageSize = 10)
{
    return await ApiResult<City>.CreateAsync(
            _context.Cities,
            pageIndex,
            pageSize
            );
}
// ...existing code...
By implementing that route, we could call the GetCities action method with this new URL: https://localhost:44334/api/Cities/0/10
This is arguably better than the following URL: https://localhost:44334/api/Cities/?pageIndex=0&pageSize=10
However, let's not do that, at least for now; relying on a given route would mean becoming unable to add additional parameters, which could be a huge loss in terms of customization options – as we'll see in a short while.
Let's now move to our Angular's CitiesComponent and update it to use this new, optimized way of fetching our cities from the server.
CitiesComponent
The only Angular files we need to change are the following:
- The
CitiesComponentTypeScript file, which is where we put all the data-retrieval logic that we now need to update - The
CitiesComponentHTML file, to bind a specific event to ourMatPaginatorelement
Let's do this.
Open the cities.component.ts file and perform the following changes (new/updated lines are highlighted):
import { Component, Inject, OnInit, ViewChild } from '@angular/core';
import { HttpClient, HttpParams } from '@angular/common/http';
import { MatTableDataSource } from '@angular/material/table';
import { MatPaginator, PageEvent } from '@angular/material/paginator';
import { City } from './city';
@Component({
  selector: 'app-cities',
  templateUrl: './cities.component.html',
  styleUrls: ['./cities.component.css']
})
export class CitiesComponent implements OnInit {
  public displayedColumns: string[] = ['id', 'name', 'lat', 'lon'];
  public cities: MatTableDataSource<City>;
  @ViewChild(MatPaginator) paginator: MatPaginator;
  constructor(
    private http: HttpClient,
    @Inject('BASE_URL') private baseUrl: string) {
  }
  ngOnInit() {
    var pageEvent = new PageEvent();
    pageEvent.pageIndex = 0;
    pageEvent.pageSize = 10;
    this.getData(pageEvent);
  }
  getData(event: PageEvent) {
    var url = this.baseUrl + 'api/Cities';
    var params = new HttpParams()
      .set("pageIndex", event.pageIndex.toString())
      .set("pageSize", event.pageSize.toString());
    this.http.get<any>(url, { params })
      .subscribe(result => {
        this.paginator.length = result.totalCount;
        this.paginator.pageIndex = result.pageIndex;
        this.paginator.pageSize = result.pageSize;
        this.cities = new MatTableDataSource<City>(result.data);
      }, error => console.error(error));
  }
}
Let's try to summarize what we did here:
- We used the
@ViewChilddecorator to set a static view query and store its result to thepaginatorvariable; this allows us to access and manipulate theMatPaginatorinstance that we previously set up in our component's template from within the component class. - We removed the
HttpClientfrom thengOnInit()life cycle hook method and placed the whole data-retrieval login in a separategetData()method. In order to do this, we had to define a couple of internal class variables tohosttheHttpClientand thebaseUrlto persist them so that we'll be able to use them multiple times (that is, on multiplegetData()calls). - We changed the data-retrieval logic to match our new JSON response object.
- We modified our
paginatorconfiguration strategy to manually set the values we get from the server side instead of having it figuring them out automatically; doing that is required, otherwise it would just take into account (and paginate) the small portion of cities we retrieve upon each HTTP request instead of the full batch.
Among the various new stuff we've implemented with the preceding code, the @ViewChild decorator deserves a couple more words: in a nutshell, it can be used to get a reference of a DOM template element from within the Angular component, thus making it a very useful feature whenever we need to manipulate the element's properties.
As we can see from the preceding code, the @ViewChild decorator is defined using a selector parameter, which is required to access the DOM element: this selector can be a class name (if the class has either the @Component or @Directive decorator), a template reference variable, a provider defined in the child component tree, and so on. In our specific scenario, we've used the MatPaginator class name, since it does have the @Component decorator.
While we're at it, it can be useful to know that the @ViewChild decorator also accepts a second parameter, which was required until Angular 8 and became optional since Angular 9: a static flag, which can be either true or false (from Angular 9, it defaults to false). If this flag is explicitly set to true, the @ViewChild is retrieved from the template before the Change Detection phase runs (that is, even before the ngOnInit() life cycle); conversely, the component/element retrieval task is resolved either after the Change Detection phase if the element is inside a nested view (for example, a view with a *ngIf conditional display directive), or before Change Detection if it isn't.
Since we've used the [hidden] attribute binding in the template instead of the *ngIf directive, our MatPaginator won't run into initialization issues, even without having to set that flag to true.
For additional information about the @ViewChild decorator, we suggest you take a look at the Angular docs: https://angular.io/api/core/ViewChild
As for the cities.component.html file, we just need to add a single line to the <mat-paginator> directive to bind the getData() event upon each paging event. Here's how to do that (the new line is highlighted):
// ...existing code
<!-- Pagination directive -->
<mat-paginator [hidden]="!cities"
    (page)="getData($event)"
    [pageSize]="10"
    [pageSizeOptions]="[10, 20, 50]"
    showFirstLastButtons></mat-paginator>
This simple binding plays a very important role: it ensures that the getData() event is called every time the user interacts with the paginator element to perform a page change, asking for the previous/next page, first/last page, changing the number of items to display, and so on. As we can easily understand, such a call is required for server-side pagination since we need to fetch the updated data from the server every time we have to display different rows.
Once done, let's try the new magic by hitting F5 and then navigating to the Cities view. If we did everything properly, we should get the same UI that we could see before:

Figure 5.9: The same paginated Cities table with better performance
However, this time, we should experience better overall performance and faster response times. That's because we're not dealing with thousands of JSON items and HTML table rows under the hood; we're fetching only a few of them at a time (that is, those we get to see) using our improved server-side logic.
Since we're done with paging, we can finally deal with sorting.
Adding sorting with MatSortModule
In order to implement sorting, we're going to use MatSortModule, which can be implemented just like the paginator module.
This time, we won't make client-side sorting experiments as we did with paging early on; we're going for the server-side pattern right from the start.
In general terms, whenever we deal with paging and sorting, we should always take the server-side implementation into account, since it will likely improve the overall performance of our apps while often preventing the need to handle that kind of stuff using additional client-side code.
Extending ApiResult
Let's start with the ASP.NET back-end part.
Do you remember the ApiResult class we created earlier? It's time to improve its source code to add sorting support.
From Solution Explorer, open the /Data/ApiResult.cs file and update its content accordingly (new/updated lines are highlighted):
using Microsoft.EntityFrameworkCore;
using System;
using System.Collections.Generic;
using System.Linq;
using System.Threading.Tasks;
using System.Linq.Dynamic.Core;
using System.Reflection;
namespace WorldCities.Data
{
    public class ApiResult<T>
    {
        /// <summary>
        /// Private constructor called by the CreateAsync method.
        /// </summary>
        private ApiResult(
            List<T> data,
            int count,
            int pageIndex,
            int pageSize,
            string sortColumn,
            string sortOrder)
        {
            Data = data;
            PageIndex = pageIndex;
            PageSize = pageSize;
            TotalCount = count;
            TotalPages = (int)Math.Ceiling(count / (double)pageSize);
            SortColumn = sortColumn;
            SortOrder = sortOrder;
        }
        #region Methods
        /// <summary>
        /// Pages and/or sorts a IQueryable source.
        /// </summary>
        /// <param name="source">An IQueryable source of generic
        /// type</param>
        /// <param name="pageIndex">Zero-based current page index
        /// (0 = first page)</param>
        /// <param name="pageSize">The actual size of each
        /// page</param>
        /// <param name="sortColumn">The sorting column name</param>
        /// <param name="sortOrder">The sorting order ("ASC" or
        /// "DESC")</param>
        /// <returns>
        /// A object containing the IQueryable paged/sorted result
        /// and all the relevant paging/sorting navigation info.
        /// </returns>
        public static async Task<ApiResult<T>> CreateAsync(
            IQueryable<T> source,
            int pageIndex,
            int pageSize,
            string sortColumn = null,
            string sortOrder = null)
        {
            var count = await source.CountAsync();
            if (!string.IsNullOrEmpty(sortColumn)
                && IsValidProperty(sortColumn))
            {
                sortOrder = !string.IsNullOrEmpty(sortOrder)
                    && sortOrder.ToUpper() == "ASC"
                    ? "ASC"
                    : "DESC";
                source = source.OrderBy(
                    string.Format(
                        "{0} {1}",
                        sortColumn,
                        sortOrder)
                    );
            }
            source = source
                .Skip(pageIndex * pageSize)
                .Take(pageSize);

            var data = await source.ToListAsync();

            return new ApiResult<T>(
                data,
                count,
                pageIndex,
                pageSize,
                sortColumn,
                sortOrder);
        }
        #endregion
        #region Methods
        /// <summary>
        /// Checks if the given property name exists
        /// to protect against SQL injection attacks
        /// </summary>
        public static bool IsValidProperty(
            string propertyName,
            bool throwExceptionIfNotFound = true)
        {
            var prop = typeof(T).GetProperty(
                propertyName,
                BindingFlags.IgnoreCase |
                BindingFlags.Public |
                BindingFlags.Instance);
            if (prop == null && throwExceptionIfNotFound)
                throw new NotSupportedException(
                    string.Format(
                        "ERROR: Property '{0}' does not exist.",
                        propertyName)
                    );
            return prop != null;
        }
        #endregion
        #region Properties
        /// <summary>
        /// The data result.
        /// </summary>
        public List<T> Data { get; private set; }
        /// <summary>
        /// Zero-based index of current page.
        /// </summary>
        public int PageIndex { get; private set; }
        /// <summary>
        /// Number of items contained in each page.
        /// </summary>
        public int PageSize { get; private set; }
        /// <summary>
        /// Total items count
        /// </summary>
        public int TotalCount { get; private set; }
        /// <summary>
        /// Total pages count
        /// </summary>
        public int TotalPages { get; private set; }
        /// <summary>
        /// TRUE if the current page has a previous page,
        /// FALSE otherwise.
        /// </summary>
        public bool HasPreviousPage
        {
            get
            {
                return (PageIndex > 0);
            }
        }
        /// <summary>
        /// TRUE if the current page has a next page, FALSE otherwise.
        /// </summary>
        public bool HasNextPage
        {
            get
            {
                return ((PageIndex +1) < TotalPages);
            }
        }
        /// <summary>
        /// Sorting Column name (or null if none set)
        /// </summary>
        public string SortColumn { get; set; }
        /// <summary>
        /// Sorting Order ("ASC", "DESC" or null if none set)
        /// </summary>
        public string SortOrder { get; set; }
        #endregion
    }
}
What we did was add two new sortColumn and sortOrder attributes to the main class static method and implement them through the code; while we were there, we also took the chance to define two new properties with the same name (in uppercase) so that the sorting details will be part of the JSON response, just like the paging ones.
It's worth noting that since we're now assembling our Language-Integrated Query (LINQ)-to-SQL queries with literal data coming from the client, we also added a new IsValidProperty() method that will check that the sortColumn specified does actually exist as a typed property of the generic <T> entity we're dealing with; as the method comment clearly says, that's actually a security countermeasure against SQL injection attempts. This is a very important security issue that we'll be talking about in a short while.
In the unlikely case that you've never heard of LINQ, don't worry: we'll get there soon.
If we try to build our project right after these changes, we'll most likely be greeted by some compiler errors, such as the following one:
Error CS0246: The type or namespace name System.Linq.Dynamic could not be found (are you missing a using directive or an assembly reference?).
Don't worry, it's perfectly normal: we just need to add a new NuGet package to our project.
Installing System.Linq.Dynamic.Core
The IQueryable<T>.OrderBy() extension method that we used in the improved ApiResult source code to programmatically apply the column sorting is part of the System.Linq.Dynamic.Core namespace; thanks to this library, it's possible to write Dynamic LINQ queries (string-based) on an IQueryable, which is just like what we did in the preceding code.
Unfortunately, System.Linq.Dynamic.Core is not part of the ASP.NET stock binaries; therefore, in order to use these features, we need to add it via NuGet.
The fastest way to do that is to open Visual Studio's Package Manager Console and issue the following command:
> Install-Package System.Linq.Dynamic.Core
IMPORTANT: Be sure to install System.Linq.Dynamic.Core and not System.Linq.Dynamic, which is its .NET Framework 4.0 counterpart; the latter won't work with our ASP.NET web application project.
At the time of writing, the most recent version of the System.Linq.Dynamic.Core package is 1.2.6, which works absolutely fine for our purposes.
For those who want to retrieve additional information regarding this great package, we suggest you take a look at the following resources:
NuGet website: https://www.nuget.org/packages/System.Linq.Dynamic.Core/
GitHub project: https://github.com/StefH/System.Linq.Dynamic.Core
What is LINQ?
Before moving forward, let's spend a couple of minutes talking about LINQ in the unlikely case you have never heard anything about it.
Also known as Language-Integrated Query, LINQ is the code name of a Microsoft .NET Framework set of technologies that adds data query capabilities to .NET languages such as C# and VB.NET. LINQ was first released in 2007 and was one of the major new features of .NET Framework 3.5.
The main purpose of LINQ is to make the developer able to express structured queries against data using a first-class language construct, without having to learn different query languages for each type of data source (collection types, SQL, XML, CSV, and so on). For each of these major data source types, there's a LINQ implementation that provides the same query experience for objects (LINQ to Objects), Entity Framework entities (LINQ to Entities), relational databases (LINQ to SQL), XML (LINQ to XML), and so on.
LINQ structured queries can be expressed using two alternative – yet also complementary – approaches:
- Lambda expressions, such as the following:
var city = _context.Cities.Where(c => c.Name == "New York").First(); - Query expressions, such as the following:
var city = (from c in _context.Cities where c.Name == "New York" select c).First();
Both yield the same result with the same performance, since query expressions are translated into their lambda expression equivalents before they're compiled.
For additional information about LINQ, lambda expressions, and query expressions, check out the following links:
LINQ: https://docs.microsoft.com/en-us/dotnet/csharp/linq/
LINQ lambda expressions (C# Programming Guide): https://docs.microsoft.com/en-us/dotnet/csharp/programming-guide/statements-expressions-operators/lambda-expressions
LINQ query expression basics: https://docs.microsoft.com/en-us/dotnet/csharp/linq/query-expression-basics
Linq.Dynamic.Core pros and cons
Now, since LINQ has been built in with .NET Framework since v3.5 and it's shipped with each subsequent ASP.NET version ever since, what does the System.Linq.Dynamic.Core package actually do and why are we using it?
As we can see from the two preceding examples, both lambda expressions and query expressions work with a strongly typed approach: whenever we query an object of any type using LINQ, the source type – together with all the properties we want our query to check for – must be known by the compiler. This means that we would be unable to use these techniques with generic objects (object) or types (<T>). That's where Linq.Dynamic comes to the rescue, allowing the developer to write lambda expressions and query expressions with literal strings and translate them into their strongly typed equivalents using reflection.
Here's the same query as before written using System.Linq.Dynamic.Core:
var city = _context.Cities.Where("Name = @1", "New York").First();
We can immediately see the difference – and also the tremendous advantage we can get by using such an approach: we will be able to build our queries dynamically, regardless of whether we're dealing with strongly typed objects or generic types, just like we did within the source code of ApiResult a short while ago.
However, such an approach will also have a major downside: our code will be less testable and way too error-prone, for at least two important reasons:
- We'll be just a literal string away from query errors that will almost always lead to major crashes
- The risk of unwanted queries (including SQL injection attacks) could increase exponentially, depending on how we build those queries and/or where we get our dynamic strings from
Those who don't know what SQL injections are and/or why they are dangerous should definitely take a look at the following guide, written by Tim Sammut and Mike Schiffman from the Cisco Security Intelligence team:
Understanding SQL Injections: https://tools.cisco.com/security/center/resources/sql_injection
The former issue is bad, but the latter is even worse: being open to SQL injection attacks could be devastating and therefore is something we should avoid at any cost – including getting rid of the System.Linq.Dynamic.Core package.
Preventing SQL injections
Luckily enough, we don't need to do that; although we're getting two potentially harmful variable strings coming from the client – sortColumn and sortOrder – we have already put in place effective countermeasures for both of them in the preceding source code of ApiResult.
Here's what we did for sortOrder:
//... existing code...
sortOrder = !string.IsNullOrEmpty(sortOrder)
    && sortOrder.ToUpper() == "ASC"
    ? "ASC"
    : "DESC";
//... existing code...
As we can see, we'll convert it into either "ASC" or "DESC" before using it anywhere, thus leaving no openings to SQL injections.
The sortColumn parameter is way more complex to handle because it can theoretically contain any possible column name mapped to any of our entities: id, name, lat, lon, iso2, iso3... if we were to check them all, we would need a very long conditional block! Not to mention the fact that it would also be very hard to maintain whenever we added new entities and/or properties to our project.
For that very reason, we chose a completely different – and arguably better – approach, which relies upon the following IsValidProperty method:
// ...existing code...
public static bool IsValidProperty(
    string propertyName,
    bool throwExceptionIfNotFound = true)
{
    var prop = typeof(T).GetProperty(
        propertyName,
        BindingFlags.IgnoreCase |
        BindingFlags.Public |
        BindingFlags.Instance);
    if (prop == null && throwExceptionIfNotFound)
        throw new NotSupportedException(
            string.Format(
                "ERROR: Property '{0}' does not exist.",
                propertyName)
            );
    return prop != null;
}
// ...existing code...
As we can see, this method checks that the given propertyName corresponds to an existing typed Property within our <T> generic entity class: if it does, it returns True; otherwise, it throws a NotSupportedException (or returns False, depending on how we call it). This is a great way to shield our code against SQL injection because there's absolutely no way that a harmful string would match one of our entity's properties.
The property name check has been implemented through System.Reflection, a technique that's used to inspect and/or retrieve metadata on types at runtime. To work with reflection, we need to include the System.Reflection namespace in our class – which is precisely what we did at the beginning of the source code of our improved ApiResult.
For additional information about System.Reflection, check out the following guide: https://docs.microsoft.com/en-us/dotnet/csharp/programming-guide/concepts/reflection
As we can see by looking back at the ApiResult source code, such a method is being called in the following way:
if (!string.IsNullOrEmpty(sortColumn)
    && IsValidProperty(sortColumn))
{
    /// if we are here, sortColumn is safe to use
}
Those curly brackets define our SQL injection safety zone: as long as we deal with sortColumn within them, we have nothing to worry about.
Truth be told, even after implementing this defensive approach, there's still a minor threat we could be exposed to: if we have some reserved columns/properties that we don't want the client to interact with (system columns, for example), the preceding countermeasure won't block it from doing that; although being unable to acknowledge their existence or to read their data, an experienced user could still be able to "order" the table results by them – provided that the user knows their precise name somehow.
If we want to prevent this remote – yet theoretically possible – leak, we can set these properties to private (since we told our IsValidProperty method to only check for public properties) and/or rethink the whole method logic so that it better suits our security needs.
Updating CitiesController
Now that we have improved our ApiResult class, we can implement it within our CitiesController.
Open the /Controllers/CitiesController.cs file and change its contents accordingly (updated lines are highlighted):
// ..existing code...
// GET: api/Cities
// GET: api/Cities/?pageIndex=0&pageSize=10
// GET: api/Cities/?pageIndex=0&pageSize=10&sortColumn=name&
//  sortOrder=asc
[HttpGet]
public async Task<ActionResult<ApiResult<City>>> GetCities(
        int pageIndex = 0,
        int pageSize = 10,
        string sortColumn = null,
        string sortOrder = null)
{
    return await ApiResult<City>.CreateAsync(
            _context.Cities,
            pageIndex,
            pageSize,
            sortColumn,
            sortOrder);
}
// ..existing code...
Thanks to these two new parameters, our GetCities method will be able to sort the cities the way we want.
We're done with the back-end part; let's move on to the front-end.
Updating the Angular app
As always, we need to change three files:
- The
angular-material.module.tsfile, where we need to add the new@angular/materialmodule - The
cities.component.tsfile, to implement the sorting business logic - The
cities.component.htmlfile, to bind the new variables, methods, and references defined in the.tsfile within the UI template
angular-material.module.ts
Open the /ClientApp/src/app/angular-material.module.ts file and change it in the following way (updated lines are highlighted):
import { NgModule } from '@angular/core';
import { MatTableModule } from '@angular/material/table';
import { MatPaginatorModule } from '@angular/material/paginator';
import { MatSortModule } from '@angular/material/sort';
@NgModule({
  imports: [
    MatTableModule,
    MatPaginatorModule,
    MatSortModule
  ],
  exports: [
    MatTableModule,
    MatPaginatorModule,
    MatSortModule
  ]
})
export class AngularMaterialModule { }
From now on, we'll be able to import the MatSortModule-related classes in any Angular component.
cities.component.ts
Once done, open the cities.component.ts file and make the following modifications (updated lines are highlighted):
import { Component, Inject, OnInit, ViewChild } from '@angular/core';
import { HttpClient, HttpParams } from '@angular/common/http';
import { MatTableDataSource } from '@angular/material/table';
import { MatPaginator, PageEvent } from '@angular/material/paginator';
import { MatSort } from '@angular/material/sort';
import { City } from './city';
@Component({
  selector: 'app-cities',
  templateUrl: './cities.component.html',
  styleUrls: ['./cities.component.css']
})
export class CitiesComponent implements OnInit {
  public displayedColumns: string[] = ['id', 'name', 'lat', 'lon'];
  public cities: MatTableDataSource<City>;
  defaultPageIndex: number = 0;
  defaultPageSize: number = 10;
  public defaultSortColumn: string = "name";
  public defaultSortOrder: string = "asc";
  @ViewChild(MatPaginator) paginator: MatPaginator;
  @ViewChild(MatSort) sort: MatSort;
  constructor(
    private http: HttpClient,
    @Inject('BASE_URL') private baseUrl: string) {
  }
  ngOnInit() {
    this.loadData();
  }
  loadData() {
    var pageEvent = new PageEvent();
    pageEvent.pageIndex = this.defaultPageIndex;
    pageEvent.pageSize = this.defaultPageSize;
    this.getData(pageEvent);
  }
  getData(event: PageEvent) {
    var url = this.baseUrl + 'api/Cities';
    var params = new HttpParams()
      .set("pageIndex", event.pageIndex.toString())
      .set("pageSize", event.pageSize.toString())
      .set("sortColumn", (this.sort)
        ? this.sort.active
        : this.defaultSortColumn)
      .set("sortOrder", (this.sort)
        ? this.sort.direction
        : this.defaultSortOrder);
      this.http.get<any>(url, { params })
        .subscribe(result => {
          console.log(result);
          this.paginator.length = result.totalCount;
          this.paginator.pageIndex = result.pageIndex;
          this.paginator.pageSize = result.pageSize;
          this.cities = new MatTableDataSource<City>(result.data);
        }, error => console.error(error));
    }
}
Here's a breakdown of the most relevant changes:
- We imported the
MatSortreference from the@angular/materialpackage. - We added four new class variables to set the paging and sorting default values:
defaultPageIndex,defaultPageSize,defaultSortColumn, anddefaultSortOrder. Two of them have been defined aspublicbecause we need to use them from the HTML template via two-way data binding. - We moved the initial
getData()call from the class constructor to a new centralizedloadData()function so that we can bind it to the table (as we'll see in a short while). - We added the
sortColumnandsortOrderHTTP GET parameters to ourHttpParamsobject so that we can send the sorting information to the server side.
cities.component.html
Right after that, open the cities.component.html file and make the following modifications (updated lines are highlighted):
// ...existing code
<table mat-table [dataSource]="cities"
  class="table-striped mat-elevation-z8"
  [hidden]="!cities"
  matSort (matSortChange)="loadData()"
  matSortActive="{{defaultSortColumn}}"
  matSortDirection="{{defaultSortOrder}}">
  <!-- Id Column -->
  <ng-container matColumnDef="id">
    <th mat-header-cell *matHeaderCellDef mat-sort-header>ID</th>
    <td mat-cell *matCellDef="let city"> {{city.id}} </td>
  </ng-container>
  <!-- Name Column -->
  <ng-container matColumnDef="name">
    <th mat-header-cell *matHeaderCellDef mat-sort-header>Name</th>
    <td mat-cell *matCellDef="let city"> {{city.name}} </td>
  </ng-container>
  <!-- Lat Column -->
  <ng-container matColumnDef="lat">
    <th mat-header-cell *matHeaderCellDef mat-sort-header>Latitude
    </th>
    <td mat-cell *matCellDef="let city"> {{city.lat}} </td>
  </ng-container>
  <!-- Lon Column -->
  <ng-container matColumnDef="lon">
    <th mat-header-cell *matHeaderCellDef mat-sort-header>Longitude
    </th>
    <td mat-cell *matCellDef="let city"> {{city.lon}} </td>
  </ng-container>
  <tr mat-header-row *matHeaderRowDef="displayedColumns"></tr>
  <tr mat-row *matRowDef="let row; columns: displayedColumns;"></tr>
</table>
// ...existing code...
Here's what we did in a nutshell:
- We added the following attributes to the
<table mat-table>element:matSort: A reference to thematSortlocal variable we added to thecities.component.tsfile early on(matSortChange): An event binding that will execute thesortData()method (also defined in the.tsfile earlier) upon each sorting attempt by the usermatSortActiveandmatSortDirection: Two data bindings to thedefaultSortColumnanddefaultSortOrdervariables that we defined in the.tsfile early on
- We added the
mat-sort-headerattribute to each<th mat-header-cell>element (one for each table column).
Now we can see why we didn't use the sleek URL we defined early on in our ASP.NET CitiesController and opted for the standard GET parameters instead: this approach allows us to programmatically add an indefinite number of HTTP GET parameters to our request thanks to the HttpParams class from the @angular/common/http package.
Let's quickly test it out by hitting F5 and navigating to the Cities view. Here's what we should be able to see:
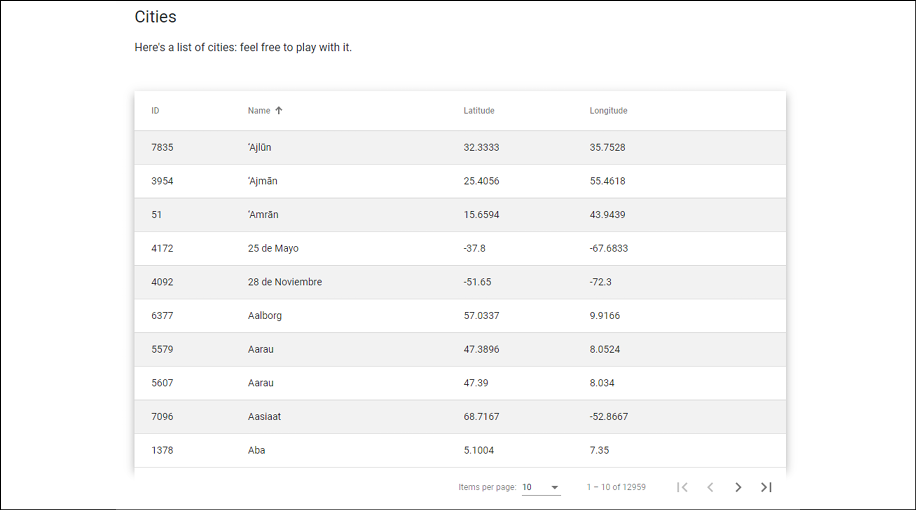
Figure 5.10: Cities table with pagination and sorting
The cities are now sorted alphabetically in ascending order. If we click on the various column headers, we can change their order as we please: the first click will sort the content in ascending order, while the second will do the opposite.
It's worth noting how the paging and sorting features are able to coexist without issues; needless to say, whenever we try to change the table sorting, the paging will just roll back to the first page.
Now that the sorting has been implemented, there's only one missing feature left: filtering.
Adding filtering
If we think that we'll be able to get away with another component, this time, we're going to be disappointed: Angular Material does not provide a specific module to be used for filtering purposes. This means that we cannot rely on a standard approach to add filtering to our table; we have to figure out a reasonable approach by ourselves.
In general terms, the best thing to do whenever we need to code a feature by ourselves is start to visualize what we want it to look like: for example, we can imagine a Search input field lying on top of our table that would trigger our CitiesComponent to reload the cities data from the server – through its getData() method – whenever we type something in it. How does that sound?
Let's try to lay down an action plan:
- As always, we'll need to extend our
ApiResultclass to programmatically handle the filtering task on the server side. - We'll also need to change the signature of the
GetCities()action method of our .NETCitiesControllerso we can get the additional information from the client. - Right after that, we'll have to implement the filtering logic within our Angular
CitiesComponent. - Eventually, we'll need to add the input textbox in the
CitiesComponentHTML template file and bind an event to it to trigger the data retrieval process upon typing something. - Before moving further, we'll take the chance to talk about the performance impact of our filtering feature and how we can address it.
Now that we have made it, let's do our best to put this plan into action.
Extending ApiResult (again)
It seems like we need to perform another upgrade to our beloved ApiResult class to add filtering support to the already existing paging and sorting logic.
Truth be told, we're not forced to do everything within the ApiResult class: we could skip that part entirely and just add the following to our existing CitiesController:
// ...existing code...
[HttpGet]
public async Task<ActionResult<ApiResult<City>>> GetCities(
        int pageIndex = 0,
        int pageSize = 10,
        string sortColumn = null,
        string sortOrder = null,
        string filterColumn = null,
        string filterQuery = null)
{
    // first we perform the filtering...
    var cities = _context.Cities;
    if (!string.IsNullOrEmpty(filterColumn)
        && !string.IsNullOrEmpty(filterQuery))
    {
        cities= cities.Where(c => c.Name.Contains(filterQuery));
    }
    // ... and then we call the ApiResult
    return await ApiResult<City>.CreateAsync(
            cities,
            pageIndex,
            pageSize,
            sortColumn,
            sortOrder);
}
// ...existing code...
That's definitely a viable approach. As a matter of fact, if we weren't using the System.Linq.Dynamic.Core package library, this would most likely be the only possible approach; we would have no way to programmatically set a column filter using an external class that works with generic IQueryable<T> objects, because such a class would be unaware of the entity type and property names.
Luckily enough, we do have that package, so we can avoid performing the preceding changes (or roll them back, if we have already done that) and modify our /Data/ApiResult.cs class file in the following way instead:
using Microsoft.EntityFrameworkCore;
using System;
using System.Collections.Generic;
using System.Linq;
using System.Threading.Tasks;
using System.Linq.Dynamic.Core;
using System.Reflection;
namespace WorldCities.Data
{
    public class ApiResult<T>
    {
        /// <summary>
        /// Private constructor called by the CreateAsync method.
        /// </summary>
        private ApiResult(
            List<T> data,
            int count,
            int pageIndex,
            int pageSize,
            string sortColumn,
            string sortOrder,
            string filterColumn,
            string filterQuery)
        {
            Data = data;
            PageIndex = pageIndex;
            PageSize = pageSize;
            TotalCount = count;
            TotalPages = (int)Math.Ceiling(count / (double)pageSize);
            SortColumn = sortColumn;
            SortOrder = sortOrder;
            FilterColumn = filterColumn;
            FilterQuery = filterQuery;
        }
        #region Methods
        /// <summary>
        /// Pages, sorts and/or filters a IQueryable source.
        /// </summary>
        /// <param name="source">An IQueryable source of generic
        /// type</param>
        /// <param name="pageIndex">Zero-based current page index
        /// (0 = first page)</param>
        /// <param name="pageSize">The actual size of
        /// each page</param>
        /// <param name="sortColumn">The sorting column name</param>
        /// <param name="sortOrder">The sorting order ("ASC" or
        /// "DESC")</param>
        /// <param name="filterColumn">The filtering column
        ///  name</param>
        /// <param name="filterQuery">The filtering query (value to
        /// lookup)</param>
        /// <returns>
        /// A object containing the IQueryable paged/sorted/filtered
        /// result
        /// and all the relevant paging/sorting/filtering navigation
        /// info.
        /// </returns>
        public static async Task<ApiResult<T>> CreateAsync(
            IQueryable<T> source,
            int pageIndex,
            int pageSize,
            string sortColumn = null,
            string sortOrder = null,
            string filterColumn = null,
            string filterQuery = null)
        {
            if (!string.IsNullOrEmpty(filterColumn)
                && !string.IsNullOrEmpty(filterQuery)
                && IsValidProperty(filterColumn))
            {
                source = source.Where(
                    string.Format("{0}.Contains(@0)",
                    filterColumn),
                    filterQuery);
            }
            var count = await source.CountAsync();
            if (!string.IsNullOrEmpty(sortColumn)
                && IsValidProperty(sortColumn))
            {
                sortOrder = !string.IsNullOrEmpty(sortOrder)
                    && sortOrder.ToUpper() == "ASC"
                    ? "ASC"
                    : "DESC";
                source = source.OrderBy(
                    string.Format(
                        "{0} {1}",
                        sortColumn,
                        sortOrder)
                    );
            }
            source = source
                .Skip(pageIndex * pageSize)
                .Take(pageSize);
            var data = await source.ToListAsync();

            return new ApiResult<T>(
                data,
                count,
                pageIndex,
                pageSize,
                sortColumn,
                sortOrder,
                filterColumn,
                filterQuery);
        }

        /// <summary>
        /// Checks if the given property name exists
        /// to protect against SQL injection attacks
        /// </summary>
        public static bool IsValidProperty(
            string propertyName,
            bool throwExceptionIfNotFound = true)
        {
            var prop = typeof(T).GetProperty(
                propertyName,
                BindingFlags.IgnoreCase |
                BindingFlags.Public |
                BindingFlags.Static |
                BindingFlags.Instance);
            if (prop == null && throwExceptionIfNotFound)
                throw new NotSupportedException(
                    string.Format(
                        "ERROR: Property '{0}' does not exist.",
                        propertyName)
                    );
            return prop != null;
        }
        #endregion
        #region Properties
        /// <summary>
        /// IQueryable data result to return.
        /// </summary>
        public List<T> Data { get; private set; }
        /// <summary>
        /// Zero-based index of current page.
        /// </summary>
        public int PageIndex { get; private set; }
        /// <summary>
        /// Number of items contained in each page.
        /// </summary>
        public int PageSize { get; private set; }
        /// <summary>
        /// Total items count
        /// </summary>
        public int TotalCount { get; private set; }
        /// <summary>
        /// Total pages count
        /// </summary>
        public int TotalPages { get; private set; }
        /// <summary>
        /// TRUE if the current page has a previous page,
        /// FALSE otherwise.
        /// </summary>
        public bool HasPreviousPage
        {
            get
            {
                return (PageIndex > 0);
            }
        }
        /// <summary>
        /// TRUE if the current page has a next page, FALSE otherwise.
        /// </summary>
        public bool HasNextPage
        {
            get
            {
                return ((PageIndex +1) < TotalPages);
            }
        }
        /// <summary>
        /// Sorting Column name (or null if none set)
        /// </summary>
        public string SortColumn { get; set; }
        /// <summary>
        /// Sorting Order ("ASC", "DESC" or null if none set)
        /// </summary>
        public string SortOrder { get; set; }
        /// <summary>
        /// Filter Column name (or null if none set)
        /// </summary>
        public string FilterColumn { get; set; }
        /// <summary>
        /// Filter Query string
        /// (to be used within the given FilterColumn)
        /// </summary>
        public string FilterQuery { get; set; }
        #endregion
    }
}
And that's it. As we can see, we were able to programmatically implement the IQueryable<T>.Where() method – which actually performs the filtering task – thanks to another useful extension method provided by the System.Linq.Dynamic.Core package.
Needless to say, we took the chance to use our IsValidProperty method again to shield our code against possible SQL injection attempts: the filtering-related logic (and dynamic LINQ query) will only be executed if it returns True, that is, if the filterColumn parameter value matches with an existing entity's public property.
While we were there, we also added two additional properties (FilterColumn and FilterQuery), so that we'll have them on the JSON response object, and modified the constructor method signature accordingly.
CitiesController
Now, we can open our /Controllers/CitiesController.cs file and make the following changes:
[HttpGet]
public async Task<ActionResult<ApiResult<City>>> GetCities(
        int pageIndex = 0,
        int pageSize = 10,
        string sortColumn = null,
        string sortOrder = null,
        string filterColumn = null,
        string filterQuery = null)
{
    return await ApiResult<City>.CreateAsync(
            _context.Cities,
            pageIndex,
            pageSize,
            sortColumn,
            sortOrder,
            filterColumn,
            filterQuery);
}
The preceding code is very similar to the alternative implementation that we assumed in the previous section; as we mentioned earlier, both approaches are viable, depending on our tastes. However, since we're going to use this same implementation for the countries in a short while, making good use of System.Linq.Dynamic.Core and centralizing all the IQueryable logic is arguably a better approach since it keeps our source code as DRY as possible.
Don't Repeat Yourself (DRY) is a widely achieved principle of software development. Whenever we violate it, we fall into a WET approach, which could mean Write Everything Twice, We Enjoy Typing, or Waste Everyone's Time, depending on what we like the most.
The .NET part is done; let's move on to Angular.
CitiesComponent
Open the /ClientApp/src/app/cities/cities.component.ts file and update its content in the following way (modified lines are highlighted):
import { Component, Inject, OnInit, ViewChild } from '@angular/core';
import { HttpClient, HttpParams } from '@angular/common/http';
import { MatTableDataSource } from '@angular/material/table';
import { MatPaginator, PageEvent } from '@angular/material/paginator';
import { MatSort } from '@angular/material/sort';
import { City } from './city';
@Component({
  selector: 'app-cities',
  templateUrl: './cities.component.html',
  styleUrls: ['./cities.component.css']
})
export class CitiesComponent implements OnInit {
  public displayedColumns: string[] = ['id', 'name', 'lat', 'lon'];
  public cities: MatTableDataSource<City>;
  defaultPageIndex: number = 0;
  defaultPageSize: number = 10;
  public defaultSortColumn: string = "name";
  public defaultSortOrder: string = "asc";
  defaultFilterColumn: string = "name";
  filterQuery:string = null;
  @ViewChild(MatPaginator) paginator: MatPaginator;
  @ViewChild(MatSort) sort: MatSort;
  constructor(
      private http: HttpClient,
      @Inject('BASE_URL') private baseUrl: string) {
  }
  ngOnInit() {
      this.loadData(null);
  }
  loadData(query: string = null) {
    var pageEvent = new PageEvent();
    pageEvent.pageIndex = this.defaultPageIndex;
    pageEvent.pageSize = this.defaultPageSize;
    if (query) {
        this.filterQuery = query;
    }
    this.getData(pageEvent);
  }
  getData(event: PageEvent) {
    var url = this.baseUrl + 'api/Cities';
    var params = new HttpParams()
      .set("pageIndex", event.pageIndex.toString())
      .set("pageSize", event.pageSize.toString())
      .set("sortColumn", (this.sort)
        ? this.sort.active
        : this.defaultSortColumn)
      .set("sortOrder", (this.sort)
        ? this.sort.direction
        : this.defaultSortOrder);
    if (this.filterQuery) {
        params = params
            .set("filterColumn", this.defaultFilterColumn)
            .set("filterQuery", this.filterQuery);
    }
    this.http.get<any>(url, { params })
      .subscribe(result => {
        this.paginator.length = result.totalCount;
        this.paginator.pageIndex = result.pageIndex;
        this.paginator.pageSize = result.pageSize;
        this.cities = new MatTableDataSource<City>(result.data);
    }, error => console.error(error));
 }
}
This time, the new code only consists of a few additional lines; we've just changed the signature of the loadData() method (with a null default value, so that we won't break anything) and conditionally added a couple of parameters to our HTTP request – that's it.
CitiesComponent template (HTML) file
Let's see what we need to add in the /ClientApp/src/app/cities/cities.component.html template file:
<h1>Cities</h1>
<p>Here's a list of cities: feel free to play with it.</p>
<p *ngIf="!cities"><em>Loading...</em></p>
<mat-form-field [hidden]="!cities">
    <input matInput (keyup)="loadData($event.target.value)"
        placeholder="Filter by name (or part of it)...">
</mat-form-field>
<table mat-table [dataSource]="cities"
  class="table-striped mat-elevation-z8"
  [hidden]="!cities"
  matSort (matSortChange)="loadData()"
  matSortActive="{{defaultSortColumn}}"
  matSortDirection="{{defaultSortOrder}}">
// ...existing code...
As we can see, we just added a <mat-form-field> element with the usual [hidden] attribute binding (to make it appear only after our cities have been loaded) and a (keyup) event binding that will trigger the loadData() method upon each keypress; this call will also contain the input value, which will be handled by our component class by the means we just implemented there.
CitiesComponent style (CSS) file
Before testing it out, we need to make a minor change to the /ClientApp/src/app/cities/cities.component.css file as well:
table {
  width: 100%;
}
.mat-form-field {
  font-size: 14px;
  width: 100%;
}
This is required to make our new MatInputModule span through the entire available space (it's limited to 180px by default).
AngularMaterialModule
Wait a minute: did we just say MatInputModule? That's correct: as a matter of fact, it seems like we have actually used an Angular Material module in our filtering implementation after all – and for good reason, since it looks much better than a vanilla HTML input textbox!
However, since we did that, we need to reference it within our AngularMaterialModule container or we'll get a compiler error. To do that, open the /ClientApp/src/app/angular-material.module.ts file and add the following lines:
import { NgModule } from '@angular/core';
import { MatTableModule } from '@angular/material/table';
import { MatPaginatorModule } from '@angular/material/paginator';
import { MatSortModule } from '@angular/material/sort';
import { MatInputModule } from '@angular/material/input';
@NgModule({
  imports: [
    MatTableModule,
    MatPaginatorModule,
    MatSortModule,
    MatInputModule
  ],
  exports: [
    MatTableModule,
    MatPaginatorModule,
    MatSortModule,
    MatInputModule
  ]
})
export class AngularMaterialModule { }
That's it: now, we can hit F5 and navigate to the Cities view to test the new filtering feature. If we did everything properly, we should be able to see something similar to the following screenshot:
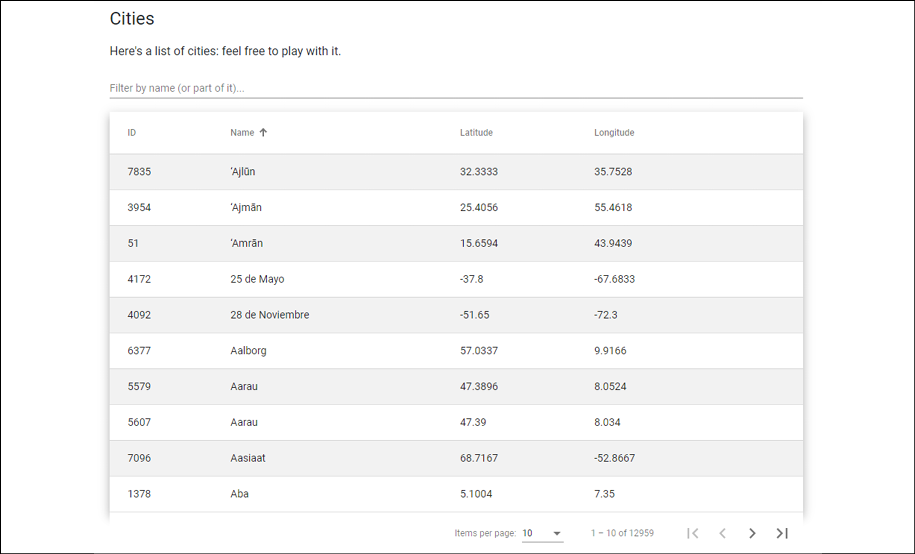
Figure 5.11: Cities table with pagination, sorting, and filtering
Looks pretty good, right?
If we try to type something into the filter textbox, we should see the table and the paginator update accordingly in real time. Look at what happens if we type New York in the filter textbox:

Figure 5.12: Cities table filtered for "New York"
That's definitely a good real-time filtering feature.
Performance considerations
Before moving further, it would be wise to spend a few minutes talking about the performance impact of the filter we've just implemented.
As we can see, the call to the loadData method is directly bound to the HTML input's keyup event, meaning that will fire upon each user's keystroke. This is great in terms of user experience, because our users will immediately get filtered data as they type; however, this real-time filter also has a serious downside in terms of performance impact: every time the filter text changes (that is, upon each keystroke), Angular fires an HTTP request to the back-end to retrieve the updated list of results. Such behavior is intrinsically resource-intensive and can easily become a huge performance issue, especially if we're dealing with large tables and/or non-indexed columns.
Are there ways to improve this approach without compromising the results obtained in terms of user experience? As a matter of fact, the answer is yes, but we won't do that now: we'll talk more about it in Chapter 6, Forms and Data Validation, when we introduce the concepts of debouncing and throttling.
Adding the countries to the loop
Before moving on, how about getting the countries up to speed? Yeah, it would mean redoing everything that we just did a second time; however, now that we know how to do this, we'll arguably be able to do it in a flash...... or maybe not.
Nonetheless, we should definitely spend a reasonable amount of time doing that now, because it would be a great way to plant everything we have learned so far in our muscle memory.
Let's do this now so that we can move on to trying something else. To avoid wasting pages, we'll just focus on the most relevant steps here, leaving everything else to what we just did with the cities – and to our GitHub repository, which hosts the full source code of what we need to do.
ASP.NET
Let's start with the ASP.NET part.
CountriesController
We should already have our CountriesController ready from Chapter 4, Data Model with Entity Framework Core, right? Open that file and replace the GetCountries() default action method with the following code:
// ...existing code...
[HttpGet]
public async Task<ActionResult<ApiResult<Country>>> GetCountries(
        int pageIndex = 0,
        int pageSize = 10,
        string sortColumn = null,
        string sortOrder = null,
        string filterColumn = null,
        string filterQuery = null)
{
    return await ApiResult<Country>.CreateAsync(
            _context.Countries,
            pageIndex,
            pageSize,
            sortColumn,
            sortOrder,
            filterColumn,
            filterQuery);
}
// ...existing code...
Luckily enough, our ApiResult class is type-agnostic; therefore, we can use it there with no issues. Also, since we have centralized all the hard work there, the .NET server-side part is already done.
An odd JSON naming issue
Before moving on, let's quickly test the component: hit F5 and type the following URL into the browser's address bar: https://localhost:44334/api/Countries/?pageIndex=0&pageSize=2.
As soon as we hit Enter, we should be able to see the following interface:

Figure 5.13: JSON array for the countries
It seems like it's all g... Hey, wait a minute: what's up with those isO2 and isO3 property names? They shouldn't be capitalized like that!
In order to understand what happened there, we need to take a step back and acknowledge something we might have underestimated so far: the camelCase conversion that the brand new System.Text.Json API (introduced with .NET Core 3) automatically does when serializing all our .NET classes to JSON. We already talked about this issue early on in this chapter, when we saw the .NET CitiesController JSON output for the first time, and we said that it wasn't a big deal since Angular is also camelCase-oriented – we would just have to define the various interfaces using camelCase as well.
Unfortunately, such automatic camelCase conversion might cause unwanted side effects when dealing with all-uppercase properties such as those two; whenever this happens, we need to adapt our source code to properly deal with that:
- The most obvious thing to do would be to just define them in our Angular interface in the exact same way, that is, using that exact casing; however, this would mean dealing with those
isO2andisO3variable names throughout our whole Angular code, which is rather ugly and might also be quite misleading. - If we don't want to adopt those hideous property names, there is an alternative – and arguably better – workaround we can use: we can decorate our offending properties with the
[JsonPropertyName]data annotation, which allows us to force a JSON property name, regardless of the default casing convention (be it camelCase or PascalCase) specified within theStartupclass.
The [JsonPropertyName] workaround seems the most reasonable fix we can apply to our specific scenario; let's just go with it and get rid of this problem for good!
Open the /Data/Models/Country.cs file and add the following lines to the existing code (new lines are highlighted):
// ...existing code...
/// <summary>
/// Country code (in ISO 3166-1 ALPHA-2 format)
/// </summary>
[JsonPropertyName("iso2")]
public string ISO2 { get; set; }
/// <summary>
/// Country code (in ISO 3166-1 ALPHA-3 format)
/// </summary>
[JsonPropertyName("iso3")]
public string ISO3 { get; set; }
// ...existing code...
Now, we can see whether those properties will respect this behavior by hitting F5 and typing the same URL as before into the browser's address bar: https://localhost:44334/api/Countries/?pageIndex=0&pageSize=2:

Figure 5.14: Amended JSON array for countries
It definitely seems like they do; thanks to this unexpected issue, we had the chance to add a powerful new weapon to our ASP.NET arsenal.
Now, we just need to create and configure the Angular component.
Angular
The Angular implementation will be less trivial than the ASP.NET one since we'll have to deal with multiple aspects:
- Adding the
CountriesComponentTS, HTML, and CSS files and implementing theCountriestable, as well as the paging, sorting, and filtering features as we did with the cities - Configuring the
AppModuleto properly reference it and add the corresponding route - Updating the
NavComponentto add the navigation link
Let's do this! From Solution Explorer, do the following:
- Navigate to the
/ClientApp/src/app/folder. - Create a new
/countries/folder. - Within that folder, create the following new files:
country.tscountries.component.tscountries.component.htmlcountries.component.css
Once done, fill them with the following content.
country.ts
Here's the source code for the /ClientApp/src/app/countries/country.ts interface file:
export interface Country {
    id: number;
    name: string;
    iso2: string;
    iso3: string;
}
Nothing new here – the code is very similar to what we did when we created the city.ts interface file.
countries.component.ts
Here's the source code for the /ClientApp/src/app/countries/countries.component.ts file:
import { Component, Inject, OnInit, ViewChild } from '@angular/core';
import { HttpClient, HttpParams } from '@angular/common/http';
import { MatTableDataSource } from '@angular/material/table';
import { MatPaginator, PageEvent } from '@angular/material/paginator';
import { MatSort } from '@angular/material/sort';
import { Country } from './country';
@Component({
 selector: 'app-countries',
 templateUrl: './countries.component.html',
 styleUrls: ['./countries.component.css']
})
export class CountriesComponent implements OnInit {
 public displayedColumns: string[] = ['id', 'name', 'iso2', 'iso3'];
 public countries: MatTableDataSource<Country>;
 defaultPageIndex: number = 0;
 defaultPageSize: number = 10;
 public defaultSortColumn: string = "name";
 public defaultSortOrder: string = "asc";
 defaultFilterColumn: string = "name";
 filterQuery: string = null;
 @ViewChild(MatPaginator) paginator: MatPaginator;
 @ViewChild(MatSort) sort: MatSort;
 constructor(
 private http: HttpClient,
 @Inject('BASE_URL') private baseUrl: string) {
 }
 ngOnInit() {
 this.loadData(null);
 }
 loadData(query: string = null) {
 var pageEvent = new PageEvent();
 pageEvent.pageIndex = this.defaultPageIndex;
 pageEvent.pageSize = this.defaultPageSize;
 if (query) {
 this.filterQuery = query;
 }
 this.getData(pageEvent);
 }
 getData(event: PageEvent) {
 var url = this.baseUrl + 'api/Countries';
 var params = new HttpParams()
 .set("pageIndex", event.pageIndex.toString())
 .set("pageSize", event.pageSize.toString())
 .set("sortColumn", (this.sort)
 ? this.sort.active
 : this.defaultSortColumn)
 .set("sortOrder", (this.sort)
 ? this.sort.direction
 : this.defaultSortOrder);
 if (this.filterQuery) {
 params = params
 .set("filterColumn", this.defaultFilterColumn)
 .set("filterQuery", this.filterQuery);
 }
 this.http.get<any>(url, { params })
 .subscribe(result => {
 this.paginator.length = result.totalCount;
 this.paginator.pageIndex = result.pageIndex;
 this.paginator.pageSize = result.pageSize;
 this.countries = new MatTableDataSource<Country>(result.data);
 }, error => console.error(error));
 }
}
Again, this is basically a mirror of the cities.component.ts file.
countries.component.html
Here's the source code for the /ClientApp/src/app/countries/countries.component.html file:
<h1>Countries</h1>
<p>Here's a list of countries: feel free to play with it.</p>
<p *ngIf="!countries"><em>Loading...</em></p>
<mat-form-field [hidden]="!countries">
  <input matInput (keyup)="loadData($event.target.value)"
      placeholder="Filter by name (or part of it)...">
</mat-form-field>
<table mat-table [dataSource]="countries"
  class="table-striped mat-elevation-z8"
  [hidden]="!countries"
  matSort (matSortChange)="loadData()"
  matSortActive="{{defaultSortColumn}}"
  matSortDirection="{{defaultSortOrder}}">
  <!-- Id Column -->
  <ng-container matColumnDef="id">
    <th mat-header-cell *matHeaderCellDef mat-sort-header>ID</th>
    <td mat-cell *matCellDef="let country"> {{country.id}} </td>
  </ng-container>
  <!-- Name Column -->
  <ng-container matColumnDef="name">
    <th mat-header-cell *matHeaderCellDef mat-sort-header>Name</th>
    <td mat-cell *matCellDef="let country"> {{country.name}} </td>
  </ng-container>
  <!-- Lat Column -->
  <ng-container matColumnDef="iso2">
    <th mat-header-cell *matHeaderCellDef mat-sort-header>ISO 2</th>
    <td mat-cell *matCellDef="let country"> {{country.iso2}} </td>
  </ng-container>
  <!-- Lon Column -->
  <ng-container matColumnDef="iso3">
    <th mat-header-cell *matHeaderCellDef mat-sort-header>ISO 3</th>
    <td mat-cell *matCellDef="let country"> {{country.iso3}} </td>
  </ng-container>
  <tr mat-header-row *matHeaderRowDef="displayedColumns"></tr>
  <tr mat-row *matRowDef="let row; columns: displayedColumns;"></tr>
</table>
<!-- Pagination directive -->
<mat-paginator [hidden]="!countries"
    (page)="getData($event)"
    [pageSize]="10"
    [pageSizeOptions]="[10, 20, 50]"
    showFirstLastButtons></mat-paginator>
The template, just as expected, is almost identical to the cities.component.html template file.
countries.component.css
Here's the source code for the /ClientApp/src/app/countries/countries.component.css file:
table {
  width: 100%;
}
.mat-form-field {
  font-size: 14px;
  width: 100%;
}
The preceding file is so similar to the cities.components.css file that we could even reference it instead of creating a new one; however, dealing with separate files is almost always a better choice, considering that we might need to apply different changes to the Cities and Countries tables later on.
AppModule
Now let's register our new component to the AppModule configuration file.
Open the /ClientApp/src/app/app.module.ts file and add the following highlighted lines:
import { BrowserModule } from '@angular/platform-browser';
import { NgModule } from '@angular/core';
import { FormsModule } from '@angular/forms';
import { HttpClientModule, HTTP_INTERCEPTORS } from '@angular/common/http';
import { AppRoutingModule } from './app-routing.module';
import { AppComponent } from './app.component';
import { NavMenuComponent } from './nav-menu/nav-menu.component';
import { HomeComponent } from './home/home.component';
import { CitiesComponent } from './cities/cities.component';
import { CountriesComponent } from './countries/countries.component';
import { BrowserAnimationsModule } from '@angular/platform-browser/animations';
import { AngularMaterialModule } from './angular-material.module';
@NgModule({
  declarations: [
    AppComponent,
    NavMenuComponent,
    HomeComponent,
    CitiesComponent,
    CountriesComponent
  ],
[...]
Once done, we can get to the routing part.
AppRoutingModule
The routing rule that we need to add is very similar to the one we added for the CitiesComponent a while ago:
import { NgModule } from '@angular/core';
import { Routes, RouterModule } from '@angular/router';
import { HomeComponent } from './home/home.component';
import { CitiesComponent } from './cities/cities.component';
import { CountriesComponent } from './countries/countries.component';
const routes: Routes = [
  { path: '', component: HomeComponent, pathMatch: 'full' },
  { path: 'cities', component: CitiesComponent },
  { path: 'countries', component: CountriesComponent }
];
@NgModule({
  imports: [RouterModule.forRoot(routes)],
  exports: [RouterModule]
})
export class AppRoutingModule { }
The new routing rule will make our new CountriesComponent get served by Angular when the client browser points to the /countries dedicated route. However, our users won't know that such a route exists if we don't add a visible link to it within our NavComponent menu; that's precisely why we're going to add it next.
NavComponent
Open the /ClientApp/src/app/nav-menu/nav-menu.component.html file and add the following highlighted lines to the existing code:
// ...existing code...
<ul class="navbar-nav flex-grow">
  <li
    class="nav-item"
    [routerLinkActive]="['link-active']"
    [routerLinkActiveOptions]="{ exact: true }"
  >
    <a class="nav-link text-dark" [routerLink]="['/']">Home</a>
  </li>
  <li class="nav-item" [routerLinkActive]="['link-active']">
    <a class="nav-link text-dark" [routerLink]="['/cities']"
      >Cities</a
    >
  </li>
  <li class="nav-item" [routerLinkActive]="['link-active']">
    <a class="nav-link text-dark" [routerLink]="['/countries']"
      >Countries</a
    >
  </li>
</ul>
// ...existing code...
... and that's it!
Our CountriesComponent is done, and – if we didn't make mistakes – it should work in about the same way as our beloved CitiesComponent that took so much time to finalize.
Testing CountriesComponent
It's time to see the results of our hard work: hit F5, navigate to the Countries view, and expect to see the following:

Figure 5.15: Countries table with pagination, sorting, and filtering
If we're able to get this same output on our first attempt, it definitely means that we have learned what to do; if we didn't, don't worry: we'll just have to check what we did wrong and fix it. Practice makes perfect.
IMPORTANT: don't be fooled by appearances; be sure to check that paging, sorting, and filtering are properly working before going further.
The browser's console log can be a very useful tool for debugging server-side and client-side errors; most Angular errors come with well-documented exception text and a contextual link to the corresponding file and source code line, thus making it quite easy for the developer to understand what happens under the hood.
Summary
This chapter was all about reading data from the ASP.NET back-end and finding a way to properly show it to the browser with the Angular front-end.
We started by using our existing CitiesController to fetch a large number of cities with Angular components; although both frameworks are perfectly able to deal with massive data, we quickly understood that we need to improve the whole data request, response, and render flow process to grant our users a decent user experience.
For this very reason, we chose to adopt the System.Linq.Dynamic.Core .NET package to revamp our server-side business logic and the Angular Material npm package to greatly improve our client-side UI. By combining the powerful features of these two packages, we managed to pull off a bunch of interesting features: paging, sorting, and filtering. During our development journey, we also took the chance to identify, address, and mitigate some important security issues, such as a harmful SQL injection risk.
Right after finishing our work with Cities, we moved on to Countries, taking the chance to retrace our steps and cement what we just learned into our muscle memory.
After all our hard work, we can definitely say that we did a great job and fulfilled our goal: being able to read our data from the .NET back-end and gracefully present it through the front-end with Angular, thus making the end users fully able to see and interact with it.
We're now ready to add another layer of complexity to our application: give our users the chance to modify the existing data and/or add new data using HTML forms; these features are a must-have for most interactive web applications such as CMSes, forums, social networks, chat rooms, and the like. In the next chapter, we'll see how we can deal with such tasks using reactive forms, a pivotal Angular module that provides a model-driven approach to handling form inputs whose values change over time.
Suggested topics
JSON, RESTful conventions, HTTP verbs, HTTP status, life cycle hooks, client-side paging, server-side paging, sorting, filtering, dependency injection, SQL injection
ASP.NET
System.Linq, System.Linq.Dynamic.Core, IQueryable, Entity Framework Core
Angular
Components, Routing, Modules, AppModule, HttpClient, ngIf, hidden, Data Binding, Property Binding, Attribute Binding, ngFor, Directives, Structural Directives, interpolations, templates
References
- Add sorting, filtering, and paging – ASP.NET MVC with EF Core: https://docs.microsoft.com/en-us/aspnet/core/data/ef-mvc/sort-filter-page
- Bootstrap Official Website: https://getbootstrap.com
- Angular Material official website: https://material.angular.io/
- Angular Material GitHub repository: https://github.com/angular/components
- Angular Material Typography: https://material.angular.io/guide/typography
- Angular BrowserAnimationsModule: https://angular.io/api/platform-browser/animations/BrowserAnimationsModule
- Angular Animation System: https://angular.io/guide/animations
- Angular Material: table overview: https://material.angular.io/components/table/overview
- Angular – ViewChild: https://angular.io/api/core/ViewChild
- System.Linq.Dynamic.Core project page on GitHub: https://github.com/StefH/System.Linq.Dynamic.Core
- LINQ Overview: https://docs.microsoft.com/en-us/dotnet/csharp/linq/
- LINQ (Language Integrated Query): https://docs.microsoft.com/en-us/dotnet/csharp/programming-guide/concepts/linq/
- LINQ Lambda Expressions (C# Programming Guide): https://docs.microsoft.com/en-us/dotnet/csharp/programming-guide/statements-expressions-operators/lambda-expressions
- LINQ Query expression basics: https://docs.microsoft.com/en-us/dotnet/csharp/linq/query-expression-basics
- Reflection (C#): https://docs.microsoft.com/en-us/dotnet/csharp/programming-guide/concepts/reflection
- .NET Core and Entity Framework: set IQueryable<T> Column Names programmatically with Dynamic LINQ: https://www.ryadel.com/en/asp-net-core-set-column-name-programmatically-dynamic-linq-where-iqueryable/
- Understanding SQL Injections: https://tools.cisco.com/security/center/resources/sql_injection