
12
Progressive Web Apps
In this chapter, we’ll focus on a topic that we just briefly mentioned back in Chapter 2, Getting Ready, when we first talked about the different development patterns for web applications available nowadays: Progressive Web Apps (PWAs).
As a matter of fact, both our HealthCheck and WorldCities apps currently stick to the Single-Page Application (SPA) model, at least for the most part; in the following sections, we’ll see how we can turn them into PWAs by implementing several well-established capabilities required by such a development approach.
As we learned in Chapter 2, Getting Ready, a PWA is a web application that uses a modern web browser’s capabilities to deliver an app-like experience to users. To achieve this, the PWA needs to meet some technical requirements, including (yet not limited to) a Web App Manifest file and a service worker to allow it to work in offline mode and behave just like a mobile app.
More precisely, here’s what we’re going to talk about:
- PWA distinctive features, where we’ll summarize the main characteristics of a PWA and identify the technical requirements of a PWA by following its known specifications
- Implementing the PWA requirements on our existing
HealthCheckandWorldCitiesapps to turn them into PWAs. More precisely, we’ll do that using two different approaches: manually performing all the required steps for theHealthCheckapp, and then using the PWA automatic setup offered by the Angular CLI for theWorldCitiesapp - Handling the offline status, where we’ll update our components to behave differently when the app is offline – such as limiting their features and/or showing an offline status informative message
- Testing the new PWA capabilities, where we’ll ensure that our implementation will properly work with both of our apps
By the end of this chapter, we’ll have learned how to successfully convert an existing SPA into a PWA.
Technical requirements
In this chapter, we’re going to need all previous technical requirements listed in previous chapters, with the following additional packages:
@angular/service-worker(npm package)angular-connection-service(npm package)Microsoft.AspNetCore.Cors(NuGet package)WebEssentials.AspNetCore.ServiceWorker(NuGet package, optional)http-server(npm package)
As always, it’s advisable to avoid installing them straight away; we’re going to bring them in during this chapter to better contextualize their purposes within our project.
The code files for this chapter can be found at https://github.com/PacktPublishing/ASP.NET-Core-6-and-Angular/tree/master/Chapter_12/.
PWA distinctive features
Let’s start by summarizing the main distinctive characteristics of a PWA:
- Progressive: A PWA should work for every user, regardless of the platform and/or browser used.
- Responsive: They must adapt well to any form factor: desktop, mobile, tablet, and so on.
- Connectivity-independent: They must be able to work offline—at least to some extent, such as informing the user that some features might not work in offline mode—or on low-quality networks.
- App-like: They need to provide the same navigation and interaction mechanics as mobile apps. This includes tap support, gesture-based scrolling, and so on.
- Safe: They must provide HTTPS support for better security, such as preventing snooping and ensuring that their content has not been tampered with.
- Discoverable: They have to be identifiable as web applications using a W3C manifest file and a service worker registration scope so that search engines will be able to find, identify, and categorize them.
- Re-engageable: They should make re-engagement easy through features such as push notifications.
- Installable: They should allow users to install and keep them on their desktop and/or mobile home screen, just like any standard mobile app, yet without the hassle of having to download and install them from an app store.
- Linkable: They should be easily shared through a URL, without requiring complex installation.
The preceding characteristics can be inferred from the following articles written by the Google developers and engineers who spent their efforts on introducing the PWA concept and defining its core specs:
https://developers.google.com/web/progressive-web-apps
https://developers.google.com/web/fundamentals
https://infrequently.org/2015/06/progressive-apps-escaping-tabs-without-losing-our-soul/
These high-level requirements can be translated into specific technical tasks that we have to implement. The best way to do that is by starting with the technical baseline criteria described by Alex Russell, the Google Chrome engineer who coined the term PWA together with the designer Frances Berriman back in 2015:
- Originate from a secure origin: In other words, there’s full HTTPS support with no mixed content (green padlock display)
- Load while offline, even if it’s just an offline information page: This clearly implies that we need to implement a service worker
- Reference a Web App Manifest with at least the four key properties:
name,short_name,stat_url, anddisplay(with either a standalone or fullscreen value) - A 144 × 144 icon in PNG format: Other sizes are supported, but the 144 x 144 one is the minimum requirement
- Use vector graphics, as they can scale indefinitely and require smaller file sizes
Each one of these technical requirements can be translated into a specific technical task that we have to implement. In the following sections, we’ll see how we can implement them.
Secure origin
Implementing the secure origin feature basically means serving our app through an HTTPS certificate. Such a requirement is rather easy to fulfill nowadays: TLS certificates are quite cheap thanks to the many resellers available. A PositiveSSL certificate issued by Comodo Inc. can be purchased online for $10/year or so and is immediately available for download.
If we don’t want to spend money, there’s also a free alternative provided by Let’s Encrypt: a free, automated, open Certificate Authority that can be used to obtain a TLS certificate without costs. However, the method they use to release the certificate requires shell access (also known as SSH access) to the deployment web host.
For additional information about Let’s Encrypt and how to obtain an HTTPS certificate for free, check out the official site: https://letsencrypt.org/.
For the sake of simplicity, we’ll not cover the HTTPS certificate release and installation part; we’ll take for granted that the reader will be able to properly install it, thanks to the many how-to guides available from the various resellers’ websites (including Let’s Encrypt).
Offline loading
Connection independency is one of the most important capabilities of PWAs; to properly implement it, we need to introduce—and implement—a concept that we’ve just barely mentioned until now: service workers. What are they, and how can they help our app to work while offline?
The best way to figure out what a service worker is would be to think of it as a script that runs inside the web browser and handles a specific task for the application that registered it: such tasks can include caching support and push notifications.
When properly implemented and registered, service workers will enhance the user experience (UX) provided by standard websites by delivering a UX similar to what can be achieved by native mobile apps; technically, their role is to intercept any ongoing HTTP request made by the user and—whenever it’s directed to the web application they are registered for—check for the web application’s availability and act accordingly. To put it in other words, we could say that they act as an HTTP proxy with fallback capabilities when the application is unable to handle the request.
Such a fallback can be configured by the developer to behave in many ways, such as the following:
- Caching service (also known as offline mode): The service worker will deliver a cached response by querying an internal (local) cache previously built from the app (when it was online)
- Offline warning: Whenever no cached content is available (or if we didn’t implement a caching mechanism), the service worker can serve an offline status informative text, warning the user that the app is unable to work
Those who are familiar with forward cache services might prefer to imagine service workers as reverse proxies (or CDN edges) installed in the end user’s web browser instead.
The caching service feature is great for web applications that provide static content, such as HTML5-based gaming apps and Angular apps that don’t require any back-end interaction. Unfortunately, it’s not ideal for our two apps: both HealthCheck and WorldCities strongly rely upon the back-end Web API provided by ASP.NET. Conversely, these apps can definitely benefit from an offline warning, so that their users will be informed that an internet connection is required—instead of getting a connection error, a 404 - Not Found message, or any other message.
Service workers versus HttpInterceptors
If we remember the various Angular features that we introduced in Chapter 11, Authentication and Authorization, we can see how the aforementioned behavior reminds us of the role performed by HttpInterceptors.
However, since interceptors are part of the Angular app script bundle, they always cease to work whenever the user closes the browser tab that contains the web app.
Furthermore, interceptors are only able to intercept calls made with Angular’s HttpClient: they won’t be able to handle browser requests issued to load scripts, stylesheets, images, and so on.
Conversely, service workers need to be preserved after the user closes the tab so that they can intercept the browser requests before connecting to the app.
Enough with the theory, let’s now see how we can implement an offline mode, Web App Manifest, and PNG icons in our existing apps.
Introducing @angular/service-worker
Starting with version 5.0.0, Angular provides a fully featured service worker implementation that can be easily integrated into any app without needing to code against low-level APIs. Such an implementation is handled by the @angular/service-worker npm package and relies upon a manifest file that is loaded from the server that describes the resources to cache and will be used as an index by the service worker, which behaves in the following way:
- When the app is online, each indexed resource will be checked to detect changes; if the source has changed, the service worker will update or rebuild the cache
- When the app is offline, the cached version will be served instead
The aforementioned manifest file is generated from a CLI-generated configuration file called ngsw-config.json, which we’ll have to create and set up accordingly.
It’s worth mentioning that web browsers will always ignore service workers if the website that tries to register them is served over an unsecured (non-HTTPS) connection. The reason for that is quite simple to understand: since service workers’ defining role is to proxy their source web application and potentially serve alternative content, malicious parties could be interested in tampering with them; therefore, allowing their registration to secure websites only will provide an additional security layer to the whole mechanism.
Here’s an example of a manifest file similar to the one we need (and that we’ll add in a short while):
{
  "name": "My Sample App",
  "short_name": " MySampleApp ",
  "start_url": ".",
  "display": "standalone",
  "background_color": "#fff",
  "description": "A simply readable Hacker News app.",
  "icons": [{
    "src": "images/touch/homescreen48.png",
    "sizes": "48x48",
    "type": "image/png"
  }, {
    "src": "images/touch/homescreen72.png",
    "sizes": "72x72",
    "type": "image/png"
  }, {
... multiple icon definitions ...
  }],
  "related_applications": [{
    "platform": "play",
    "url": "https://play.google.com/store/apps/details?id=my.sample.app "
  }]
}
It’s worth noting that @angular/service-worker isn’t the only available approach we could adopt to implement the service worker and Web App Manifest file’s PWA capabilities. As a matter of fact, ASP.NET Core provides its own way to deal with these requirements with a set of middleware that can be easily installed and integrated into our project’s HTTP stack.
The ASP.NET Core PWA middleware alternative
Among the various solutions provided, the most interesting one—at least in our opinion—is the WebEssentials.AspNetCore.ServiceWorker NuGet package developed by Mads Kristensen, a prolific author of Visual Studio extensions and ASP.NET Core libraries; the package provides fully featured ASP.NET Core PWA middleware that comes with full Web App Manifest support and pre-built service workers and is a valid back-end and front-end alternative to the pure front-end solution provided by the @angular/service-worker npm package.
To get additional information about the WebEssentials.AspNetCore.ServiceWorker NuGet package, check out the following URLs:
https://github.com/madskristensen/WebEssentials.AspNetCore.ServiceWorker
https://www.nuget.org/packages/WebEssentials.AspNetCore.ServiceWorker/
All in all, it seems that we have two convenient ways to fulfill our PWA-related tasks: which one should we choose?
Ideally, we would have loved to implement both of them; however, for reasons of space, we’ll just use the @angular/service-worker npm package, leaving the ASP.NET Core PWA middleware alternative for another time.
Choosing the Angular service worker will also give us some advantages: since it’s specifically designed for Angular, it will definitely help us to fix some common issues.
In the following section, we’ll learn how to implement the @angular/service-worker package in our existing Angular apps following two very different—yet equally rewarding—approaches.
Implementing the PWA requirements
To perform the required implementation steps that we’ve focused on in the previous section, we have two choices:
- Perform a manual update of our app’s source code
- Use the automatic installation feature provided by the Angular CLI
To learn the most from the experience, both of these paths should be taken at least once. Luckily enough, we have two existing Angular apps to experiment with. Therefore, we’ll take the manual route for our HealthCheck app first, then we’ll experience the automatic CLI setup for the WorldCities app.
Manual installation
In this section, we’ll see how to manually implement the required technical steps we’re still missing to make our HealthCheck app fully compliant with the PWA requirements.
Let’s briefly recap them:
- Add the
@angular/service-workernpm package (package.json) - Enable service worker support in the Angular CLI configuration file (
angular.json) - Import and register
ServiceWorkerModulein theAppModuleclass (app.module.ts) - Update the main app’s HTML template file (
index.html) - Add a suitable icon file (
favicon.ico) - Add the manifest file (
manifest.webmanifest) - Add the service worker configuration file (
ngsw-config.json)
For each step, we’ve mentioned the relevant file that we’ll have to update in parentheses.
Adding the @angular/service-worker npm package
The first thing to do is to add the @angular/service-worker npm package to our package.json file. As we can easily guess, such a package contains Angular’s service worker implementation that we were talking about a moment ago.
Open the package.json file and add the following package reference to the "dependencies" section, right below the @angular/router package:
// ...
"@angular/router": "13.0.1",
"@angular/service-worker": "13.0.1",
// ...
As soon as we save the file, the npm package should be downloaded and installed automatically by Visual Studio; if that’s not the case, run npm install manually to force the packages to update.
Updating the angular.json file
Open the angular.json configuration file and add the "serviceWorker" and "ngswConfigPath" keys to the end of the projects | HealthCheck | architect | build | options section:
// ...
"scripts": [],
"serviceWorker": true,
"ngswConfigPath": "ngsw-config.json"
// ...
As always, whenever we have issues while applying these changes, we can check out the source code available from this book’s GitHub repository.
The "serviceWorker" flag that we’ve just set up will cause the production build to include a couple of extra files in the output folder:
ngsw-worker.js: The main service worker filengsw.json: The Angular service worker’s runtime configuration
Both of these files are required for our service worker to perform its job.
Importing ServiceWorkerModule
ServiceWorkerModule provided by the @angular/service-worker npm package library will take care of registering the service worker as well as providing a few services we can use to interact with it.
To install it on our HealthCheck app, open the /src/app/app.module.ts file and add the following lines (the new lines are highlighted):
// ...
import { ServiceWorkerModule } from '@angular/service-worker';
import { environment } from '../environments/environment';
// ...
imports: [
  // ...
  ServiceWorkerModule.register('ngsw-worker.js', {
      enabled: environment.production,
      // Register the ServiceWorker as soon as the app is stable
      // or after 30 seconds (whichever comes first).
      registrationStrategy: 'registerWhenStable:30000'
    })
],
// ...
As we said earlier, the ngsw-worker.js file referenced in the preceding code is the main service worker file, which will be auto-generated by the Angular CLI when building the app.
When implemented in this way, the service worker will be enabled only when our Angular app runs in a production environment, which is precisely what we want.
For additional information regarding the service worker registration options and the various registrationStrategy settings, visit the following URL: https://angular.io/api/service-worker/SwRegistrationOptions.
Updating the index.html file
The /src/index.html file is the main entry point for our Angular app(s). It contains the <app-root> element, which will be replaced by our app’s GUI at the end of the bootstrap phase, as well as some resource references and meta tags that describe our application’s behavior and configuration settings.
Open that file and add the following code at the end of the <head> element (the updated lines are highlighted):
<!doctype html>
<html lang="en">
<head>
  <meta charset="utf-8">
  <title>HealthCheck</title>
  <base href="/">
  <meta name="viewport" content="width=device-width, initial-scale=1">
  <link rel="icon" type="image/x-icon" href="favicon.ico">
  <link rel="preconnect" href="https://fonts.gstatic.com">
  <link href="https://fonts.googleapis.com/css2?family=Roboto:wght@300;400;500&display=swap" rel="stylesheet">
  <link href="https://fonts.googleapis.com/icon?family=Material+Icons" rel="stylesheet">
  <!-- PWA required files -->
  <link rel="manifest" href="manifest.webmanifest">
  <meta name="theme-color" content="#1976d2">
</head>
<body class="mat-typography">
  <app-root></app-root>
</body>
</html>
The highlighted lines configure the app’s theme-color, and—most importantly—the link to the manifest.webmanifest file, which—as its name clearly implies—is the app’s manifest file, one of the key requirements for any PWA.
That’s great to hear, except it doesn’t exist in our app yet: let’s fix this gap now.
Adding the Web App Manifest file
Instead of manually creating a Web App Manifest file from scratch, we can generate it automatically using one of the various Web App Manifest generators available online.
For the purpose of this book we’re going to use the Web App Manifest Generator by Samson Amaugo: https://github.com/sammychinedu2ky/Web-App-Manifest-Generator
And more specifically, we’ll use the instance hosted by Netlify at the following URL: https://manifest-gen.netlify.app/.
This handy tool will also generate all of the required PNG icon files for us, hence saving us a lot of time. However, we’ll require a 512 x 512 image source. If we don’t have one, we can easily create one using the DummyImage website, another useful free tool that can be used to generate placeholder images of any size, which is available at https://dummyimage.com/.
Here’s a generated PNG file that we can use to feed the preceding Firebase Web App Manifest Generator tool:

Figure 12.1: PNG file generated by DummyImage
As we can easily guess, HC stands for HealthCheck; we won’t likely win a graphic design contest with this image, but it will work just fine for our current task.
The preceding PNG file can be downloaded from: https://dummyimage.com/512x512/361f47/fff.png&text=HC.
The reader is free to either use it, create another file using that same tool, or provide another image.
The 512 x 512 icon will be used by the Web App Manifest Generator online tool to create all the required icons for our PWA.
As per Google’s recommendations, a valid PWA manifest file will need at least two icons with a respective size of 192 x 192 and 512 x 512 pixels: https://web.dev/installable-manifest/#recommendations.
The online generator will vastly exceed the minimum requirements by creating eight different icons to accommodate most of the major formats used by different devices.
Once done, go back to the Web App Manifest Generator online tool and configure it using the following parameters:
- App Name:
HealthCheck - Short Name:
HealthCheck - Theme Color:
#2196f3 - Background Color:
#2196f3 - Display Mode:
Standalone - Orientation:
Any - Application Scope:
/ - Start Url:
/
Then, click to the right of the UPLOAD button below the Upload via Graphql option and select the HC image that we generated a moment ago, as shown in the following screenshot:
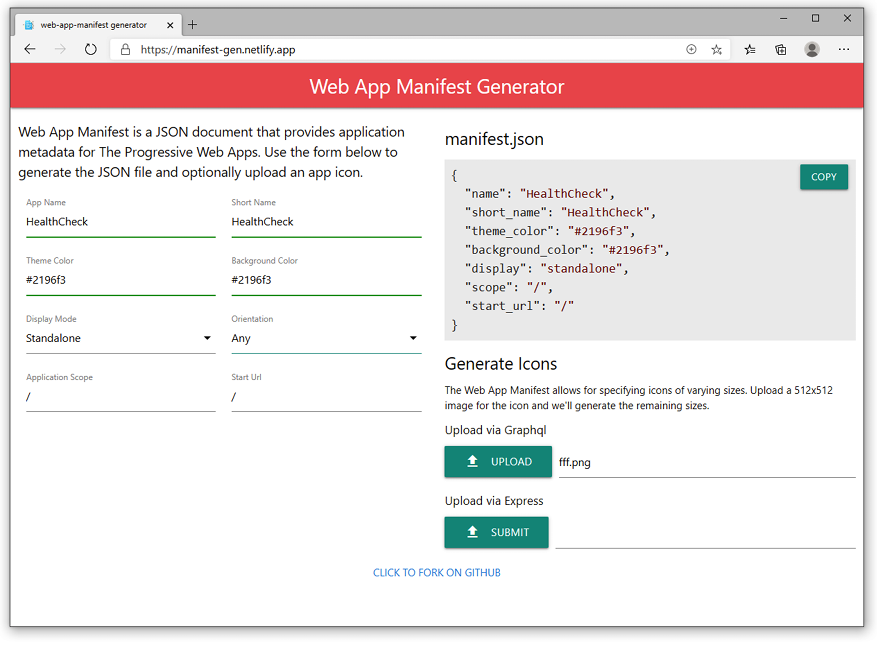
Figure 12.2: Web App Manifest Generator
Generate the archive file by clicking on the UPLOAD button, unpack it, and copy the included files in the following way:
- The
manifest.jsonfile in the/src/folder - The
/icons/folder, with all of its content, in the/src/assets/folder, so that the actual PNG files will be placed in the/src/assets/icons/folder
Once done, we need to perform the following changes to the manifest.json file:
- Change all of the icon starting paths from
images/icons/toassets/icons/ - Rename it from
manifest.jsontomanifest.webmanifest, since that’s the name defined by the Web App Manifest W3C specs
As a matter of fact, the .json and .webmanifest extensions will both work; however, since most web servers do not natively support the .webmanifest extension, opting for the .json choice would arguably make things easier.
That said, since we do want our PWAs to adhere to the Web App Manifest W3C specs, we’re going to perform the above renaming and use the .webmanifest extension for our sample apps. This decision will require us to perform some additional tasks when we deploy our PWAs in production, such as manually adding that extension (and its application/manifest+json MIME type) to the list of supported file types in several web servers – as we’ll see in Chapter 15, Windows, Linux, and Azure Deployment.
Those who want to take a look at the Web App Manifest W3C Working Draft 09 December 2019 can visit the following URL: https://www.w3.org/TR/appmanifest/.
To know more about the .json versus .webmanifest extension debate, take a look at this interesting discussion in the Web App Manifest GitHub repository: https://github.com/w3c/manifest/issues/689.
Now that we have made the necessary changes to the manifest.json file, we need to ensure it will be included in the Angular publishing bundle.
Publishing the Web App Manifest file
To have our /src/manifest.webmanifest file published together with the rest of our HealthCheck Angular app files, we need to add it to the /angular.json CLI configuration file.
Open that file and locate all of the following entries:
"assets": [
  "src/favicon.ico",
  "src/assets"
],
Replace them with the following updated value:
"assets": [
  "src/favicon.ico",
  "src/assets",
  "src/manifest.webmanifest"
],
There should be two "asset" key entries in the angular.json file:
projects > health_check > architect > build > optionsprojects > health_check > architect > test > options
Both of them need to be modified as explained in the preceding code.
With this update, the manifest.webmanifest file will be published to the output folder whenever we build the Angular app.
Adding the favicon
A favicon (also known as a favorite icon, shortcut icon, website icon, tab icon, URL icon, or bookmark icon) is a file containing one or more small icons that can be used to identify a specific website; whenever we see a small icon in a browser’s address bar, history, and/or tab containing a given website, we’re looking at that website’s favicon.
Favicons can be generated manually, but if we’re not graphic designers, we might want to use one of the various favicon generators available online, especially considering that most of them are entirely free to use; the only thing that we need is a suitable image, which needs to be provided manually (and uploaded to the service).
Here’s a couple of recommended favicon online generators available nowadays:
favicon.io (https://favicon.io/)
Real Favicon Generator (https://realfavicongenerator.net/)
Alternatively, we can download one of the many royalty-free favicon sets available online.
Here are some websites that offer free favicons to download:
Icons8 (https://icons8.com/icons/set/favicon)
FreeFavicon (https://www.freefavicon.com/freefavicons/icons/)
As a matter of fact, the ASP.NET Core and Angular Visual Studio template that we used to create our HealthCheck project already provided us with a favicon: we can find it in our project’s /wwwroot/ folder.
Honestly speaking, this favicon is not that bad, as we can see from the following screenshot:

Figure 12.3: The default favicon provided by our template
Keeping the above favicon won’t prevent our app from becoming a PWA; that said, if we want to replace it with a custom one, we’re free to do that using one of the aforementioned websites.
Adding the ngsw-config.json file
From Solution Explorer, create a new ngsw-config.json file in the HealthCheck project’s root folder, and replace the content with the following:
{
  "$schema": "./node_modules/@angular/service-worker/config/schema.json",
  "index": "/index.html",
  "assetGroups": [
    {
      "name": "app",
      "installMode": "prefetch",
      "resources": {
        "files": [
          "/favicon.ico",
          "/index.html",
          "/manifest.webmanifest",
          "/*.css",
          "/*.js"
        ]
      }
    },
    {
      "name": "assets",
      "installMode": "lazy",
      "updateMode": "prefetch",
      "resources": {
        "files": [
          "/assets/**",
          "/*.(eot|svg|cur|jpg|png|webp|gif|otf|ttf|woff|woff2|ani)"
        ]
      }
    }
  ]
}
As we can see by looking at the assetGroups > app section, the preceding file tells Angular to cache the favicon.ico file and the manifest.webmanifest file, which we created a short while ago, as well as the main index.html file and all of the CSS and JS bundles—in other words, our application’s static asset files. Right after that, there is an additional assetGroup > assets section, which defines the image files to cache.
The main difference between these two sections is the installMode parameter value, which determines how these resources are initially cached:
prefetchtells the service worker to fetch those resources while it’s caching the current version of the app; in other words, it will put all of those contents in the cache as soon as they become available, that is, the first time the browser visits the online app. We might call this an up-front caching strategy.lazytells the service worker to only cache those resources when the browsers explicitly request them for the first time. This could be called an on-demand caching strategy.
The preceding settings can be good for generic Angular apps that only rely on the front-end (no back-end required calls) since these files basically contain the whole app; more specifically, an Angular app hosting an HTML5 game—which arguably relies upon a lot of image files—might think about moving some of its image files (or even all of them) from the assets section to the app section, so that the whole application—including the icons, the sprites, and all of the image resources—will be cached upfront and be entirely available even when the app is offline.
However, such a caching strategy would not be enough for our HealthCheck and WorldCities apps; even if we tell our service worker to cache the whole app files, all of our apps’ HTTP calls would still fail whenever the browser is offline, without letting the user know anything about it. As a matter of fact, our back-end availability requirement forces us to do some additional work for both of our apps.
However, before doing that, let’s bring our WorldCities app up to speed.
Automatic installation
All of the steps that we performed manually in the previous section to enable Service Worker support for our HealthCheck app can be done automatically by using the following CLI command:
> ng add @angular/[email protected]
Let’s adopt this alternative technique for our WorldCities app.
Open Command Prompt and navigate to the WorldCities app’s root folder, then execute the preceding command; the Angular CLI will automatically configure our app by adding the @angular/service-worker package and performing the other required steps.
The most relevant information for the whole operation will be written in the console output, as shown in the following screenshot:
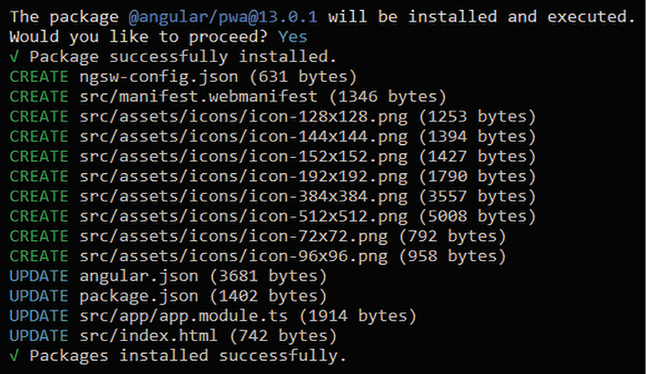
Figure 12.4: Enabling service worker support via Command Prompt
As we can see from the logs, the automatic process performs the same steps that we just applied to the HealthCheck app.
The Angular PNG icon set
The PWA automatic setup feature will also provide some PNG icons of various sizes in the /src/assets/icons/ folder. If we open them with a graphics application, we can see that they all reproduce the Angular logo, as shown in the following figure:

Figure 12.5: The Angular logo provided by the PWA automatic setup
Whenever we want to make our app available to the public, we will likely want to change these icons. However, they are more than enough, at least for the time being; let’s keep these files as they are and move on to the last remaining task to transform our SPAs into PWAs.
Handling the offline status
Now that we have configured a service worker in both of our apps, we can think of a way to handle the offline status message, so that each one of our components will be able to behave in a different way when the app is offline—such as limiting their features and showing an offline status informative message to our users.
To implement these conditional behaviors, we need to find a way to properly determine the browser connectivity status, that is, whether it’s online or not; in the following sections, we’ll briefly review several different approaches that we can use to do that to make the (arguably) best possible choice. These approaches are:
- The window’s
ononline/onofflineevent - The
Navigator.onLineproperty - A third-party package that determines the online/offline status in Angular
We will go into each of these in the following sections.
Option 1 – the window’s ononline/onoffline event
If we’re willing to accept a pure JavaScript way to handle this, such a task can be easily achieved using the window.ononline and window.onoffline JavaScript events, which are directly accessible from any Angular class.
Here’s how we can use them:
window.addEventListener("online", function(e) {
  alert("online");
}, false);
window.addEventListener("offline", function(e) {
  alert("offline");
}, false);
However, if we’re willing to adopt a pure JavaScript approach, there’s an even better way to implement it.
Option 2 – the Navigator.onLine property
Since we don’t want to track the network status changes and are just looking for a simple way to determine whether the browser is online or not, we can make things even simpler by just checking the window.navigator.onLine property:
if (navigator.onLine) {
  alert("online");
}
else {
  alert("offline");
}
As we can easily guess from its name, this property returns the online status of the browser. The property returns a Boolean value, with true meaning online and false meaning offline, and is updated whenever the browser’s ability to connect to the network changes.
Thanks to this property, our Angular implementation could be reduced to this:
ngOnInit() {
  this.isOnline = navigator.onLine;
}
Then, we can use the isOnline local variable within our component’s template file so that we can show different content to our users using the ngIf structural directive. That would be pretty easy, right?
Unfortunately, things are never that simple; let’s try to understand why.
Downsides of the JavaScript approaches
Both of the JavaScript-based approaches we’ve mentioned suffer from a serious drawback caused by the fact that modern browsers implement the navigator.onLine property (as well as the window.ononline and window.onoffline events) in different ways.
More specifically, Chrome and Safari – as well as the new Chromium-based Microsoft Edge – will set that property to true whenever the browser can connect to a LAN or a router.
This can easily produce a false positive since most home and business connections are connected to the internet through a LAN, which will probably stay up even when the actual internet access is down.
For additional information regarding the Navigator.onLine property and its drawbacks, check out the following URL: https://developer.mozilla.org/en-US/docs/Web/API/NavigatorOnLine/onLine.
All things considered, this basically means that we cannot use the convenient approaches described earlier to check our browser’s online status, so in order to seriously deal with this matter, we need to find a better way to do it.
Option 3 – the angular-connection-service npm package
Luckily enough, there’s a neat npm package that does precisely what we need: its name is ng-online-status and it’s basically an internet connection monitoring service that can detect whether the browser has an active internet connection or not.
The online detection task is performed using a (configurable) heartbeat mechanism, which will periodically issue HTTP head requests to a (configurable) URL to determine the internet connection status.
Unfortunately, the ng-connection-service latest version—which introduced the heartbeat feature —is not available on npm as of the time of writing: the last updated version is 1.0.4, which was developed for Angular 6 some years ago and was still based upon the window.ononline and window.onoffline events that we talked about earlier.
At the time of writing, I don’t know why the author hasn’t updated the npm package yet; however, since he made the latest version’s source code available on GitHub under an MIT license, a lot of developers forked its original work, updated it for Angular’s newer versions, and published the resulting packages to npm under that same license. For that very reason, we’re going to use one of these forks, which is called angular-connection-service.
Here are the package default values:
enableHeartbeat:trueheartbeatUrl://httpstat.us/200heartbeatInterval:3000(milliseconds)heartbeatRetryInterval:1000requestMethod:head
For additional information about the ng-connection-service npm package, check out the following URL: https://github.com/ultrasonicsoft/ng-connection-service.
Most of them are good, except for heartbeatUrl—for various reasons that we’ll explain later on.
Needless to say, with it being an Angular service, we’ll be able to configure it in a centralized way and then inject it whenever we need to without having to manually configure it every time: that almost seems too good to be true!
Let’s see how we can implement it.
Installing the service
To do that, open the package.json file of the HealthCheck project and add the following line right below the @angular/service-worker package that we added a moment ago:
// ...
"@angular/service-worker": "13.0.1",
"angular-connection-service": "13.0.1",
// ...
Be sure to use a version compatible with the Angular version we’re currently using.
Version 13.0.1, the latest at the time of writing, is meant to work with the version of Angular recommended by this book.
Once done, open Command Prompt and execute npm install to update the packages: right after that, we can implement the service within our app(s).
Updating the AppModule file
The first thing to do is to add the package module to our AppModule file. To do that, open the HealthCheck project’s app.module.ts file and add the following highlighted lines:
// ...
import { environment } from '../environments/environment';
import { ConnectionServiceModule, ConnectionServiceOptions, ConnectionServiceOptionsToken } from 'angular-connection-service';
@NgModule({
// ...
  imports: [
// ...
    ConnectionServiceModule
  ],
  providers: [
    {
      provide: ConnectionServiceOptionsToken,
      useValue: <ConnectionServiceOptions>{
        heartbeatUrl: environment.baseUrl + 'api/heartbeat',
      }
    }
  ],
// ...
As we can see, we took the chance to modify the heartbeatUrl value; instead of querying the default httpstat.us third-party website, we’re going to check a dedicated api/heartbeat endpoint that we’ll make available within our Web API project. We’ve opted for that choice for several good reasons, the most important of them being the following:
- To avoid being a nuisance to those third-party hosts
- To receive a more relevant result, since we need to know if our app can reach our specific Web API domain
- To avoid Cross-Origin Resource Sharing (CORS) issues against third-party resources (more on that later)
Before switching to ASP.NET Core and creating that api/endpoint endpoint, let’s finish the Angular part of the job.
Updating the AppComponent
The whole point of what we’re doing right now is to make our users aware of the app being offline with an offline status informative message. To be effective, this message should be displayed:
- As soon as possible, so that our users will know the app’s connectivity status before navigating somewhere
- Everywhere, so that they will be warned about it even if they’re visiting some internal views
Therefore, a good place to implement it would be the AppComponent class, which contains all of our components, regardless of the front-end route picked by the user.
app.component.ts
Let’s start with the TypeScript file.
Open the /src/app/app.component.ts file and modify its class file accordingly (the updated lines are highlighted):
import { Component } from '@angular/core';
import { ConnectionService } from 'angular-connection-service';
@Component({
  selector: 'app-root',
  templateUrl: './app.component.html',
  styleUrls: ['./app.component.scss']
})
export class AppComponent {
  title = 'HealthCheck';
  hasNetworkConnection: boolean = true;
  hasInternetAccess: boolean = true;
  constructor(private connectionService: ConnectionService) {
    this.connectionService.monitor().subscribe((currentState: any) => {
      this.hasNetworkConnection = currentState.hasNetworkConnection;
      this.hasInternetAccess = currentState.hasInternetAccess;
    });
  }
  public isOnline() {
    return this.hasNetworkConnection && this.hasInternetAccess;
  }
}
The above code should be quite easy to understand at this point: we’ve set up some local variables and subscribed to the connectionService – instantiated in the component’s constructor using DI – to periodically update them. Last but not least, we’ve added an isOnline() method that can be used to determine the app’s online status.
app.component.html
Now that we have the isOnline() method, we can modify the template file of AppComponent to show the informative “offline status” message to our users whenever it returns false.
Open the /src/app/app.component.html file and update its content with the following highlighted lines:
<app-nav-menu></app-nav-menu>
<div class="alert alert-warning" *ngIf="!this.isOnline()">
  <strong>WARNING</strong>: the app is currently <i>offline</i>:
  some features that rely upon the back-end might not work as
  expected. This message will automatically disappear as soon
  as the internet connection becomes available again.
</div>
<div class="container">
  <router-outlet></router-outlet>
</div>
That’s it: since our app’s Home view doesn’t directly require a back-end HTTP request, we’ve chosen to just show a warning message to inform the user that some of our app’s features might not work while offline. Conversely, we could’ve entirely shut down the app by putting an additional ngIf="!this.isOnline()" structural directive to the other elements, so that the offline status message would be the only visible output.
app.component.scss
Now we just need to style our new offline status alert.
Open the /src/app/app.component.scss file and append the following lines to the existing content:
.alert {
  position: relative;
  padding: .75rem 1.25rem;
  margin-bottom: 1rem;
  border: 1px solid transparent;
  border-radius: .25rem;
  &.alert-warning {
    color: #856404;
    background-color: #fff3cd;
    border-color: #ffeeba;
  }
}
That’s it: with this we’re done with our Angular tasks.
Before switching to ASP.NET Core, let’s perform a quick test of what we did so far: hit F5 to run the project in Debug mode and press CTRL + SHIFT + J to show the console window.
If we did everything correctly, the AppComponent should subscribe to the new service, which should hit an HTTP 404 while trying to check for the api/heartbeat endpoint, which doesn’t exist yet.
As a result, the isOnline() method should return false, thus causing the alert to show up, as in the following screenshot:
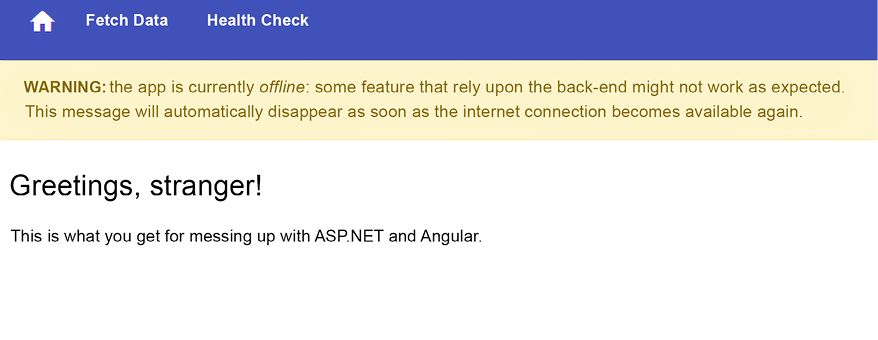
Figure 12.6: The offline alert message showing up
Now we need to ensure that the api/heartbeat endpoint will be found: to do that, we need to switch to the HealthCheckAPI project and perform some updates there as well.
However, before switching to the ASP.NET Core Web API project, let’s take the chance to apply all the Angular changes to the WorldCities project as well. The GitHub project repository for this chapter contains all the required updates for both projects and is a good reference for those who need help.
Adding the api/heartbeat endpoint
To create a new API endpoint in our ASP.NET Core app we might be tempted to add a new Controller, just like we did in all previous chapters: or maybe we can create a new action method in an existing controller?
As a matter of fact, both options would work just fine: however, the HealthCheckAPI project doesn’t have any controller yet, and creating a new one just to handle a heartbeat HEAD request might be overkill. As for the WorldCitiesAPI project, the existing controllers are meant to serve a specific purpose: what would a heartbeat action method have to do with controllers returning cities and countries data?
If controllers were the only way to handle such a task, we would definitely have to create a new controller in both of our Web API projects. However, we can take this chance to introduce an alternative method to deal with HTTP requests that we’ve never used until now; this method is called Minimal APIs and it was introduced with ASP.NET Core 6.
Introducing Minimal APIs
Explaining Minimal APIs in few words is not an easy task: however, for the sake of simplicity, let’s try to briefly summarize the concepts of this new ASP.NET Core feature.
In a nutshell, Minimal APIs are a set of helper methods introduced to allow developers to handle HTTP requests with minimal dependencies, files, and source code.
This new approach can be used together with standard controllers, as well as to entirely replace them, depending on the given scenario: ideally, they are best suited for microservices and lightweight APIs, or to handle very simple requests – just like the api/heartbeat endpoint that we need to add.
Without further ado, let’s open the Program.cs file and implement our very first Minimal API, right below the existing app.MapControllers() method:
//...
app.MapControllers();
app.MapMethods("/api/heartbeat", new[] { "HEAD" },
    () => Results.Ok());
//...
As we can see, the newly added method is rather minimalistic, yet very readable: we are handling incoming HTTP requests pointing to the api/heartbeat endpoint (HEAD requests only), returning a standard 200 – OK HTTP response without content. That’s a lot swifter than creating a dedicated controller, right?
As for the empty content, we just did that because we don’t need any: the content for a HEAD request is quite irrelevant, the angular-connection-service just needs to check the status code of our response to determine our app’s online status.
To test what we just did, we can run our HealthCheck project again: this time the alert shouldn’t be visible anymore, meaning that our new api/heartbeat endpoint can be reached by the Angular app and causing the AppComponent's isOnline() method to return true.
Now we just need to perform the same tasks in our WorldCitiesAPI project, then we can move to the next step.
Cross-Origin Resource Sharing
Now that we’ve added the api/heartbeat endpoint to our ASP.NET Web API project, let’s spend some valuable time understanding the concept of Cross-Request Resource Sharing, better known as CORS.
As we said earlier, the latest version of angular-connection-service allows us to perform a HEAD request over a defined amount of time (“heartbeat”) to determine whether we’re online or not. However, we have chosen to change the third-party website that was set in the service’s default values (//httpstat.us/200) to a dedicated Web API endpoint under our control (api/heartbeat) that we’ve just added for that specific purpose.
Why did we do that? What’s wrong with periodically issuing a HEAD request against a third-party website?
The first reason is rather simple to understand: we don’t want to be a nuisance to those websites since they’re definitely not meant for us to check their online status.
If their system administrators see our requests in their log, they could ban us or take some countermeasures that could prevent our heartbeat check from working or—even worse—compromise its reliability status.
Another reason is because the reliability of a third-party site like httpstat.us could be very different from our Web API: what if such a website is reachable while the production environment of our WorldCitiesAPI project is not? It’s rather obvious that we should check our heartbeat, not a different website’s one.
However, there’s yet another important reason for avoiding such a practice.
Allowing our app to issue HTTP requests to external websites might violate the default CORS policy settings of those websites; while we’re here, it could be useful to take a bit of time to better understand this concept.
As we might already know, modern browsers have built-in security settings that prevent a web page from making JavaScript requests to a different domain than the one that served the web page: such a restriction is called a same-origin policy and is introduced to prevent a malicious third-party website from reading data from another site.
However, most websites might want (or need) to issue some external requests to other websites: for example, the default heartbeatUrl configured in angular-connection-service would have told our app to issue a HEAD request to the //httpstat.us external website to check its online status.
These requirements, which are rather common in most apps, are called CORS: to allow them, the browser expects to receive from the receiving server—the one that hosts the required resources—a suitable CORS policy that will allow them to pass. If this policy doesn’t come—or doesn’t include the requesting origin—the HTTP request will be blocked. Since this heartbeat-based mechanism is now a critical part of our app, we can’t take the risk of being blocked by third-party CORS restrictions: therefore, we’ve replaced that troublesome external reference with a more secure URL pointing to an internal resource under our control.
At the time of writing, all httpstat.us endpoints have been configured to allow all origins, headers, and HTTP methods, thus posing no CORS issues: however, we have no guarantees that such a “no-restrictions” approach will be maintained in the future.
That said, since our Web API is playing the role of the external server, we might still want to configure such a policy to allow our app to be able to call the api/heartbeat endpoint – as well as any other endpoint – even from a non-local origin. This is not required now that we’re testing our app in our localhost environment, but could definitely be the case when we publish our project in production.
For additional information about CORS and its settings, visit the following URL: https://developer.mozilla.org/en-US/docs/Web/HTTP/CORS.
Enough with the theory: let’s see how we can implement CORS in our HealthCheckAPI project and allow all of its endpoints – including, yet not limited to, the api/heartbeat one – to be called from external servers.
Implementing CORS
Configuring CORS in ASP.NET Core requires adding the CORS services and the CORS middleware, part of the Microsoft.AspNetCore.Cors namespace, to the Program.cs file.
However, before doing that, we need to provide our app with a configuration setting that we can use to specify the origin that we want to allow: a suitable place to do that is the appsettings.json file.
Adding the AllowedCORS configuration setting
Open the HealthCheckAPI’s appsettings.json file and add a new AllowedCORS key right below the AllowedHosts key, as shown below:
// ...
"AllowedHosts": "*",
"AllowedCORS": "*"
// ...
The "*" wildcard value will relax the CORS policy for any endpoint, which can be good for our testing purposes: we’ll restrict such permissive behavior in Chapter 15, Windows, Linux, and Azure Deployment, when we’ll deploy our app(s) in production.
As we can see, we didn’t use the existing AllowedHosts key because it serves a different purpose – which we will not deal with for reasons of space. Those interested to know more about it can check out the following URL:https://docs.microsoft.com/en-us/aspnet/core/fundamentals/servers/kestrel/host-filtering.
Right after saving the HealthCheckAPI’s appsettings.json file, open the WorldCitiesAPI’s appsettings.json file and add the AllowedCORS key there as well before moving on.
Now that we have the AllowedCORS configuration setting available, we can update our Program.cs file.
Updating the Program.cs file
Open the HealthCheckAPI’s Program.cs file and add the required highlighted lines of code:
using Microsoft.AspNetCore.Cors;
// ...
builder.Services.AddSwaggerGen();
builder.Services.AddCors(options =>
    options.AddPolicy(name: "AngularPolicy",
        cfg => {
            cfg.AllowAnyHeader();
            cfg.AllowAnyMethod();
            cfg.WithOrigins(builder.Configuration["AllowedCORS"]);
        }));
// ...
app.UseAuthorization();
app.UseCors("AngularPolicy");
// ...
The above code shouldn’t be too hard to understand:
- We’ve added the CORS services (
AddCors) and configured a CORS policy that – when applied – relaxes CORS for any HTTP header and method for theAllowedCORSendpoints specified in theappsettings.jsonfile. - Down below, we added the CORS middleware (
UseCors) just below theUseAuthorization()method: it’s very important to place it before the middlewares that handle the various endpoints (Controllers, HealthChecks, Minimal APIs, and so on), so that our CORS policy will be applied to all of them.
With this, we’ve successfully implemented all the required PWA features. Again, be sure to also apply the above CORS settings to the WorldCitiesAPI project before moving on.
Let’s now find a way to properly test out what we did; it won’t be easy to do that from within Visual Studio due to the distinctive features of PWAs, but there are some workarounds we can use to pull it off.
Testing the PWA capabilities
In this section, we’ll try to test the service worker registration for our HealthCheck app. Unfortunately, doing it from a Visual Studio development environment is a rather complex task for several reasons, including the following:
ng serve, the Angular CLI command that pre-installs the packages and starts the app whenever we run our app in debug mode, doesn’t support service workers- The service worker registration tasks that we put in the
AppModuleclass a while ago only register it when the app is running in a production environment - The required static files generated by the Angular CLI using the
angular.jsonconfiguration file that we modified earlier on will only be available in production environments
However, we can easily work around these limitations by compiling our Angular app for production and then running the generated files with a separate, dedicated HTTP server.
In the following sections, we are going to see how we can do all that.
Compiling the app
Here’s how we can publish our app using the Angular CLI. Open the Command Prompt, navigate to the project’s root folder, and type the following command:
ng build
The CLI will compile our Angular app within a new /dist/ folder that will contain all the generated files. It’s worth noting that we are going to use this folder (and all its content) to test our service worker only, deleting it afterward.
As an alternative, we could also exclude it from version control by adding the folder path to the .gitignore file – which is what we did in the GitHub repository for this book.
Now we just need to install a separate HTTP server that can support our service worker. To this end, we’re going to use the http-server npm package: a simple, zero-configuration command-line static HTTP server that is also recommended by the official Angular documentation for service workers.
It’s important to understand that http-service is not meant to be used for production usage: however, its overall simplicity makes it perfect to use for testing, local development, and learning.
Installing http-server
http-server can be either installed using npm or directly launched using npx, a tool shipped with Node.js that can be used to execute npm package binaries without installing them.
If we want to globally install it before launching it, we can do so with the following commands:
> npm install http-server -g
> http-server -p 8080 -c-1 dist/HealthCheck/
If we just want to test out our service worker, we can use the following command instead:
> npx http-server -p 8080 -c-1 dist/HealthCheck/
Both commands will launch http-server and serve our HealthCheck app to the local 8080 TCP port, as shown in the following screenshot:
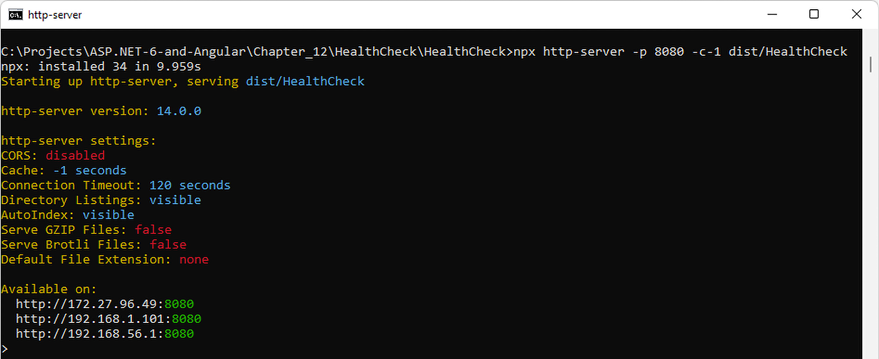
Figure 12.7: Launching http-server and serving the HealthCheck app
As soon as we do that, we can connect to it by opening a browser and typing the following URL in the address bar: http://localhost:8080.
We can check out the PWA capabilities of our apps just like we did with Visual Studio and IIS Express earlier; however, we won’t be able to test the back-end HTTP requests since http-server doesn’t natively support ASP.NET Core. Luckily enough, we don’t need the back-end to run these tests.
Testing out our PWAs
For the sake of simplicity, the following screenshots will be all related to HealthCheck, but the same checks could be applied to the WorldCities app as well since we configured it using the same implementation patterns.
It’s strongly advisable to perform the following tests with a Chromium-based browser, such as Google Chrome or Microsoft Edge, since such engines come with some neat built-in tools to check for Web App Manifest and service worker presence. Also, it’s strongly advisable to use the browser’s incognito mode to ensure that the service worker will always start from scratch, without reading previously built caches or states.
Let’s start our test by stopping all our projects and closing all the windows to ensure we have no running or active processes. Right after that, launch the http-server – as explained in the previous section – and open a browser to the following URL: http://localhost:8080.
If we did everything correctly we should see the app’s Home view with the yellow offline alert visible on screen. The reason for that is quite simple: our Web API is not launched (yet), hence the Angular app is unable to reach the api/heartbeat endpoint.
We can easily check out this behavior by pressing Shift + Ctrl + J to open the Chrome Developer Tools and then look at the Console tab, as shown in the following screenshot:
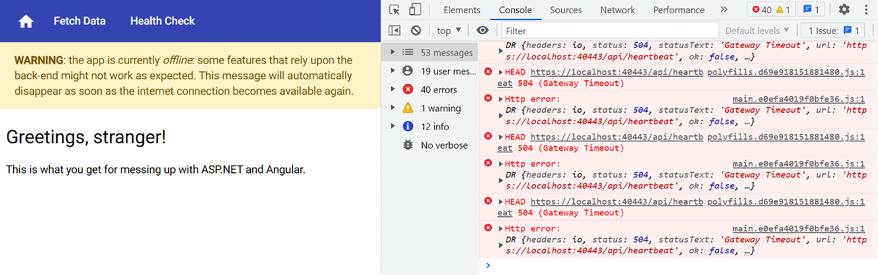
Figure 12.8: Chrome Developer Tools
Now we can hit F5 to start our HealthCheck and HealthCheckAPI projects, which should make the offline alert message disappear within a few seconds: once done, we can proceed with the following test.
Keeping the Chrome Developer Tools window open, navigate to the Application tab where we can see that our Web App Manifest file has been properly loaded. If we scroll down the Application | Manifest panel, we’ll be able to see our PNG icons as well.
NOTE: It can take a while (10–20 seconds on a typical development machine) before the service worker actually shows up on the first installation.
The next thing we can check is the Application | Service Workers panel, which should strongly resemble the one shown in the following screenshot:
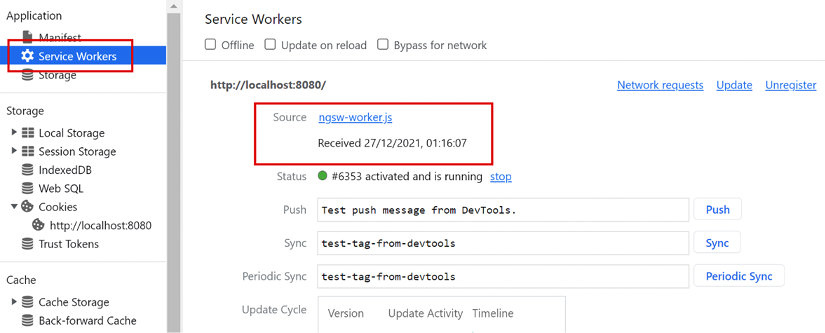
Figure 12.9: The Service Workers panel
The service worker JavaScript file should be clearly visible, as well as its registration date and current up-and-running status.
Let’s now try to put our web browser offline. To do that, activate the Offline checkbox in the top-left section of the Chrome Developer Tools’ Application tab and see what happens:

Figure 12.10: View after putting the web browser offline
Our offline warning info message should immediately kick in, thanks to our angular-connected-service implementation. If we move to the Network tab, we can see that the api/heartbeat endpoint isn’t reachable anymore, meaning that the isOnline() method of AppComponent is now returning false.
Now, we can resume the connectivity (by de-selecting the Offline checkbox) and check out two more things: the linkable and installable PWA capabilities. Both of them are clearly shown on the rightmost part of the browser’s address bar, as we can see in the following screenshot:
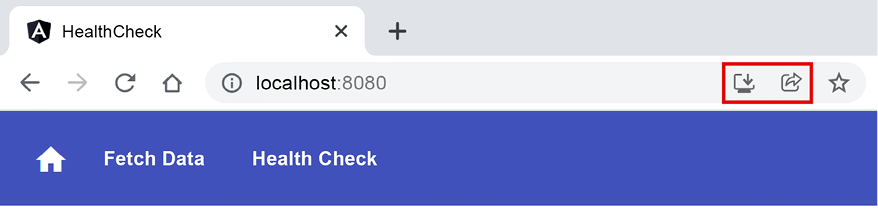
Figure 12.11: Checking the linkable and installable icons
If we go there with the mouse pointer, we should be able to see the contextual messages asking us to send the app’s URL to other devices (left) and install it to the desktop (right).
Installing the PWA
Let’s now click the install button (the one with the plus sign inscribed in a circle) and confirm that we want to locally install the HealthCheck PWA.
Within seconds, we should be able to see the Home view of our newly installed app in a desktop app-like window, as shown in the following screenshot:

Figure 12.12: HealthCheck PWA in a desktop app-like window
From there, do the following:
- Press Shift + Ctrl + J to open the Google Chrome Developer Tools again
- Navigate to the Application | Service Workers panel
- Click on the Offline checkbox to check/activate it again
The app should, again, show the offline warning information message.
Needless to say, we won’t be able to see our health check results table while our app is offline, since that data is fetched in real time and we currently have no offline caching mechanism that will save it in local storage and make it available when the internet connection is unavailable; however, the offline warning information message is enough to make our users aware of the fact that the app is offline.
That’s it: we have successfully turned our SPAs into PWAs. As a matter of fact, we have just scratched the surface of the many possibilities offered by such a promising deployment approach; however, we’ve successfully demonstrated that our front-end and back-end frameworks are fully able to handle their main requirements properly and consistently.
Summary
This chapter was all about PWAs: we spent some valuable time better understanding the high-level distinctive features of this modern web development pattern and how to translate them into technical specifications. Right after that, we started implementing them, taking into account the various available options offered by our front-end and back-end frameworks.
Since the PWA concept is closely related to the front-end aspects of our app, we chose to adopt the Angular way of implementing their required capabilities; with that in mind, we chose to take the manual route for our HealthCheck app first, then to experience the automatic installation feature powered by the Angular CLI for the WorldCities app. In both scenarios, we made good use of the @angular/service-worker npm package, a module available since Angular 5 that provides a fully featured service worker implementation that can be easily integrated into our apps.
Once done, we took some time to understand how we could handle the offline status of our app, evaluating various strategies and eventually choosing a heartbeat-based solution using the angular-connection-service npm package and a dedicated Web API endpoint. While dealing with these tasks, we took the chance to learn and implement some convenient ASP.NET Core features, such as Minimal APIs and Cross-Origin Resource Sharing.
After we did that, we manually ran some consistency tests to check the brand-new PWA capabilities of our apps using Google Chrome and its developer tools.
At the end of this chapter, we finally saw our service worker in action, as well as the Web App Manifest file being able to serve the PNG icons and provide the installing and linking features to our apps.
The various concepts that we learned throughout this chapter have also helped us to focus on some very important issues regarding the differences between development and production environments, hence making us ready to properly face the final part of our journey: Windows, Linux, and Azure deployment, which will be the main topics of Chapter 15, Windows, Linux, and Azure Deployment. However, before we get to that point, there are still a couple of topics that we need to address in the next two chapters.
Suggested topics
For further information, we recommend the following topics: Progressive Web Apps (PWAs), @angular/service-worker, secure origin, HTTPS, TLS, Let’s Encrypt, service workers, HTTPInterceptors, favicons, Web App Manifest file, Microsoft.AspNetCore.Cors, Cross-Origin Resource Sharing (CORS), offline status, window.navigator, ng-connection-service, IIS Express, and http-server.
References
- Progressive Web Apps: https://developers.google.com/web/progressive-web-apps
- Web Fundamentals: https://developers.google.com/web/fundamentals
- Progressive Web Apps: Escaping Tabs Without Losing Our Soul: https://infrequently.org/2015/06/progressive-apps-escaping-tabs-without-losing-our-soul/
- Let’s Encrypt: https://letsencrypt.org/
- The Web App Manifest: https://developers.google.com/web/fundamentals/web-app-manifest
- Angular Service Workers: https://angular.io/guide/service-worker-getting-started
- Service worker configuration: https://angular.io/guide/service-worker-config
- Service Workers – Practical Guided Introduction (several examples): https://blog.angular-university.io/service-workers/
- Angular University: Service Worker step-by-step guide: https://blog.angular-university.io/angular-service-worker/
- favicon.io: https://favicon.io/
- Real Favicon Generator: https://realfavicongenerator.net/
- Icons8: https://icons8.com/icons/set/favicon
- FreeFavicon: https://www.freefavicon.com/freefavicons/icons/
- Firebase Web App Manifest Generator: https://app-manifest.firebaseapp.com
- DummyImage – Placeholder Image Generator: https://dummyimage.com/
- Google Developers recommendation for installability requirements: https://web.dev/installable-manifest/#recommendations
- Web App Manifest – W3C Working Draft 09 December 2019: https://www.w3.org/TR/appmanifest/
- Enable Cross-Origin Requests (CORS) in ASP.NET Core: https://docs.microsoft.com/en-us/aspnet/core/security/cors
- http-server: https://www.npmjs.com/package/http-server
- npx - execute npm package binaries: https://www.npmjs.com/package/npx
- ng-serve: https://angular.io/cli/serve
- angular-connection-service: https://github.com/Ryadel/angular-connection-service
- Visual Studio publish profiles (.pubxml) for ASP.NET Core app deployment: https://docs.microsoft.com/en-us/aspnet/core/host-and-deploy/visual-studio-publish-profiles
- Angular – Service Worker registration options: https://angular.io/api/service-worker/SwRegistrationOptions